
Since Facebook is one of the most widely used marketing platforms, many businesses and marketers face the need to properly configure event tracking. This allows the advertising system to optimize campaigns for target user actions, identify effective audiences, and accurately attribute advertising results.
Given how relevant this topic is for our team’s clients, I decided to cover the key aspects of Facebook event setup in this article.
In general, there are two ways to configure event delivery to Facebook: from the frontend and from the backend. Each approach has its own nuances and deserves a separate, in-depth discussion.
In this article, I will focus specifically on setting up frontend events. These can also be sent in two ways:
- directly through the website code (either implemented by a developer or via plugins);
- independently via GTM.
We will focus on the latter option — web-based event delivery through Web GTM without making any changes to the website code. We’ll go through the full setup process: from installing the Facebook Pixel and sending custom and eCommerce events to validating the implementation using a browser extension. For eCommerce events, we’ll use existing GA4 eCommerce data from the dataLayer.
In this article, we’ll cover the following steps:
- Installing the Facebook (Meta Pixel) library on the website via Web GTM
- Sending events to Facebook (Meta Pixel) via Google Tag Manager
- Where to find events in the Facebook interface (Meta Events Manager)
- Registering a custom event
- Summary
Installing the Facebook (Meta Pixel) library on a website via Web GTM
There are two main ways to install the Facebook Pixel on a website using a Web GTM container:
- via an HTML Tag in GTM;
- via a tag from the Community Template Gallery in GTM.
Depending on the chosen method, you’ll need either the base Facebook Pixel code or the Pixel ID for further setup, so next we’ll look at how to find them.
How to find the Facebook Pixel code
This section will be useful for those who are just starting to explore the setup details and need a more step-by-step explanation. If you’re already familiar with the interface, you can skip ahead to the next section — Installing the Facebook Pixel using Web GTM.
First, let’s find the required data in the Facebook interface so that during the subsequent setup steps (described later) you have everything you need at hand.
To do this:
- Go to Events Manager and select Datasets.
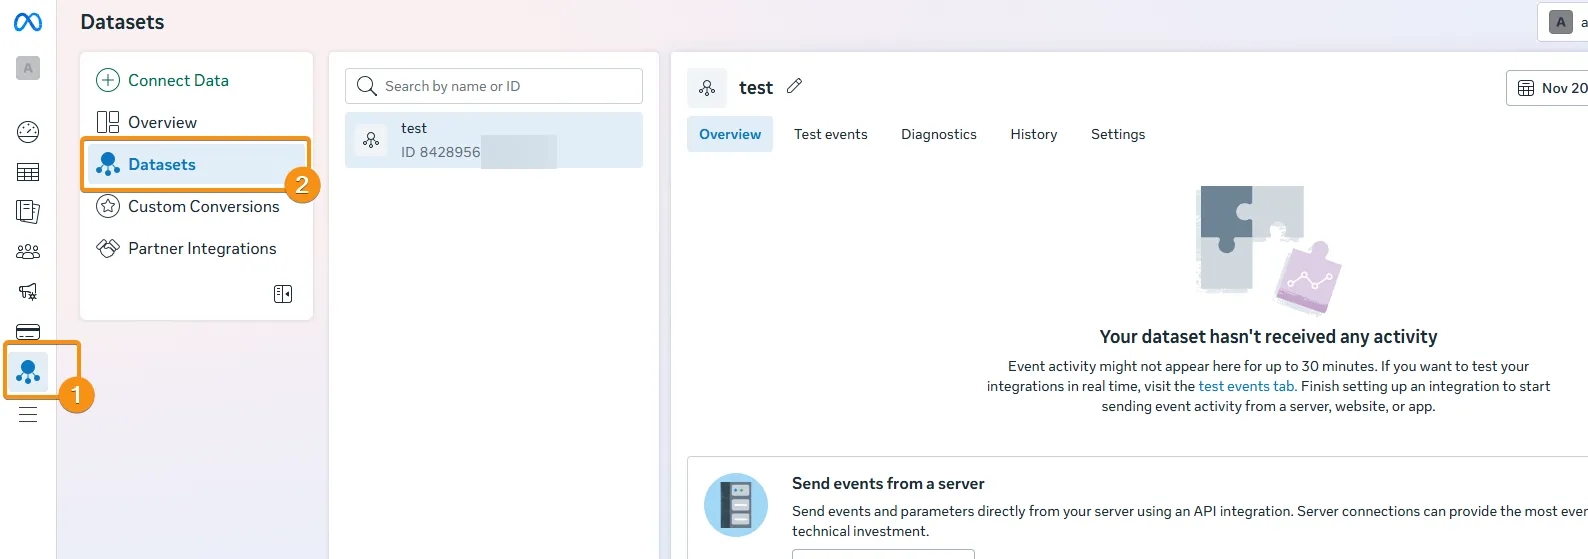
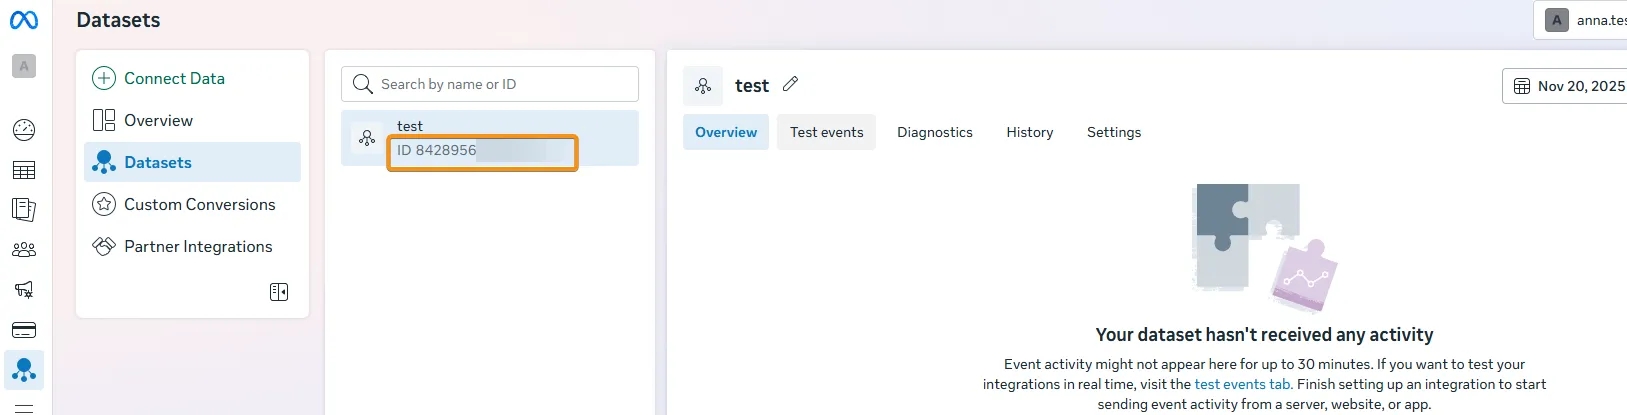
2. Here, you can copy the Pixel ID for the setup option using a tag from the Community Template Gallery. If you plan to use only this tag, this is all the information you’ll need.
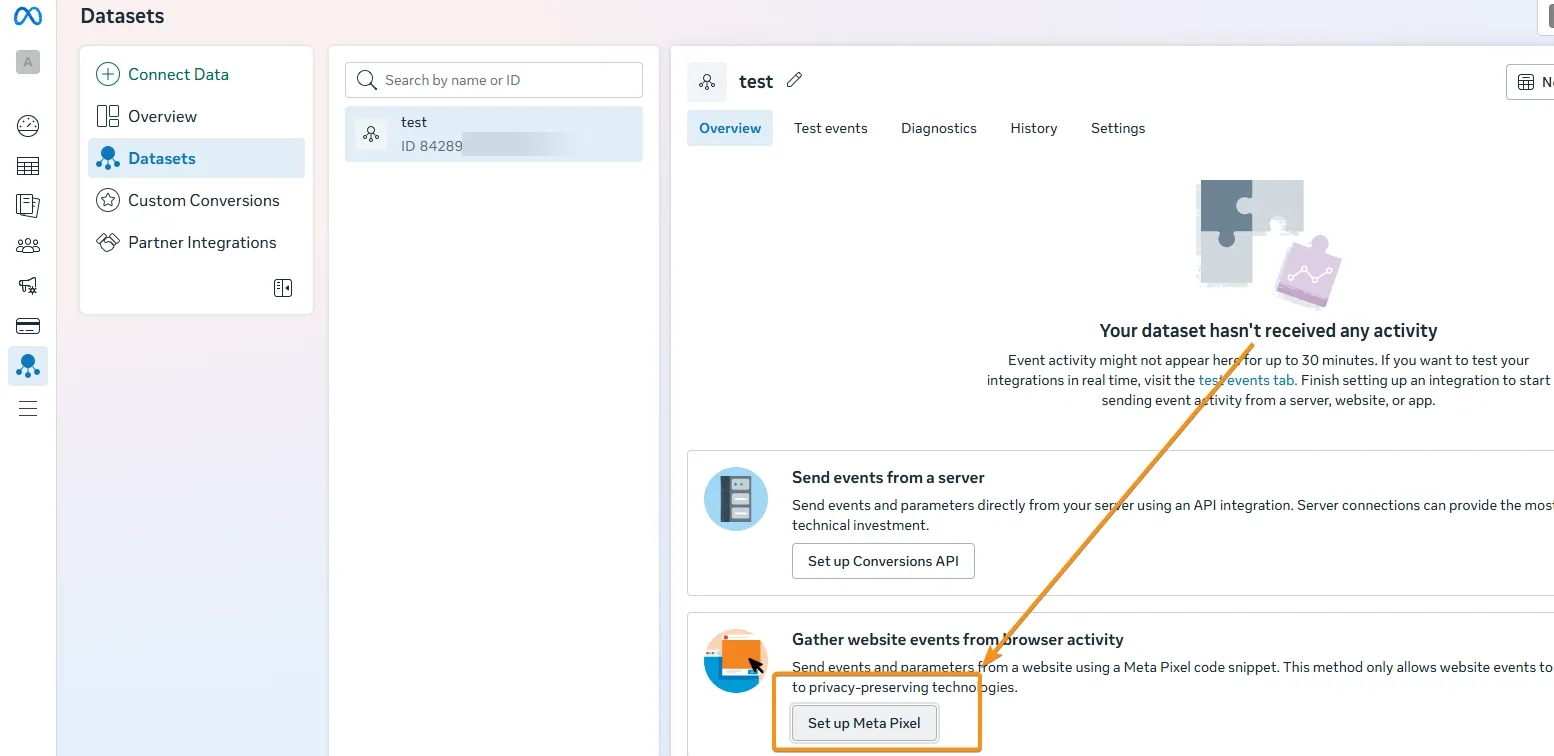
3. If you decide to use installation via a Custom HTML Tag, you’ll need to find the full Facebook Pixel installation code. To do this, open your pixel and click Set up Facebook Pixel.
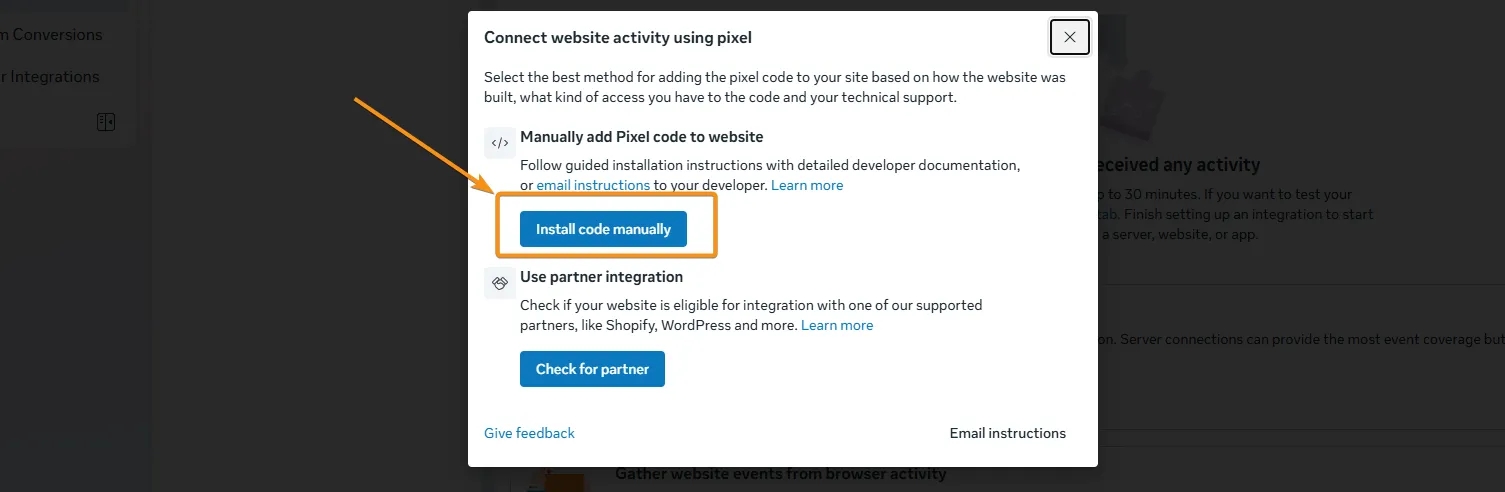
4. Next, select Install code manually.
5. Copy the suggested code.
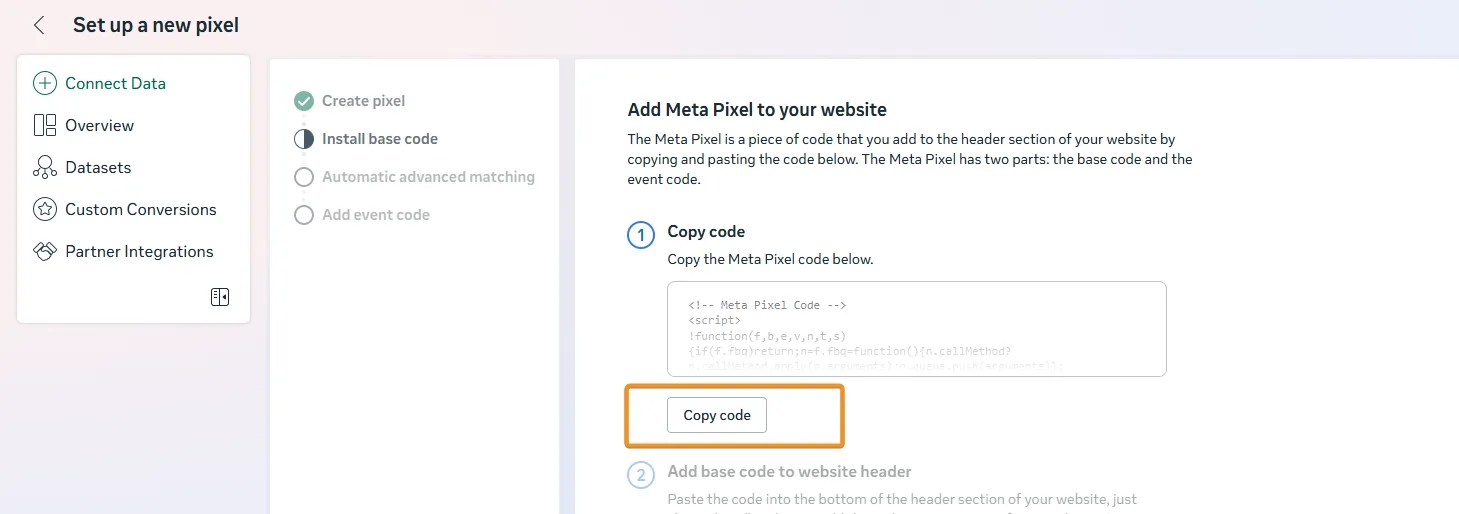
In general, the code will look something like this — instead of {your-pixel-id-goes-here}, you’ll see your own Pixel ID:
<!-- Facebook Pixel Code -->
<script>
  !function(f,b,e,v,n,t,s)
  {if(f.fbq)return;n=f.fbq=function(){n.callMethod?
  n.callMethod.apply(n,arguments):n.queue.push(arguments)};
  if(!f._fbq)f._fbq=n;n.push=n;n.loaded=!0;n.version='2.0';
  n.queue=[];t=b.createElement(e);t.async=!0;
  t.src=v;s=b.getElementsByTagName(e)[0];
  s.parentNode.insertBefore(t,s)}(window, document,'script',
  'https://connect.facebook.net/en_US/fbevents.js');
  fbq('init', '{your-pixel-id-goes-here}');
  fbq('track', 'PageView');
</script>
<!-- End Facebook Pixel Code -->
Pay attention to this line in the code — fbq('track', 'PageView');: the base Pixel code not only loads the library but also sends the PageView event for page views.
Installing the Facebook Pixel using Web GTM
Now let’s move directly to installing the Facebook Pixel on the website. As mentioned earlier, we are focusing on setup options via GTM, and there are several ways to do this:
- via a Custom HTML Tag in GTM;
- via a template from the Community Template Gallery.
Installing the Facebook Pixel via a Custom HTML Tag in GTM
The first option allows you to install the base Facebook Pixel code on the website as follows:
- Create a new Custom HTML tag and paste the copied base Facebook Pixel code into it.
- As the trigger, select one of the standard, automatically created triggers — All Pages — so that the base code, including the PageView event, fires on every page of the website.
The final setup will look like this:

Advantages of this approach:
- This is a standard way of adding any code to a website;
- There is no need to look for templates or check their relevance.
Disadvantages:
- You need to understand exactly which code should be sent;
- If multiple different pixels are installed this way, all events configured for Facebook will be sent to all pixels at once. In particular, the PageView event will be duplicated because it will be triggered multiple times.
Therefore, although this is the simplest option, I recommend using an alternative approach.
Alternative option: installing the Meta Pixel via a Community Template Gallery template in GTM
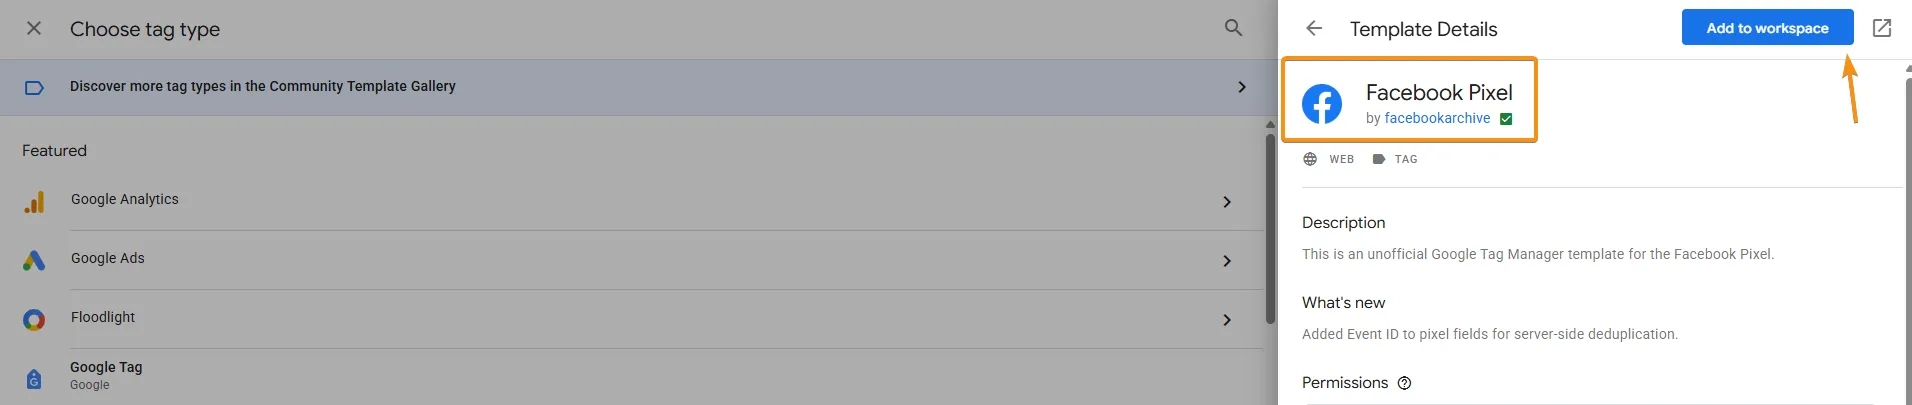
- In GTM, go to Tags and, when creating a new tag, open the Community Template Gallery, where you can find the Facebook Pixel template and add it to your workspace.
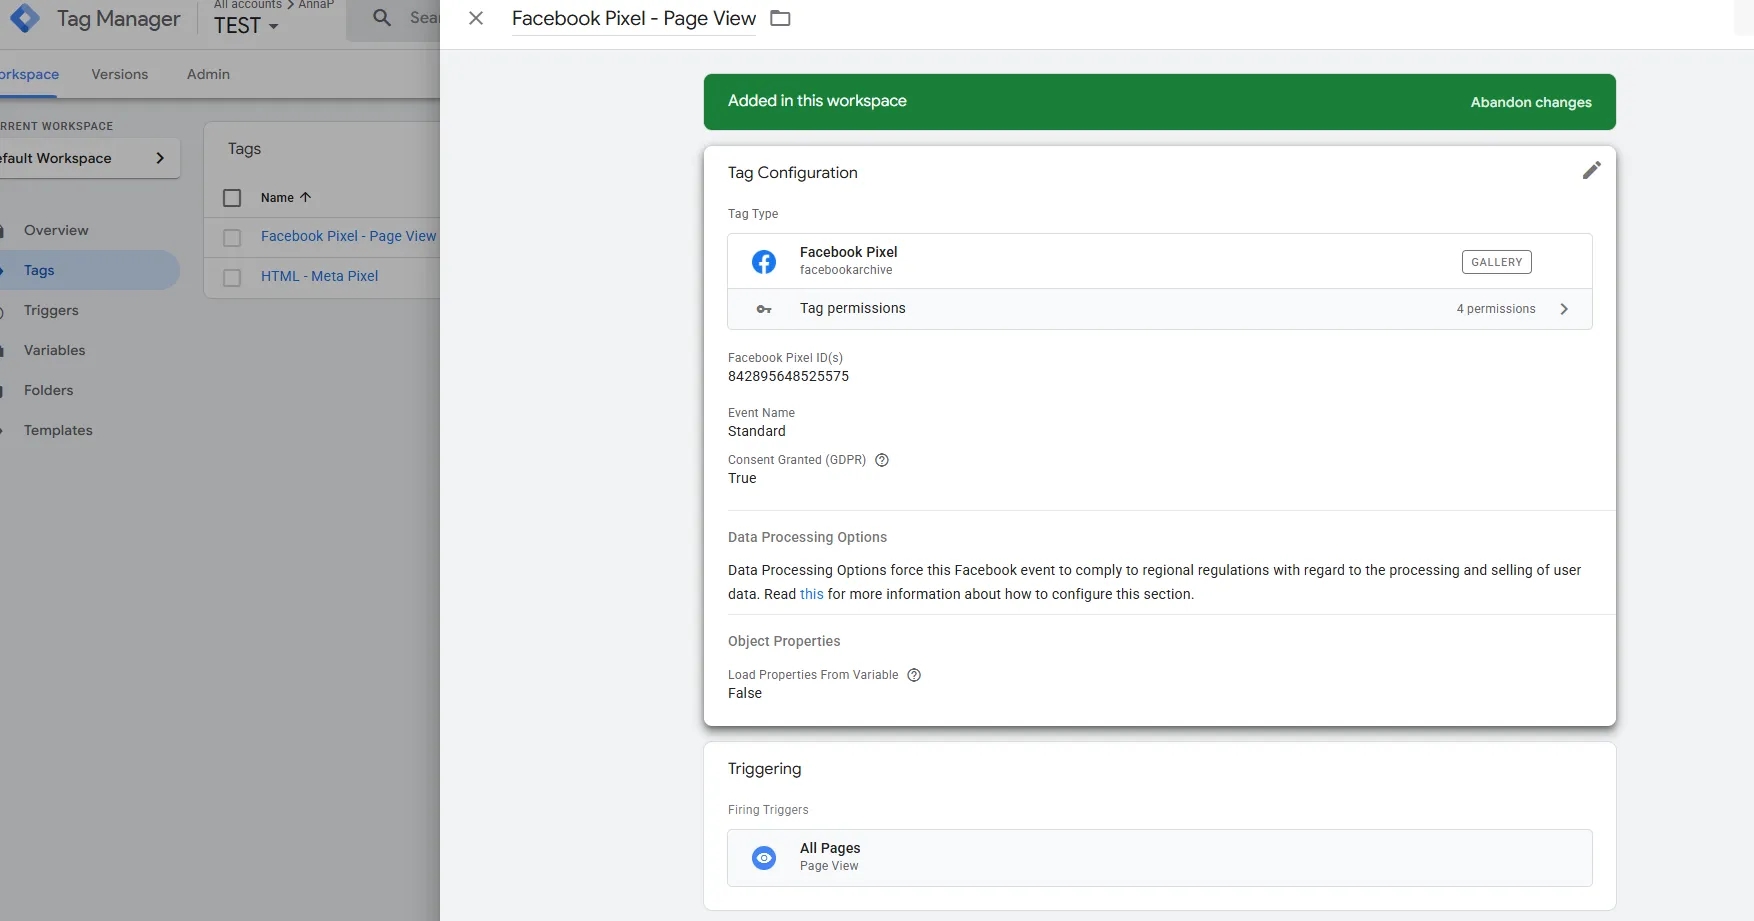
2. In the new Facebook Pixel tag, paste the previously copied Pixel ID.
As mentioned earlier, the base code sends the PageView event by default, so that is the event we select here. As with the previous setup, set the trigger to All Pages — meaning the page view event should fire on every page of the website.

The final configuration will look like this:
Advantages of this approach:
- There is no need to know or work with the underlying code;
- Very easy to understand if you don’t have prior experience with Web GTM.
Disadvantages:
- Although this is an official template integrated via the Community Template Gallery, it may become outdated over time.
Debugging the current setup using the Meta Pixel Helper extension
Regardless of which setup method you chose, the pixel is already installed on the website and the PageView event is being sent. Now let’s verify that everything is working correctly.
To do this, Google Chrome offers an official extension from Meta — Facebook Pixel Helper, which helps validate your setup.
Open the website page, click on the extension, and check that the Facebook pixel is detected and that the PageView event is sent without any issues. The green checkmark next to the event name confirms that the event is being transmitted correctly.
If there were any issues during setup, you would see a different color next to the event in the extension, and by expanding it, you could review the error details.

Sending events to Facebook (Meta Pixel) via GTM
Event tracking allows Facebook to receive information about user actions on the website. This is essential for accurate conversion measurement, campaign optimization, and building remarketing audiences.
You can review the standard list of events supported by Facebook via the official documentation.
In general, all events can be divided into two groups: standard events (which include both standard and custom events that we’ll cover separately) and eCommerce events.
eCommerce event tracking is more complex and has its own specifics, so below we’ll look at both groups of events separately.
Sending standard (non-eCommerce) events to Facebook Pixel
As an example, let’s take one of the most common user actions to track — a successful form submission. Most often, this action is tracked using the Lead event.
Just like when installing the base Pixel code, there are two ways to send events to Facebook via GTM:
- via a Custom HTML Tag in GTM;
- via the Facebook Pixel tag.
Let’s go through both options so you can choose the one that works best for you.
Sending standard events via a Custom HTML Tag
This option may seem more complex, as it requires knowing the code used to send the event. In practice, however, it’s quite straightforward:
- Create a new Custom HTML tag and insert the following code:
<script>
  fbq('track', 'Lead');
</script>
2. Next, add a trigger for a successful form submission.
As a result, the setup will look like this:
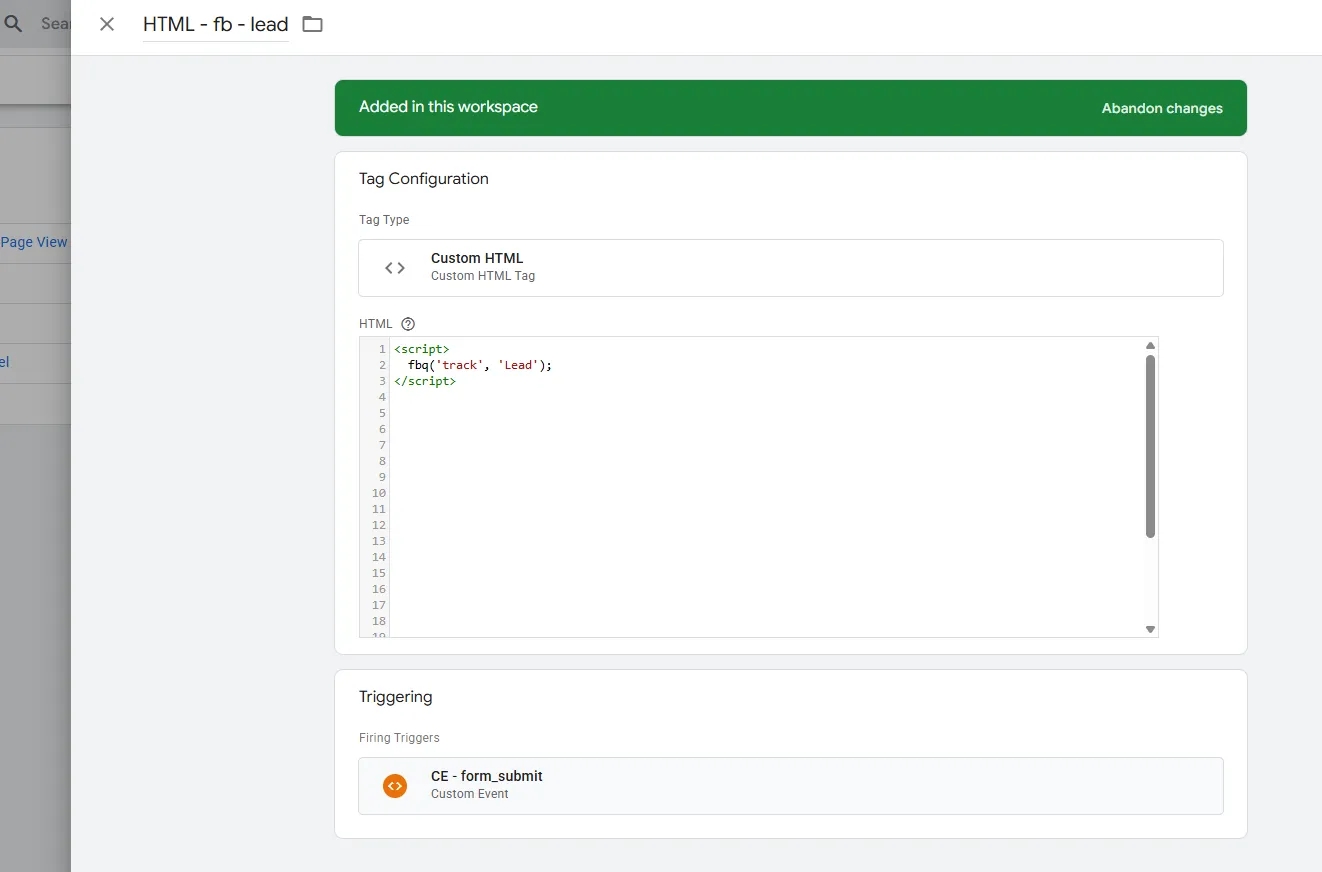
I won’t go into detail about triggers here, as this is a separate topic. Triggers can also be reused — for example, the same ones that are already used to send similar events to other marketing platforms.
If you’d like to dive deeper into trigger setup, you can check out articles by my colleague:
- Tracking form submissions using the “Element Visibility” trigger
- Tracking form submissions using the basic GTM trigger
- Tracking link clicks with Google Tag Manager: a practical guide with examples
- Tracking clicks on website elements with Google Tag Manager: an advanced guide
- Tracking user interactions with forms using Google Tag Manager
- Tracking video interactions using Google Tag Manager
That’s it. The event is configured — and it’s not as complicated as it might have seemed.
By the way, just like in GA4, Facebook allows you to send events with additional parameters. So let’s slightly modify our event setup and add the content_name parameter, which will pass the form name. In my case, the form name will be 'test form'.
<script>
  fbq('track', 'Lead', {
    content_name: 'test form' // Form name.
  });
</script>
Now the setup will look like this:
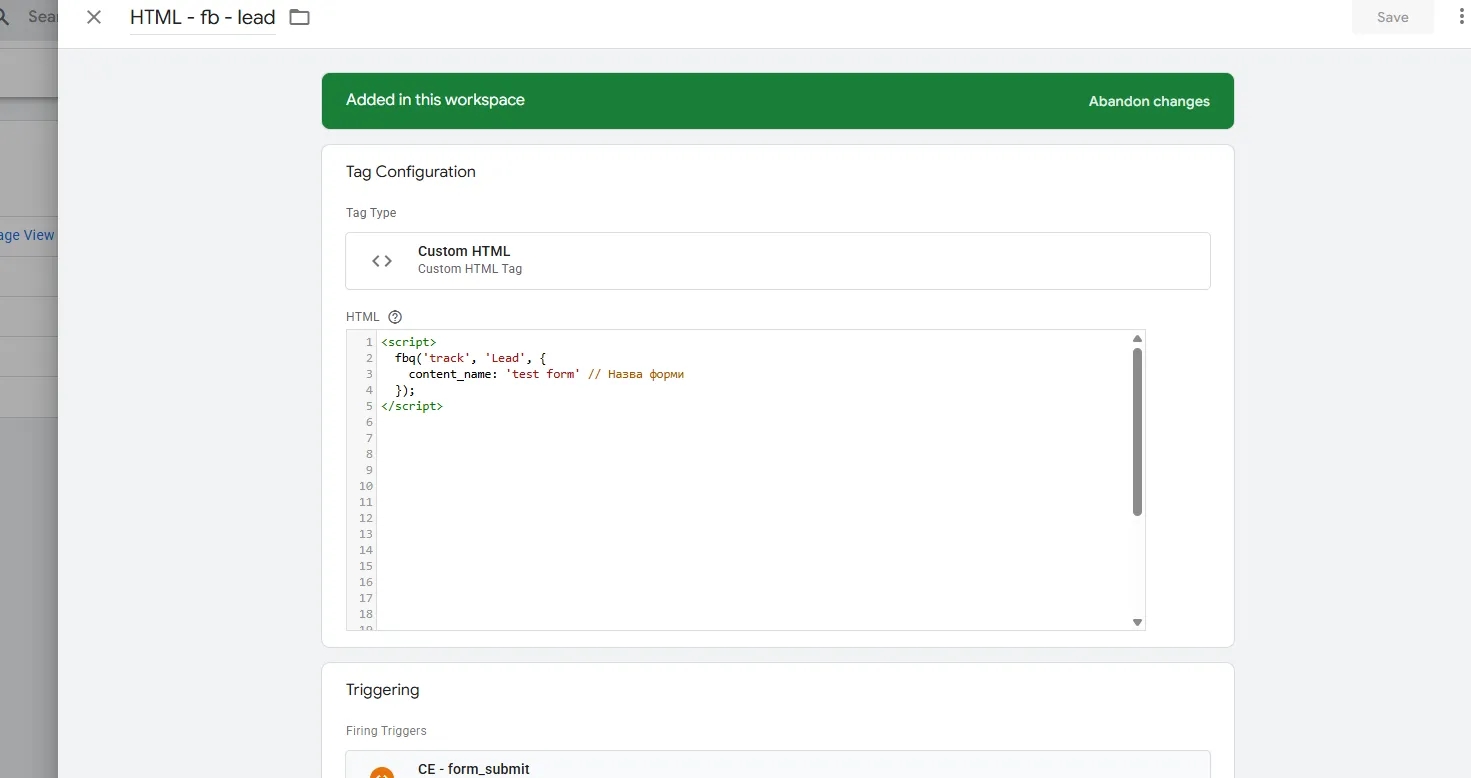
Don’t forget to validate your setup: go to the website and use the extension we discussed earlier to check the result.
In the end, we can see that the Lead event was sent successfully. The green indicator next to it confirms that the event fired correctly. We can also see the content_name parameter, which contains the form name.

Sending standard events via the Facebook Pixel tag
Now let’s look at an alternative approach and configure the same Lead event. We’re already familiar with the Facebook Pixel tag, which allows us to send events without knowing the underlying code.
To do this, we need to:
- create a new Facebook Pixel tag;
- specify the Facebook Pixel ID (as we did earlier);
- select Lead from the list of standard events;
- optionally add a variable in the Object Properties section (in our example, this is
content_namewith the form name); - add a trigger for a successful form submission.
As a result, the setup will look like this:

This way, we can quickly configure the Lead event without working directly with code.
Regardless of the chosen method, the final result and validation will be identical to the previous setup option.
Sending custom events to Facebook Pixel via GTM
So far, we’ve only looked at sending events from the list of standard events. However, we’re not limited to that list and can also send events with custom names. Let’s now take a closer look at sending a custom event.
If we talk about the Custom HTML Tag option, in this case we only need to change the event name from Lead to the one we plan to send.
That’s why we’ll focus in more detail on sending a custom event using the Facebook Pixel tag. We’ll track the same action (a successful form submission) but name it, for example, FormSubmit.
To do this, we need to follow almost the same steps as for the Lead event, with one key difference during event selection:
- create a new Facebook Pixel tag;
- specify the Facebook Pixel ID (as we did earlier);
- select a custom event and specify its name —
FormSubmit; - add a trigger for a successful form submission.
The setup will look like this:

When a custom event is sent to Facebook, it will be received by the Pixel but will not be available for use in advertising campaigns.
To be able to use a custom event in campaigns, it must be registered in Facebook. We’ll return to this step at the end of the article in the “Registering a custom event” section.
Sending eCommerce events to Facebook Pixel via GTM
Here, we also have two setup options:
- via a Custom HTML Tag in GTM;
- via the Facebook Pixel tag.
We’ll therefore review both approaches.
But before moving on to the configuration itself, let’s first take a closer look at the structure of eCommerce events.
eCommerce event structure
eCommerce events are slightly more complex, as they require sending an additional array with product data. This is the key difference we’ll examine in more detail below.
Facebook, like other related systems, has its own event structure, so let’s briefly review it. Looking at the code for sending an eCommerce event using Purchase as an example, we can see that such an event includes more parameters as well as an array with product data.
The basic structure of a Facebook event (using a purchase as an example) looks like this:
fbq('track', 'Purchase',
  {
    value: 115.00,
    currency: 'USD',
    contents: [
      {
        id: '301',
        quantity: 1
      },
      {
        id: '401',
        quantity: 2
      }],
    content_type: 'product',
    compared_product: 'recommended-banner-shoes',
    delivery_category: 'in_store'
  }
);
You can find more detailed examples of code for sending different events via the official documentation.
All of this data that needs to be sent to Facebook along with the event is usually also sent to GA4 analytics, but with a slightly different structure. Therefore, I suggest using the information that is already passed into the dataLayer and used for sending events to GA4, and reusing it to send the required event data to Facebook as well.
One of the key features of GTM that’s often overlooked is that eCommerce data is sent to the dataLayer once in a unified structure, after which it can be reused and sent to multiple platforms.
We use GA4 as an example because most websites already rely on it to send events to analytics — either via developers or plugins. The only requirement is that events are sent not directly from the site code, but via the dataLayer array used by GTM.
In this article, we won’t cover how to configure eCommerce events for GA4. We’ll assume that this setup is already in place. You can read more about how to configure it here.
Let’s assume that the website already sends the basic eCommerce funnel events (view_item, add_to_cart, begin_checkout, purchase) with the following structure (using a purchase event as an example), which corresponds to the structure used for sending eCommerce events to analytics:
dataLayer.push({ ecommerce: null });  // Clear the previous ecommerce object.
dataLayer.push({
  event: "purchase",
  ecommerce: {
    transaction_id: "T_12345",
    value: 72.05,
    currency: "USD",
    items: [
    {
      item_id: "SKU_12345",
      item_name: "Stan and Friends Tee",
      item_category: "Apparel",
      price: 10.01,
      quantity: 3
    },
    {
      item_id: "SKU_12346",
      item_name: "Google Grey Women's Tee",
      item_category: "Apparel",
      price: 21.01,
      quantity: 2
    }]
  }
});
Передача eCommerce-івентів через Custom HTML Tag у GTM
Для передачі івентів базової eCommerce-воронки Facebook (ViewContent, AddToCart, InitiateCheckout, Purchase) нам потрібно:
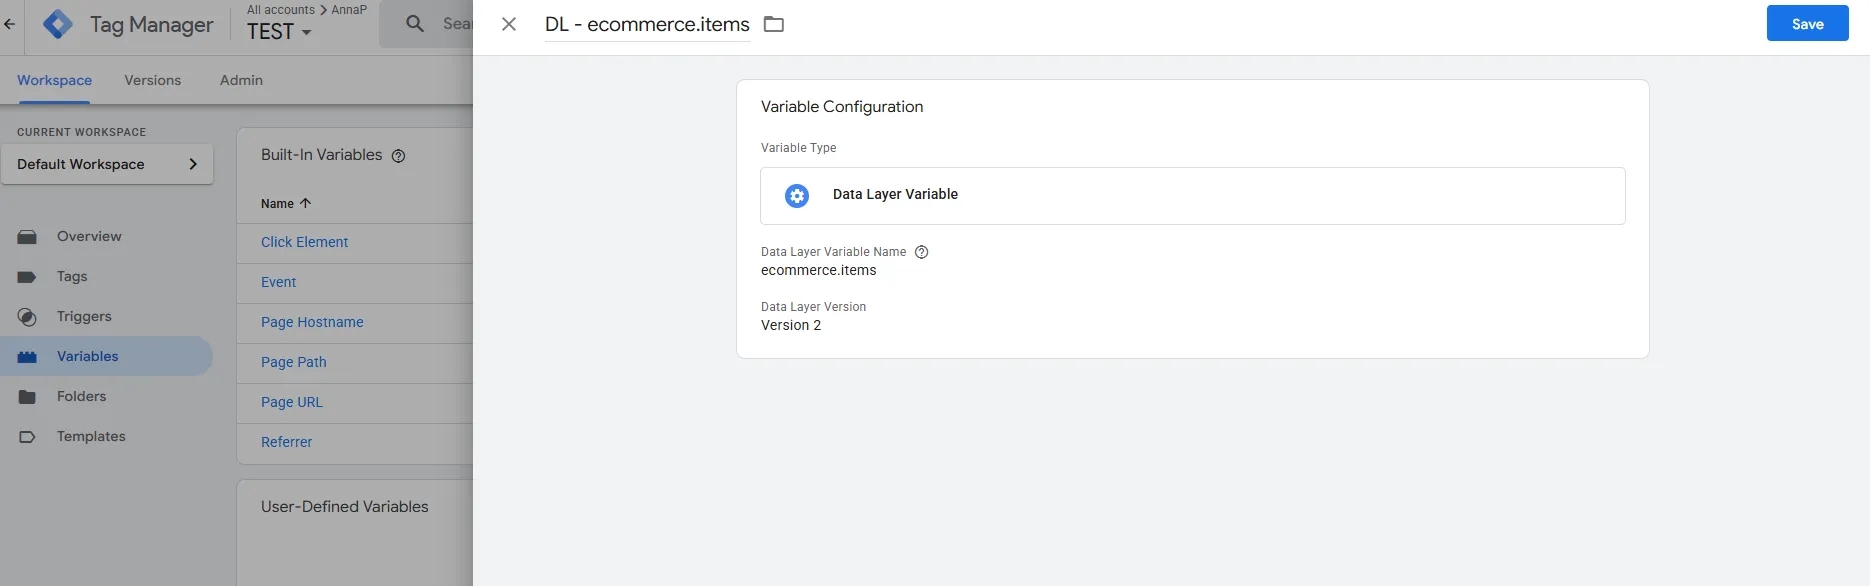
- Створити змінну DL - ecommerce.items для того, щоб ми отримали масив товарів з dataLayer, який передається разом з eCommerce-івентами GA4;
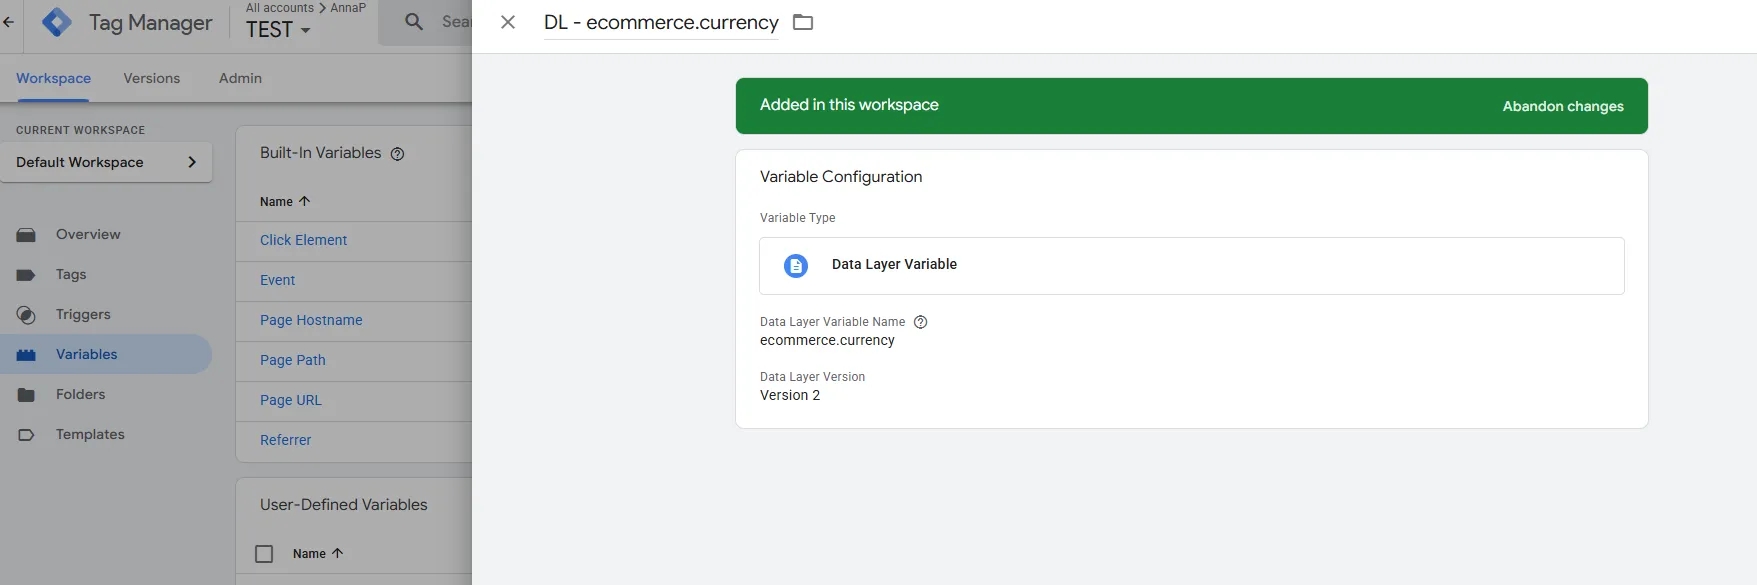
2. Створити змінну DL – ecommerce.currency, яка буде додатково витягувати валюту (Можна не створювати змінну, а вводити валюту вручну).
3. Створити новий тег Custom HTML, за допомогою якого ми адаптуємо структуру даних GA4 під потрібну для Facebook структуру.
Наведений нижче код розрахований на передачу базової eCommerce-воронки (перегляд картки товару, додавання до кошика, початок оформлення замовлення та покупка). Ви можете використовувати його без змін або адаптувати під свої потреби.
У коментарях до коду пояснено, за що відповідає кожна частина.
<!-- Facebook Pixel Code -->
<script>
(function() {

  var event; // Variable that will store the event name
  var ecom = {{DL - ecommerce.items}}; // Variable with the product array we created earlier. If you used a different variable name, substitute your version.

// Map GA4 events to Facebook Pixel events
  switch({{Event}}) {  // Loop through the event name
    case "view_item":
        event = "ViewContent"; // if dataLayer event = view_item, send ViewContent
        break;
    case "add_to_cart":
        event = "AddToCart"; // if dataLayer event = add_to_cart, send AddToCart
        break;
    case "begin_checkout":
        event = "InitiateCheckout"; // same logic for the next funnel steps
        break;
  case "purchase":
        event = "Purchase"; // same logic for purchase
        break;
    default:
        event = false;
  }// You can also remove funnel steps you don’t want to send from here

  fbProduct = []; // Create an array of products
  fbId = []; // And an array of IDs
  var fbValue = 0; // Total order / event value

  ecom.forEach(function(item, i, ecom) { // Loop through all items in ecommerce.items
    gaFormat = item
    o = {}; // Create an item object in the Facebook Pixel format
    o.id = item.item_id; // Product ID
    o.quantity = item.quantity||1; // Quantity (default is 1)
    o.item_price = item.price; // Product price
    o.name = item.item_name;// Product name
    o.category = item.item_category; // Product category
    fbProduct[i] = o; // Add the product to the products array
    fbId[i] = item.item_id; // Add the product ID to a separate array
    fbValue += Number(item.price*item.quantity)||Number(item.price); // Calculate total (price × quantity)
  });


// Send the event to Facebook Pixel
      fbq('track', event, {
      content: fbProduct,
      content_ids: fbId,
      content_type: 'product',
      value: fbValue,
      currency: {{DL - ecommerce.currency}} // Send currency (or set it manually)
      });
})();
</script>
<!-- End Facebook Pixel Code -->
4. Since in this example we send the entire standard eCommerce funnel at once, the trigger should match the classic eCommerce approach — a list of required events defined via a regular expression.
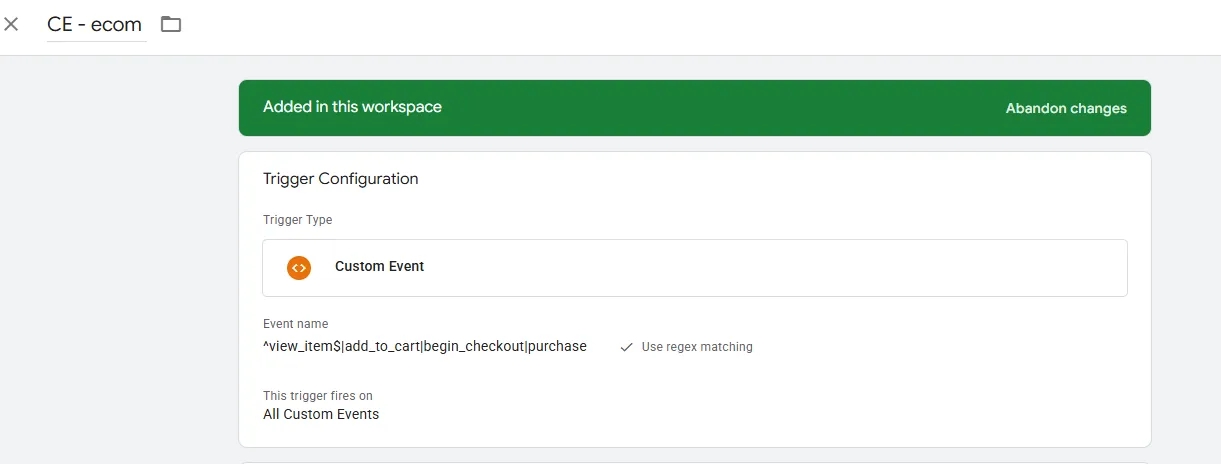
The full setup will look like this:
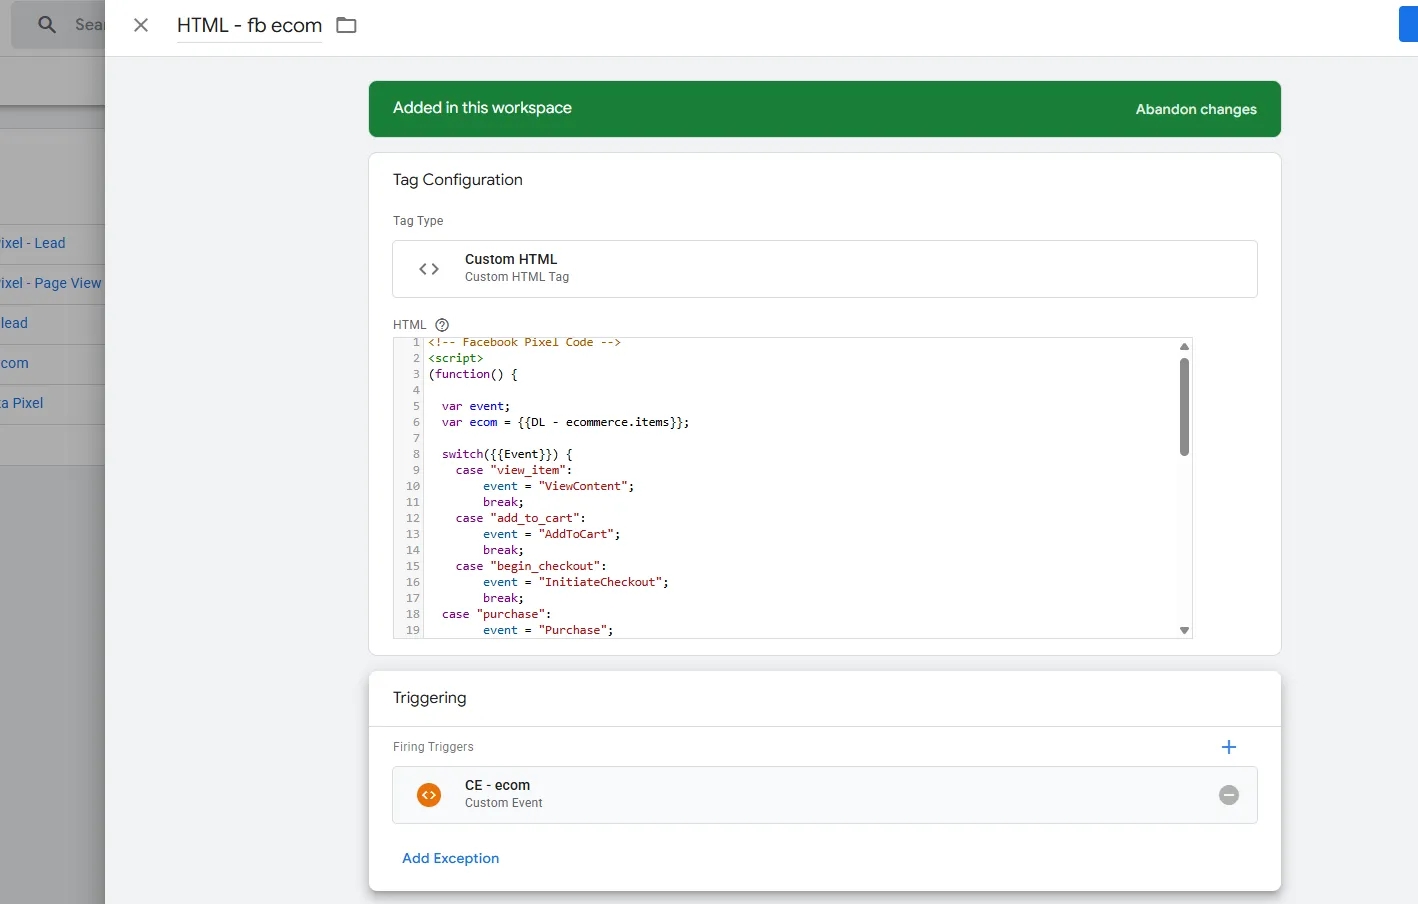
This way, we have configured the delivery of four Facebook eCommerce events (ViewContent, AddToCart, InitiateCheckout, Purchase) and can immediately validate them using the browser extension we discussed earlier.

This is a clear example of the power of GTM. Without involving a developer, we reused GA4 eCommerce dataLayer events and, within minutes, sent them to another platform.
Sending eCommerce events via the Facebook Pixel tag
In most cases, it’s easier to use the previous option — and it’s the one I personally use most often. However, for full understanding, let’s also review the other approach.
Now let’s configure eCommerce event delivery using the Facebook Pixel tag.
To do this, we need to complete the following steps:
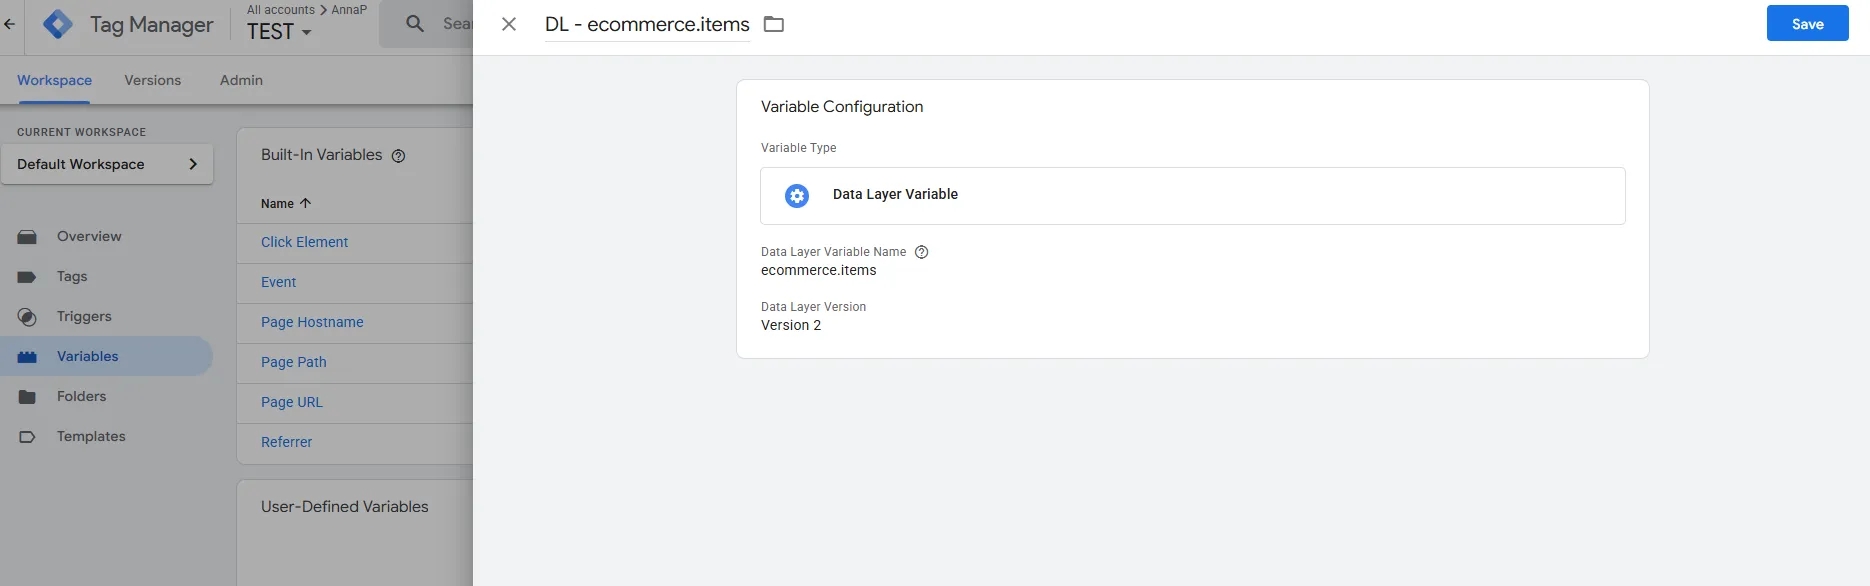
- We already have the variable we created in the previous setup option — DL - ecommerce.items.
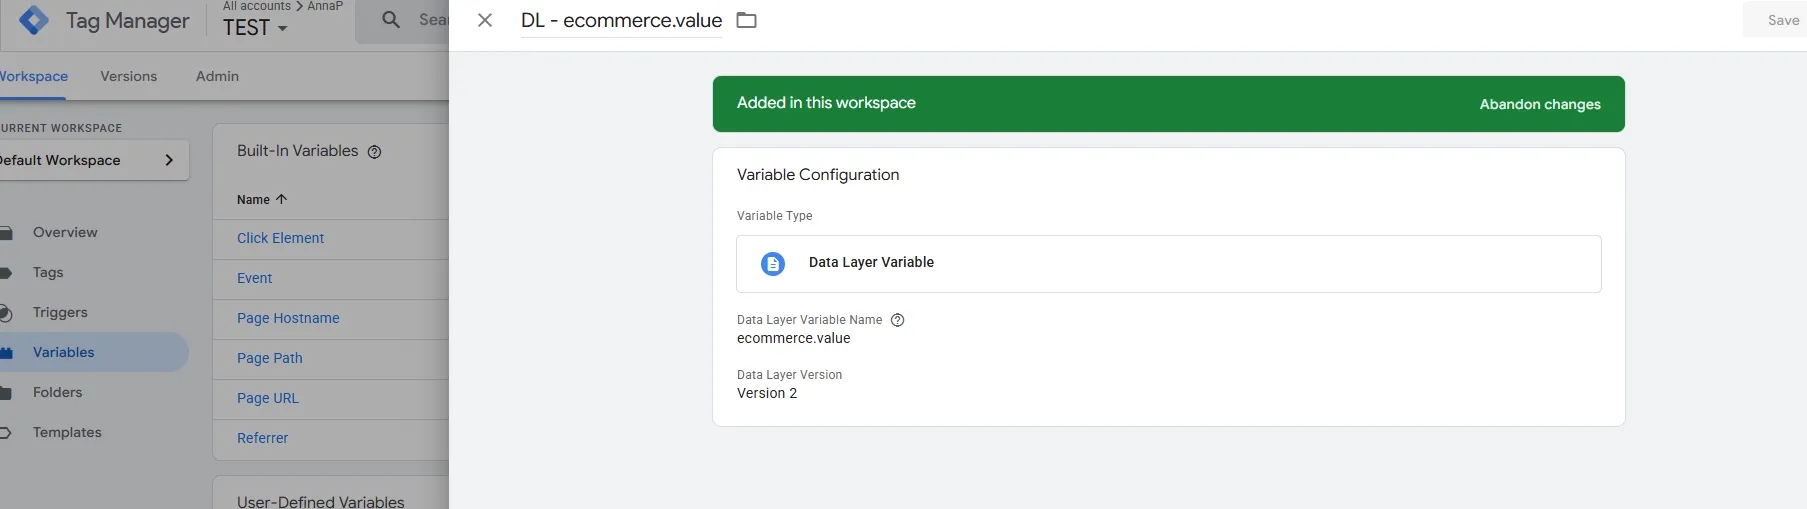
2. Create a variable that will contain value.
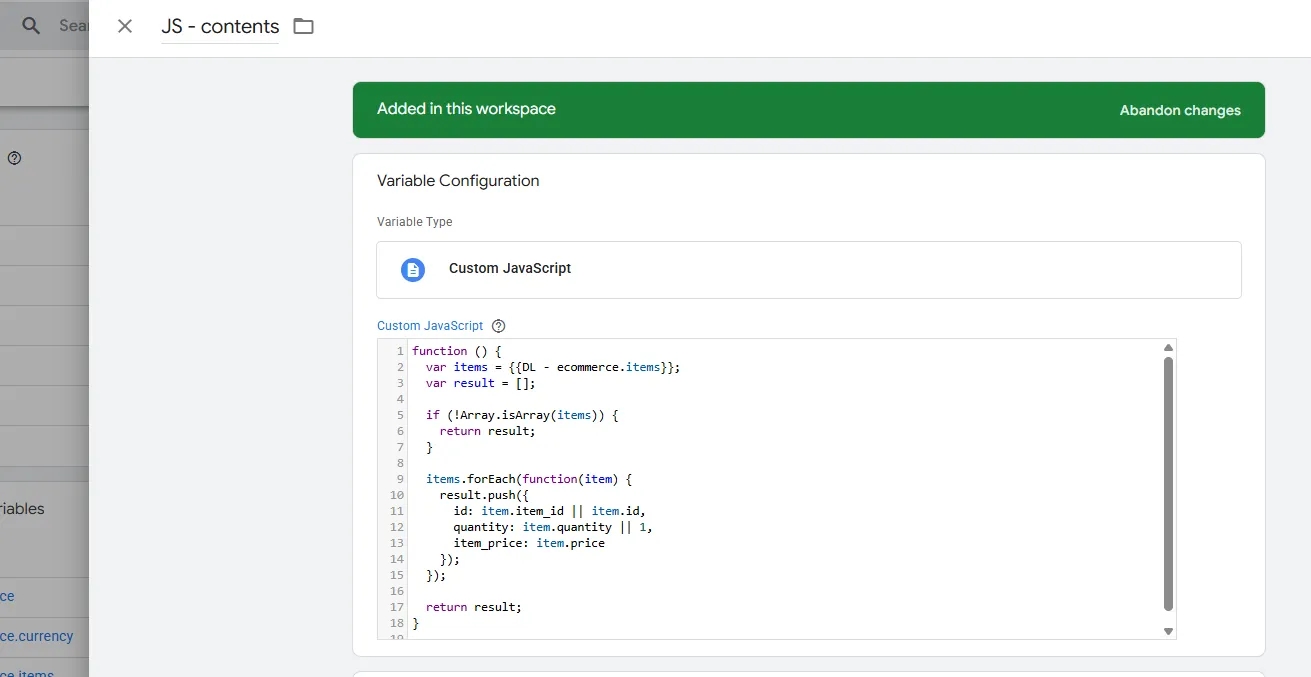
3. Create a Custom JavaScript variable that will process the data from DL - ecommerce.items and return the product array in the format we need.
function () {
  var items = {{DL - ecommerce.items}};// Get items array from dataLayer (GA4 ecommerce.items)
  var result = [];// Empty array for the output

  if (!Array.isArray(items)) {// Check if items is an array
    return result;// If not — return empty array to avoid errors
  }

  items.forEach(function(item) {// Loop through all items in ecommerce.items
    result.push({// Push each product in the required format
      id: item.item_id || item.id,
      quantity: item.quantity || 1,// Quantity (default is 1)
      item_price: item.price
    });
  });

  return result;
}
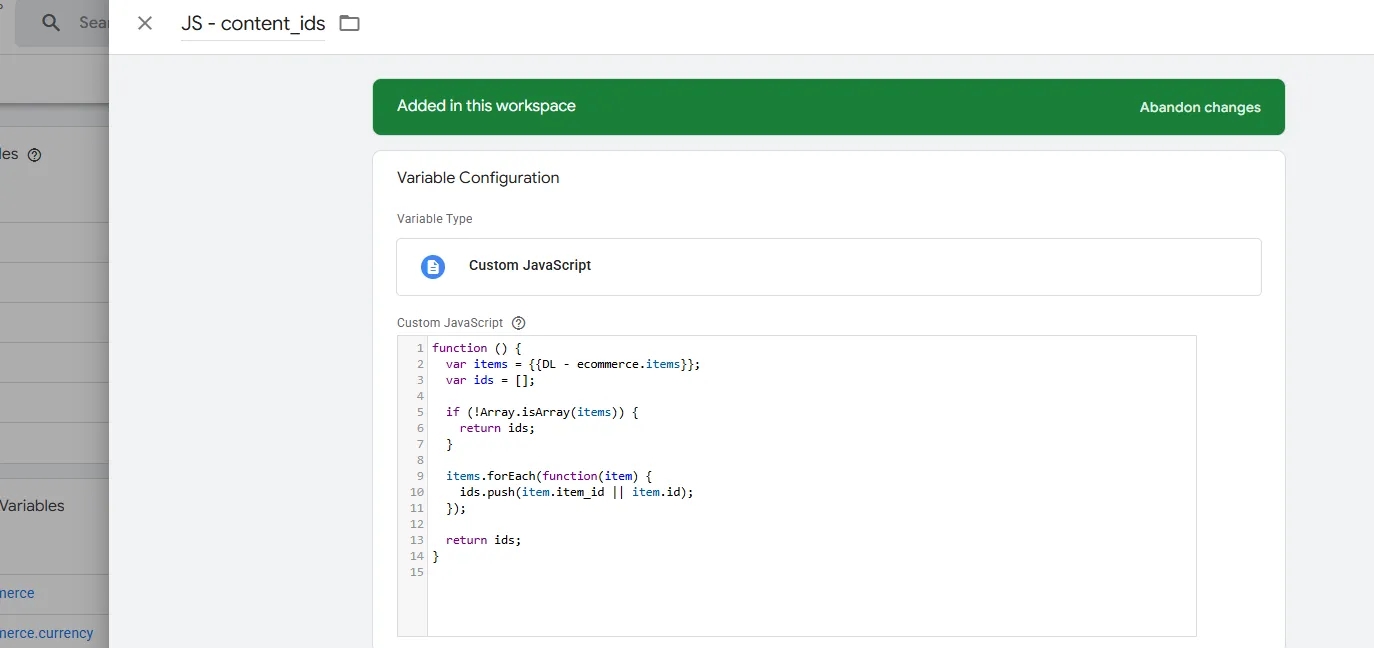
4. Create another Custom JavaScript variable that will contain an array of product IDs.
function () {
  var items = {{DL - ecommerce.items}};// Get items array from dataLayer
  var ids = [];// Empty array for item IDs

  if (!Array.isArray(items)) {// If items is not an array — return empty array
    return ids;
  }

  items.forEach(function(item) {// Loop through all items
    ids.push(item.item_id || item.id);// Push item ID
  });

  return ids;
}
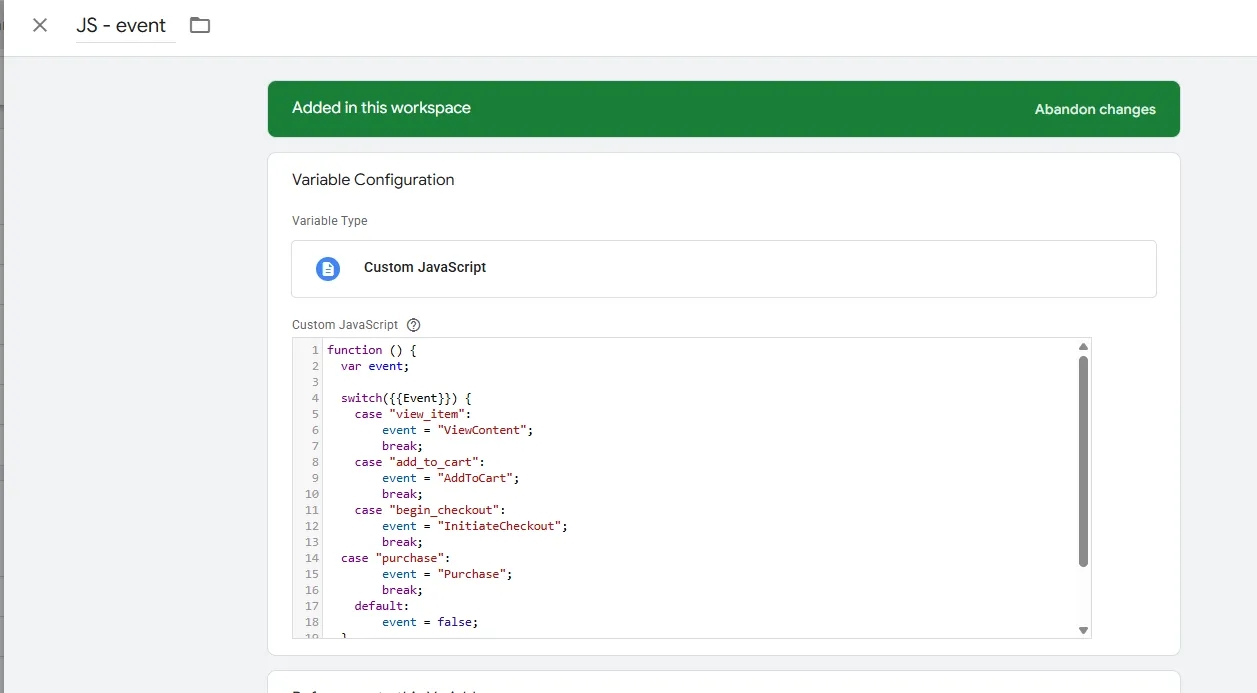
5. Create a variable that will output the event name in Facebook’s format.
function () {
  var event;// Variable to store the event name

  switch({{Event}}) {    // Map the GA4 dataLayer event to the corresponding Facebook event
    case "view_item":
        event = "ViewContent";
        break;
    case "add_to_cart":
        event = "AddToCart";
        break;
    case "begin_checkout":
        event = "InitiateCheckout";
        break;
  case "purchase":
        event = "Purchase";
        break;
    default:
        event = false;
  }

  return event;// Return the Facebook event name
}
Note that in this approach, each individual parameter is handled by a separate variable.
Now we move on to a familiar step and create a new Facebook Pixel tag:
- enter your Facebook Pixel ID;
- since we’re sending multiple events (as in the previous setup), in the Event Name field select Variable and specify the created variable — JS - event;
- in Object Properties, add:
value— from your created variable DL - ecommerce.value;currency— set manually (or create a variable, as in the HTML tag option);content_ids— your variable with product IDs;content_type— set manually toproduct;contents— your variable with the product array;
- use the same trigger as in the previous option for the eCommerce funnel.
The configuration will look like this:

This way, we’ve additionally configured event delivery using the Facebook Pixel tag and are sending the same data as in the previous approach.

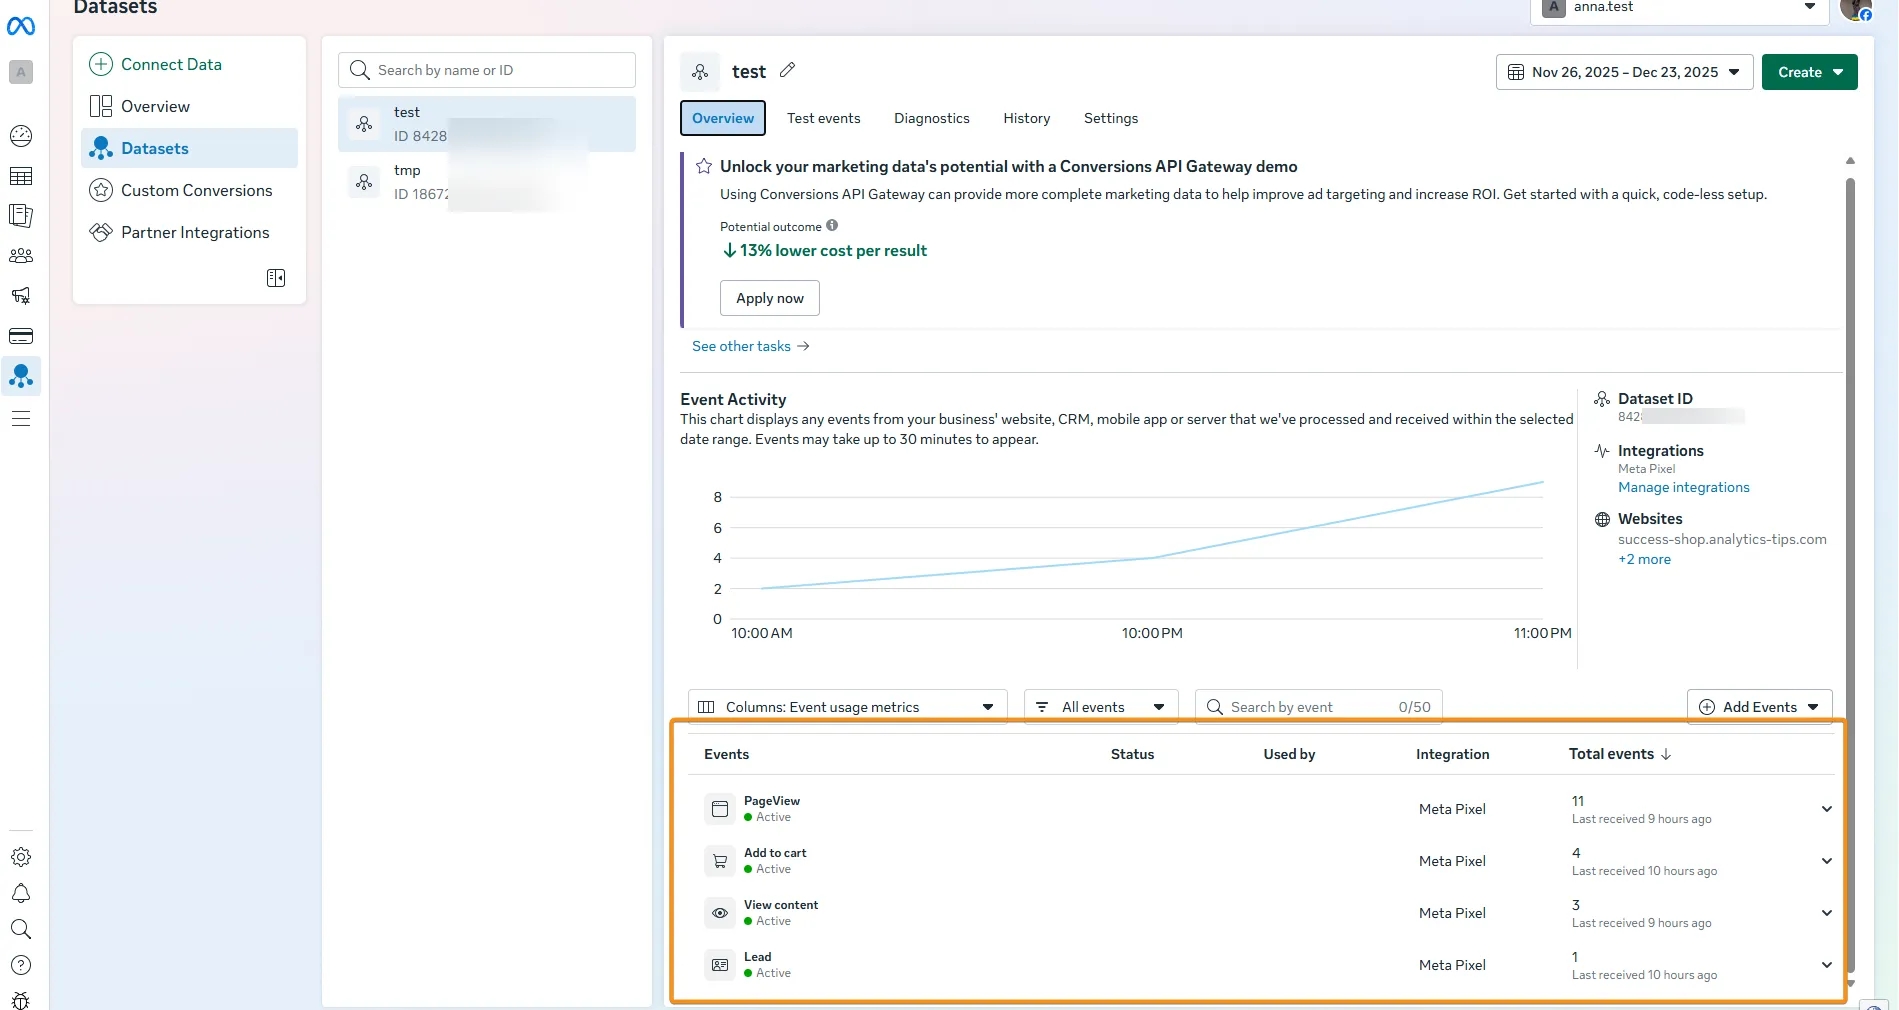
Where to find the transmitted events in the Facebook interface (Meta Events Manager)
Let’s return to the Pixel whose ID we used earlier during setup. Here, you can now see the events whose transmission we configured and that have been sent to the Facebook Pixel.
Registering a custom event
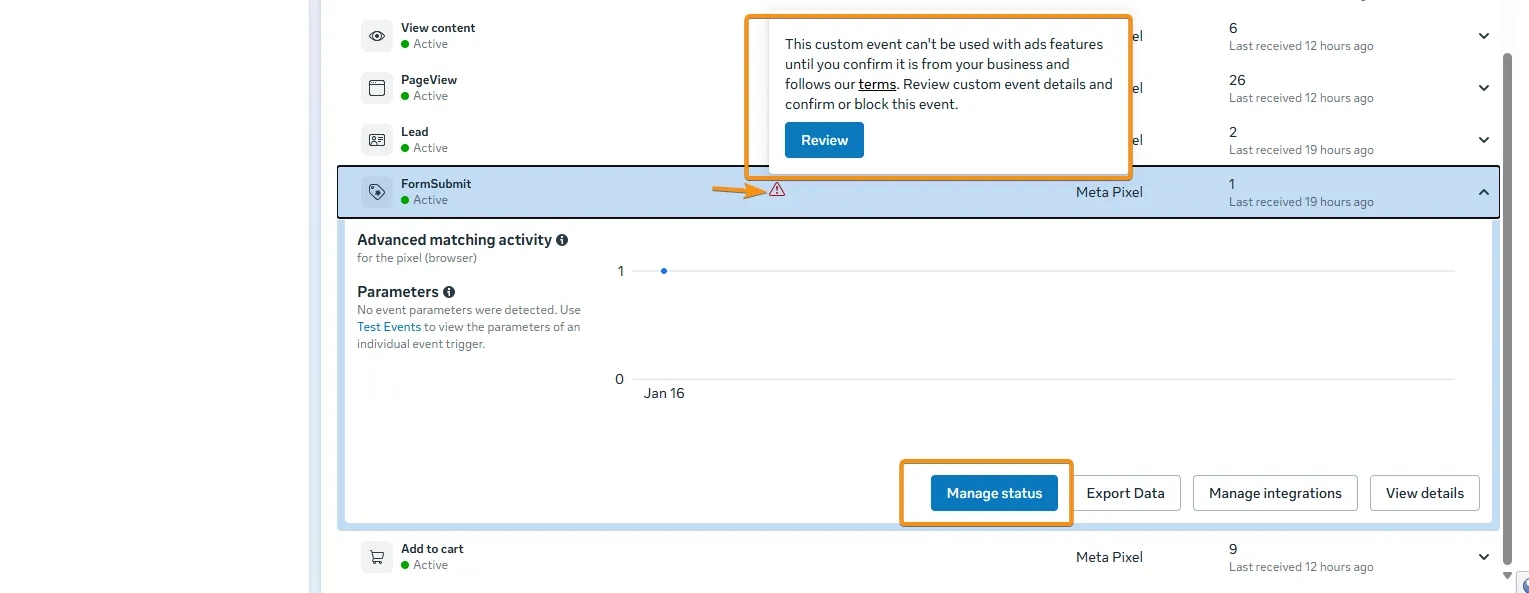
When a custom event is sent, Facebook records it in the Pixel, but it does not pass it further to the Ads Manager, as Facebook needs confirmation that this is indeed your event.
- That’s why the event must be approved. To do this, you can click either Review or Manage status.
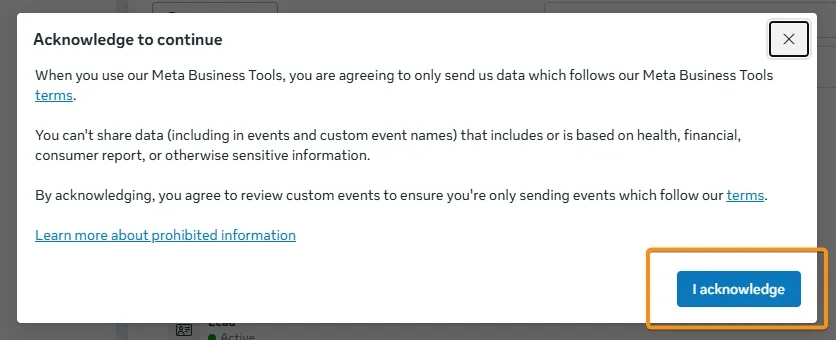
2. Next, you confirm that you are familiar with the rules for sending events and that you comply with them.
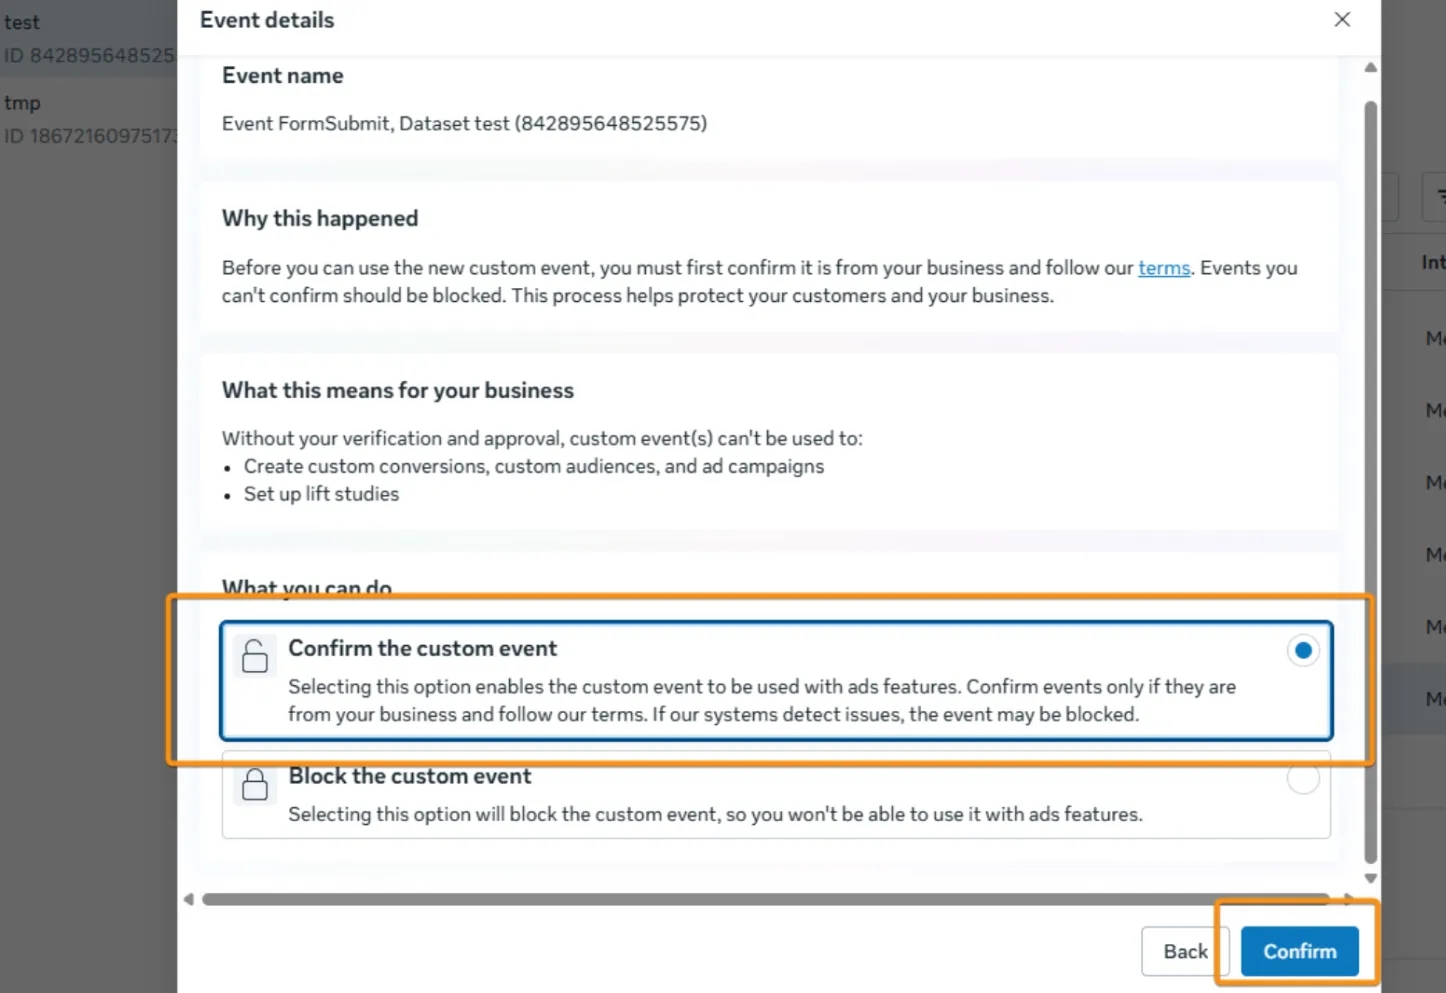
3. At the next step, you confirm the event.
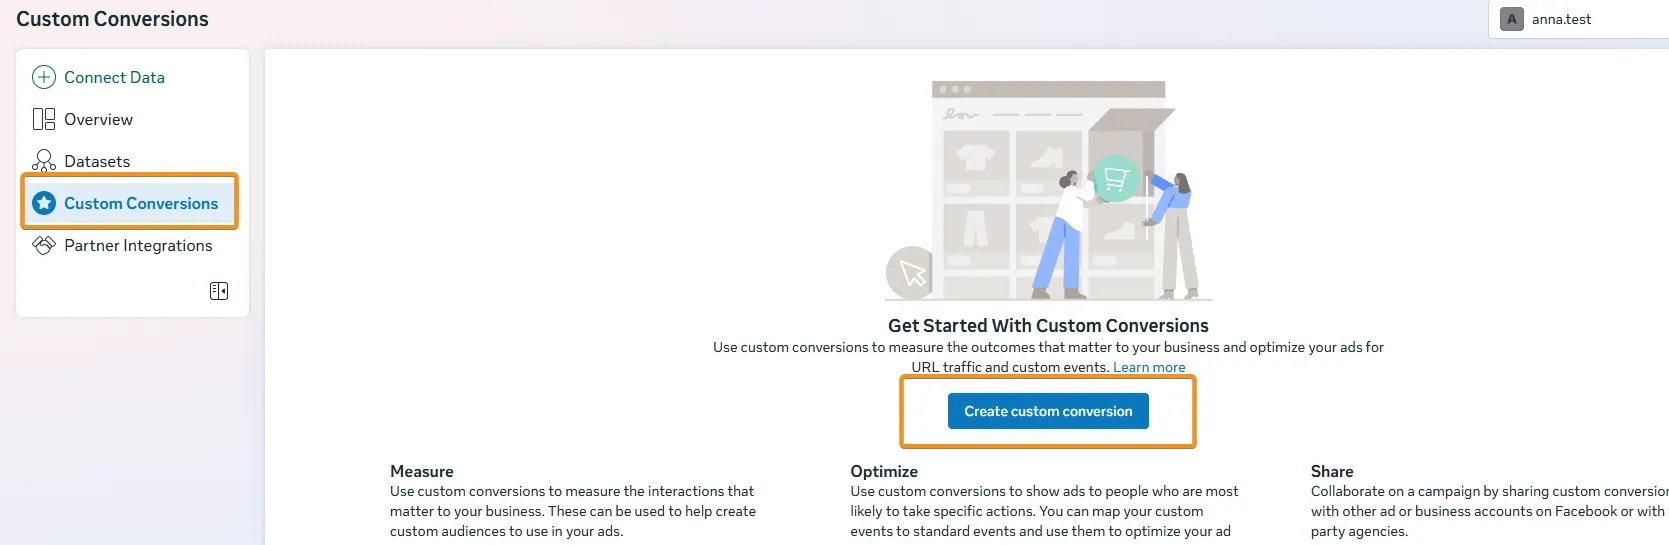
4. However, the setup doesn’t end here. After that, go to the Custom Conversions section and create a custom conversion.
5. For a minimal setup: give it a name (you can use the same name as the event to avoid confusion), select your custom event in the Event field, and add a rule that defines when the conversion should fire (for example, you can specify your website).
The final configuration may look like this:
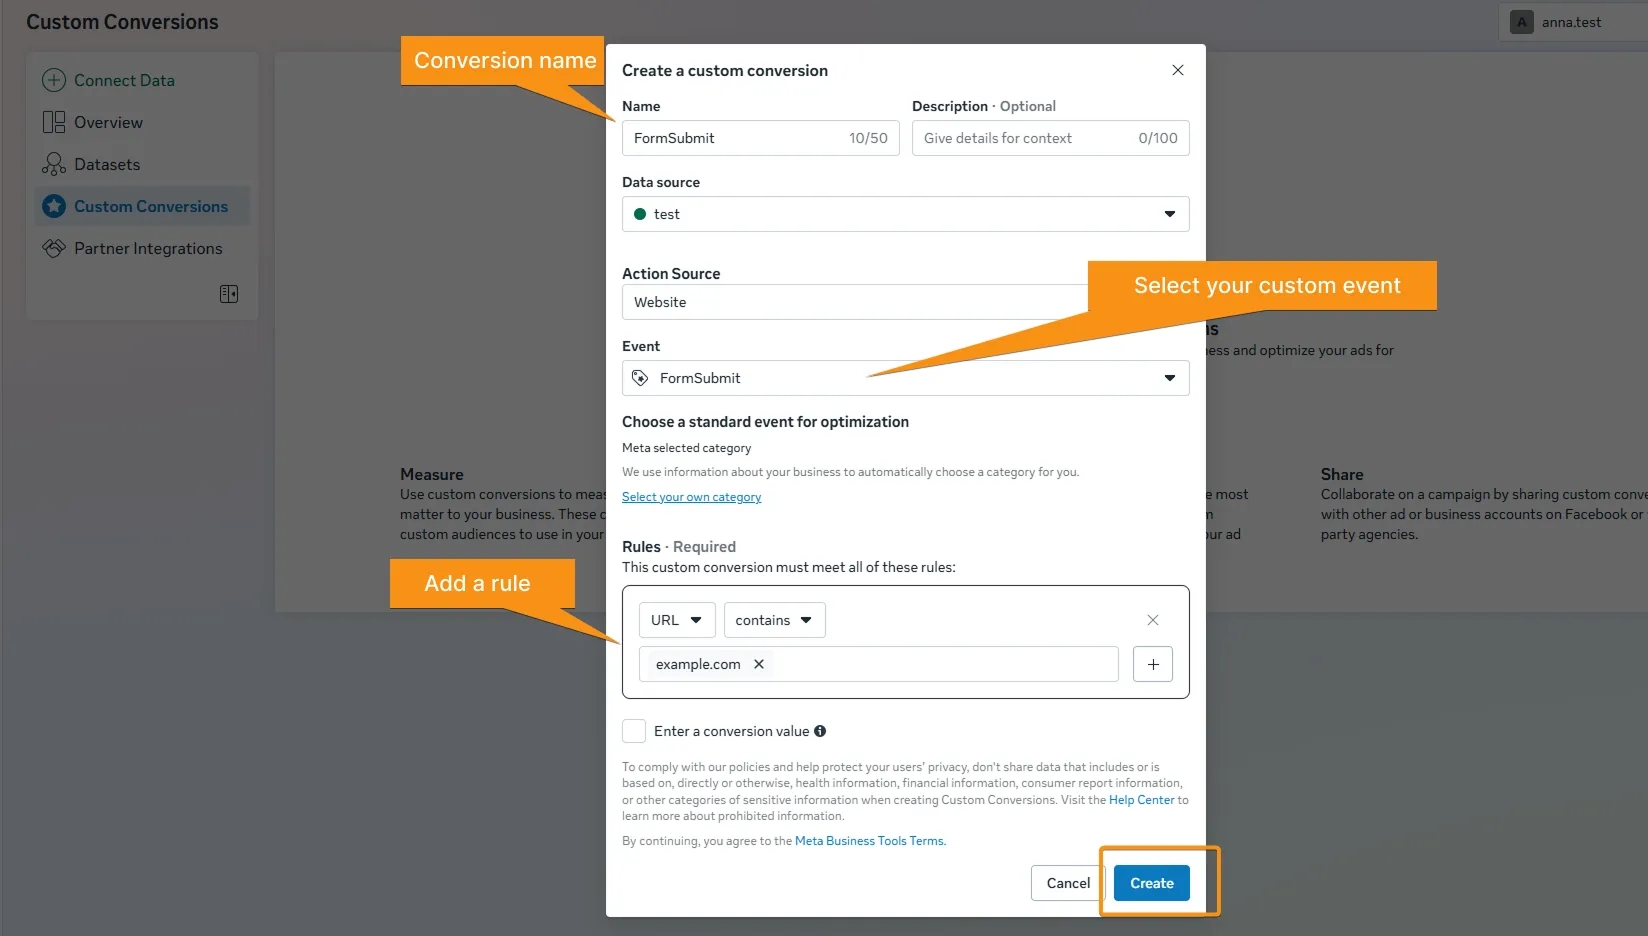
Тепер створена конверсія на базі кастомного івенту буде доступна у вашому рекламному кабінеті.
Summary
As a result, we’ve covered event setup using different delivery methods — from installing the base Facebook Pixel code to sending eCommerce events in multiple ways.
I hope this makes it easier for you to configure event tracking on your own and that the process no longer feels complicated.
And if, while working with GTM, you start to feel the need for a deeper and more systematic understanding — not just of individual solutions, but of the overall logic behind tags, triggers, variables, and the dataLayer — this is exactly what the hands-on PRO GTM course by my colleague focuses on.
Loading comments…