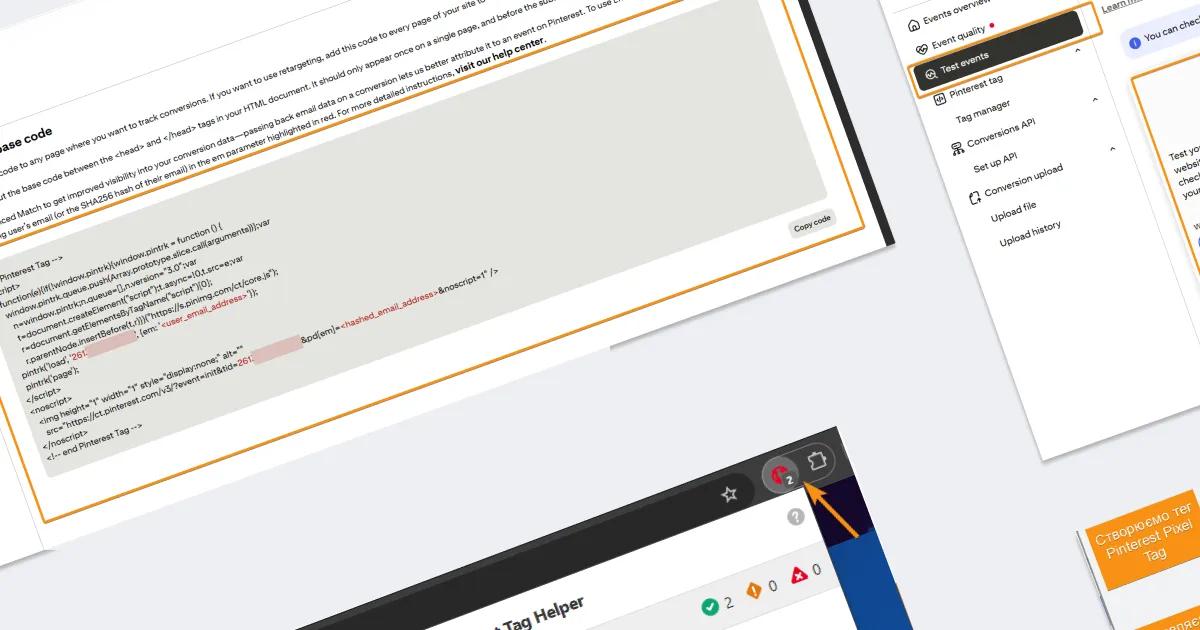

Pinterest is a marketing platform used to attract new customers. And, of course, just like on any other marketing platform, you need to track advertising performance to evaluate campaign effectiveness, optimize marketing strategies, and understand user behavior.
To ensure that Pinterest Ads correctly tracks web conversions, you need to set up the Pinterest Tag and enable event transmission from the website.
In this article, I will show how to do this through Google Tag Manager without making changes to the website’s code. We will go through installing the base tag, working with the community Pinterest Pixel Tag template, and configuring eCommerce event tracking using the existing GA4 eCommerce dataLayer implementation.
This article covers the following steps:
Installing the Pinterest base code on the website and sending the first “PageVisit” event
There are usually several ways to install the Pinterest Tag on a website:
- directly in the site’s code (inside
<head>), - via an HTML Tag in GTM,
- through a tag from the Community Template Gallery in GTM.
In our example, we will configure everything through GTM, since I recommend keeping all tracking configurations in one place to avoid chaos and maintain better control over data transmission. This also minimizes the need for developer involvement in the future.
Before installing the Pinterest Tag on the site, let’s first find all the data required for this setup.
How to find the Pinterest Tag code and TAG_ID
For further configuration, depending on the method you choose, you will need either the Pinterest base code or the TAG_ID. So first, we need to locate them in the Ads Manager so that later (as described in the next steps) you have all the necessary information at hand.
To do this:
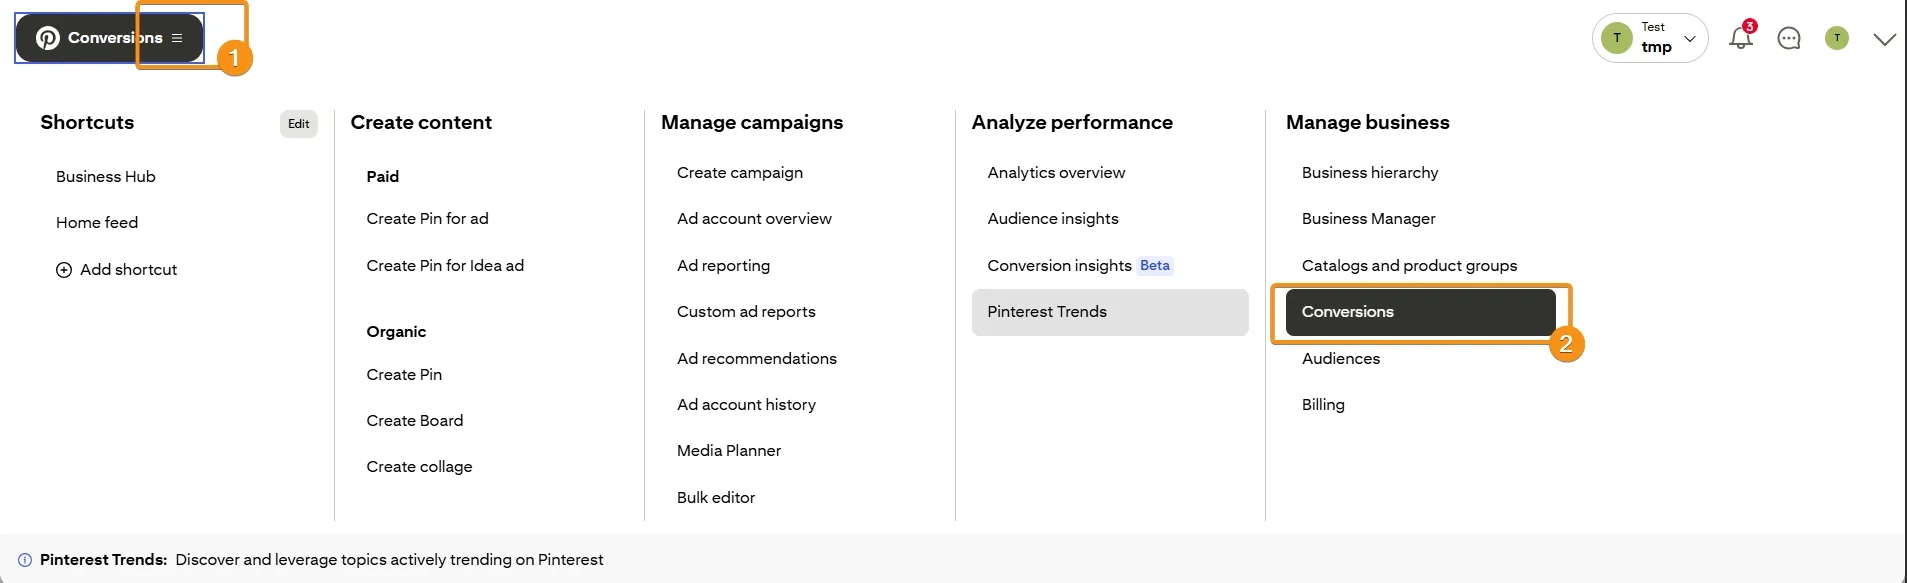
- Go to the Conversions tab.
- Pinterest tag -> Tag manager -> Install the Pinterest tag
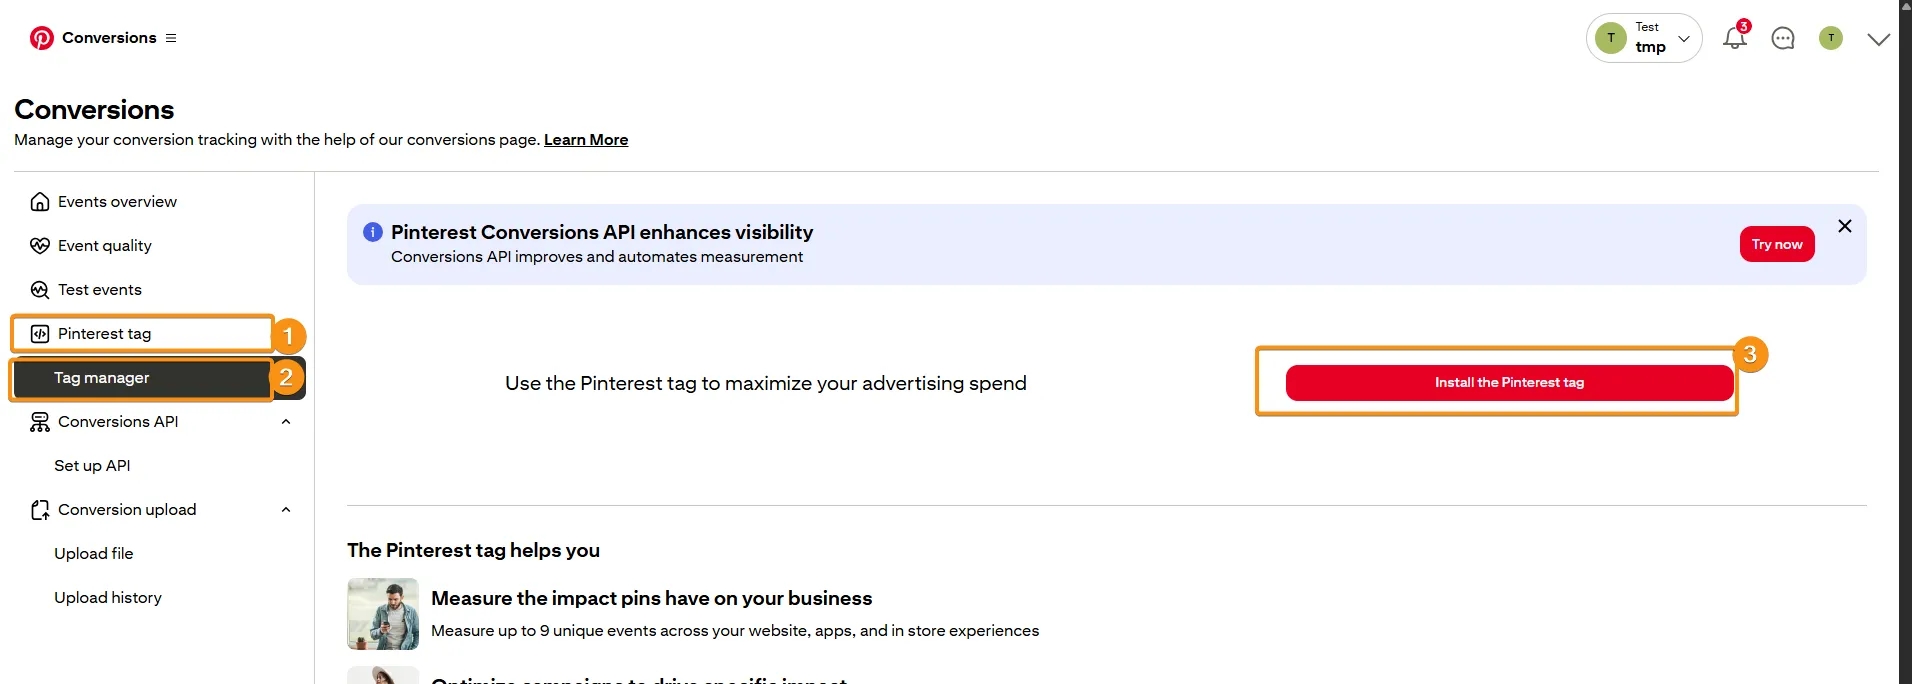
- Here, on the first step, you can already see your TAG_ID (copy it — you will need it for configuring the tag through the Community Template Gallery).

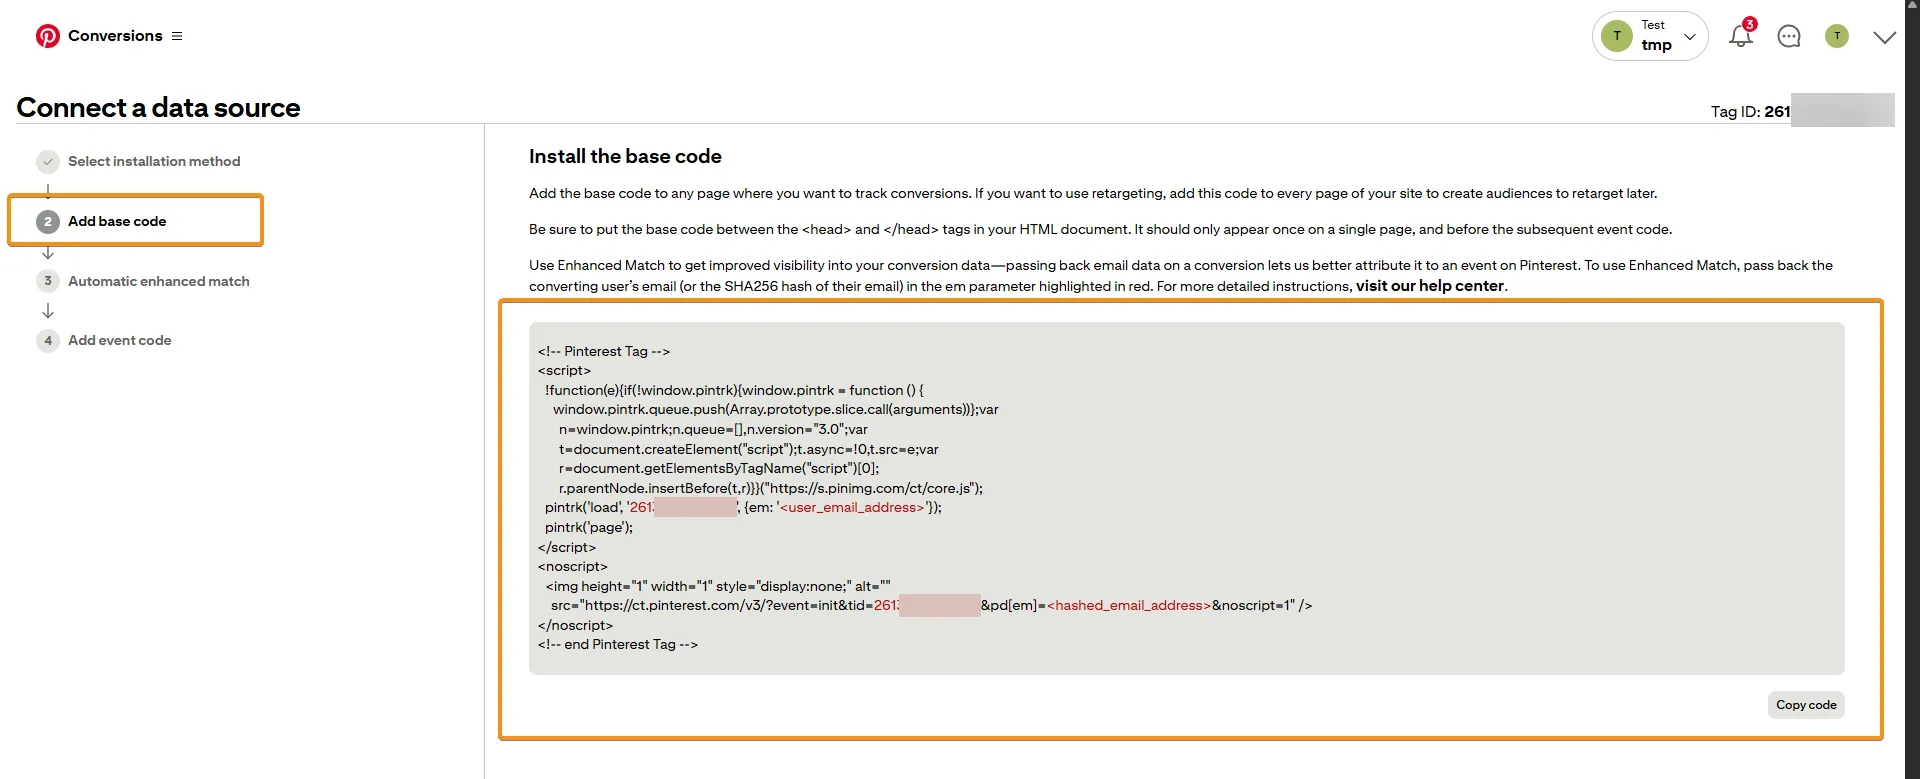
- If you choose to use a Custom HTML tag, skip the first step → Skip to manual setup → then go to Add base code, where you can immediately see the code that Pinterest recommends installing.
Installation via GTM
Now let’s move on to actually installing the Pinterest Tag on the website. As mentioned earlier, we will look at configuration options via GTM, and there are several ways to do this:
- through a Custom HTML Tag in GTM,
- through the Pinterest Pixel Tag template from the Community Template Gallery.
Through a Custom HTML Tag in GTM
The first method for installing the Pinterest base code on the site:
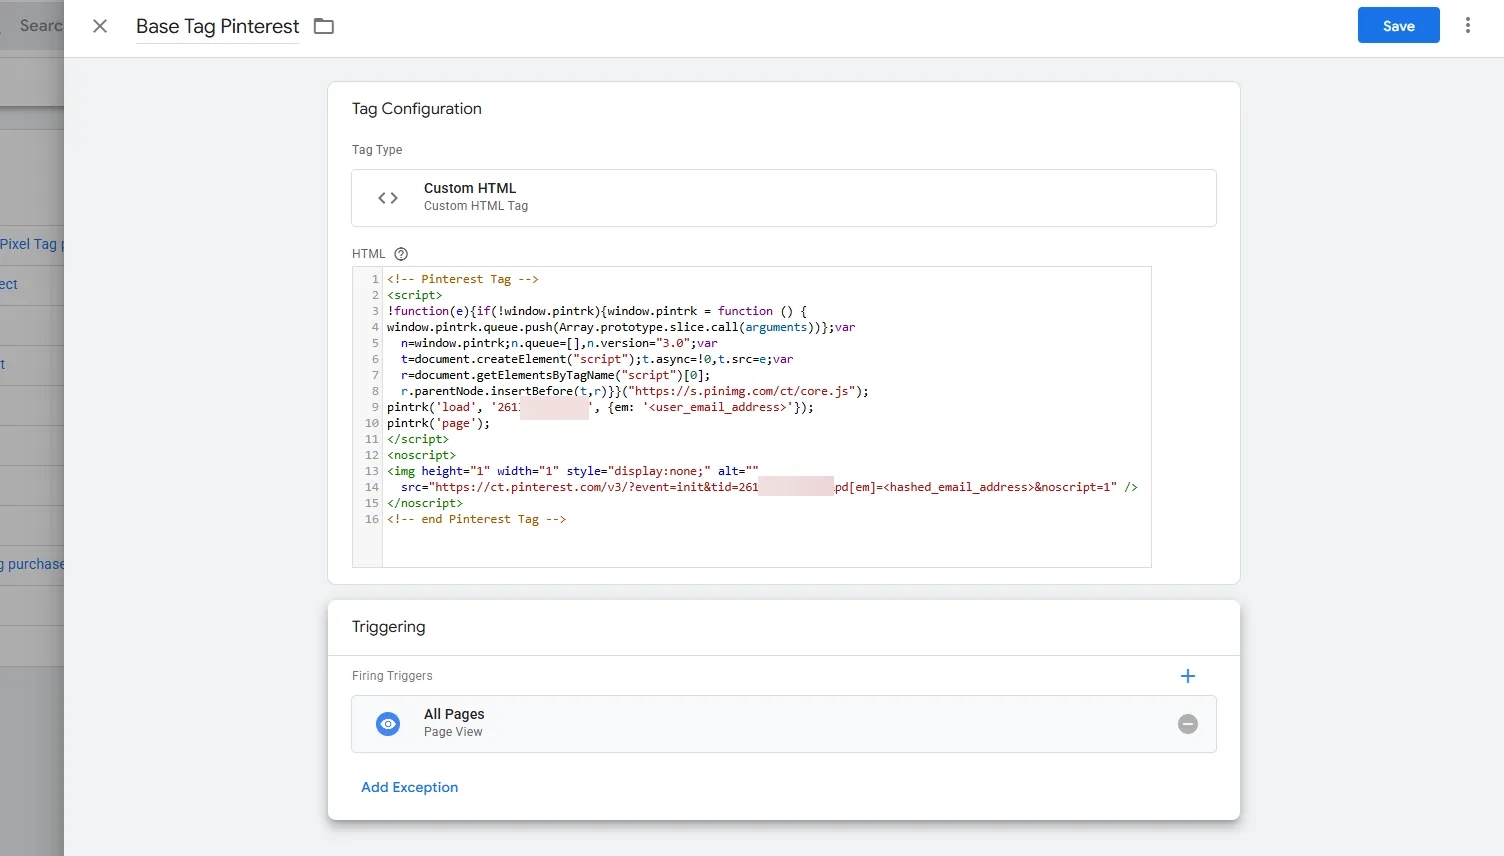
- Create a new Custom HTML tag and paste the copied code provided by Pinterest.
- As the trigger, select one of the automatically created standard triggers — All Pages — so that the base code fires on every page of the site.
Final setup example:
Although this method looks very simple, I still recommend using the next one. Here’s why:
- with this method, you only install the Pinterest base code with the library and do not send any events, which is not enough for full tracking setup;
- this approach requires knowledge of code both for installing the library and for sending events.
Through the Pinterest Pixel Tag template from the Community Template Gallery
This method is more convenient because it does not require any coding knowledge and allows you not only to install the Pinterest base tag but also to configure sending the first event (PageVisit) right away. For this, you only need the TAG_ID.
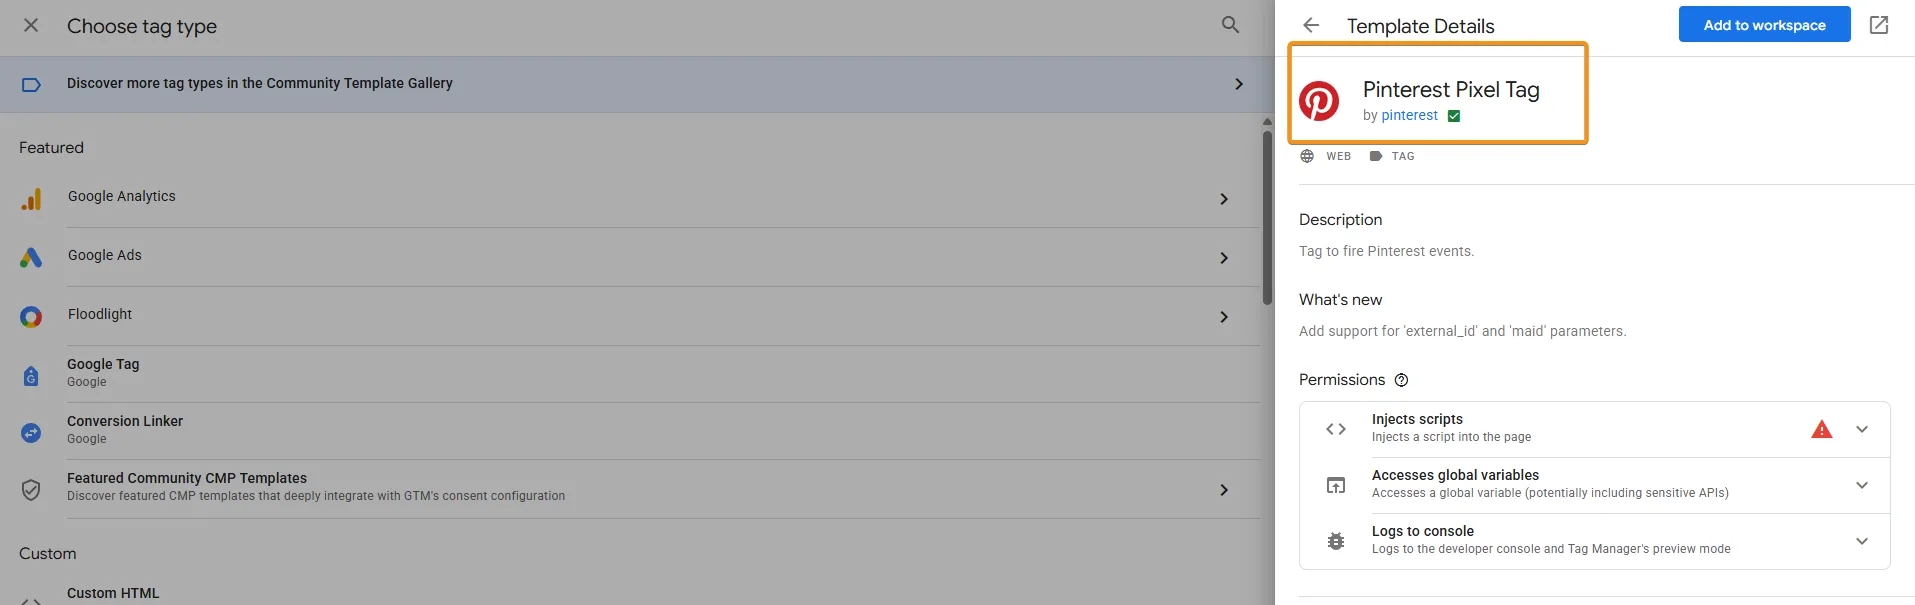
- In GTM, go to tags and when creating a new tag, open the Community Template Gallery, find the Pinterest Pixel Tag, and add it to your workspace.
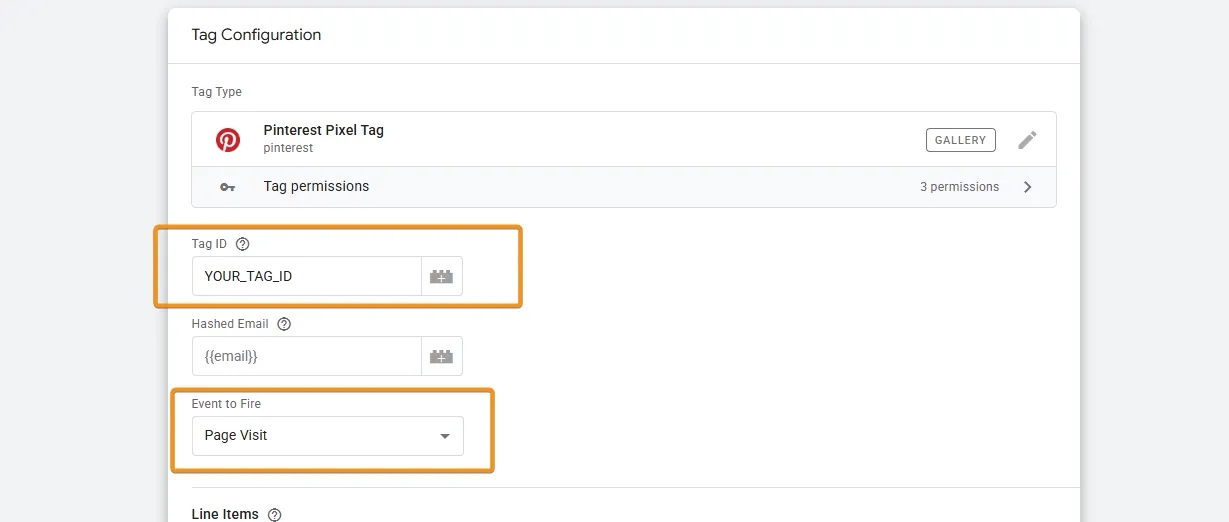
2. In the new Pinterest Pixel Tag, paste your previously copied TAG_ID.
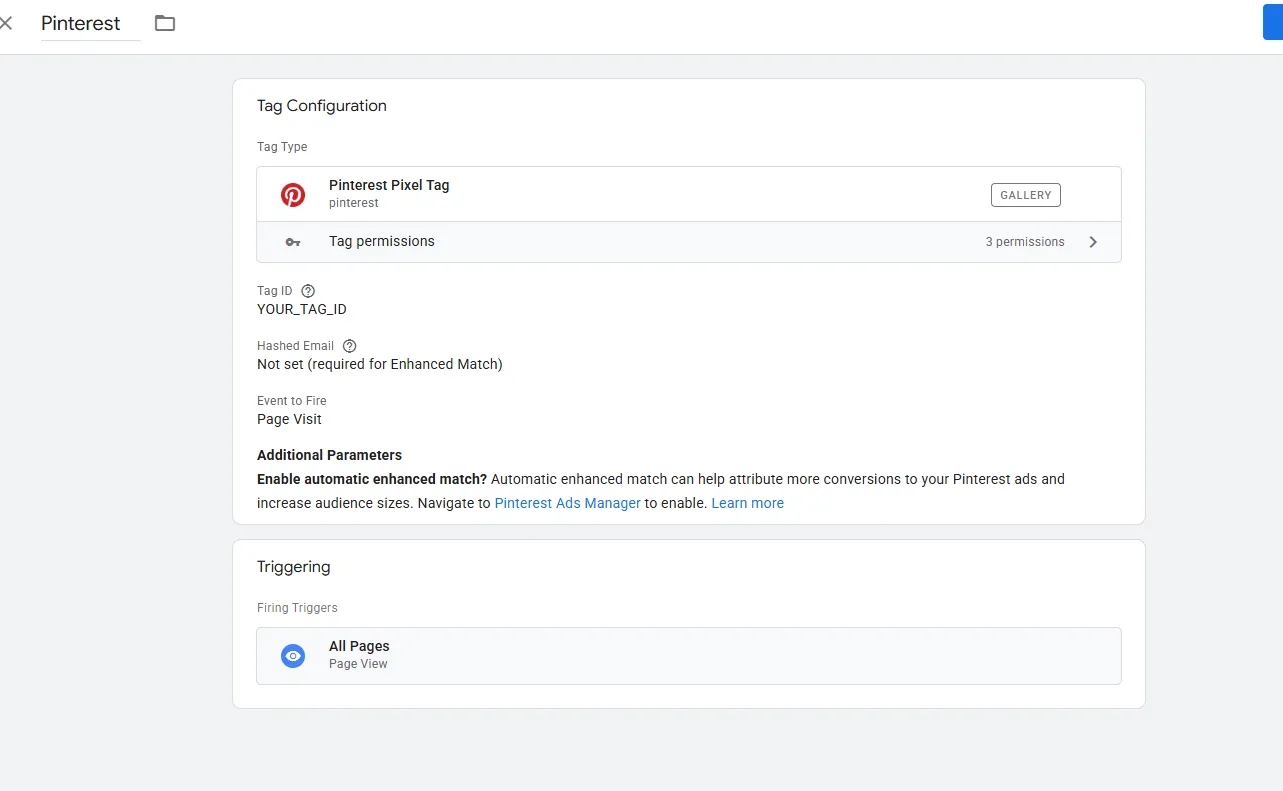
3. Then specify which event you want to send. In this case, choose PageVisit, since this event should fire on every page. Set the trigger to All Pages (same as in the previous setup).
Your configuration will look like this:
Debugging your current setup using an extension
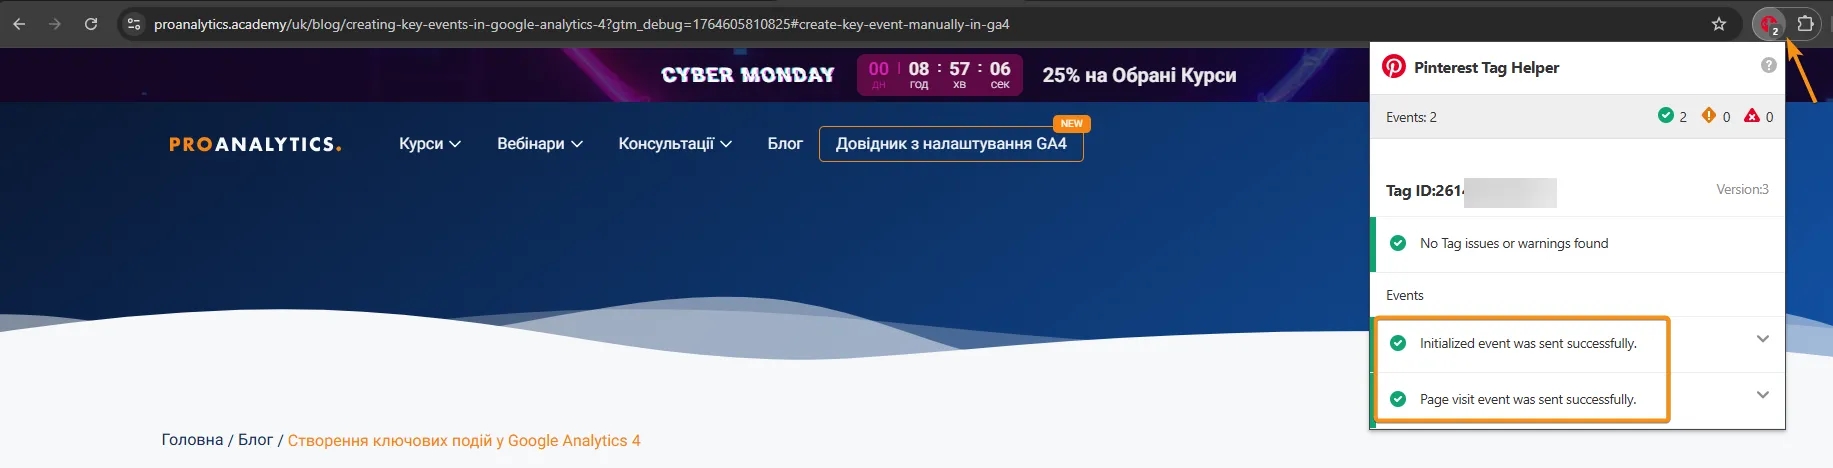
At this point, we already have the Pinterest pixel installed on the website, and the page view event is being sent. Now let’s verify the setup. штування.
To do this, Google Chrome offers the Pinterest Tag Helper extension, which helps check whether the implementation is working correctly.
So, on the website page, we open the extension and can see that the Pinterest pixel is installed and the PageView event has been sent without any issues.
Event tracking
The base code is useful, but usually not enough to properly measure performance. .
Event tracking allows Pinterest Ads to receive information about user actions on the website. This is necessary for accurate conversion measurement, campaign optimization, and building remarketing audiences.
Here is the list of events supported by Pinterest:
| Event | Purpose |
|---|---|
PageVisit | Track people who view primary pages, such as product pages and article pages. |
SignUp | Track people who sign up for your product or service. |
WatchVideo | Track people who watch videos. |
Lead | Track people who show interest in your product or service |
Search | Track people who perform searches on your website to look for specific products or store locations. |
Subscribe | Track people who subscribe to receive information and updates related to products or services. |
Custom | Track a custom event. Use this event name to track a special event that you want to include in your conversion reporting. |
[Partner-defined event] | Add any additional event that you’ve defined for the purpose of audience targeting. Unique events aren’t available for conversion reporting. Keep in mind that whitespace will be trimmed from raw event names passed through the tag. |
You can find the full list of events at the link.
Tracking non-eCommerce events
Overall, everything related to non-eCommerce events is sent in the same way as the page view event. Specifically:
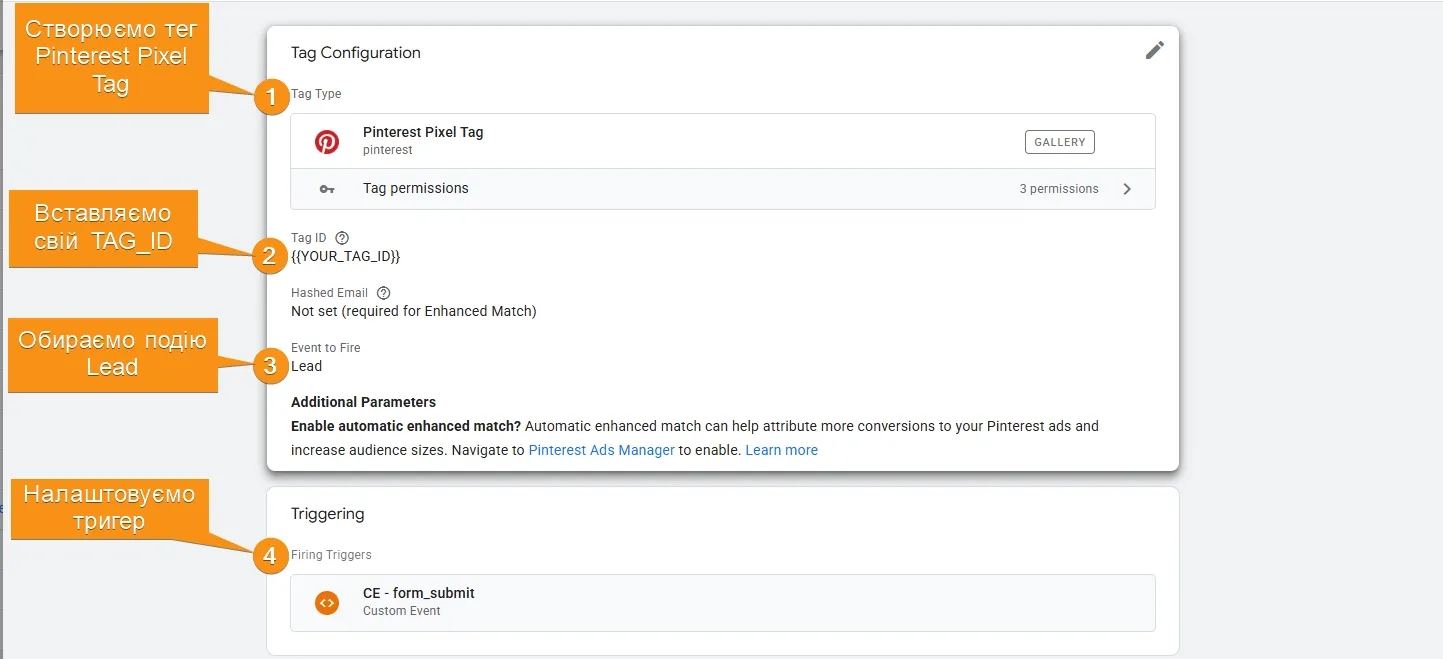
- Create a Pinterest Pixel Tag.
- Insert your TAG_ID.
- Select the event (non-eCommerce) you want to send (in the previous section, we selected PageVisit).
- Configure a trigger that corresponds to the event — that is, when exactly the tag should fire (in the previous section, we used All Pages, since the page view event must be sent on every page).
As an additional example, let’s configure the Lead event, which will be sent when a form is successfully submitted. So let’s follow the setup steps mentioned above.
If you don’t know how to configure triggers — here are articles by my colleague:
- Tracking form submissions using the “Element Visibility” trigger
- Tracking form submissions using the basic GTM trigger
- Tracking link clicks using Google Tag Manager: a practical guide with examples
- Tracking clicks on website elements with Google Tag Manager: an advanced guide
- Tracking user interactions with forms using Google Tag Manager
- Tracking video interactions using Google Tag Manager
Structure of eCommerce events
Here is the list of eCommerce events supported by Pinterest:
| Event | Purpose |
|---|---|
Checkout | Track people who complete transactions. |
AddToCart | Track people who add items to shopping carts. |
ViewCategory | Track people who view category pages. |
AddPaymentInfo | Track people who enter payment information, such as a credit card number. |
AddToWishList | Track people who add a viewed item to a wish list. |
InitiateCheckout | Track people who start the process of checking out an item for purchase. |
ViewContent | Track people who view site content. |
You can find the full list of events at the link.
When it comes to eCommerce events, things are a bit more complex, since these events require an additional array of product data. And this is exactly what we will examine in more detail next.
Pinterest has its own event structure with its own parameter names (in this article, we will not cover adding code to the website with the help of developers, as this goes beyond our topic). However, when reviewing the event structure, you can notice that it is very similar to the structure typically used for sending events to GA4. Still, it has its own differences in parameter names.
The basic structure of a Pinterest event (using a purchase as an example) looks like this.
<script>
 pintrk
 (
 'track',
 'checkout',
 {
 value: 10.00,
 order_quantity: 2,
 currency: 'USD',
 event_id: 'eventId0001',
 line_items:
    [{
        product_name: 'Parker Boots',
        product_id: '1414',
        product_price: 5.00,
        product_quantity: 1
    },
    {
        product_name: 'Parker Sandals',
        product_id: 'ABC',
        product_price: 5.00,
        product_quantity: 1
    }]
 }
 );
</script>
You can explore additional code examples for sending different events in the official Pinterest documentation.
Therefore, if you already have eCommerce event tracking for analytics (GA4) implemented in the dataLayer, you do not need a developer — you can simply use the existing implementation and adapt it to Pinterest requirements.
Here, we will not walk through configuring analytics events according to the GA4 event structure and will assume that it is already implemented on your website.
You can find more details on how to set it up in the article.
We use this as an example because most websites already use this approach when configuring analytics event tracking, whether through developers or plugins. The only requirement is that events must be pushed not directly from the site’s code but into the dataLayer, which GTM uses.
Next, as an example, we will focus on sending the main eCommerce conversion — the purchase.
For this, let’s assume that the website is already pushing the following code into the dataLayer, which corresponds to the eCommerce event structure used for analytics.
dataLayer.push({ ecommerce: null });  // Clear the previous ecommerce object.
dataLayer.push({
  event: "purchase",
  ecommerce: {
    transaction_id: "T_12345",
    value: 72.05,
    currency: "USD",
    items: [
    {
      item_id: "SKU_12345",
      item_name: "Stan and Friends Tee",
      item_category: "Apparel",
      price: 10.01,
      quantity: 3
    },
    {
      item_id: "SKU_12346",
      item_name: "Google Grey Women's Tee",
      item_category: "Apparel",
      price: 21.01,
      quantity: 2
    }]
  }
});
You can find more details about the GA4 event structure via the link.
Preparing data in GTM
Let’s look at the tag to understand which variables we need in order to send the purchase event.
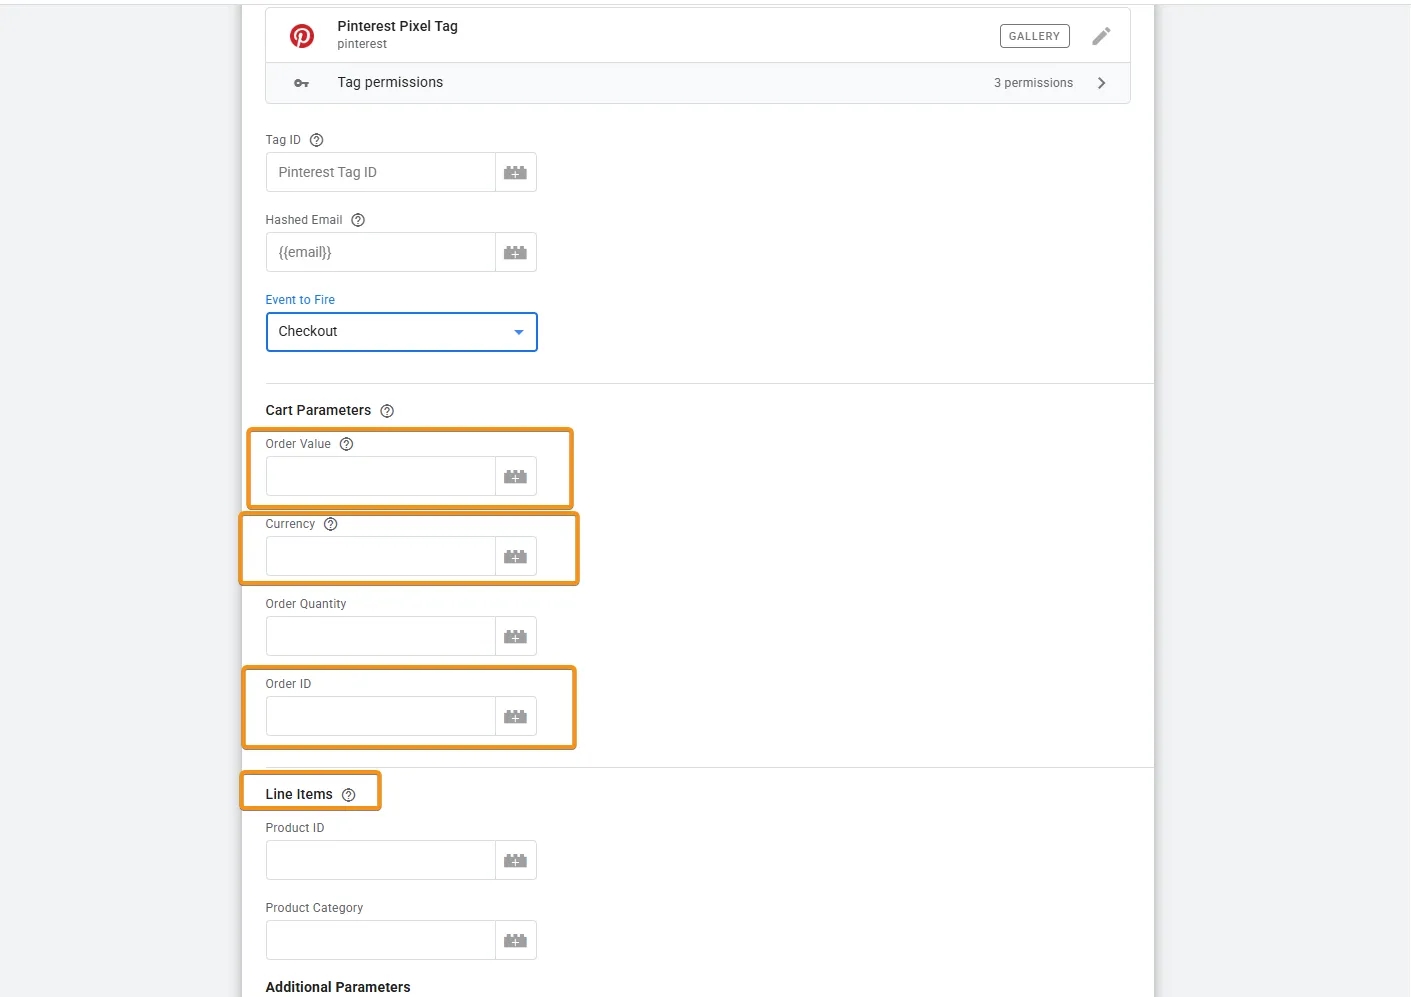
To configure event transmission, we will need the following variables:
- Value — the purchase amount
- Currency — the currency
- Order ID — the order number
- Line items — product data
So for further configuration, let’s prepare all the necessary variables. To do this, go to Variables and create the following new variables:
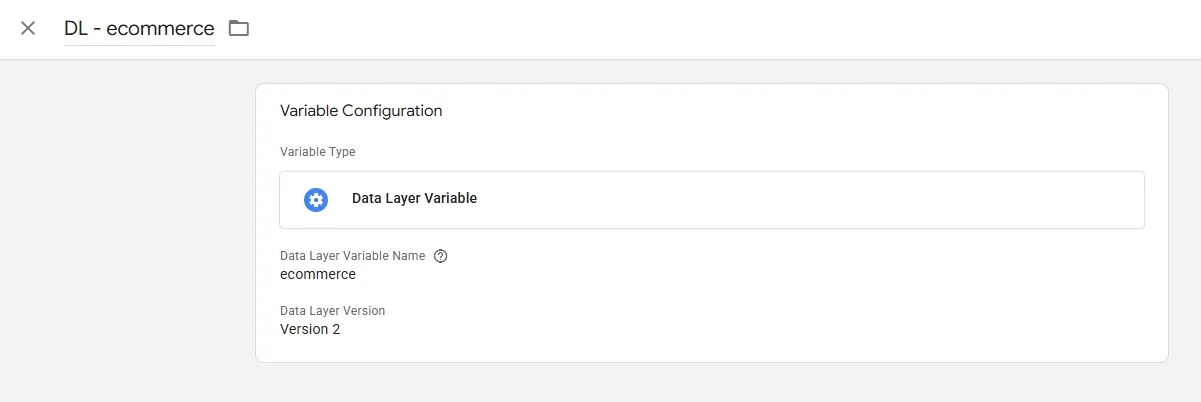
- DL - ecommerce — a variable that will contain the entire eCommerce event object and will be used to generate the product array.
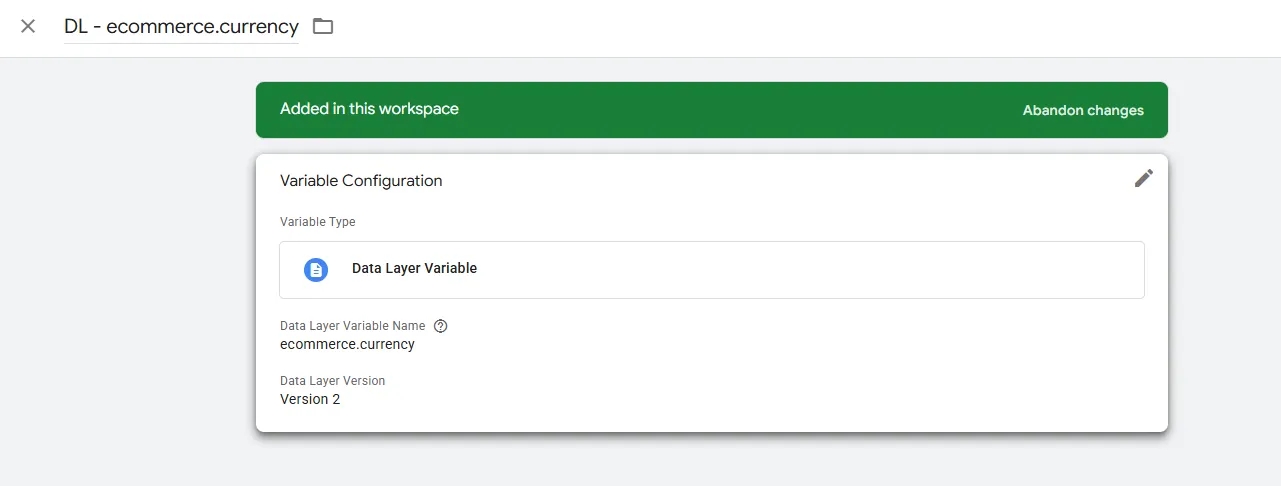
2. DL - ecommerce.currency — a variable for retrieving the currency (you may also set the value manually if the currency is constant).
3. DL - ecommerce.value — the amount received at the event level.
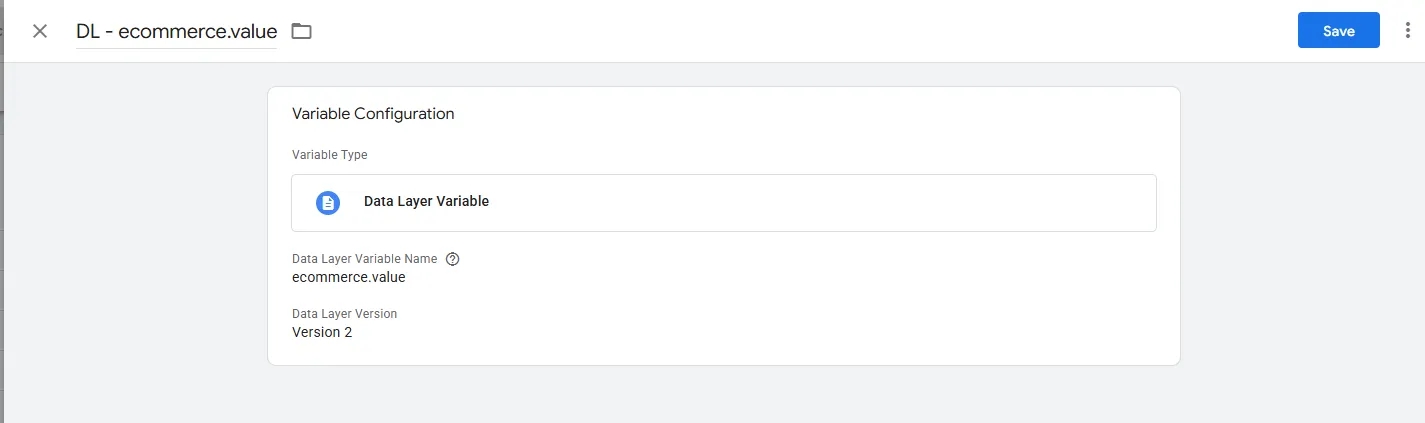
Unfortunately, in practice, value is not always passed at the event level. Therefore, you can calculate it by iterating through the product array (price * quantity). For this scenario, you can create a variable JS - value.
function() {
  var e = {{DL - ecommerce}} || {};
  var items = Array.isArray(e.items) ? e.items : [];
  var total = 0;

  for (var i = 0; i < items.length; i++) {
    var it = items[i] || {};
    var price = parseFloat((it.price + '').replace(',', '.')) || 0;
    var qty = parseFloat(it.quantity) || 1;
    total += price * qty;
  }

  return +total.toFixed(2);
}
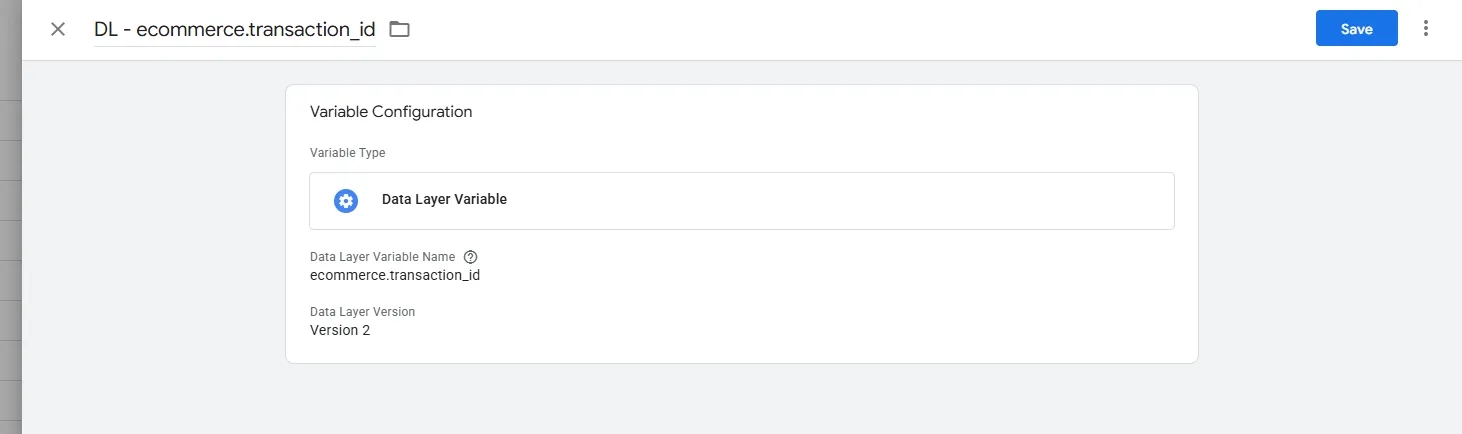
4. DL - ecommerce.transaction_id — the order number.
5. JS - line_items — the main variable that processes our eCommerce array and outputs the data with key names that Pinterest will accept.
function() {
  var e = {{DL - ecommerce}} || {};
  var items = Array.isArray(e.items) ? e.items : [];
  var out = [];

  for (var i = 0; i < items.length; i++) {
    var it = items[i] || {};
    out.push({
      product_id:       String(it.item_id || ''),
      product_name:     String(it.item_name || ''),
      product_category: String(it.item_category || ''),
      product_price:    Number(it.price) || 0,
      product_quantity: Number(it.quantity) || 1

    });
  }
  return out;
}
Sending eCommerce events
Next, to send the purchase event (in Pinterest, this is the Checkout event), we only need to:
- Use the Pinterest tag — create a new Pinterest Pixel Tag.
- Select the required event (in this example, Checkout).
- Pass in our prepared purchase data (DL - ecommerce.value, DL - ecommerce.currency, DL - ecommerce.transaction_id).
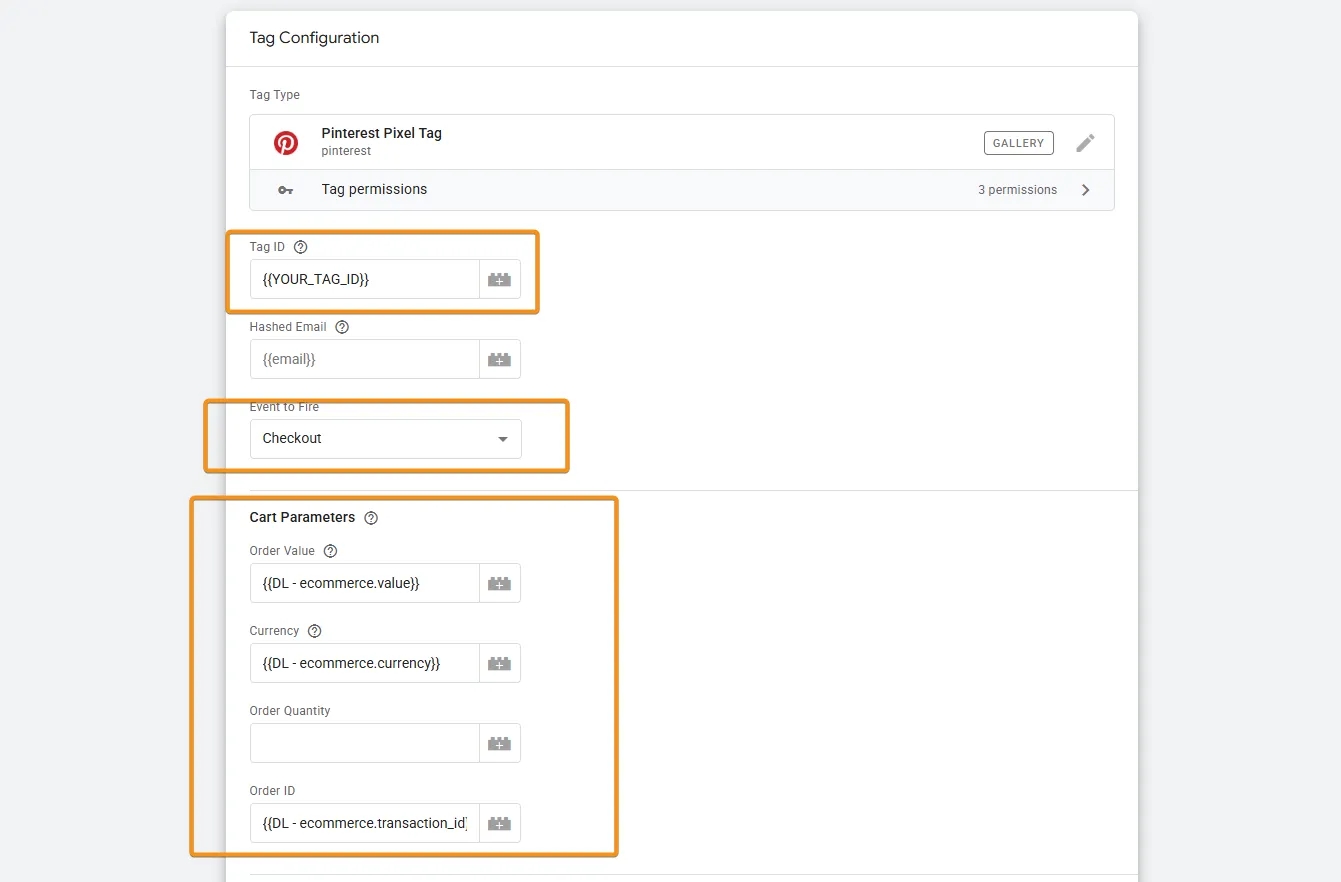
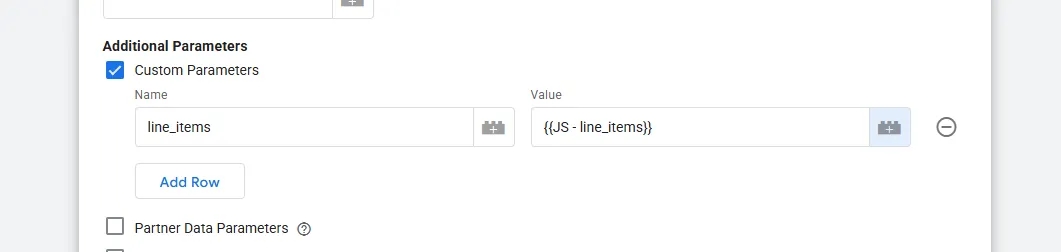
4. At the same time, product data is passed through the custom parameter line_items.
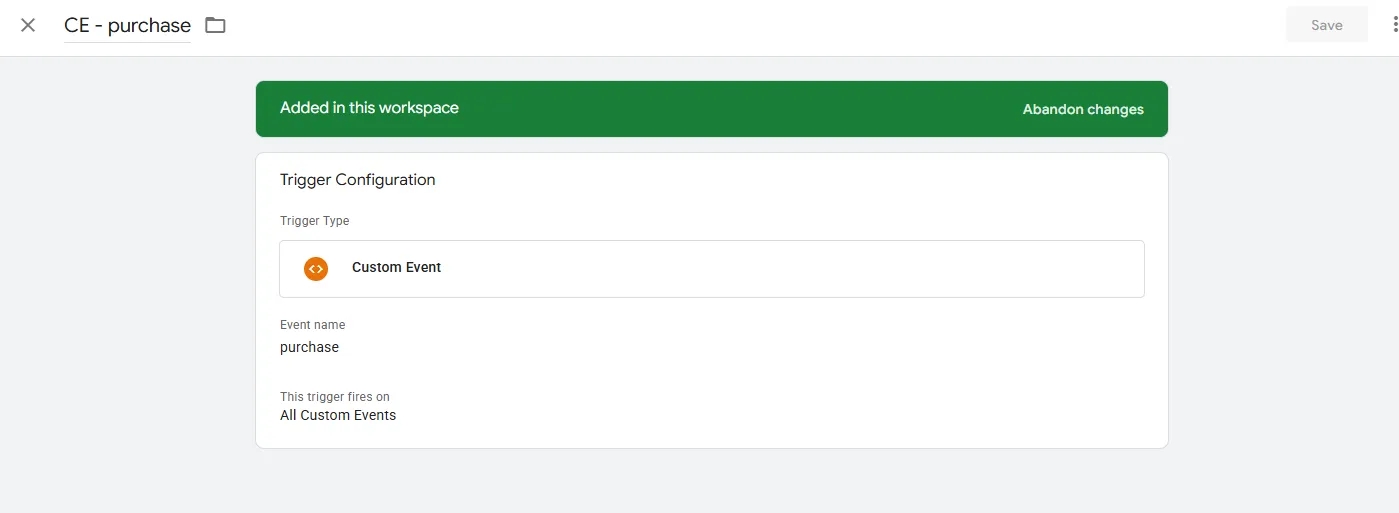
5. The trigger will be the event pushed into the dataLayer (in this case, purchase). To set this up, we create a new Custom Event trigger and specify the event name we receive from the dataLayer.
This way, we have the main eCommerce event configured.
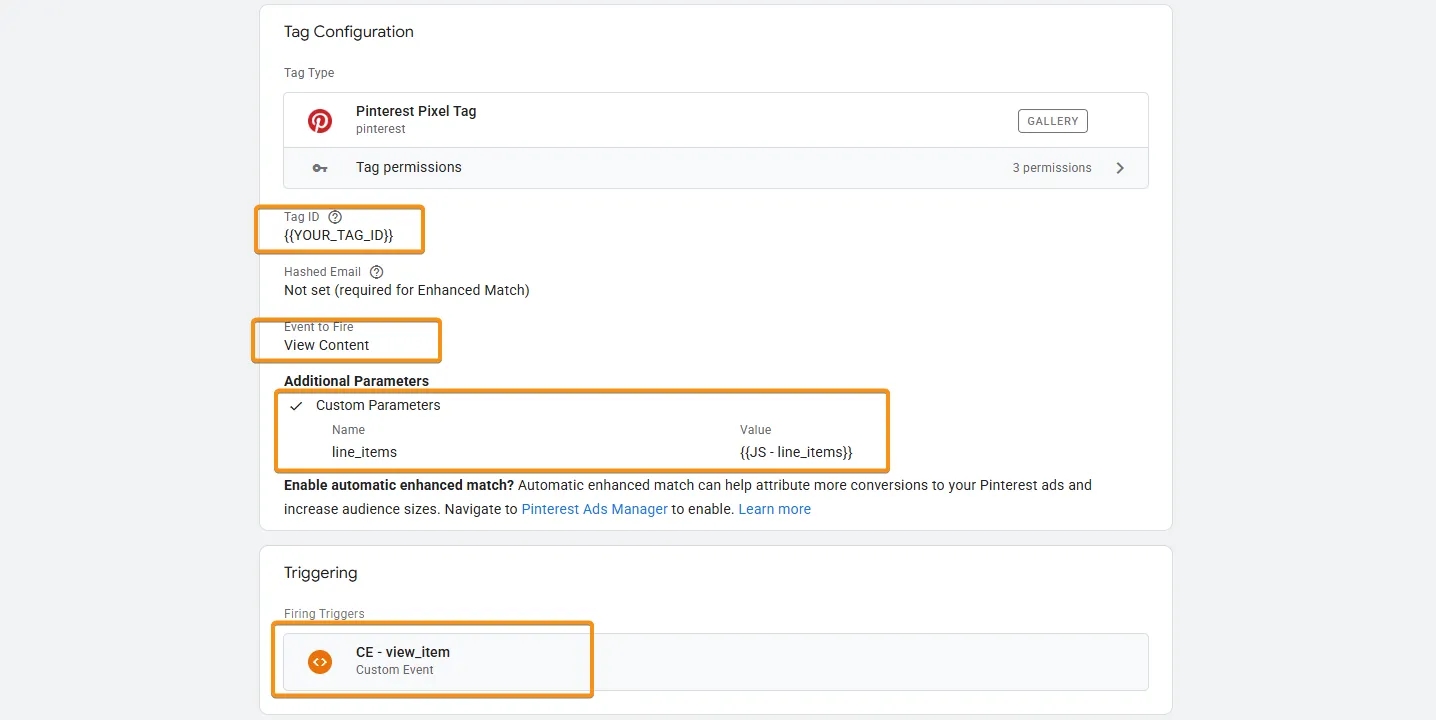
All additional events are configured in the same way, but they may require fewer parameters. For example, the product detail view event ViewContent may look like this.
How to check your current setup using an extension
Go to the website, perform the action you configured, and check the extension installed earlier (Pinterest Tag Helper).
We can immediately see that Pinterest is successfully installed, the page view event has been sent, and the ViewContent event is also received. When opening the eCommerce event, you can see that product data is transmitted correctly.
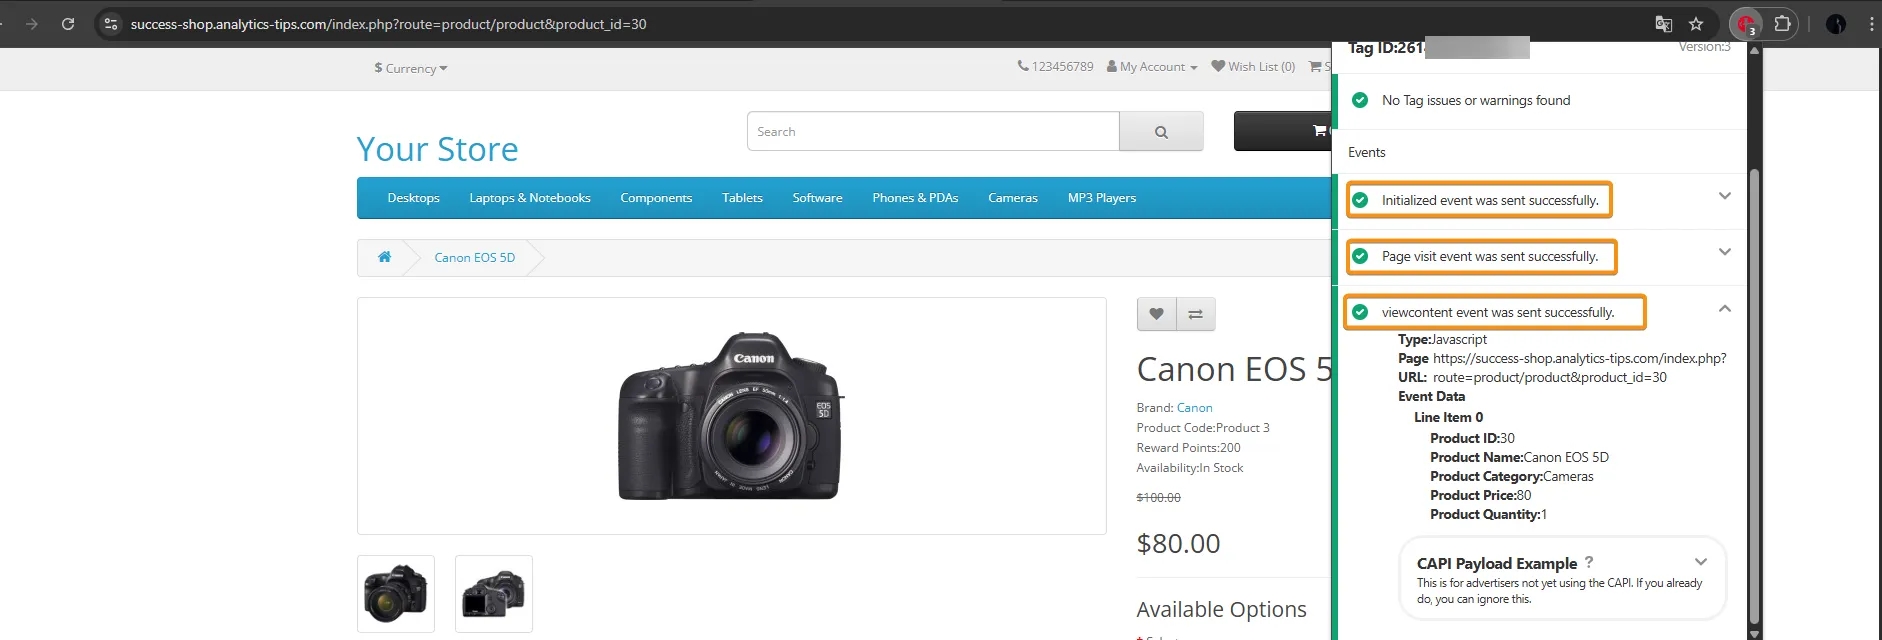
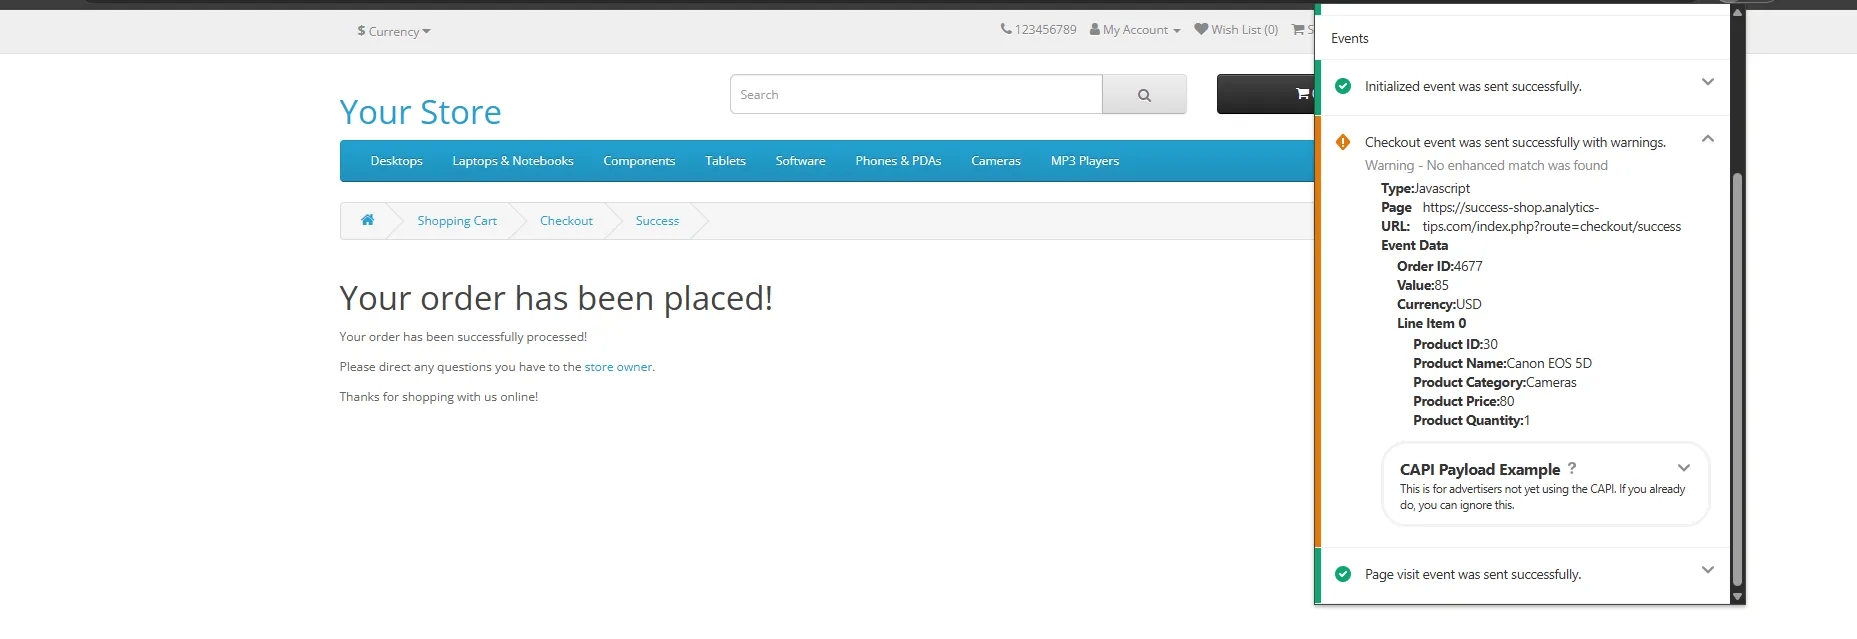
Next, we complete a purchase. Here we can also immediately see that Pinterest has been initialized, the page view event was received successfully, and the purchase event has also arrived with all the data we transmitted.
The extension additionally highlights: No enhanced match was found. This is not an error — Pinterest is simply notifying that no user data was passed (specifically, a hashed email).
These data are not required, and the tag works correctly without them. You can read more about this at the link.
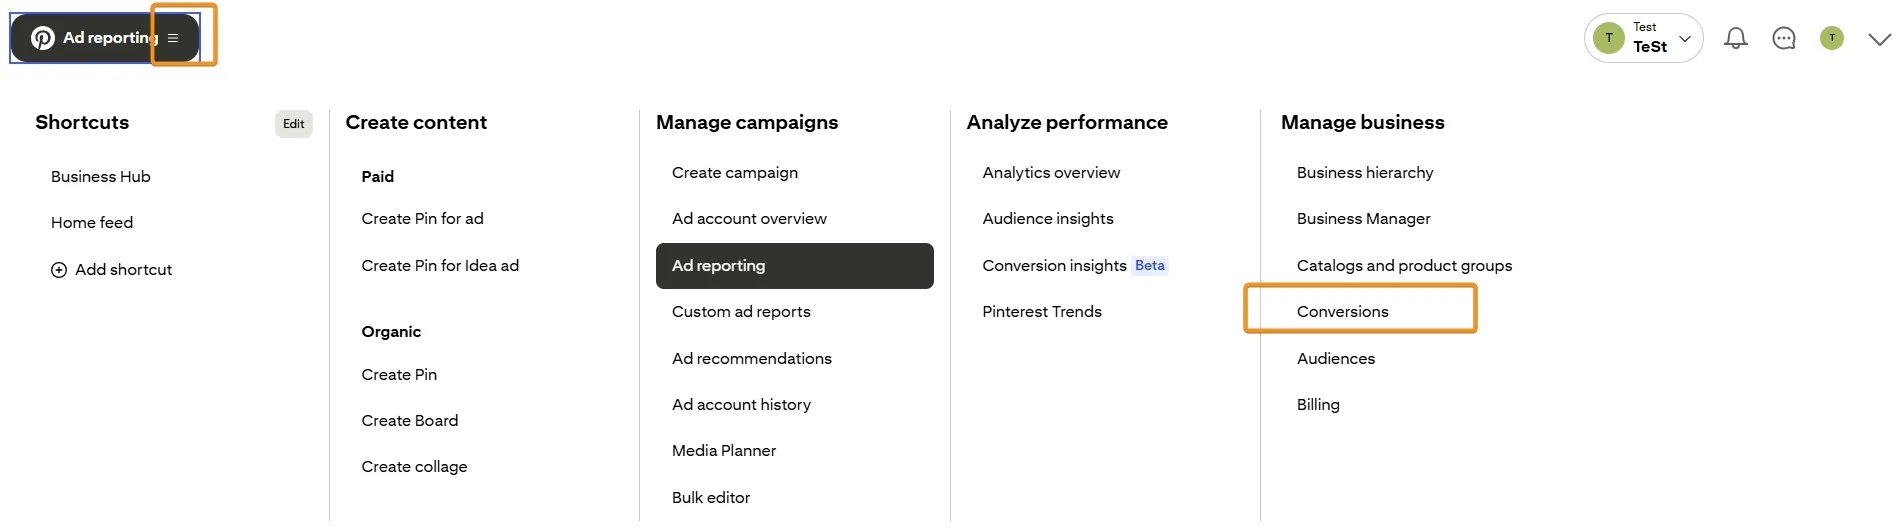
Where to find events in the Pinterest Ads interface
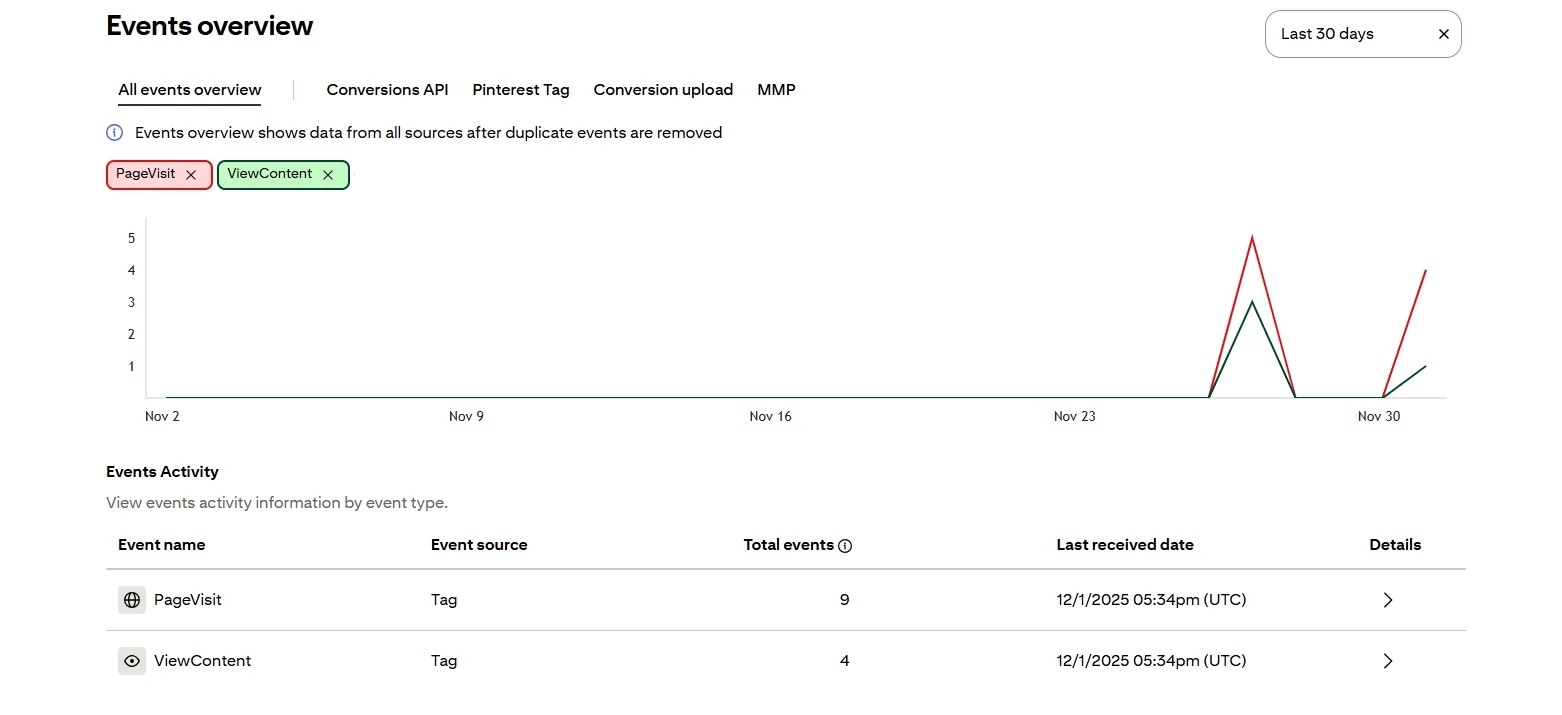
In your Pinterest Ads Manager, you can go to the Conversions section, where all events coming from your website are displayed.
Events appear in the Ads Manager within a few minutes after being sent, so you can monitor them almost in real time.
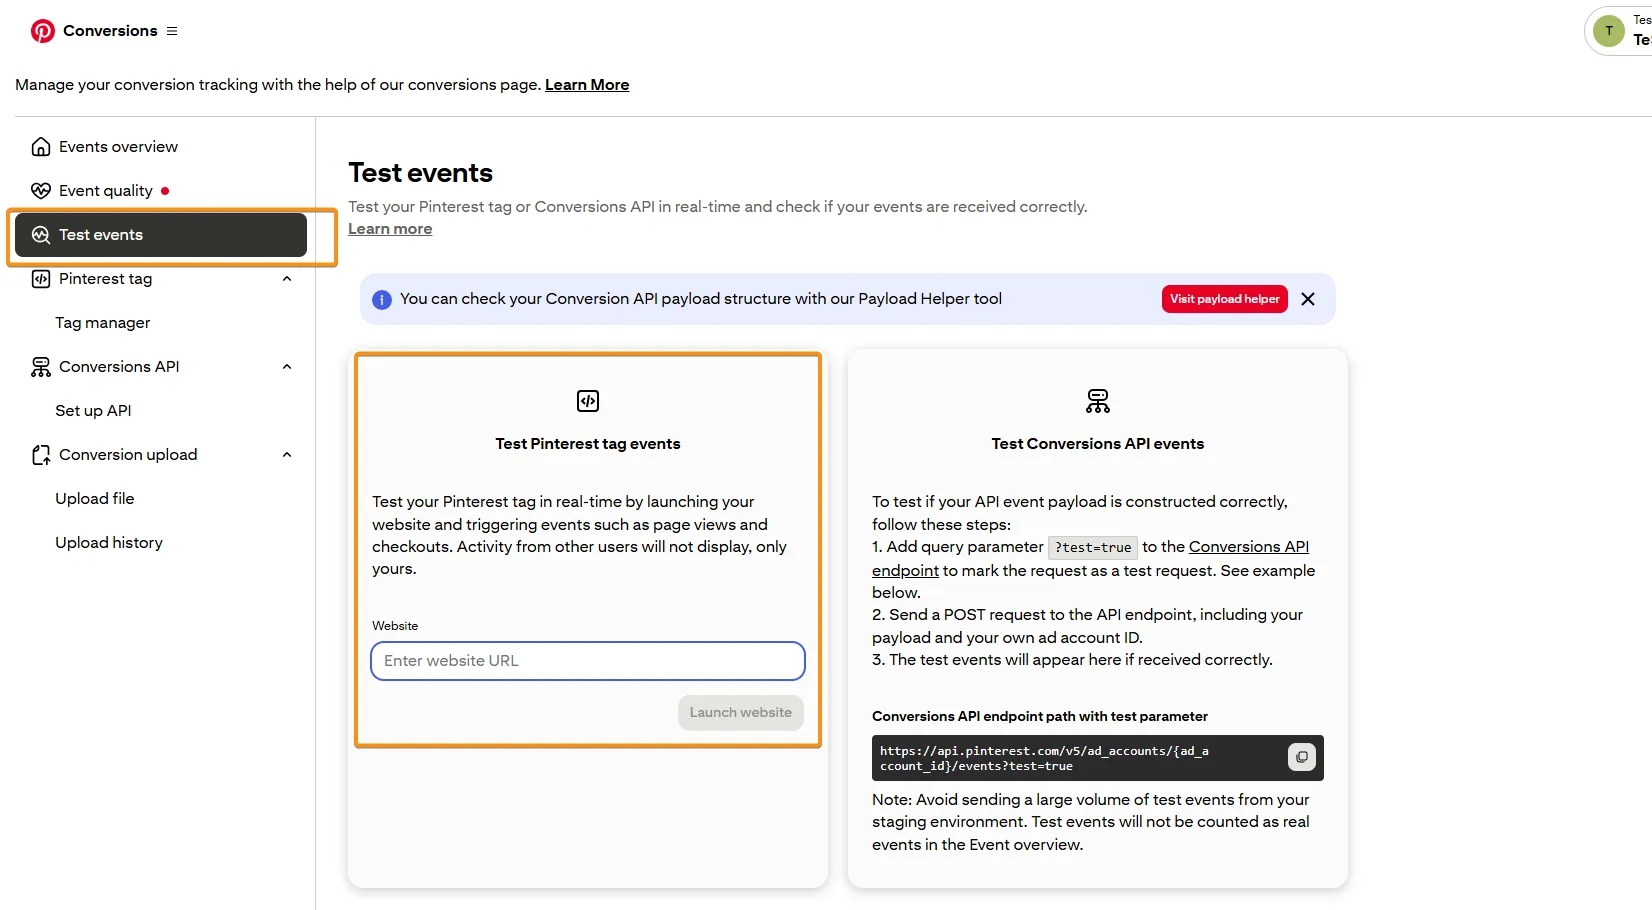
Additionally, you can test events using the built-in Test Events feature, but usually the extension (Pinterest Tag Helper) is sufficient.
Summary
As a result, we have a complete Pinterest Tag setup via GTM — from installing the base code to sending eCommerce events.
Now, I hope it will be easier for you to configure event transmission to Pinterest on your own, and that this process will no longer cause difficulties.
Loading comments…