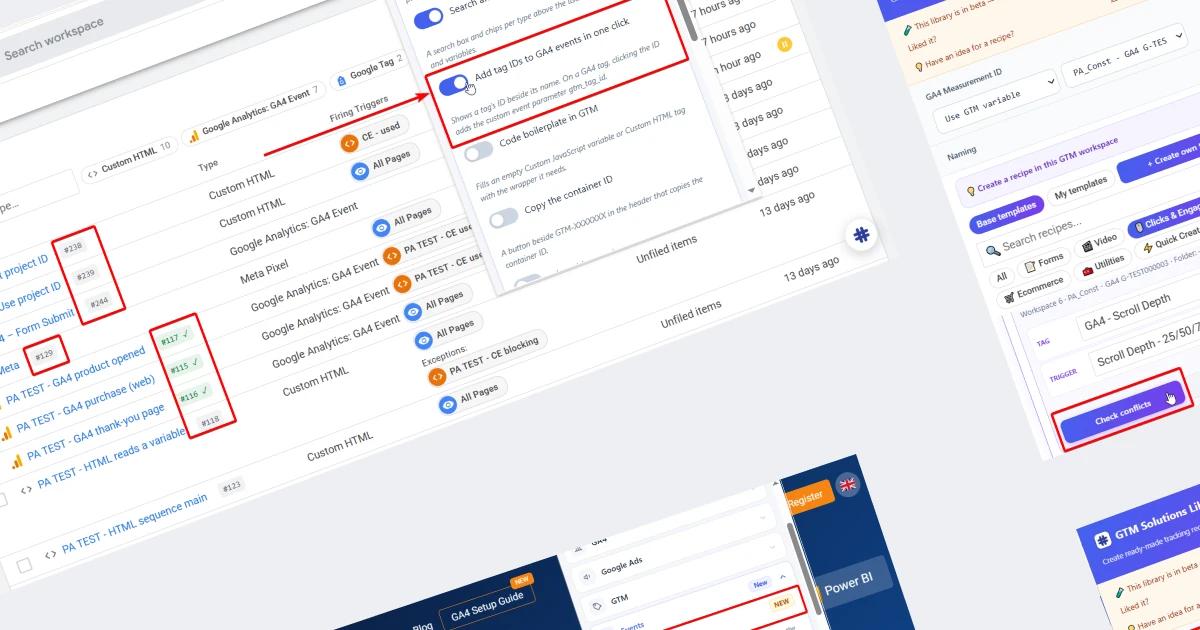

Google Tag Manager has been a mature, stable tool for a long time. Over the years its core features have been refined, and it handles most standard tracking setup and management tasks with ease.
But that doesn't mean there's nothing left to optimize in your GTM workflow. Quite the opposite: when you work with it every day, you pick up plenty of small techniques that help you set up tags faster, debug problems more easily, keep your containers organized, and spend less time on routine tasks.
That's why in this article I've put together 19 practical Google Tag Manager tips that can make your daily work a bit faster, more convenient, and even somewhat more enjoyable.
- How to jump from an open website to the right GTM container
- How to open a variable directly from a tag, trigger, or another variable
- How to create many Data Layer variables at once
- How to quickly track successful submissions of various forms and other popular actions on a website
- How to save your own GTM setup for the next project
- How to normalize a variable's value to a single format without code
- How to fire a tag only after several conditions are met
- How to combine multiple conditions in a single trigger condition
- How to check whether a CSS selector covers the entire button
- How to quickly see which GA4 events are configured in a container
- How to find out which tag sent a specific GA4 event
- How to guarantee that one tag fires before another
- How to see which website interactions are tracked through GTM and which events are sent
- How to quickly find the tag or variable you need in Preview
- How to instantly spot tags with errors in GTM Preview
- How to quickly find unused tags, triggers, and variables
- How to track JavaScript errors with GTM
- How to verify that events are passed correctly to GA4, Meta, TikTok, and Google Ads without missing anything
- How to avoid forgetting, six months from now, why a particular tag, trigger, or variable was set up
How to jump from an open website to the right GTM container
Let's start with a mini-tip that will save you hours down the line. Every time we need to open the GTM container for a specific website, we do the same thing: open the GTM page, click the search bar, type in the site, and hope the container has a sensible name. Forget all that. Use the quick launcher in the free PROANALYTICS extension. With this feature, you can jump straight from an open website to its associated GTM container or GA4 property. There's no need to search for it separately across all your accounts and cross-check IDs. Just see how easy it is:
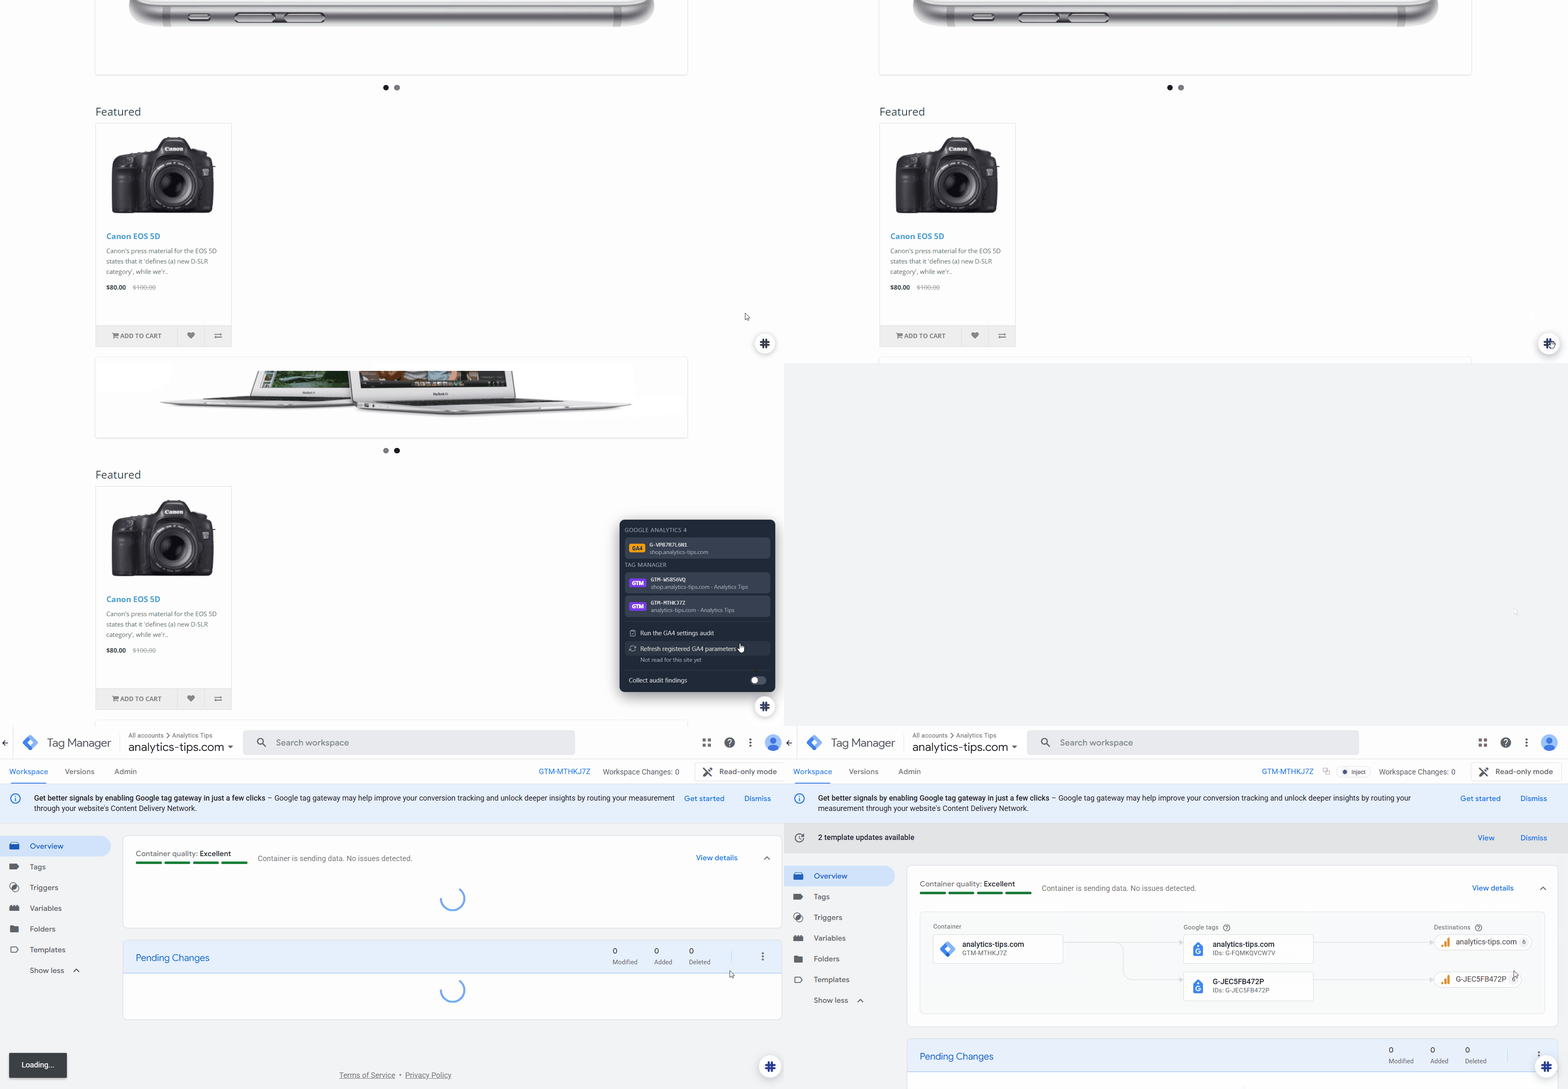
To get this button on all your websites, you only need to do the following once:
- Turn on the Quick launcher for GA4 and GTM feature in the New features block of the extension.

- Then click Refresh the list of properties and containers.
Note that at this point, GA4 and GTM will automatically open in adjacent tabs for a short while so the extension can build a directory of your available properties and containers. And yes, this works for GA4 too.
That's it. Now, on every website where you have access to GA4 or GTM, you'll see a quick-access button (the one with the hash sign).
When you're given access to a new project, just click Refresh the list of properties and containers again to update the directory of properties and containers.
How to open a variable directly from a tag, trigger, or another variable
This next tip will save you hours, too. Think of a situation where you see a variable in the settings of a tag, trigger, or another variable and need to quickly check its configuration. Normally, you'd go through these steps: close the tag > go to the Variables section > find the variable > open it.
Skip the extra steps. With the PROANALYTICS extension, you can simply click the pencil icon next to the variable and see its settings right away.
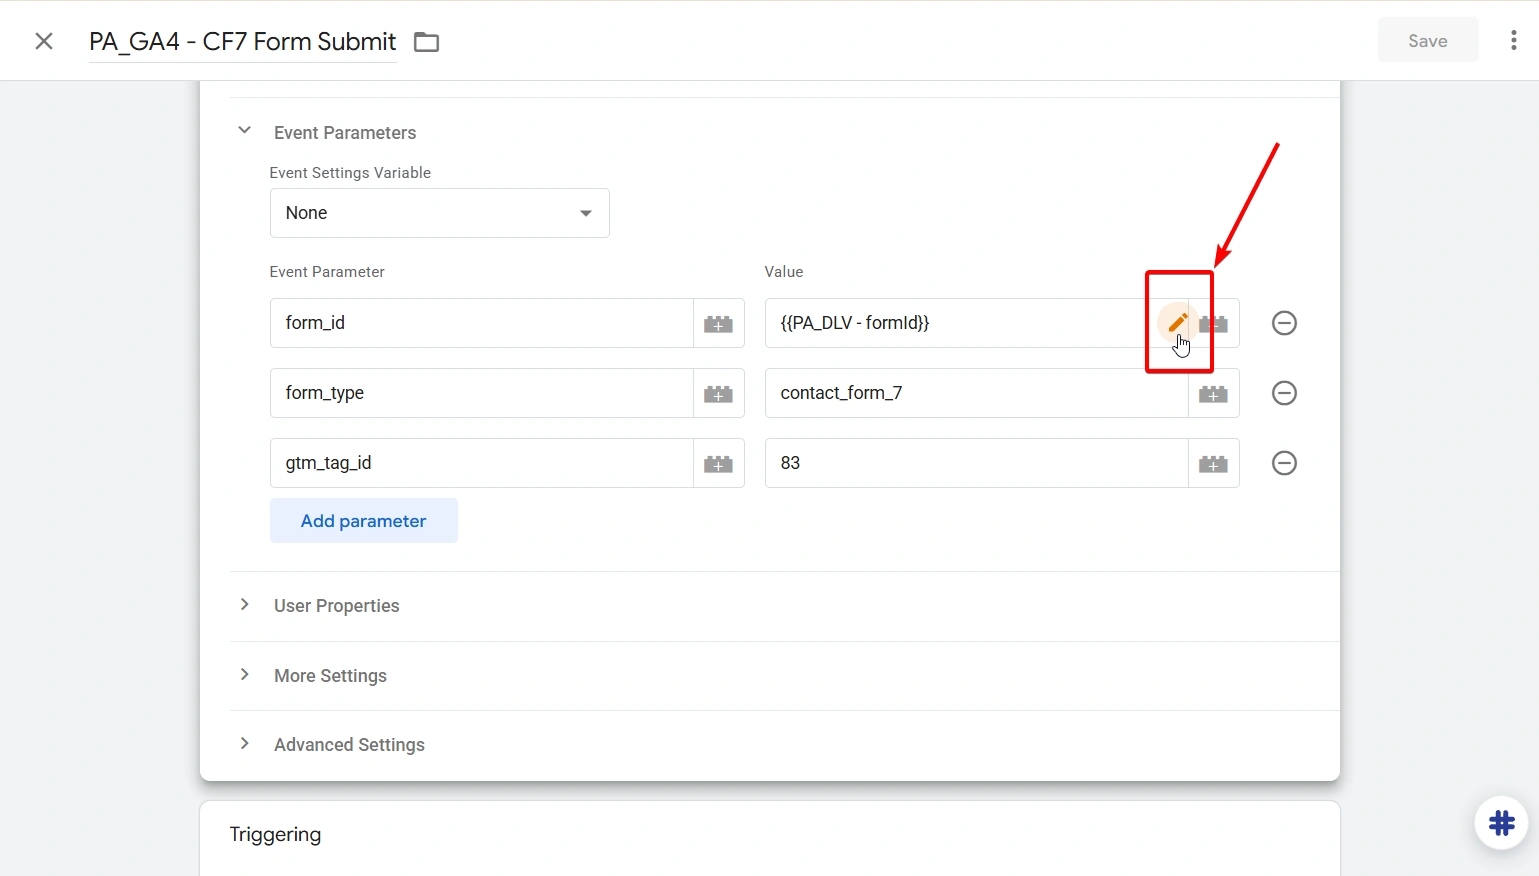
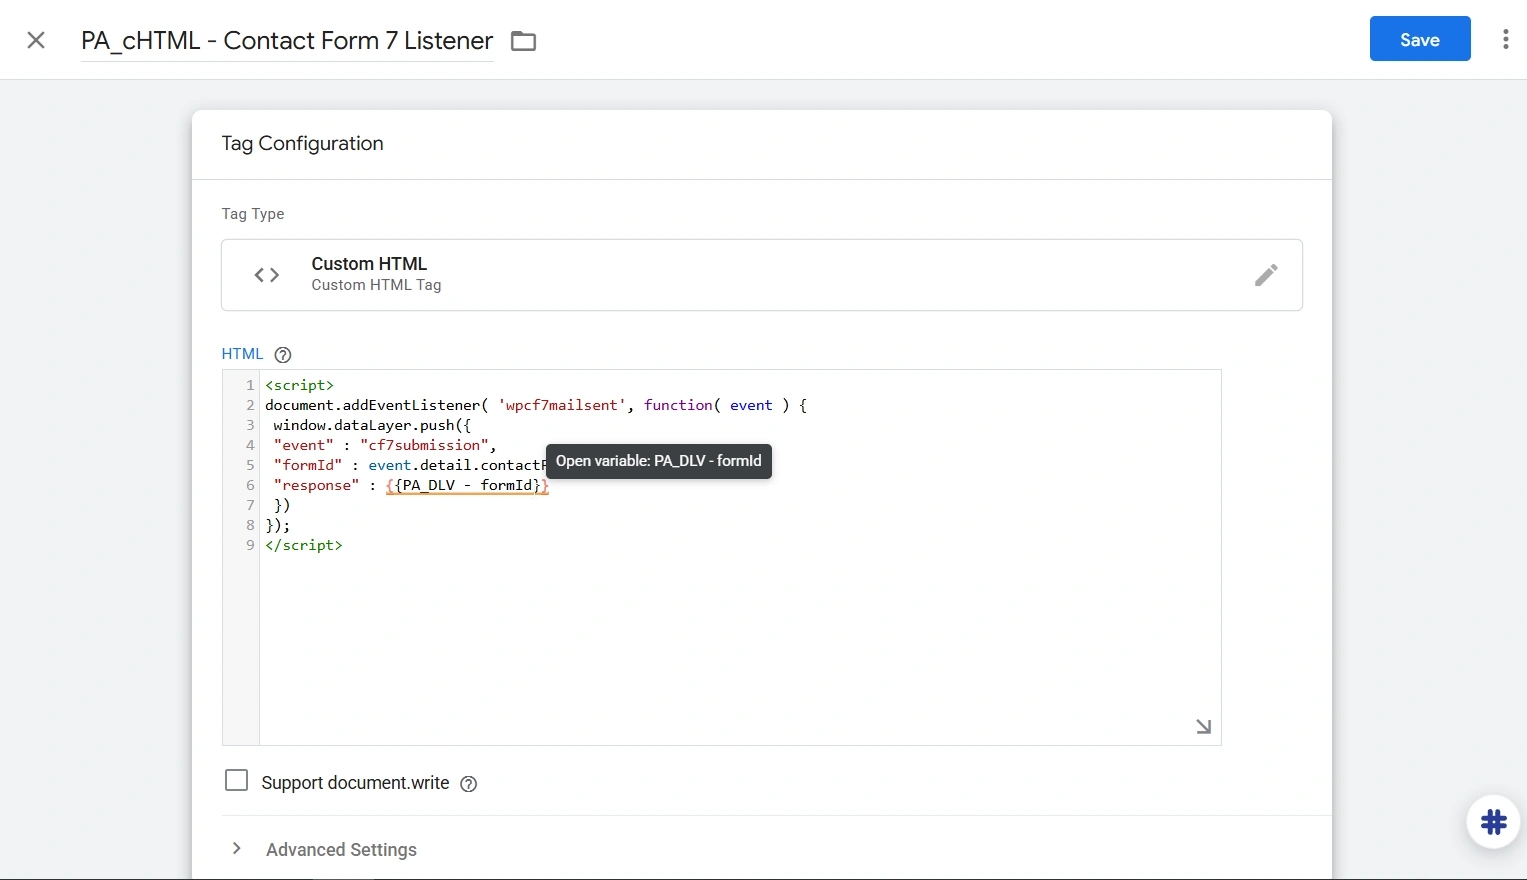
This also works for references to GTM variables in the code of a Custom JavaScript variable or a Custom HTML tag. Click the variable you need, and it opens in a new tab.
How to create many Data Layer variables at once
Let's keep speeding up your work in GTM. Say a developer has sent us a list of dataLayer keys, such as user_id, form_id, and action_type. For each of them, you'd normally have to open Variables, create a Data Layer Variable, and enter the key and a name.
With the PROANALYTICS extension, however, you can add these keys as a list and prepare the corresponding variables in practically one click.
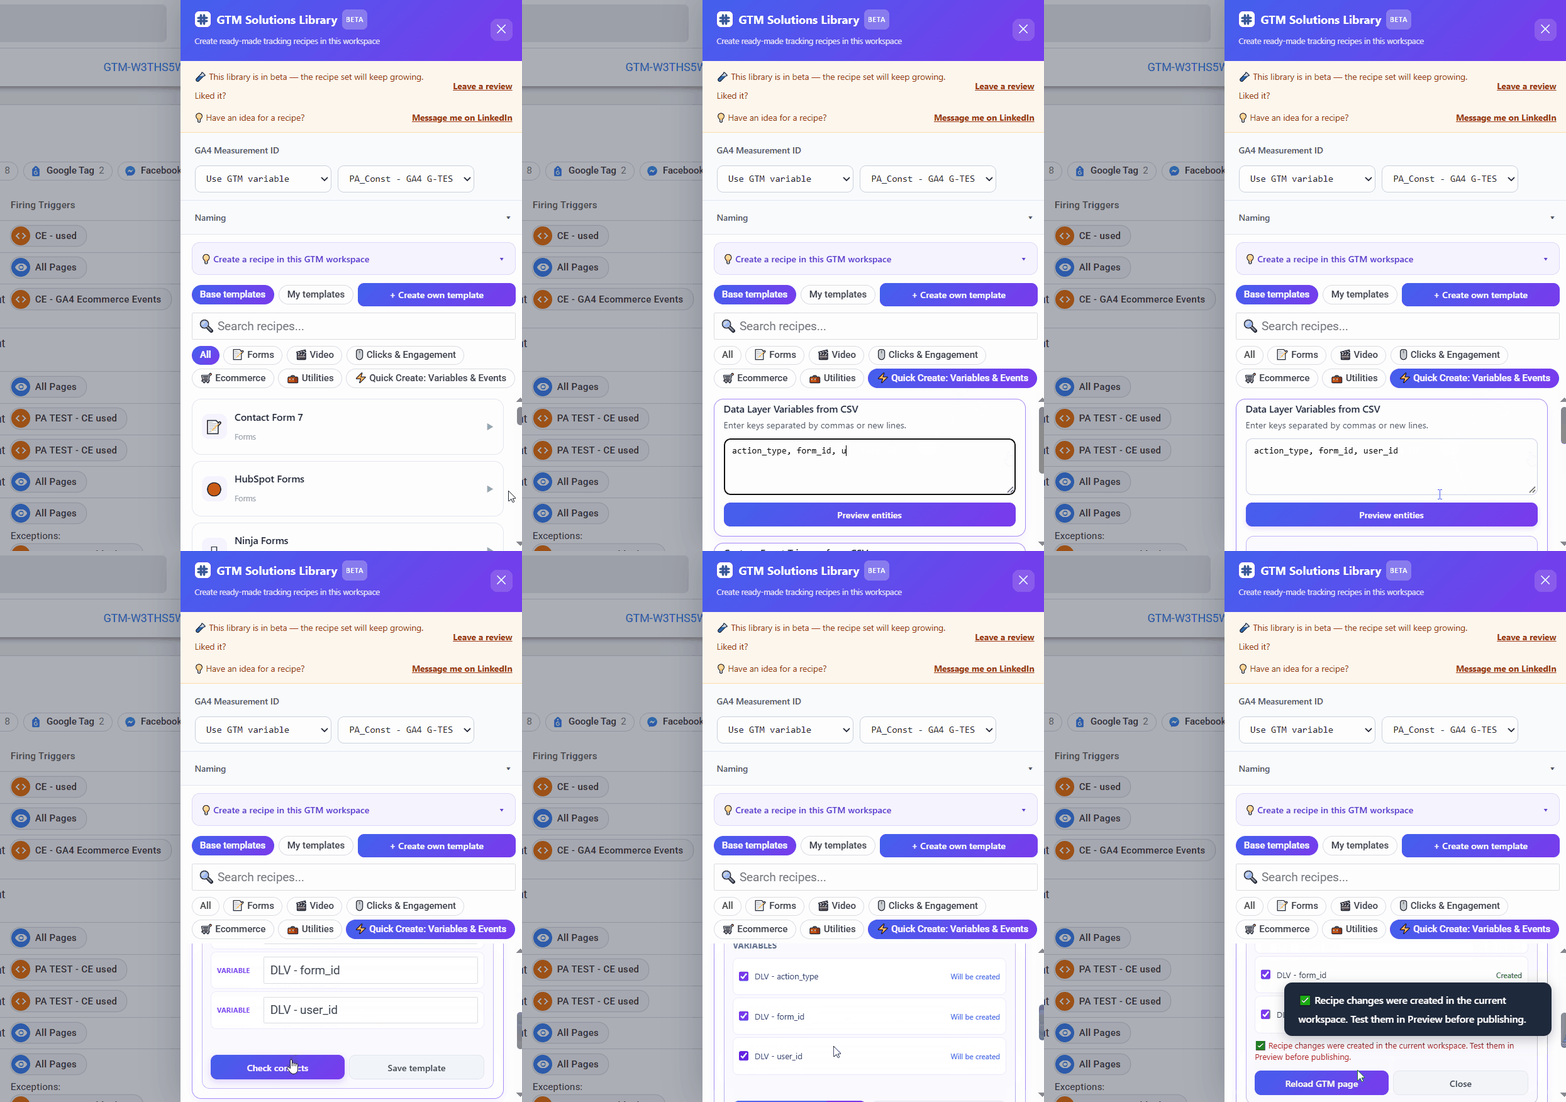
Before creating anything, the extension also checks for conflicts, so you don't accidentally create variables that already exist in the container. And don't forget to reload the page after creating them.
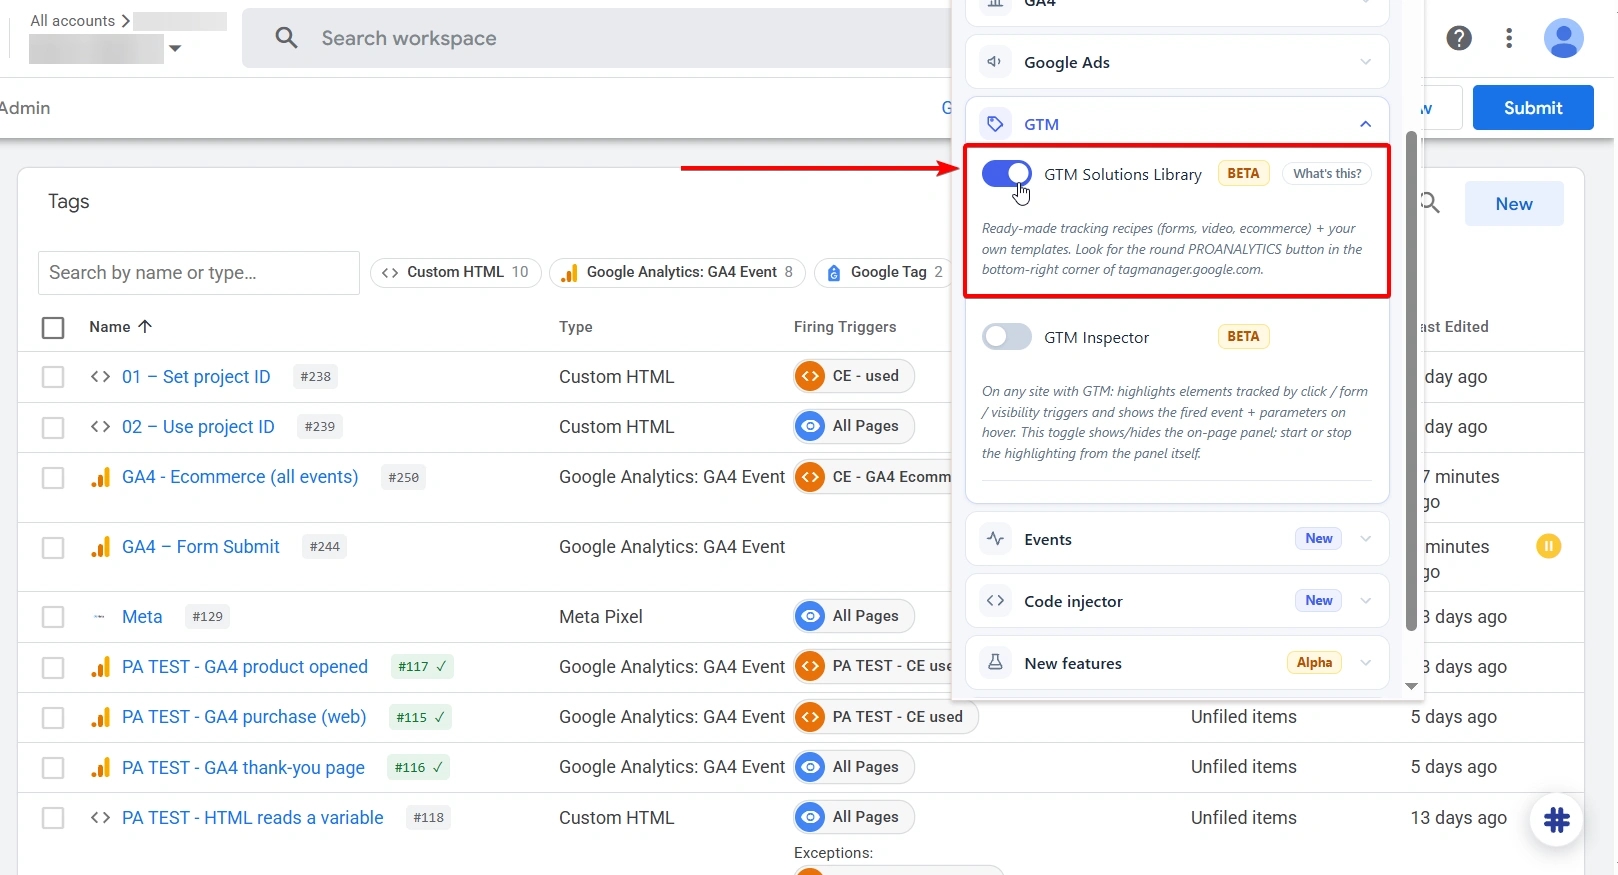
To activate the library, enable the checkbox for GTM Solutions Library in the GTM block of the extension.
How to quickly track successful submissions of various forms and other popular actions on a website
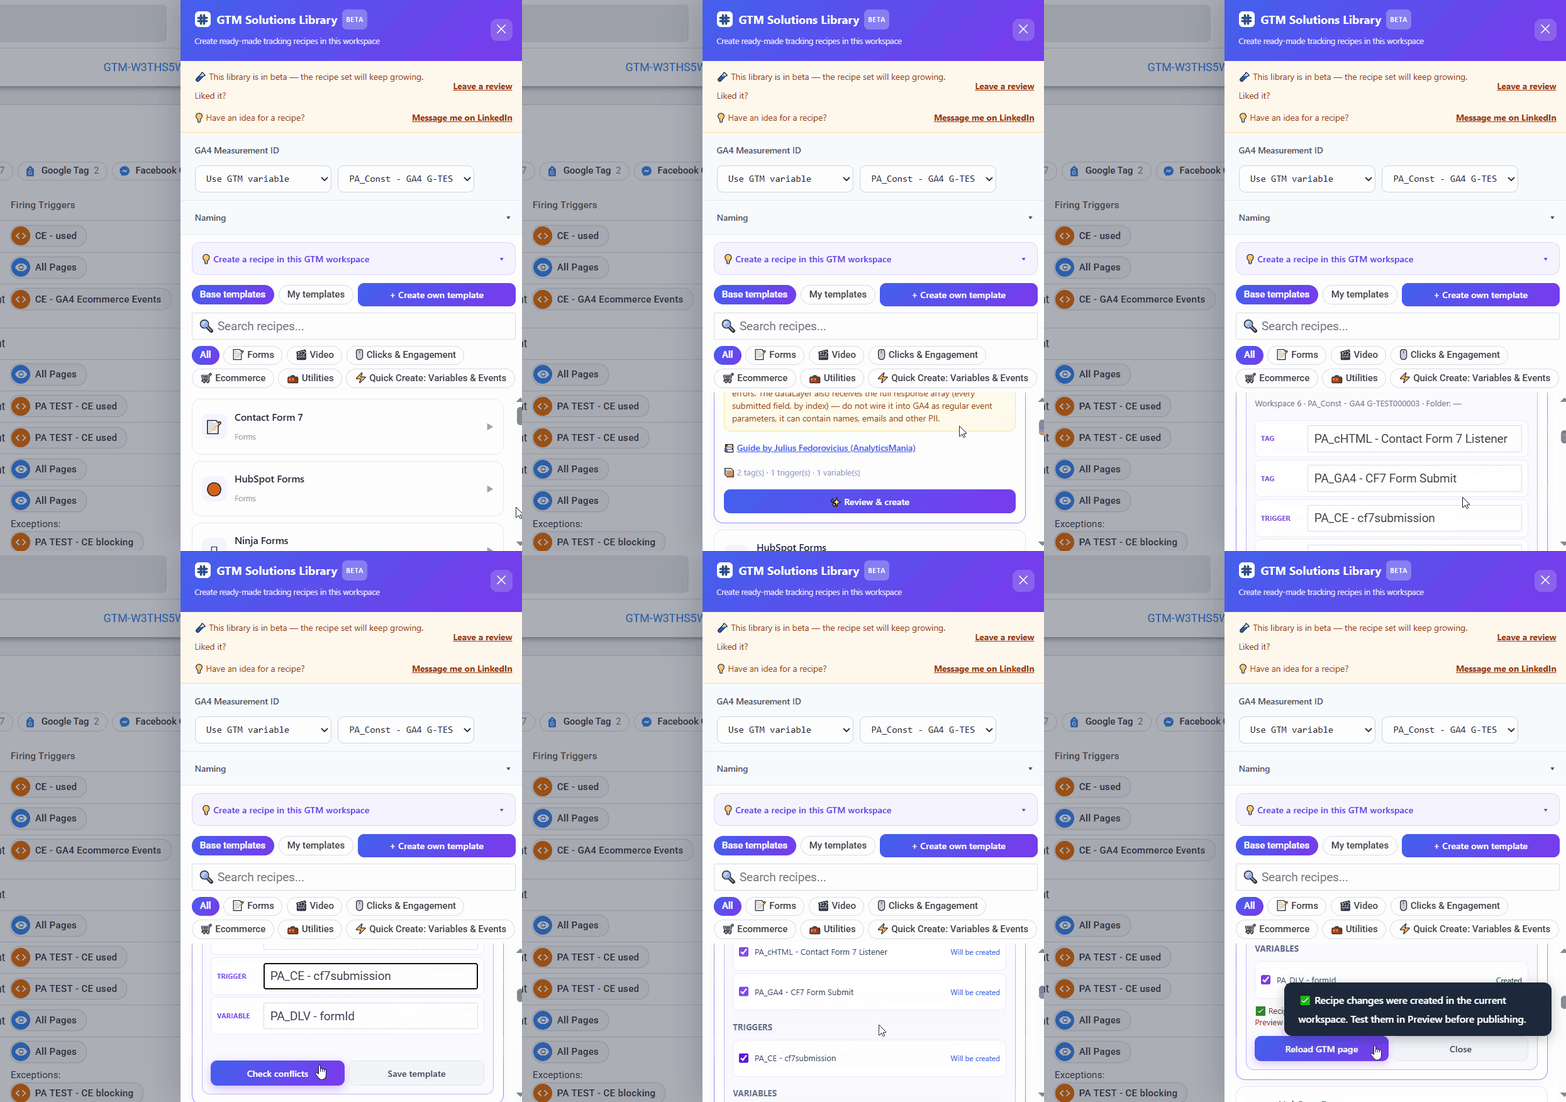
Setting up tracking for a popular form, such as HubSpot, Calendly, or WordPress forms like Contact Form 7, often starts with the same set of tags, triggers, and variables. In the PROANALYTICS extension`s library, you can pick a ready-made solution and add it to your container in a couple of clicks. Here's what it looks like:
The library currently includes 15 templates for common tasks: form and video tracking, clicks and interactions, ecommerce, and other scenarios. You can find a solution using search or filter by category.
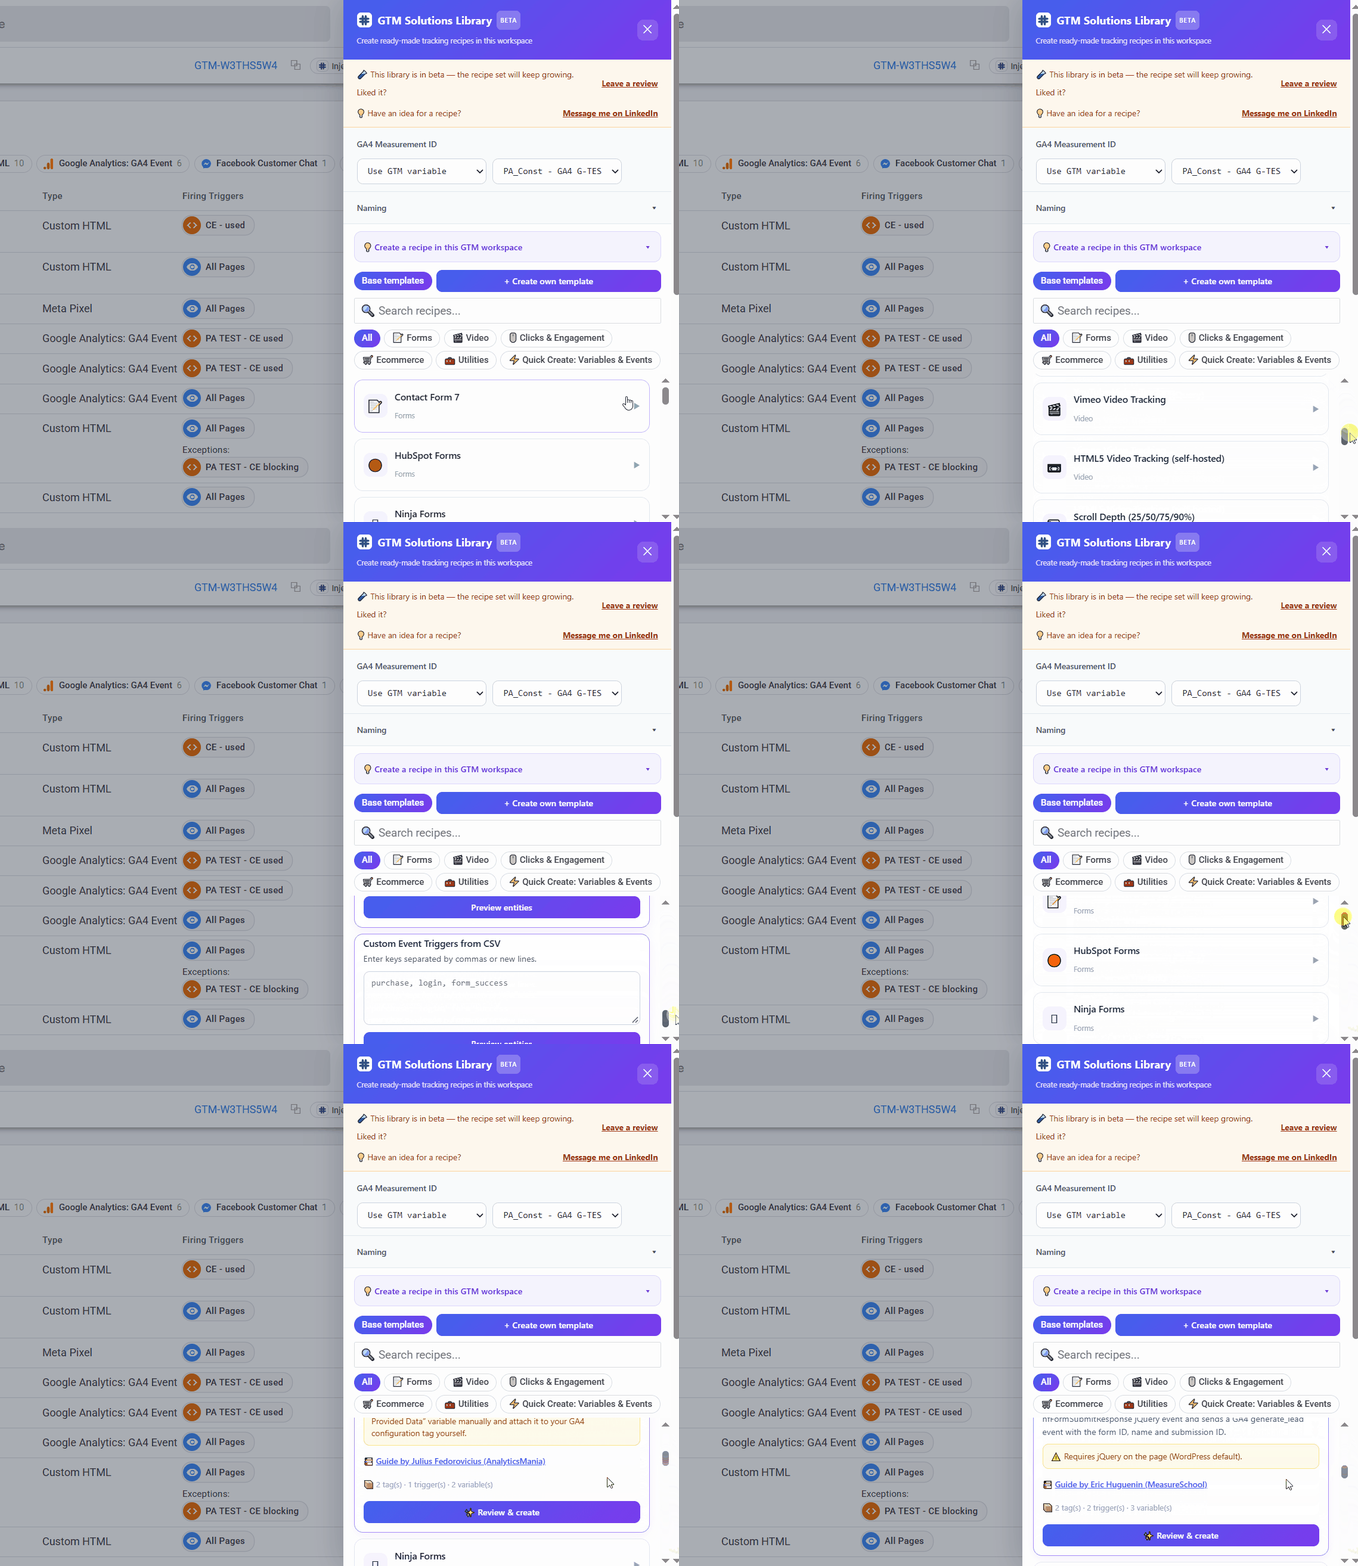
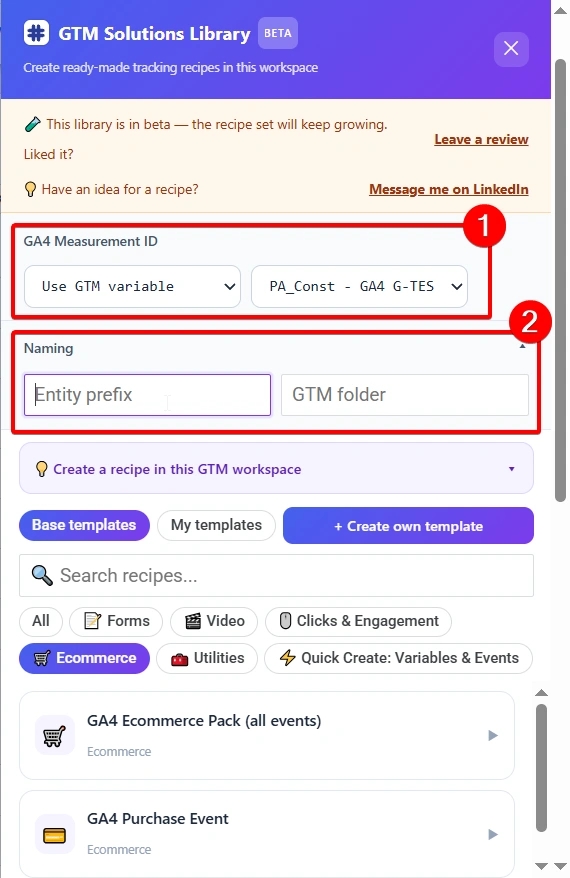
Before choosing a ready-made solution, you can set a few basic options right away.
- In the GA4 Measurement ID field, enter the ID of your GA4 data stream or select a GTM variable that already stores it.
When you add a ready-made solution, the library also checks the entities already in your container and can reuse what's already set up instead of creating duplicates.
- Below, in the Naming block, you can set an Entity prefix, a prefix for the names of the entities the library will create, as well as a GTM folder to put them in. This is especially handy if your container already follows its own naming convention or you want to keep the new entities in a separate folder from the start.
After you select a solution, the extension shows which tags, triggers, and variables are included in the template. Before creating anything, the library also checks your container for conflicts: it shows which entities already exist and can be reused, and which need to be created.
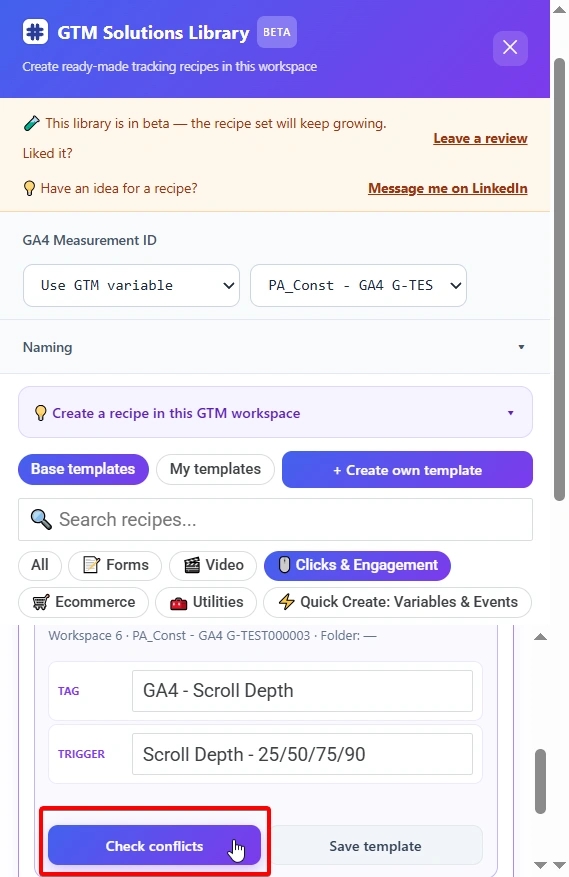
After adding a template, don't forget to reload the page.
How to save your own GTM setup for the next project
How many times have you realized you've already built a similar setup in another container and now need to recreate it? This tip is about how to save your setup as your own template. In the GTM Solutions Library in the PROANALYTICS extension, you can save the tags, triggers, and variables you need as a custom template and then reuse it in other containers. You can select just the tags you need, and PROANALYTICS will automatically suggest adding the triggers and variables associated with them.
To do this, go to Create own template, enter a name for the template, and select the entities you need.
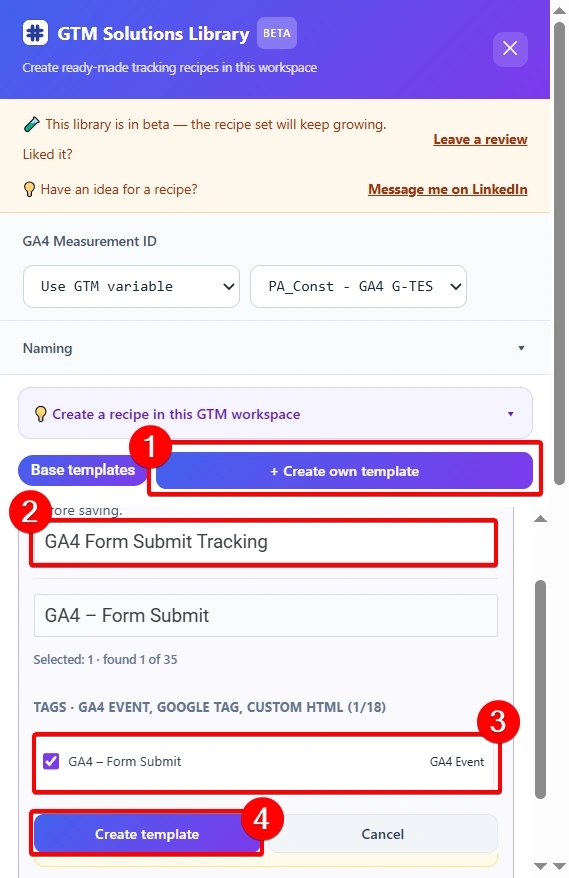
The finished template is saved in the My templates tab.
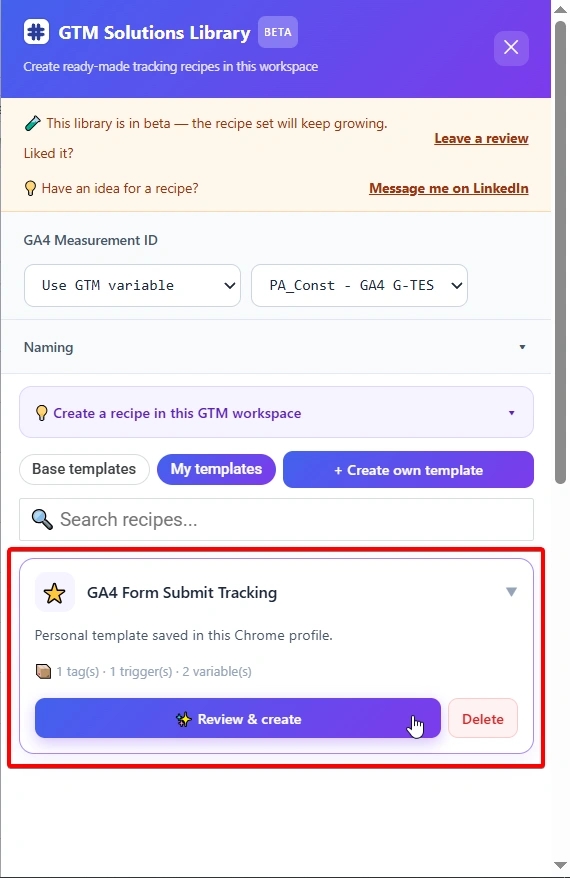
When you need the same setup in another GTM container, open your saved template, enter the values for the new project, such as the GA4 Measurement ID, and just click the create button.
How to normalize a variable's value to a single format without code
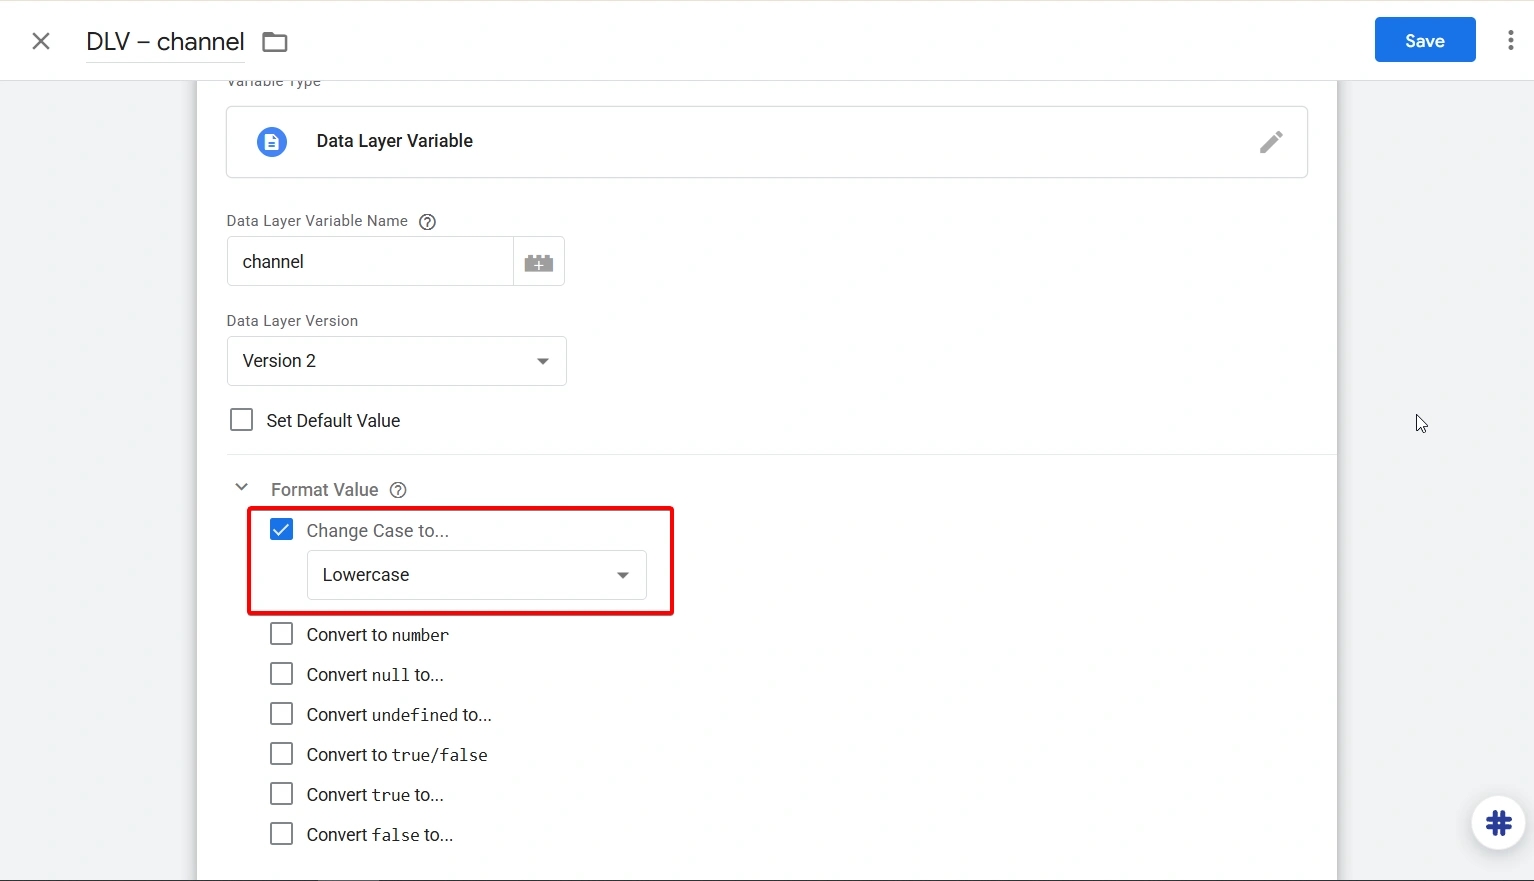
Of course, not all of these tips require installing an extension. I also know some useful features in the native interface that many people forget about or overlook. A classic example is data formatting, that is, converting a value to a consistent format. I often see people use a Custom JavaScript variable and write their own code for this in GTM, but it's much faster to use the native block available in all variables: Format Value.
- Open the variable that captures the value you need, such as a Data Layer Variable, and expand Format Value at the bottom of its settings.
- Select the transformation you need, for example, Change Case to → lowercase.
How to fire a tag only after several conditions are met
Sometimes a single trigger isn't enough. For example, you want to send an event only when a person has scrolled at least 50% of the page and stayed on it for at least 30 seconds (that is, send the event only when both conditions are met).
- To set up conditions like this, create separate triggers for each of these actions.
- Then combine them using a Trigger Group trigger.
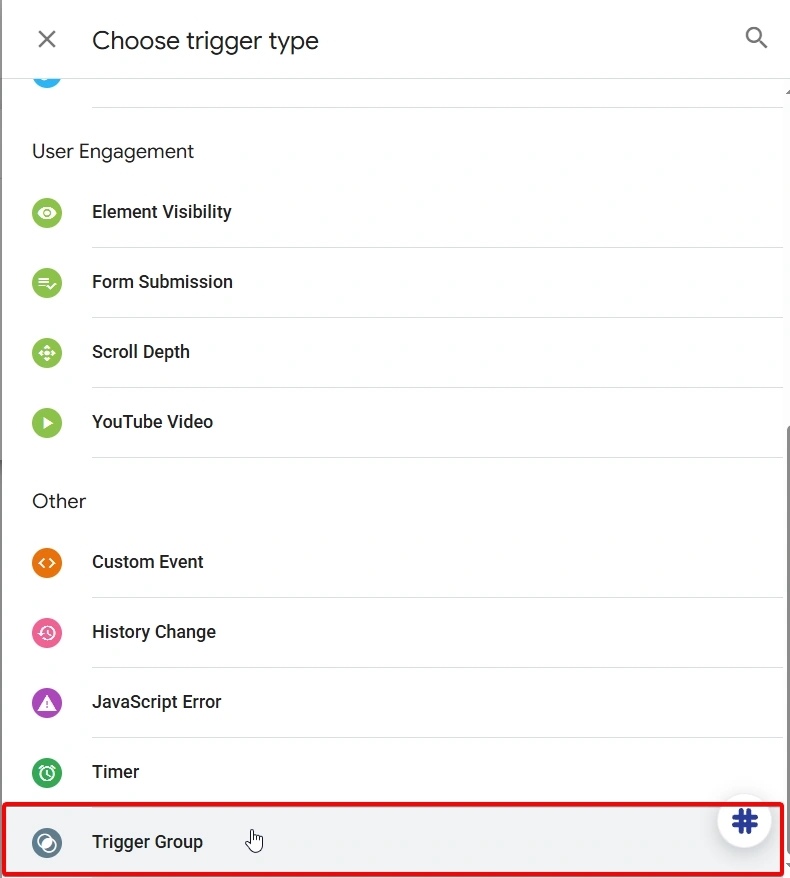
- Add the triggers you created to the group.
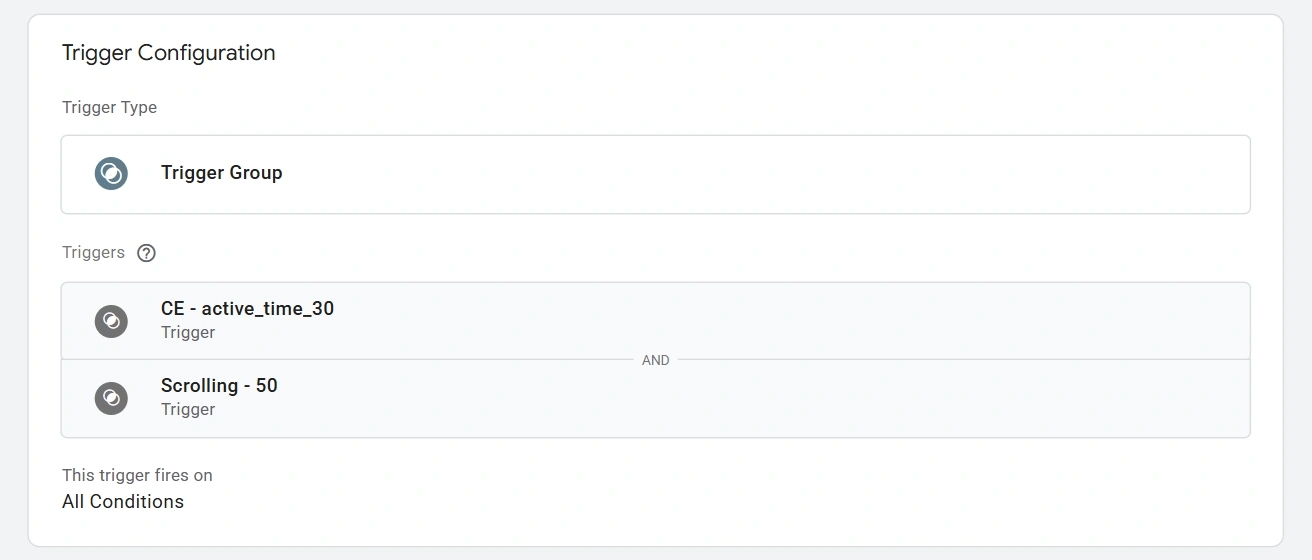
- Assign the group to the tag you need. Now GTM will send the event only if all the conditions in the group are met.
Keep in mind that the Trigger Group trigger doesn't check the order of actions. The tag fires as soon as both triggers have fired at least once.
How to combine multiple conditions in a single trigger condition
I realize this heading sounds a bit odd, but we're here for tips and tricks, so let me explain. Imagine you need a tag to fire on pages whose path begins with /blog/ or /news/, but not across the entire site.
Instead of creating a separate trigger for each condition (for example, Page Path starts with /blog/, Page Path starts with /news/), you can use regular expressions. In the Page Path condition, use the matches RegEx (ignore case) operator with the expression ^/(blog|news)(/|$). It covers the sections you need and won't match a path where blog or news is only part of another word.
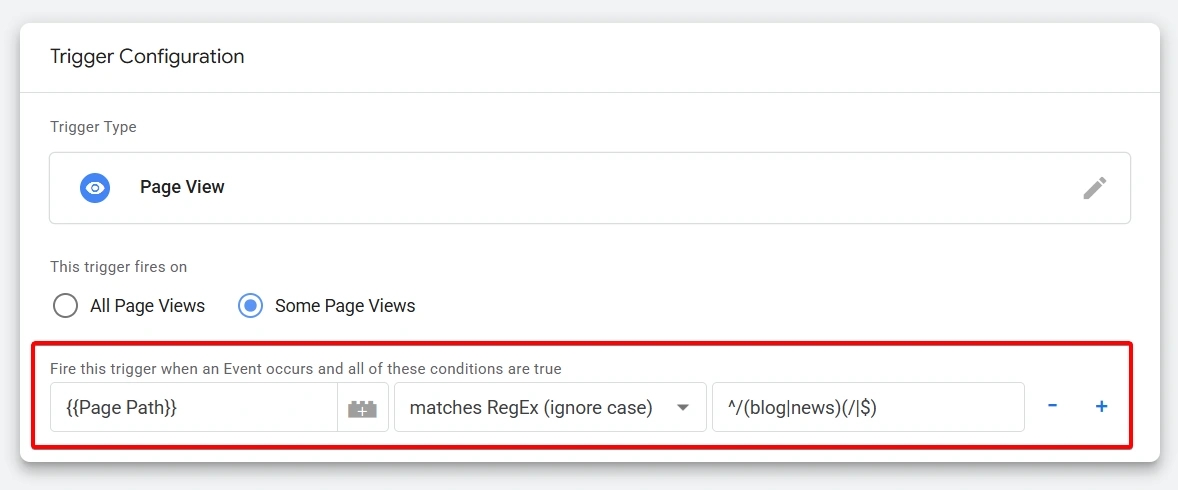
In the expression ^/(blog|news)(/|$):
- The characters
^/mean that the page path must begin with a slash. - The parentheses list the sections, separated by
|: blog or news. - If you need to add another one, such as shop, write (blog|news|shop).
- The last part,
(/|$), means that the section name must be followed by either a slash or the end of the path. So the condition will fire for/blog,/blog/, and/blog/article, but not for/blogger. - The ignore case operator makes the match case-insensitive.
As written, the trigger covers both the main section pages and all the pages within those sections. If you need only /blog and /news, without the articles inside those sections, use ^/(blog|news)/?$.
After setting it up, test the trigger in Preview: open a blog page, a news page, and a page from another section, such as /contact/. The tag should fire on the blog and news pages but not on /contact/. This confirms that a single rule covers the pages you need without firing the tag on the rest of the site.
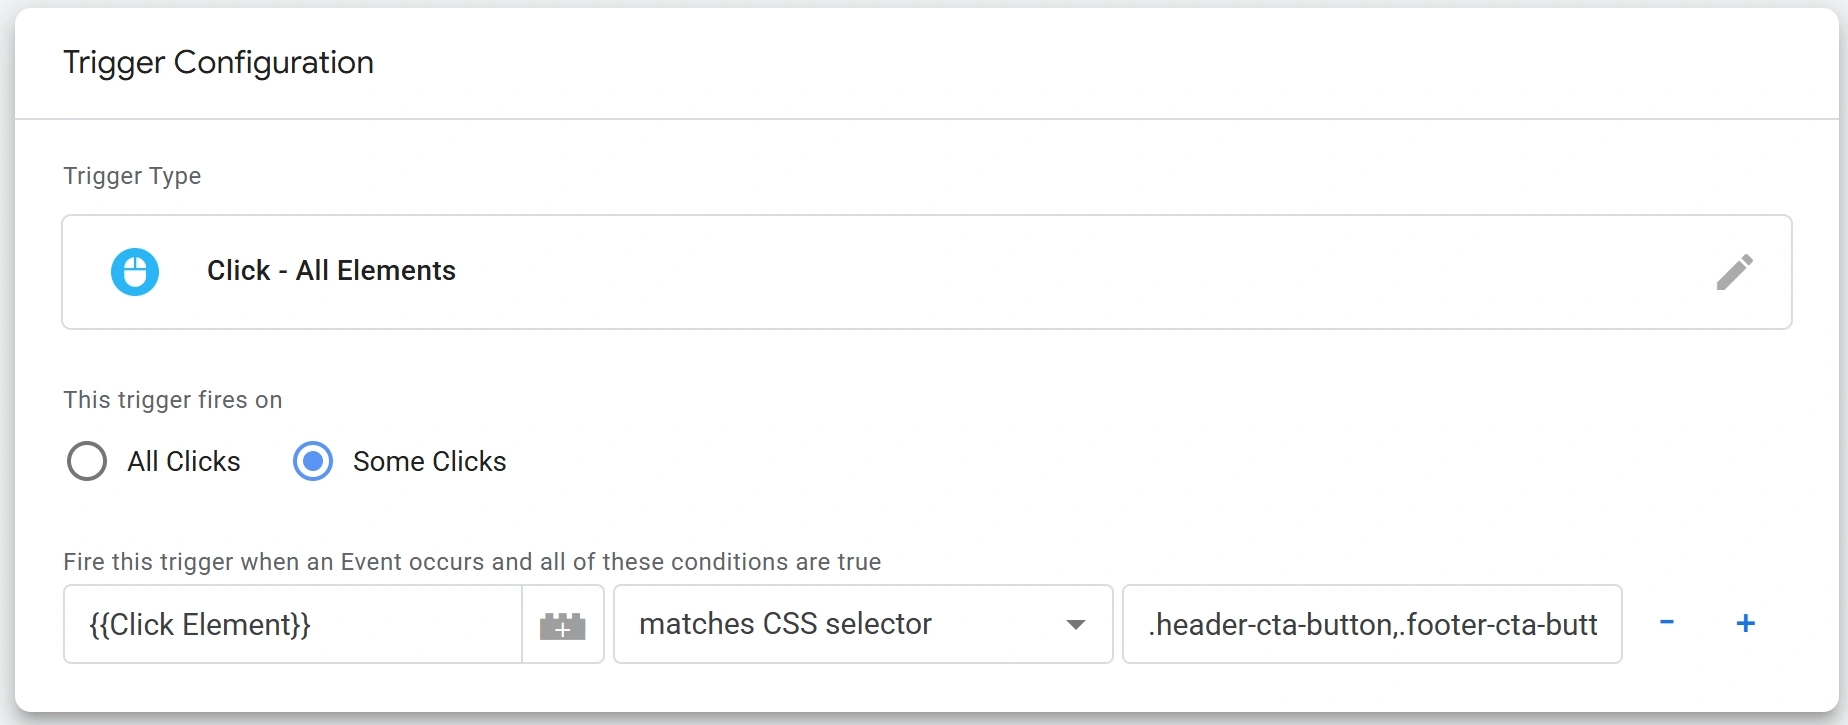
By the way, CSS selectors work in a similar way: if you want an event to be sent when someone clicks buttons with the selectors .header-cta-button and .footer-cta-button, for example, you don't need to create two separate triggers. Just list them in the trigger, separated by a comma:
How to check whether a CSS selector covers the entire button
Since we've started on the topic of CSS selectors, let's continue with it. At first glance, everything seems simple: you copy the button's selector, add it to the trigger condition, and you're done. But the button itself may consist of several nested elements, such as a container, text, and an icon.
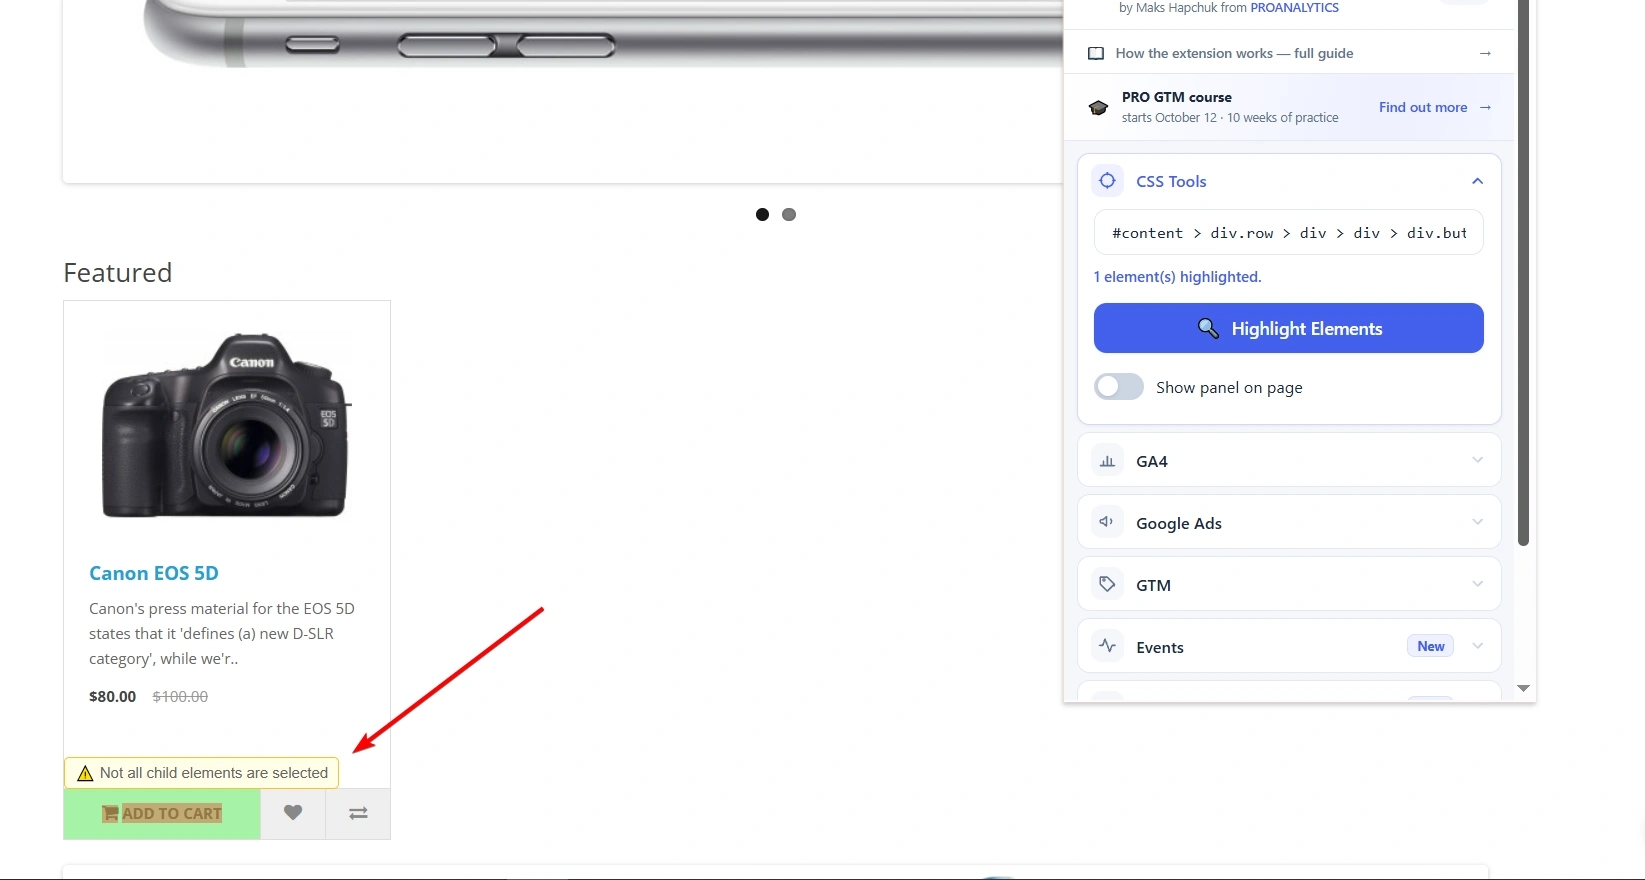
In that case, you may copy a selector that covers only part of the button. The event will then fire when someone clicks that specific part, while clicks elsewhere, such as on the icon, may not match the trigger condition. As a result, some clicks simply won't be tracked, and your analytics won't see them.
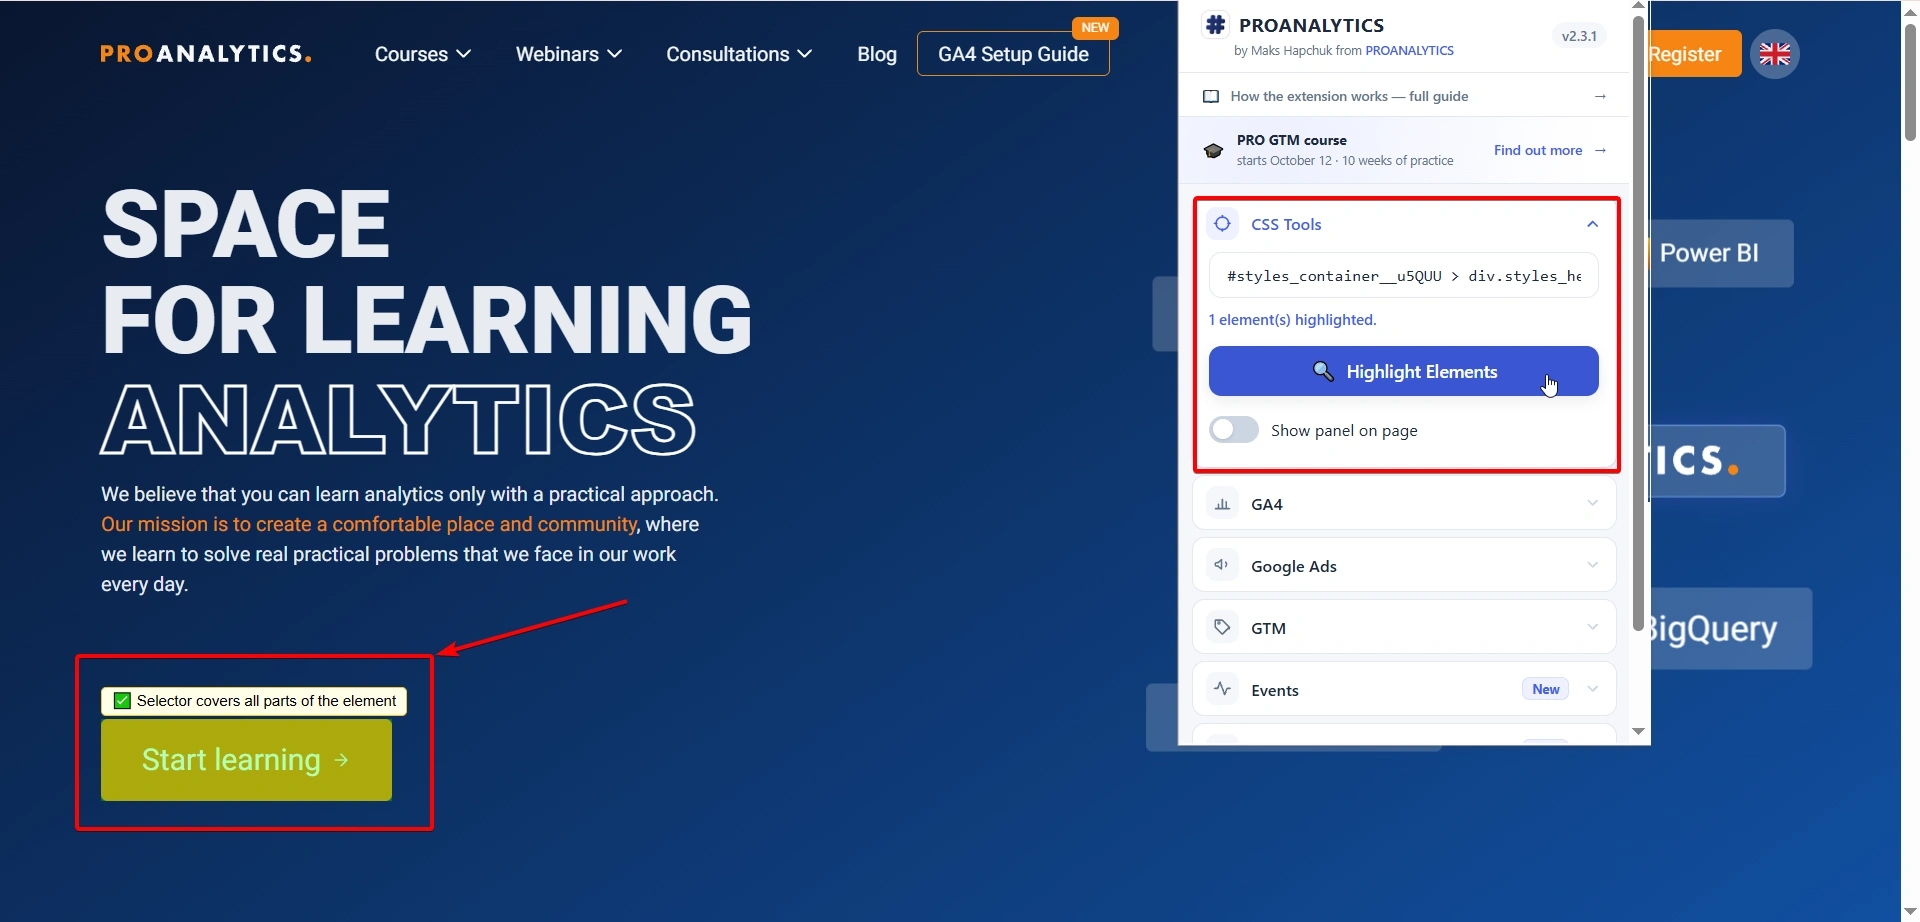
To check this quickly, use the CSS Tools feature in the PROANALYTICS extension: paste in the selector and click the element highlighting option. The tool will show exactly which part of the page the selector covers.
In the first screenshot below, everything is fine.
But here, the red area shows that a significant part of the button isn't covered:
How to quickly see which GA4 events are configured in a container
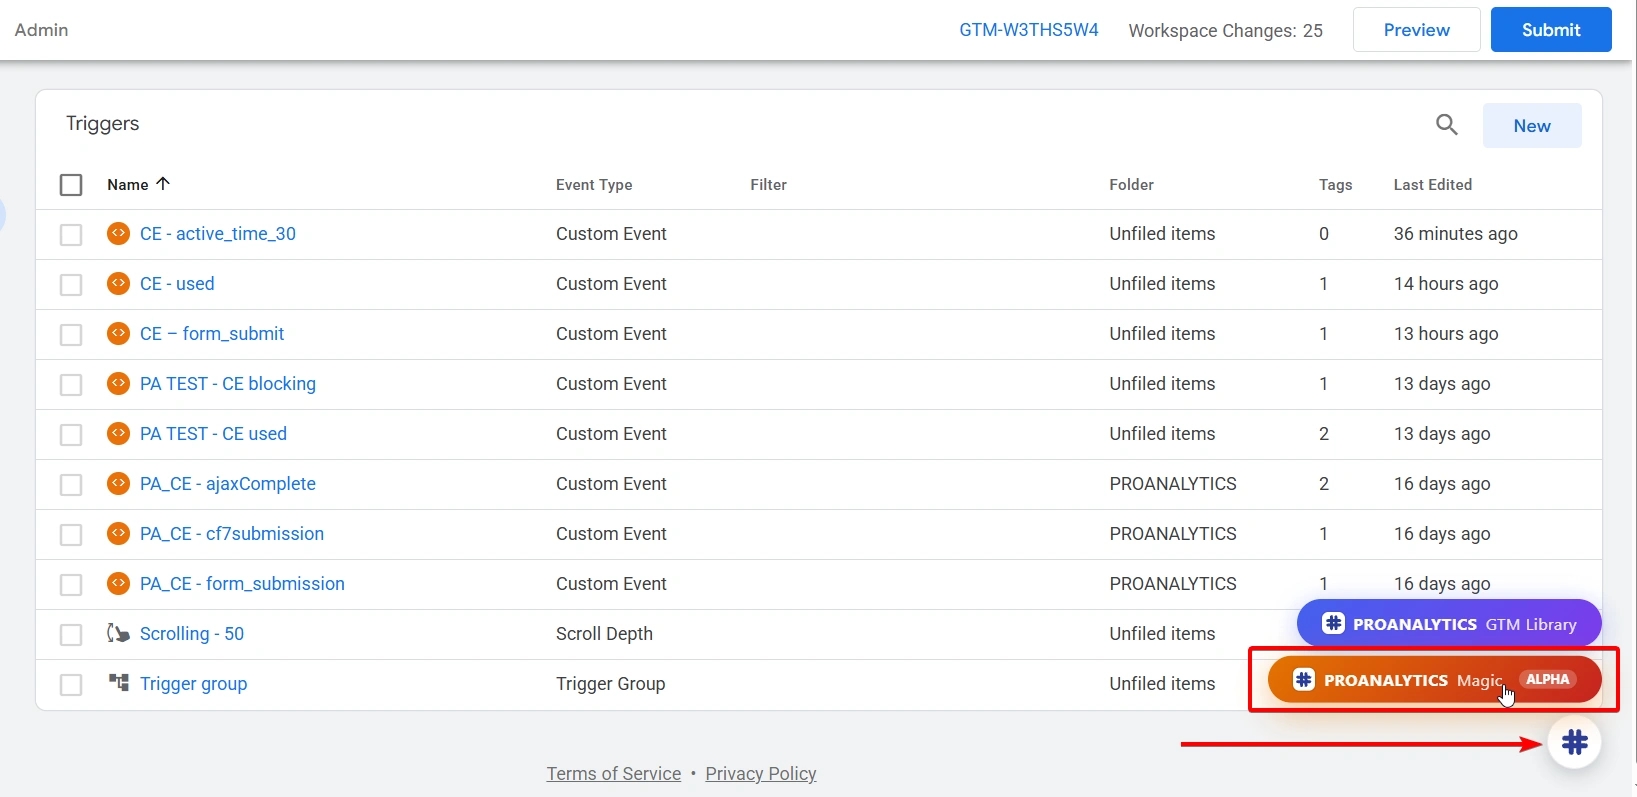
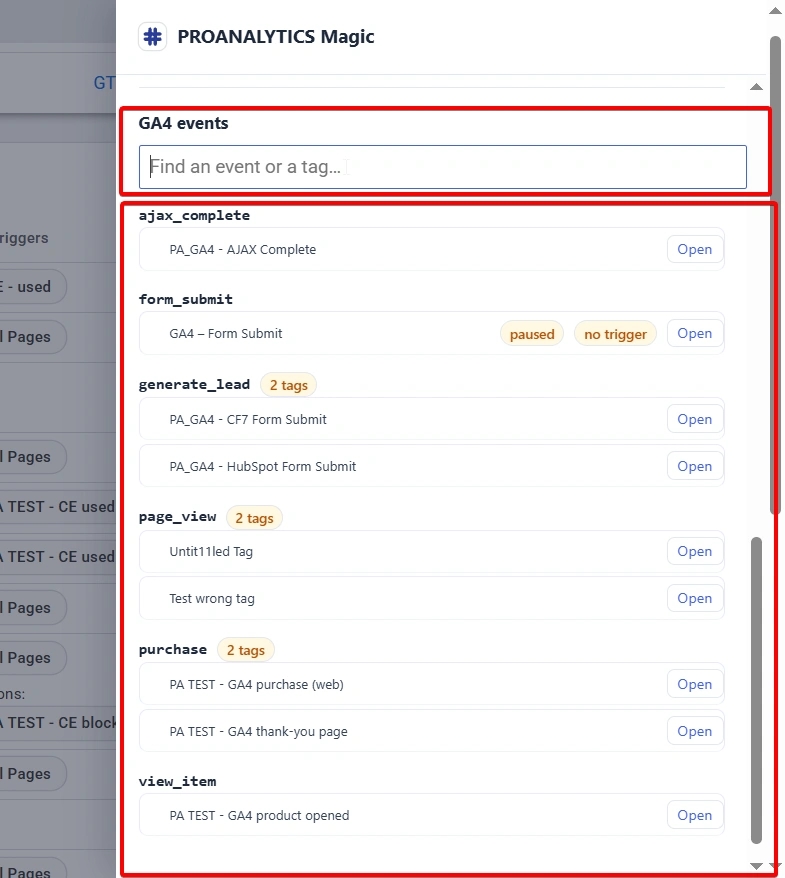
Tag names in a container don't always match the name of the event they send to GA4. If you need to quickly understand which GA4 events are configured in the container and which tags generate them, opening each tag one by one is inconvenient and slow. The PROANALYTICS Magic feature in the PROANALYTICS extension can help. Go to this feature and run a container scan.
Scroll down through the scan results.
- The extension will generate a list of events showing the tag or tags that send each one. If several tags send the same event name, that's immediately visible too. For example, in the screenshot, generate_lead, page_view, and purchase are each generated by two tags.
- At the top of the block there's a search field, Find an event or a tag, so you can quickly filter the list by either event name or tag name.
- The Open button takes you to a specific tag so you can check its settings.
How to find out which tag sent a specific GA4 event
If several tags generate the same GA4 event, the event name alone doesn't always tell you which setup to look at when troubleshooting. For situations like this, the community came up with a simple solution long ago: pass the tag ID in a separate custom GA4 parameter.
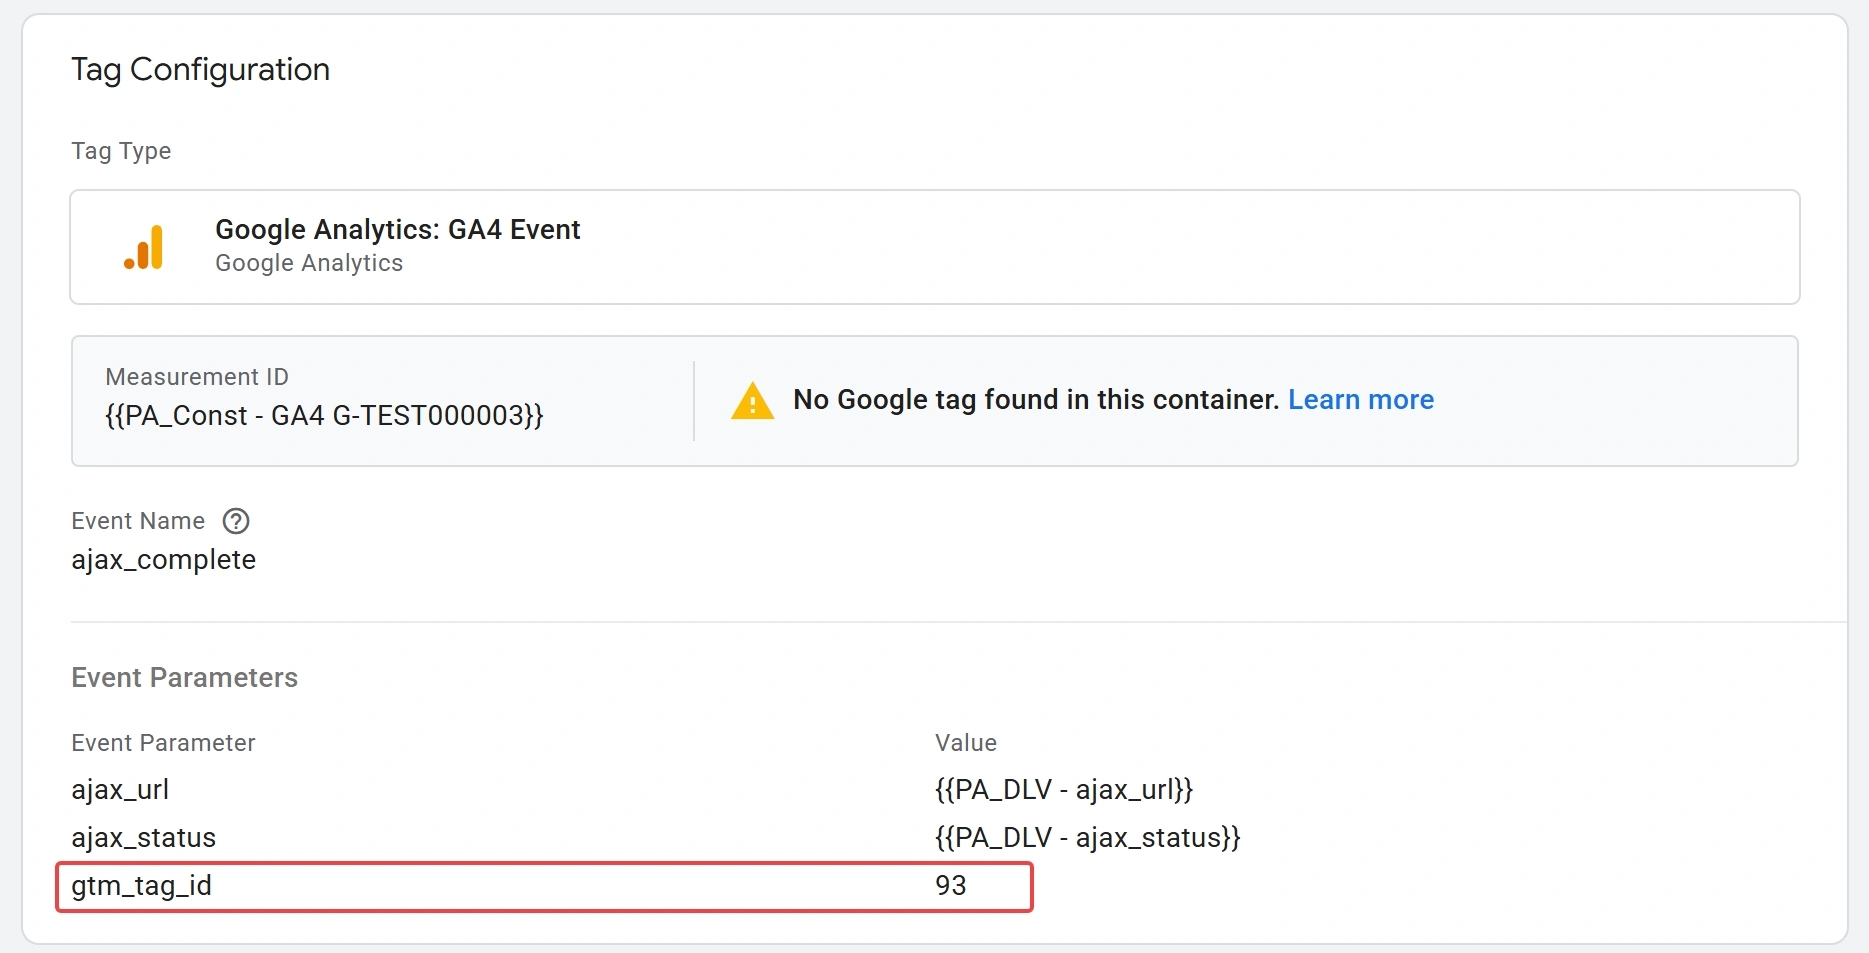
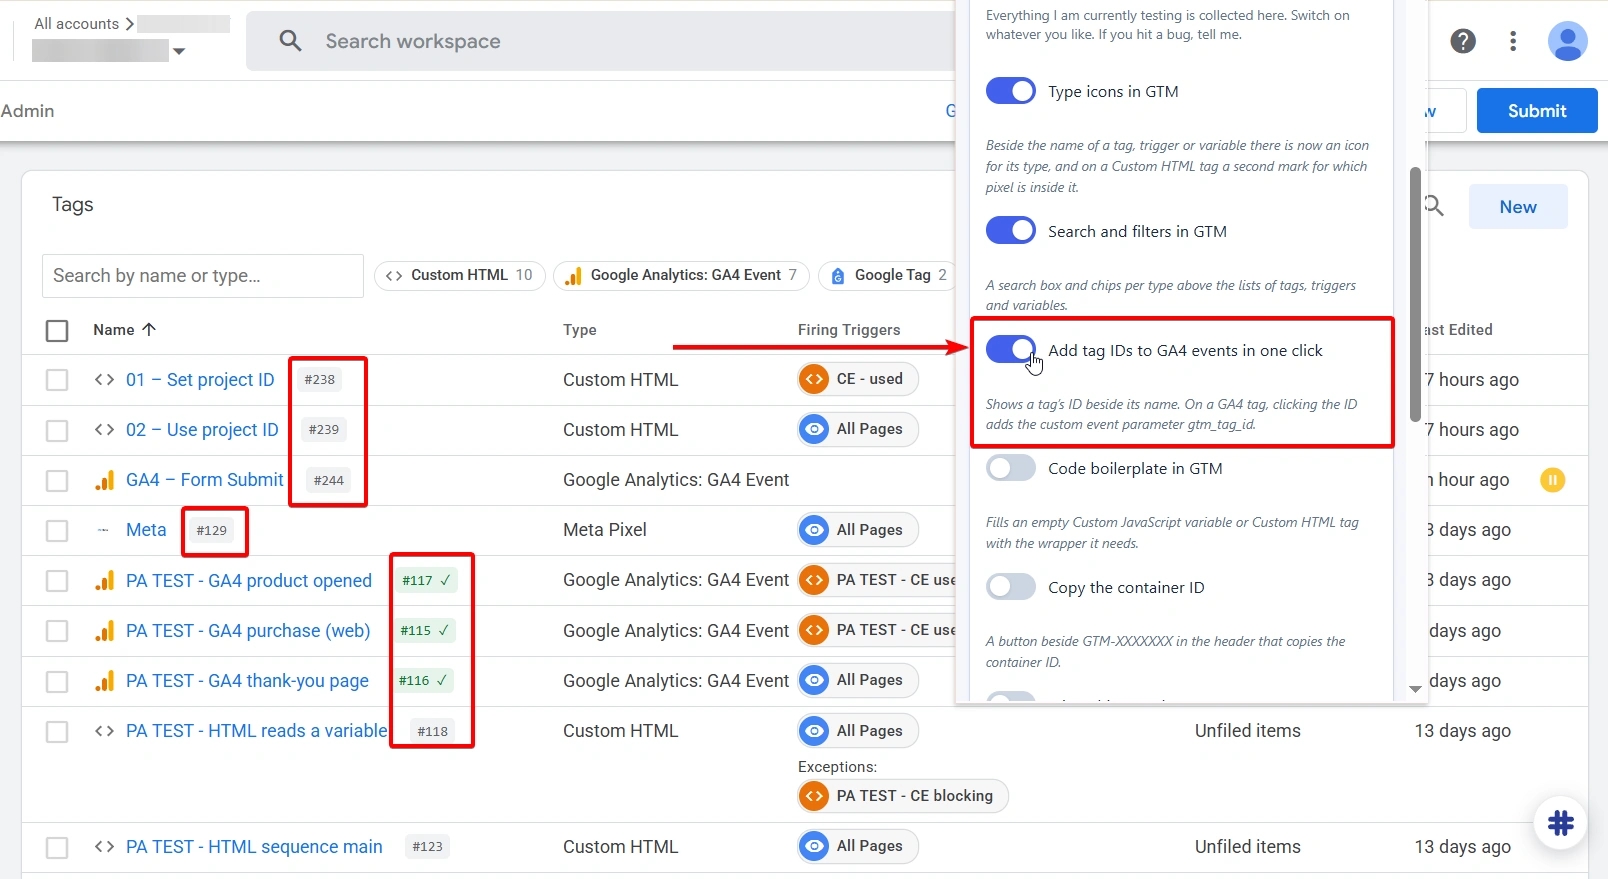
But finding the ID isn't easy in the standard interface. That's why the PROANALYTICS extension displays each tag's ID right in the GTM list. To activate this feature, select the checkbox next to the Add tag IDs to GA4 events in one click setting in the New features block.
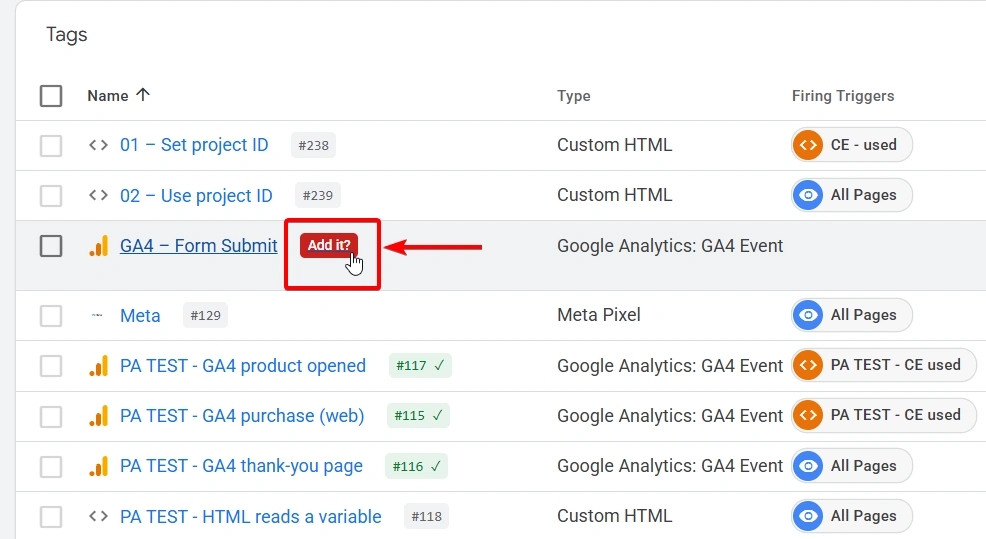
And by clicking the ID, you can add the gtm_tag_id parameter you need in one click.
How to guarantee that one tag fires before another
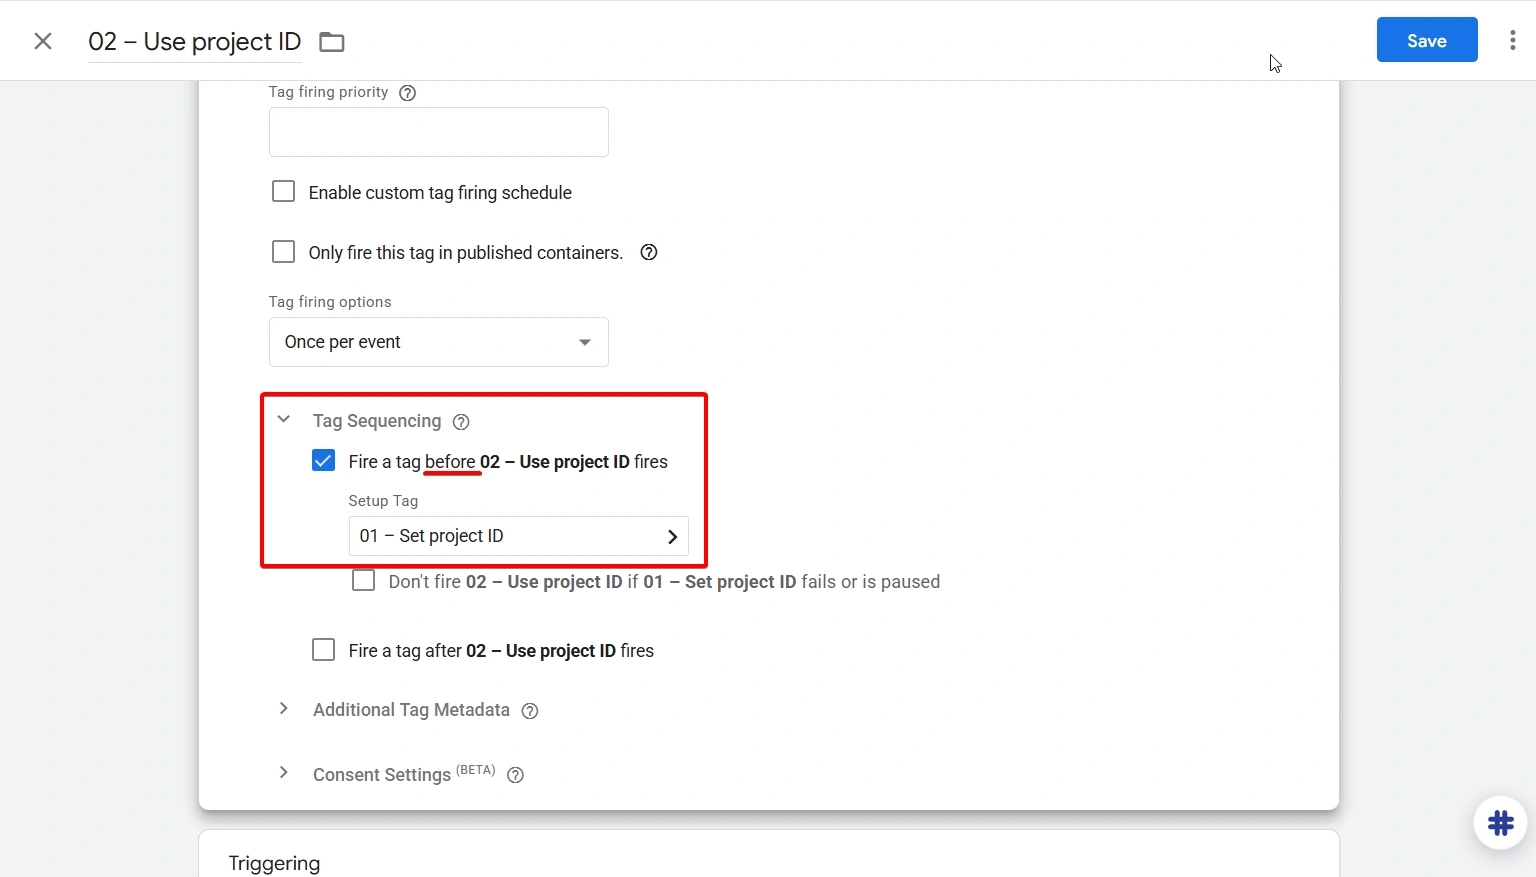
This isn't a common situation, but sometimes you need tags to fire one after another in a specific order. Tag Sequencing can help here.
- Open the tag that sends the event, go to Advanced Settings → Tag Sequencing, and enable Fire a tag before this tag fires.
- Then select the tag with the preparatory setup.
Now, when the firing condition for the main tag is met, GTM will first fire the preparatory tag and then the main one.
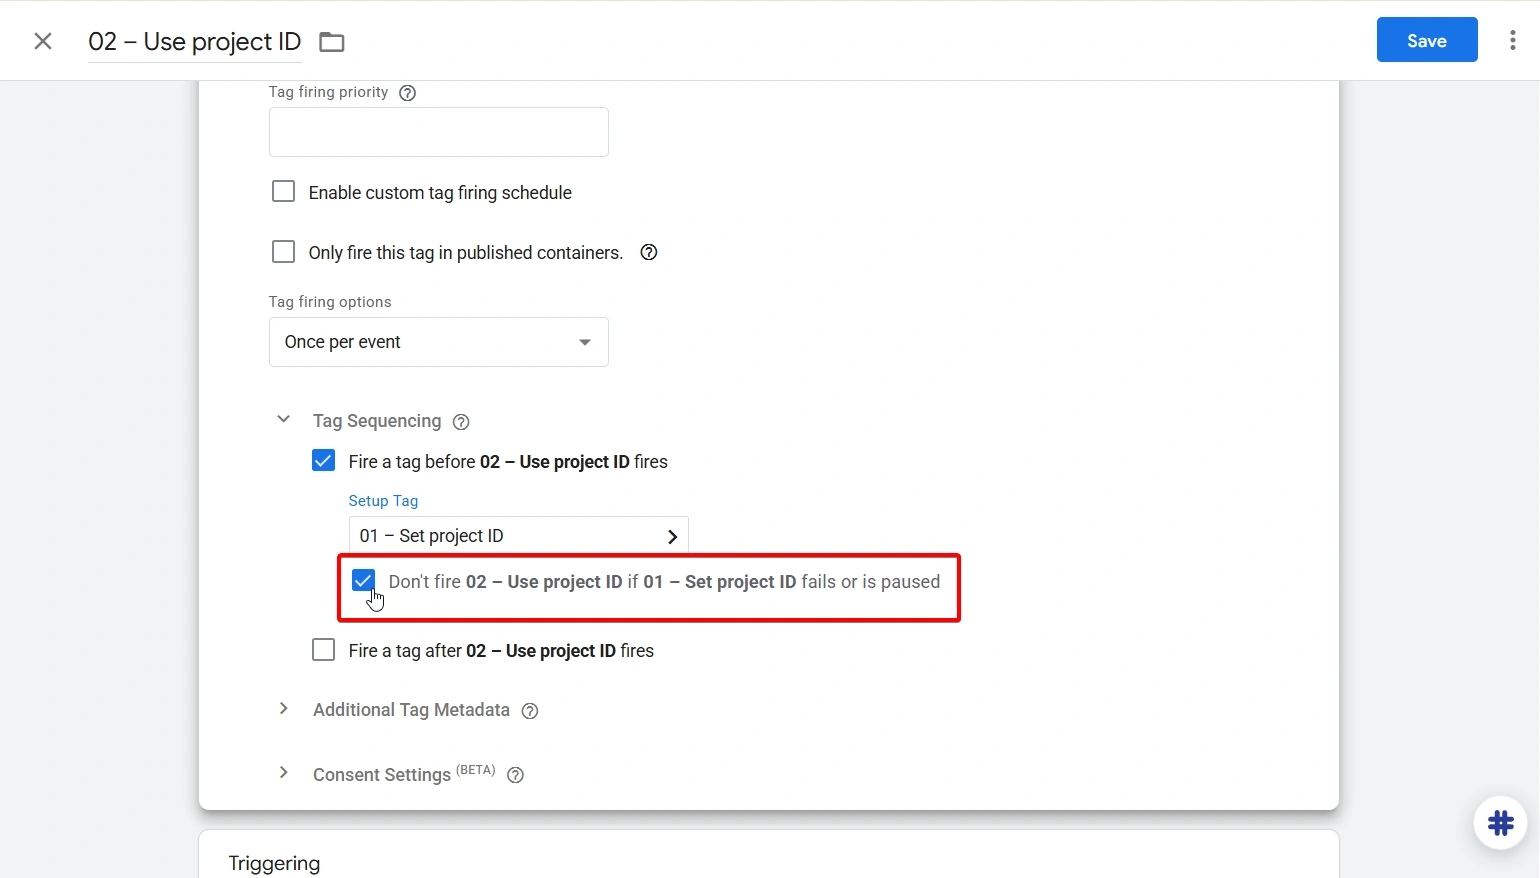
If needed, enable the option that prevents the main tag from firing if the preparatory tag fails.
For the reverse case, select Fire a tag after this tag fires.
How to see which website interactions are tracked through GTM and which events are sent
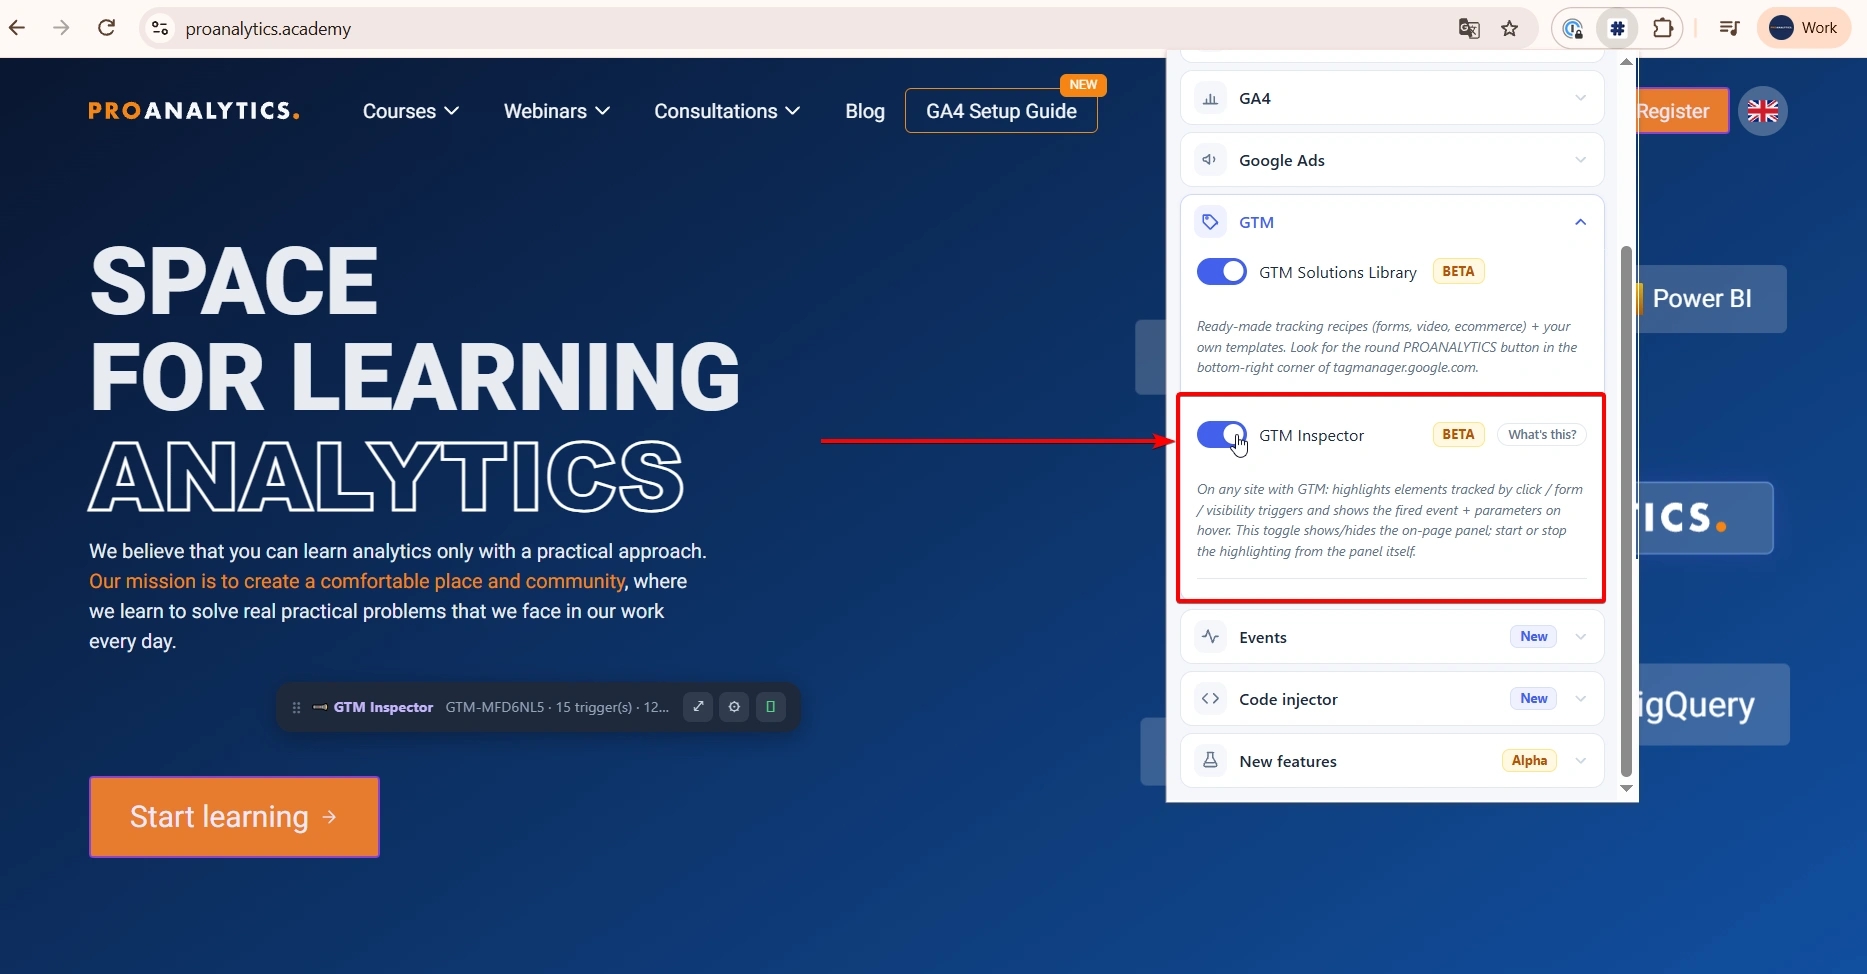
When you're working with an unfamiliar GTM container, it can sometimes be hard to tell which elements on a website a given tag or trigger is responsible for. The GTM Inspector in the PROANALYTICS extension lets you view the setup directly on the website itself. Here's what it looks like:
- The tool highlights page elements associated with click, form, or visibility triggers, and a separate panel shows the events found on the page and the types of triggers used to track them.
- If you hover over a specific element, GTM Inspector shows the details of the associated setup: the trigger type, the GTM container, the CSS selector and firing conditions, as well as the GA4 event name and its parameters.
- And when you click an element in the panel, it also scrolls you straight to the corresponding element on the page.

Before using it for the first time, don't forget to enable the feature:
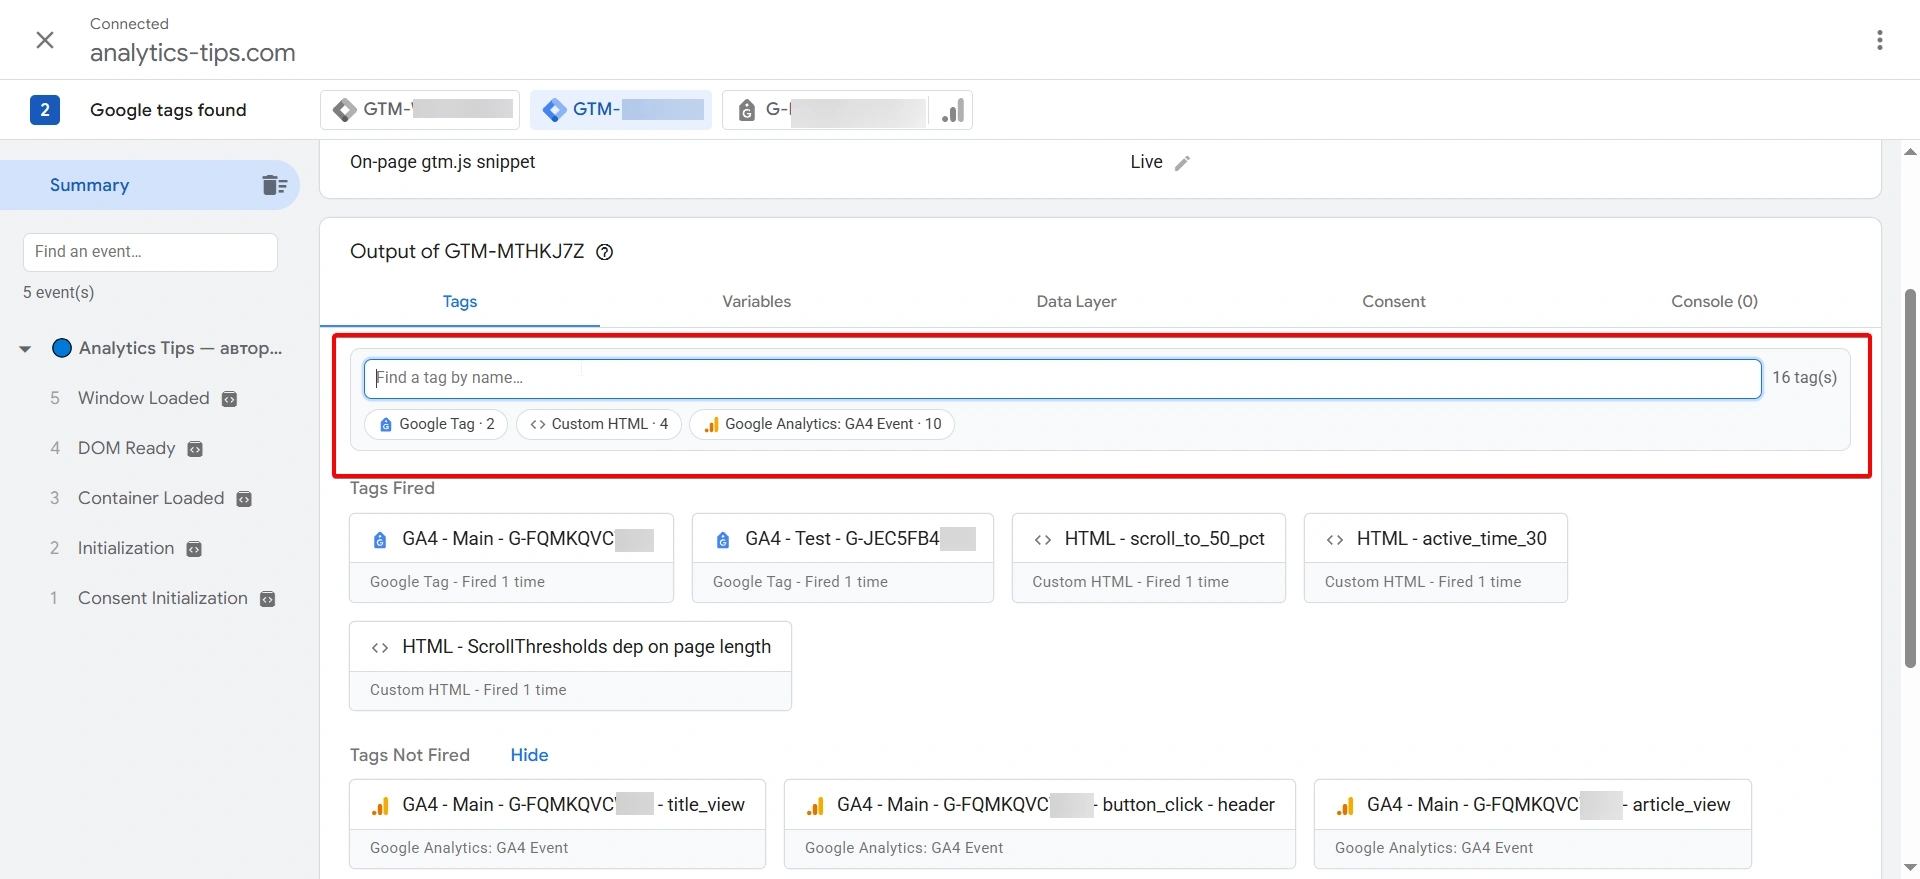
It works the same way on the Variables tab.
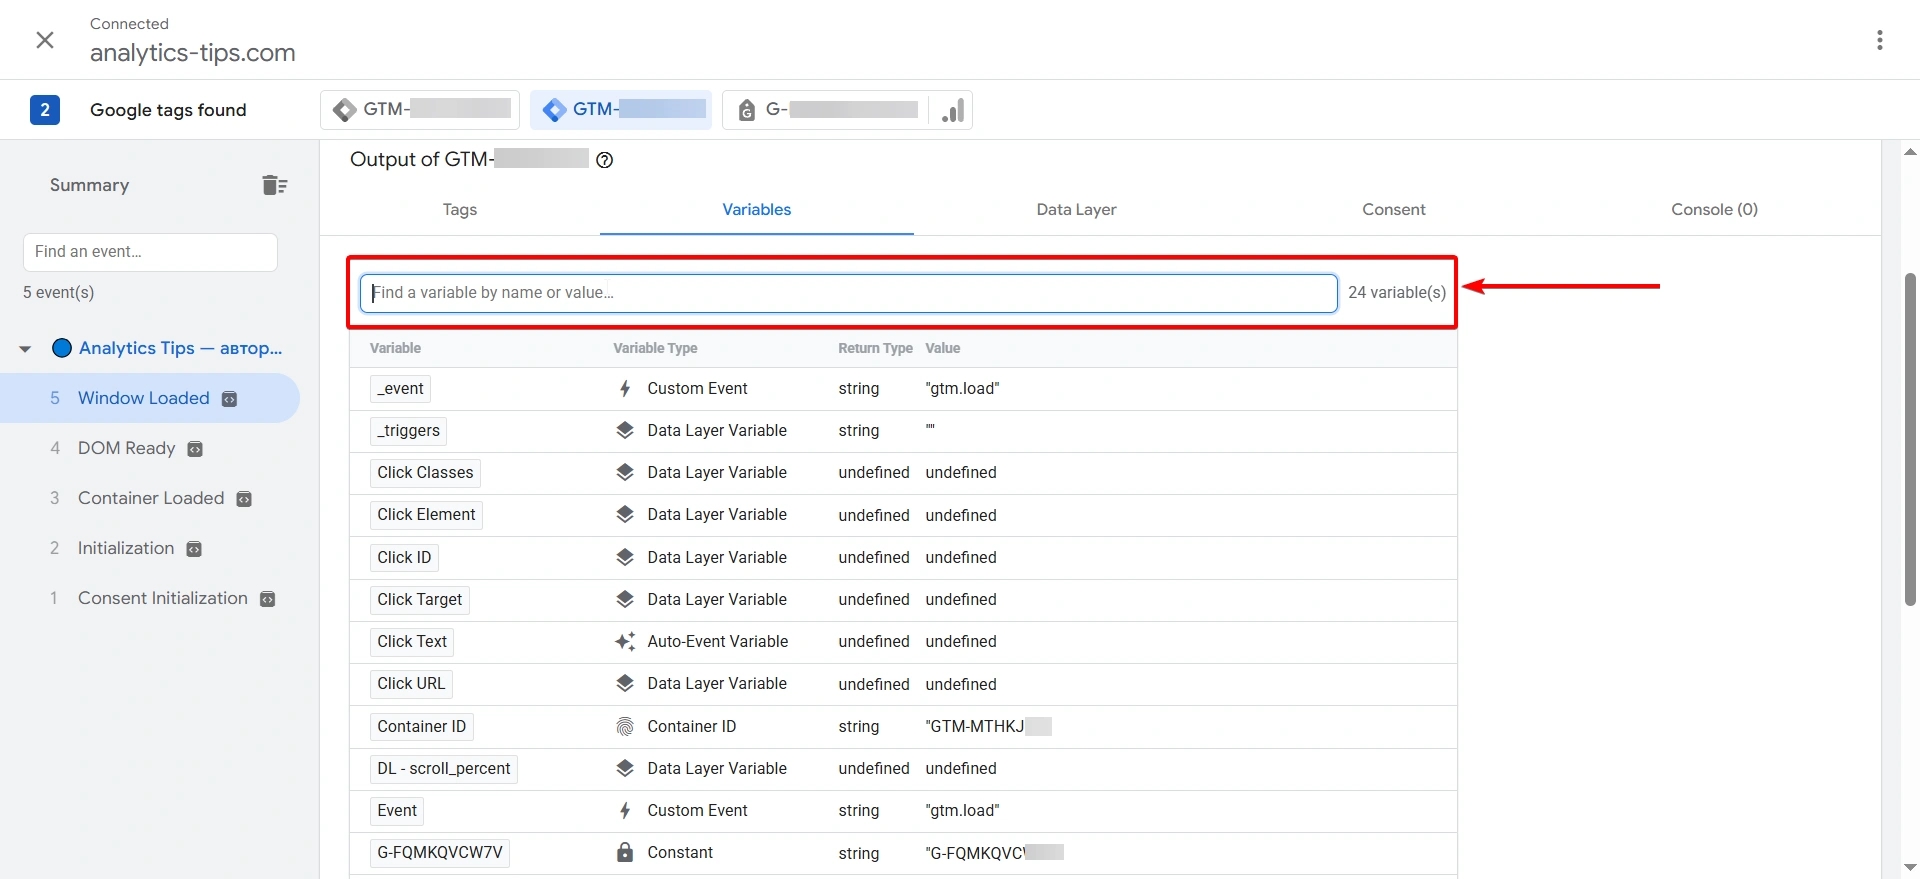
Don't forget to activate the Search and colour-coded errors in Preview feature in the New features block.
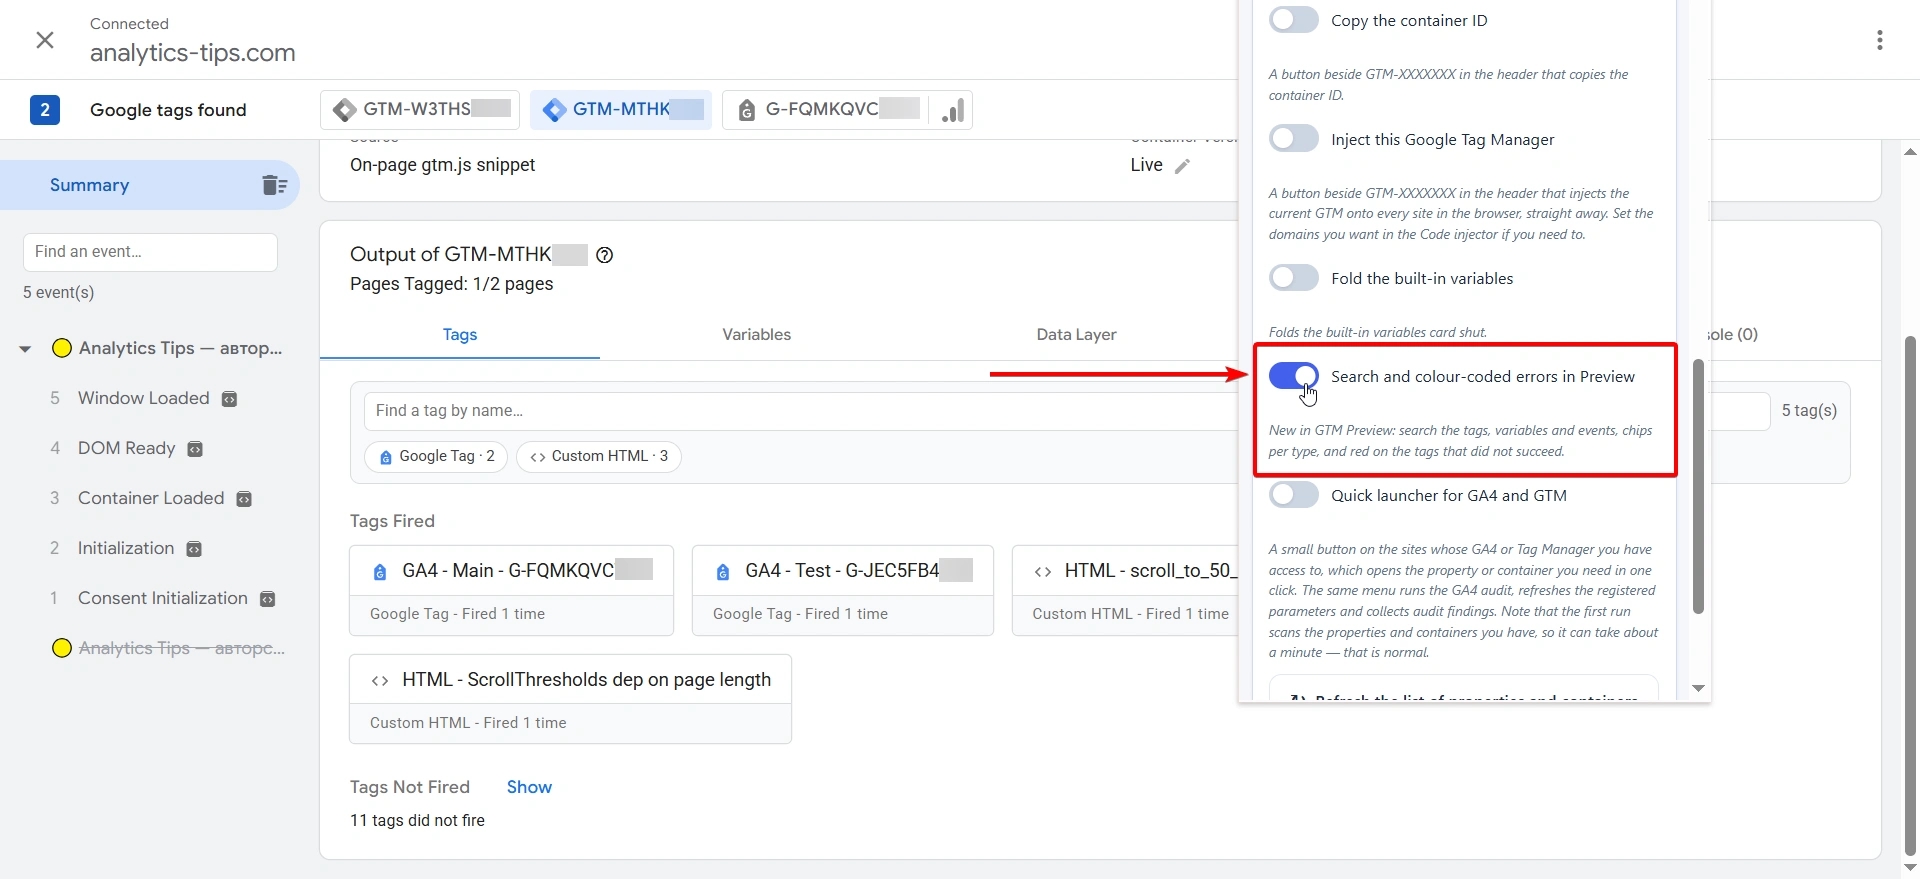
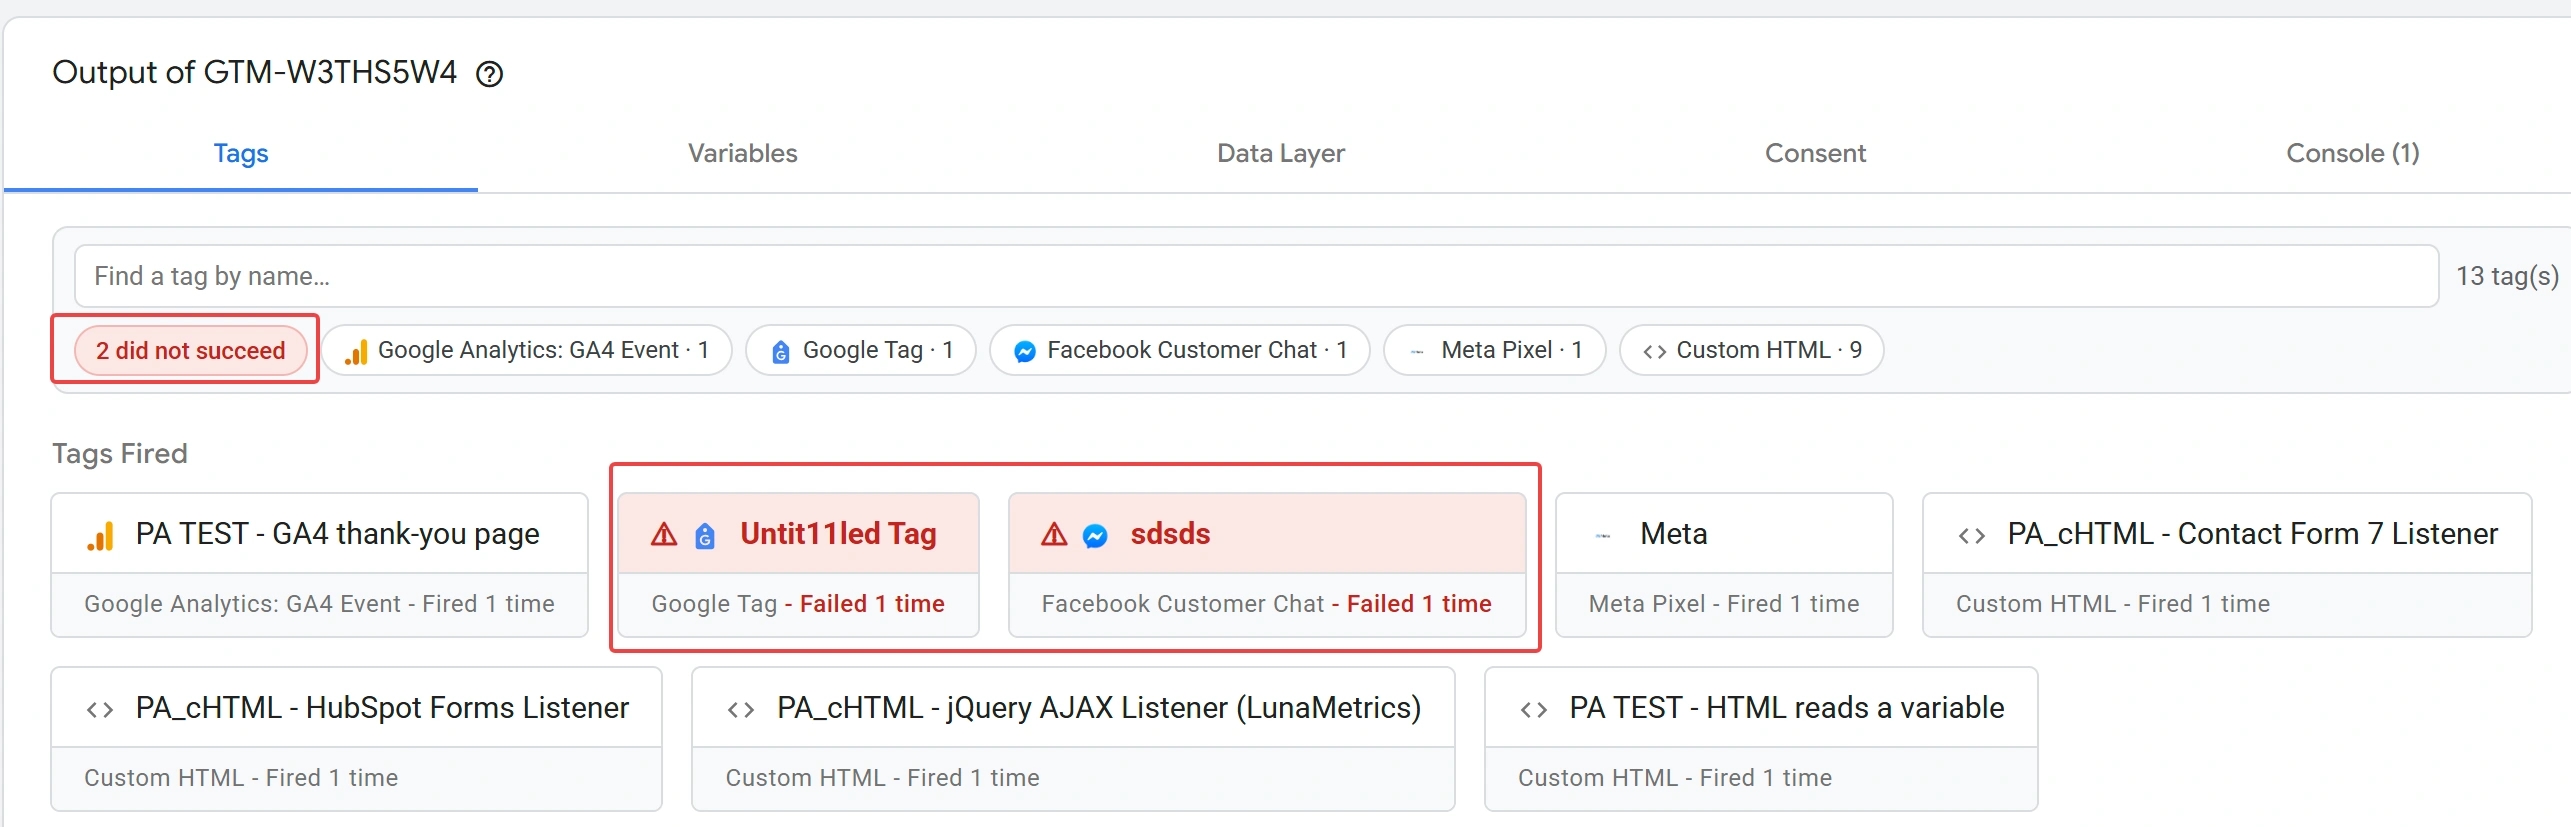
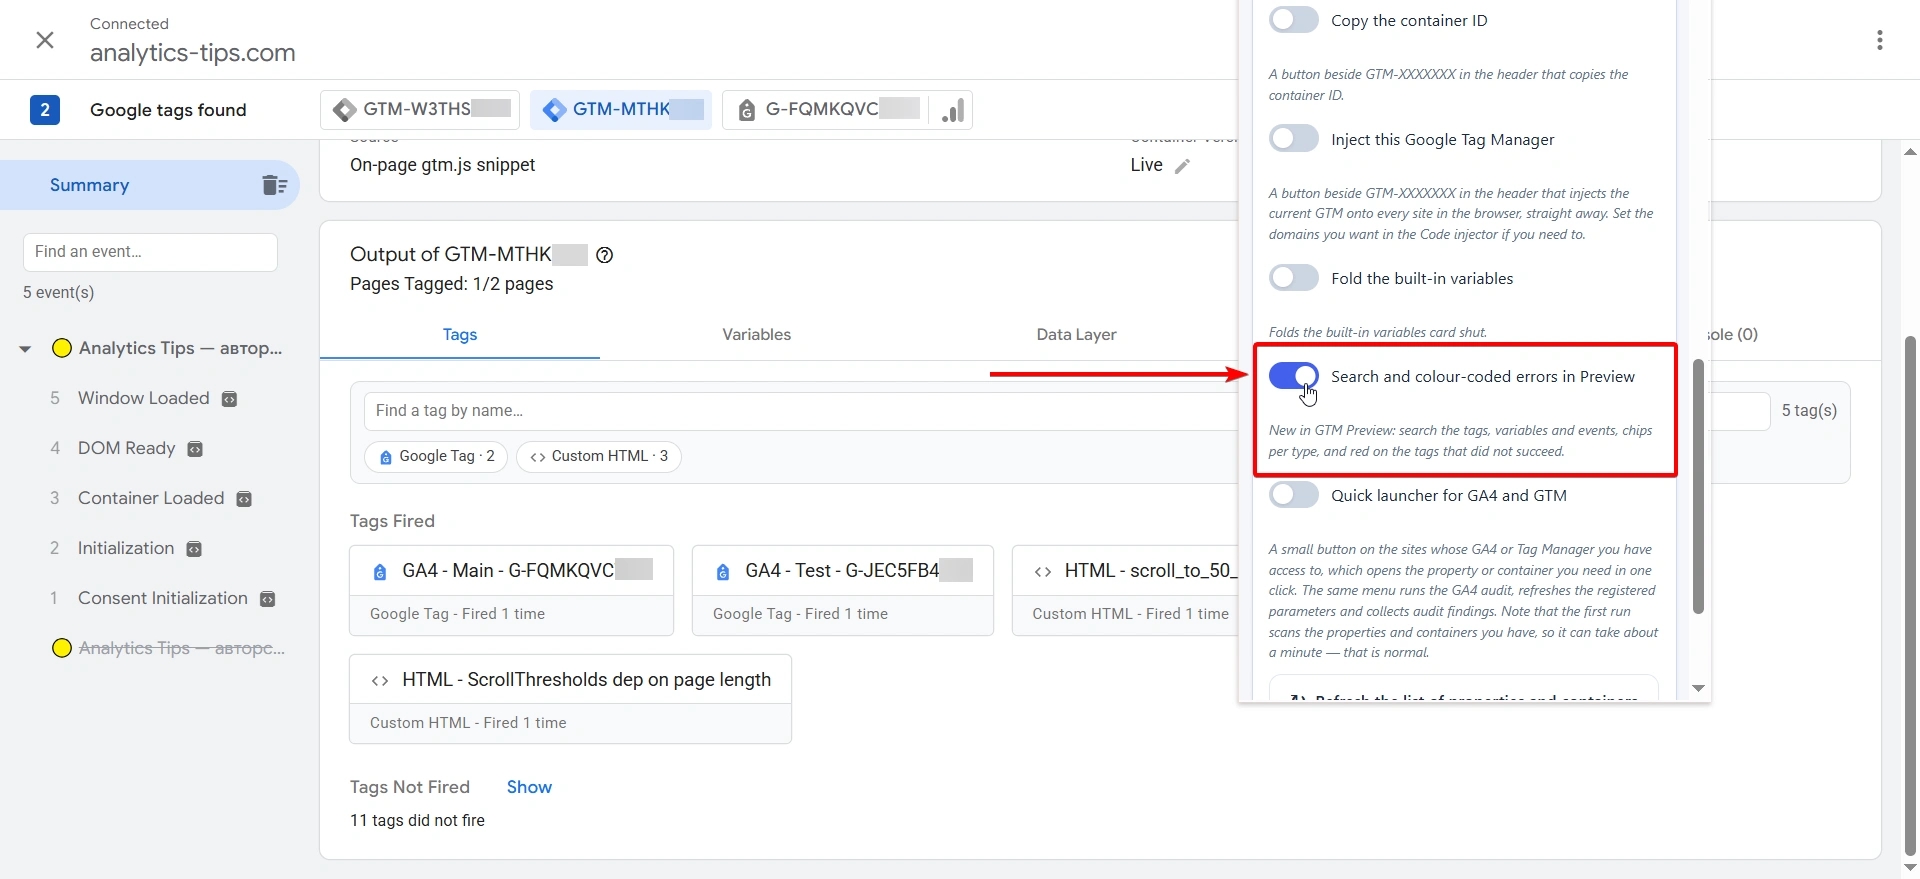
Don't forget to activate the Search and colour-coded errors in Preview feature in the New features block.
How to quickly find unused tags, triggers, and variables
A GTM container with a long history often accumulates old triggers, variables, or tags that are no longer used anywhere. Finding such entities manually in a large container takes a lot of time, so for a quick check you can use the PROANALYTICS Magic feature in the same PROANALYTICS extension.
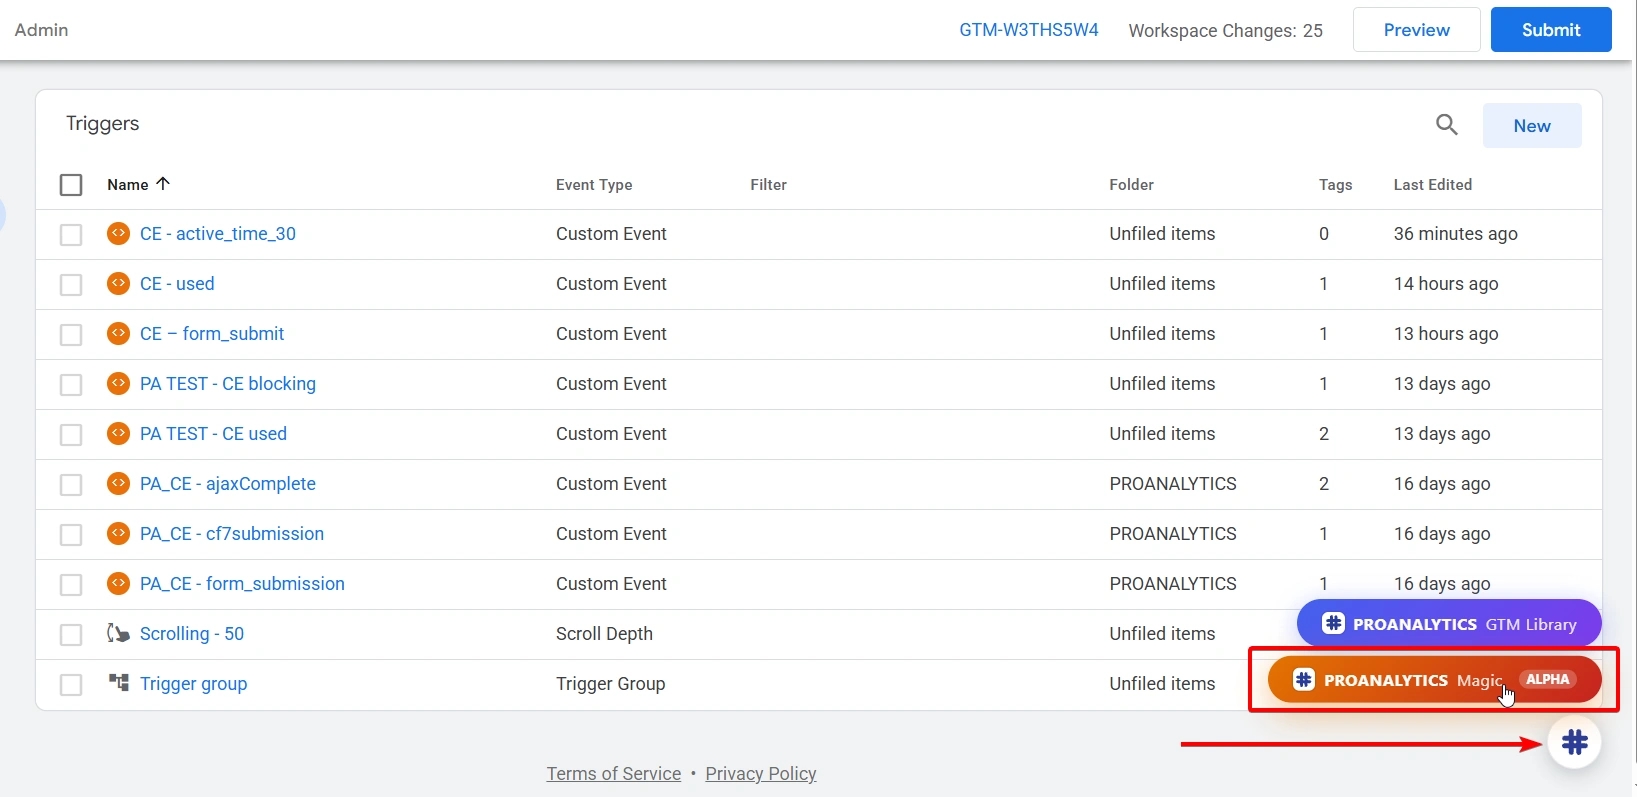
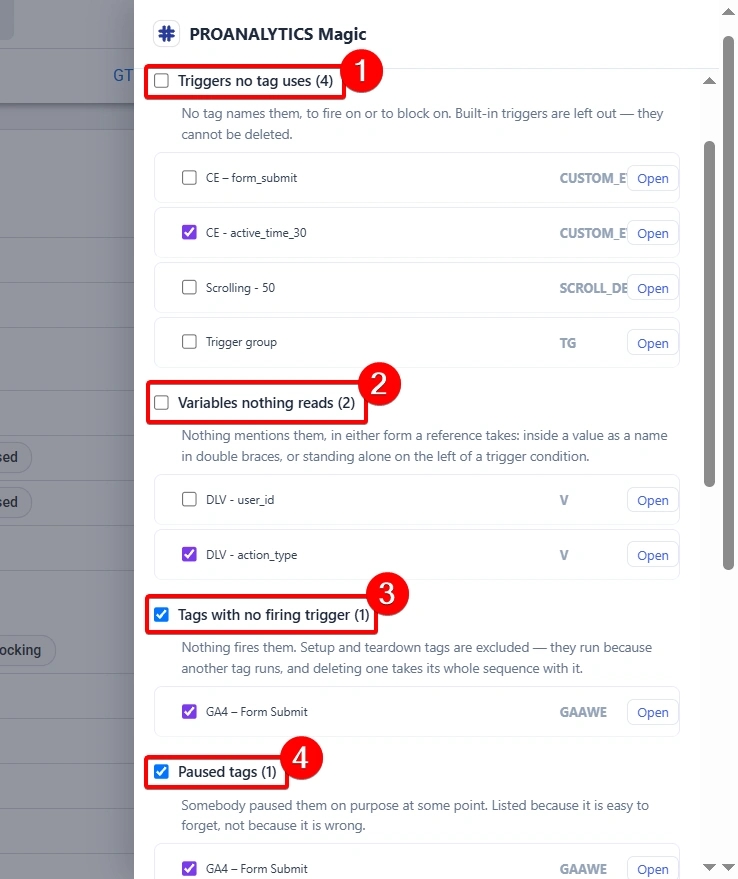
Run a container scan, and the extension will group potentially redundant entities by type:
- Triggers no tag uses: triggers that aren't used by any tag.
- Variables nothing reads: variables that aren't referenced by any other entity in the container. That is, they aren't used in tags, other variables, or trigger conditions.
- Tags with no firing trigger: tags that have no firing trigger configured. Tags that are used through Tag Sequencing are not included in this category by the extension.
- Paused tags: tags that have been paused. If there are any in the container, the extension also lists them separately so you can check whether they're still needed.
You can open each entity with the Open button and check it before deleting.
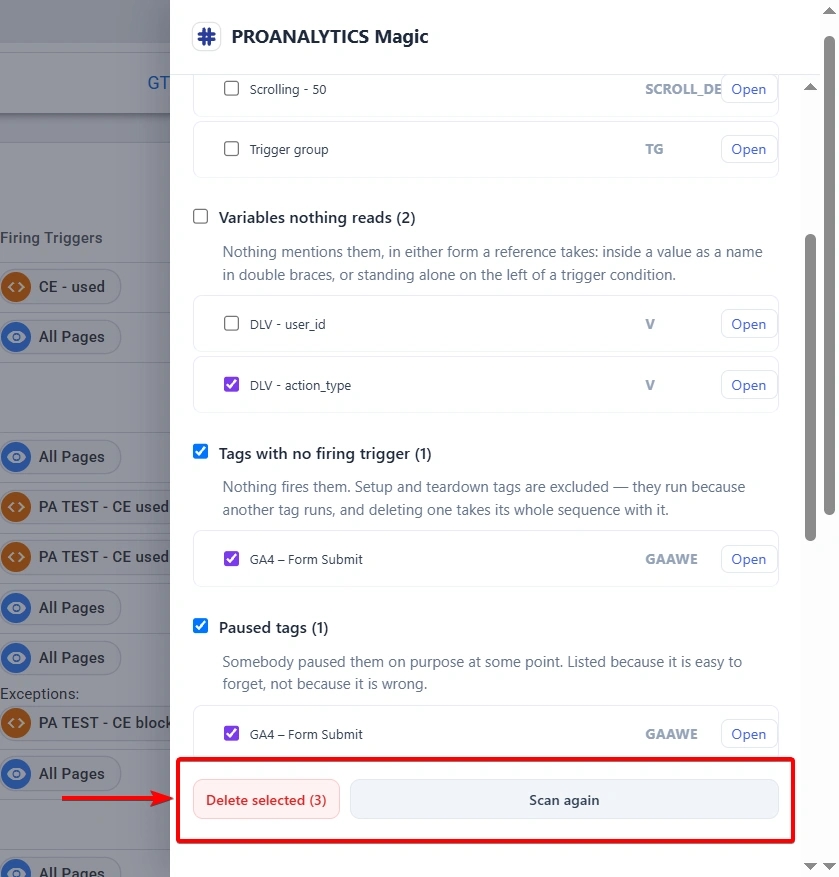
If an item is truly no longer needed, select its checkbox and click Delete selected. After making changes, don't forget to rescan the container using Scan again.
How to track JavaScript errors with GTM
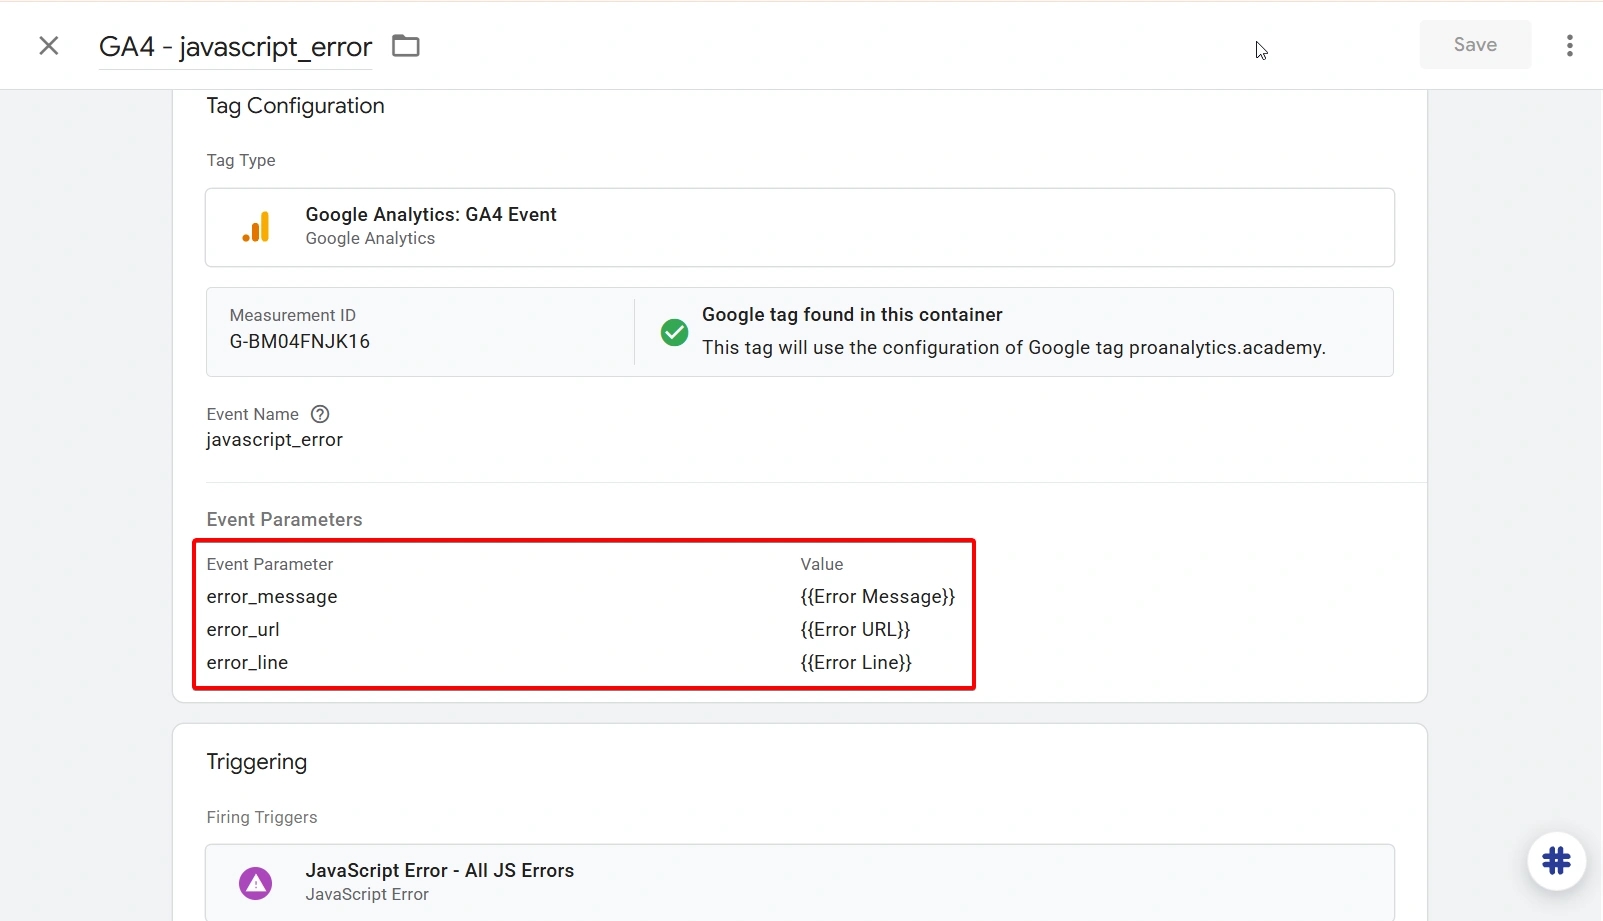
GTM can help not only with tracking user actions on a website but also with tracking actions the user failed to complete. I'm talking about tracking JavaScript errors.
GTM has a dedicated JavaScript Error trigger for this.
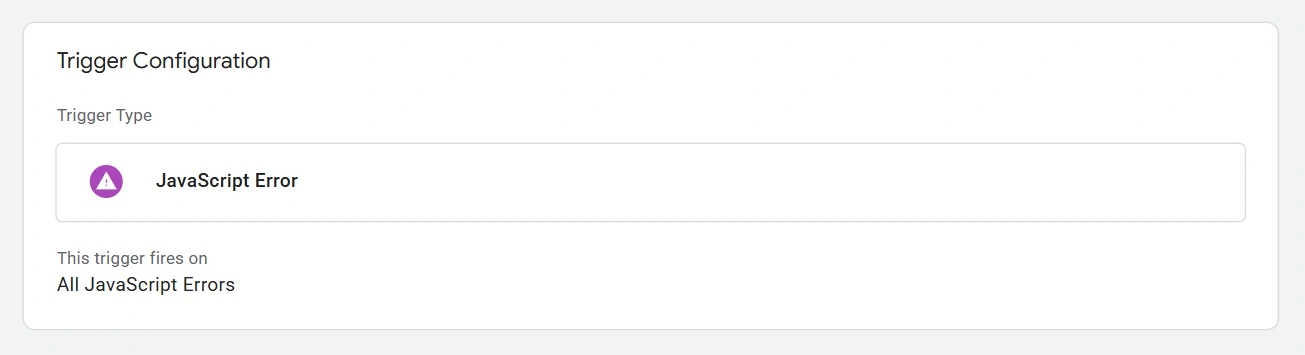
Along with the event, it's important to pass additional error parameters to GA4 using the built-in variables Error Message, Error URL, and Error Line, that is, the error text, the page URL, and the line number where the error occurred.
How to verify that events are passed correctly to GA4, Meta, TikTok, and Google Ads without missing anything
After you set up your tags, it's important to verify what is actually being sent from the website during real user interactions. And there are hundreds of extensions out there that can help with this.
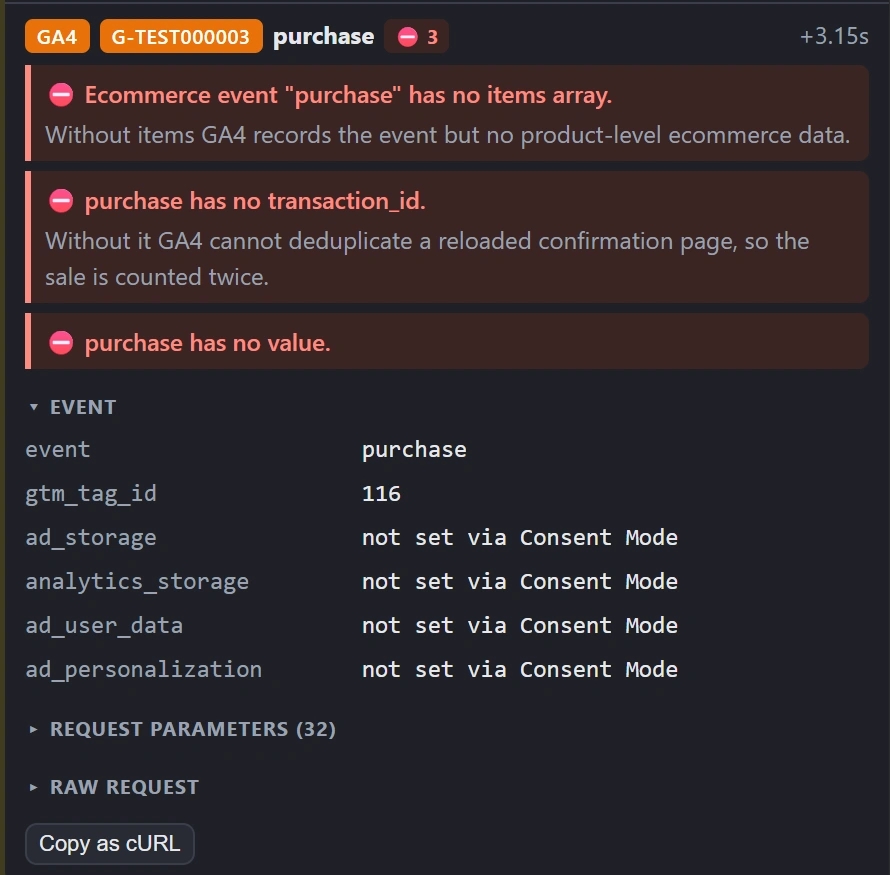
But once again, I'd recommend PROANALYTICS. Why? Because in addition to intercepting these requests, this extension also checks for required parameters, data type consistency, and even more complex cases. For example, if a product was named Canon EOS 5D when the product page was viewed, but is sent as Canon EOS 5D Black when it's added to the cart, the extension will warn you.
There are two ways to open the debugger itself:
- either look in Chrome's developer console;
- or scroll down to the Side panel block and click Open the side panel here.

After that, interact with the website like a regular user. Navigate between pages, click buttons, submit forms. The debugger will add the corresponding requests and events to the panel or console and show which platform they're sent to, which event was passed, and with what data.
To activate it, select Event Debugger in the Events block and choose the platforms whose events you want to see.

How to avoid forgetting, six months from now, why a particular tag, trigger, or variable was set up
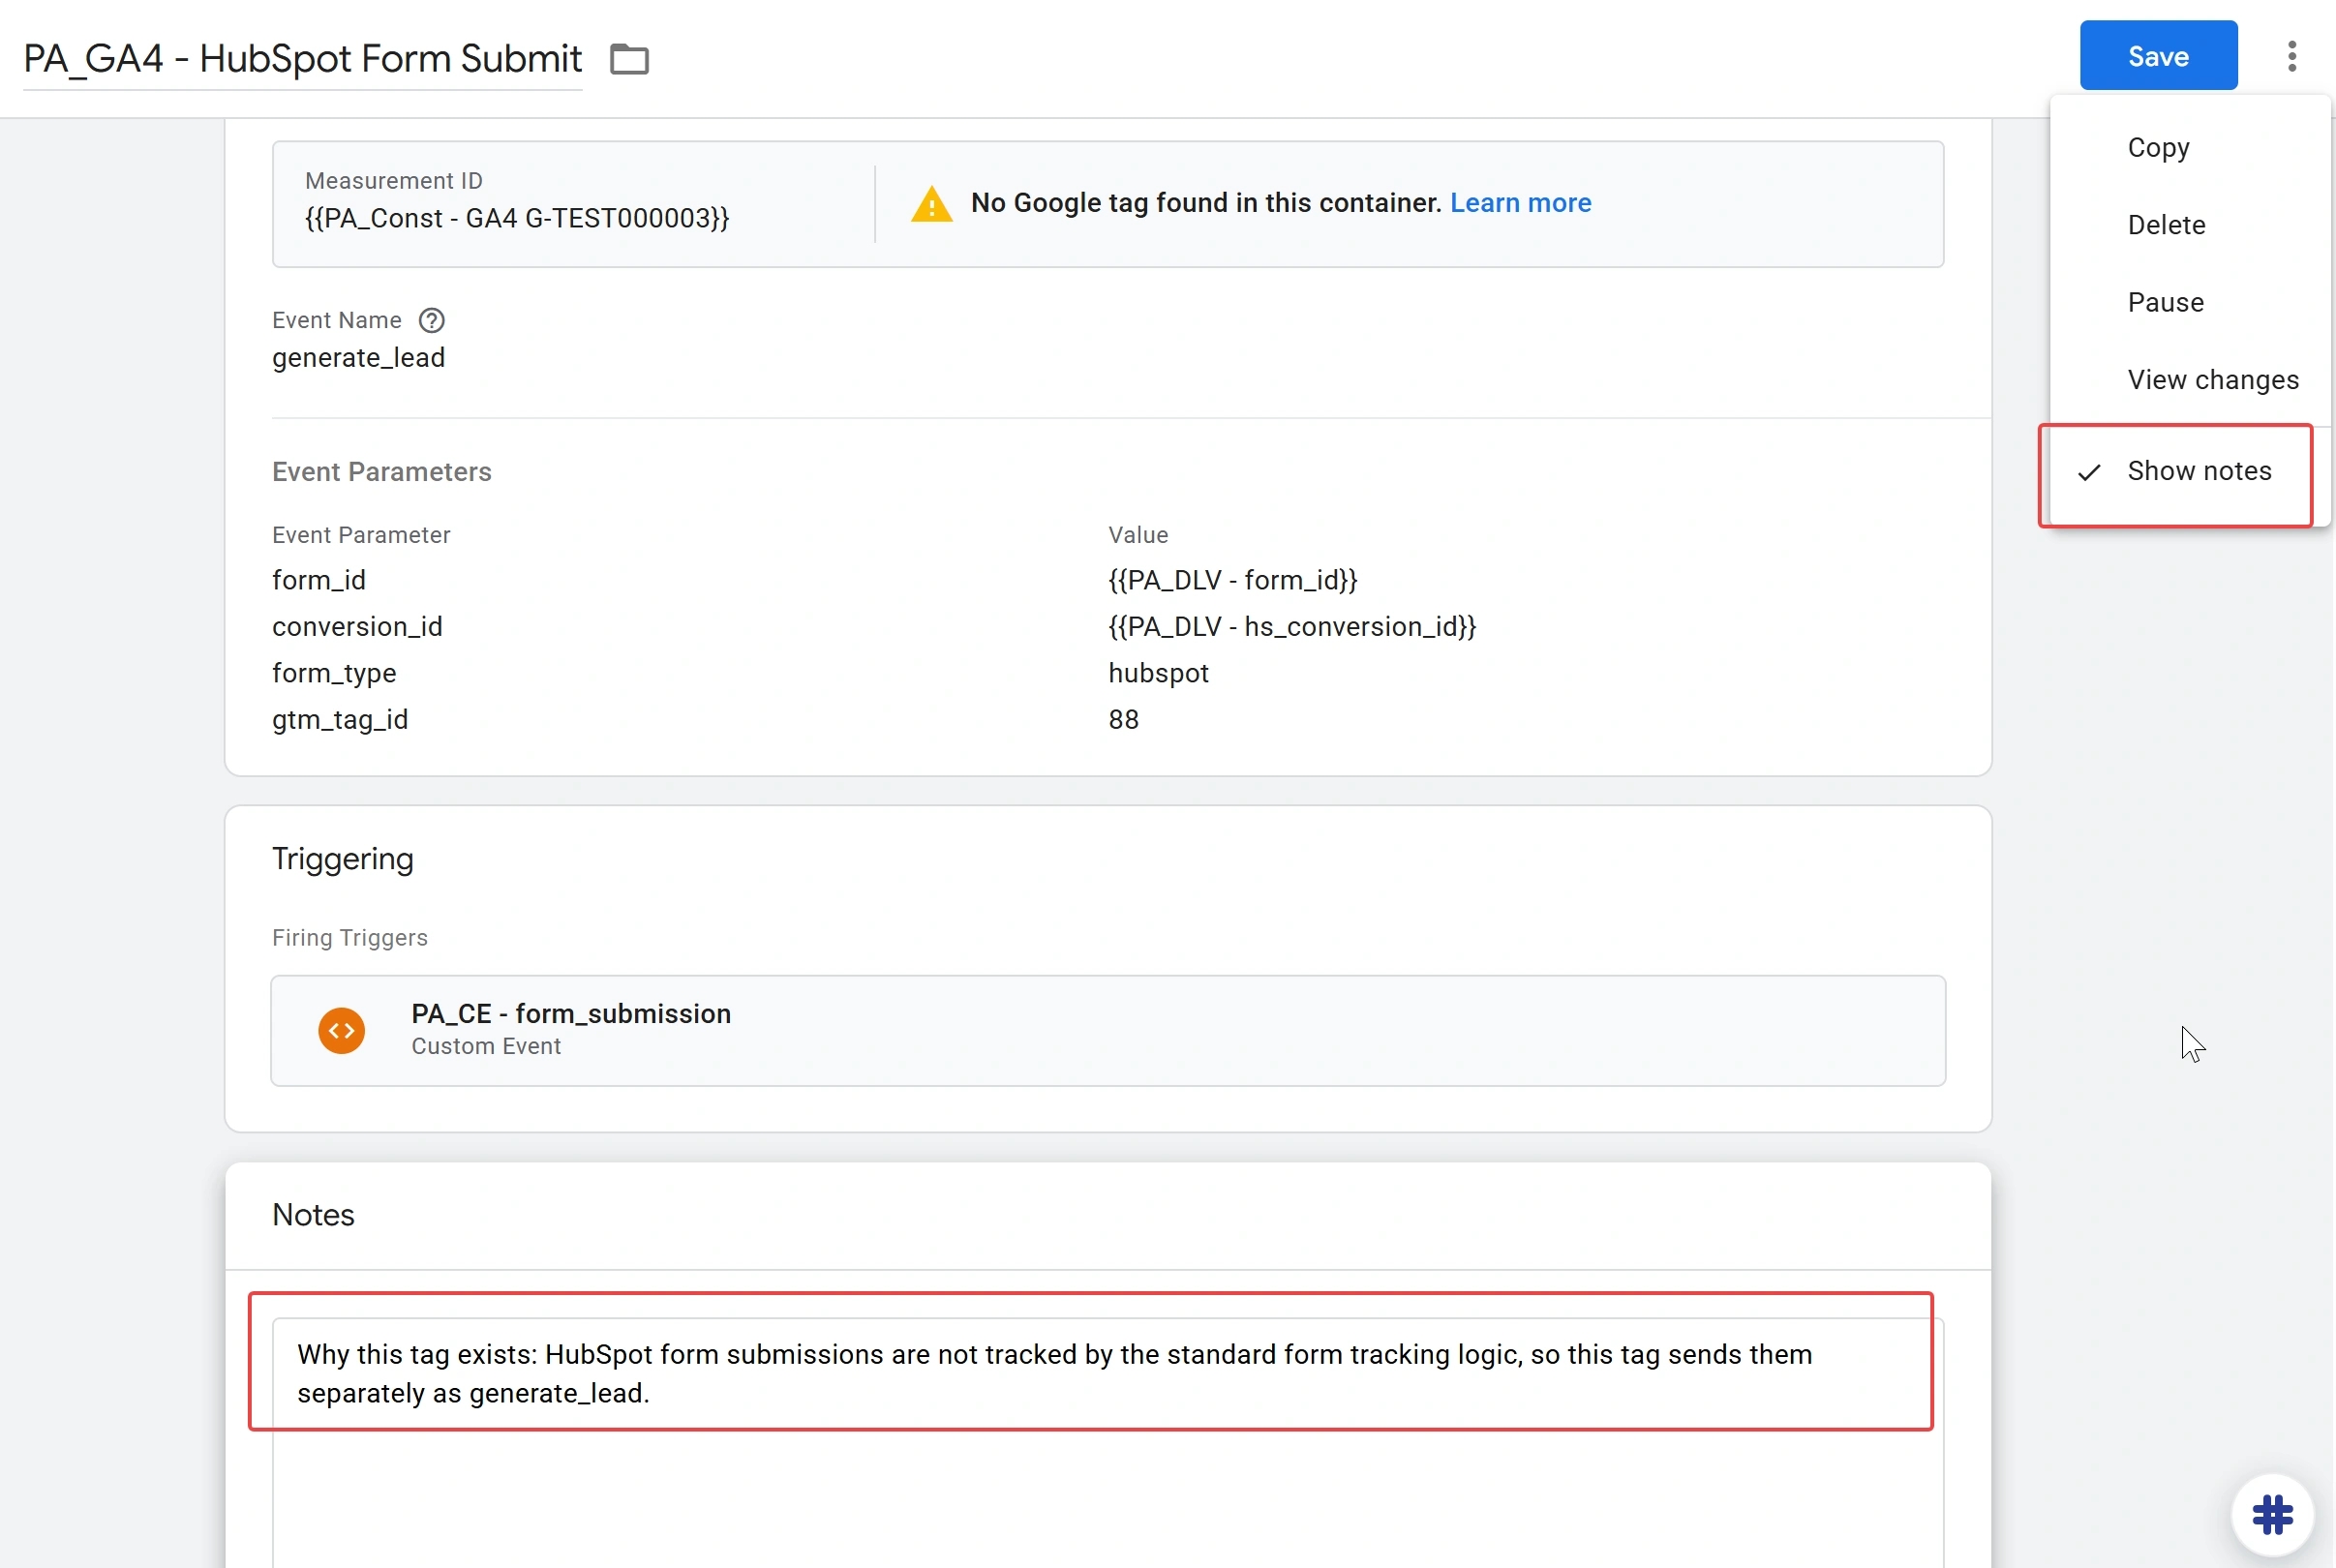
The last item on the list was inspired by a conversation in one of the chats today. If you don't want to forget, six months from now, why and for what purpose a particular setting was created, GTM lets you leave a note. This option works for tags, triggers, and variables alike.
Final Thoughts
In this article, we've covered many techniques that will cut down on routine work. But you'll get the most out of these tips when you have a solid grasp of GTM's logic and know exactly what you're setting up and why.
Loading comments…