Google Tag Manager Becomes Google Tag: What Changes in the Architecture and the Google Ads Integration

Google has introduced an update called "Optimize your Google Tag Manager container." According to the documentation, this optimization enables a GTM container to send data to Google services without separately loading the gtag.js library, and Google tag settings become shared.
In practice, these changes apply not only to Google Tag Manager but also to other Google services, including GA4 and Google Ads. One change you may notice is a second Google tag appearing in Data Manager.
There are several ways to look at this topic. To give a more complete picture and explain how the new mechanisms work, this article covers two main areas:
- Google Tag Manager. We'll look at what has changed in the architecture, what to check before migrating, and how to complete the migration step by step.
- Google Ads. We'll look at how to interpret the Data Connection Map in Data Manager, under what conditions a second tag appears there, and whether you need to do anything about it.
Part 1. The Gist of the Update: The GTM Container Is Now a Google Tag
As of October 2026, Google Tag Manager users have access to an update that optimizes container performance. This update fundamentally changes how the tagging architecture works. It affects not only GTM itself but also directly impacts the Google Ads, GA4, and Floodlight ecosystem.
How does the "old" setup work?
Previously, the relationship was one-way: any Google tag acted as a wrapper around a base GTM container, but the GTM container itself did not have the full capabilities of a Google tag. As a result, the gtag.js library still had to be loaded separately for Google tags to function.
What changed after the update?
The relationship is now two-way: your Google Tag Manager container itself becomes a full-fledged Google tag. For a more in-depth technical explanation and a breakdown of the architecture, you can read Simo Ahava's article. We'll go straight to the practical side.
Before the migration
- Check the website's source code for a standalone gtag.js installation.
Make sure the website has no separately installed Google tag code for Google Ads or GA4 that runs independently of GTM.
Why does this matter? If the website uses both a direct gtag.js integration and a Google tag configured within the optimized GTM container (as a Destination), initialization or data transmission may be duplicated. This, in turn, can result in incorrect tracking of events and conversions. Ideally, all applicable integrations should be centralized in GTM, with no parallel direct installations at the website code level.
A recent case in the PRO ANALYTICS course chat clearly illustrates how insidious this kind of mismatch can be. On one project, after the tags were merged, an additional third-party gtag.js remained on the website, loaded through an external widget. The outcome was very specific: on the user's first page load, all events were sent, but during later navigation (for example, moving to the cart or the thank-you page), only page_view fired, and all e-commerce events were blocked entirely. The trickiest part is that everything worked perfectly in debug mode, and the problem could only be traced in production — after the widget's script was blocked via GTM and the raw data in BigQuery tables was reviewed.
- Audit your tag settings.
Before making any changes in GTM, it's worth auditing your GA4 and Google Ads accounts. Pay close attention to the User-Provided Data settings.
Why does this matter? In my own practice, I far from always send this data to GA4, because I use the device-based reporting identity option. For Google Ads, however, I always set up enhanced conversions and send User-Provided Data. On a related note, this very topic is covered in the course Enhanced Conversions for Google Ads, where I walk through setting up data transfer via GTM in detail, with practical examples. Returning to the new GTM architecture: when we link our products (GA4, Google Ads) as destination tags (Destinations) within this new GTM architecture, they inherit all the centralized settings defined in the new section.
Of course, you can override these centralized parameters and apply stricter settings directly inside an individual destination tag. But if we're unifying anyway, I think it’s easier to clean everything up and unify it all right away!
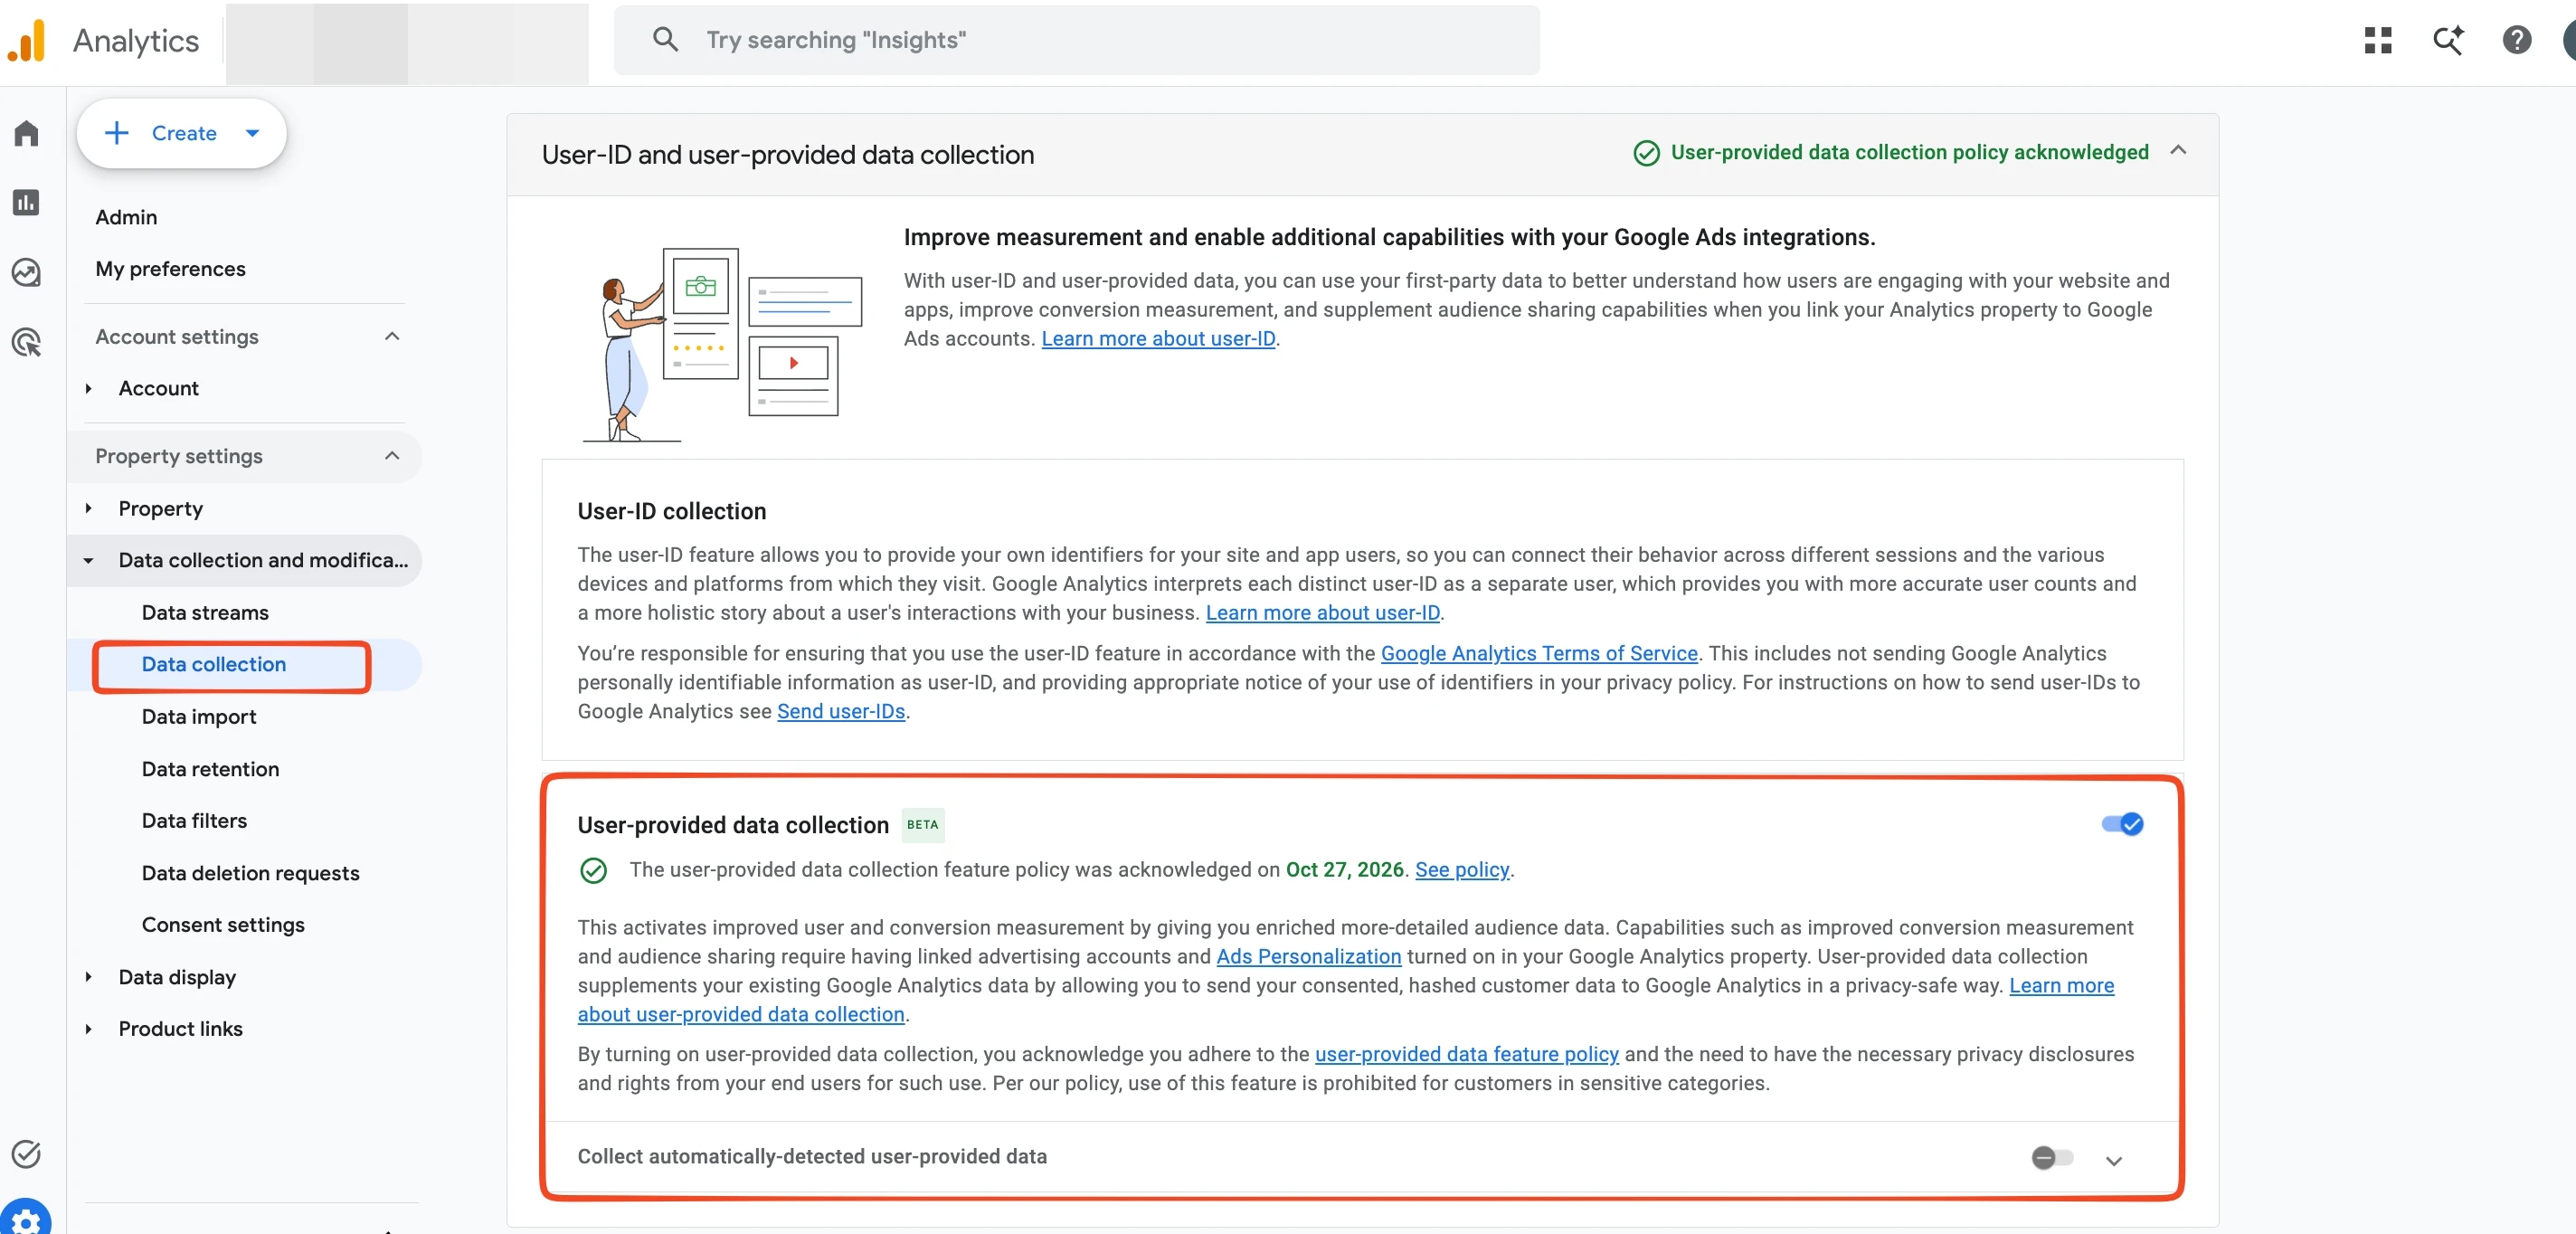
Where to find User-Provided Data collection settings in the interfaces?
- GA4 → Admin → Data collection.
2. Google Tag → Configure tag settings.
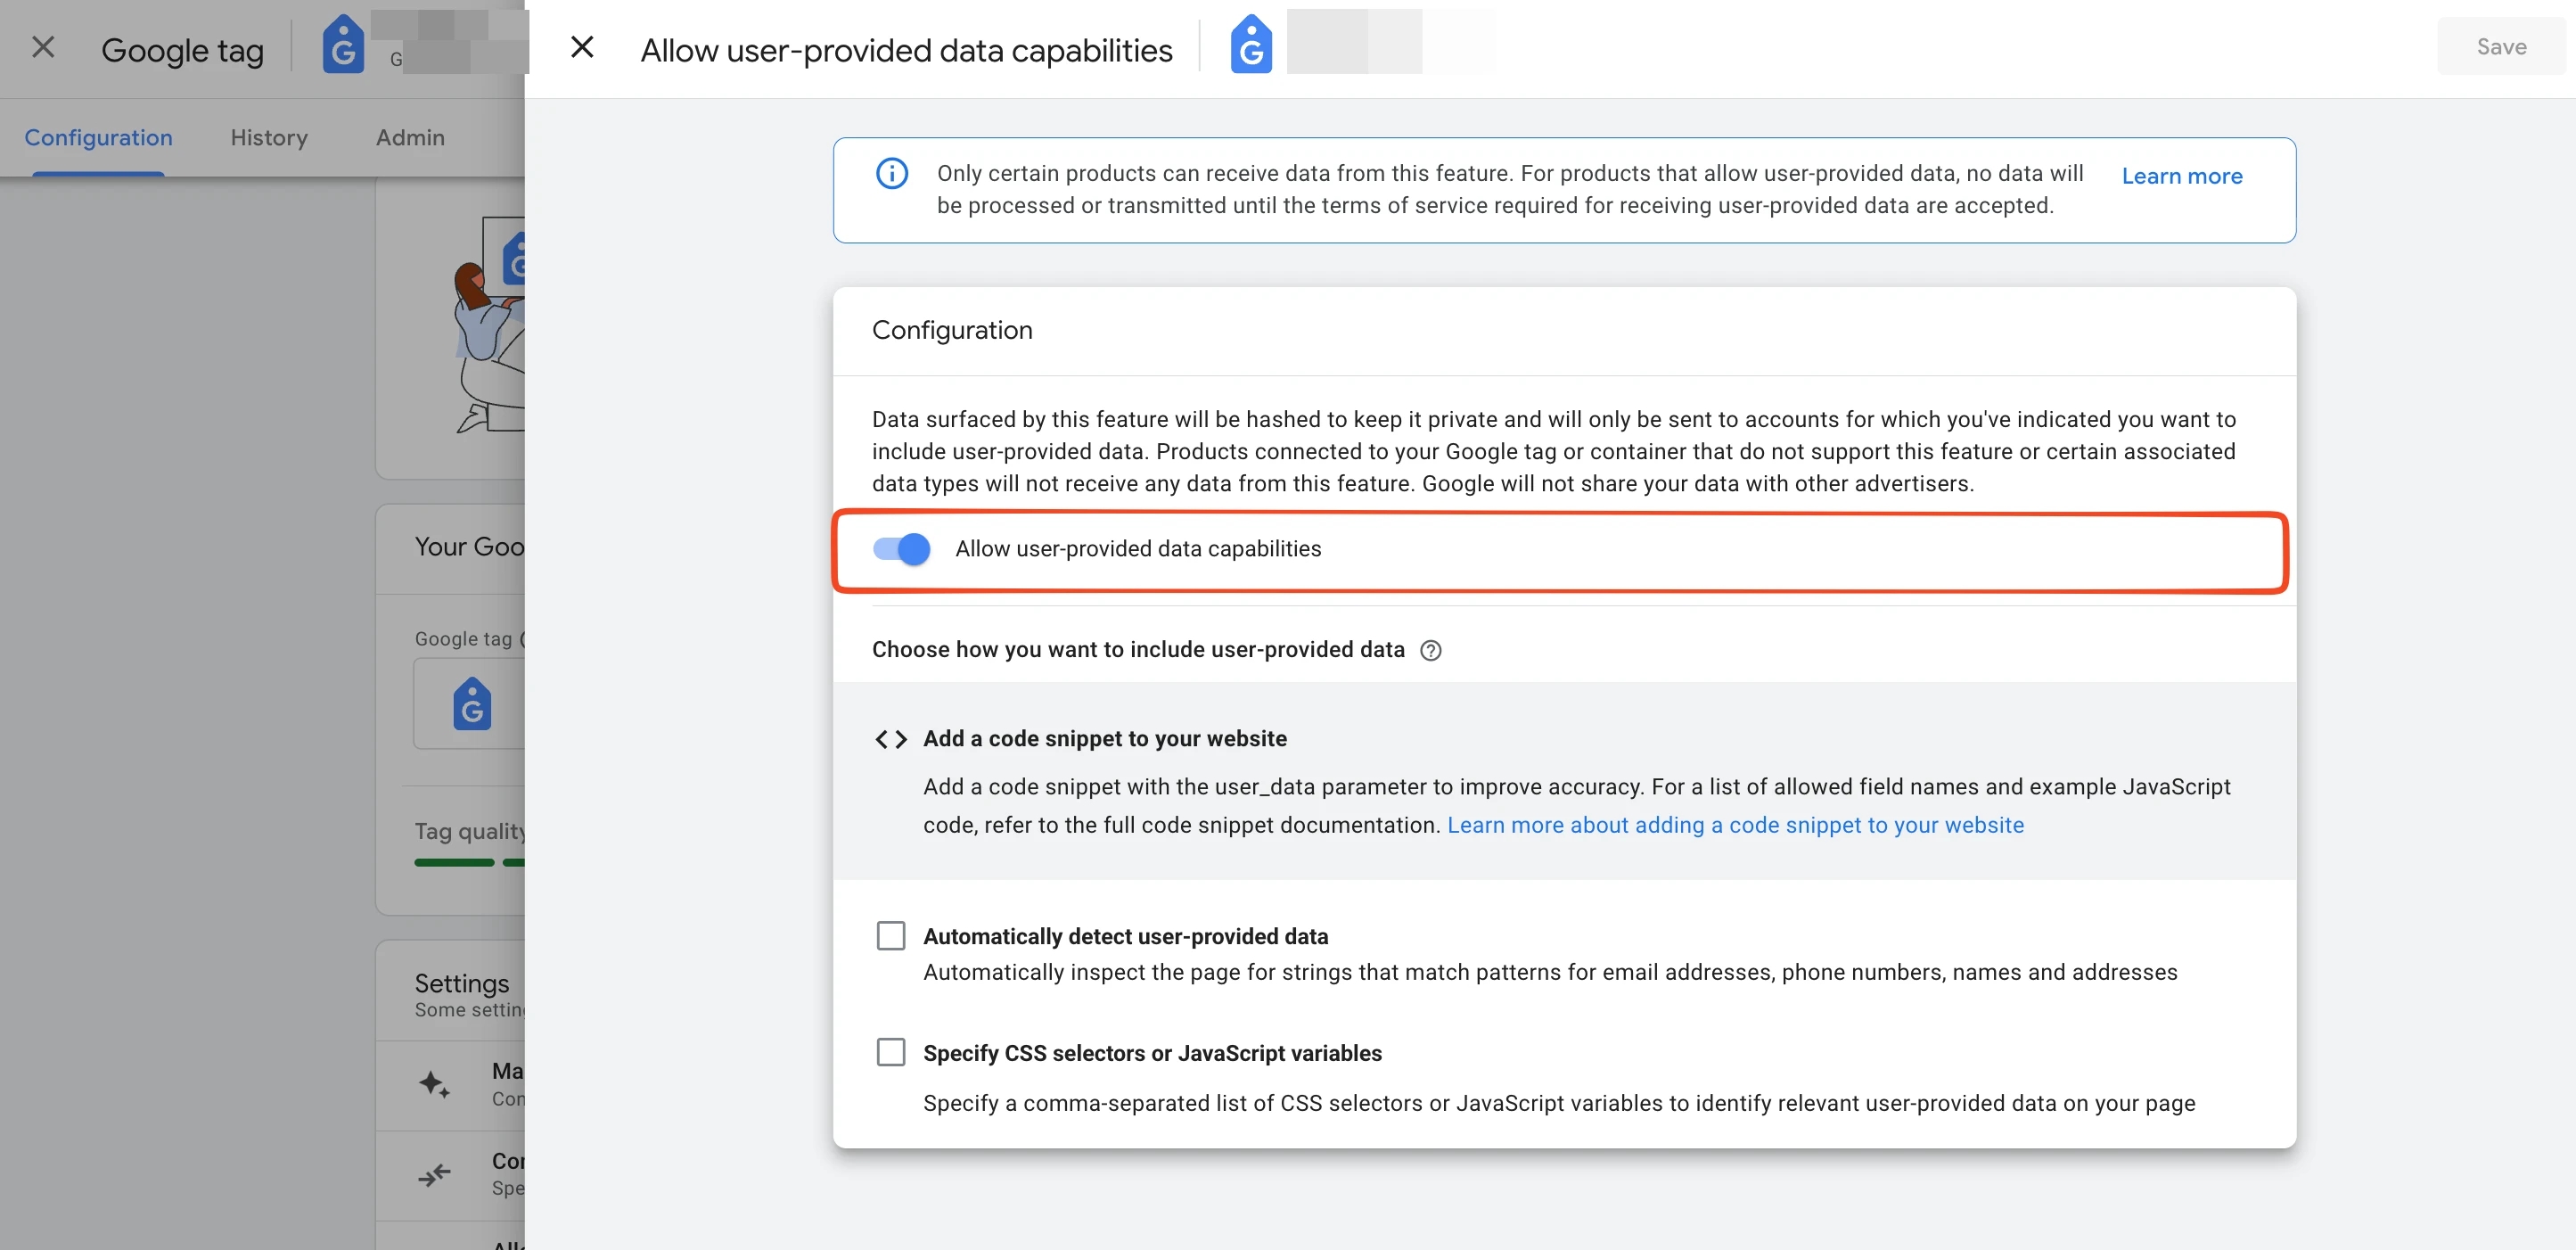
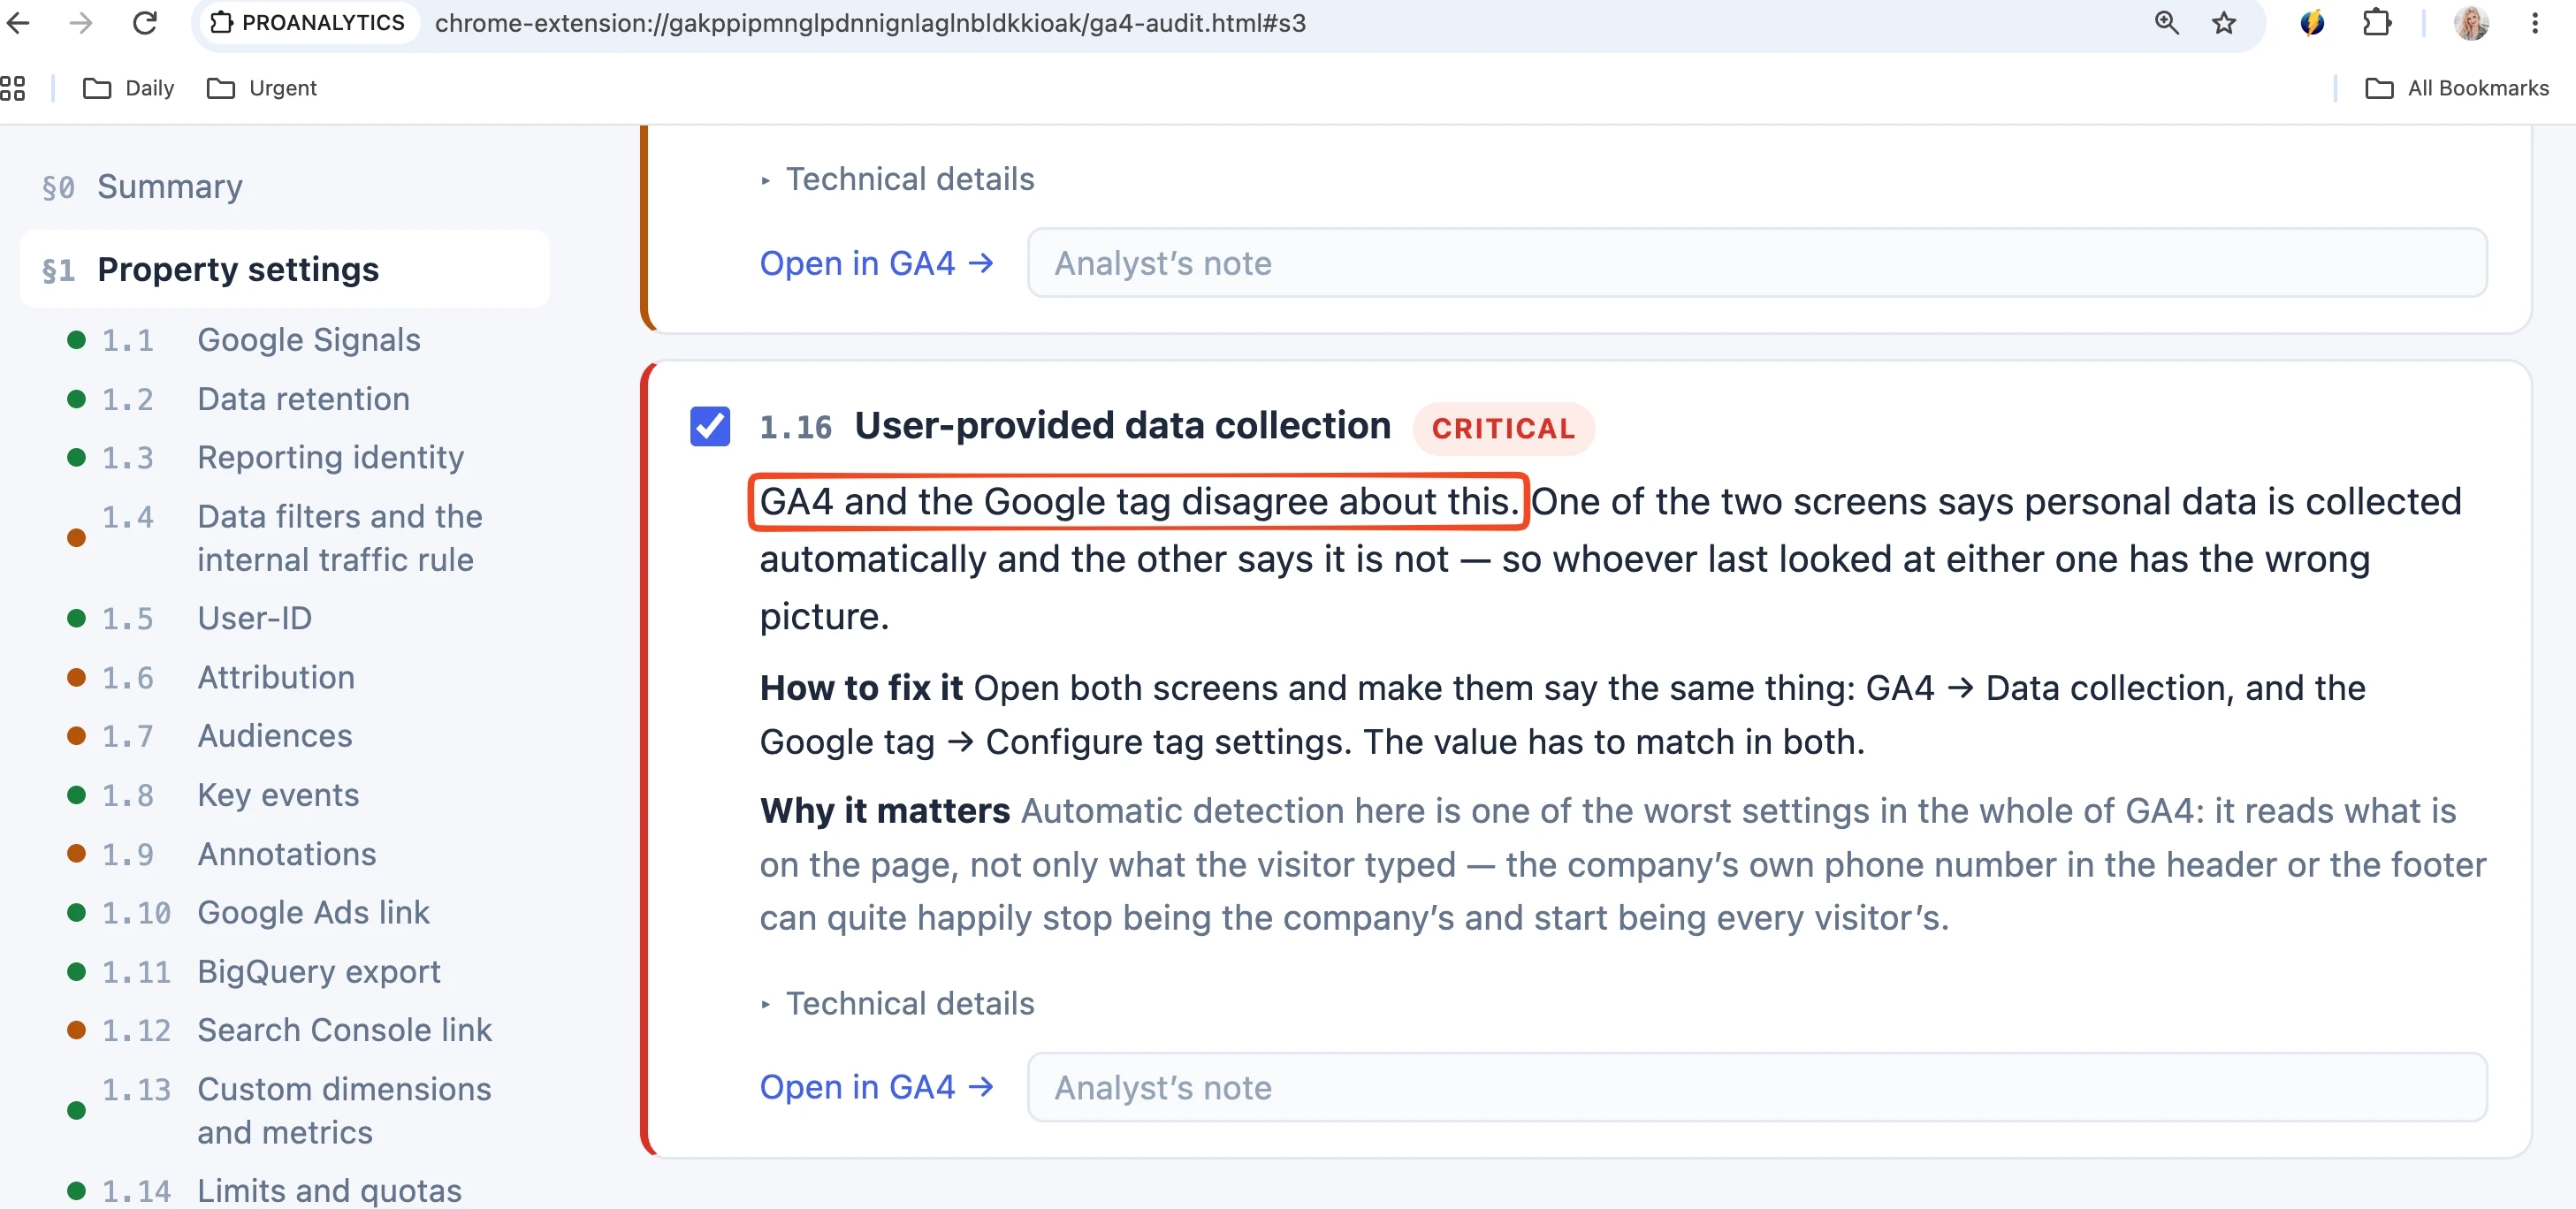
Keep in mind that a typical and very common mistake arises when GA4 and the Google tag have different settings for collecting personal data. Another tricky setting is Collect automatically-detected user-provided data. It can detect absolutely anything on the page (including a company's business phone number or email in the header or footer). As a result, the system may start interpreting the website's own contact details as a visitor's personal data.
To make the audit faster and avoid checking each section in the interfaces manually, you can use the PROANALYTICS extension. It highlights such discrepancies and auto-detection errors in one click.
Why it's convenient to fix all discrepancies before launching the migration wizard?
Even if you choose to ignore the desync at the audit stage, Google still won't let you skip it. During the update process in GTM, the system will stop you with a question and force you to make a decision:
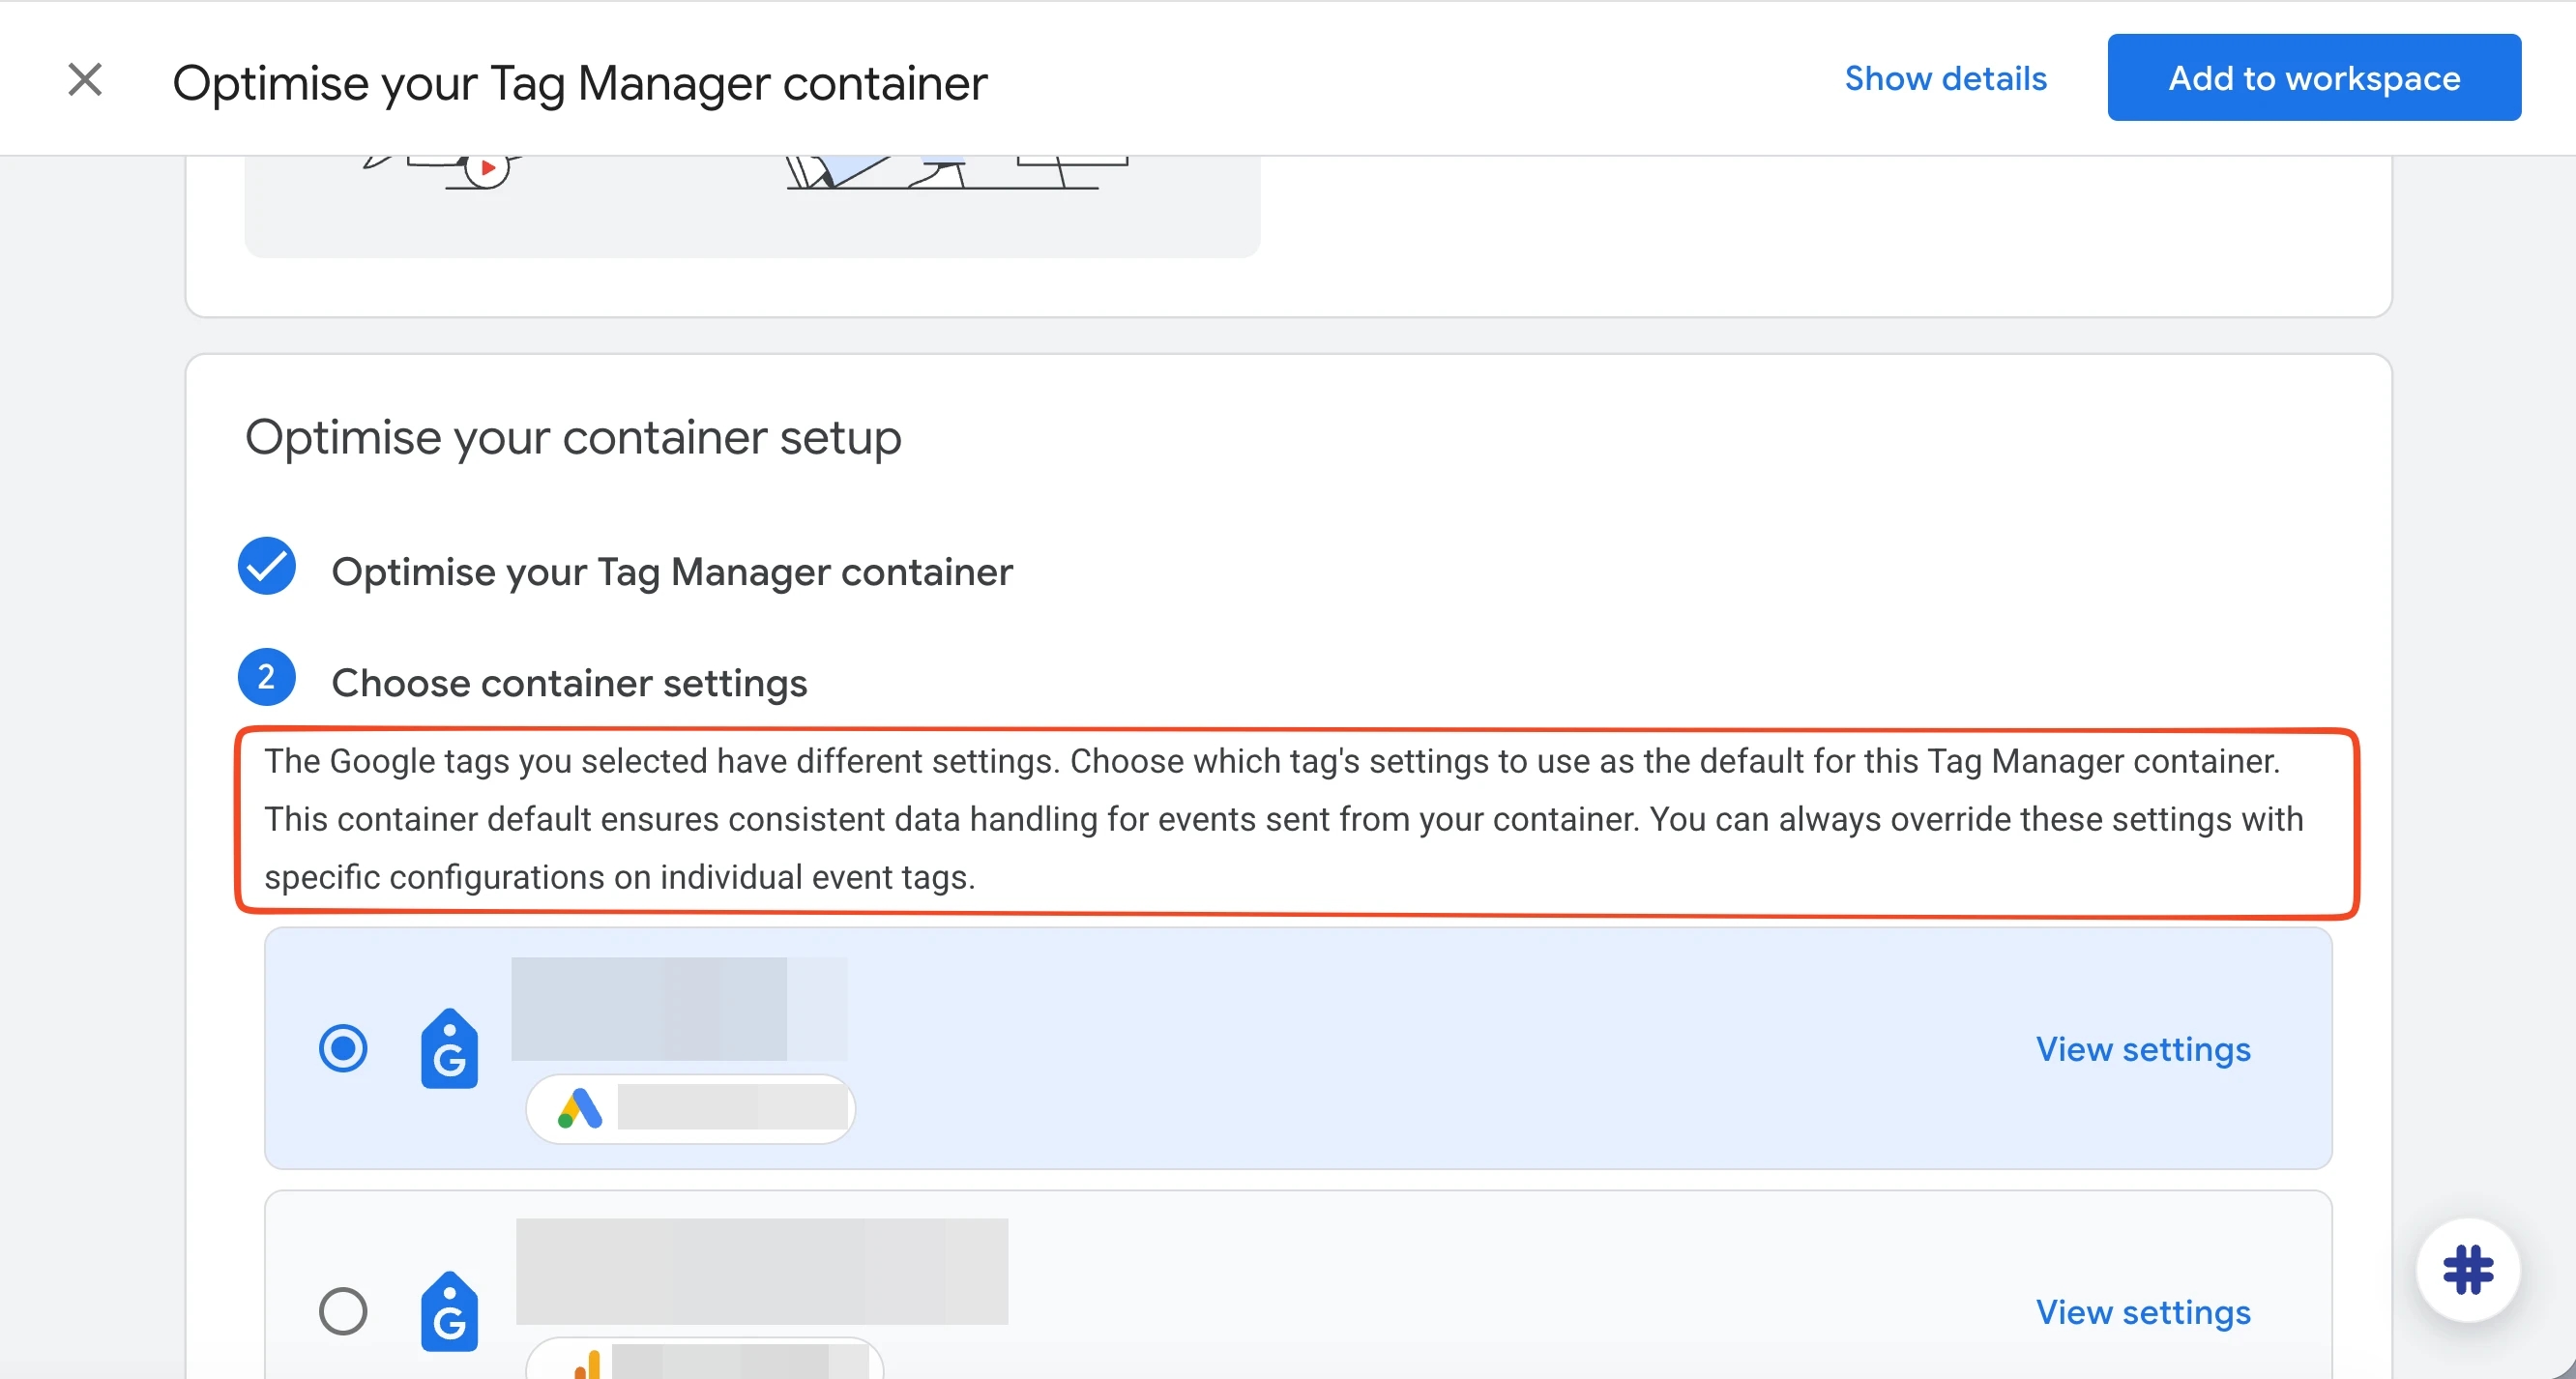
"The Google tags you selected have different settings. Choose which tag's settings to use as the defaults for this Tag Manager container. They will provide consistent data handling logic for events from your container. You can always override them in specific event tags."
Google asks you to select one of the tags as the "reference" tag, whose settings will become the defaults for the entire container. So you don't have to guess which tag is configured more correctly, and don't accidentally pull incorrect parameters from GA4 into Google Ads (or vice versa), it's much safer to make sure your settings are "OK" across the board before launching the migration.
Once the audit and preparation are complete, you can move on to implementing the "Google-recommended optimization to add tags faster and more easily."
Step-by-Step Migration in GTM
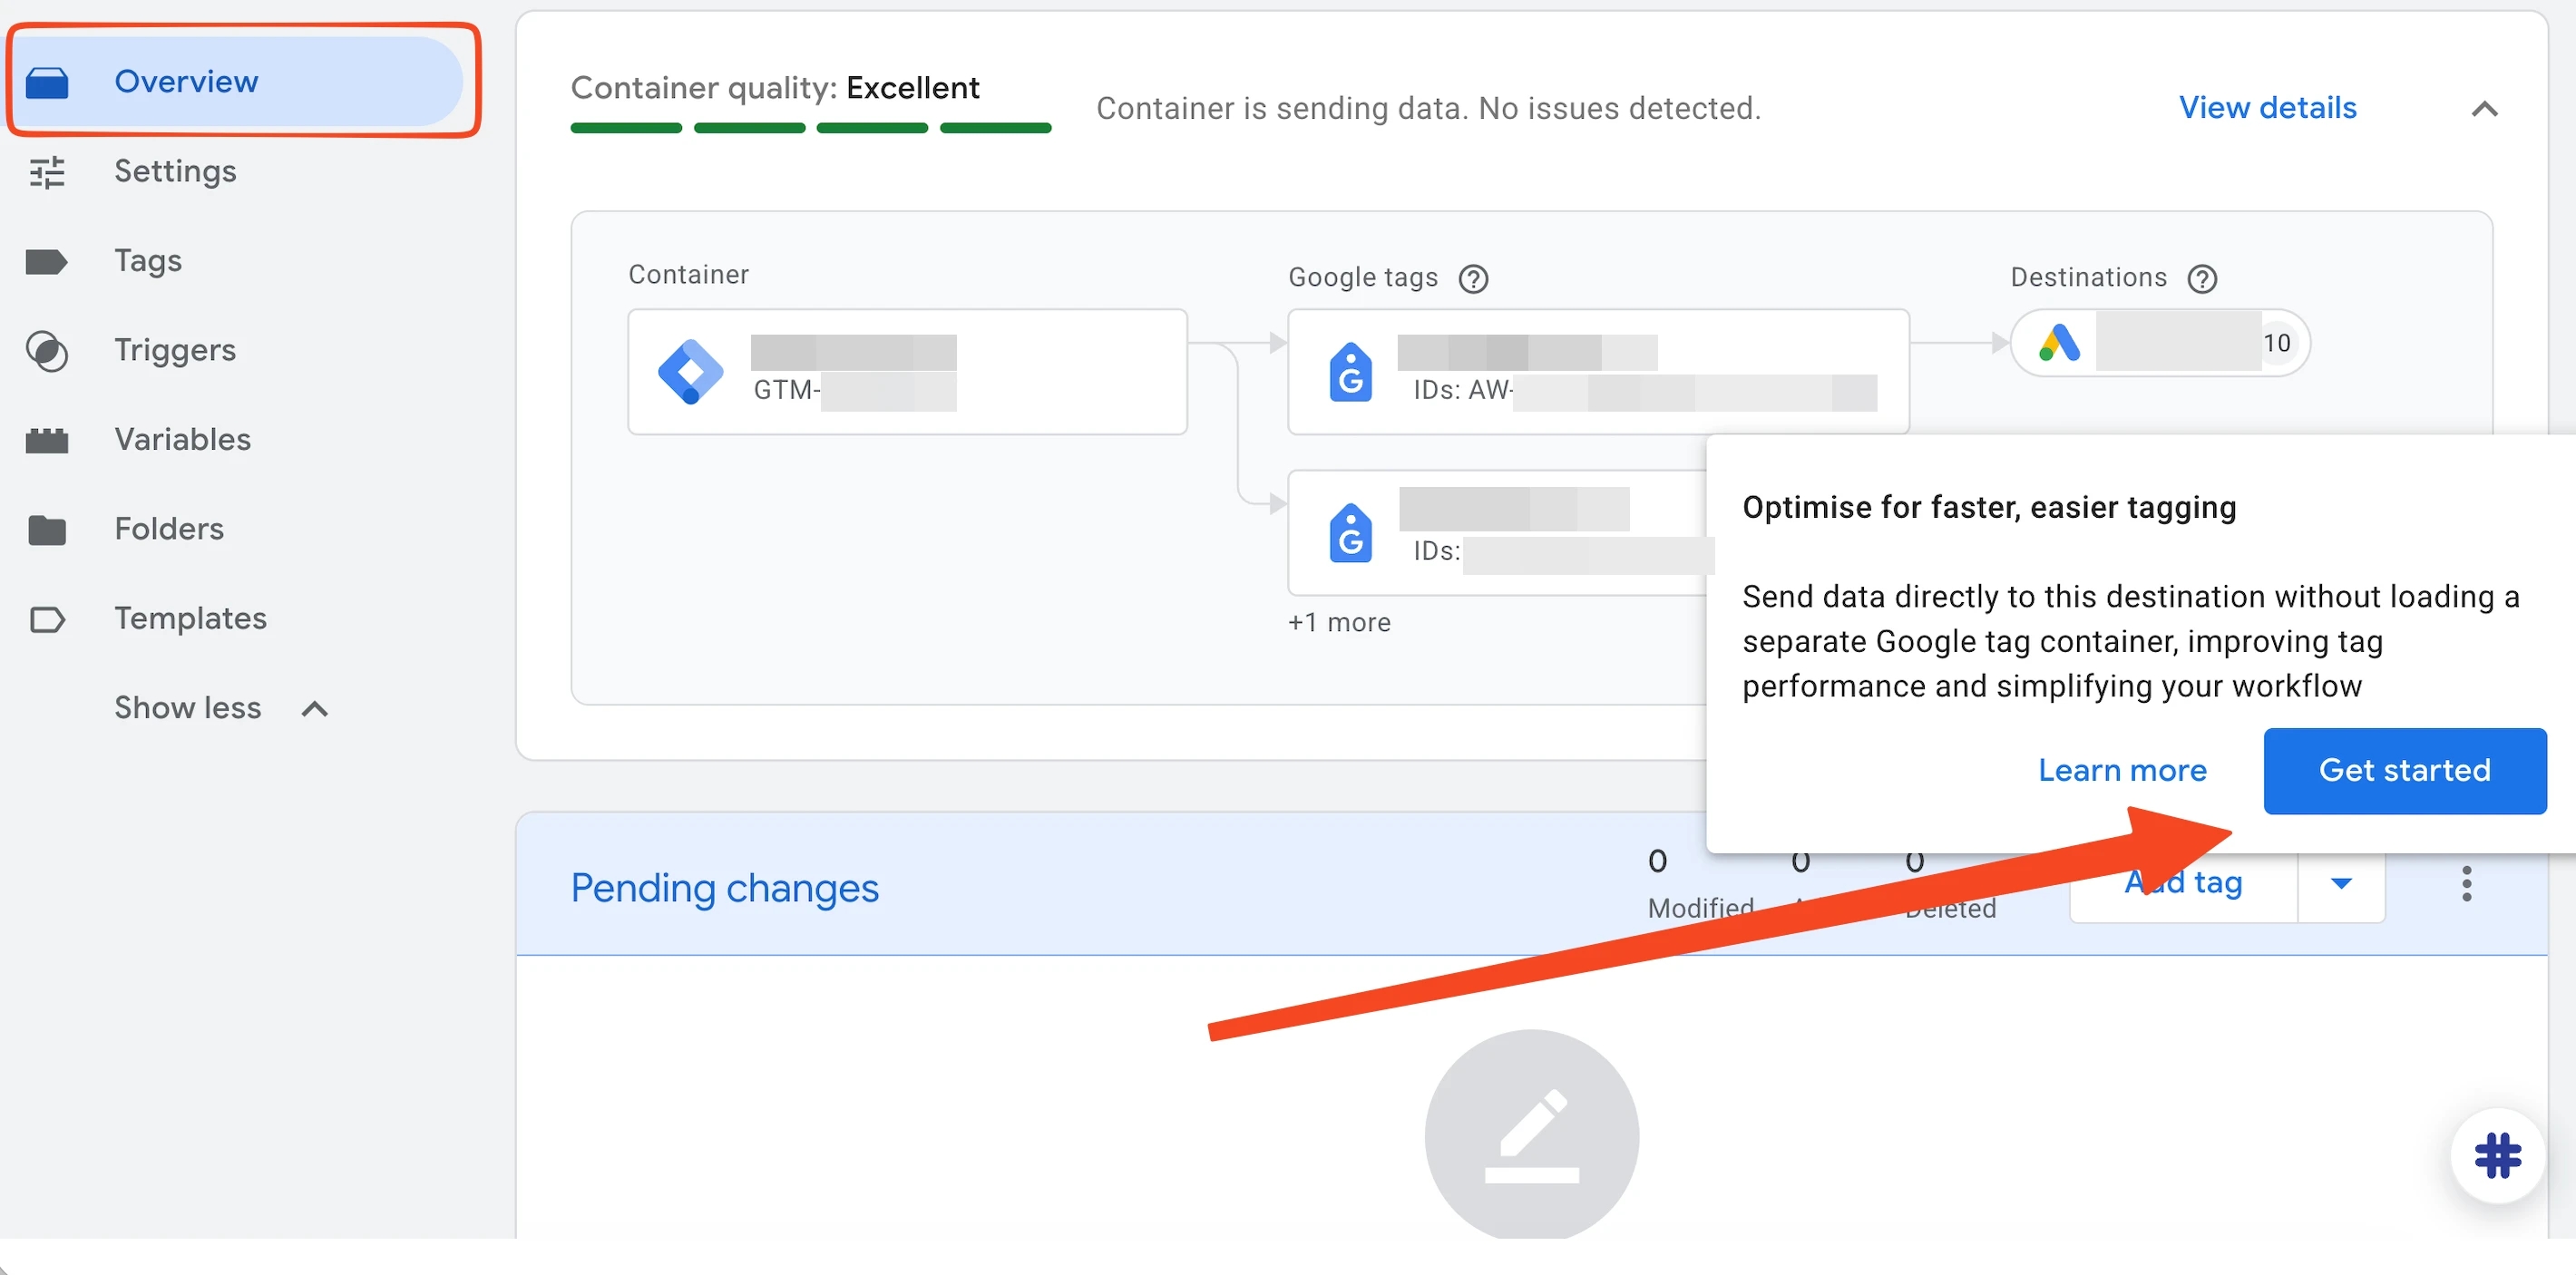
Step 1. Open Overview and start by clicking the Get started button on the tag card.
Step 2: Select the tags to migrate.
- Use the checkboxes to choose the tags you want to move into this container. To complete the optimization, Google recommends selecting all tags, but we're doing this with understanding, not trusting blindly.
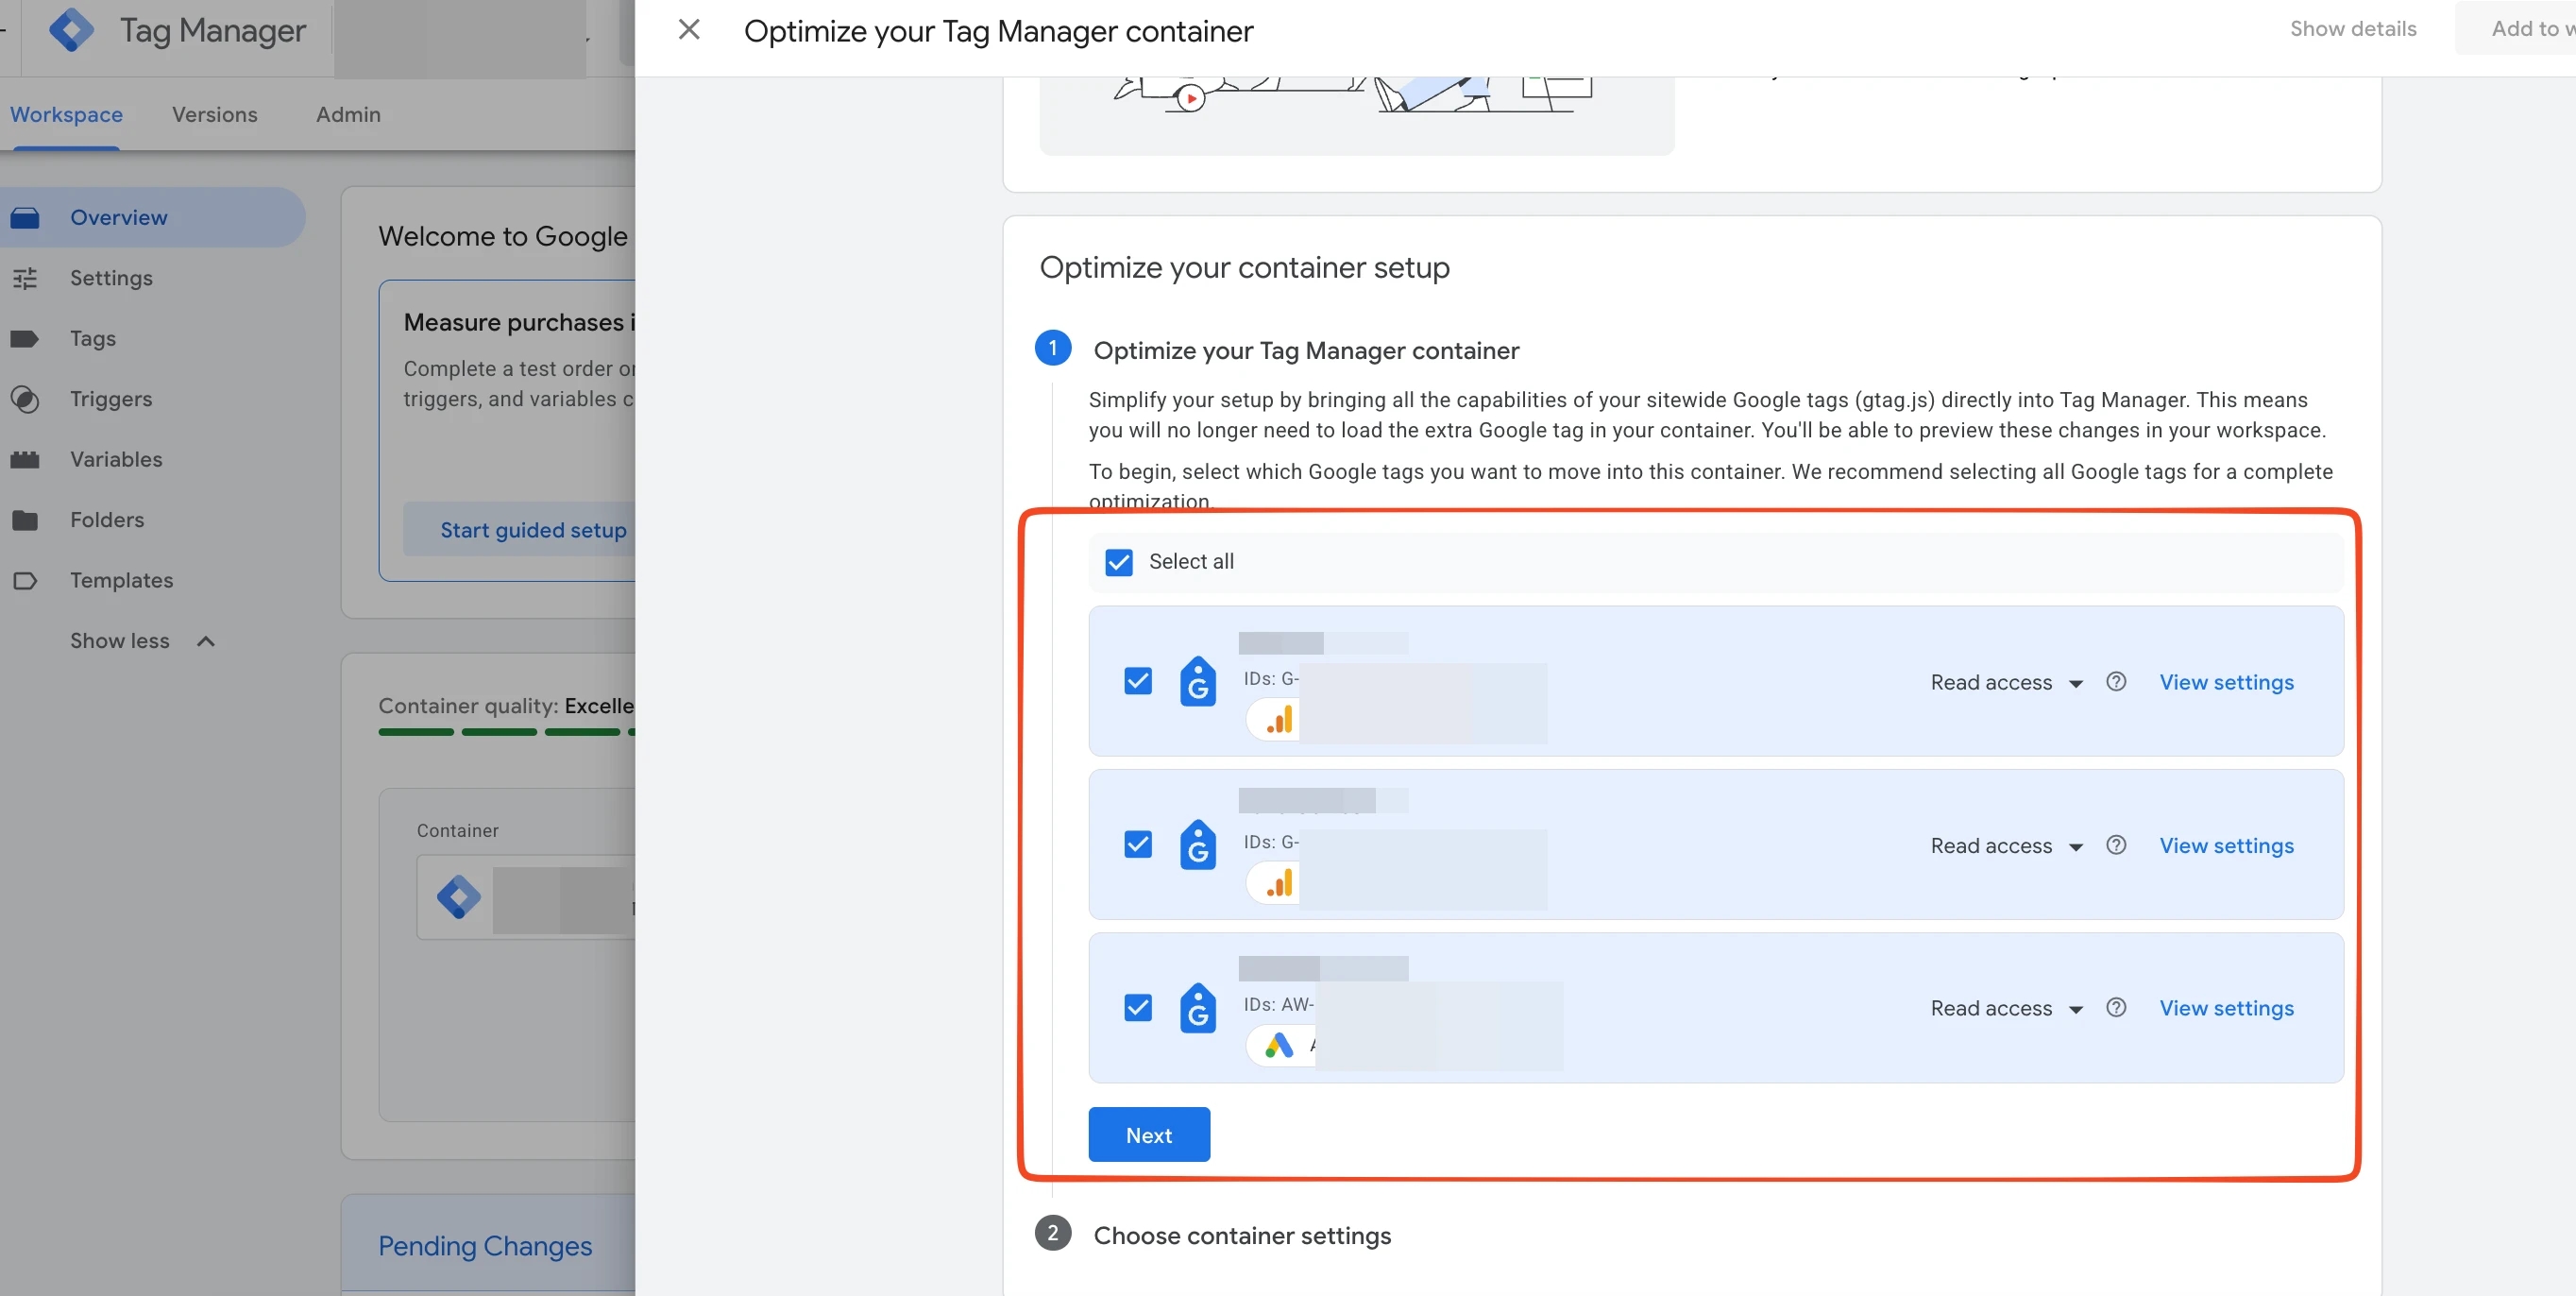
Pay attention to access: if you leave Read access enabled, users with access to Google Ads / GA4 will be able to see the contents of the GTM container in read-only mode.
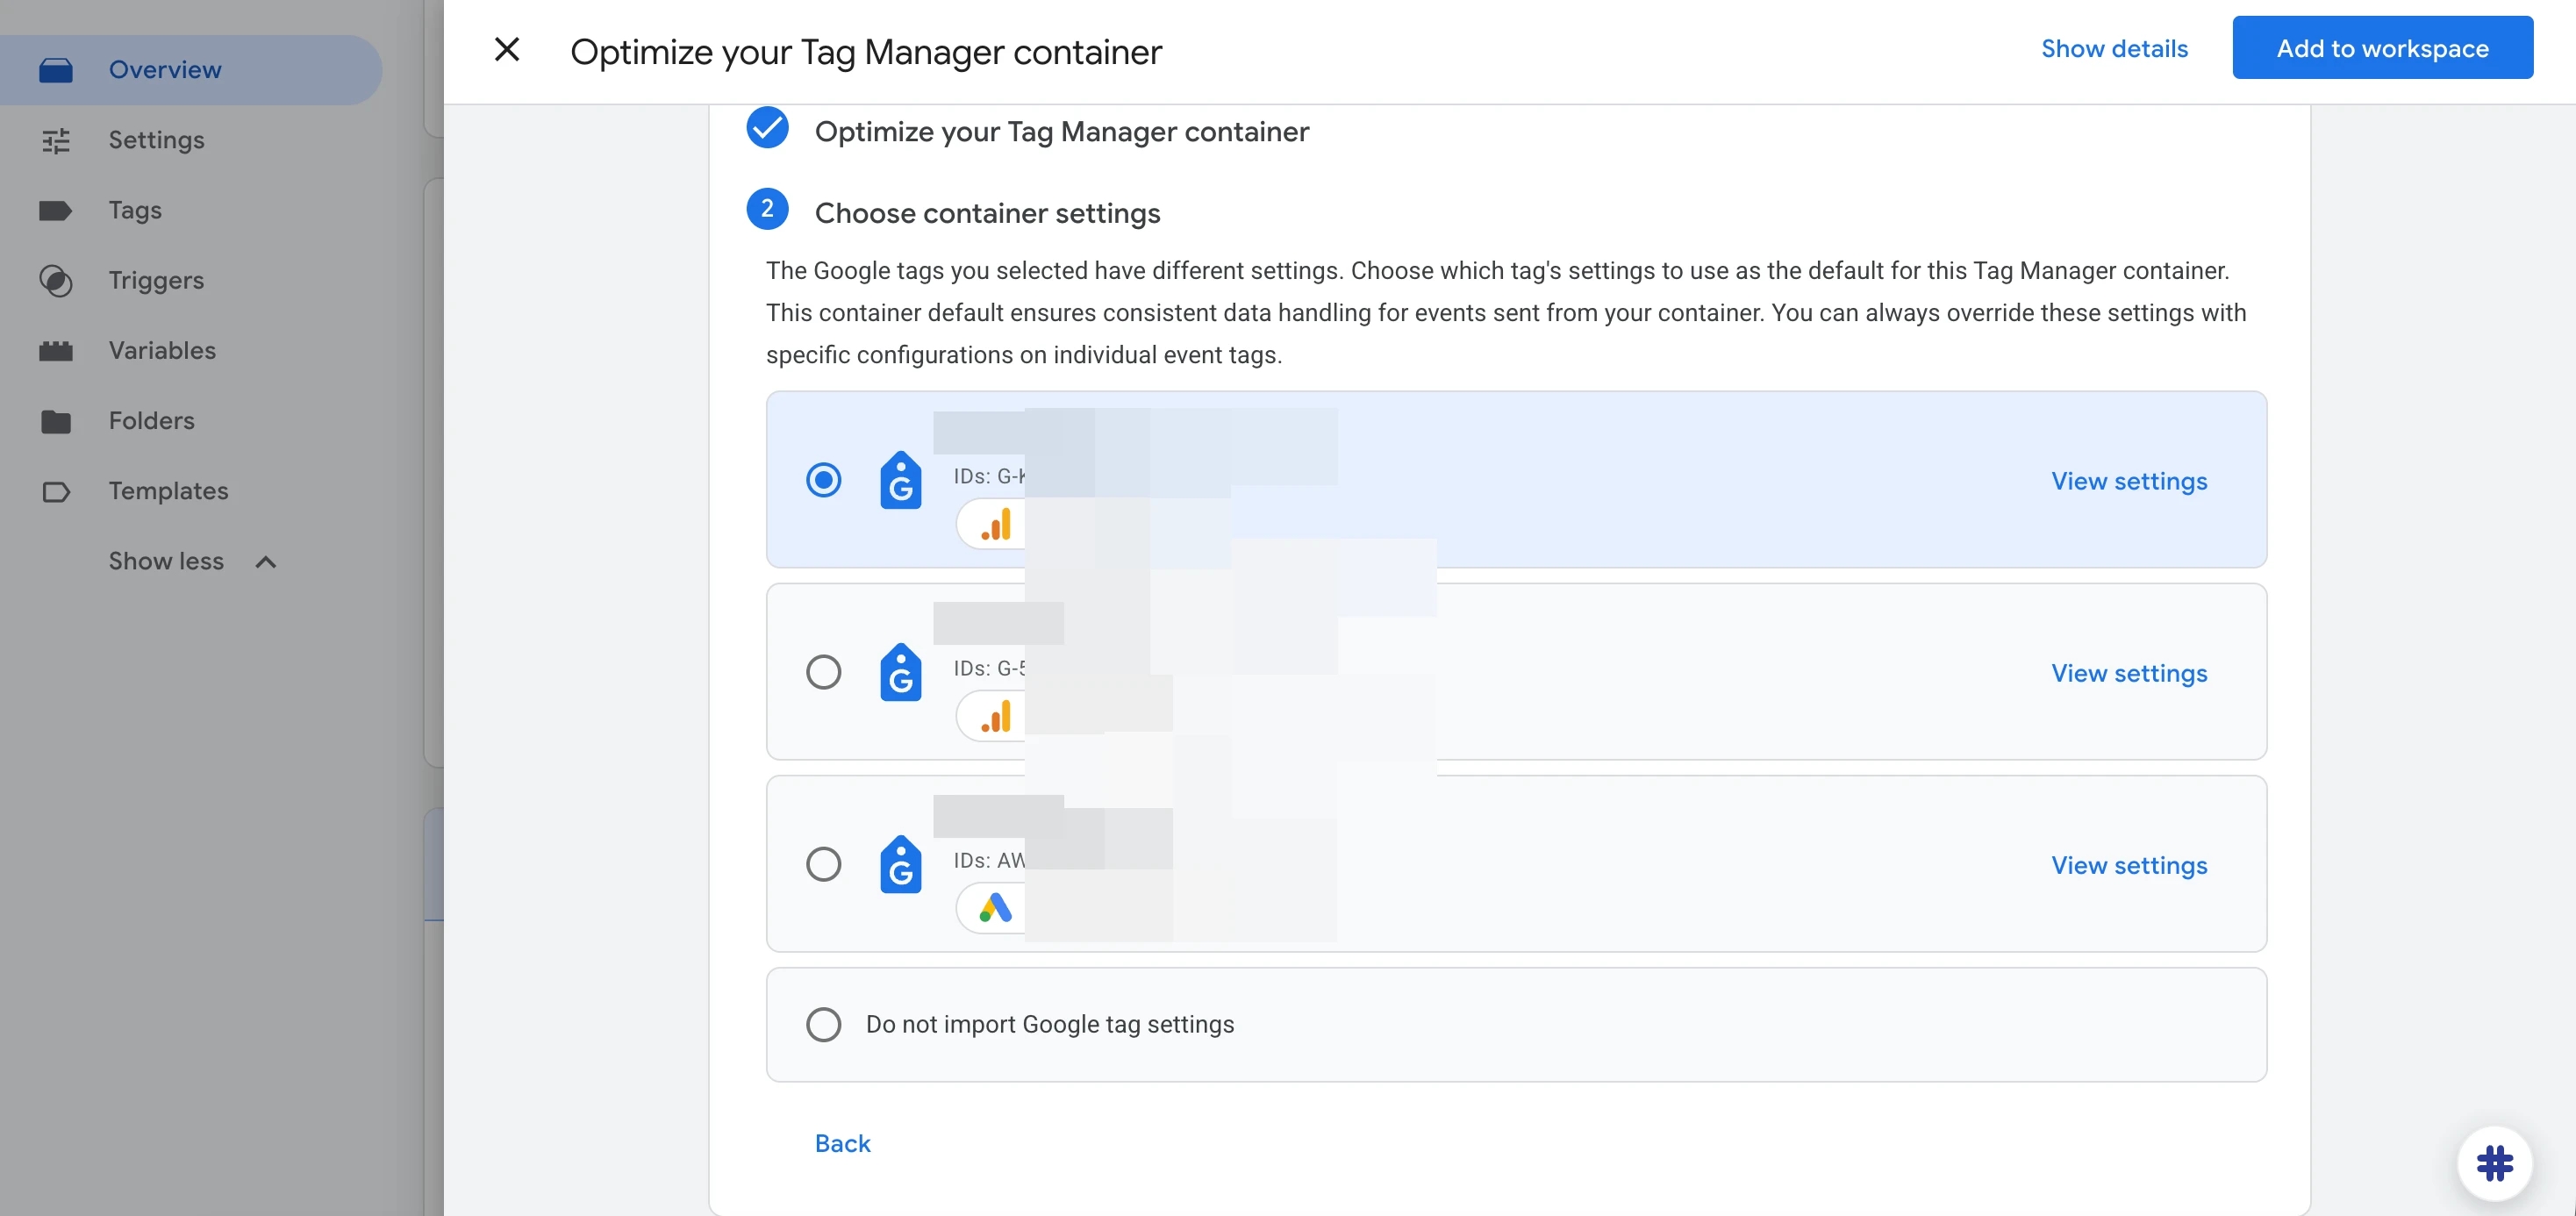
Step 3: Choose the container's default settings.
- Select the "reference" tag: the tag (for example, GA4 or Google Ads) from which GTM will copy the shared settings — User-Provided Data, cross-domain tracking, and internal traffic filters.
- Check the configuration: before making your final choice, you can additionally compare each tag's parameters by clicking View settings.
- Commit the changes: click the Add to workspace button in the top right corner.
What Changes in the GTM Interface After Migration
- The updated Overview and version control in GTM.
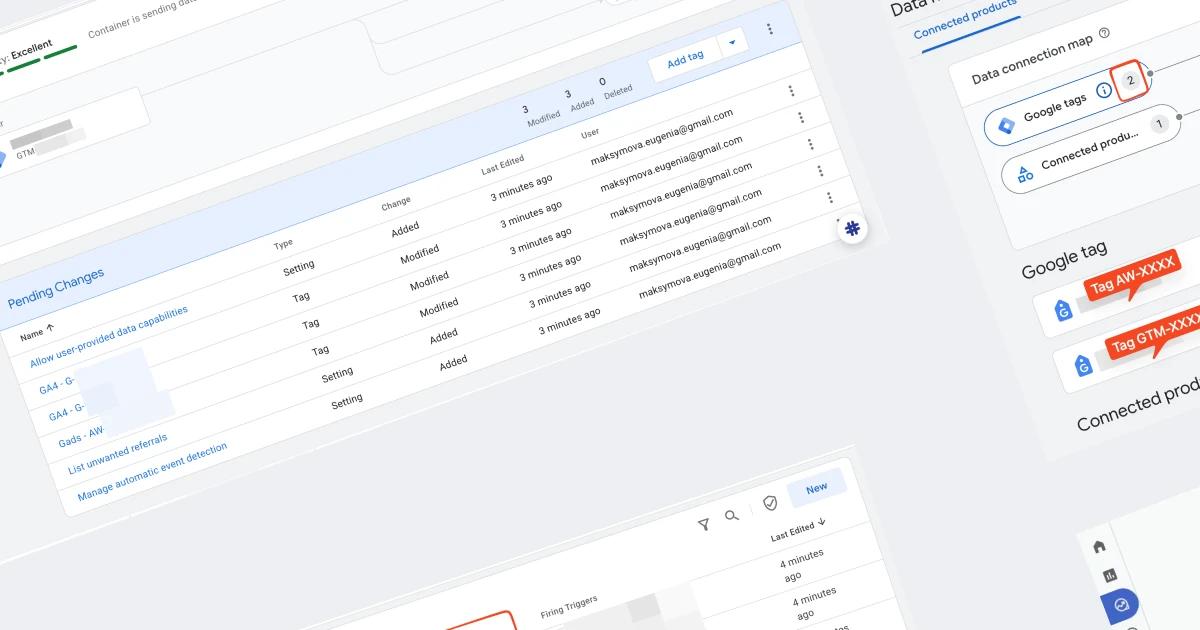
After you confirm the settings in the wizard, you'll return to the main Overview screen. Here you'll see the updated visual map: instead of the familiar diagram with separate Google tags, it now shows a direct connection between the GTM container itself and its Destinations. The old "Google tags" entity disappears from the visual entirely. And a little further down, in the Pending Changes section, a list of the changes made will appear.
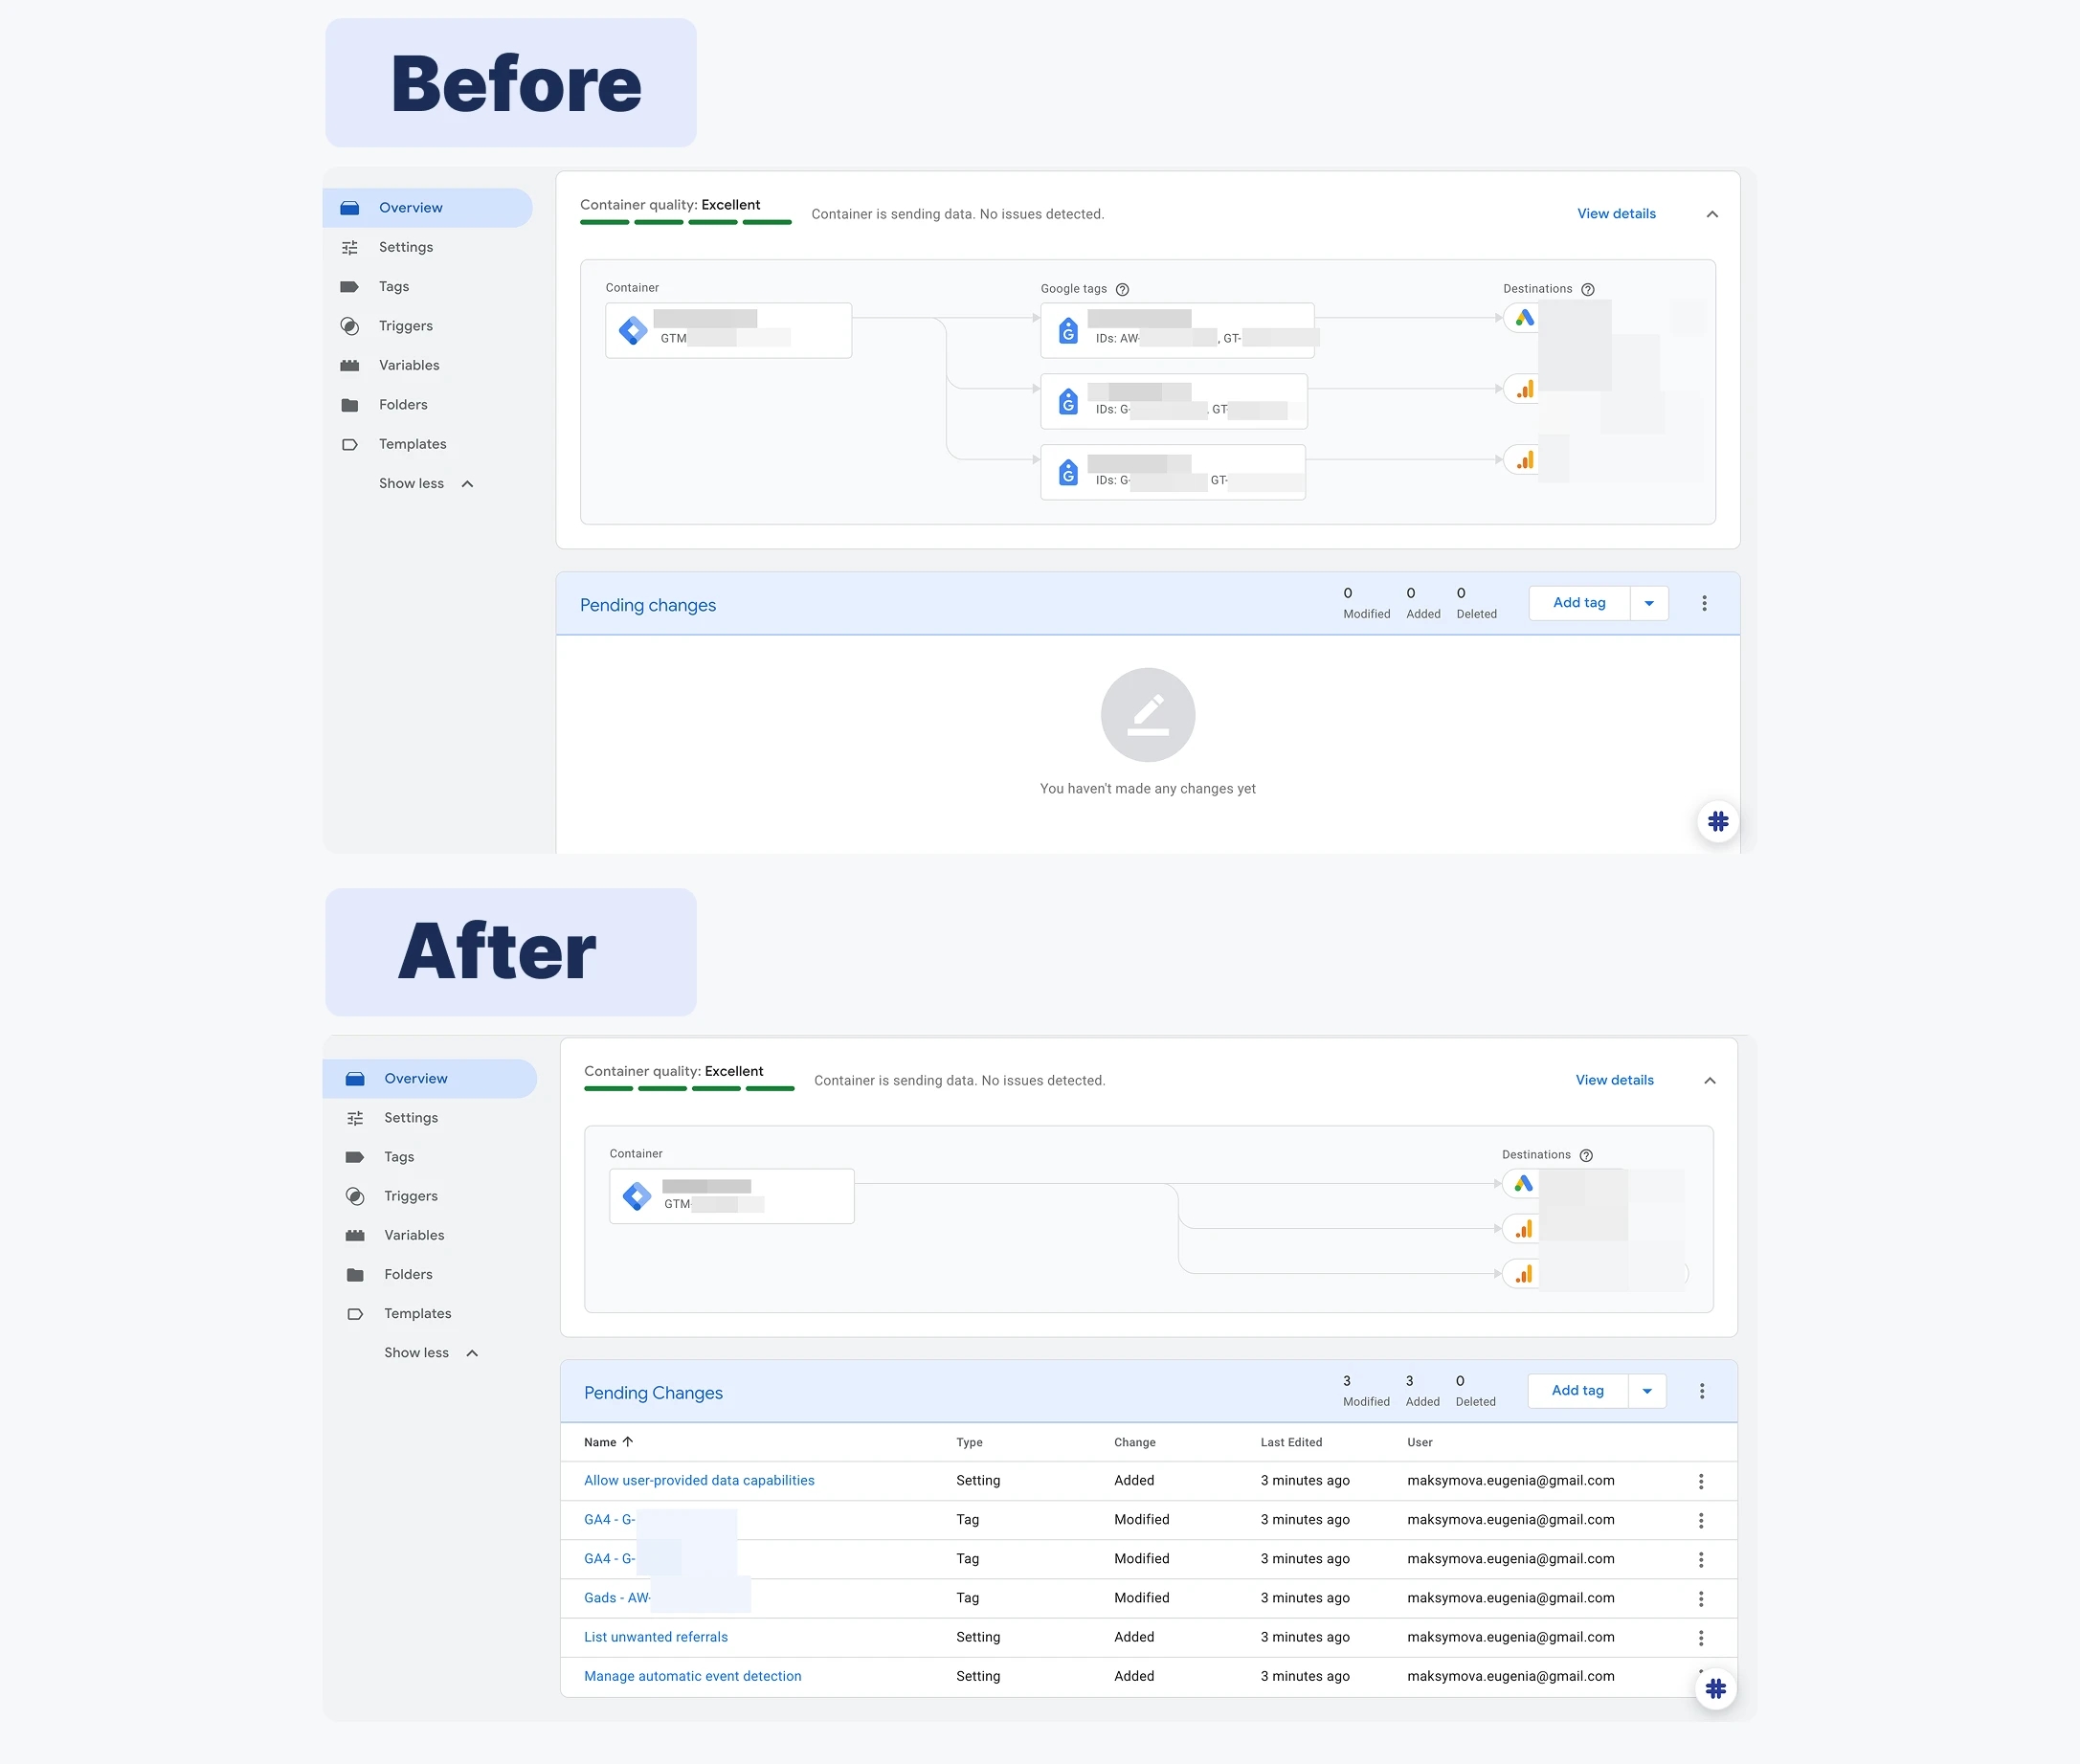
The main benefit of the update is full versioning of settings: new configurations are no longer applied blindly. They are saved to your workspace as a draft (Pending Changes). Unlike the old settings in the GA4 or Ads interfaces, tag changes are now entirely integrated into the standard GTM environment. They do NOT affect the live version of the website until you review them thoroughly in Preview mode and deliberately publish the changes. And if something goes wrong after publishing, you can always roll the container back to the previous version with a single click.
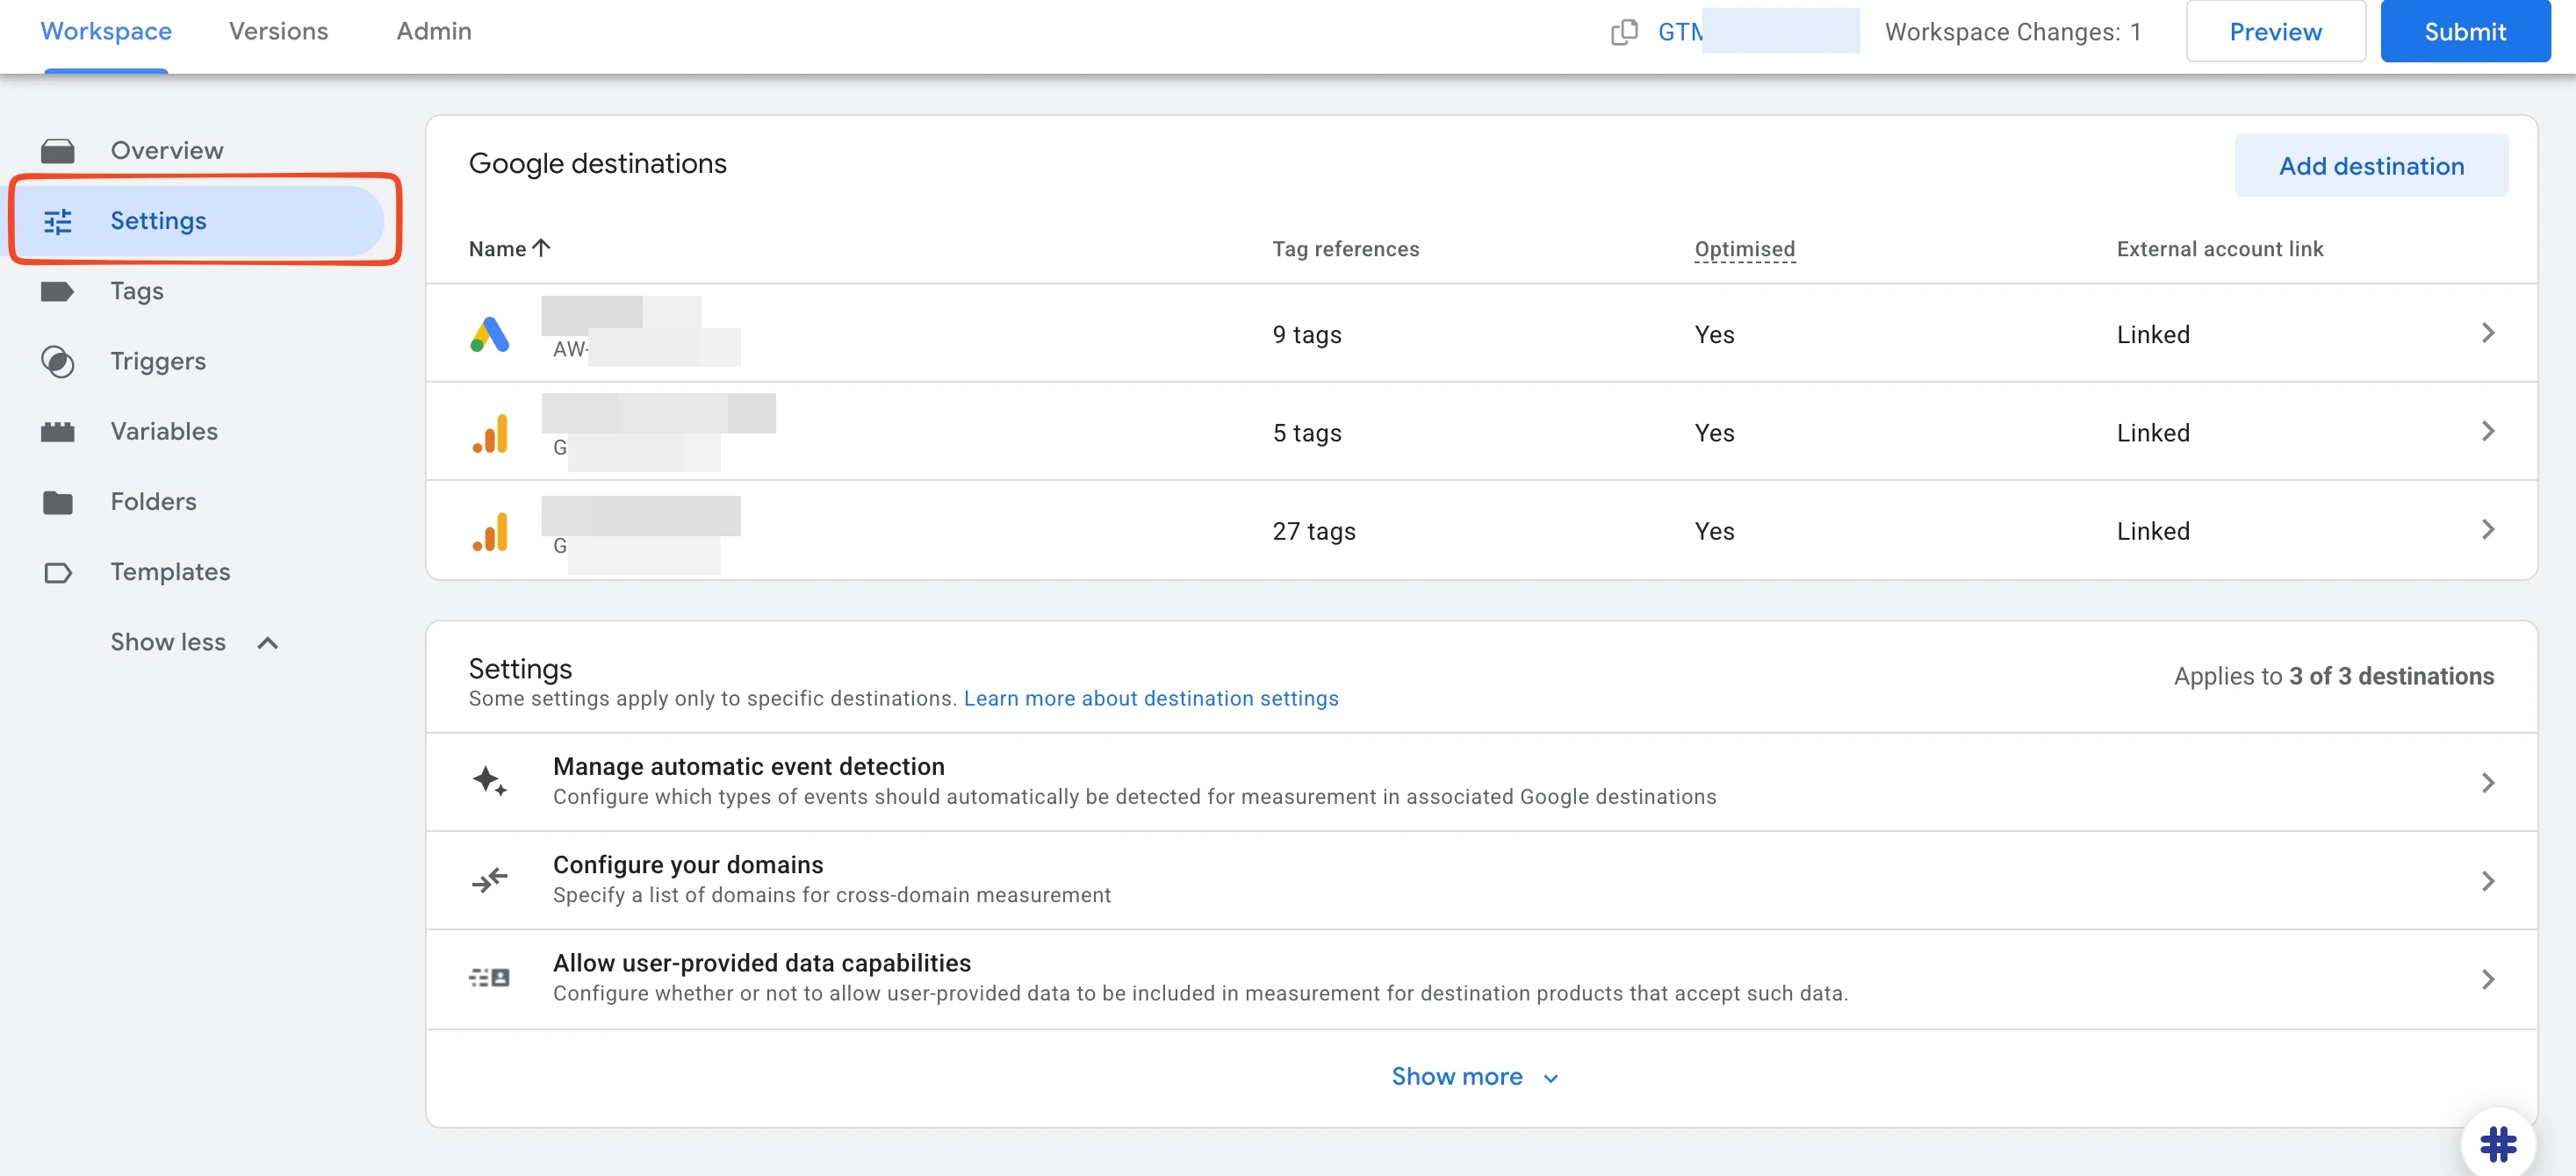
- Global settings in the Settings tab: a new section for centralized management of Destinations appears here, applying to all connected Google services at once.
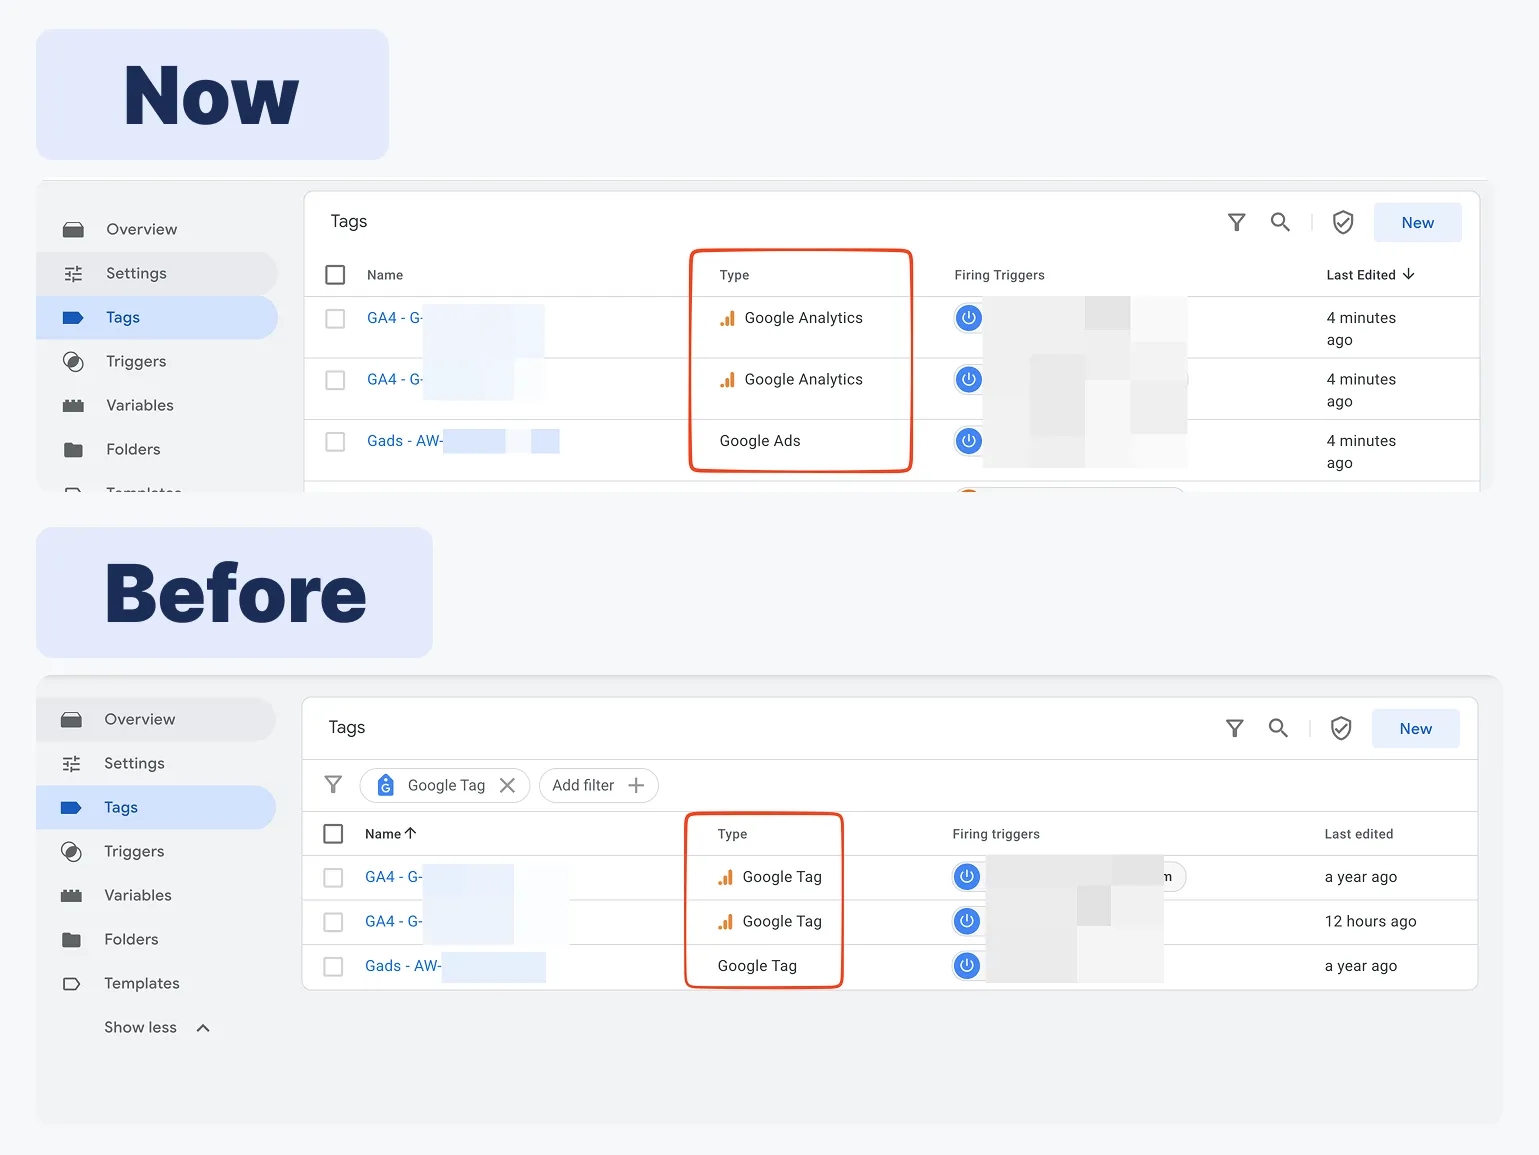
- Change of tag types in the Tags tab: classic Google tags become Destinations (the Google Ads / GA4 destination tags in the screenshot below).
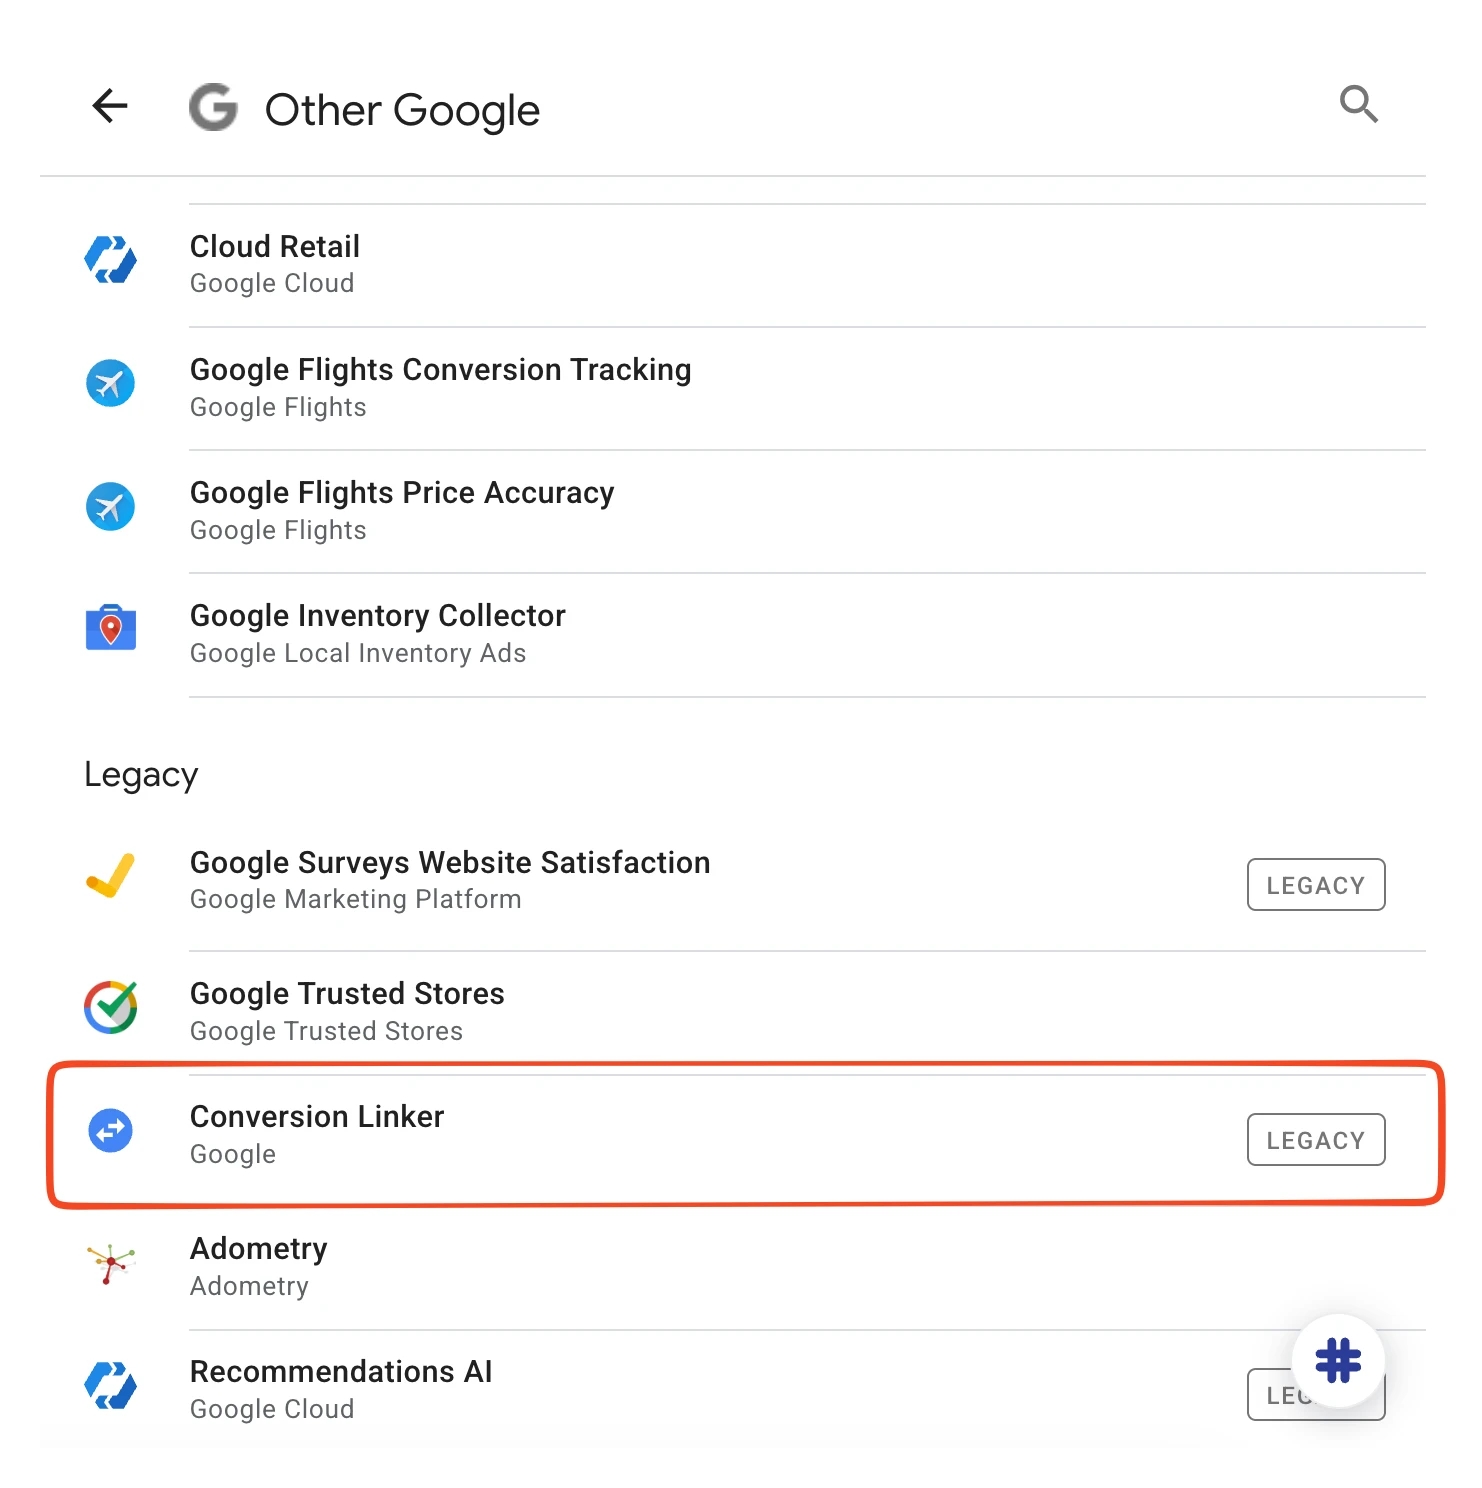
- Changes in the tag gallery: another interesting sign of the update appears when you create a new tag in GTM. If you try to add a new tag through the template gallery, you'll see that the classic Google tag has moved to a separate section, "off to the periphery" — Other Google, where Conversion Linker is also found, now marked as Legacy.
Checking settings in Preview mode and new features
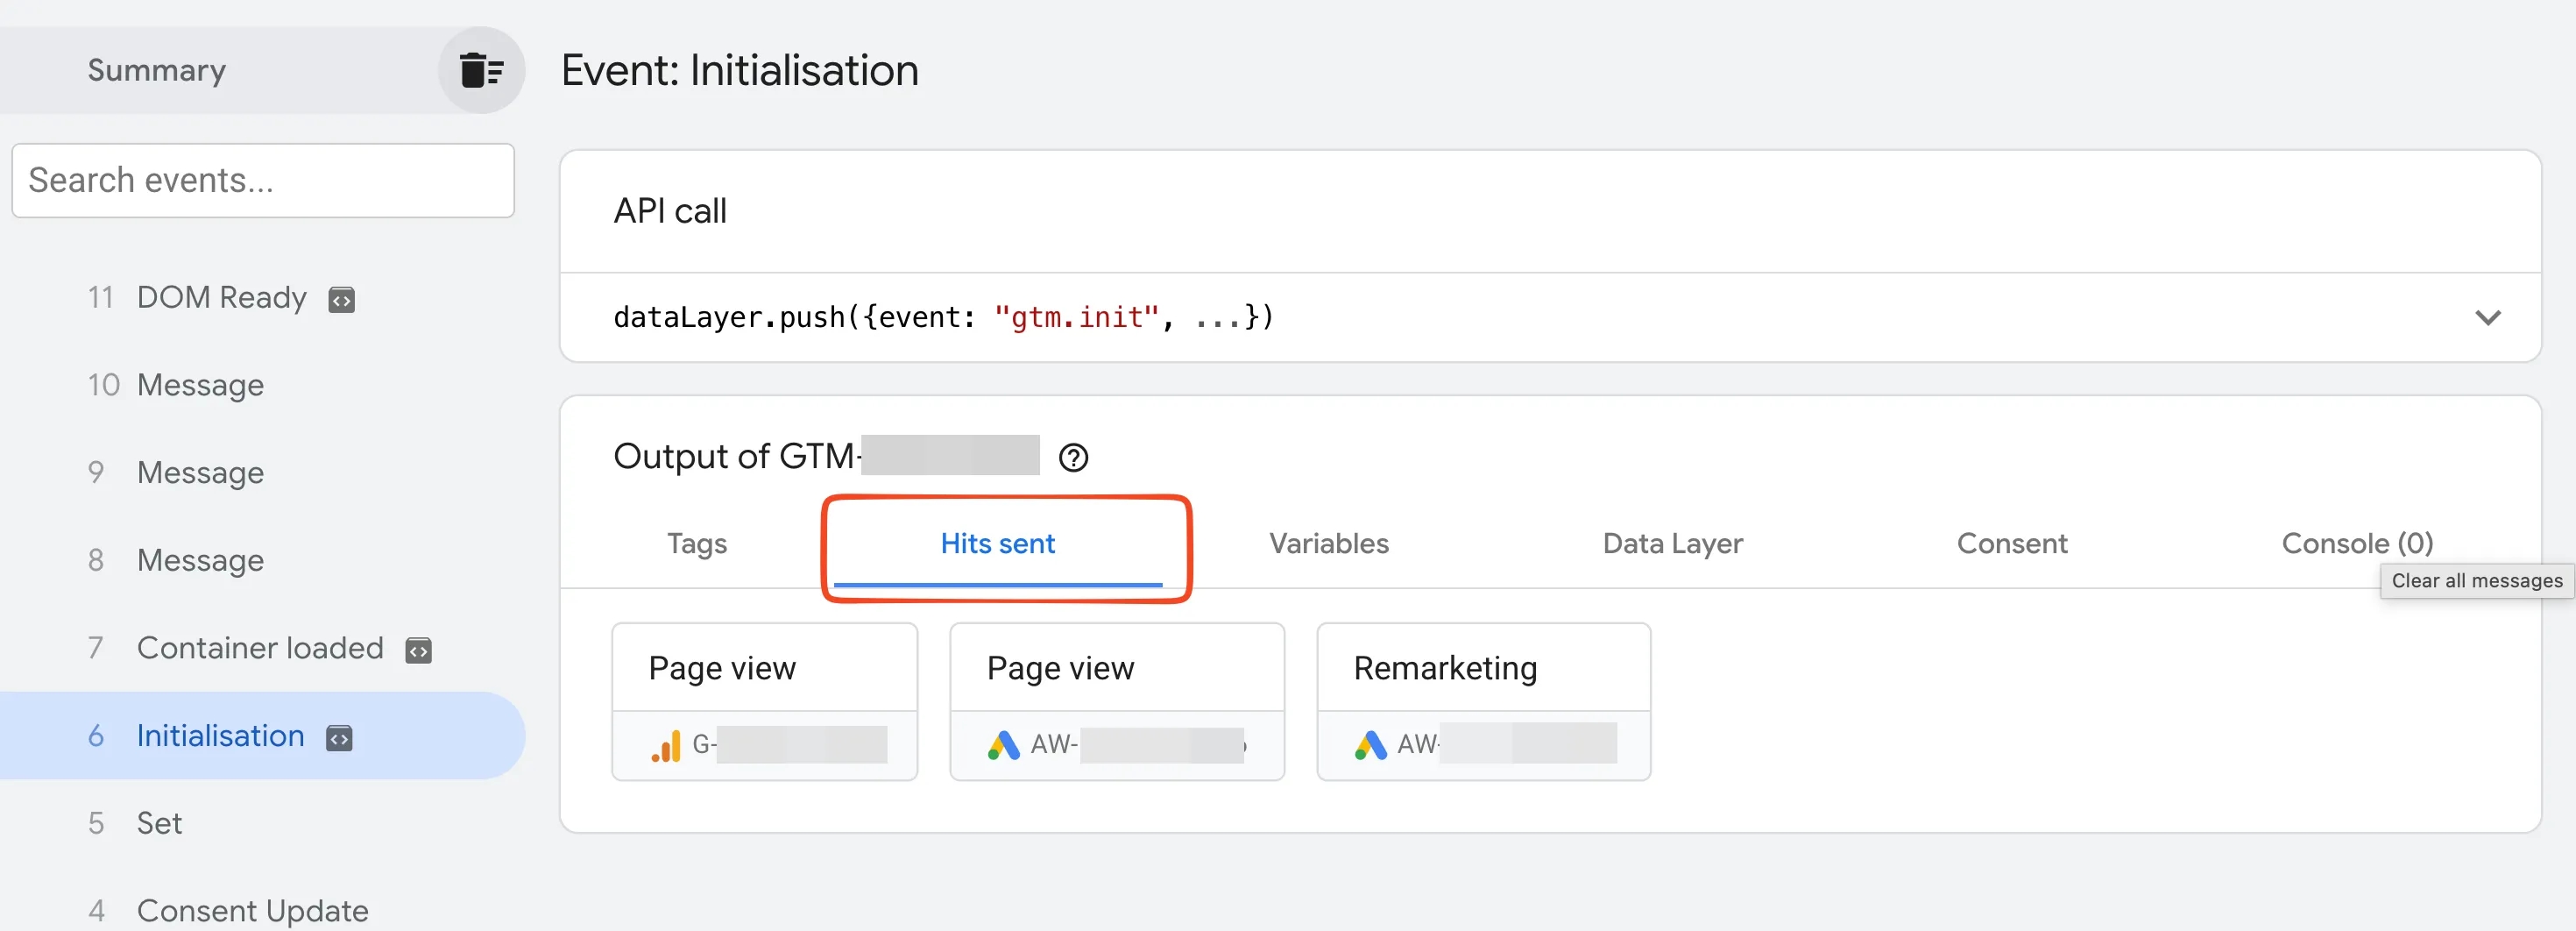
- A new Hits sent tab has appeared directly at the GTM container level, showing all requests transmitted to Google Ads and GA4 in one place.
- Instead of several separate tags, as in the previous configuration, you can see now a single Google tag, with the GA4 and Google Ads IDs listed as Destinations.
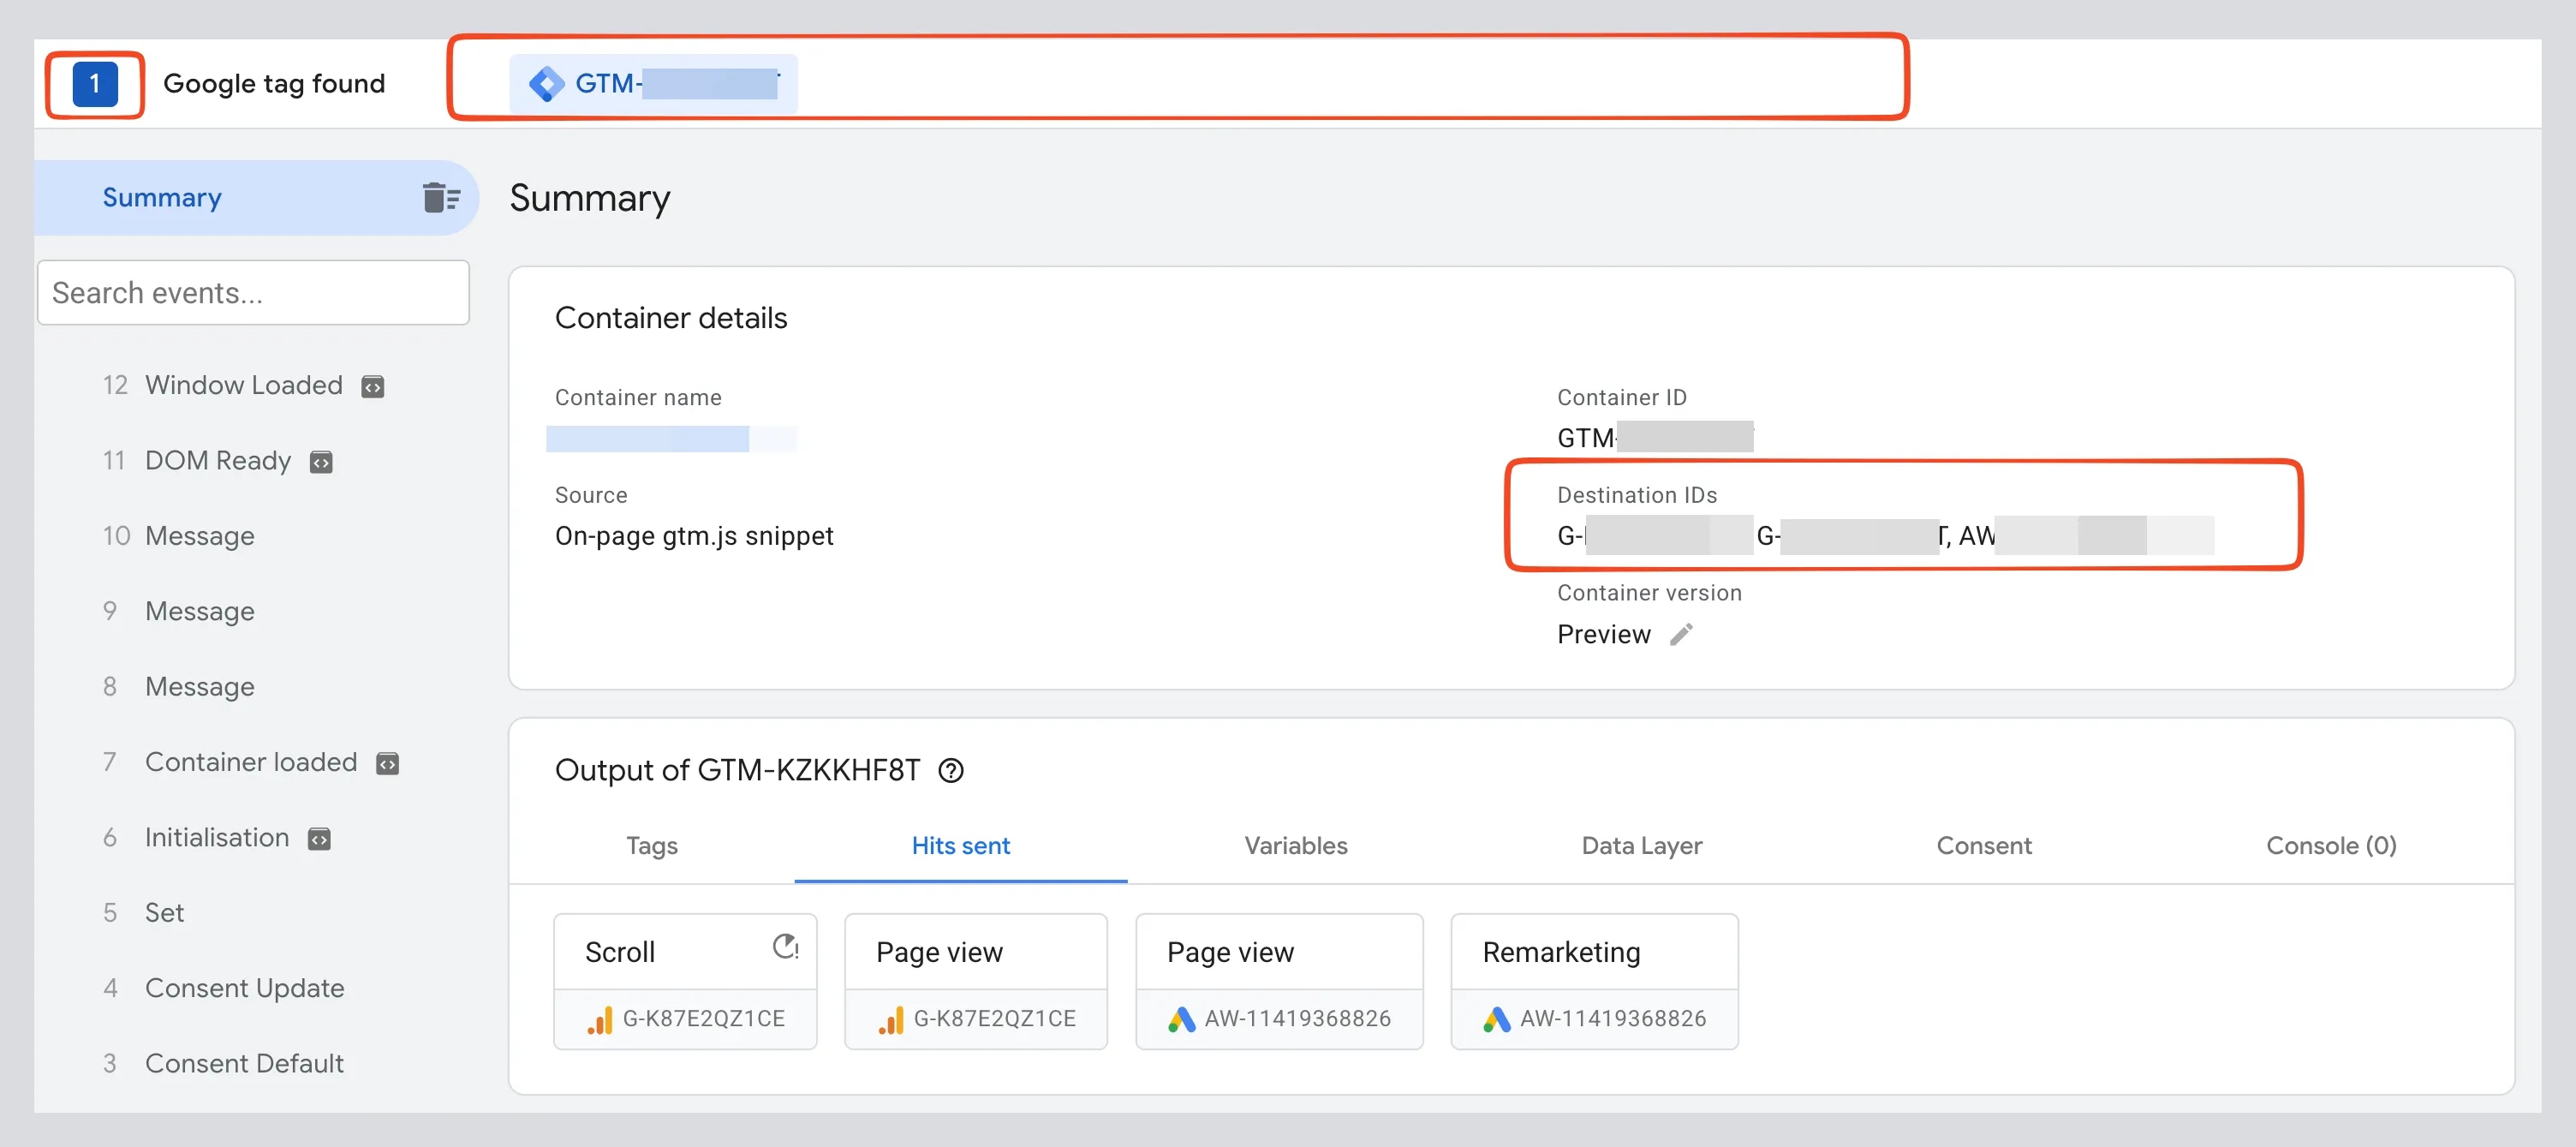
If, after the migration, you still see multiple separate tags in the top panel of Preview, the migration was not done correctly or was not fully completed.
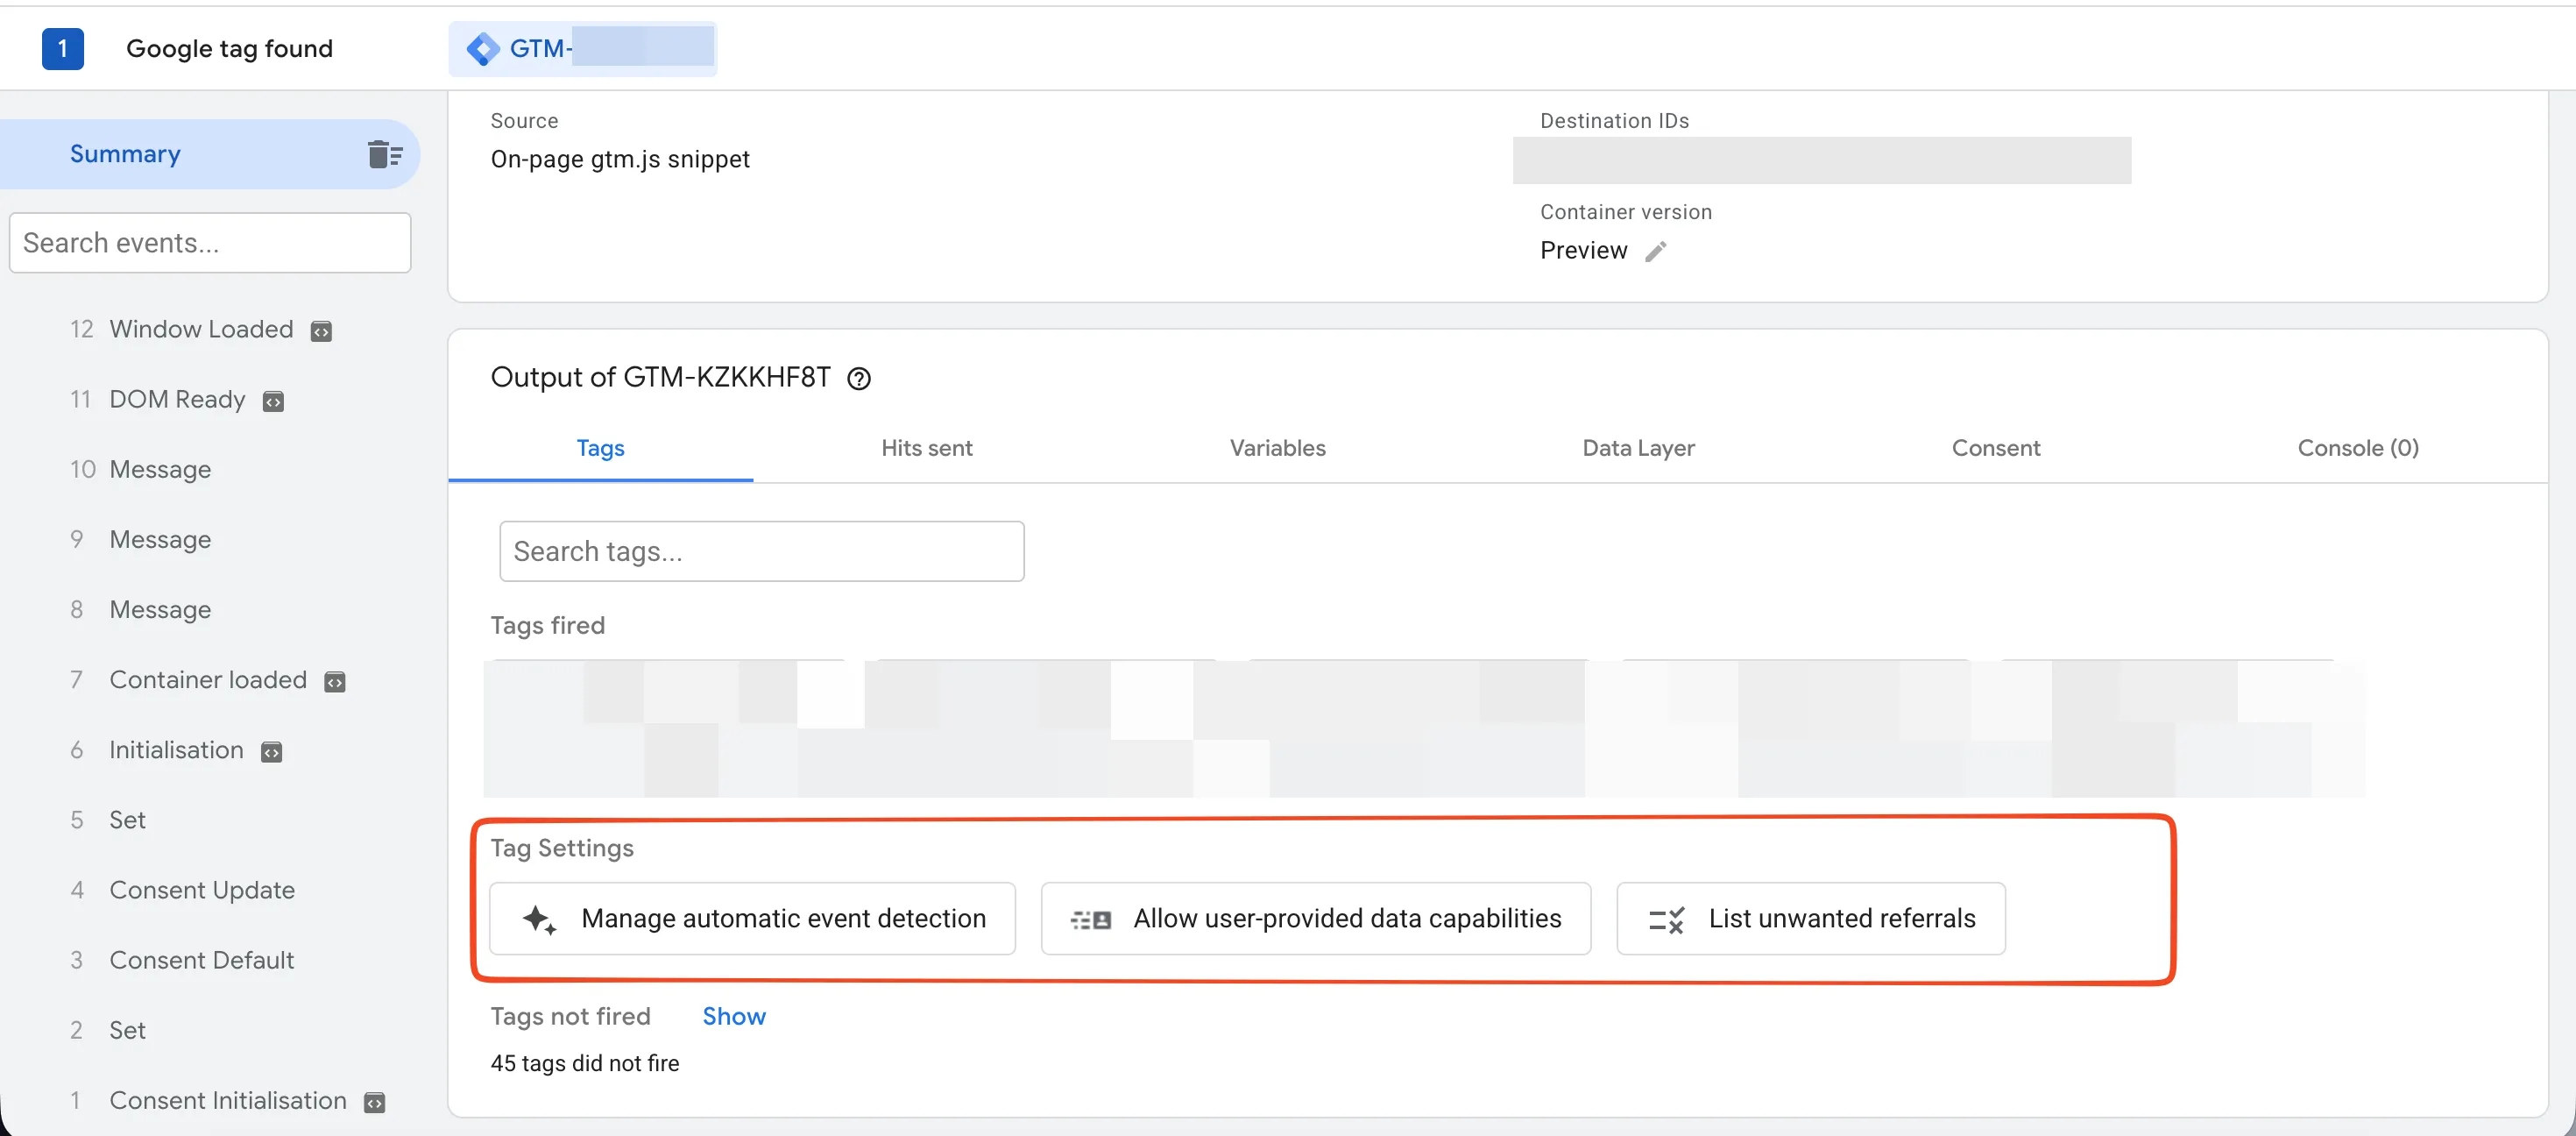
- Tag settings have appeared in the tags tab, so you can review the active centralized parameters.
- Here's what a Conversion Linker hit looks like in debug mode if you leave it in place: the tag keeps firing and acts as a duplicate layer.
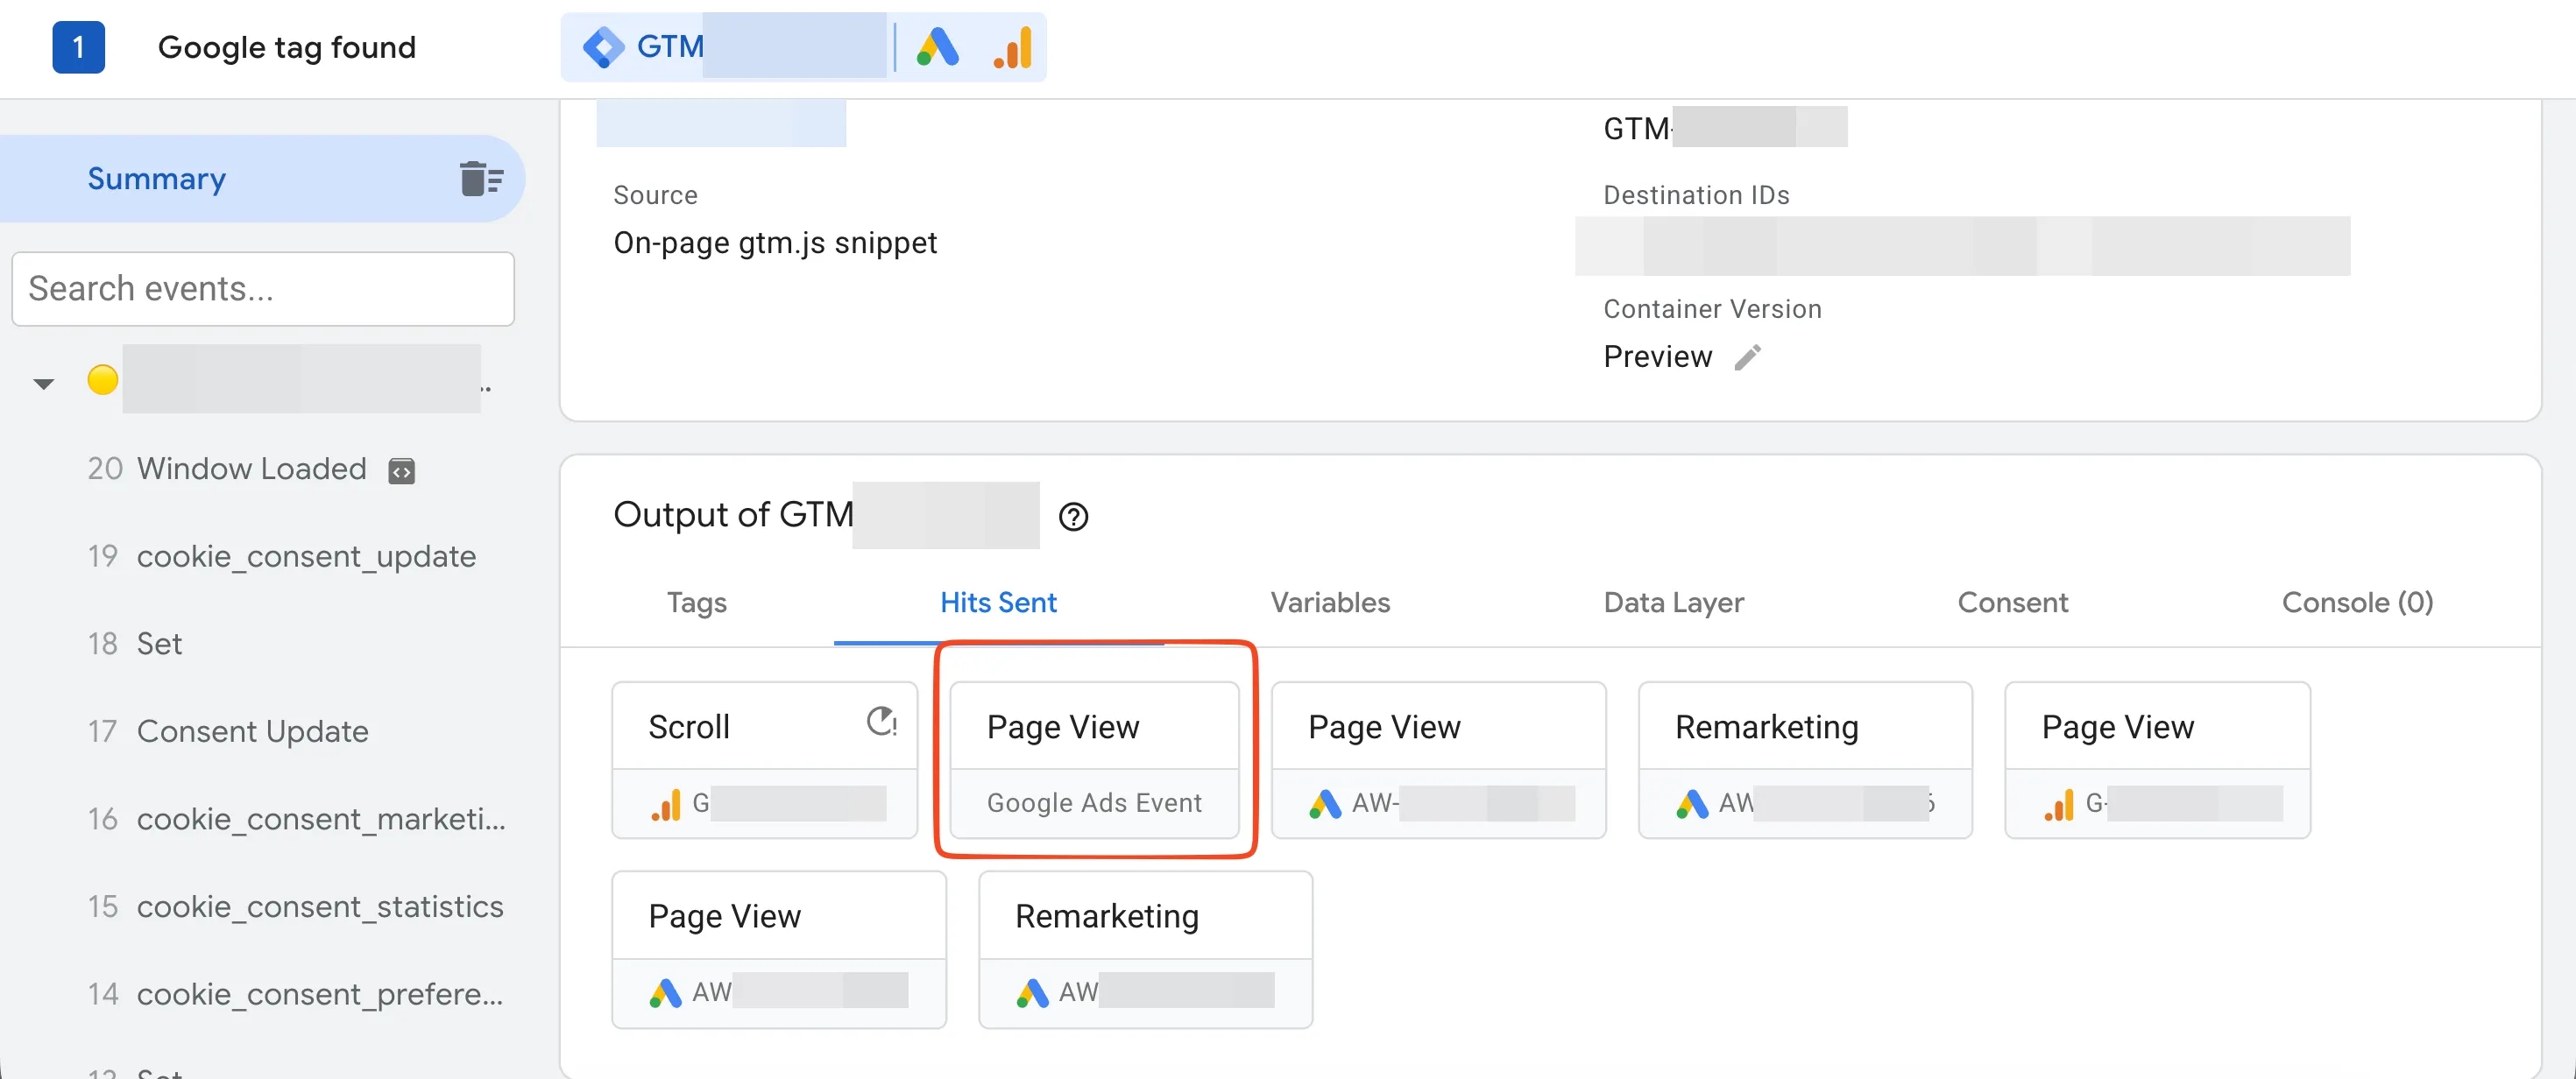
Make sure to delete Conversion Linker from the container after the migration.
We've looked at how GTM container optimization works, what to check before the migration, and what changes occur in the data transfer architecture. But what will a Google Ads specialist see on the other side of the integration?
Part 2. Google Ads: How Updated Tags Appear in Data Manager
Let's open Data Manager and look at the Data Connection Map. This is where you can see the connections between Google Ads data sources and linked Google tags. We'll also work out why a second Google tag may appear in Data Manager after GTM optimization, what it indicates, how to read the connection diagram correctly, and, most importantly, whether this change requires any action from the specialist.
The screenshot below shows a real example of this situation: two Google tags appear in Data Manager.
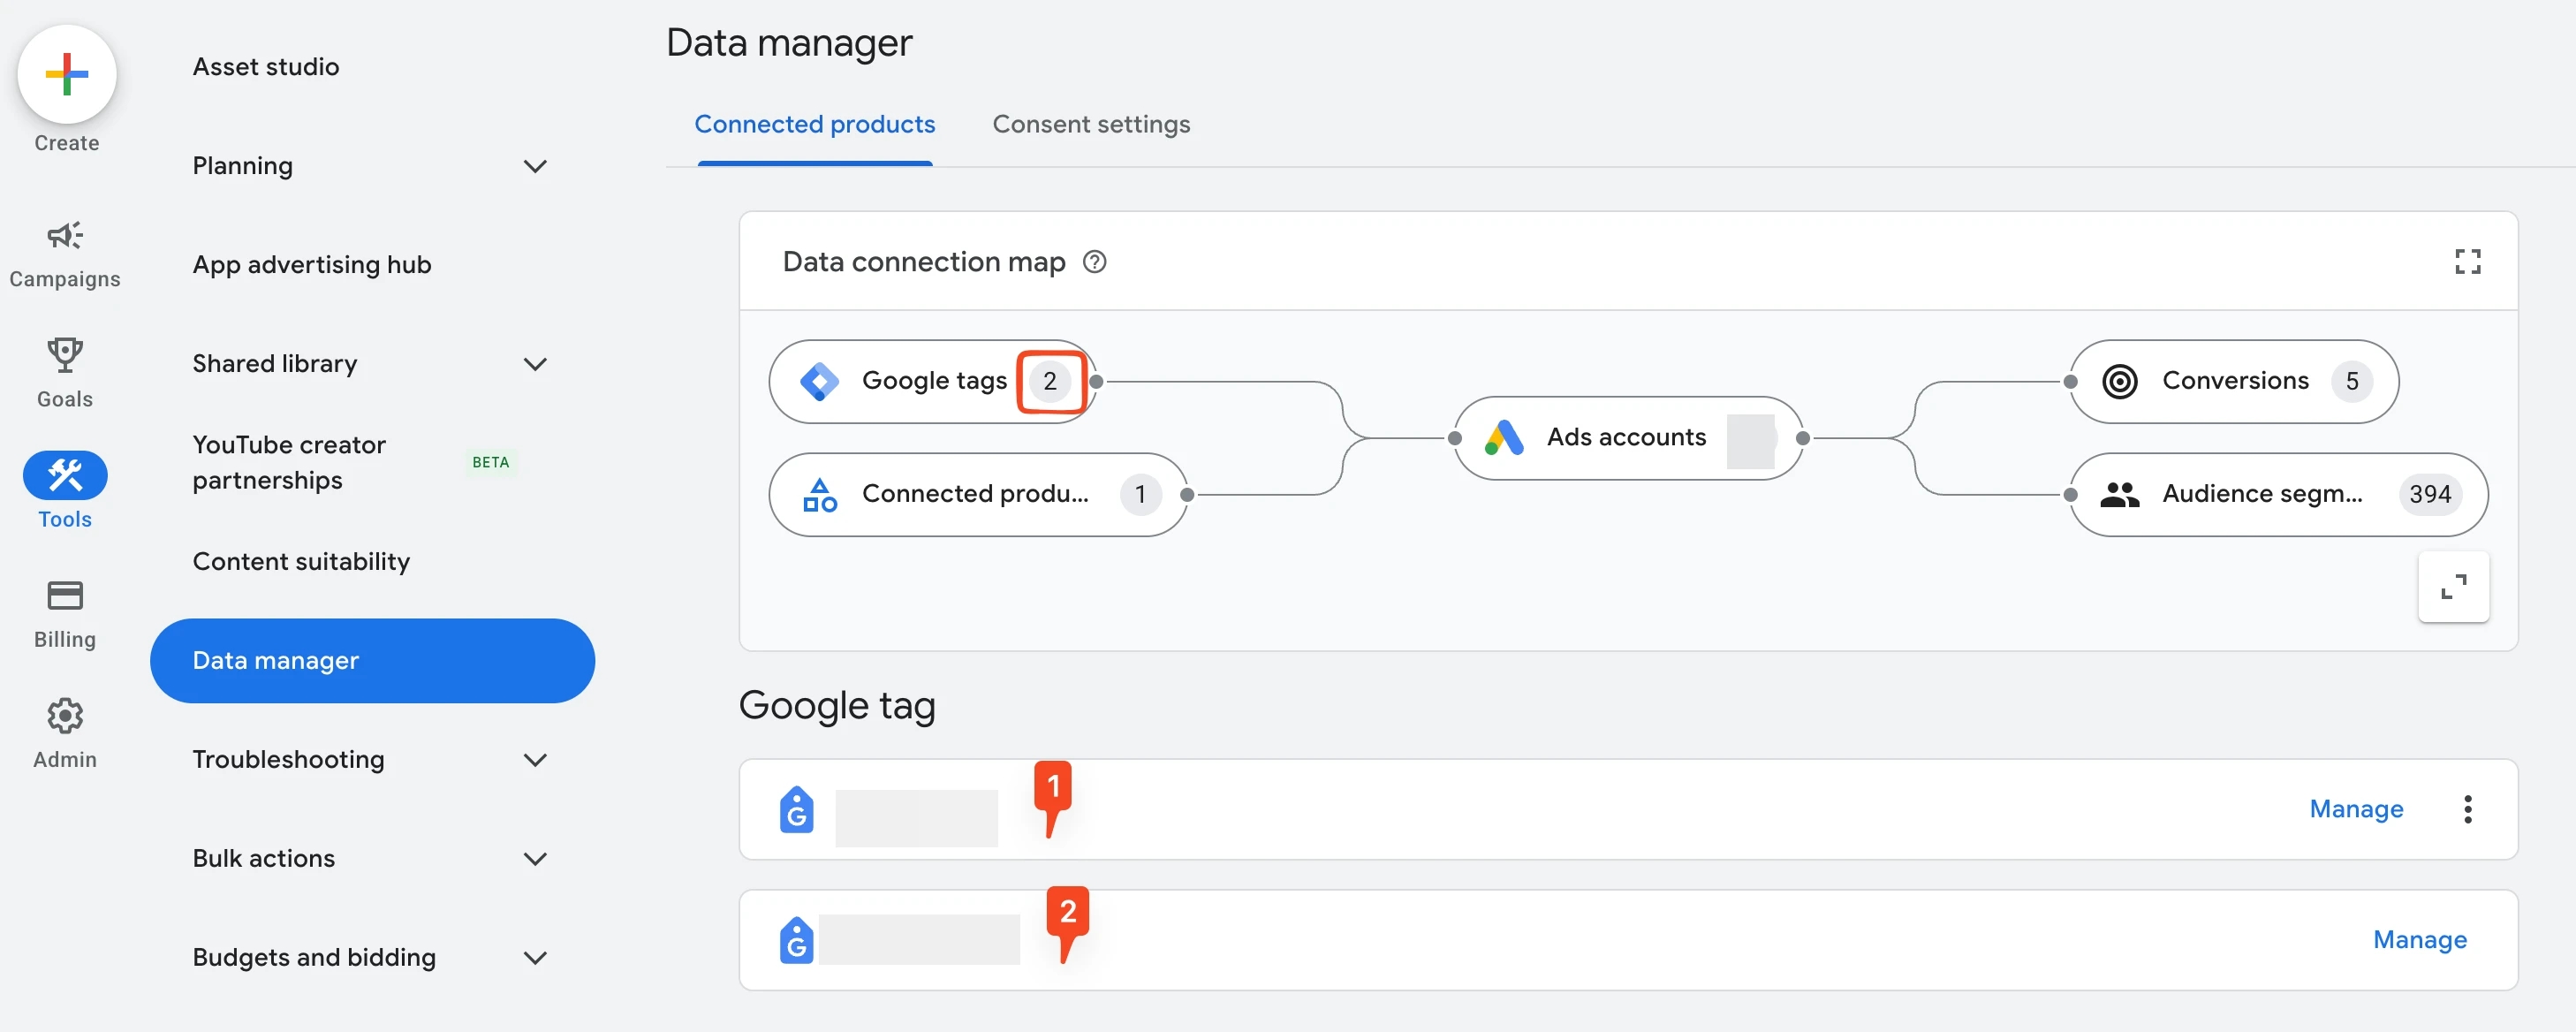
Data Manager — Data Connection Map
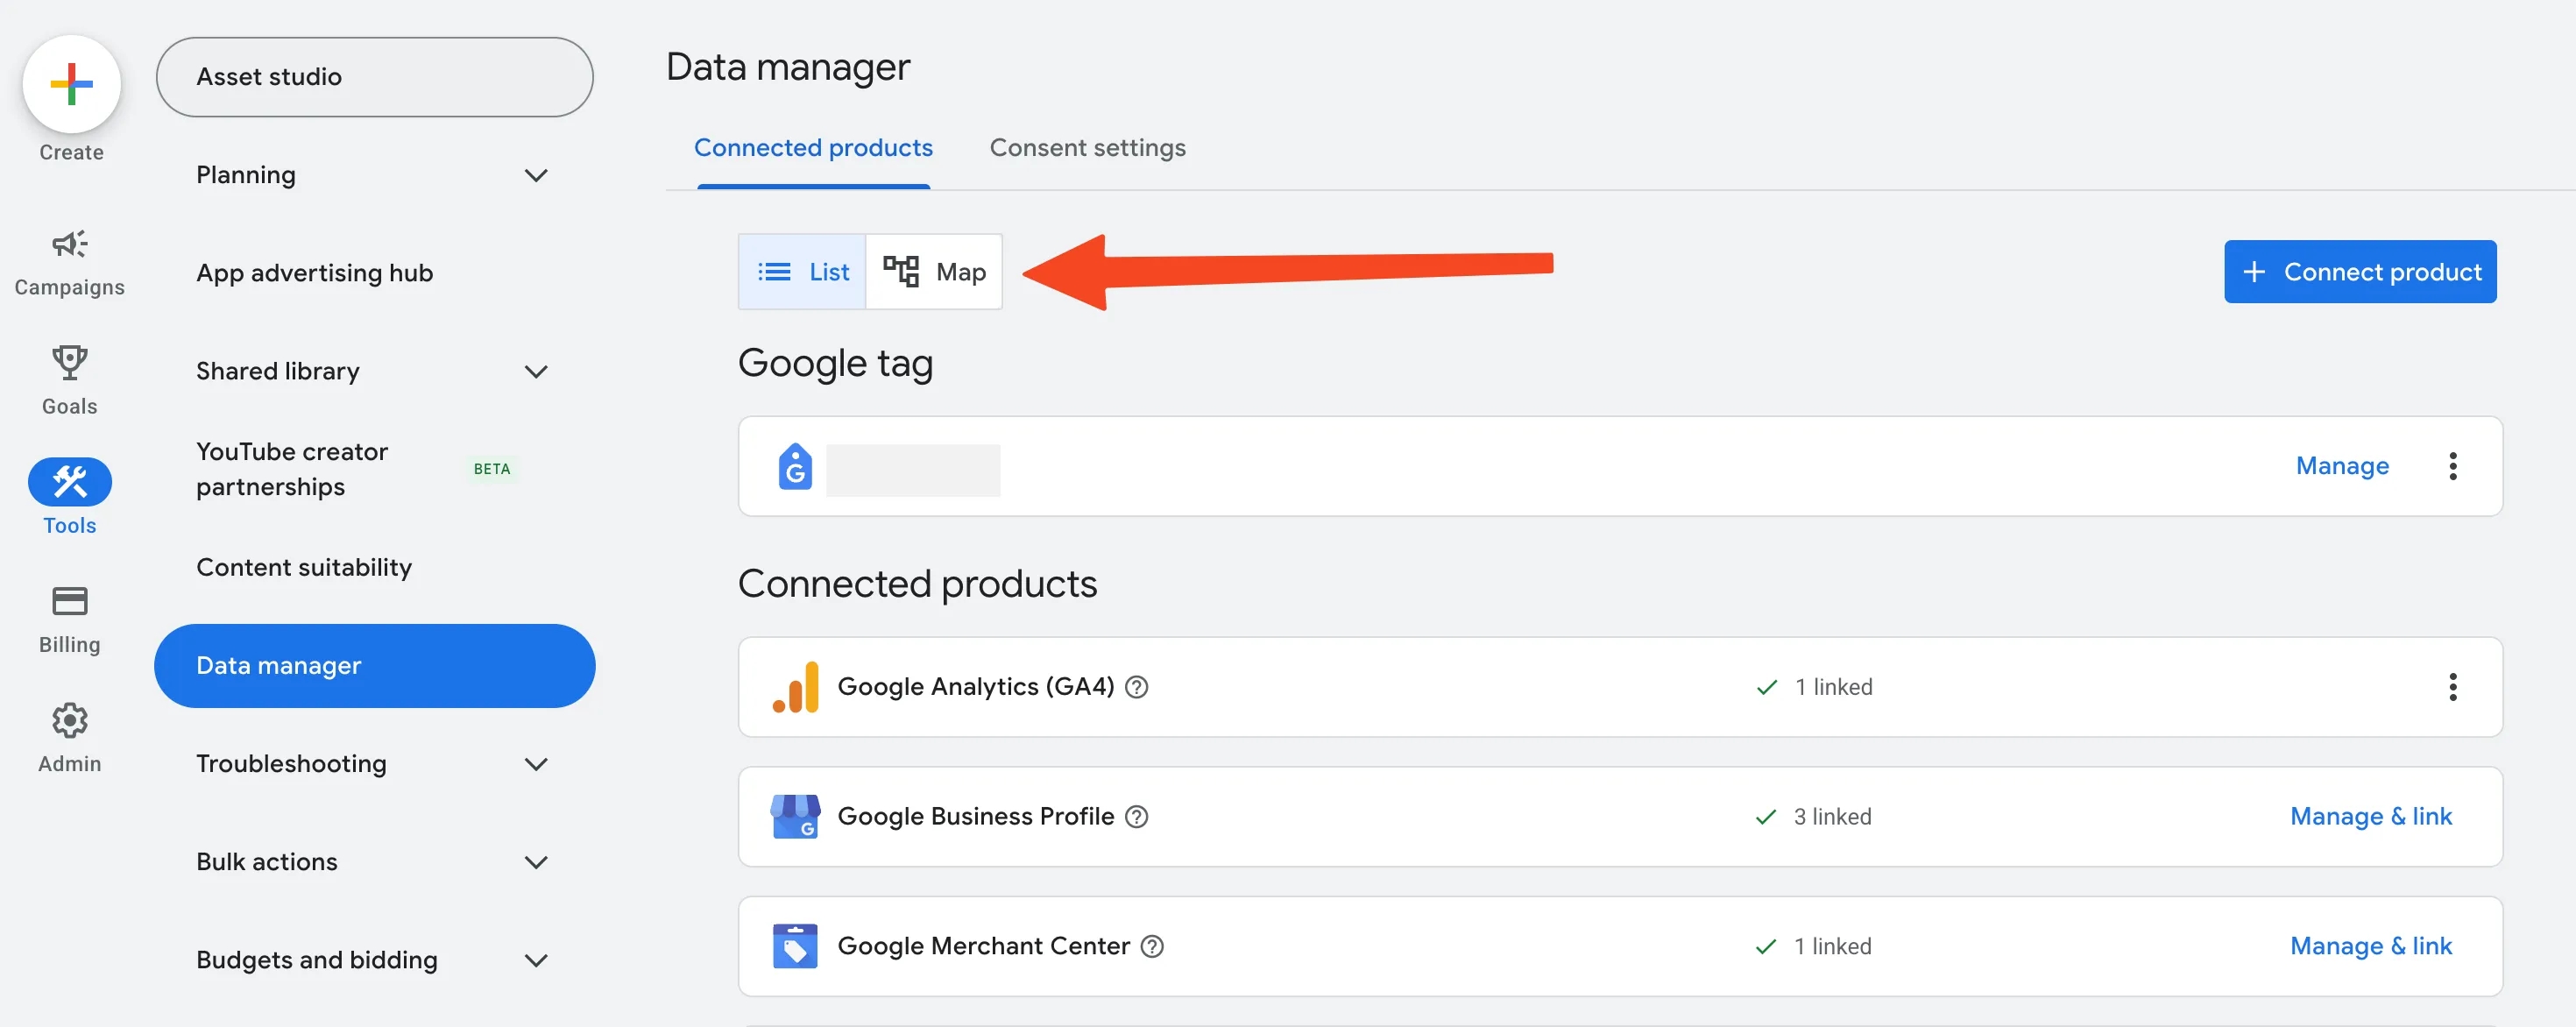
Let's start with the fact that Google Ads has updated the Data Manager interface. It now includes an interactive Data Connection Map that visualizes the entire data path, from the source to a specific activation. It's enabled with a toggle at the top of the section, although in many accounts the toggle has already disappeared and the map opens automatically.
Why do we need it?
Data Manager is Google's attempt to centralize work with an advertiser's first-party data: both online (website, apps) and offline data (for example, CRM). According to Google's logic, the more complete and cleaner these signals are, the better automated strategies perform, including Smart Bidding.
The Data Connection Map, meanwhile, is not a new data collection feature but a way to see this entire path on one screen: where the data originates, what it passes through, and where it is used. For us practitioners, it's a chance to understand within a couple of minutes what is connected to what, especially in an account we're seeing for the first time.
How does the updated Data Connection Map work?
- Main view: on the left are the data sources — Google tags and Connected products (CRM, API, and other connectors). They lead to the center — the ad account (there is a view switcher between the MCC manager account and the current account) — and then branch out to the right by Data usage into two key destinations: Conversions and Audience segments.
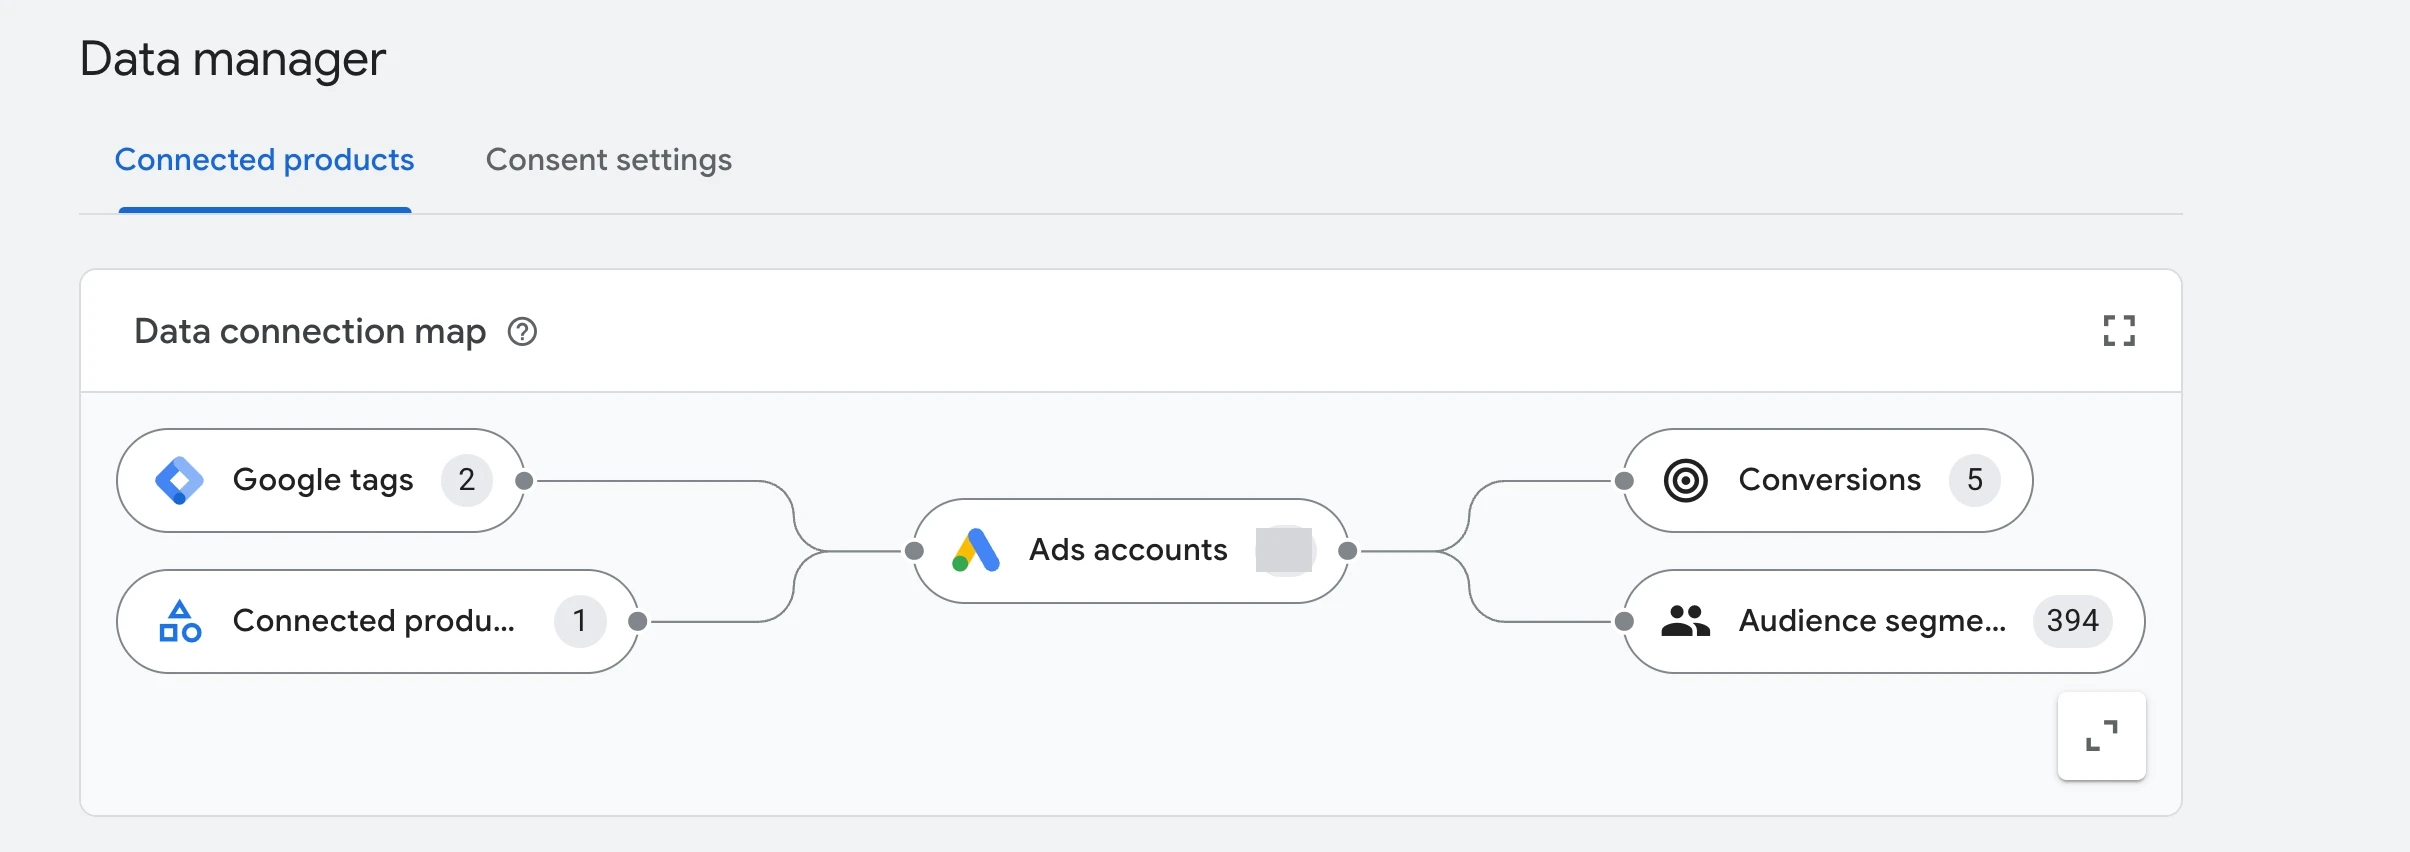
- Interactive drill-down: if you click any cell (for example, Connected products), a pop-up appears with a list of icons for the connected products — in the screenshot below these are BigQuery, Google Sheets, and HTTP connectors.
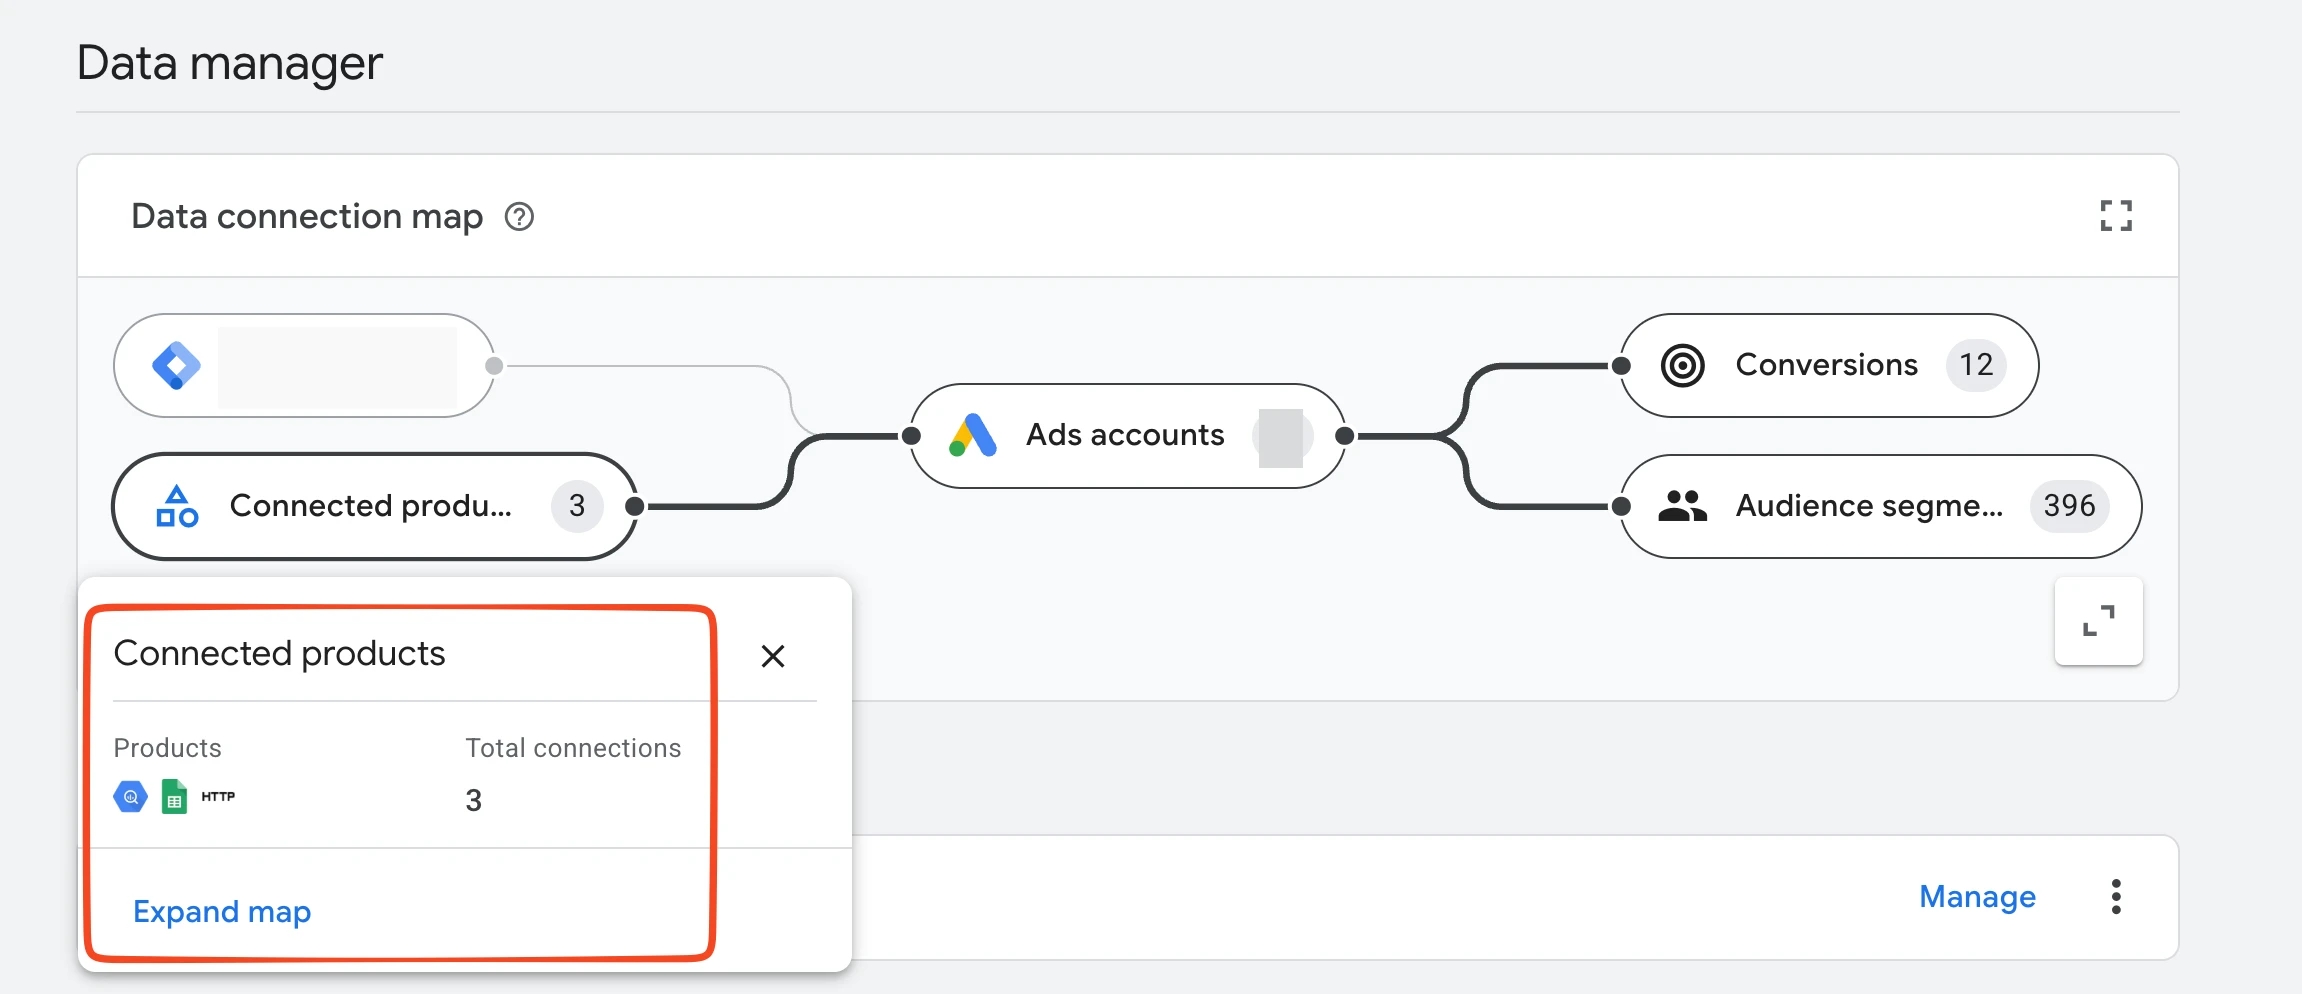
The screenshots in the article were taken from different accounts to show each situation as clearly as possible.
- Clicking Expand map expands the map, showing the exact names of the sources, their number, and the specific usage directions — the names of conversions or audiences. Just hover over a specific source to see exactly where the data "flows": all the way to a specific conversion action or audience list name. Convenient filters are also available to isolate and view the path of just one source.
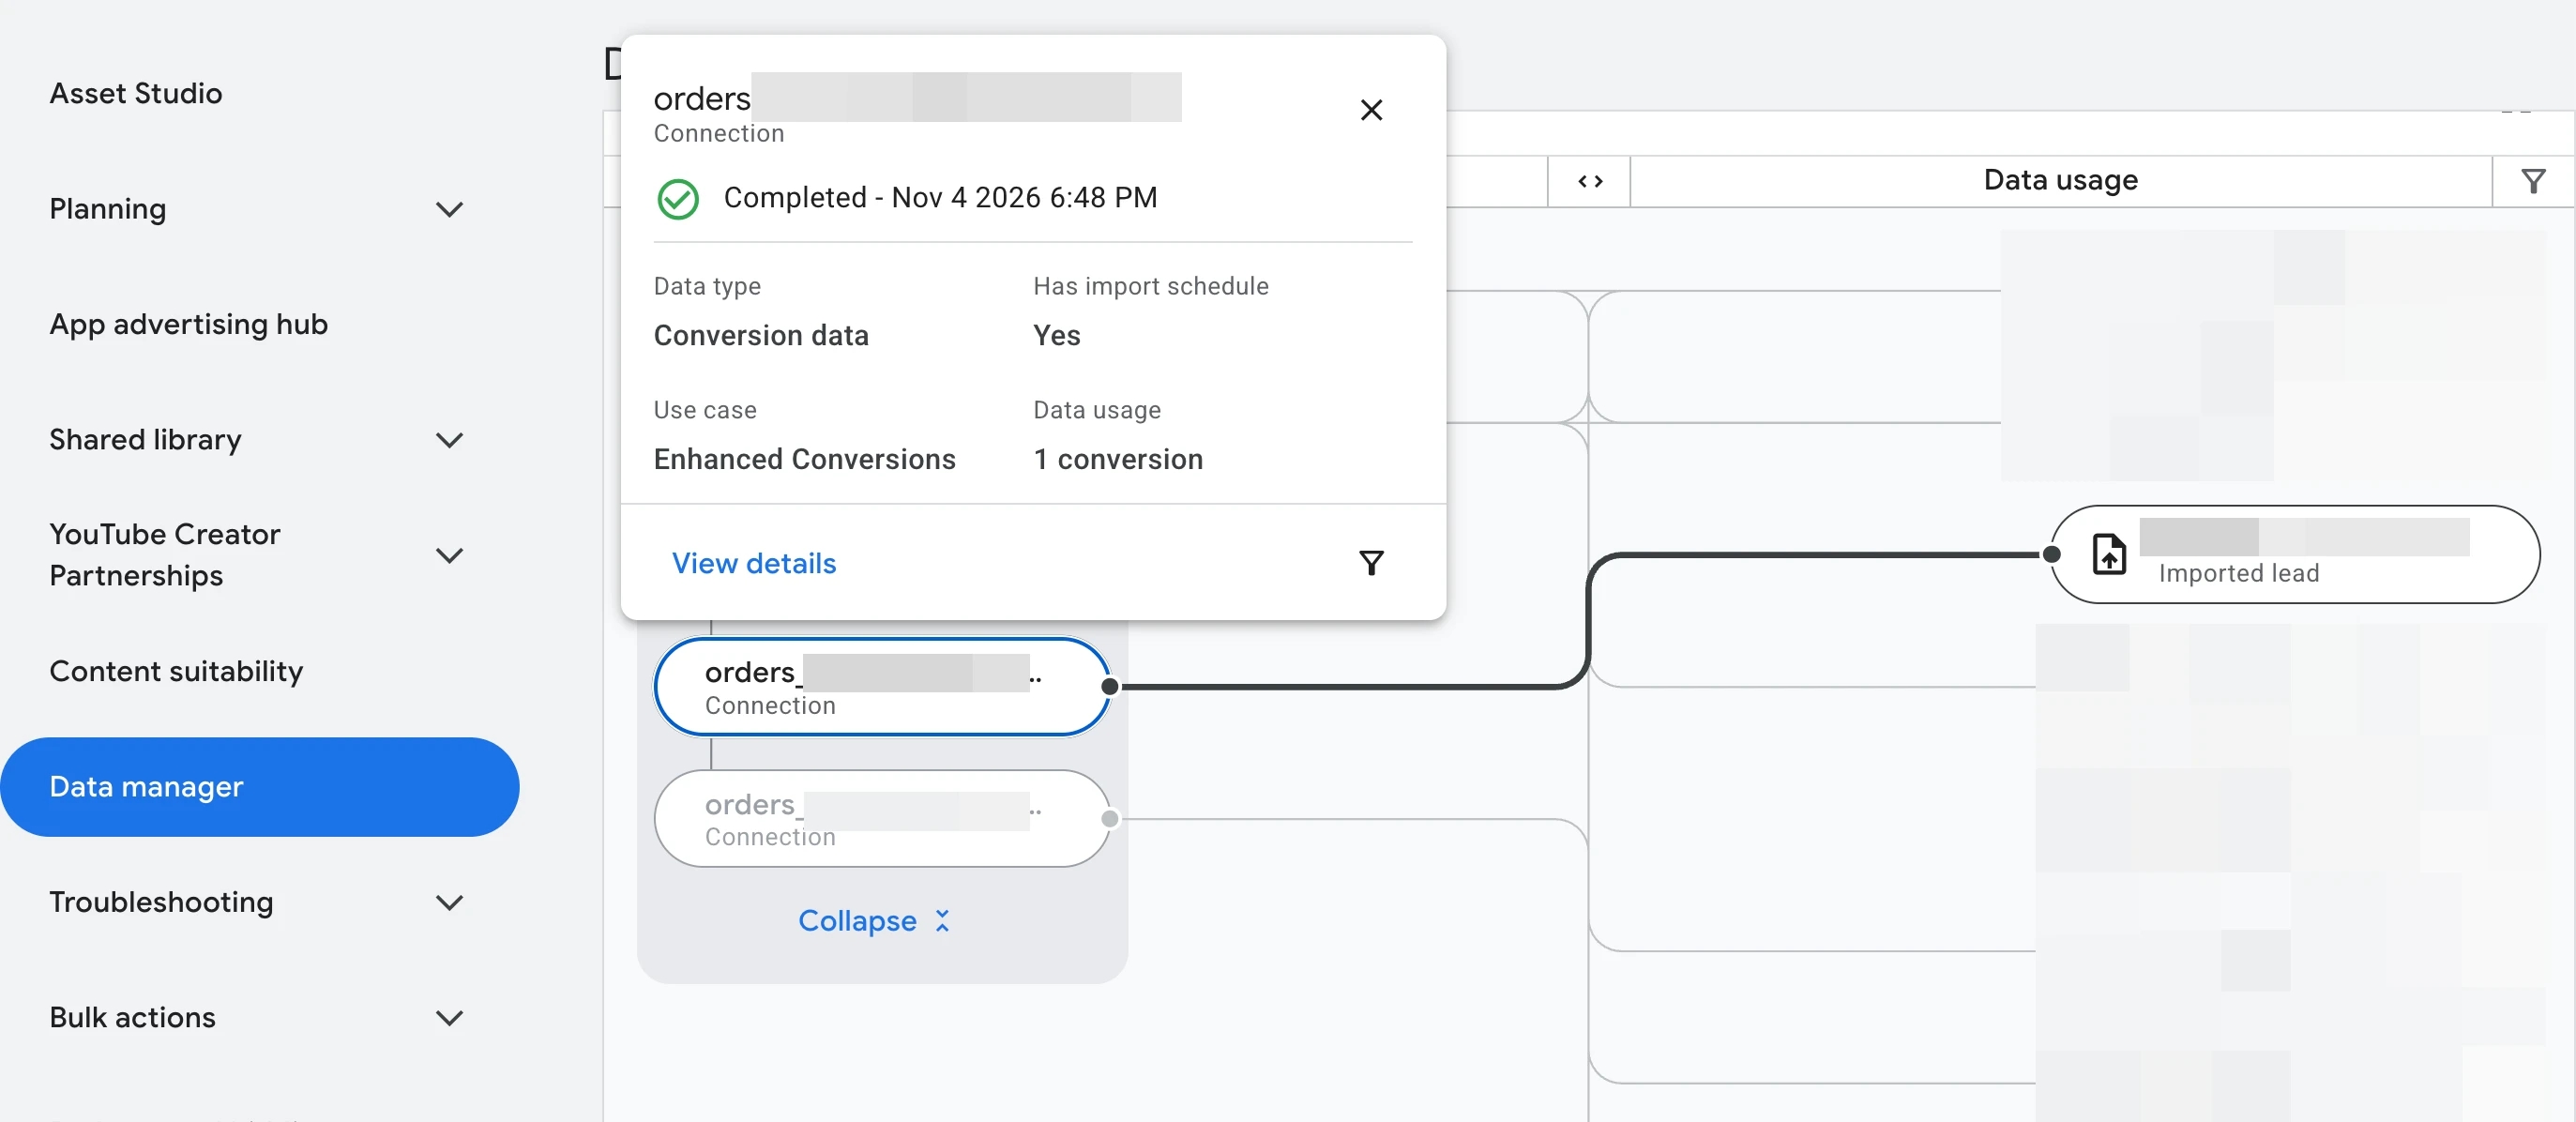
Honestly, this interactive "toy" is a real joy for ad specialists and analysts! Remember how it goes: you open an unfamiliar account for the first time and have to click through dozens of different tabs to figure out what is connected to what. Now there's no need for that — the map greatly simplifies the overview in a single visual.
- Prompt error detection: if a data source is broken, you'll see it right away — the node is highlighted with a red indicator, and a Fix it button appears on the card (for quickly jumping to the tab of the failing connector).
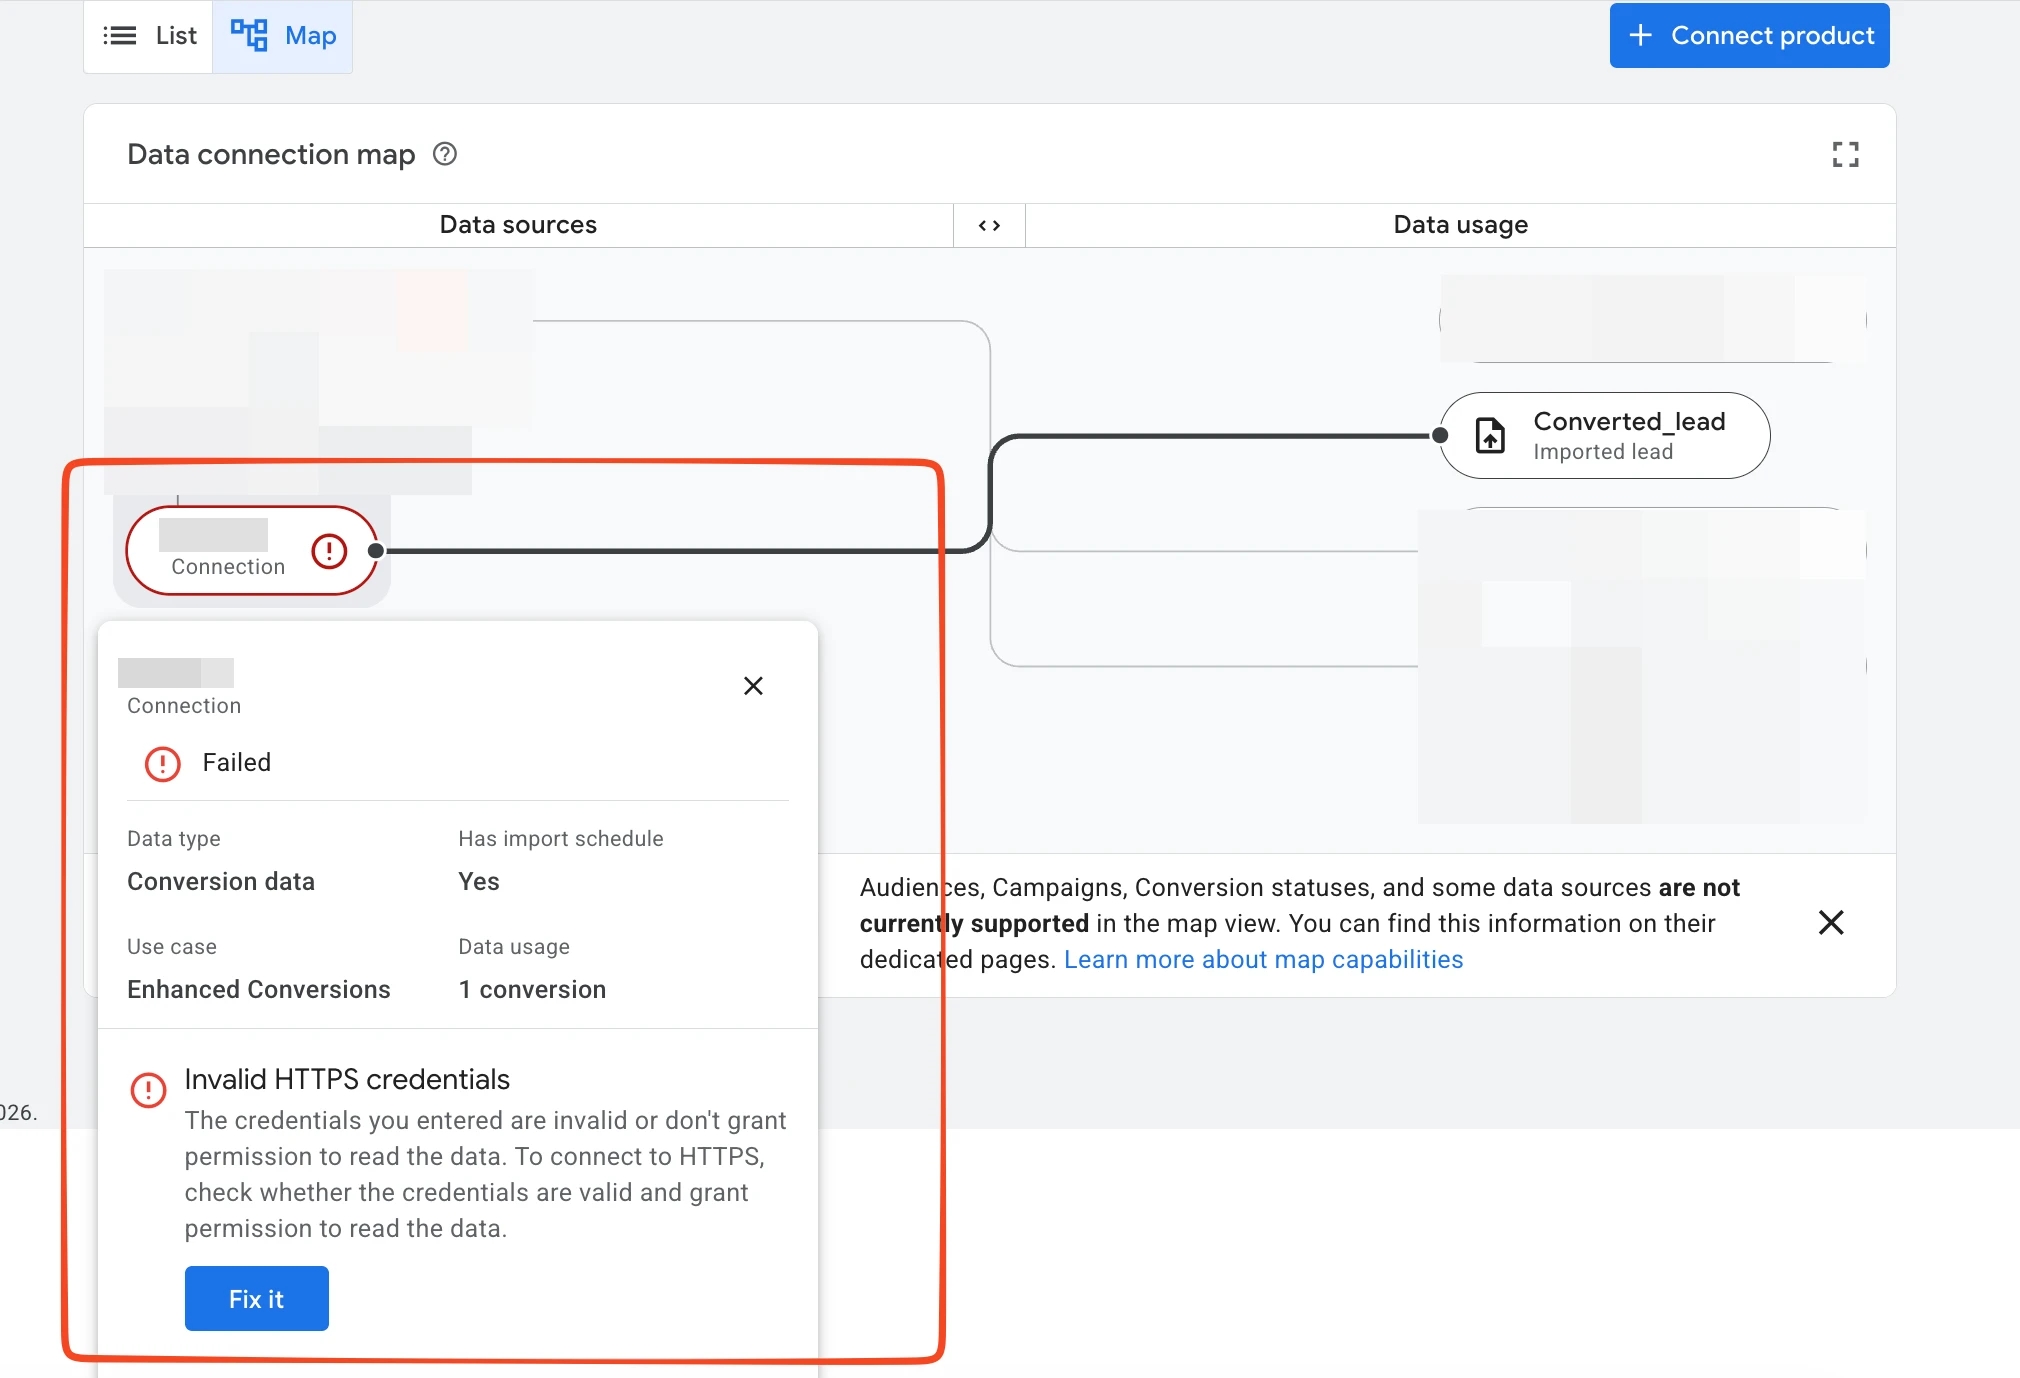
I hope the Data Connection Map is now clear. I recommend clicking through it yourself in your own accounts — it's an interactive tool with quite a few useful buttons and capabilities. Besides, its appearance and the functionality available may differ somewhat depending on the account configuration :)
Now let's go back to the screenshot I started the second part of the article with, and work out under what conditions two Google tags can appear in Data Manager and where they come from.
2 Google tags: why and under what conditions can two tags appear?
How it used to be: the usual data flow to Google Ads
Let's recall the standard setup we're all used to, which, as of this writing, I believe still works this way in most accounts. We always assembled the data path from the website to the ad account out of several separate elements:
- Google tag (AW-XXXXX): the global Google Ads script that served as the base tag for collecting audiences and remarketing.
In Data Manager, it looked like this — there was 1 Google tag, as we're all used to:
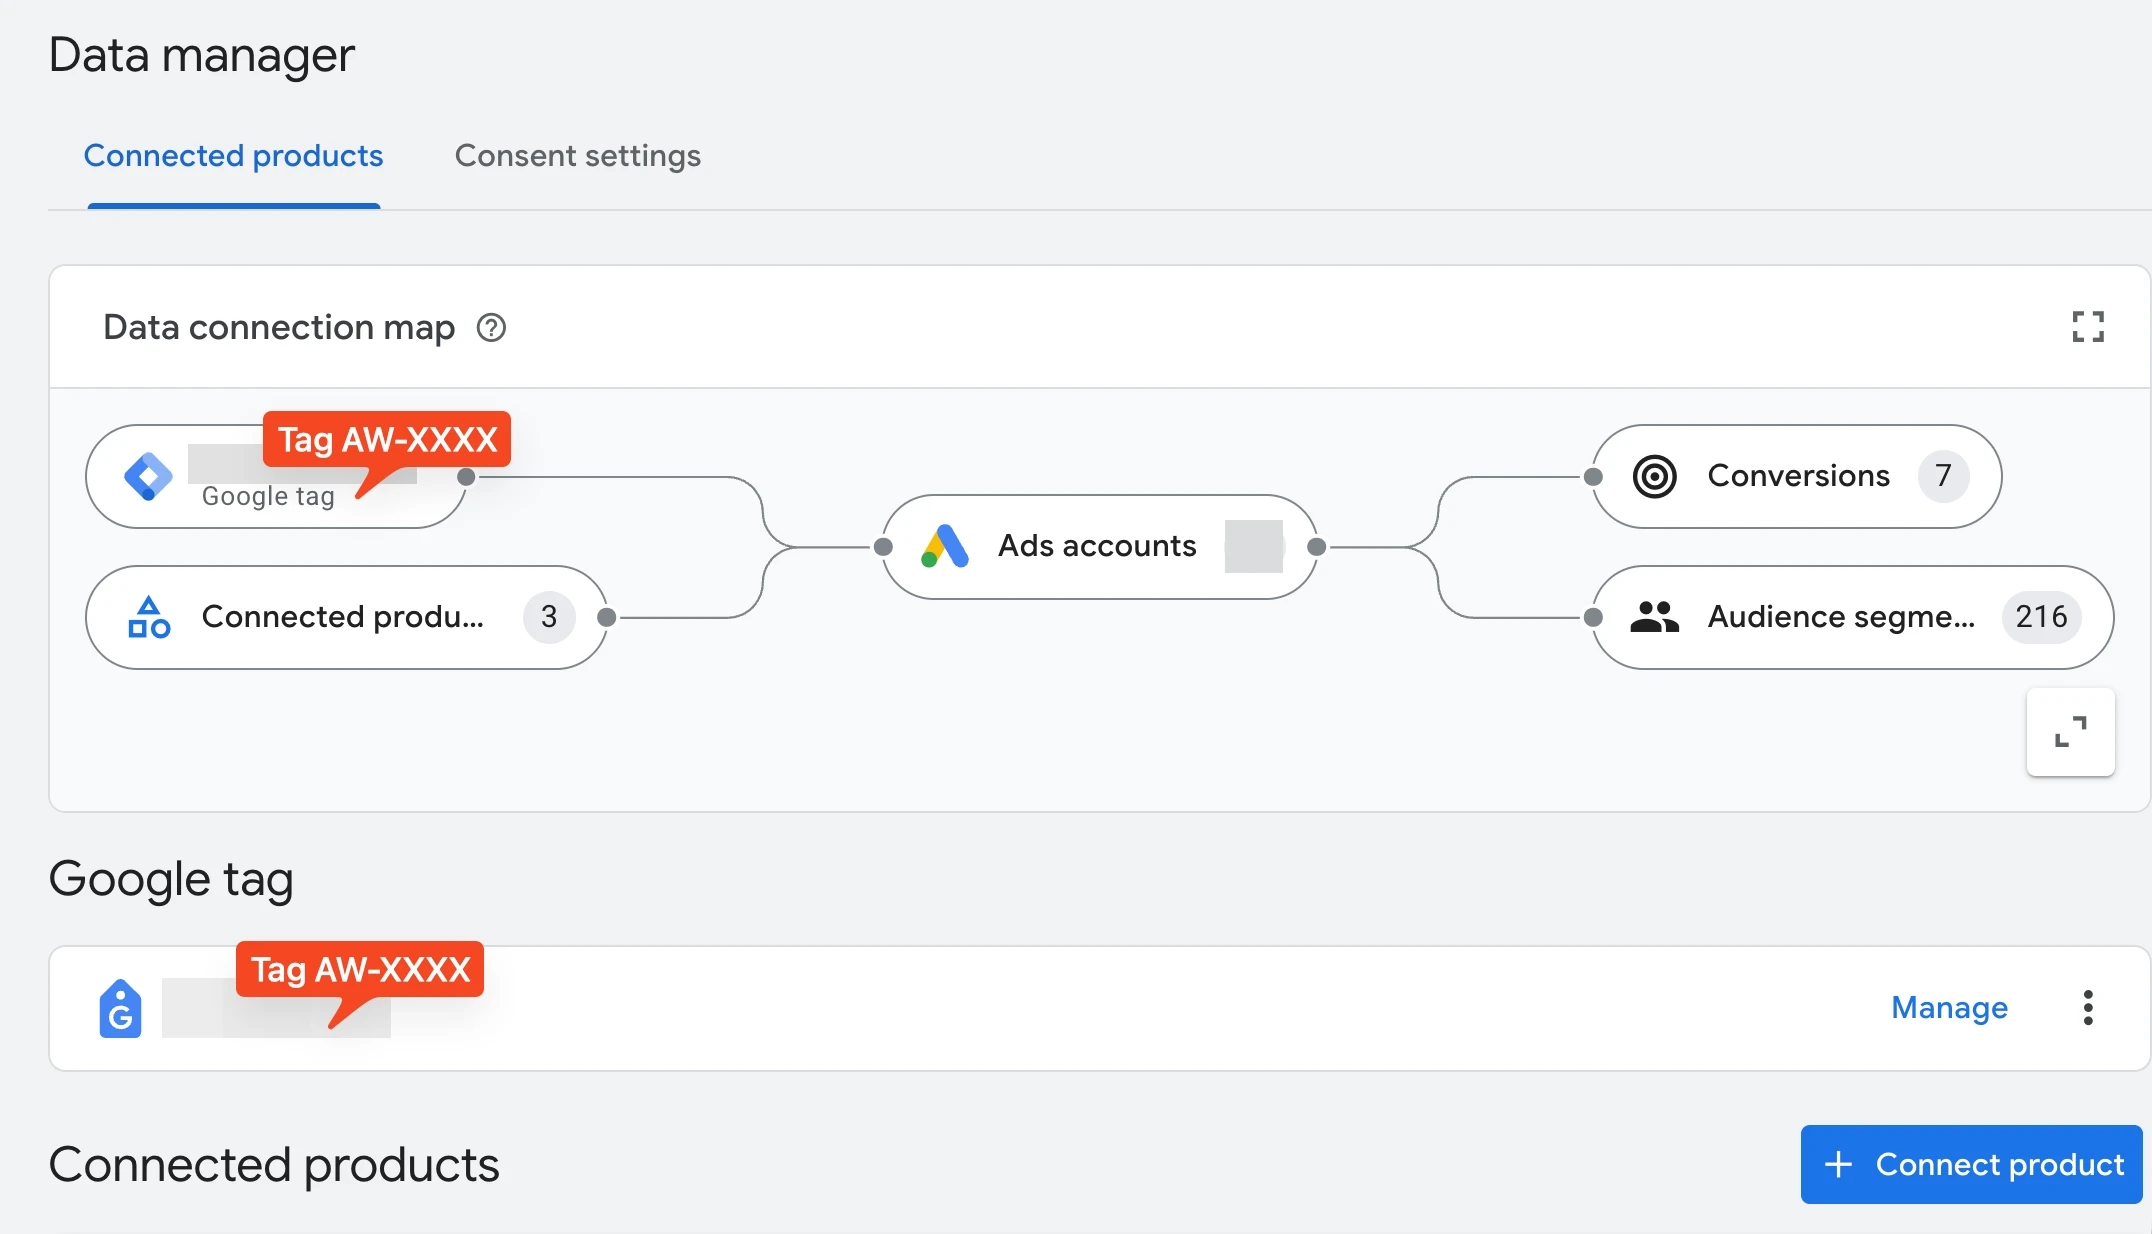
After the migration, once you’ve applied the "Google-recommended optimization to add tags faster and more easily," Data Manager shows 2 tags, which appear both on the map and in the Google tag list:
- The AW-XXXX tag (the classic Google Ads tag).
- The GTM-XXXX tag (the GTM container itself, now recognized as a full-fledged Google tag).
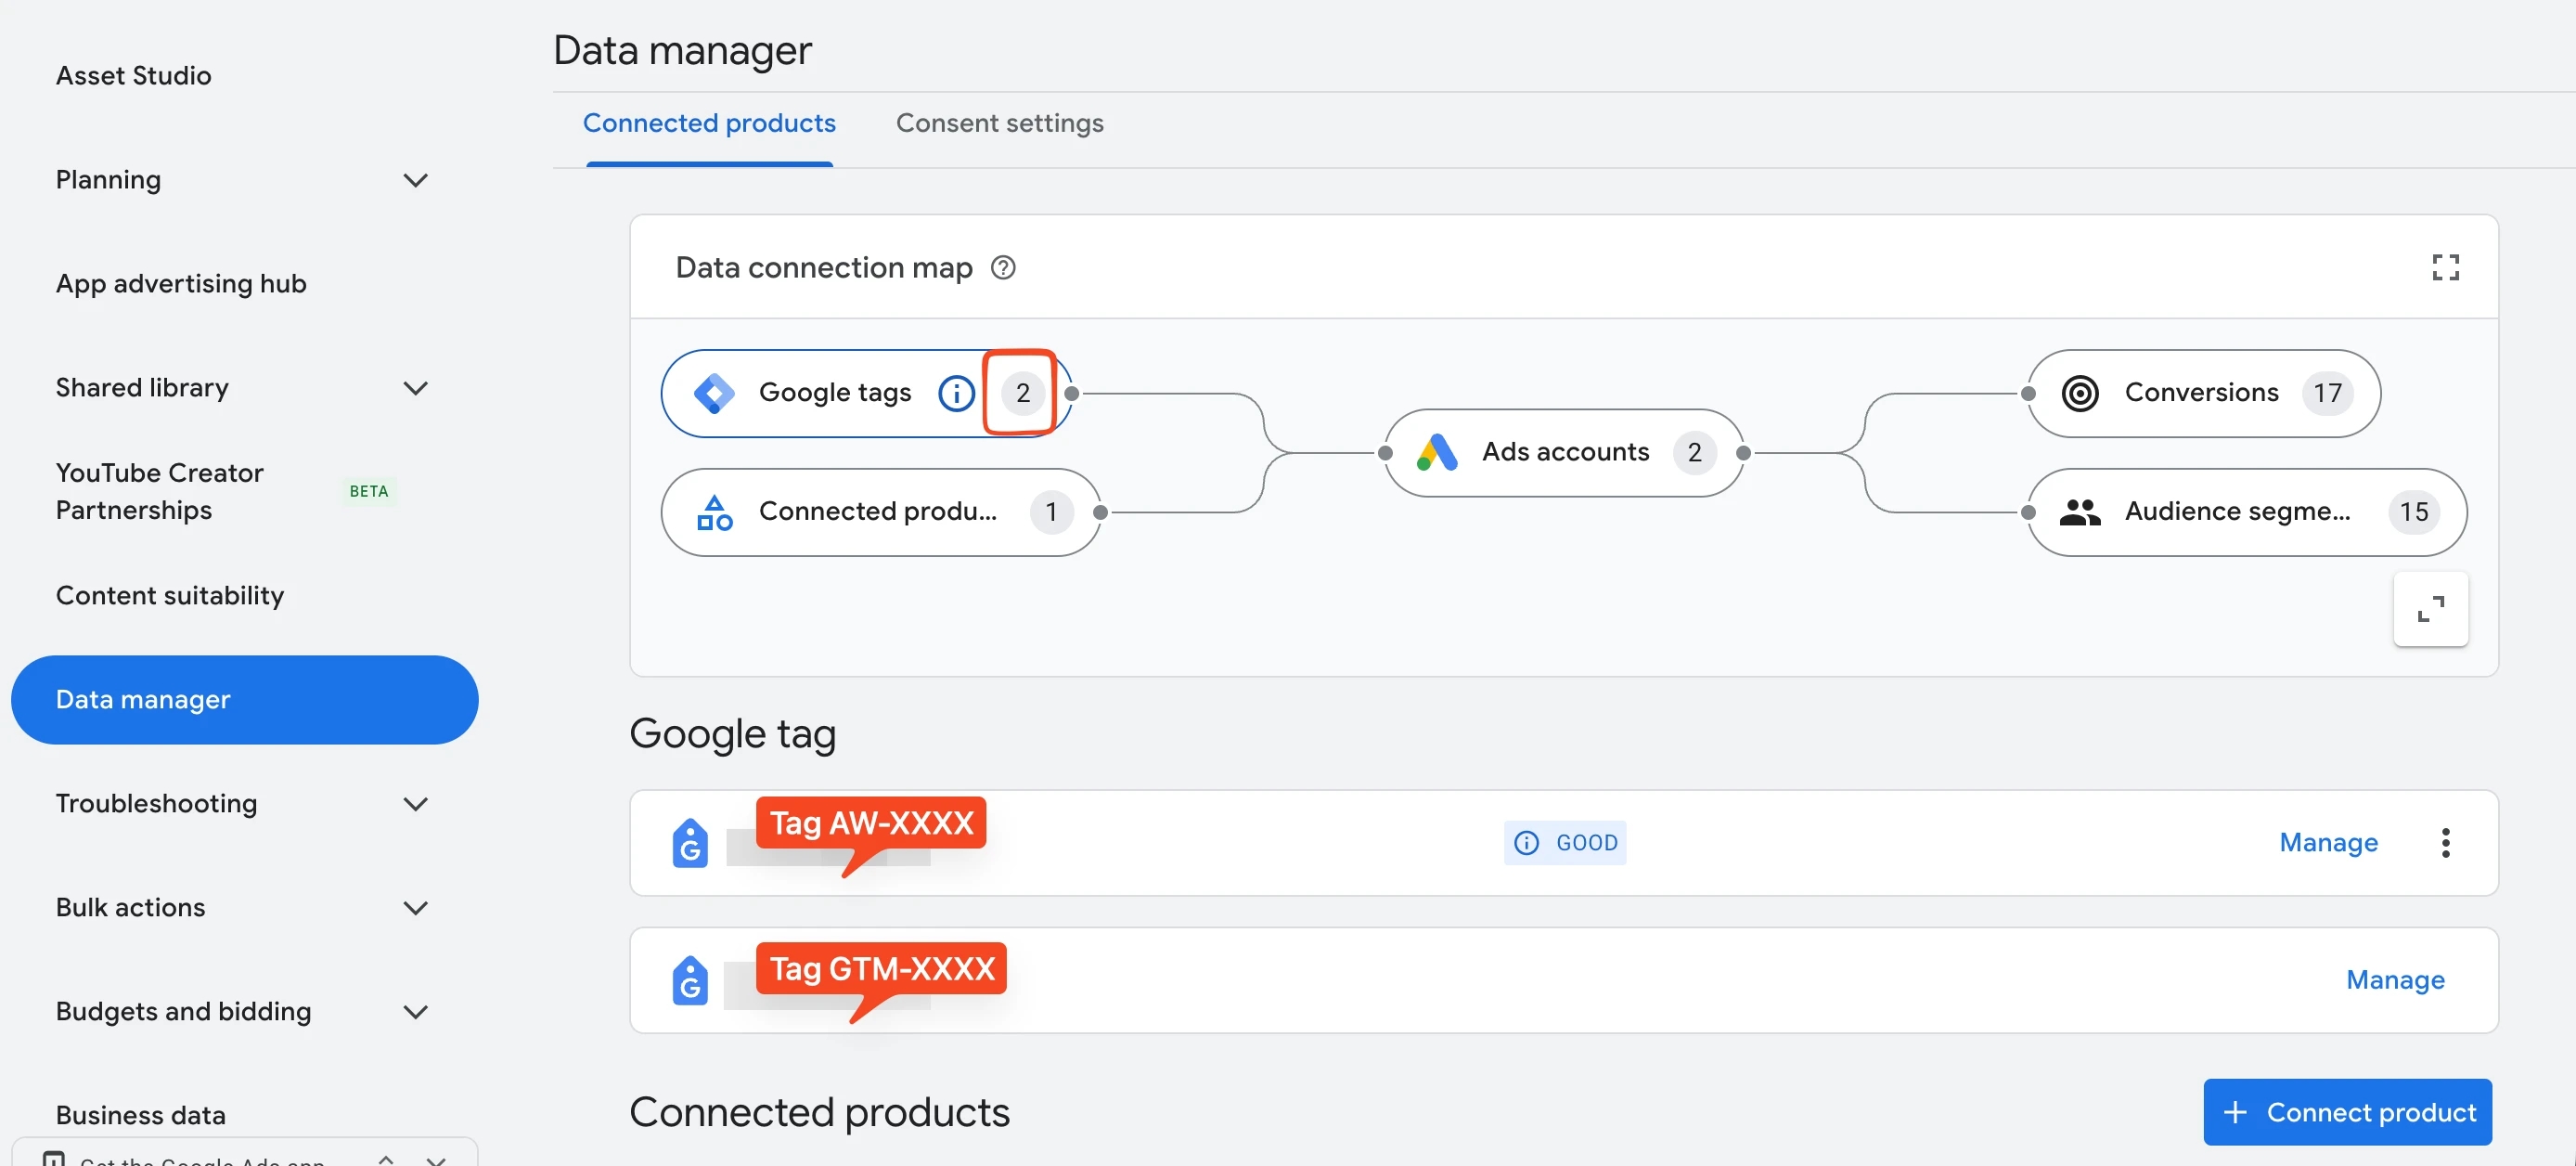
For comparison, I'll also include a screenshot from another account where the migration has already been completed but there are no connected offline data sources via other connectors, since the visual display of the Data Connection Map differs between accounts.
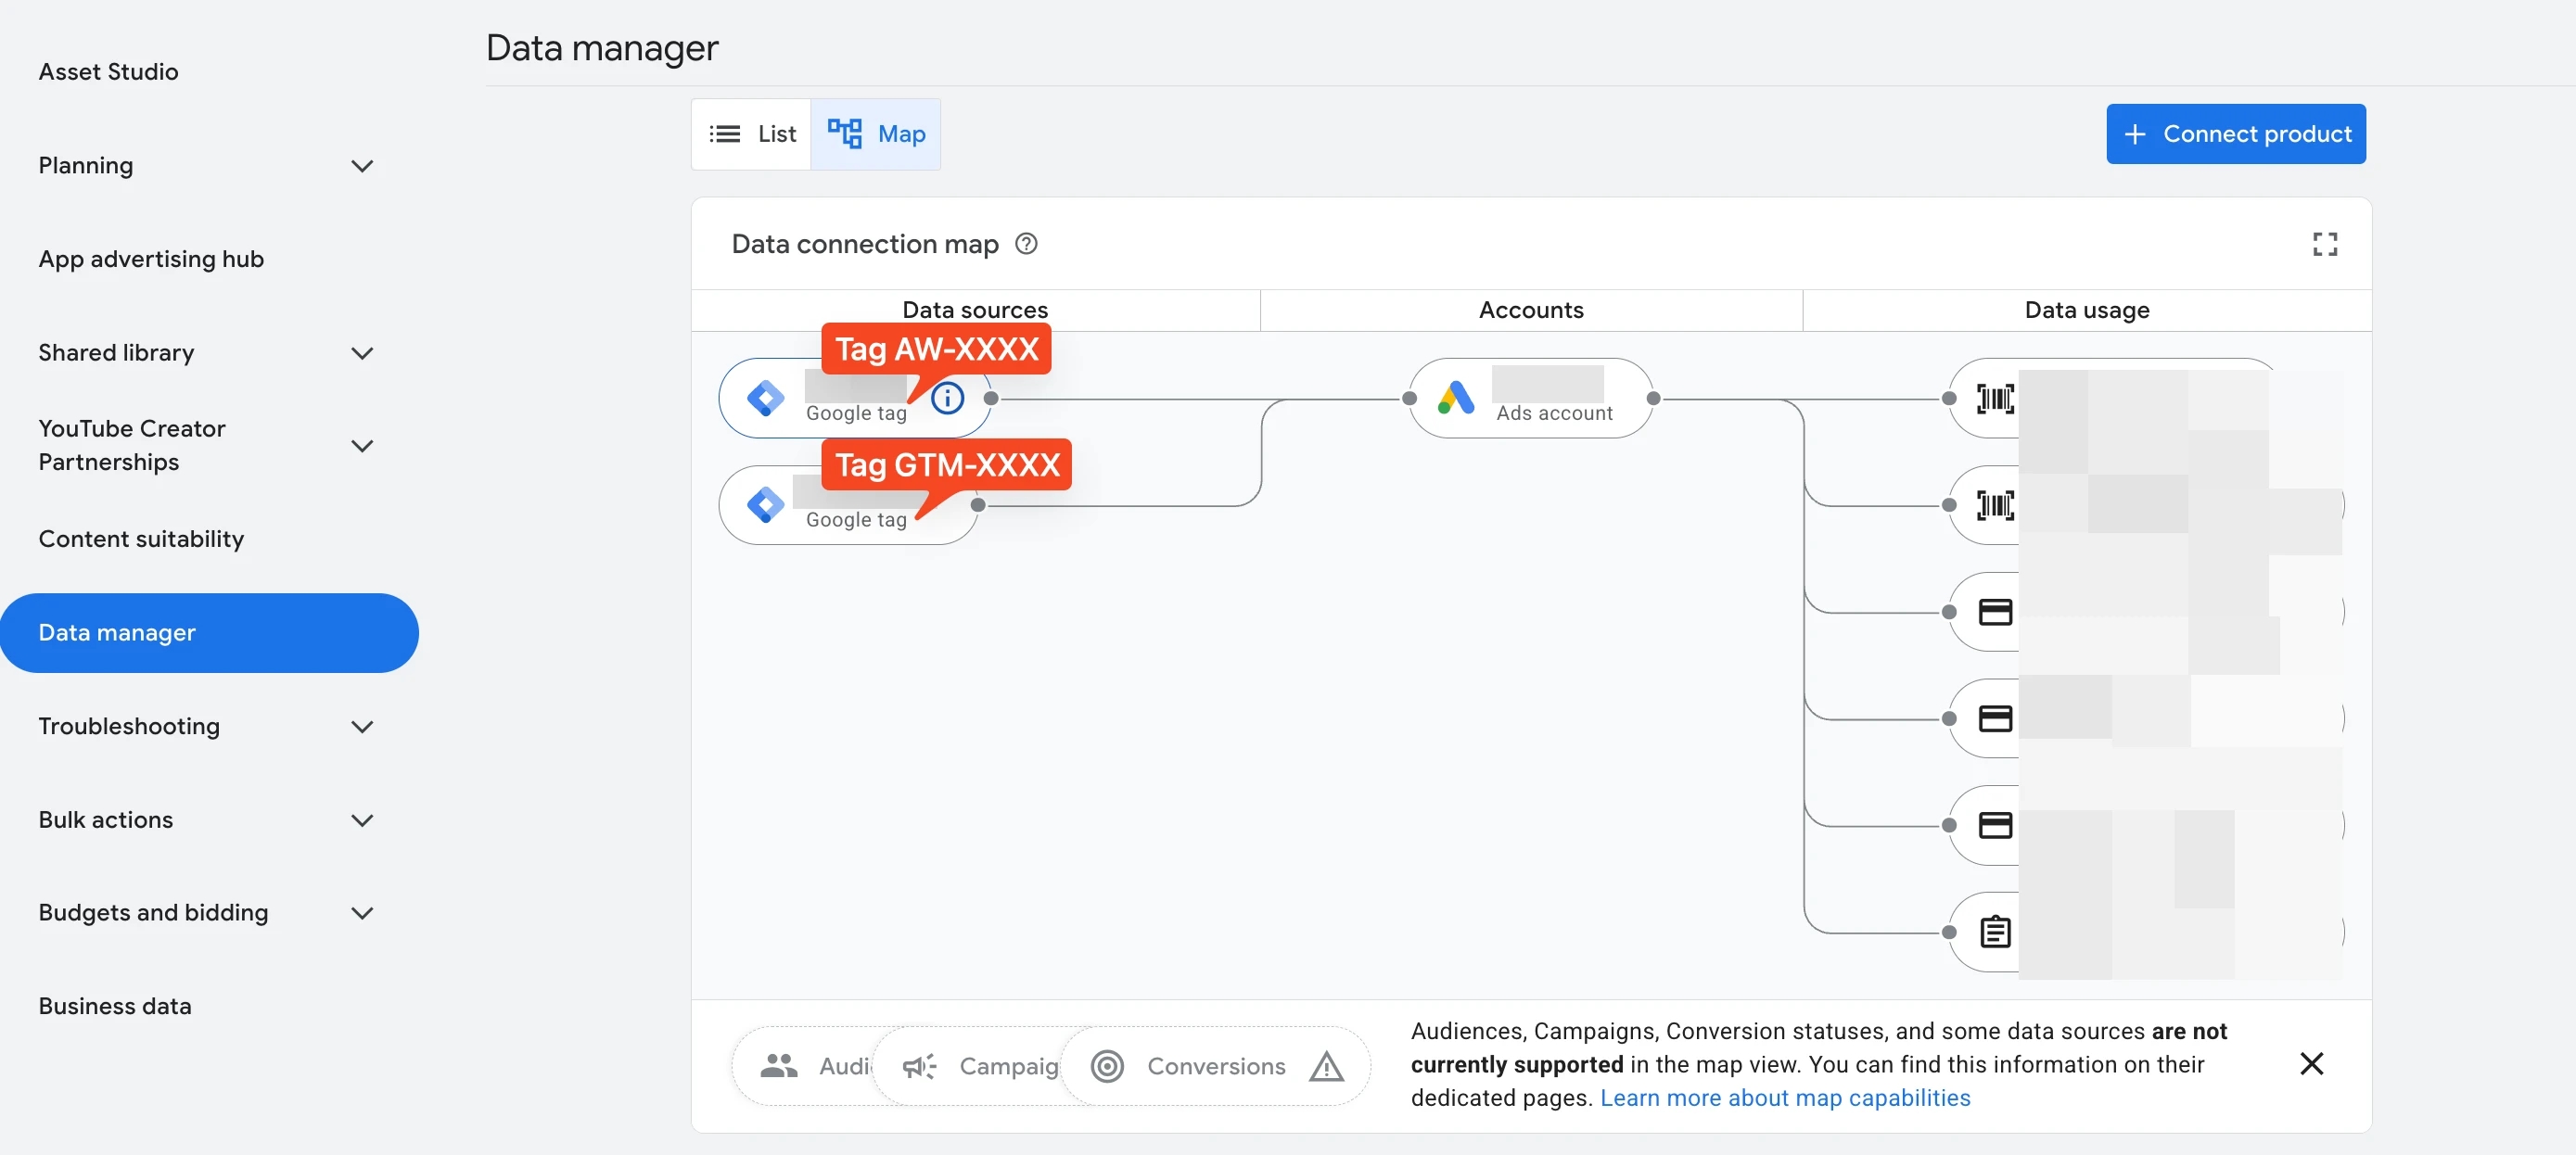
If you click the Manage button or the three-dot menu next to the first Google tag, these actions lead, as everyone is used to, to the tag settings and to the statistics collected by the Google Ads tag (AW-XXXXX). Everything is as it was before.
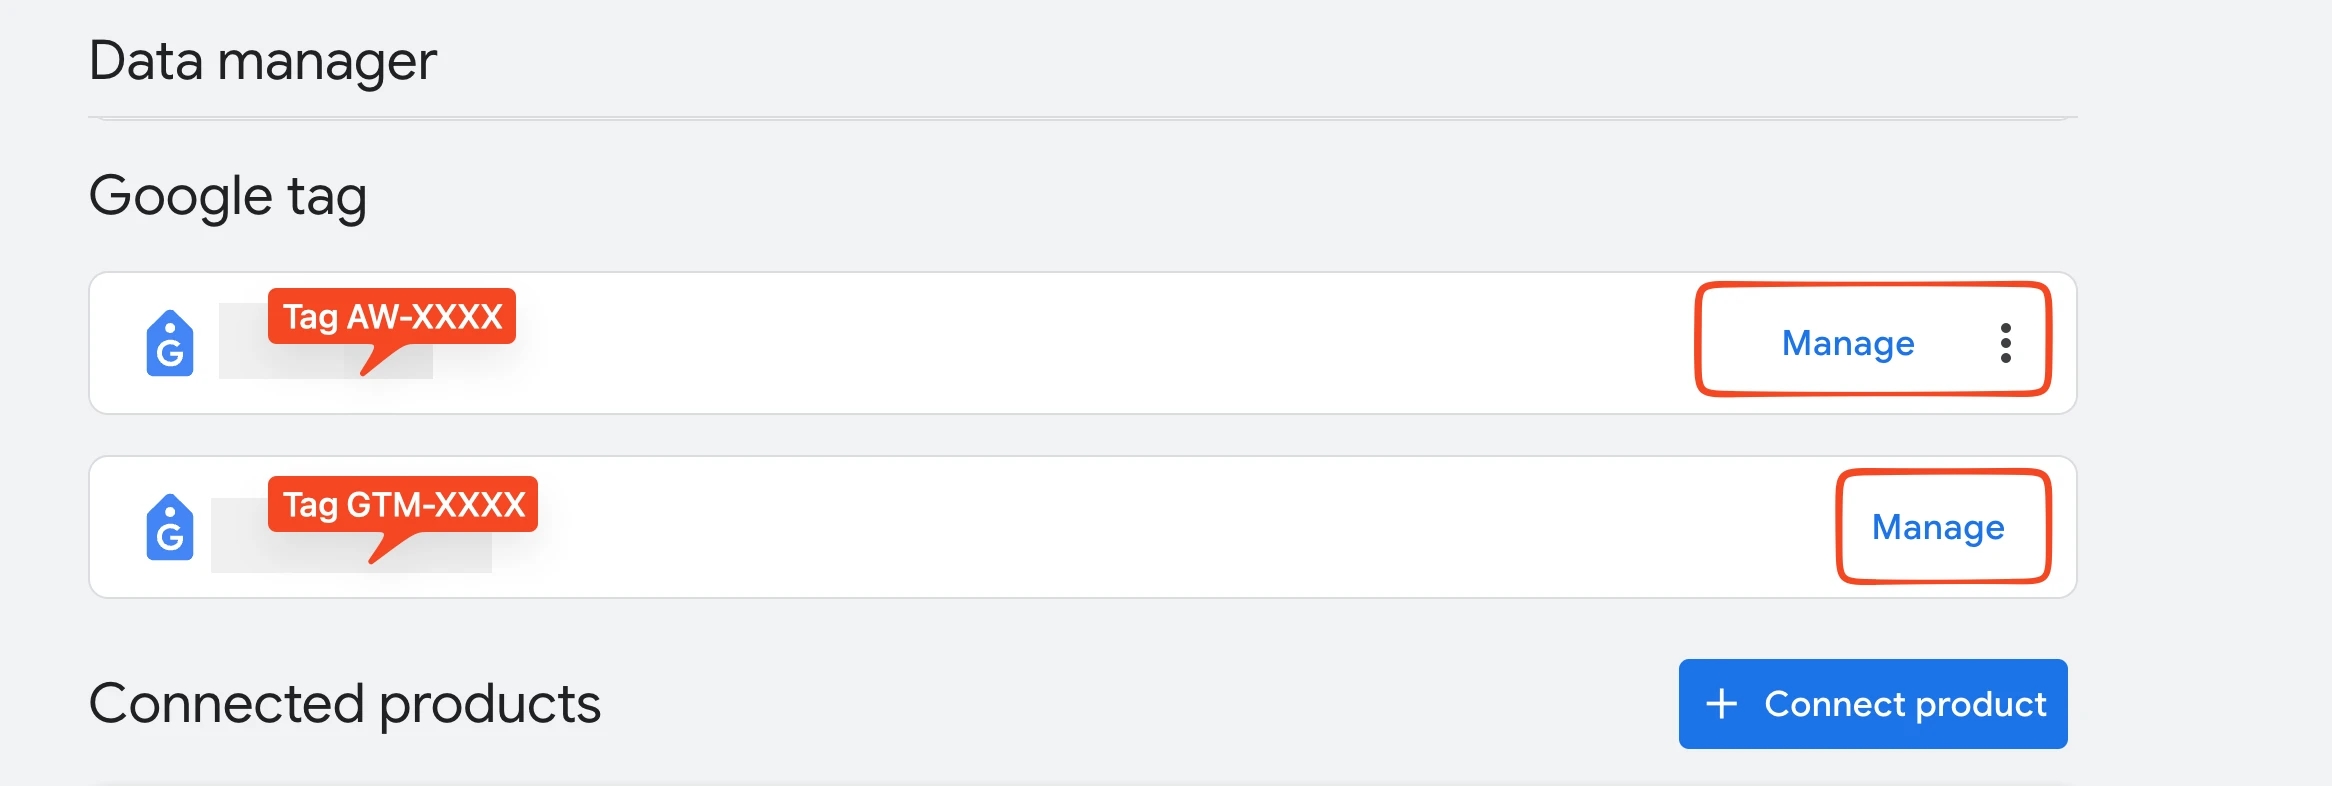
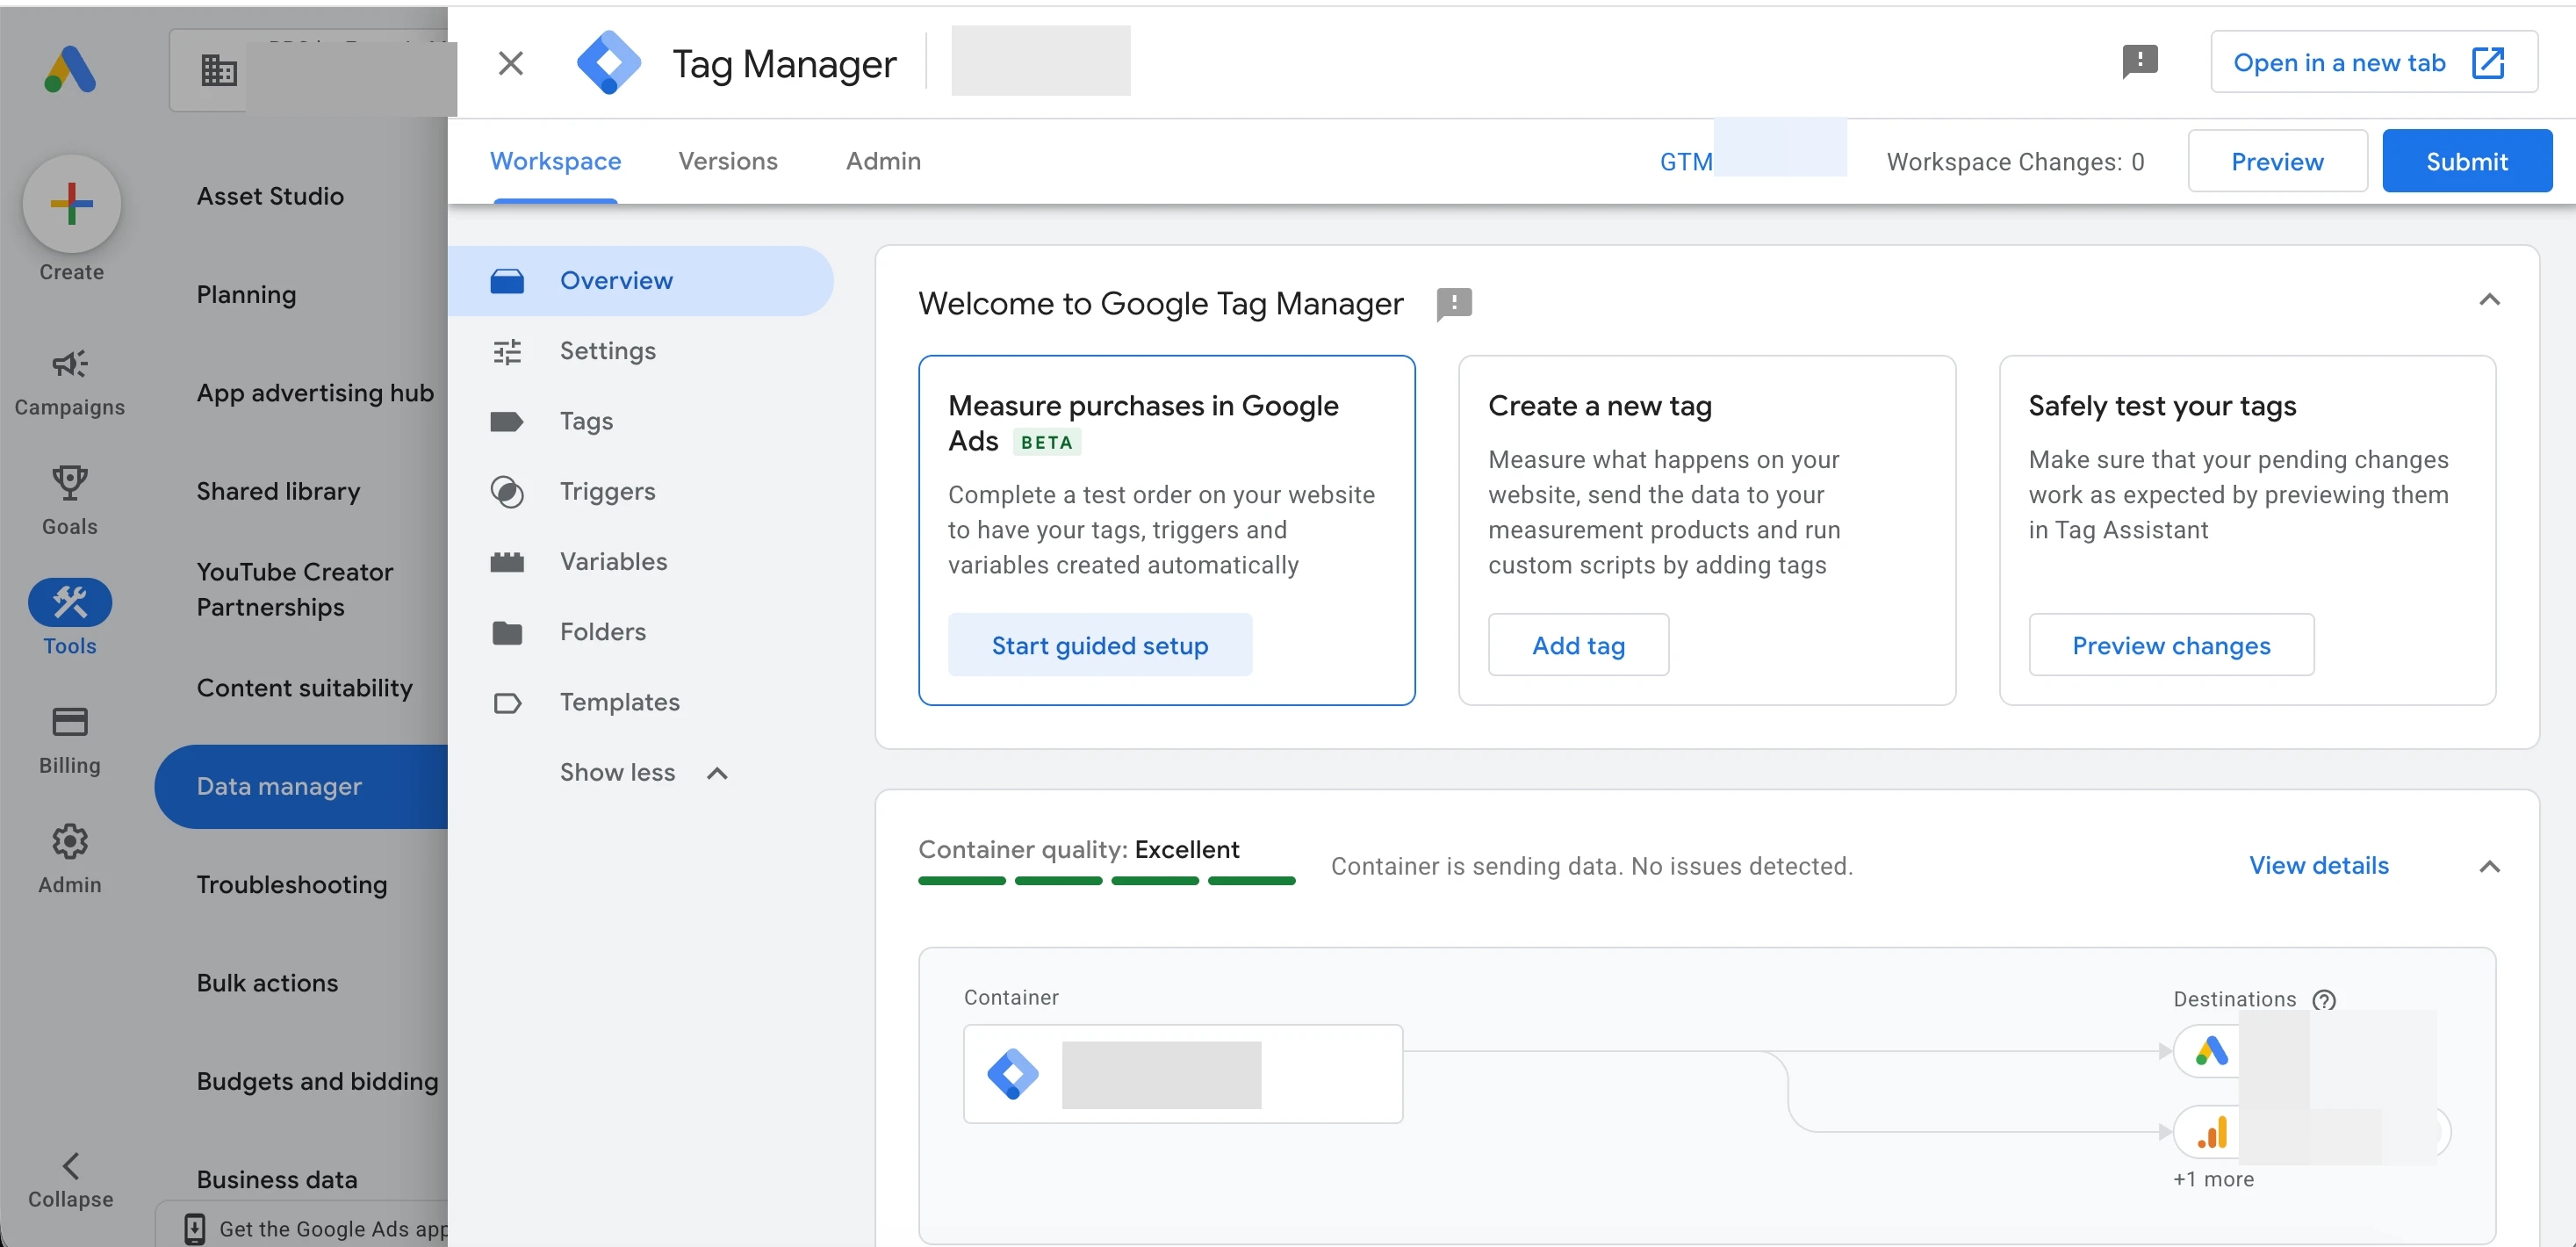
If you click Manage next to the second Google tag (the one shown in the screenshot without the three-dot menu), the corresponding Google Tag Manager container will open. The level of access to it will depend on the permissions set for the user in step 2 of the migration process.
What this means in practice
So, 2 tags in the account are the new norm of two-way integration 🙂
- AW-XXXX is the classic Google Ads tag, which now works as a Destination. Data goes into it as before, and you can view event statistics, such as dynamic remarketing, in the three-dot menu.
- GTM-XXXX is the Google Tag Manager container itself, which after optimization also receives Google tag status. That's why the Manage button here simply leads to GTM.
How to interpret this?
The appearance of a second Google tag in Data Manager doesn`t in itself mean that another independent script has appeared on the site or that anything needs to be reconfigured in Google Ads. In this setup, the GTM container is also displayed as a Google tag, and the Data Connection Map displays the connection between the container and the Google Ads destination. So if you see this picture in an ad account, start by identifying both tags and understand their roles in the data transfer setup.
So we need to get used to two tags in Data Manager, but with our eyes open :)
Conclusions: what to be prepared for?
The Google Tag Manager update changes the familiar architecture of working with Google tags: the GTM container itself now functions as a full-fledged Google tag, and the settings of connected Google services are centralized at the container level.
What to take away from this update:
- Before the migration — audit. Check that the website has no parallel gtag.js installations, and align your tag settings, especially User-Provided Data in GA4 and Google Ads. Now is the time to tidy up your configurations, before combining them under shared settings.
- After the migration — verification. Make sure the new configuration works as expected in Preview, that data reaches the right services, and that conversions are not duplicated. container. Remember to also check Conversion Linker and remove it from the container.
- Two Google tags in Data Manager are not a reason to panic. If the migration was completed correctly, the appearance of the AW-XXXX and GTM-XXXX tags is expected behavior of the new architecture. You don't need to delete either of them or go back to the old configuration.
- Don't forget about access. During the migration, you are effectively creating a new connection between GTM and other Google products, so it's worth checking who gets access to the container and at what level.
The main thing is not to treat this update as just another automatic optimization that you can simply switch on. It changes the interaction logic between GTM, GA4, and Google Ads, and therefore requires an understanding of how your setup collects and transfers data.
Loading comments…