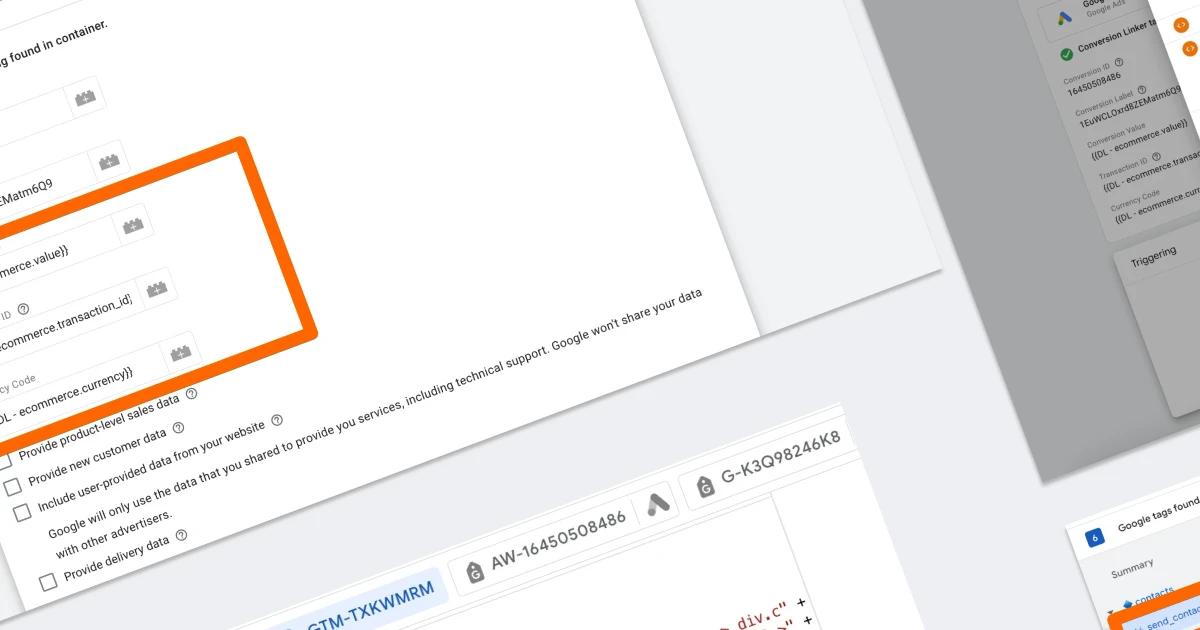

Due to the updated interface in Google Ads, new information on the Simpler Conversion Measurement Setup has been added to the article on July 10, 2025. Read more below.
If you're accustomed to importing conversions from GA4 into your advertising account, it’s worth considering setting up conversions directly within the ads interface.
Why is this beneficial?
- Faster Data Transmission: Configuring conversions directly reduces data transmission delays, allowing campaigns to respond more quickly to user behavior.
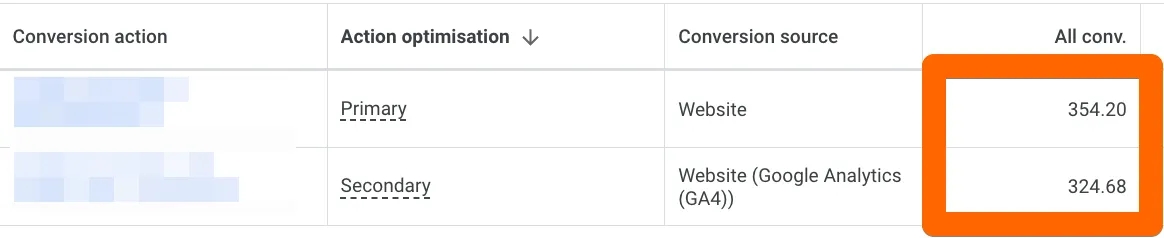
- Potentially Higher Conversion Volume: In practice, many projects see a slightly higher number of conversions tracked directly than those imported from GA4. This difference arises from variations in data attribution between systems. More conversions provide additional learning opportunities for the AI algorithms that manage campaigns.
It’s important to note that configuring conversions in the ads account doesn’t necessarily replace the GA4 import. Instead, I recommend keeping both options, designating one as the Primary conversion and the other as Secondary. This allows you to leverage the benefits of both data sources and maximize campaign performance.
In my experience, when the tag transmits conversions directly, it often reports a few more conversions than the GA4 import, though both conversions remain visible, with distinct optimization statuses (Primary and Secondary). When reviewing conversions on a given day, the number of direct website conversions is often noticeably higher.
Why did I decide to focus on this?
In the past few weeks, I’ve noticed that participants in my advanced conversions course, despite successfully mastering user data transmission setup, still encounter questions and challenges when configuring conversions themselves. That’s why I’ve prepared a step-by-step guide for setting up tracking for the most popular conversions:
Ready? Let’s get started!
Form Submission
Setting up form submission tracking in Google Ads
Working directly in the Google Ads interface: creating a conversion. Нижче наведено покрокову інструкцію:
Here’s a step-by-step guide to setting up conversions:
- In your Google Ads account, navigate to the conversions menu tab: Goals -> Conversions -> Summary.
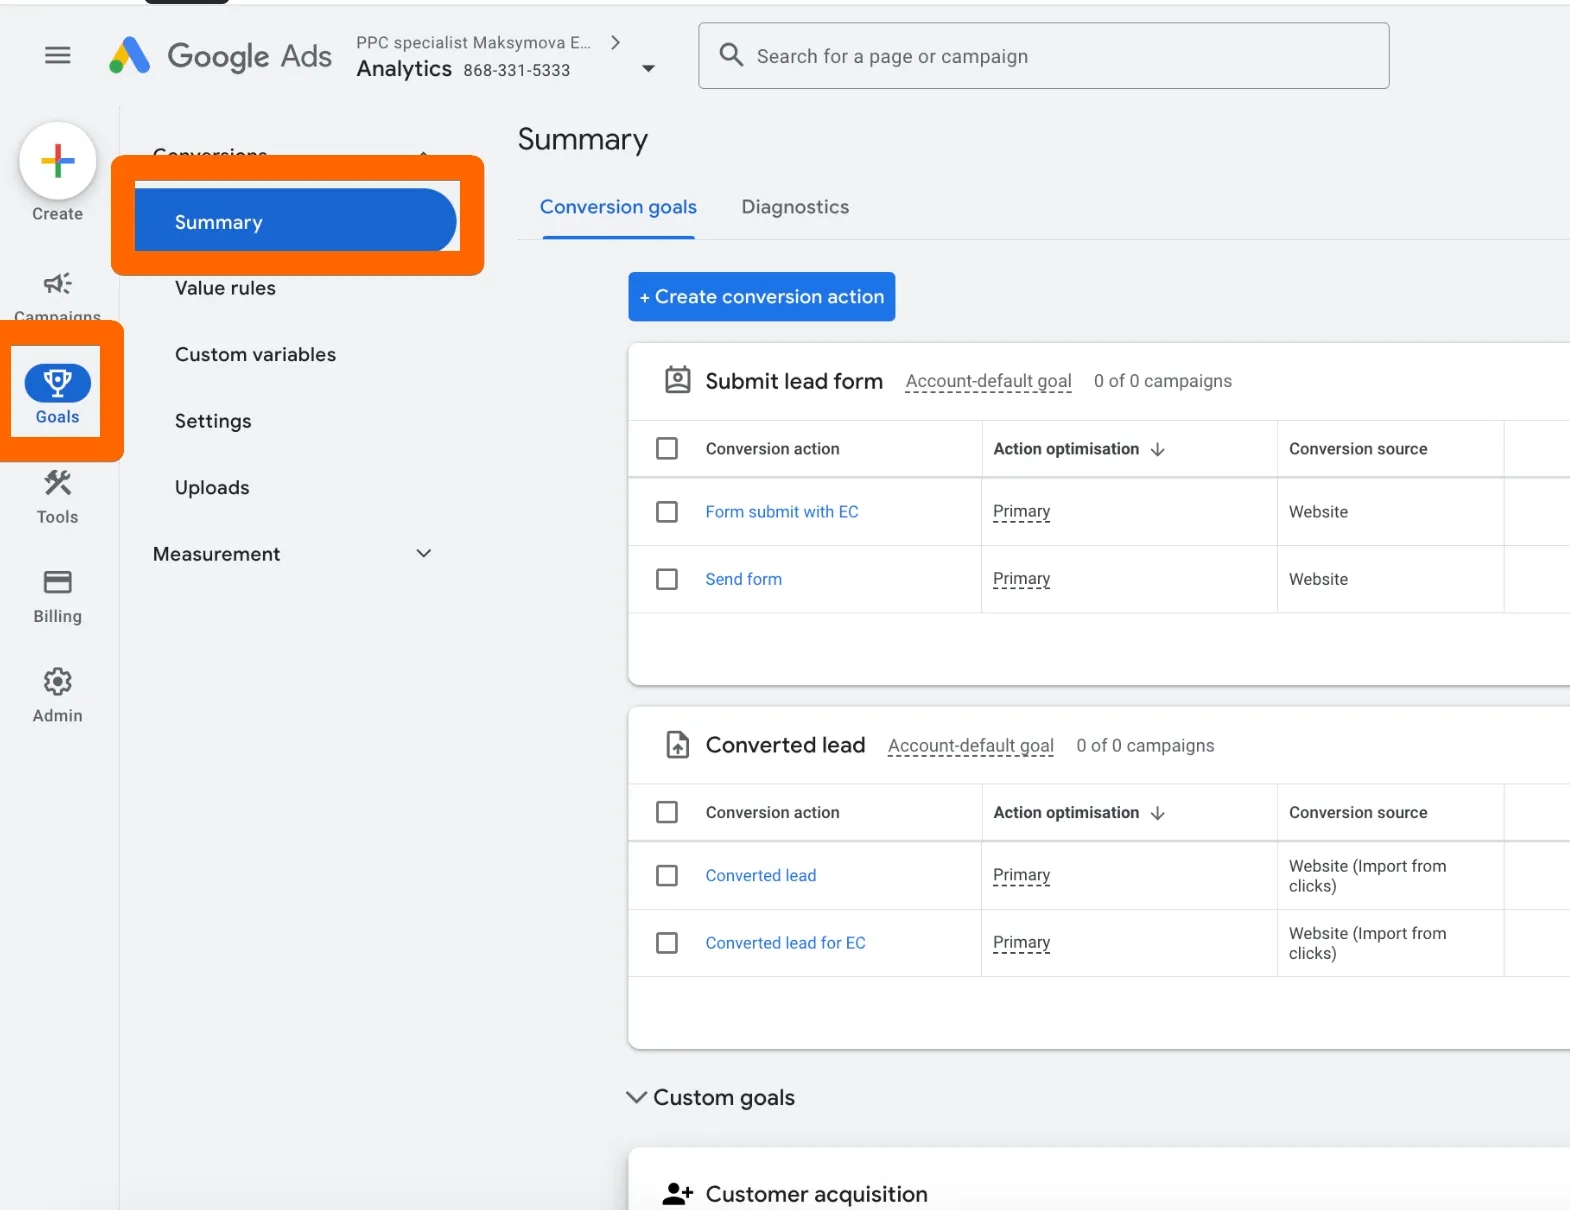
2. Click on Create conversion action.

3. Create a website conversion by selecting the Website option to track actions users take on your site.
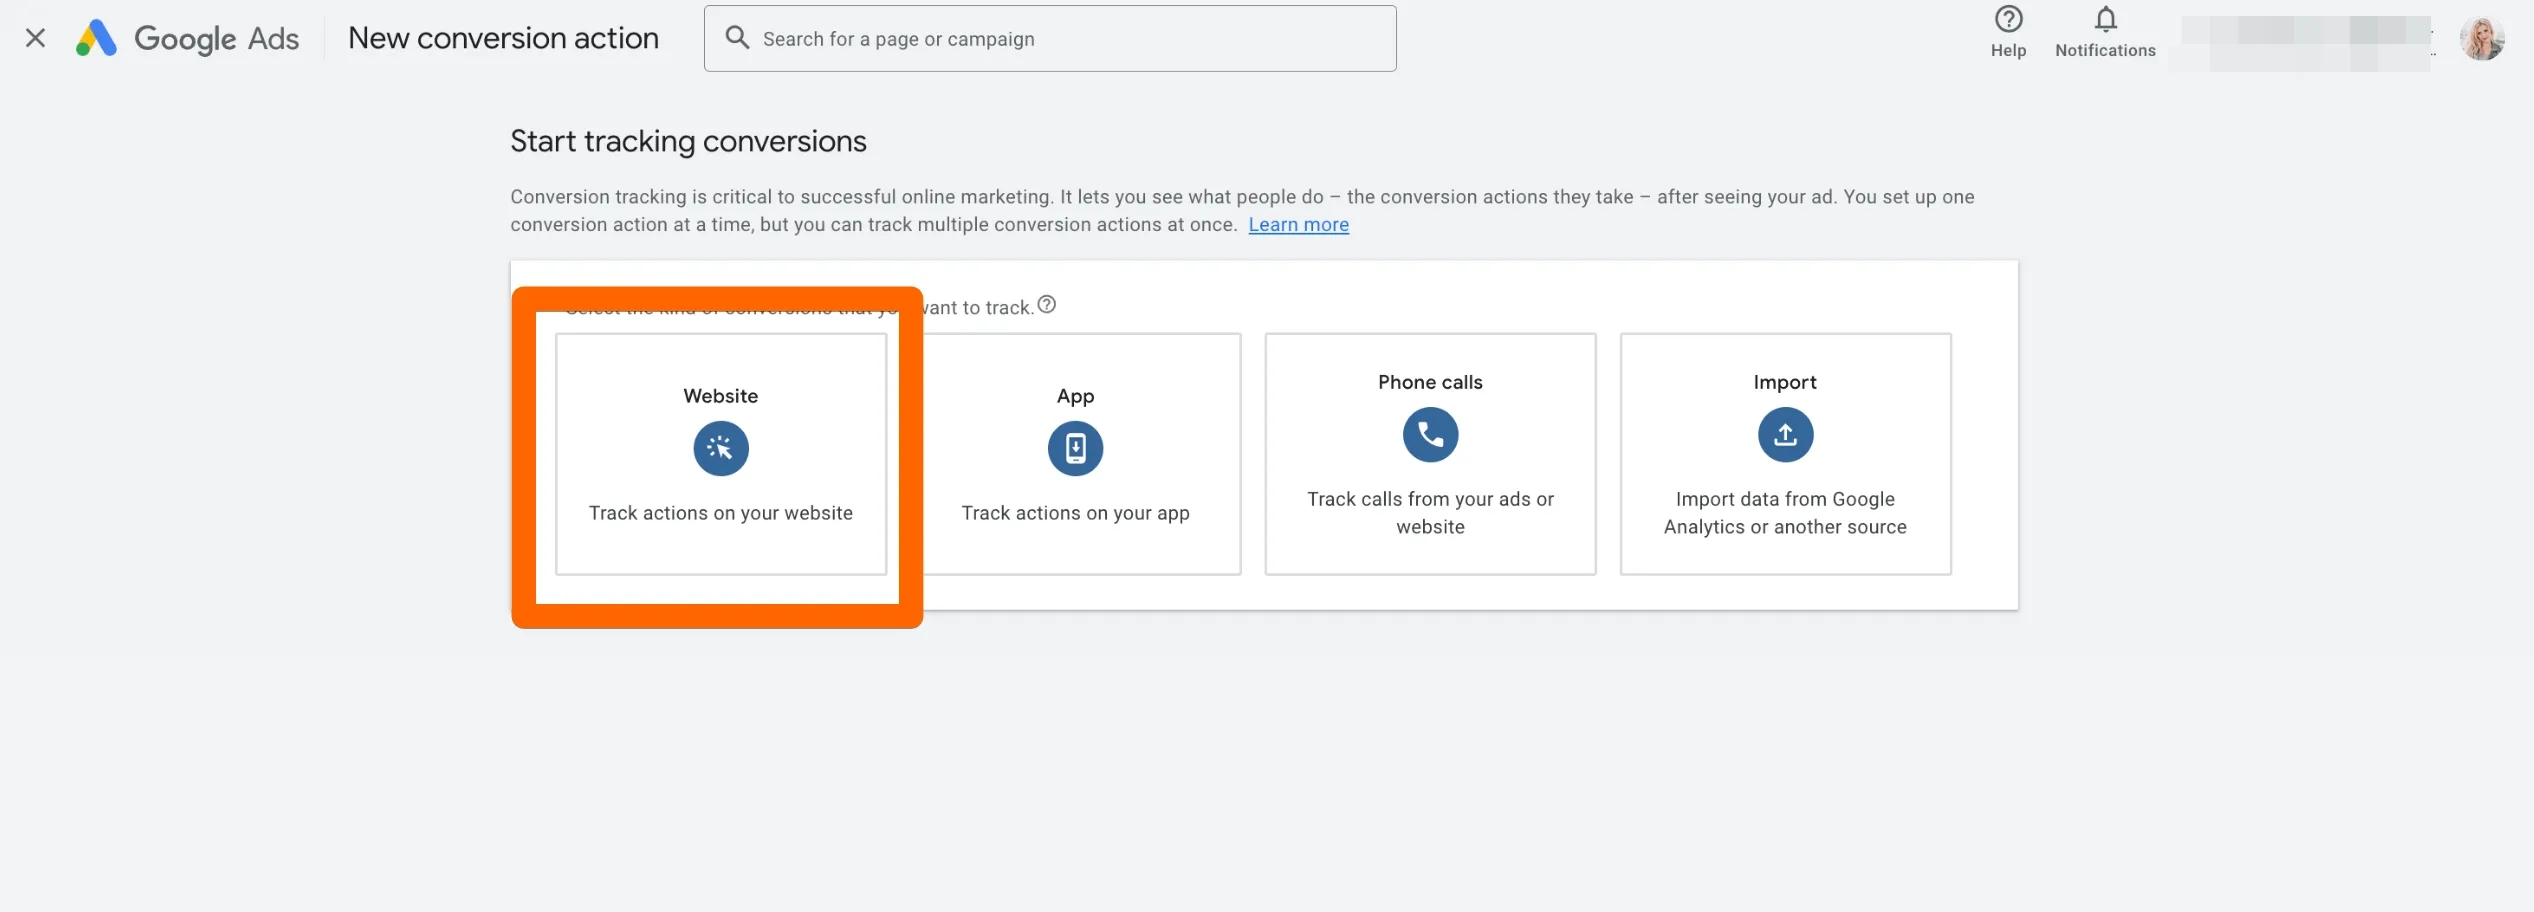
In this article, I’m focusing on online website conversions, but the screenshot shows more tracking options that might also be helpful. For example, I use the Import tab not only for GA4 conversions but also to import enhanced lead conversions. The Phone calls tab enables free Google call-tracking from your website, which is easy and quick to set up, though it has a limited list of supported countries. If your country is on Google’s forwarding numbers list, it’s a convenient option.
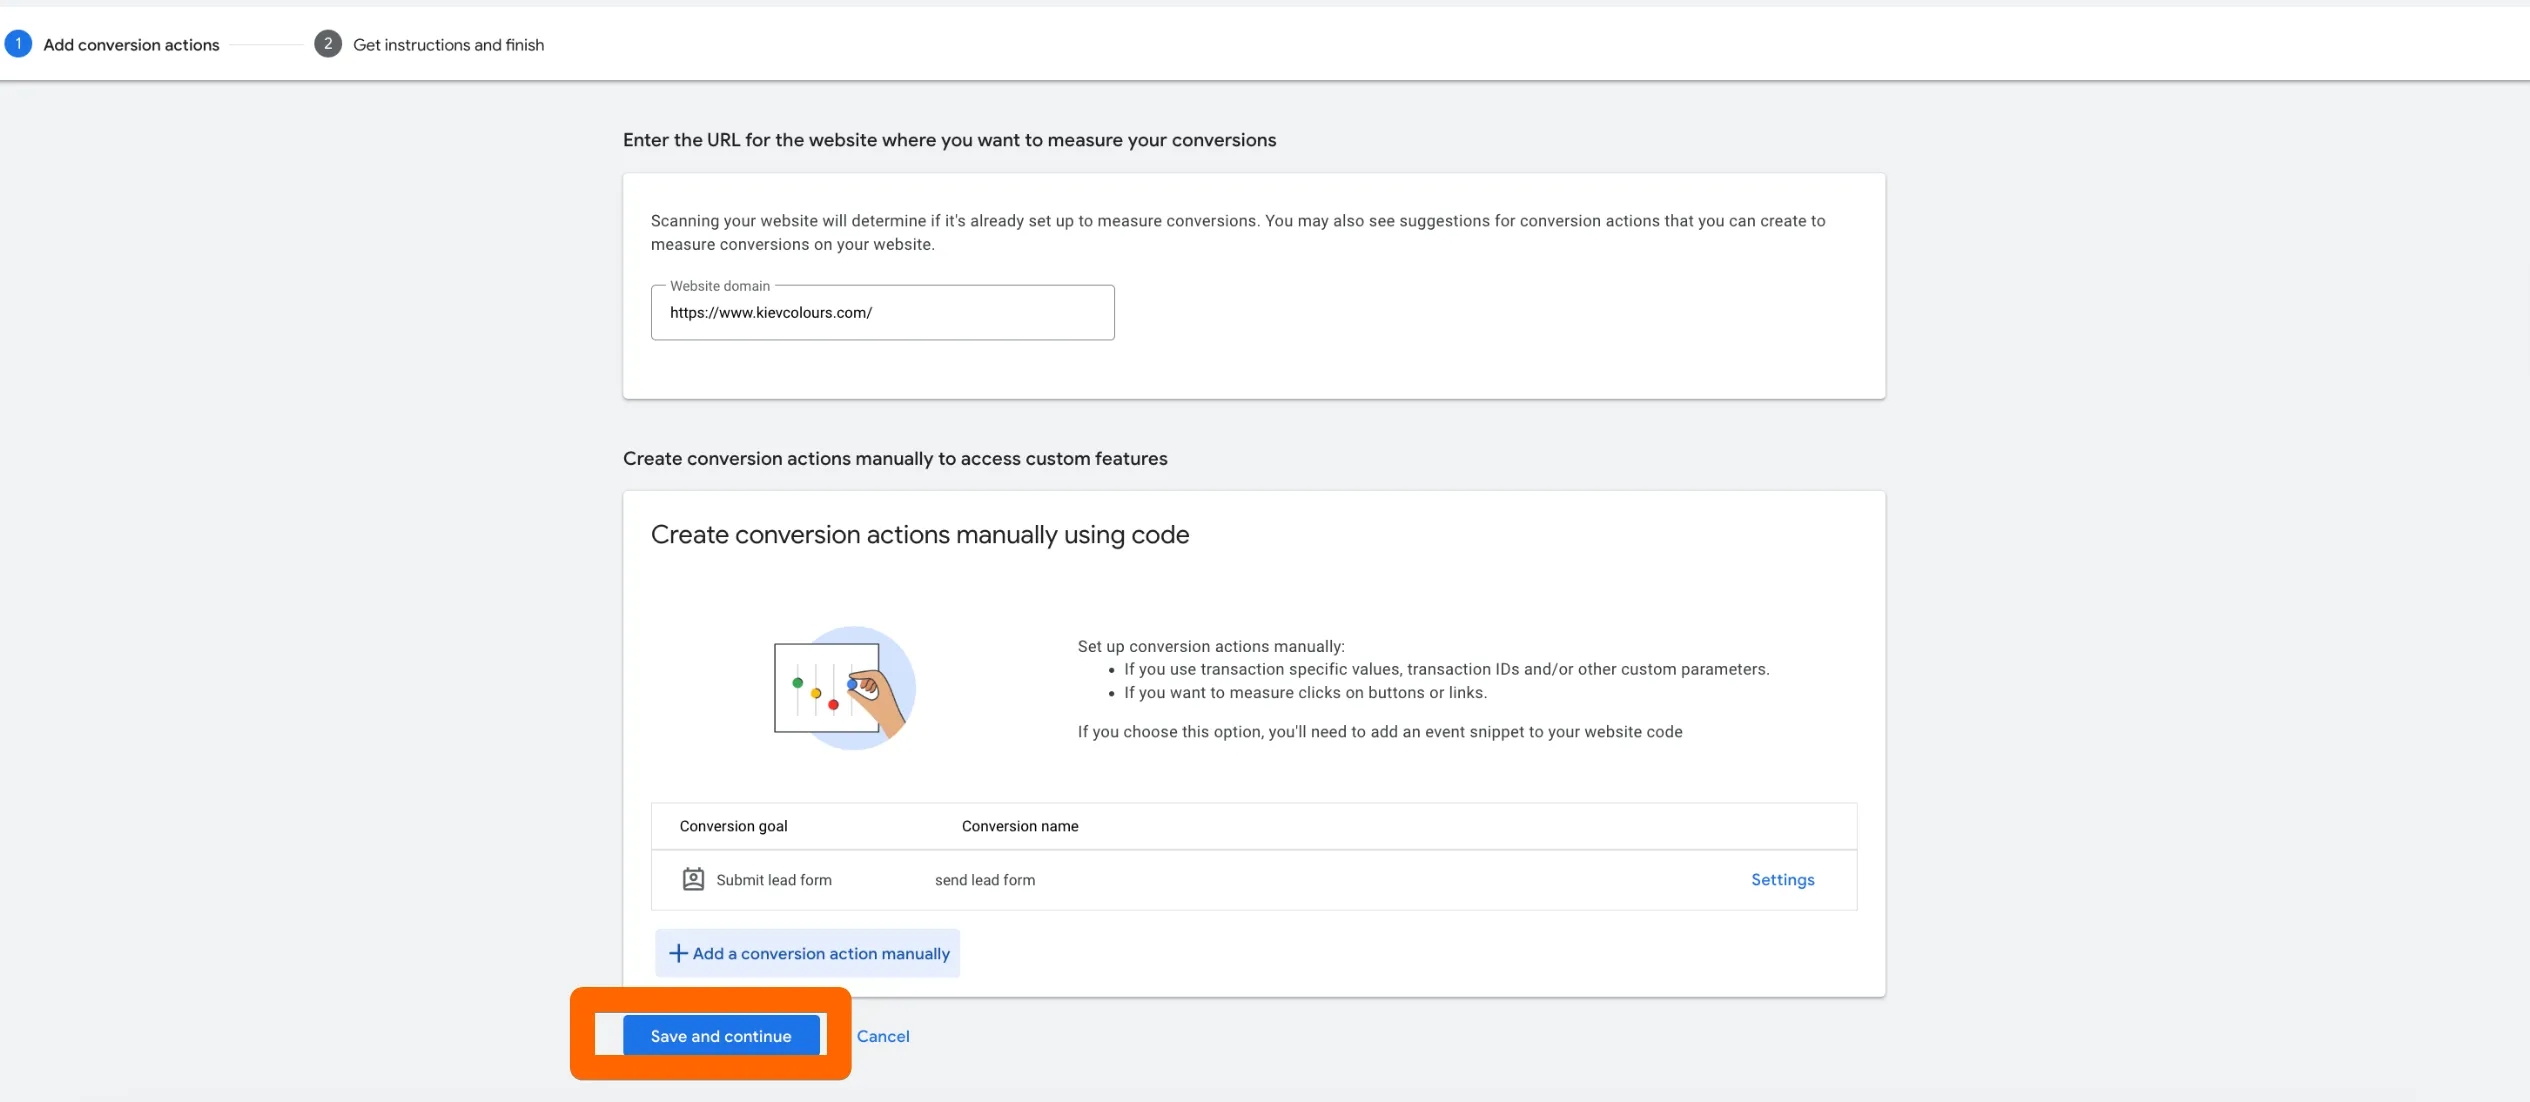
4. Enter your website URL.
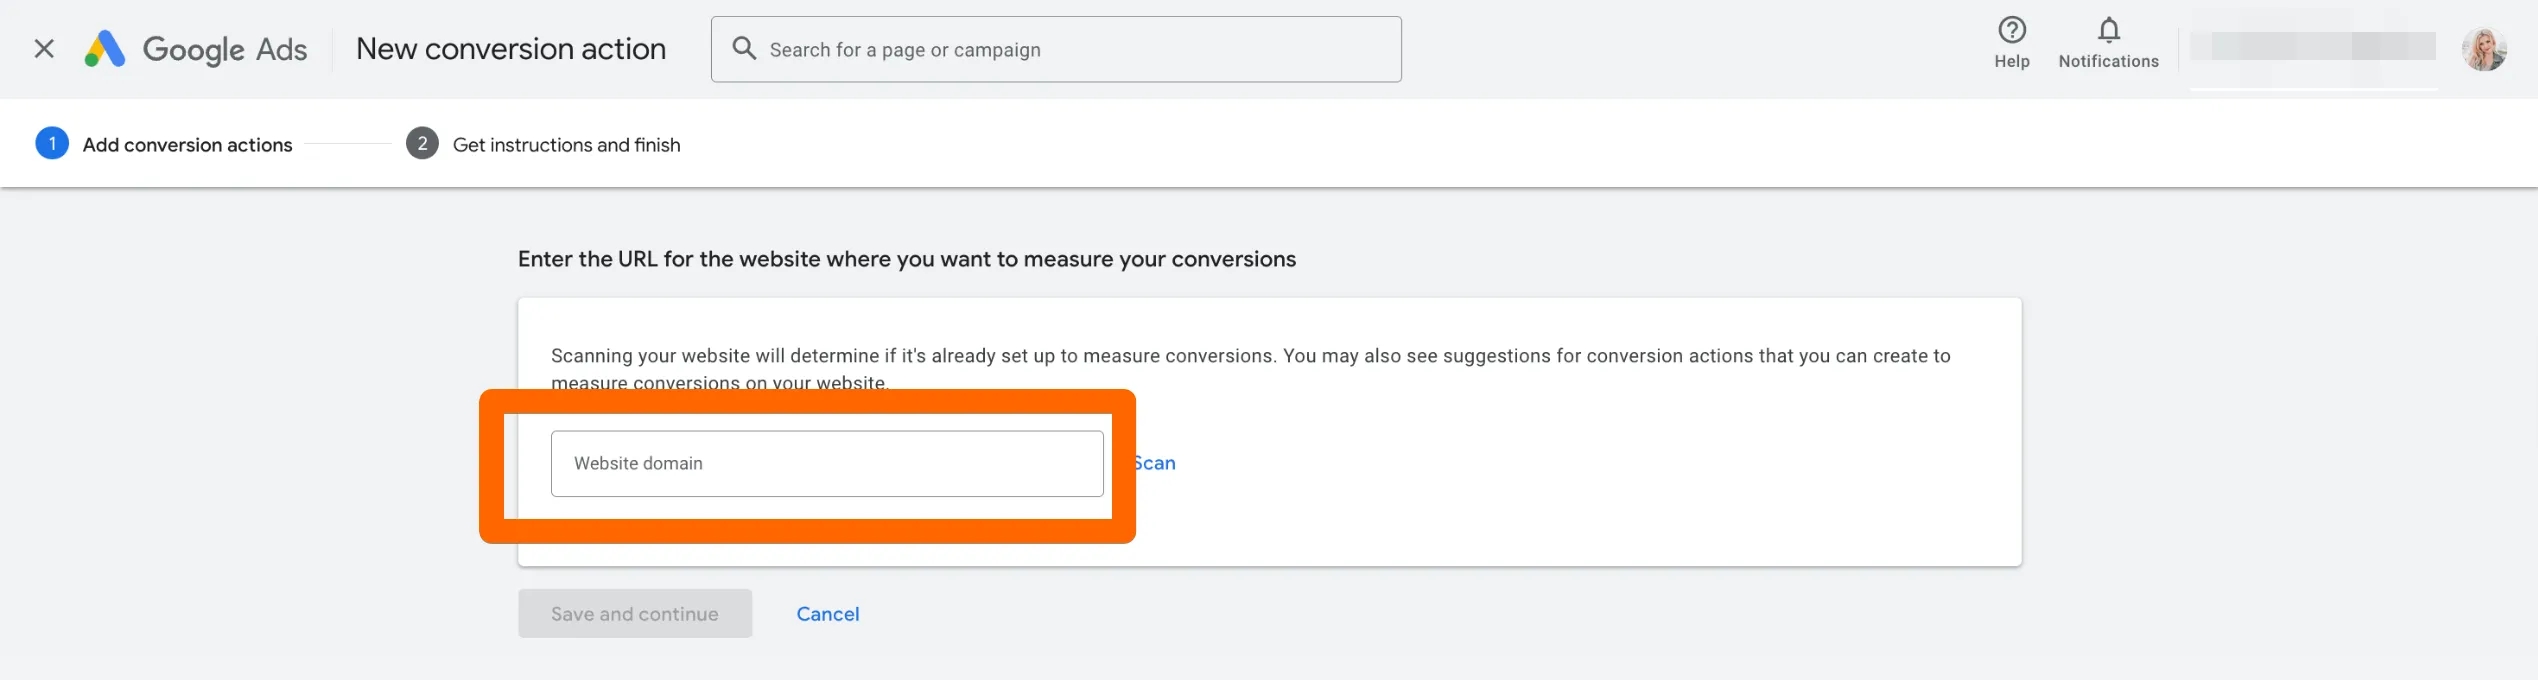
5. Pay careful attention to this step. If your domain is linked to Google Analytics 4, you may see a blue label to the right (not visible in all accounts) with one of the following options:
- Measure in Google Ads (Only use Google Ads for tracking)
- Measure in Google Analytics (Track conversions in Google Analytics)
If you see Measure in Google Ads during conversion setup, click it to select tracking solely in Google Ads. (This message usually appears when setting up conversions in Google Ads for the first time after previously using GA4 imports only.)
If you see Measure in Google Analytics, as shown in the screenshot below, you can skip this WITHOUT clicking.
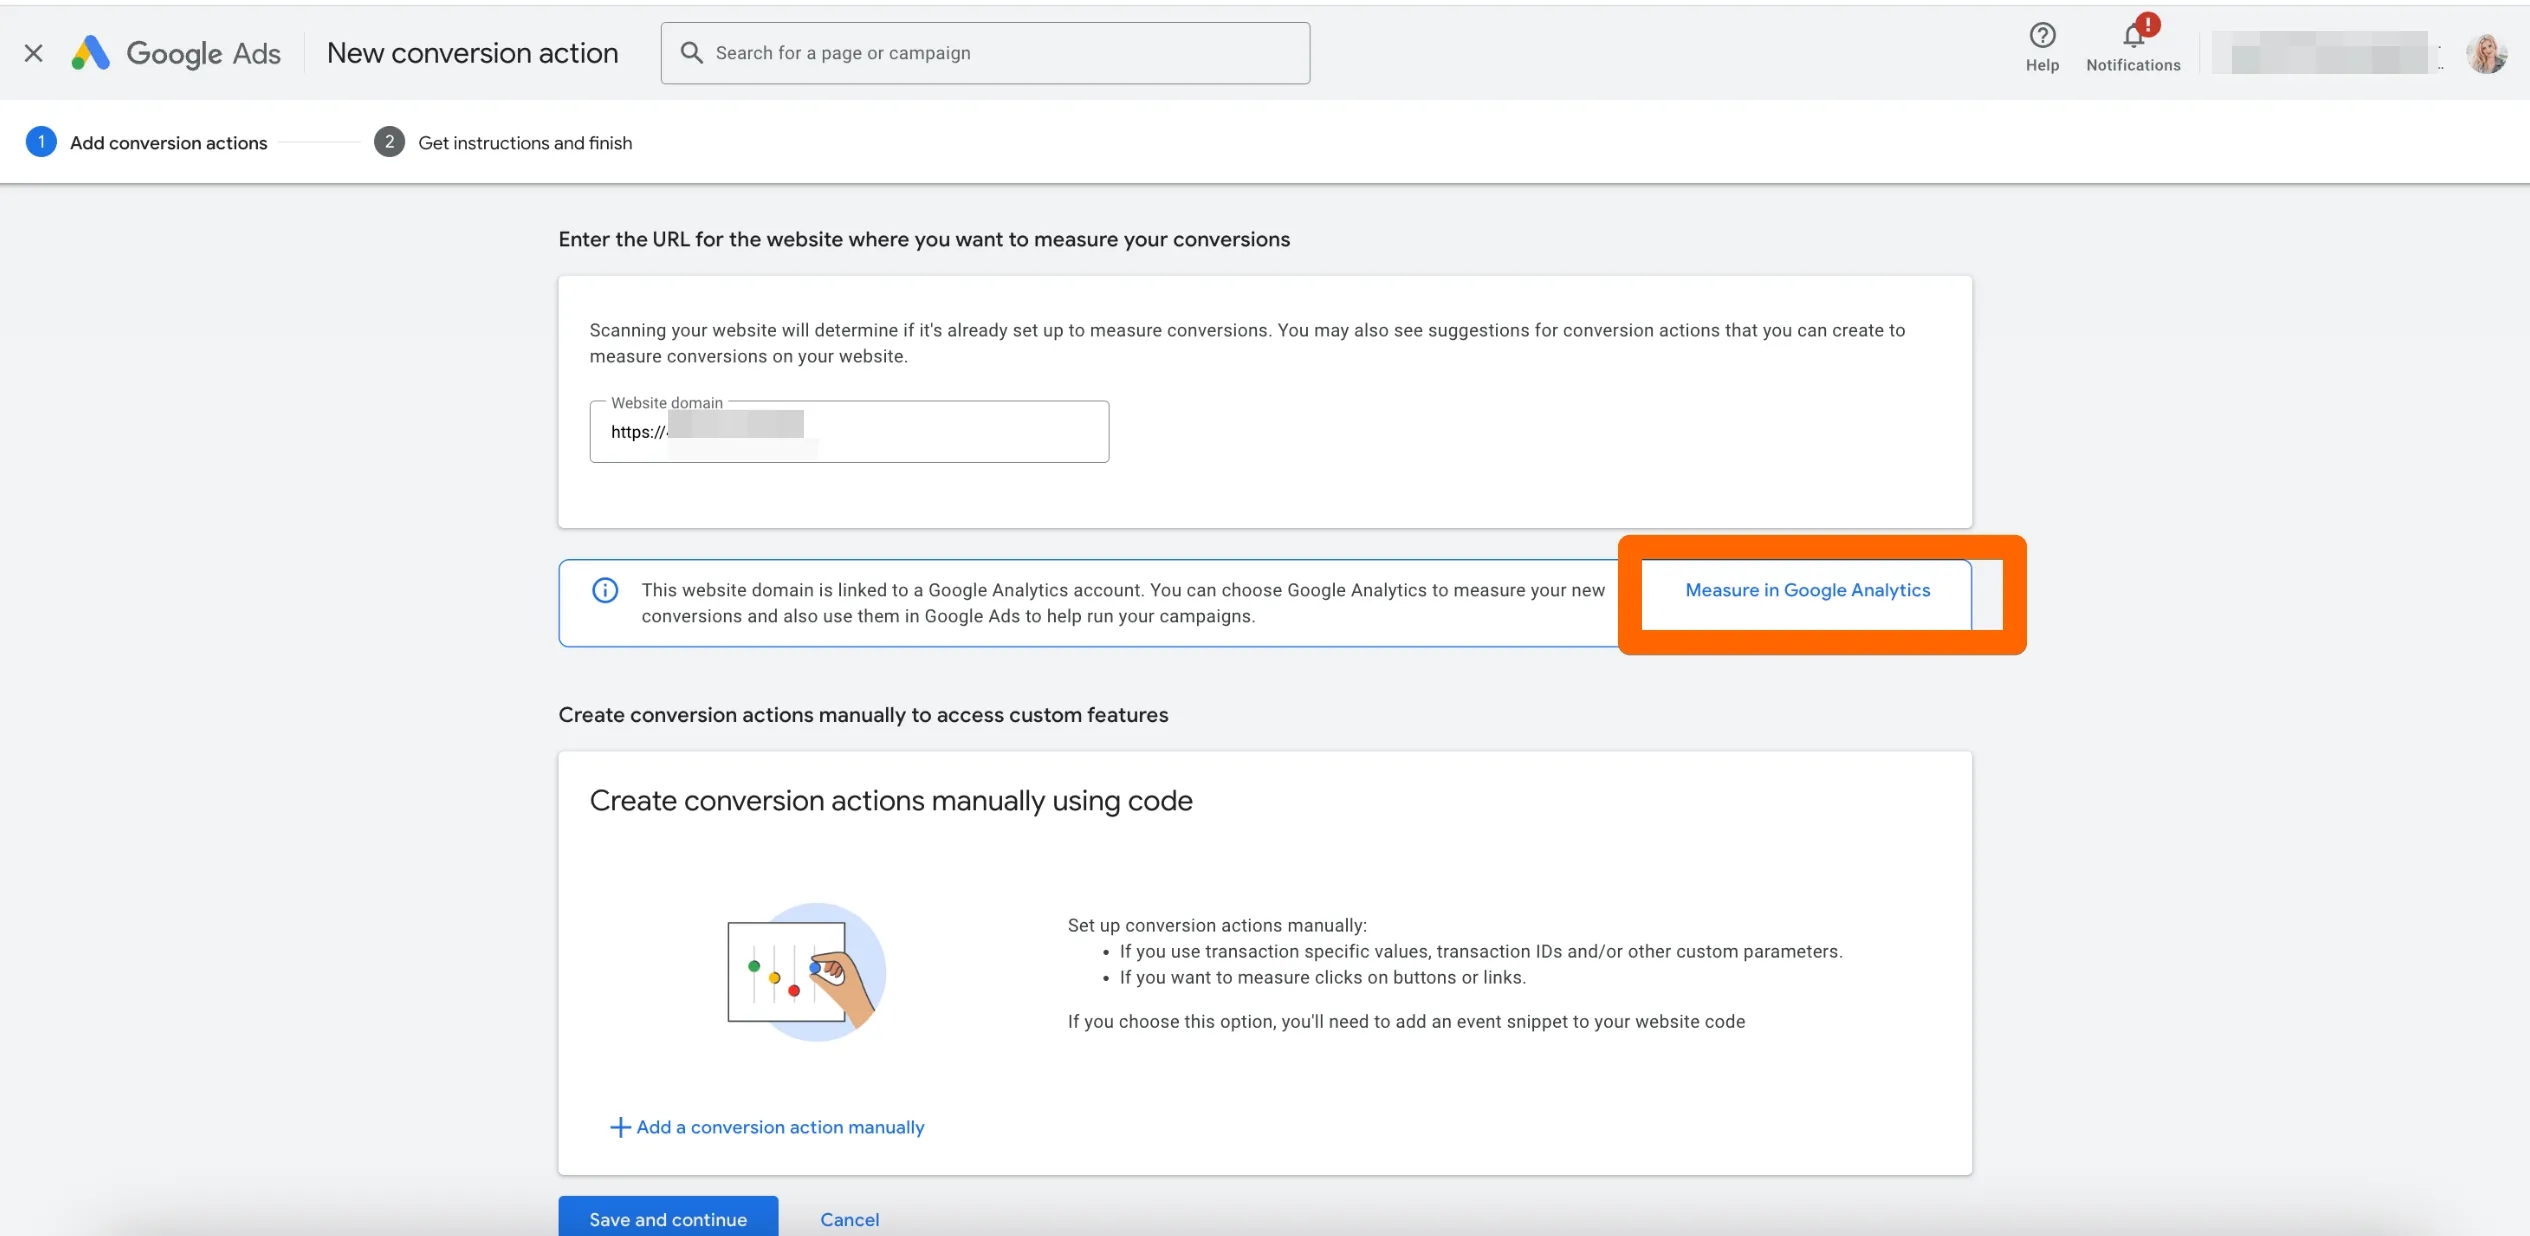
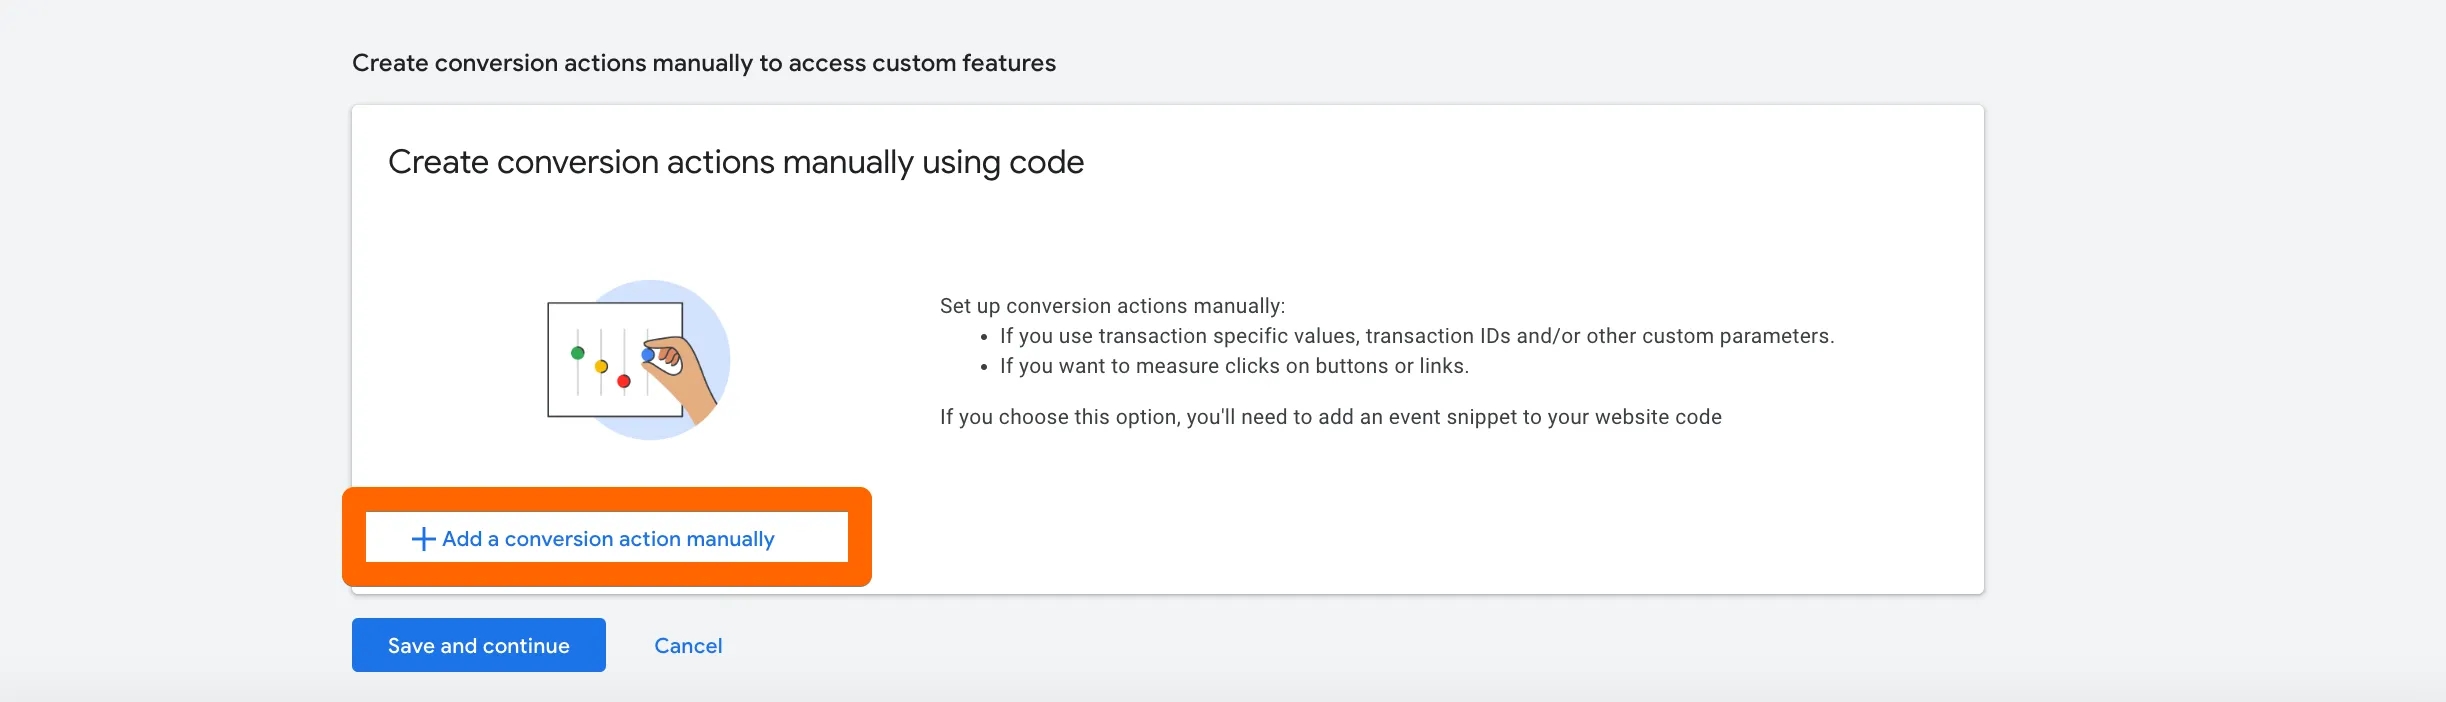
Next, click Add a conversion manually in the lower-left corner
6. You’ll see a new settings window:
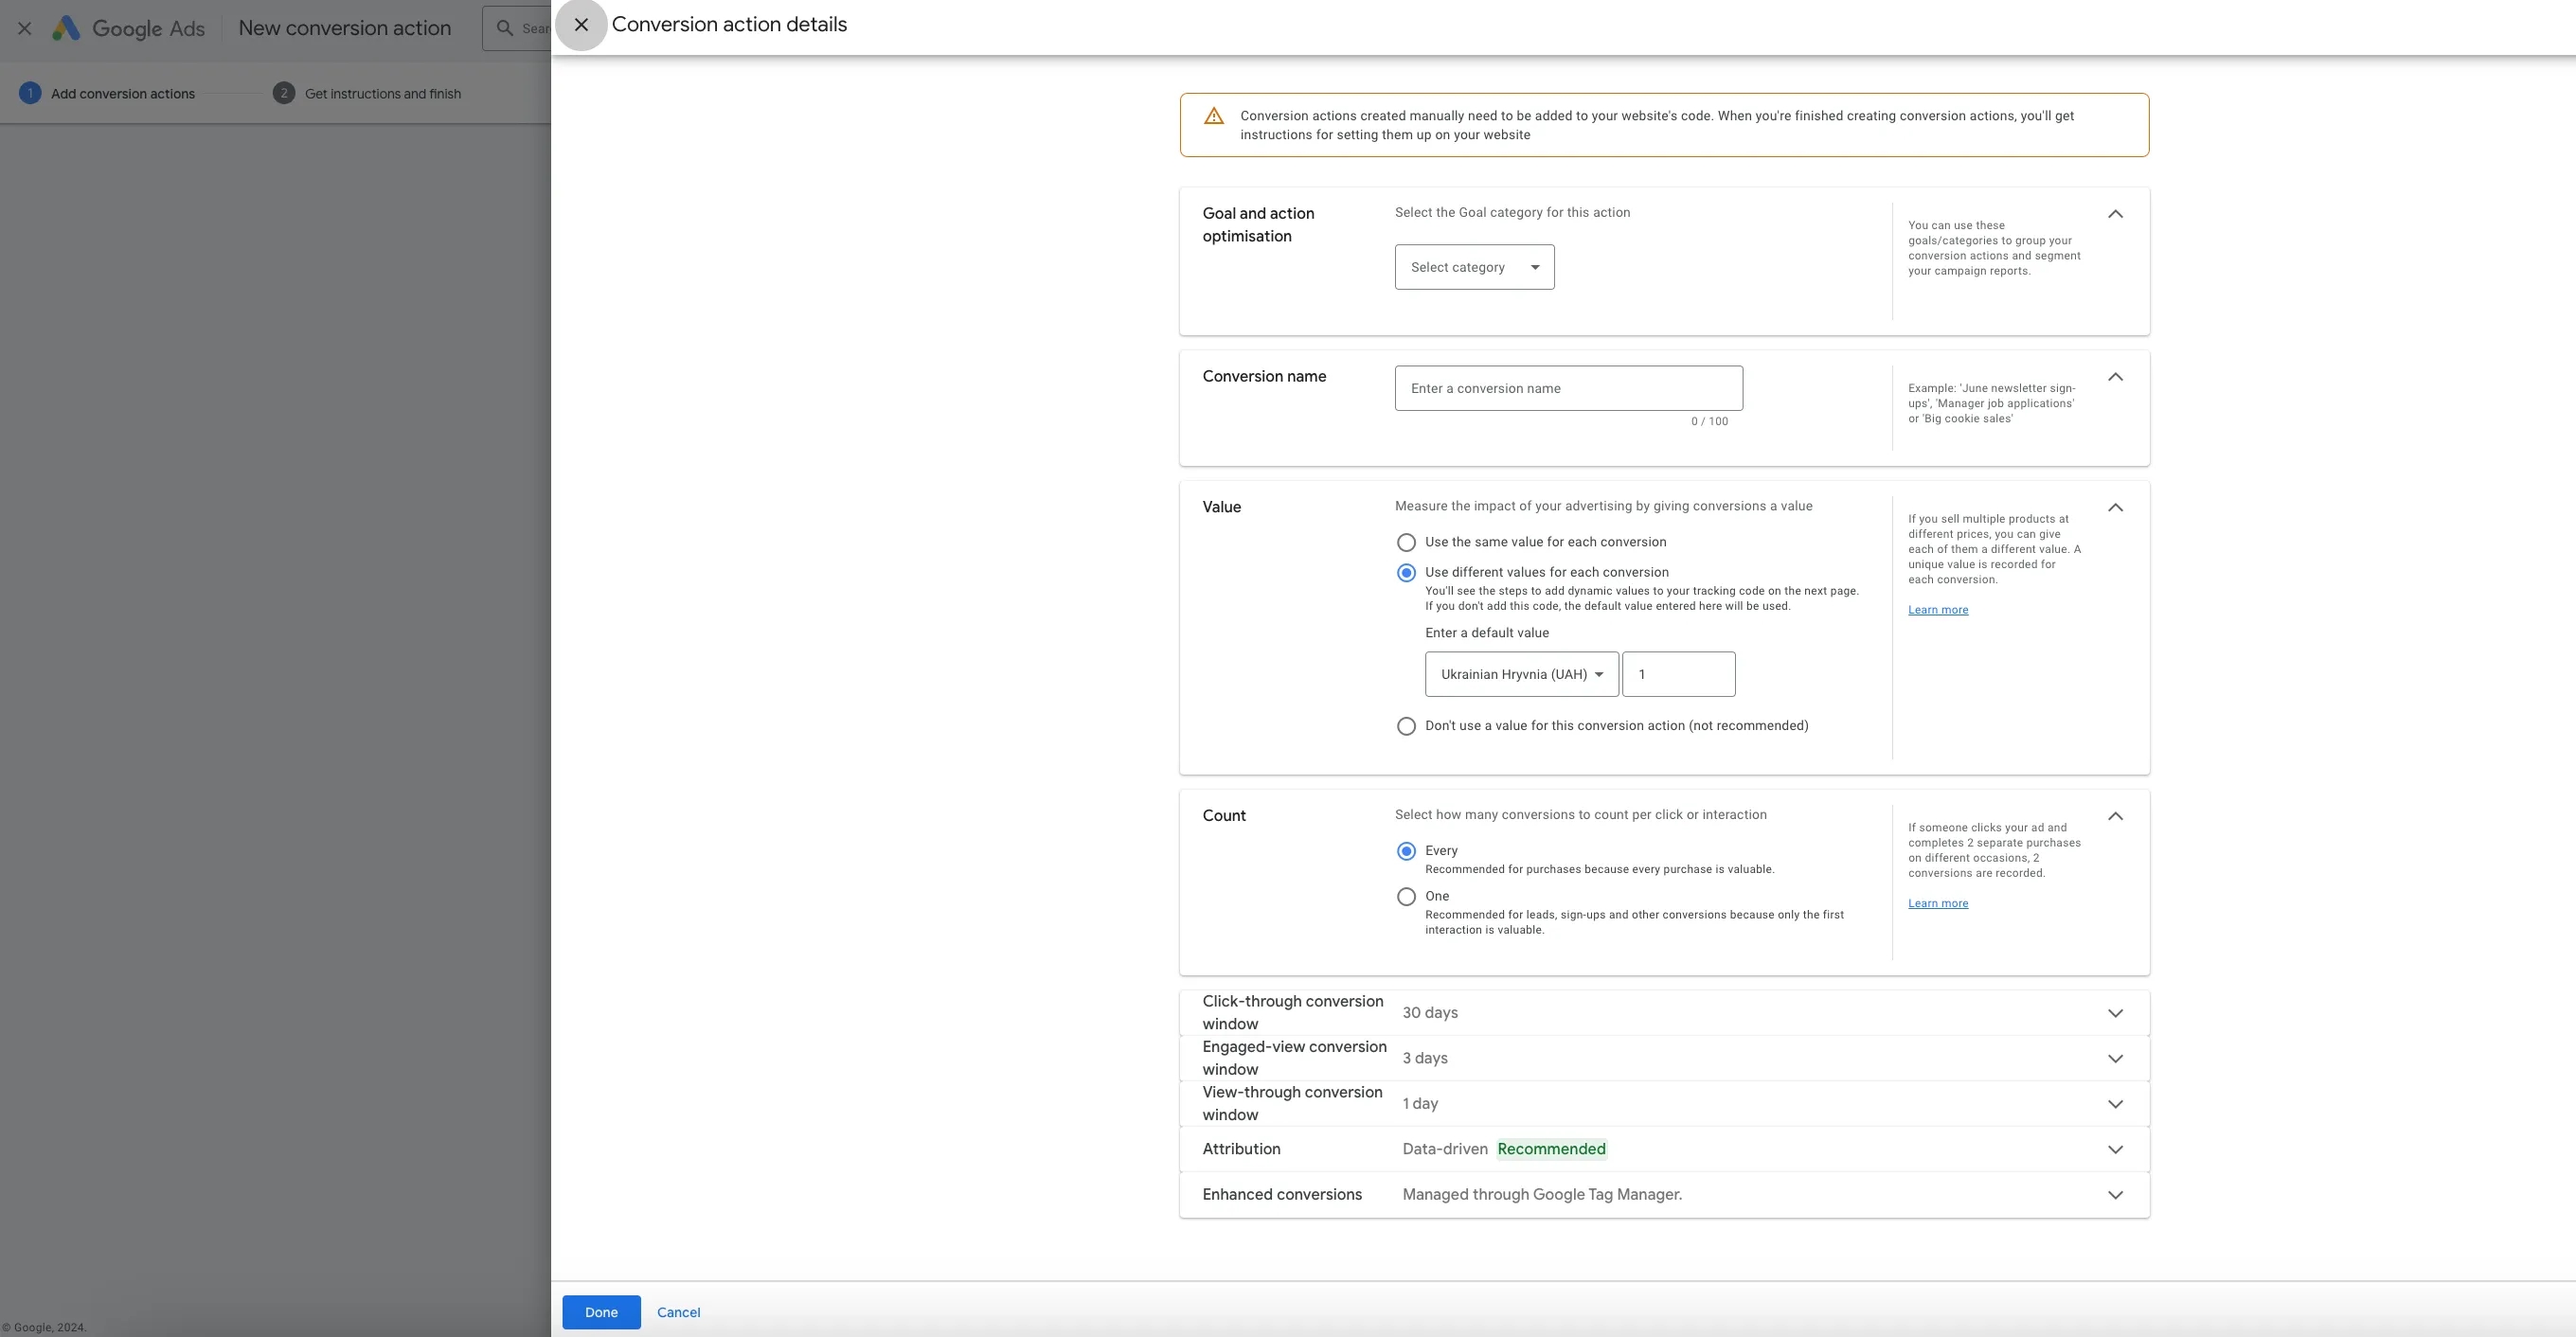
Let's take a look at each setting:
- Goal and action optimization: Select the optimization category that best fits your conversion. For form submissions, choose Submit lead form.
For purchases, select Purchase. While this choice doesn’t directly impact campaign optimization, it makes selecting and organizing conversions easier when you have a large number.
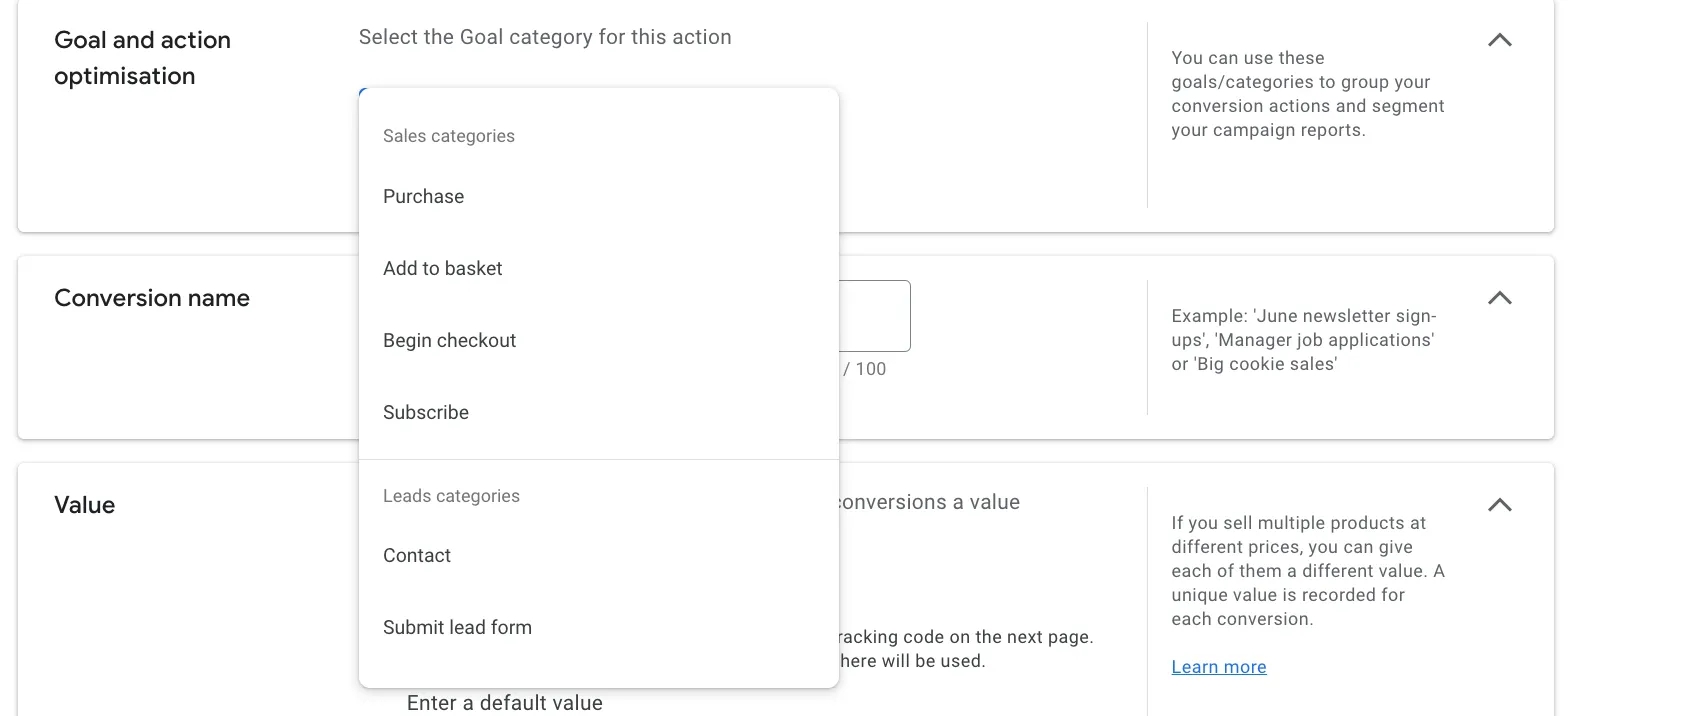
- Conversion name: Set a name for the conversion that clearly describes what it tracks.

- Value: If this is a standard form submission conversion (with no dynamic value), you can assign a fixed value to each completed form or leave it blank if you aren’t planning to use conversion value-based bidding strategies. Value setup for e-commerce will be covered later in Section 3 of Setting up Purchase Events in Tag Manager, so keep reading.
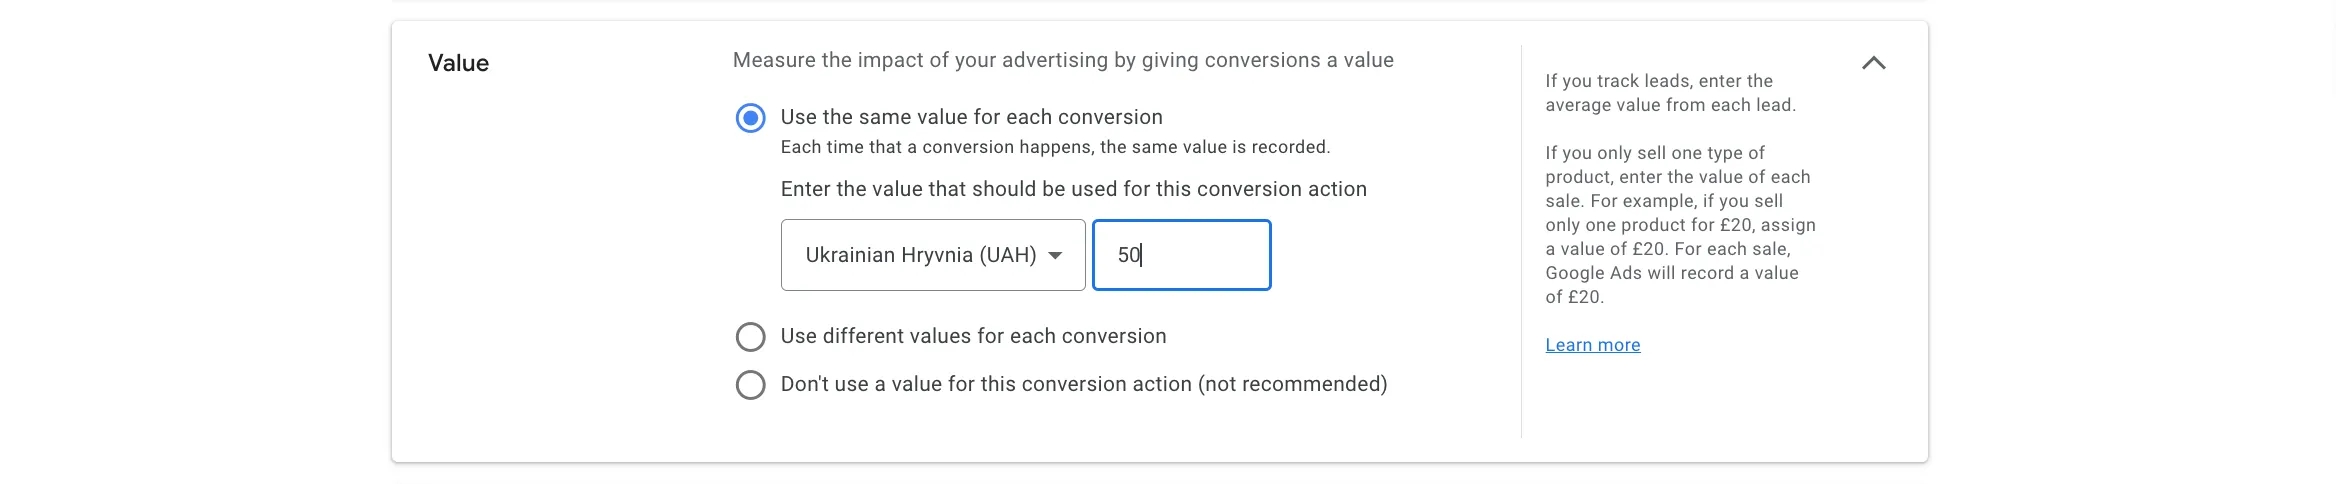
or

Conversion value in lead generation should be tailored to the business and website type. Here are two practical approaches:
- If your website offers multiple forms, like lead magnets (for capturing leads) and order forms for services, assigning different values is helpful. For instance, you might assign a lead magnet a minimal value (e.g., 10 UAH) and a service order form a higher one (e.g., 100 UAH) to help Google Ads understand which conversions are more valuable. This supports bid strategies based on conversion value.
- If you plan to upload offline conversions with actual values for confirmed leads, you may skip setting an online conversion value, allowing you to use precise offline data for performance evaluation.
- Count: Choose how to count conversions. For lead generation sites (where a single user interaction matters per ad click), I recommend counting only one conversion per click. The Count setting for purchases will be covered later in Setting up Purchase Events in Google Ads.

In some cases, such as when a user repeatedly clicks the ad and fills out the form multiple times in a day, the one conversion per click setting may not work as desired. In such cases, I add additional logic via Google Tag Manager to record a user cookie and prevent sending duplicate form submission data to Google Ads, avoiding excessive conversions in reports.
- Conversion window: The conversion window determines the period within which a conversion can be attributed to a specific ad source. This setting should reflect your business’s specifics and how quickly users decide to take action. For example, leaving the conversion window at the 30-day default means that all actions a user takes within 30 days of interacting with an ad will be counted as conversions linked to that ad. You can read more about this setting here. The default can be kept or adjusted later.

Short conversion windows help reduce the share of conversions, as they only capture interactions with ads over a limited period. The optimal window length depends on the nature of your business. For quick decisions, like ordering pizza or locksmith services, shorter periods are more suitable. For products or services requiring more time to decide, such as services with extended trial periods or women’s clothing stores (as customers often spend longer choosing), longer windows work better. This allows you to account for customer behavior, where they interact with the ad longer before purchasing.
- Attribution: By default, data-driven attribution is used, but you can change it to last-click attribution. You can read more about attribution models at the link.
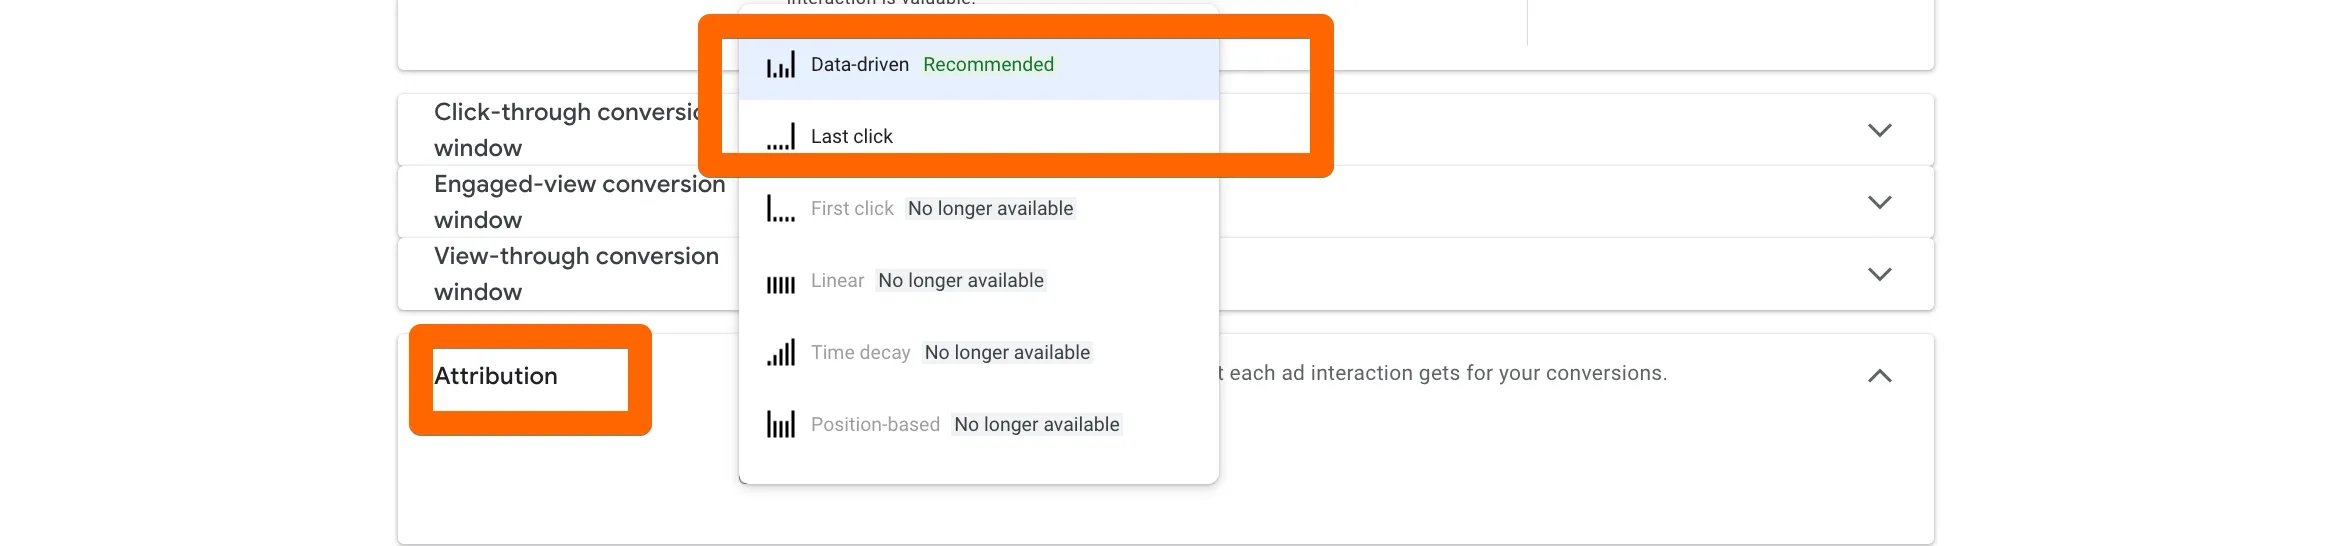
Setting conversion windows and attribution (and more): You can change these settings both when creating a conversion and later when editing. If you're unsure how these parameters work for your business, you can keep the default values and adjust them later based on analysis and testing.
Data-driven attribution is generally more suitable for businesses with a longer decision-making cycle, such as electronics e-commerce or travel agencies. Last-click attribution works better for fast-purchase businesses, like device repair or food delivery. This setting can be adjusted later by analyzing attribution reports in GA4 to make the optimal decision for your business.
- Enhanced conversions: If you are configuring the transfer of additional user data along with the conversion, enable enhanced conversions. I explain more about why this is useful to configure in my course.

All set—just click the Done button.
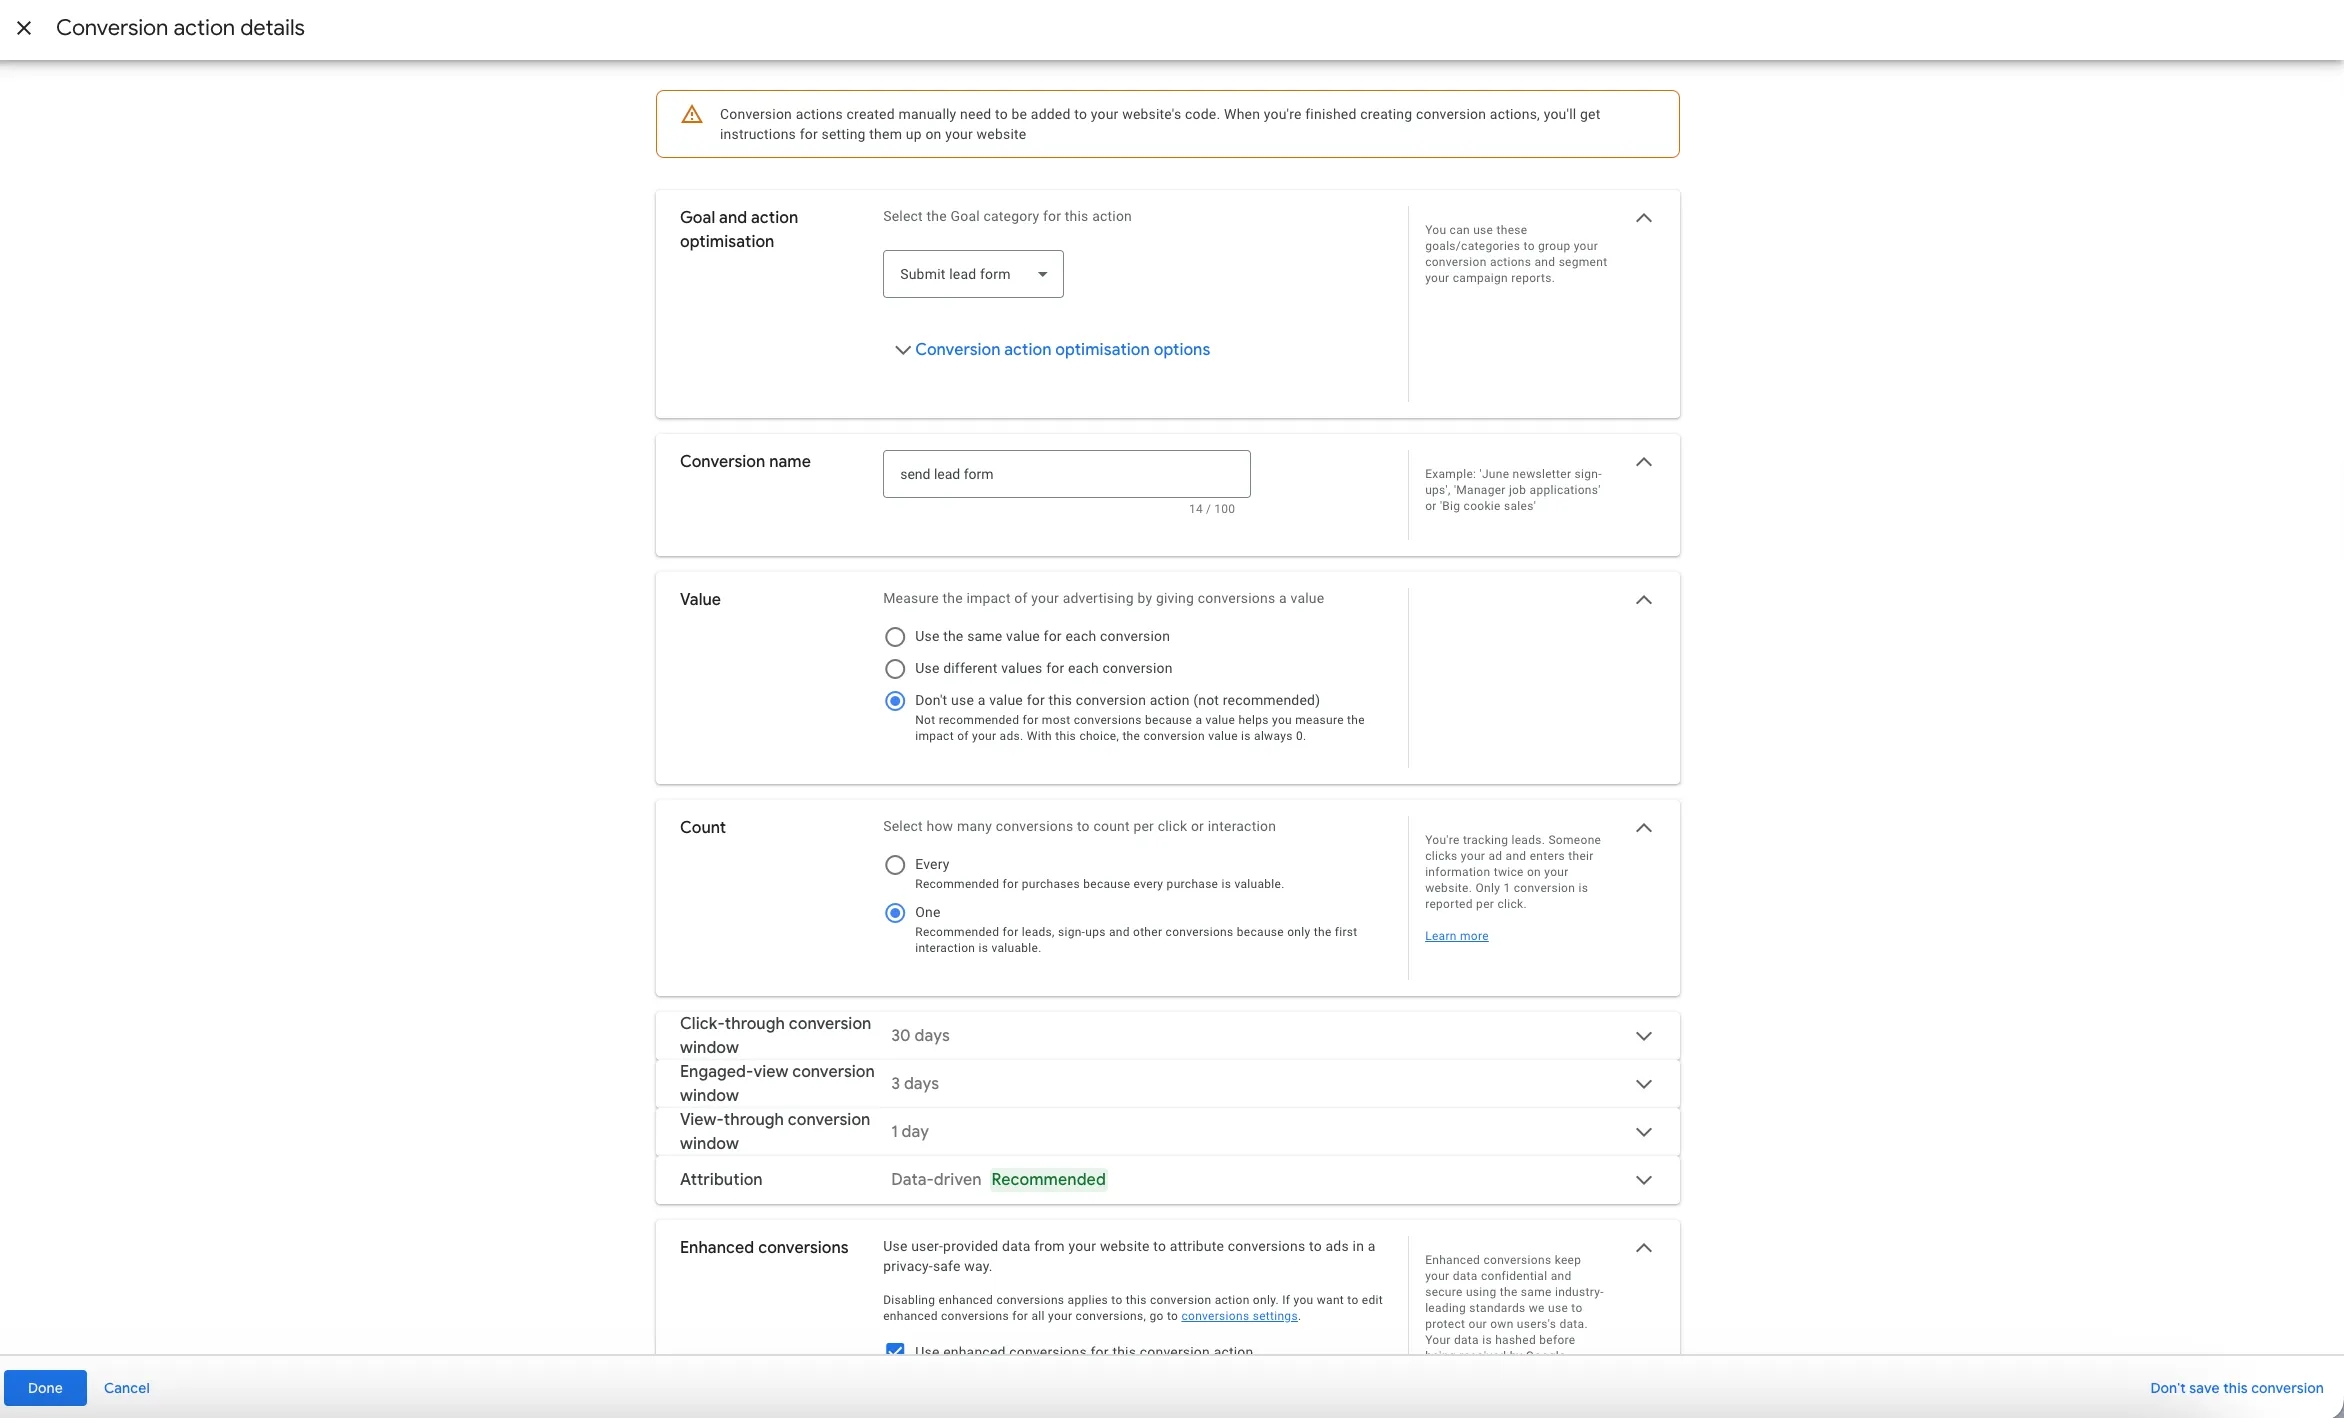
7. After that, you will be redirected to the page where the manually created conversion will be displayed. Click Save and continue.
8. Next, you will see a page with three setup options. In this article, we are covering the setup through Tag Manager, so select the relevant tab.
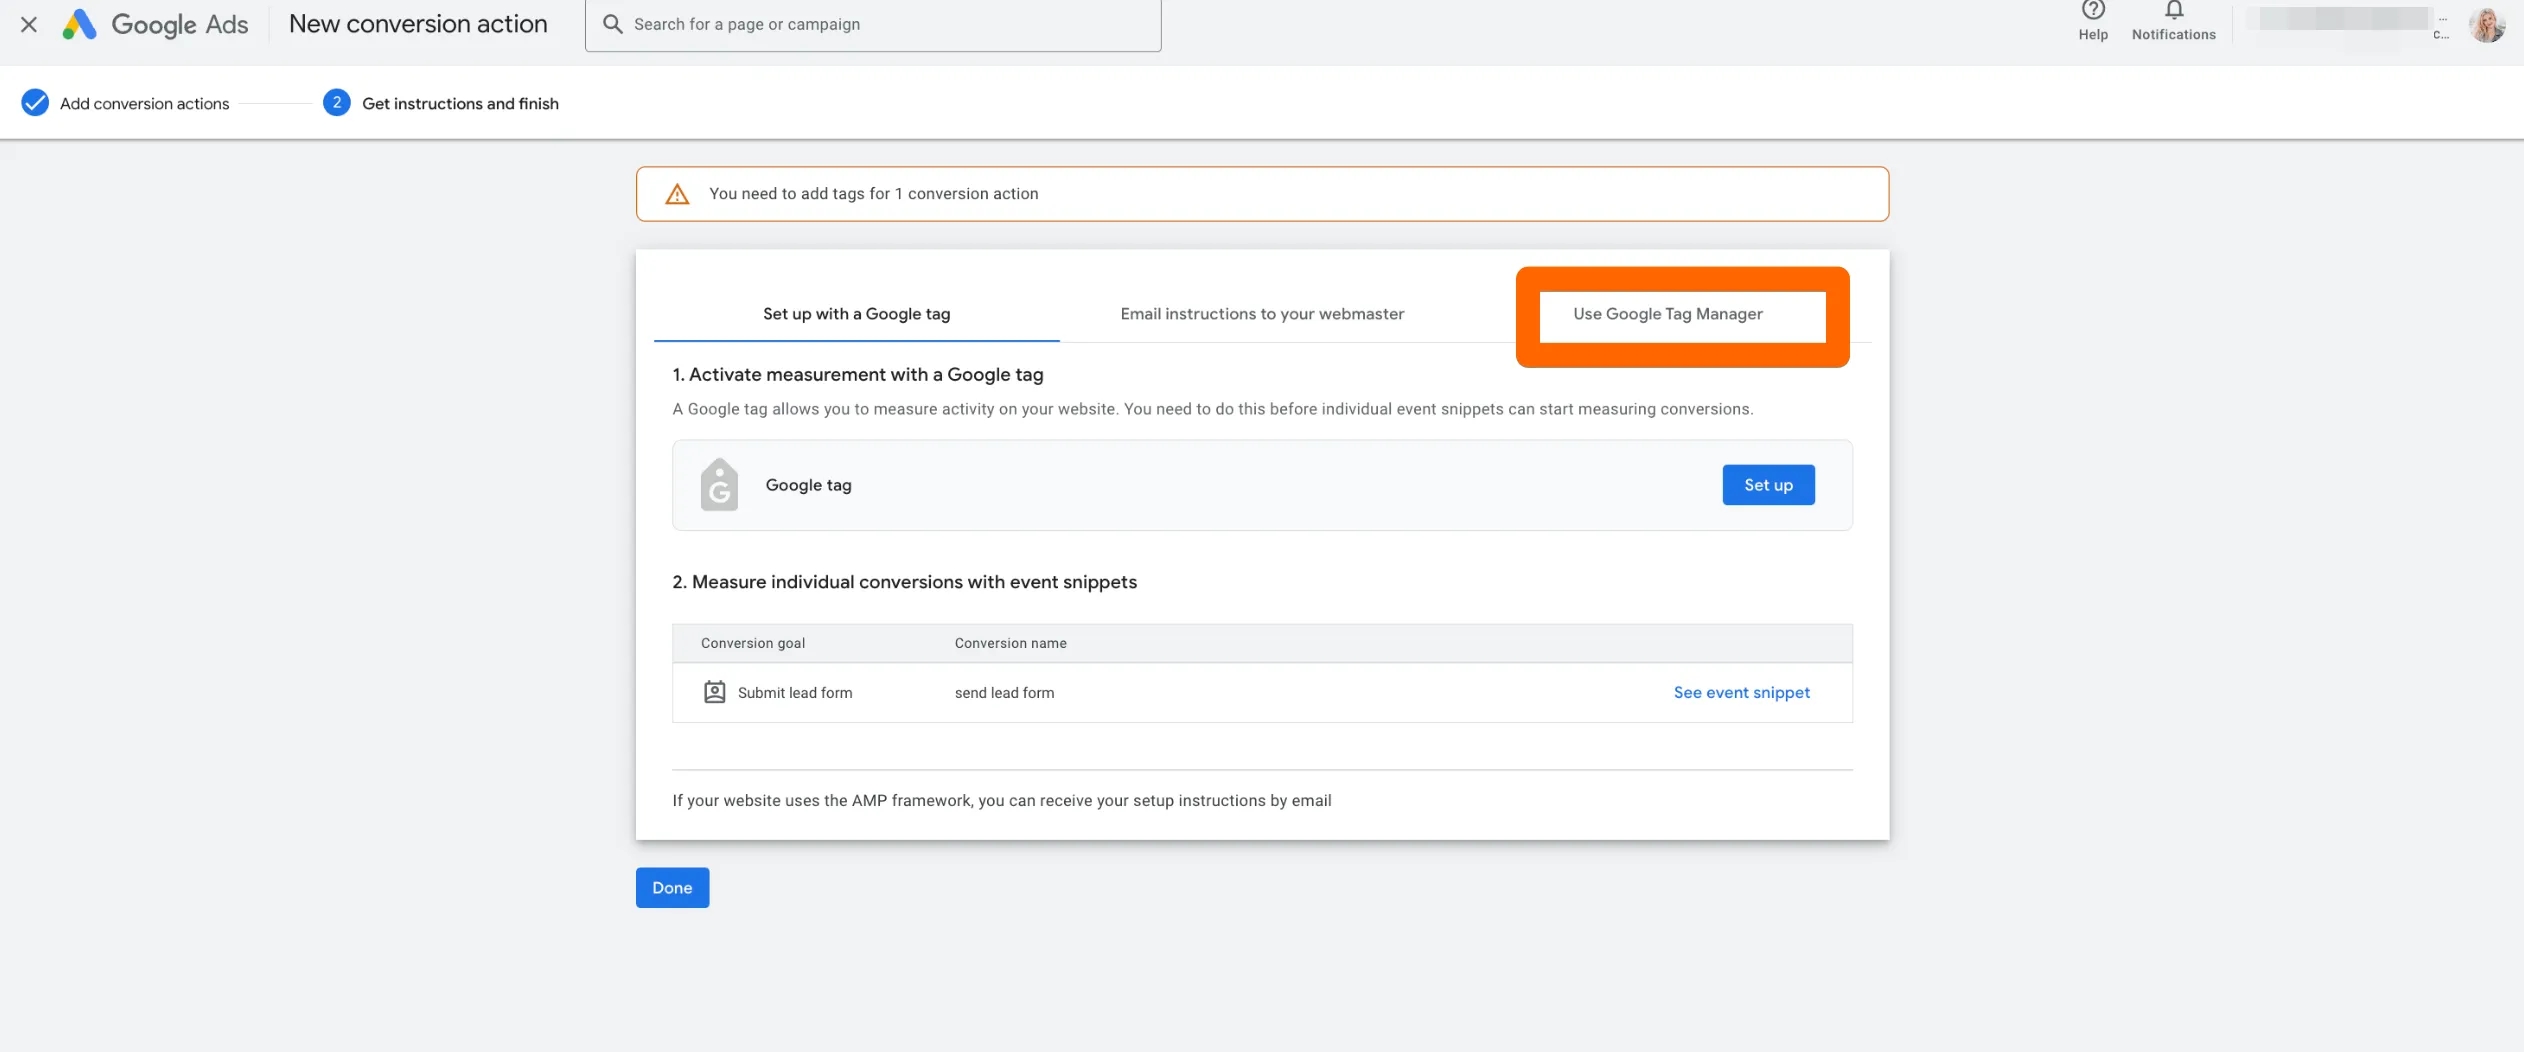
We will use Google Tag Manager as it is the most flexible solution for managing tags. It has ready-to-use templates for PPC specialists, marketers, analysts, and allows future work with non-Google products.
Here, you’ll see the configuration data: the Conversion ID and Conversion label. This data will be needed for further work with Tag Manager.
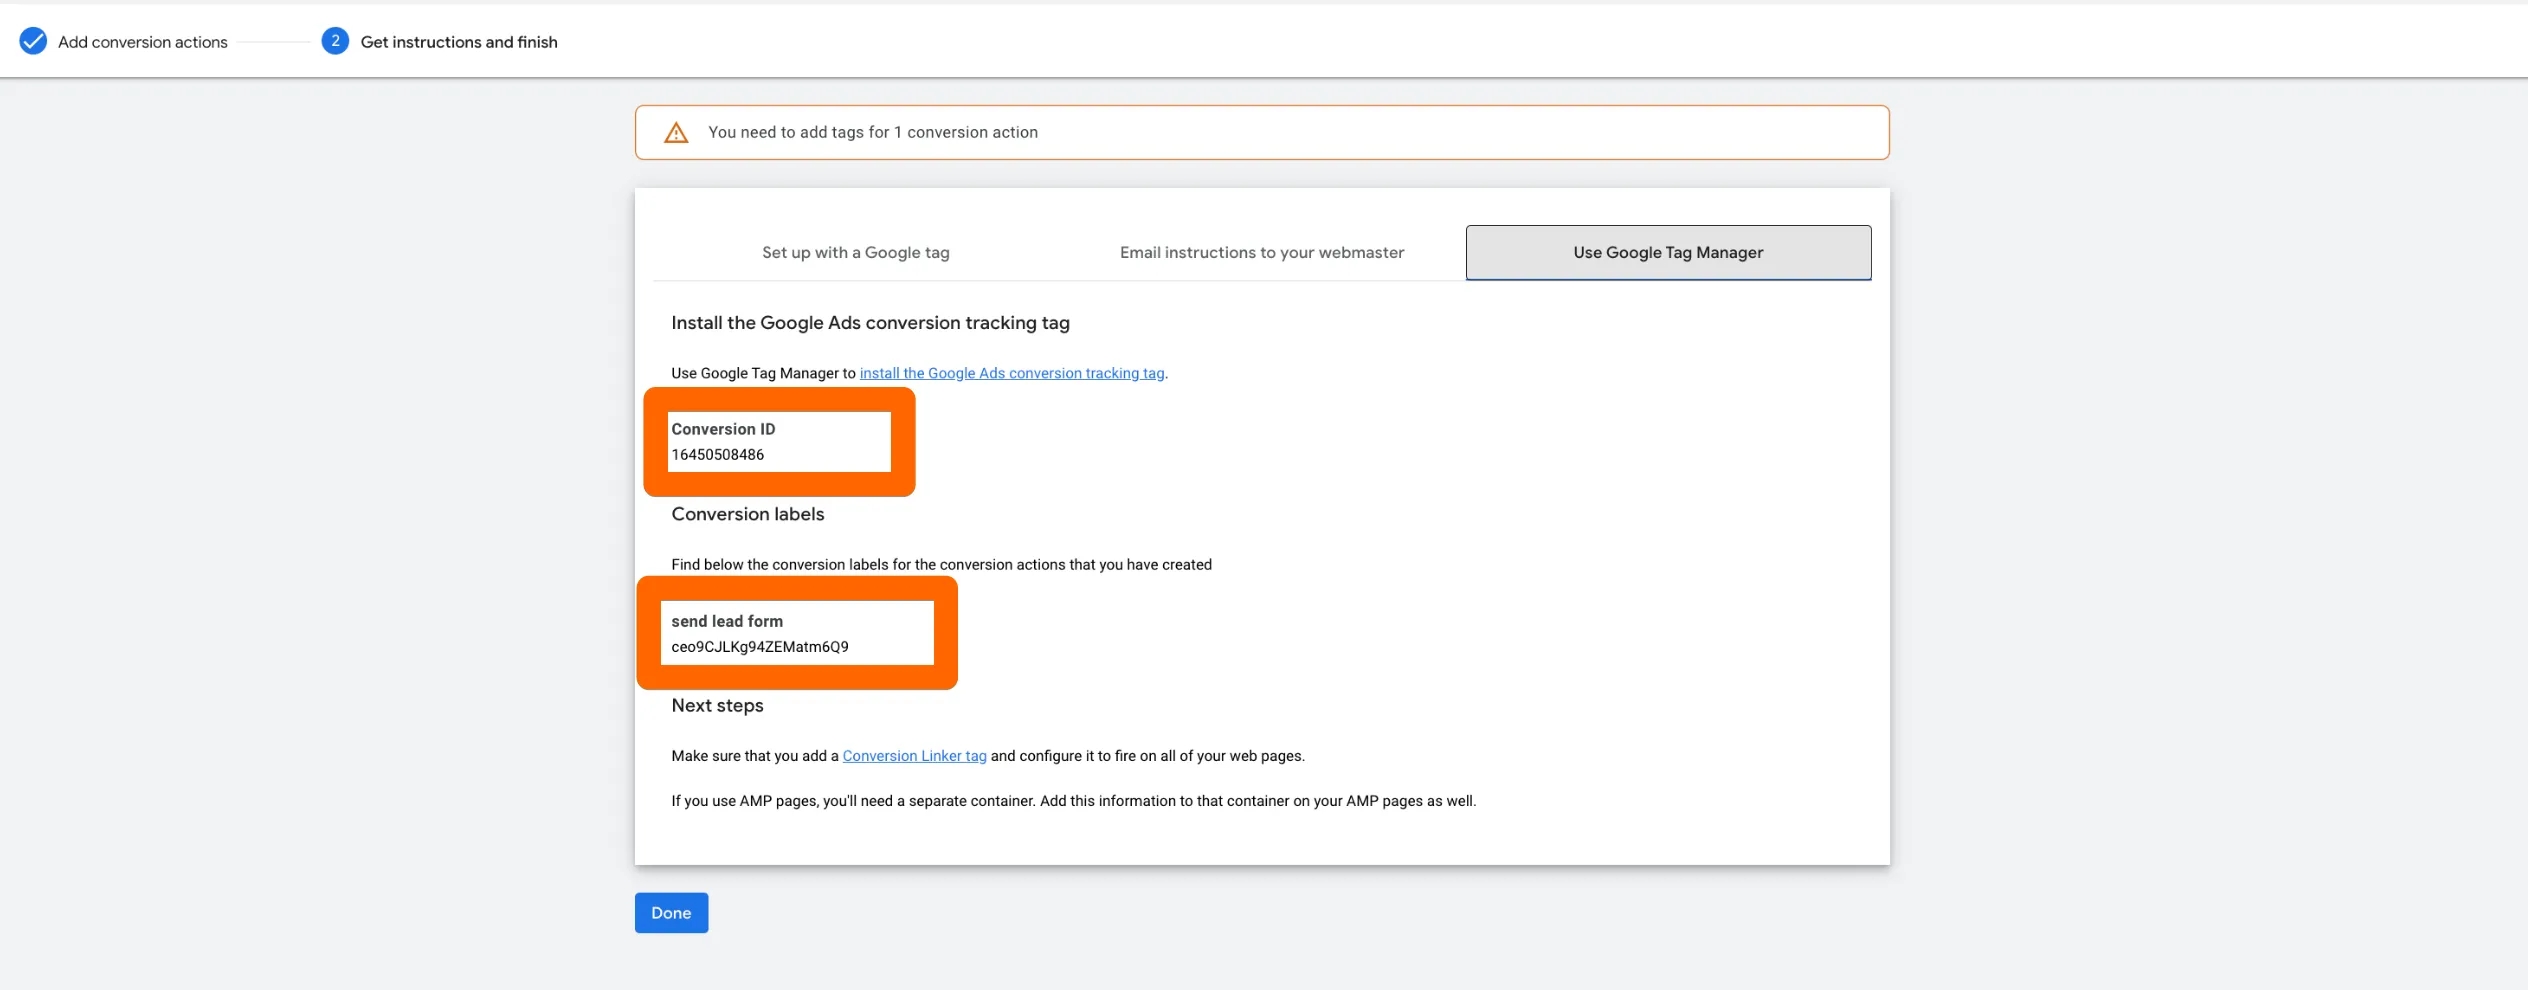
If you don't see a setup tab for GTM, you may have skipped step 4 and created the conversion via Google Analytics. To check, go to the conversions menu and check the source of your conversion—the source should be Website.

If it shows Website (Google Analytics (GA4)) instead, return to step 1 and carefully create the conversion again, following the instructions.
Form submission tracking in Tag Manager
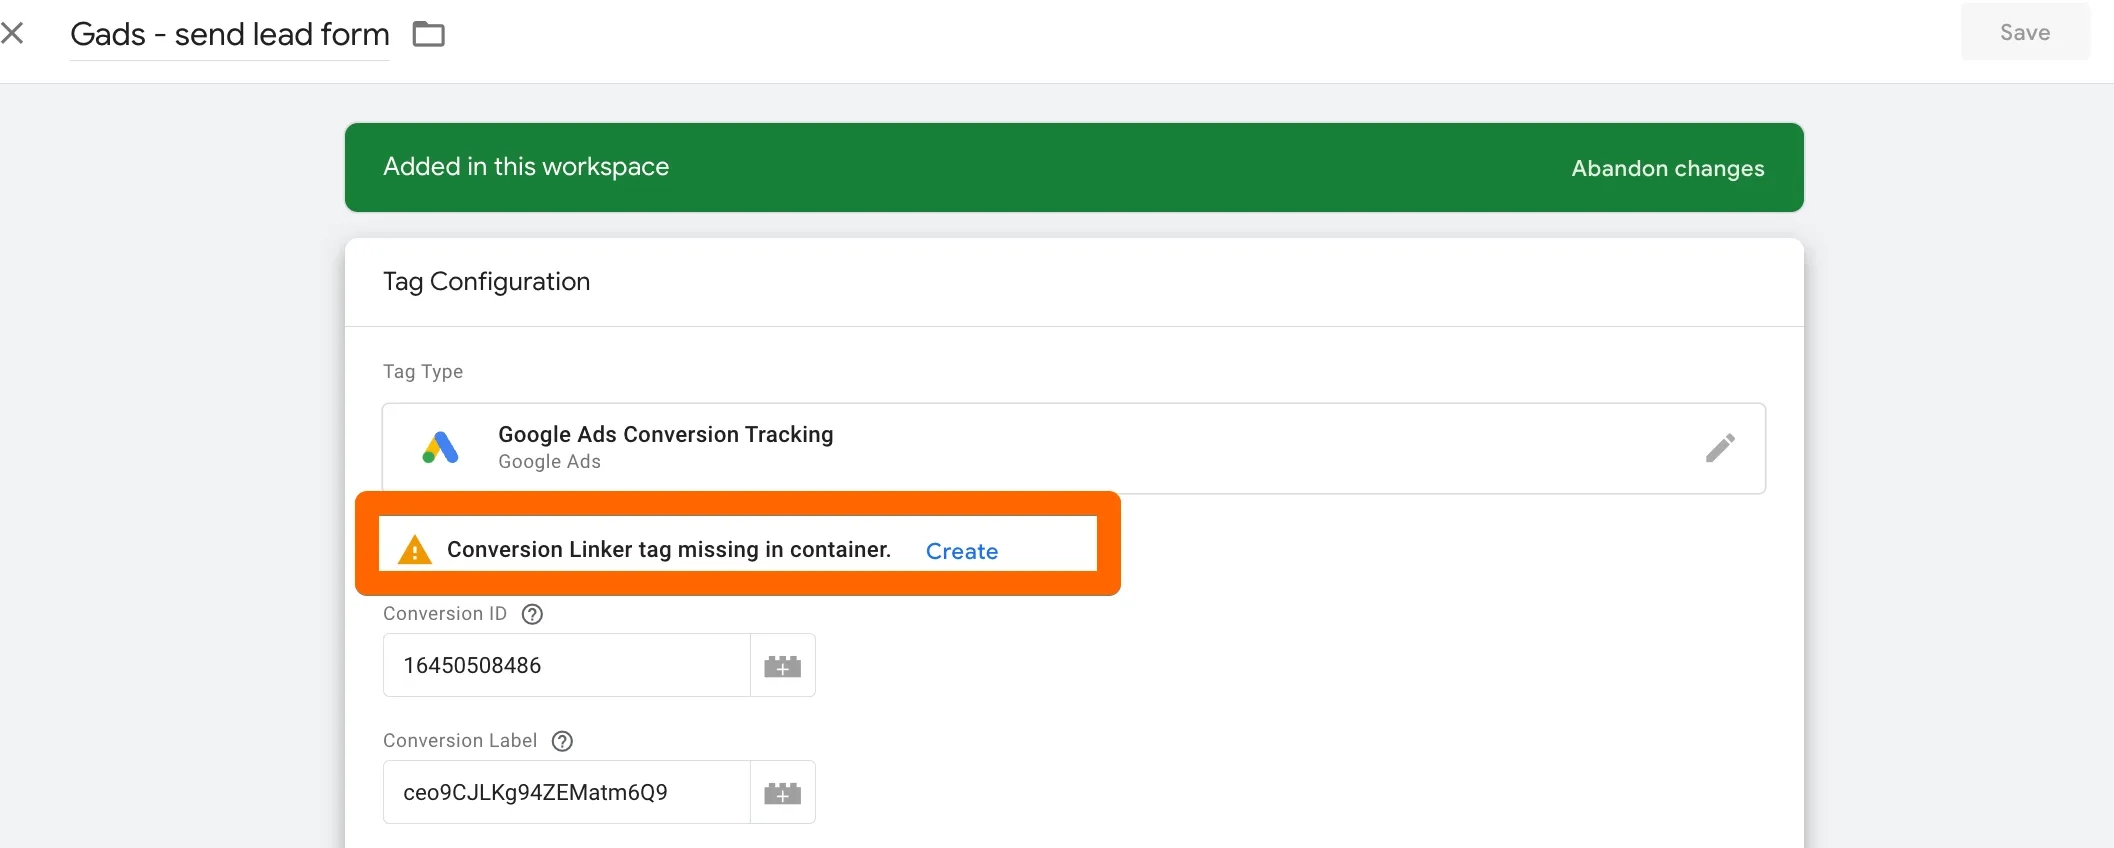
- In the Tag Manager container installed on your site, create a new tag to send the conversion to the Google Ads dashboard. To do this, go to the Tags menu and click New to create a new tag. In the tag menu, select Google Ads Conversion Tracking. Then, in the tag configuration, enter the Conversion ID and Conversion Label you obtained in step 7 of Configuring Form Submission Tracking in Google Ads.
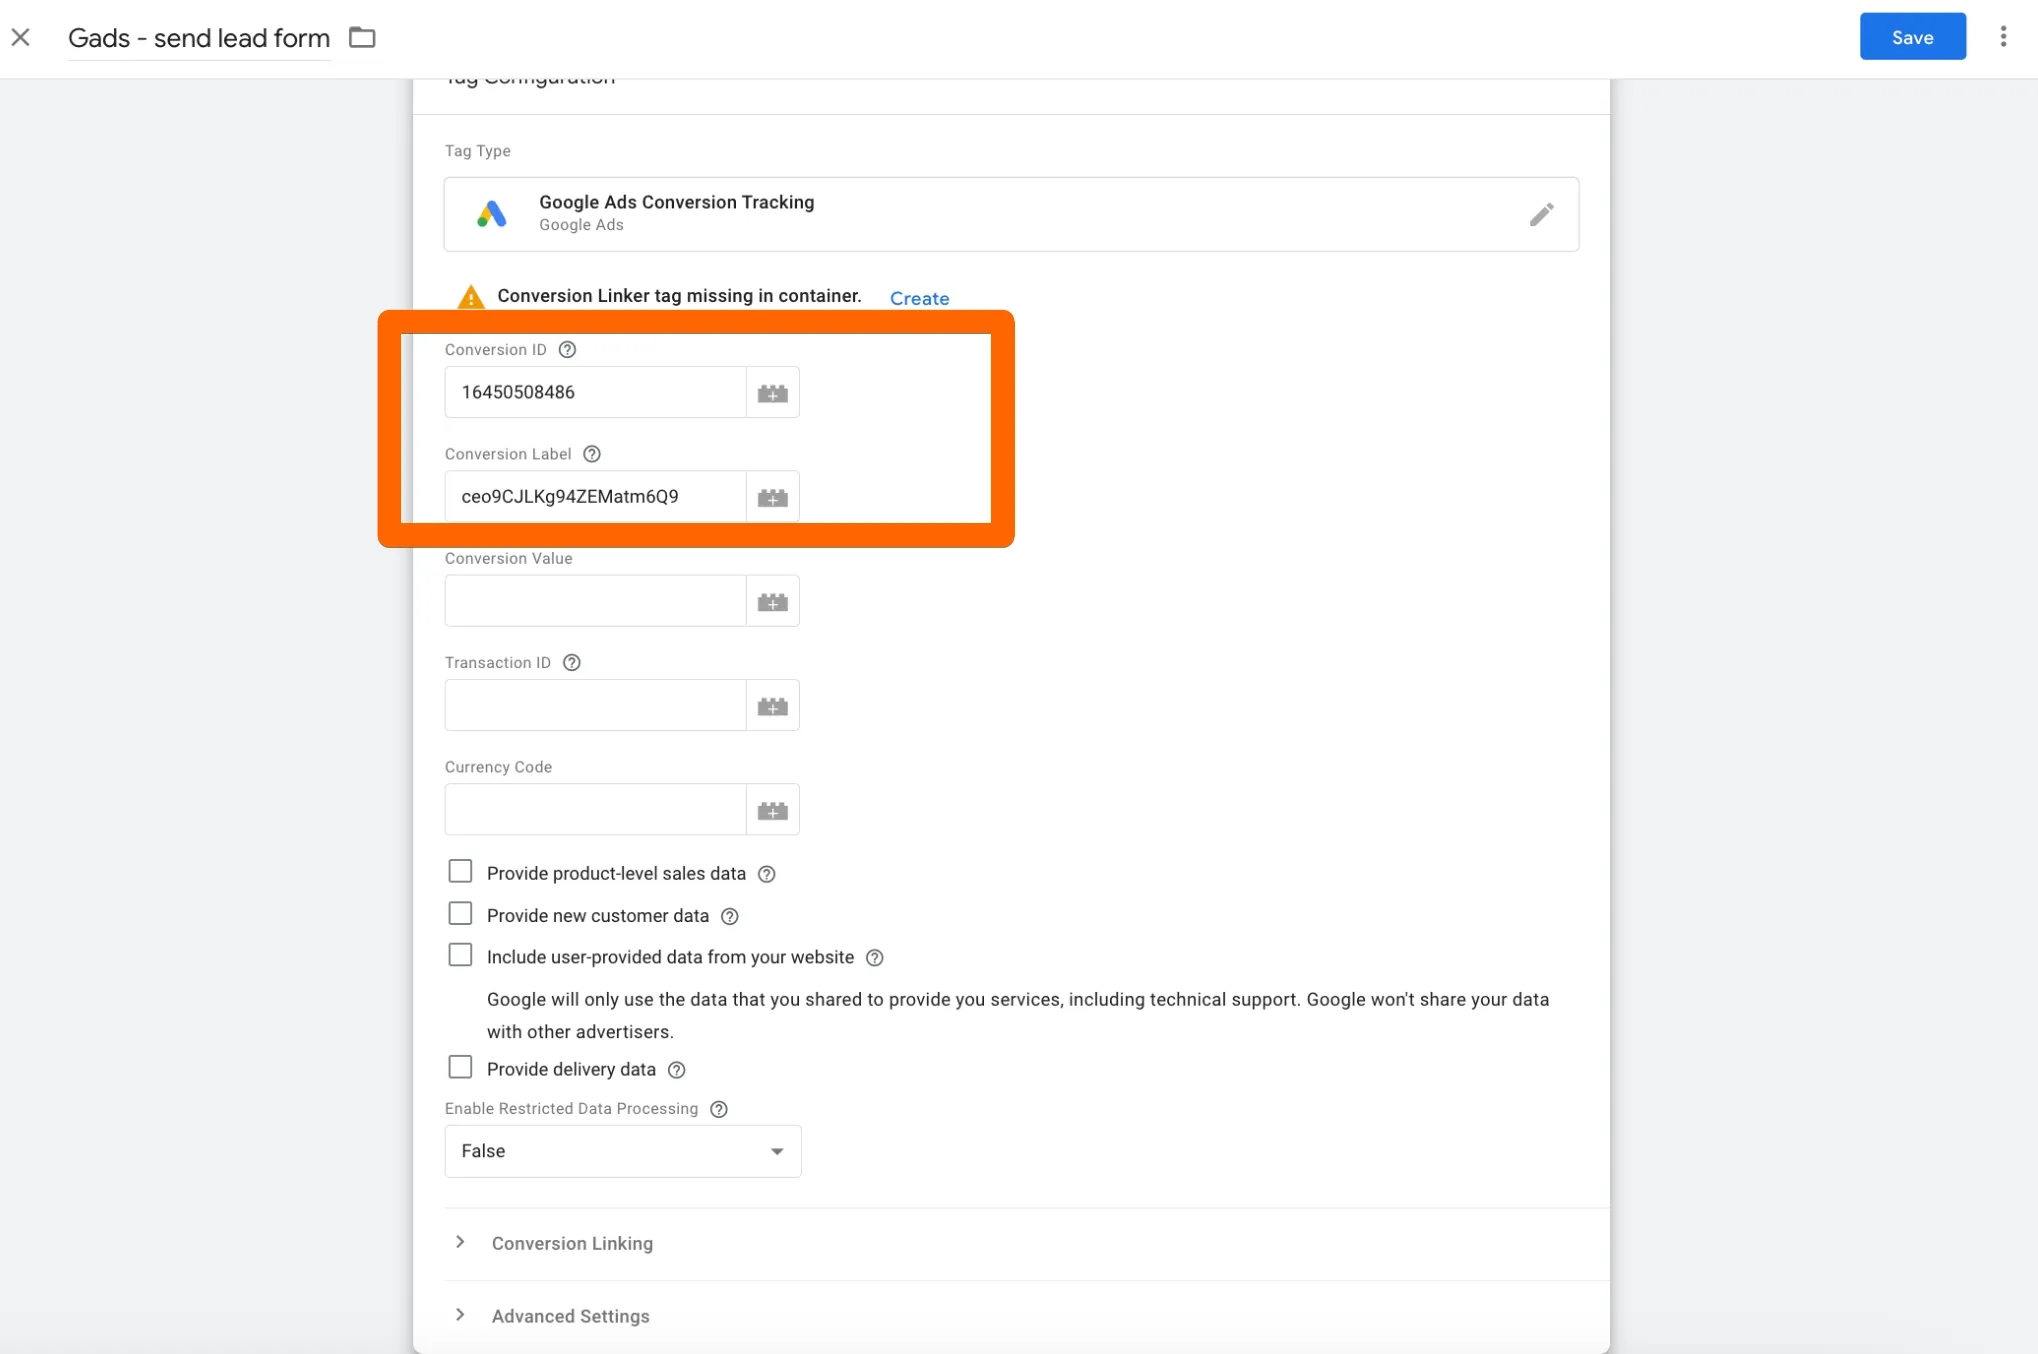
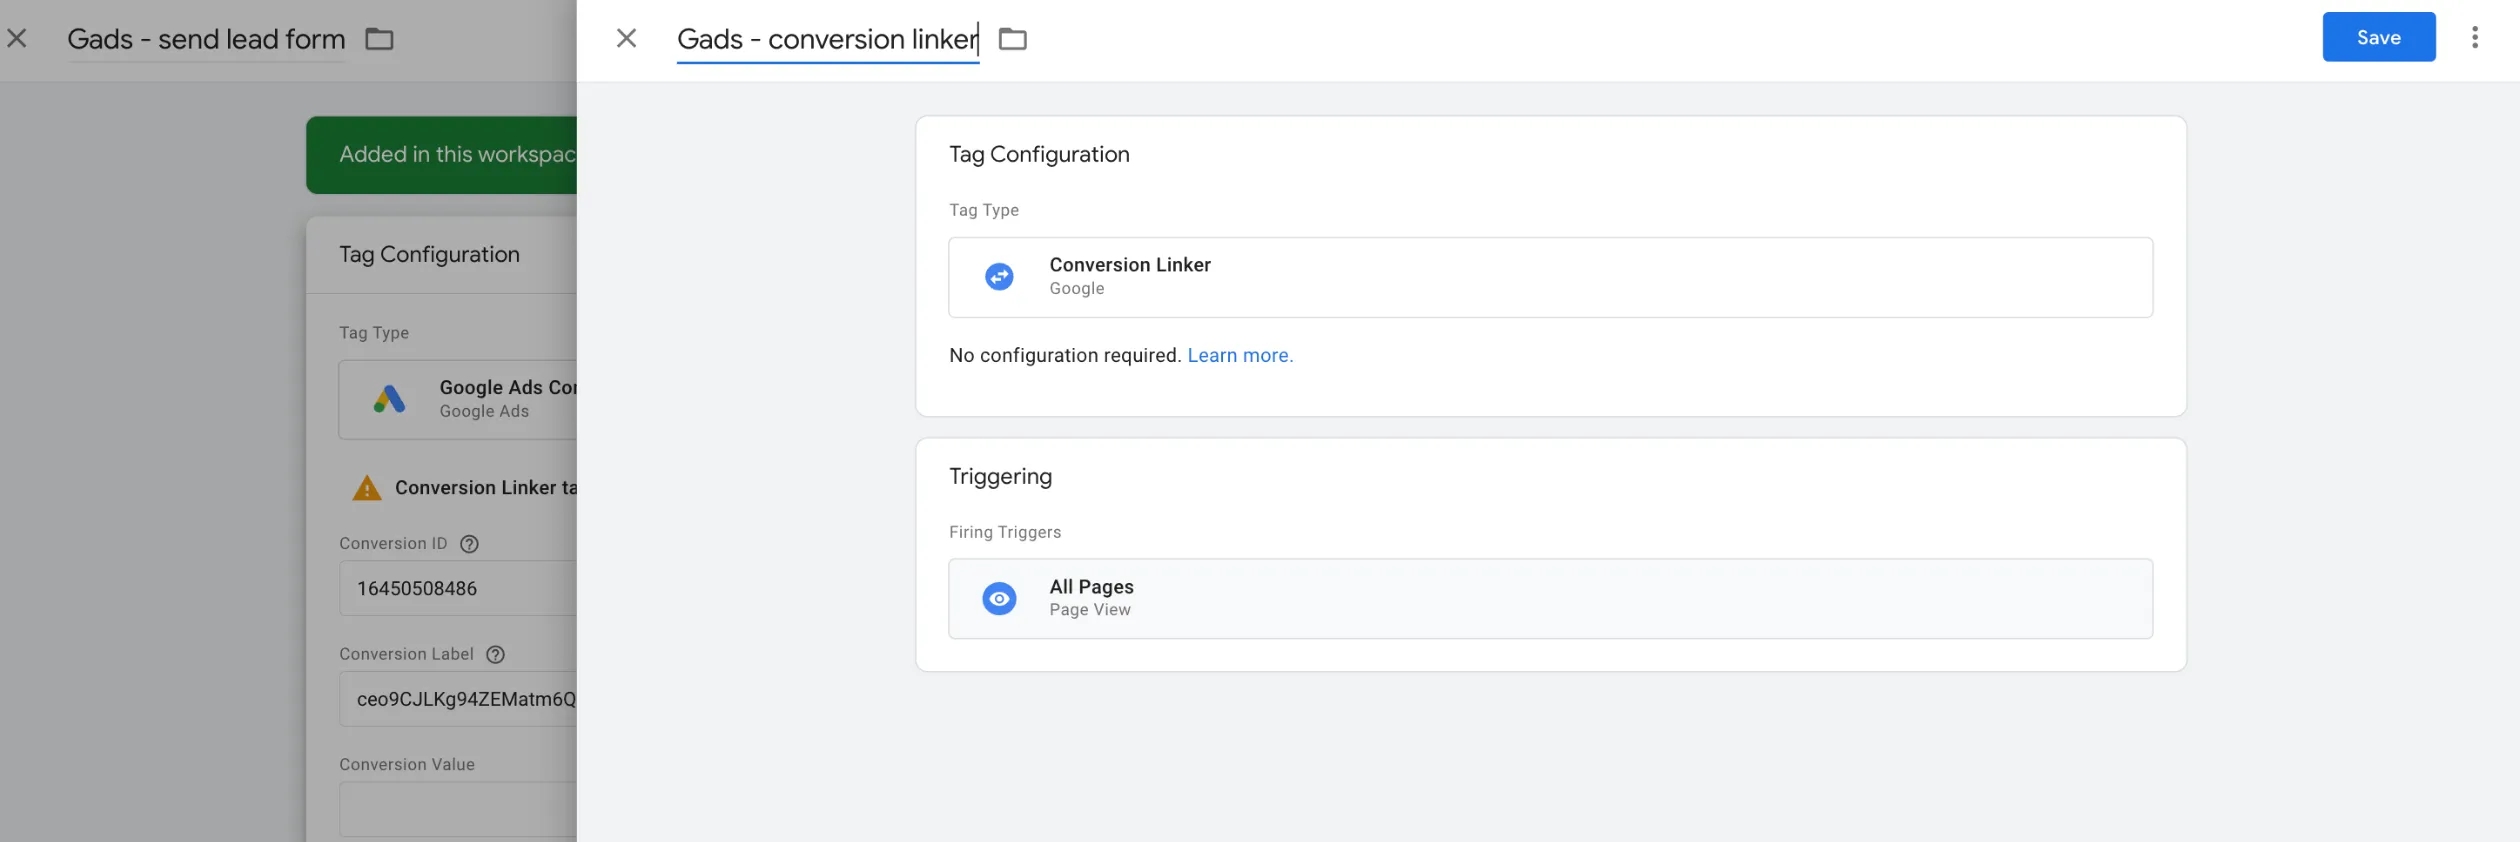
2. If your container does not have a Conversion Linker, it’s necessary to create one, as the conversion linker tag saves information about ad clicks. Just click Create next to the warning, as shown in the screenshot below.
An automatic conversion linker tag template will open, which should be active on all pages. Save the tags.
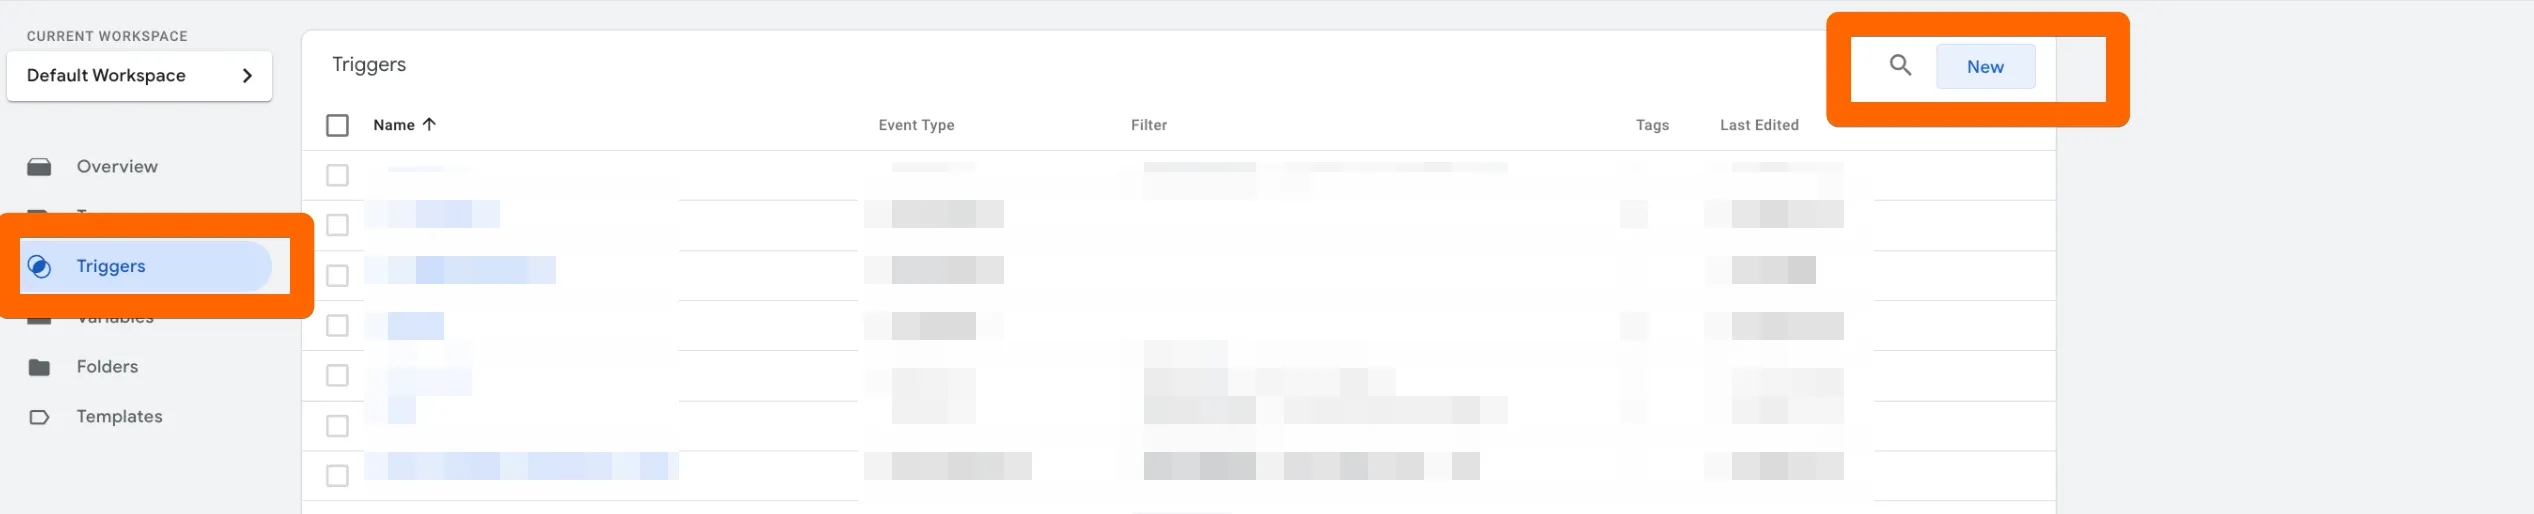
3. Next, create the appropriate trigger to track form submission. Go to the Triggers menu and click New.
Note that there are multiple ways to create triggers for form submissions depending on the form settings. This can include the built-in Form Submission trigger, the Element Visibility trigger, a custom event, or even specific settings for forms in frames using an Event Listener or validation tracking.
I am addressing those already somewhat familiar with GTM, so I’ll demonstrate just one of the many possible options.
In my example, a technical task has already been implemented for a developer regarding sending a custom event to the dataLayer, so I am creating a corresponding trigger of the Custom Event type.
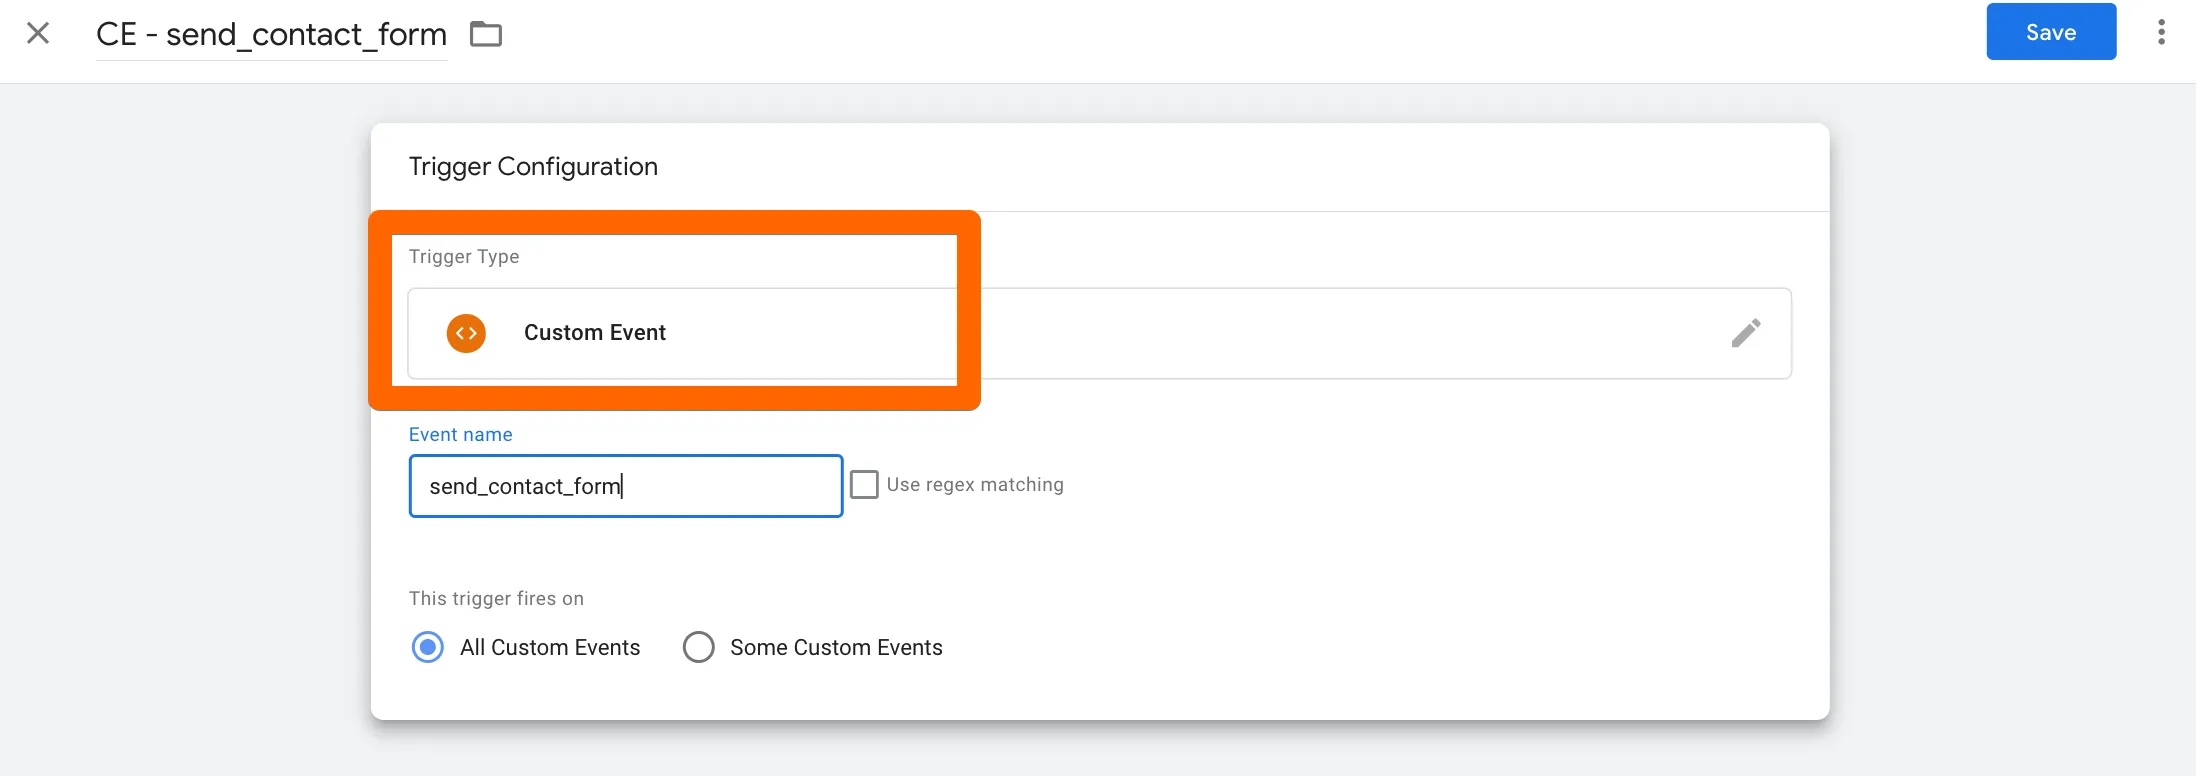
The form submission event, named send_contact_form, is present at the data layer when the form is successfully submitted, as specified in the developer’s technical task. This can be verified during form submission in GTM preview mode.
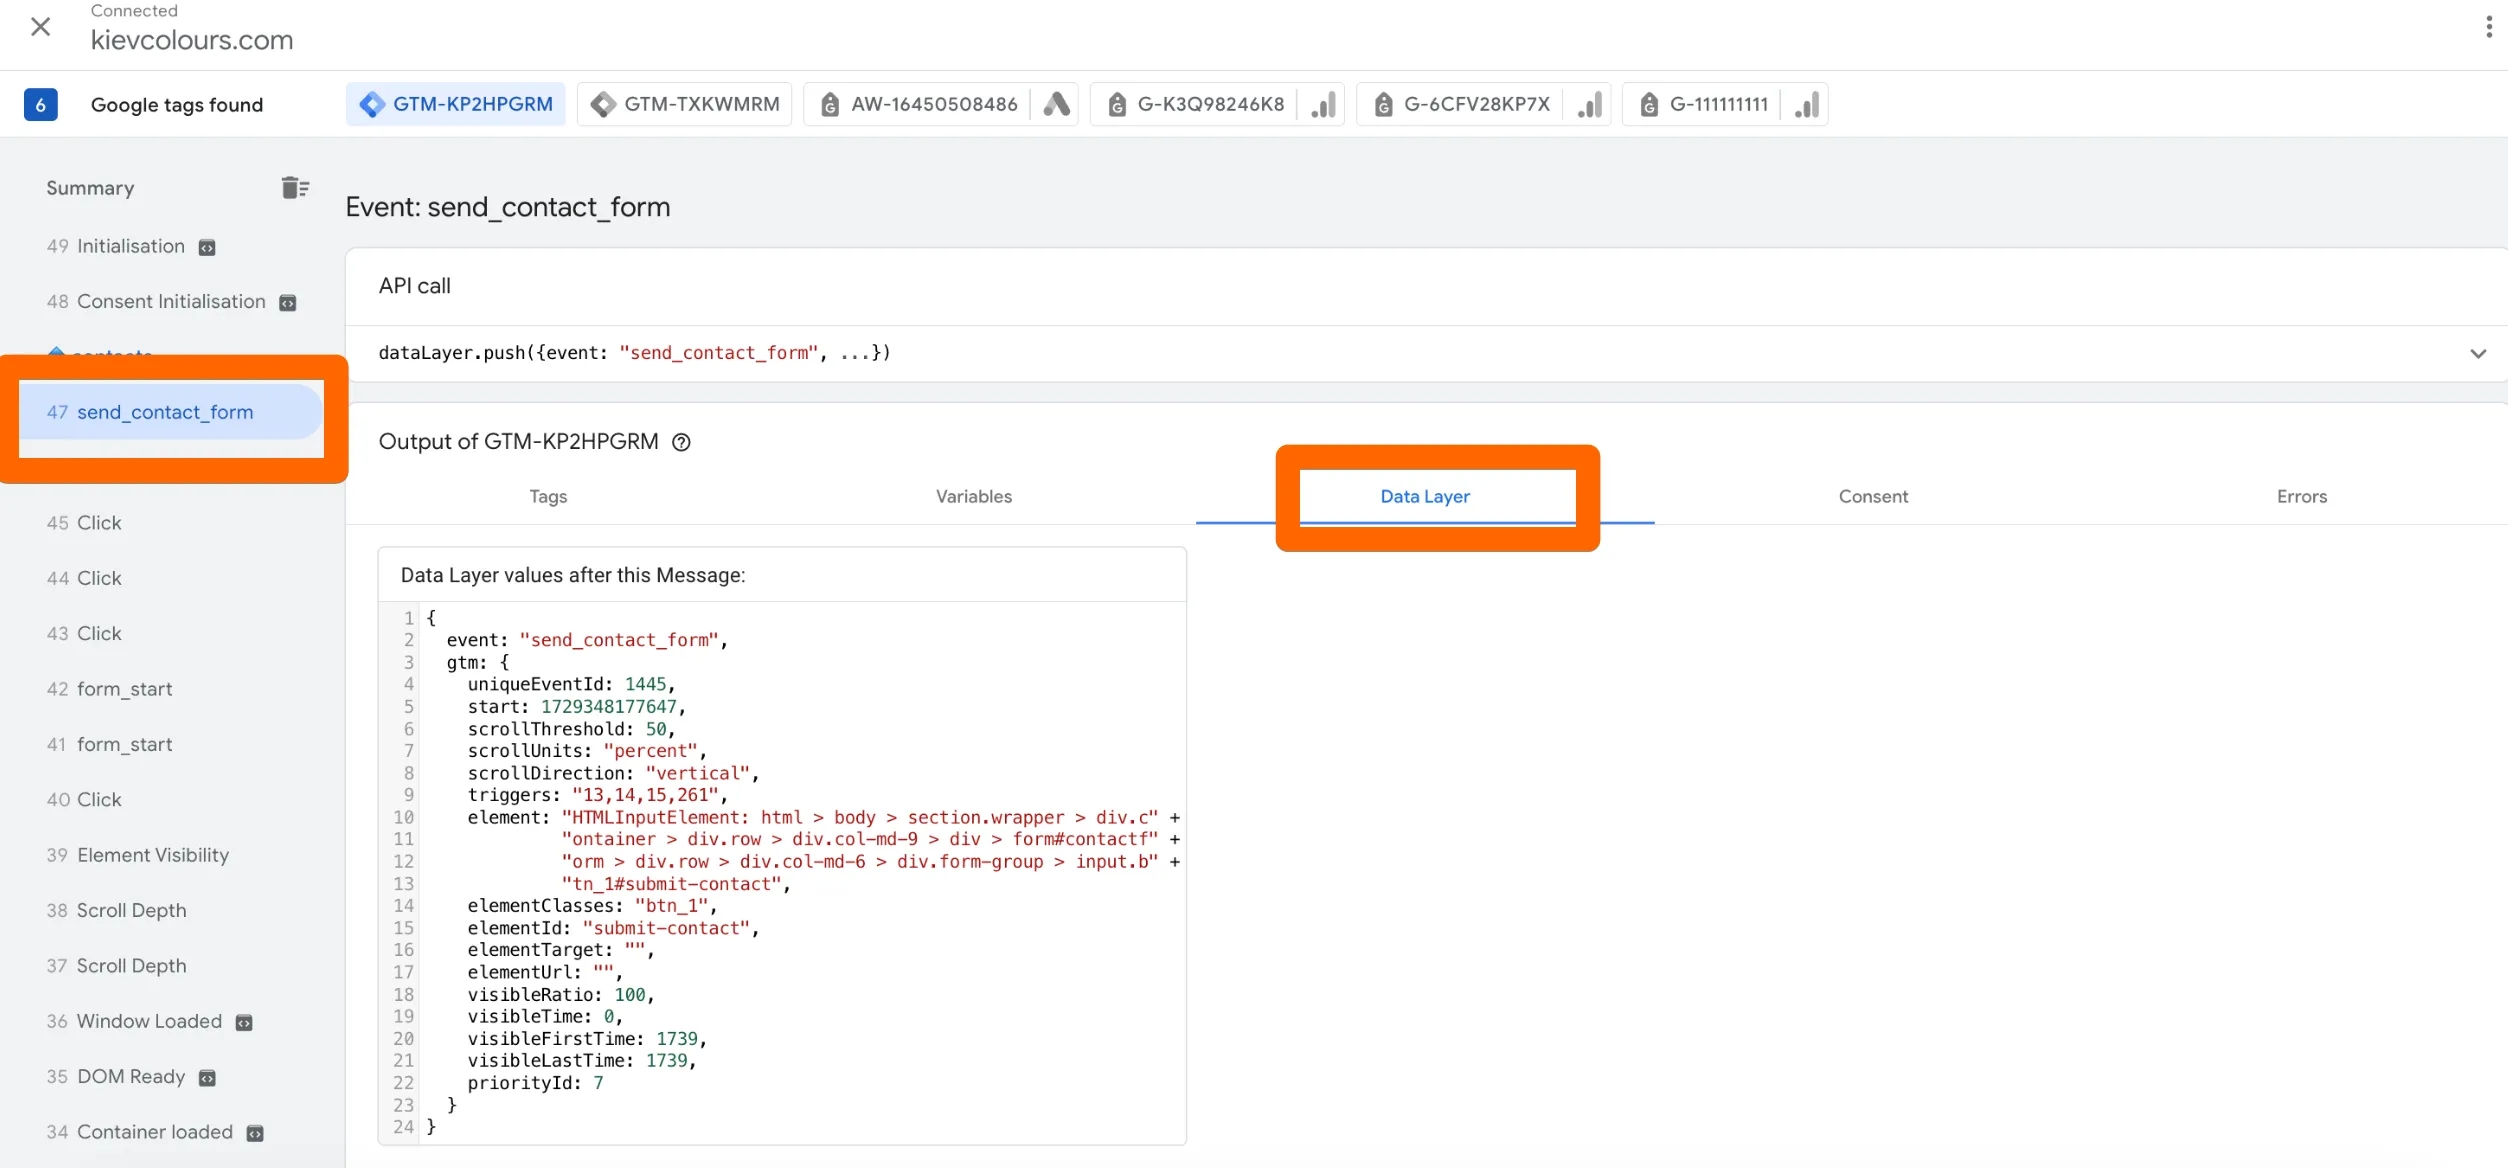
Here is an example of a simple technical task that may be helpful if you are fortunate to have a developer on the project who can implement it.
To send code upon successful form submission on the site:
<script>
    dataLayer.push({
        'event': 'xxxxx'  // replace xxxxx with your form submission event name
    });
</script>
4. Next, add the trigger to the tag in its settings. To do this, go back to the tag settings, click on trigger selection, and choose the newly created trigger from the list.
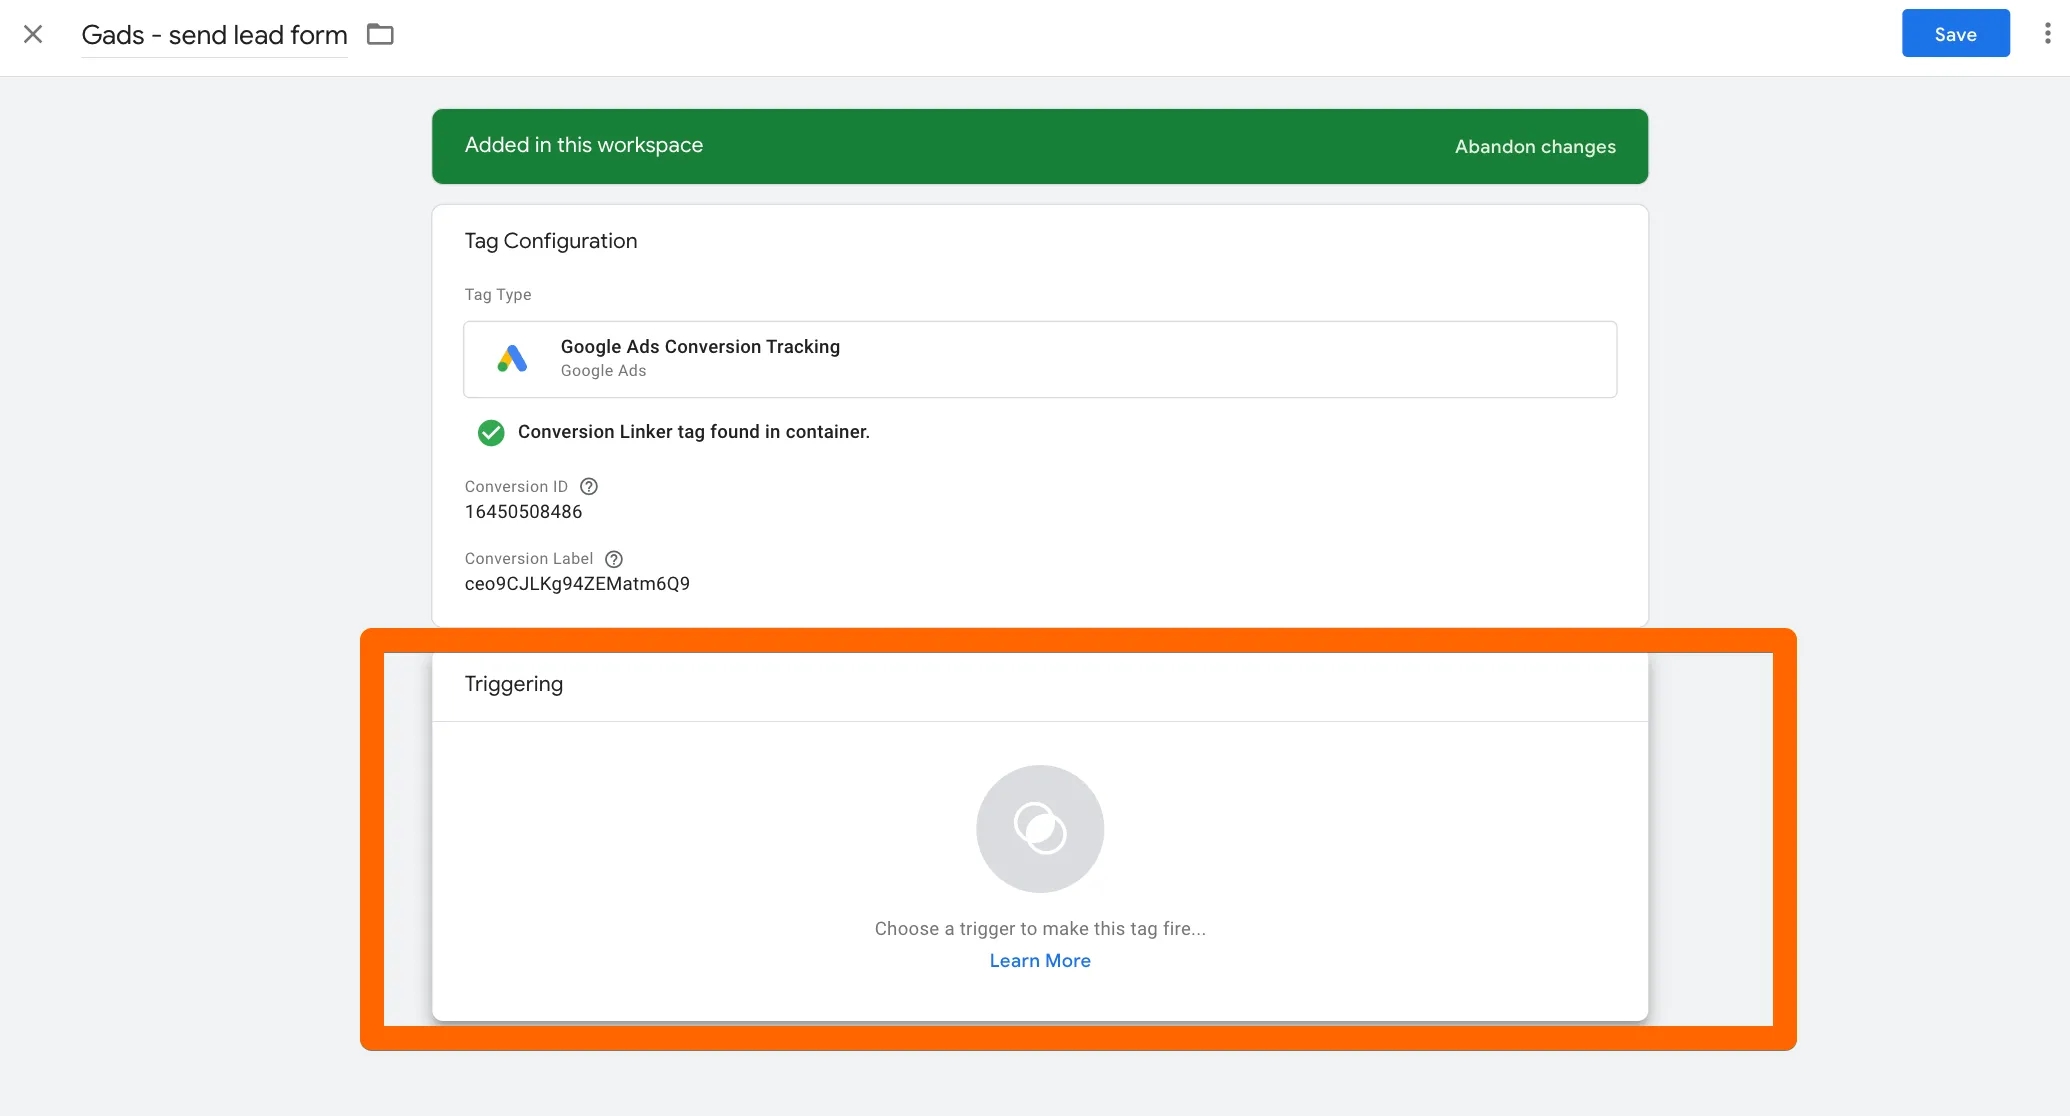
5. As a result, the basic tag setup for conversion tracking in Google Ads, along with the trigger, will appear as follows:
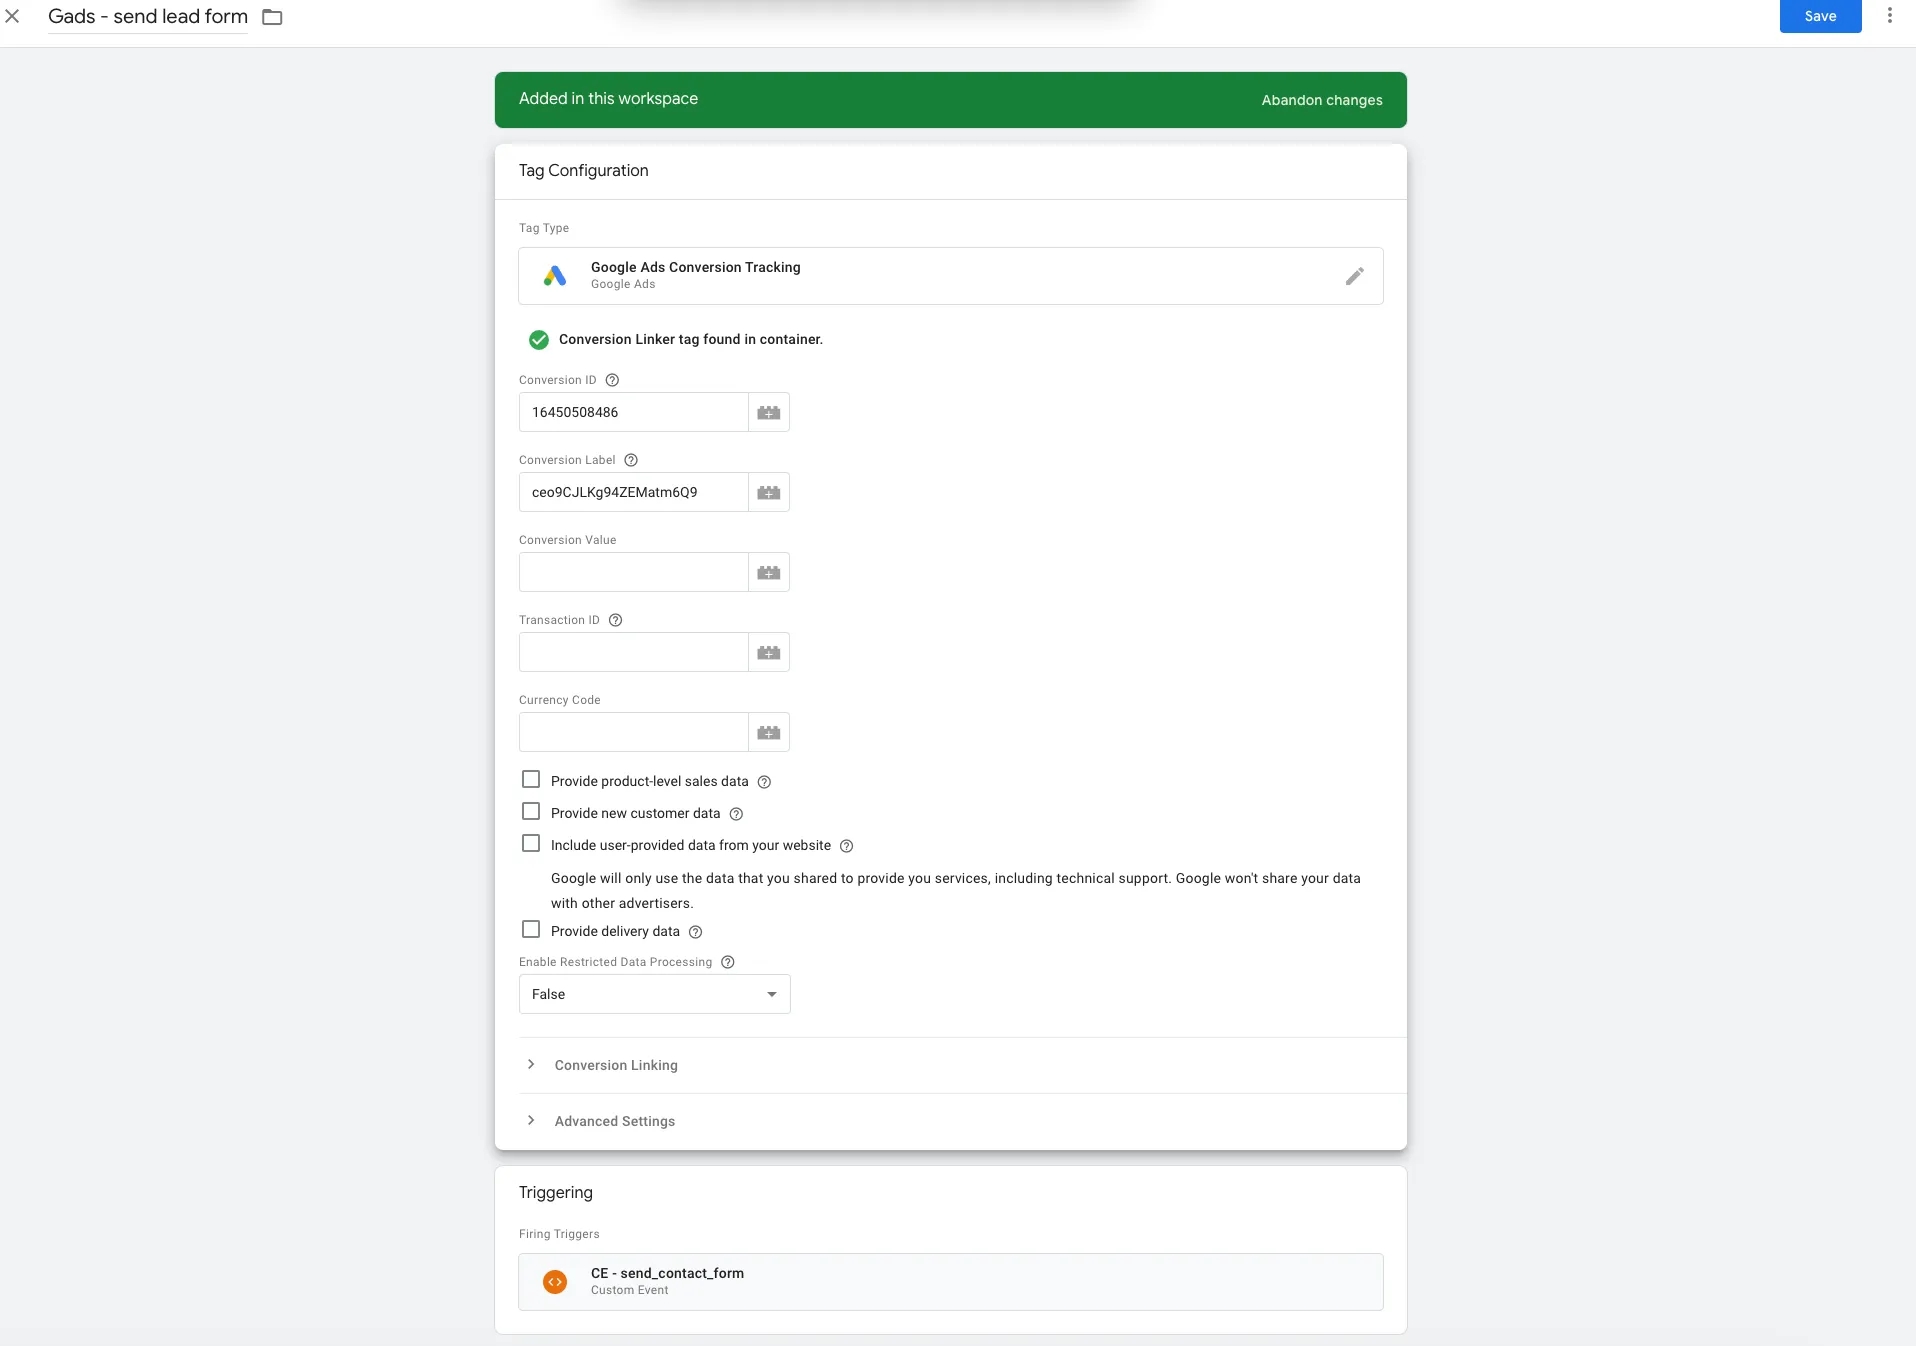
Note that not all fields have been filled in. For example, you can send conversion values and transaction IDs. I’ll demonstrate this later in the article using a purchase data submission example. Right now, we are covering standard form submission, for which it’s sufficient to specify only the Conversion ID and Conversion Label in the relevant fields, as done in step 1.
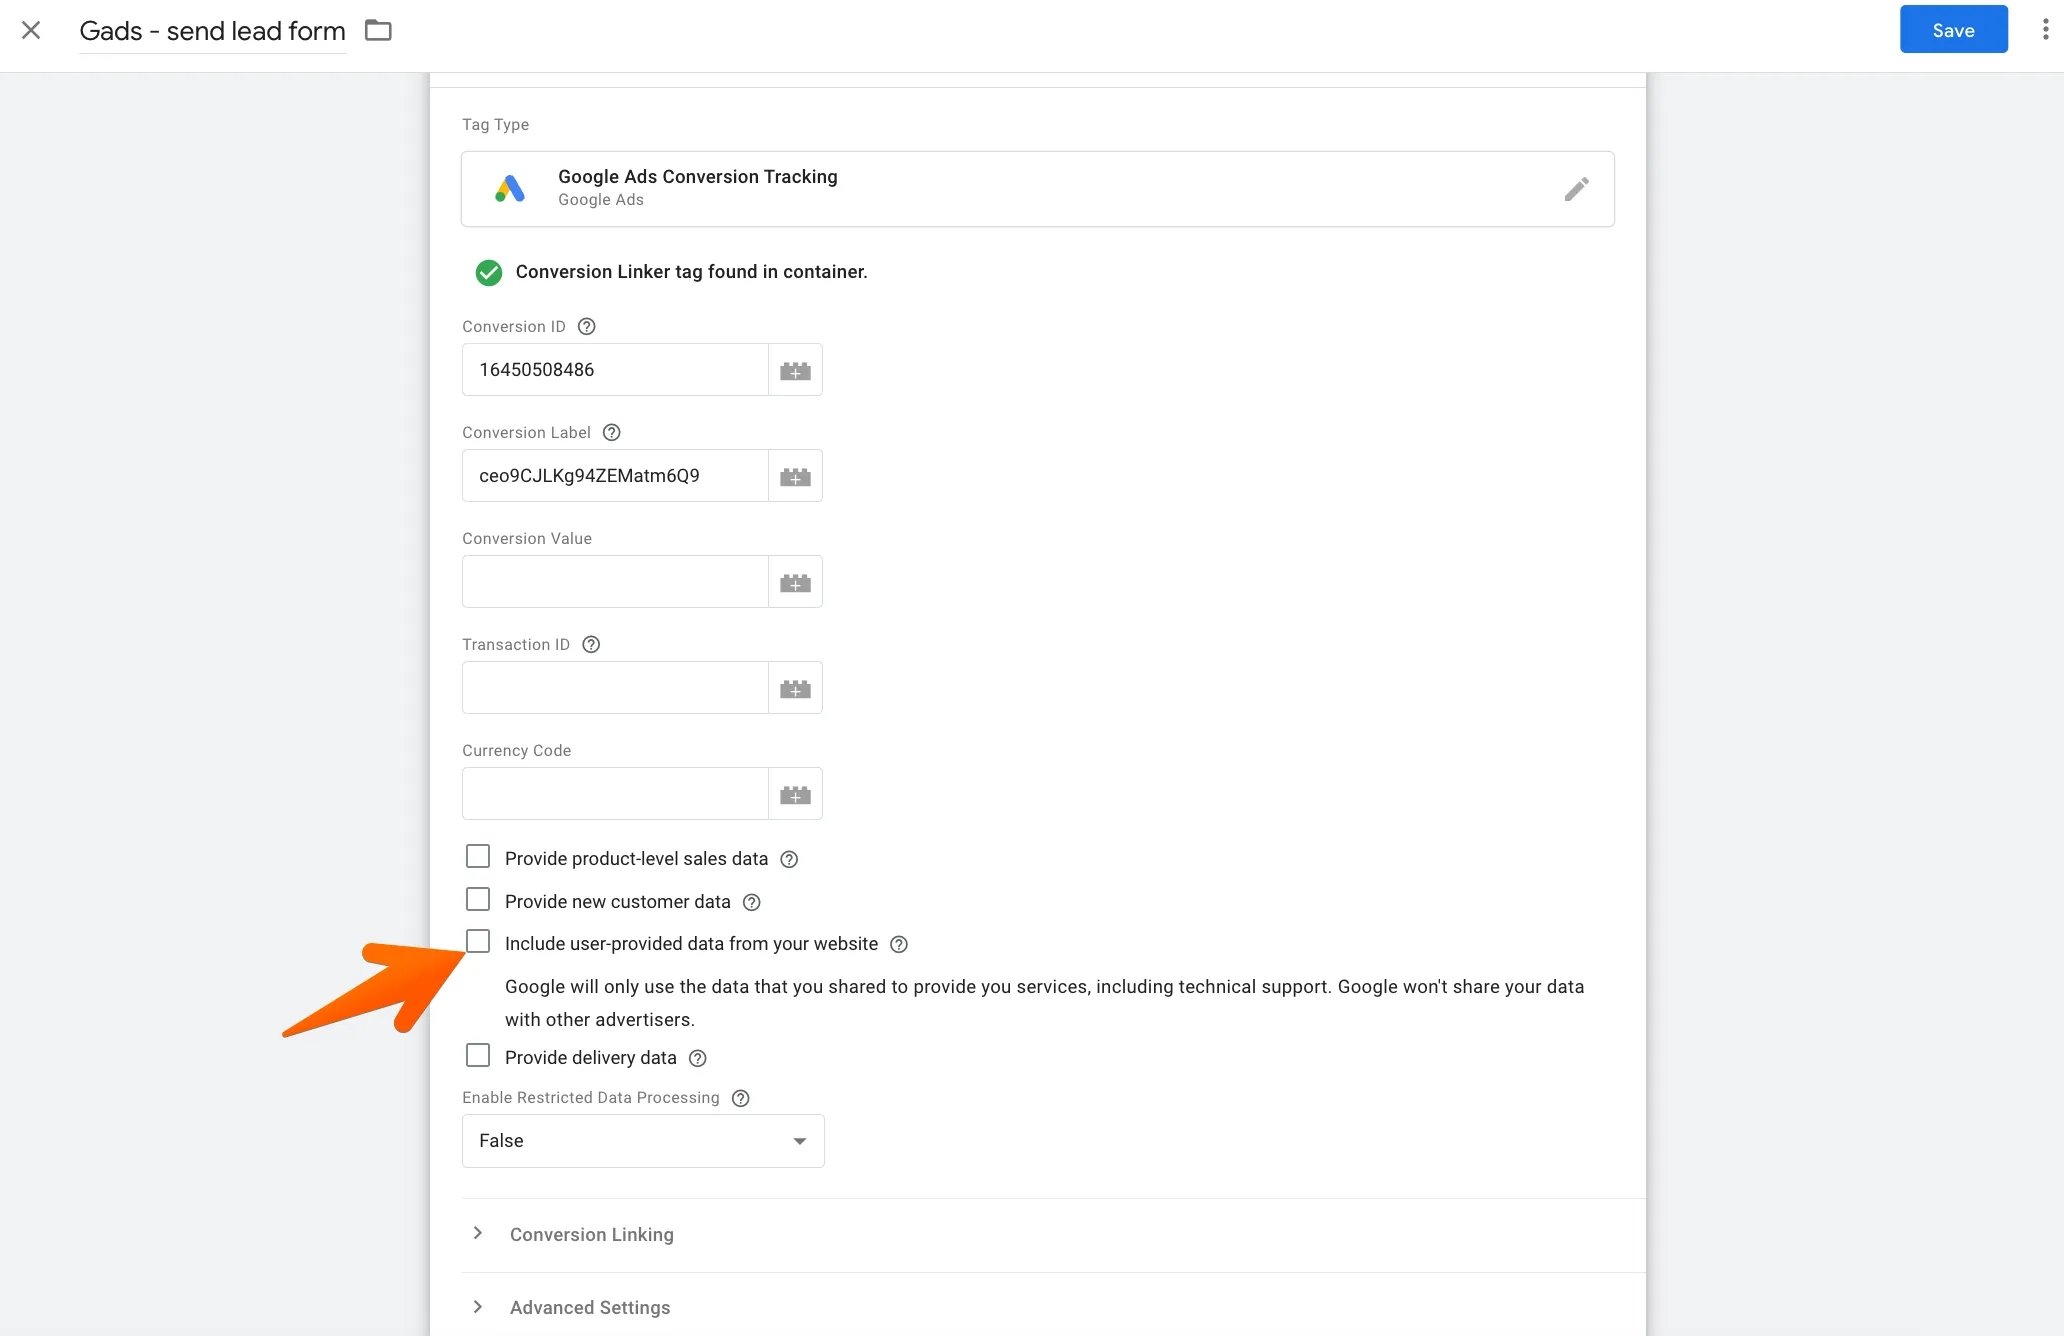
You can and should also add user-provided data if you decide to configure enhanced conversion tracking in Google Ads, i.e., sending hashed customer data (such as emails, phone numbers) to Google for more accurate tracking.
If you are already using updated conversion tag templates in your container, make sure to check out the article “How Enhanced Conversions for Web Are Now Configured in Google Tag Manager.” It provides a detailed explanation of how to work with the new tags, includes examples, and offers a ready-to-import template for GTM so you can quickly implement the changes without wasting time.
6. Verification of setup
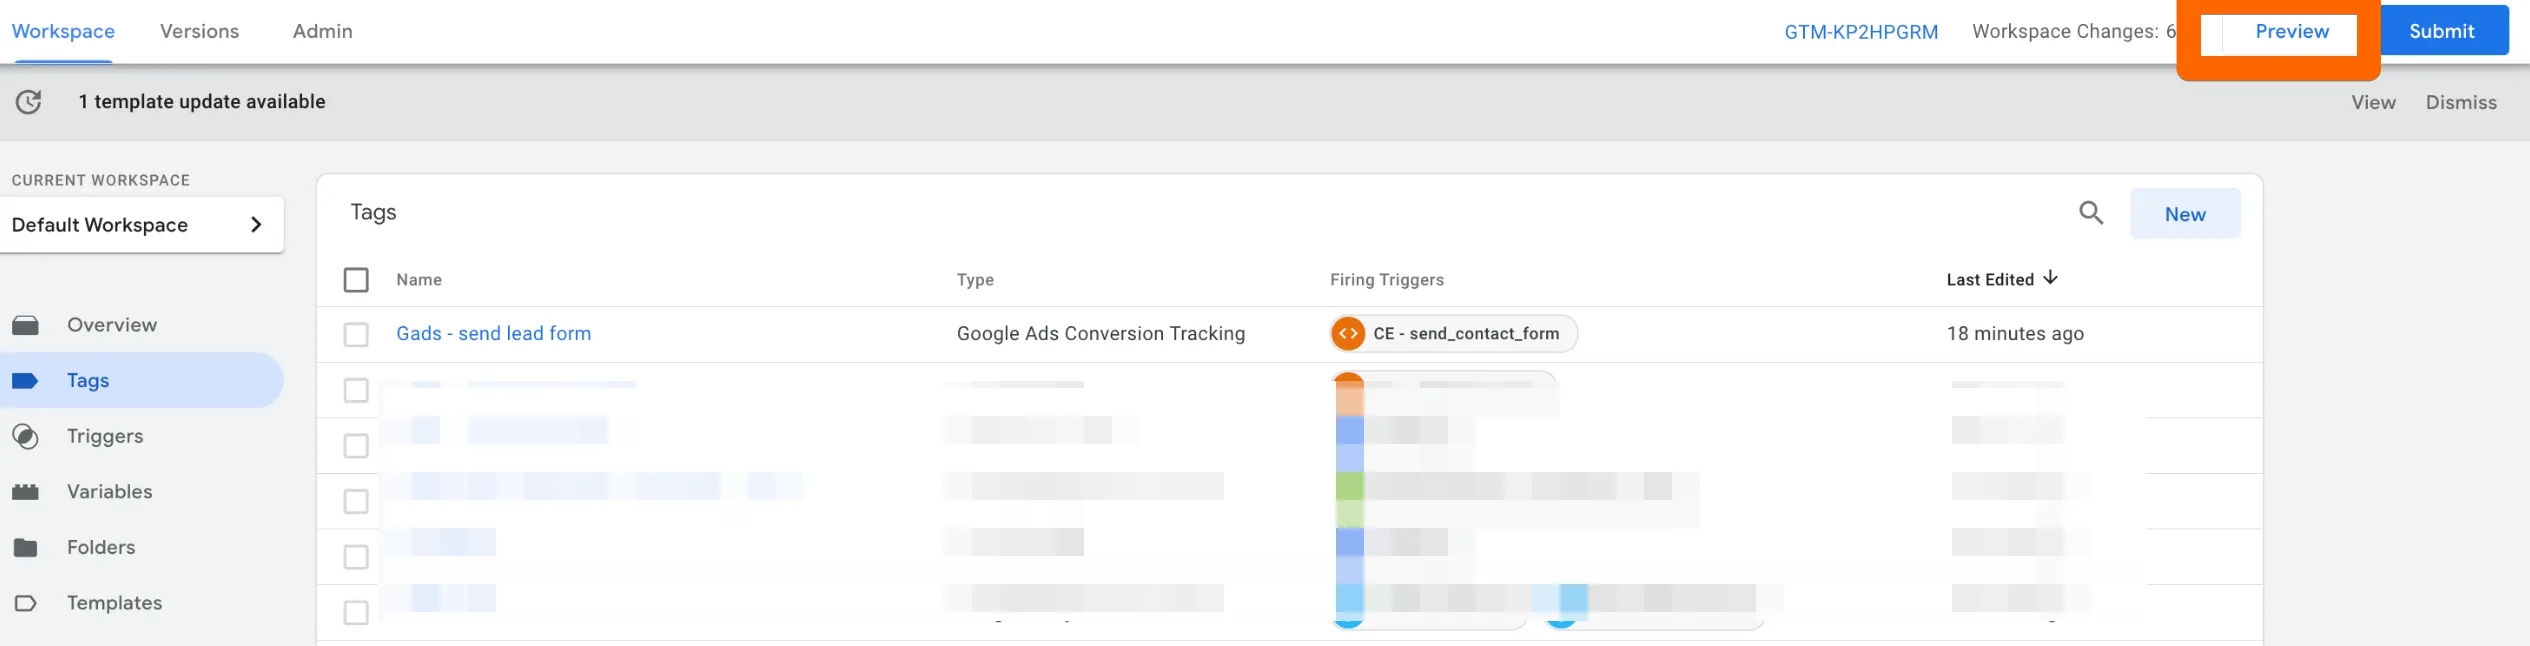
- Testing if the tag is working Enter GTM preview mode:
In the popup, enter your website's URL:
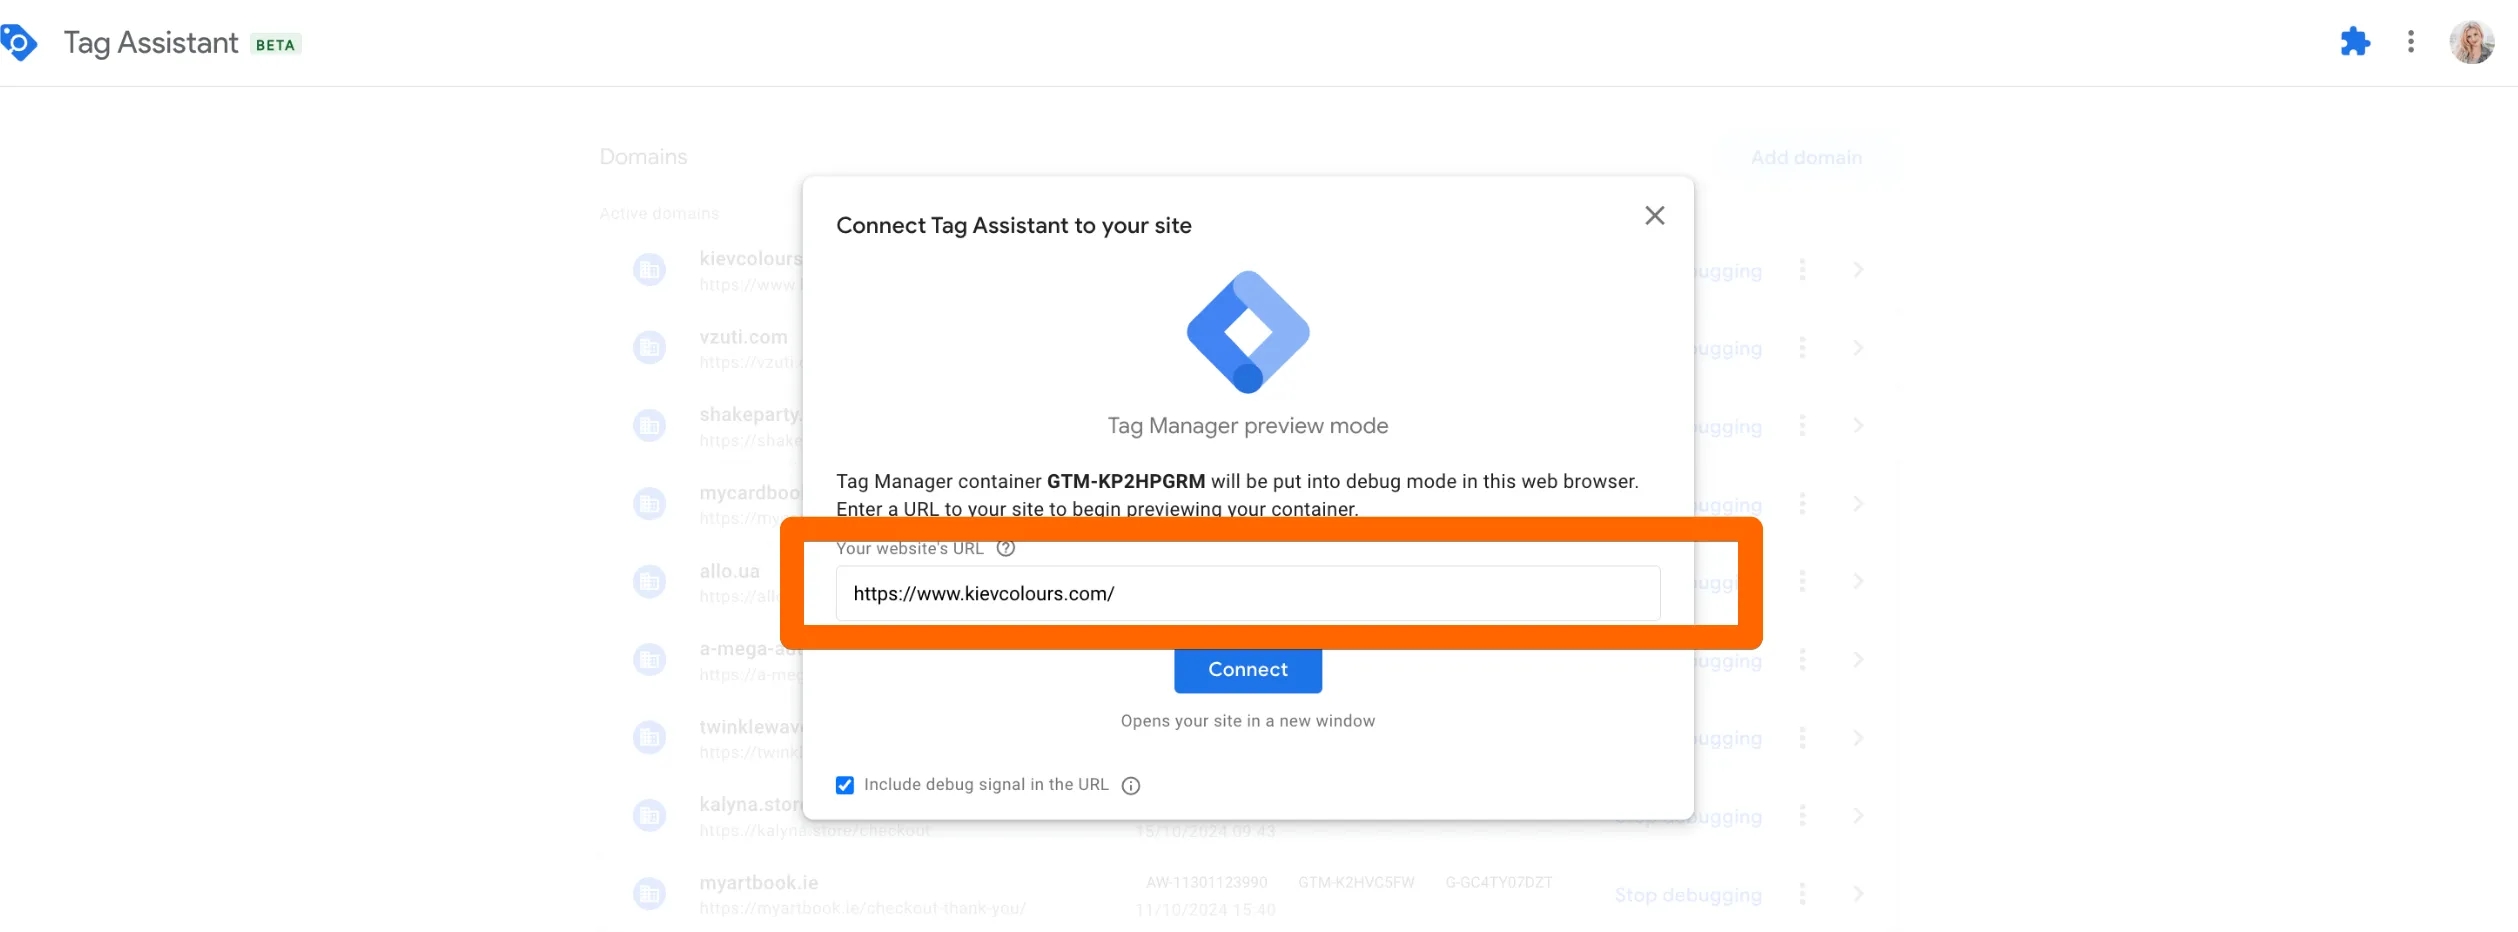
Then click Connect.
On the opened site tab, perform the target action—form submission. After that, the event should appear in the left menu of the preview window. Clicking on the event allows you to verify that the tag has fired.
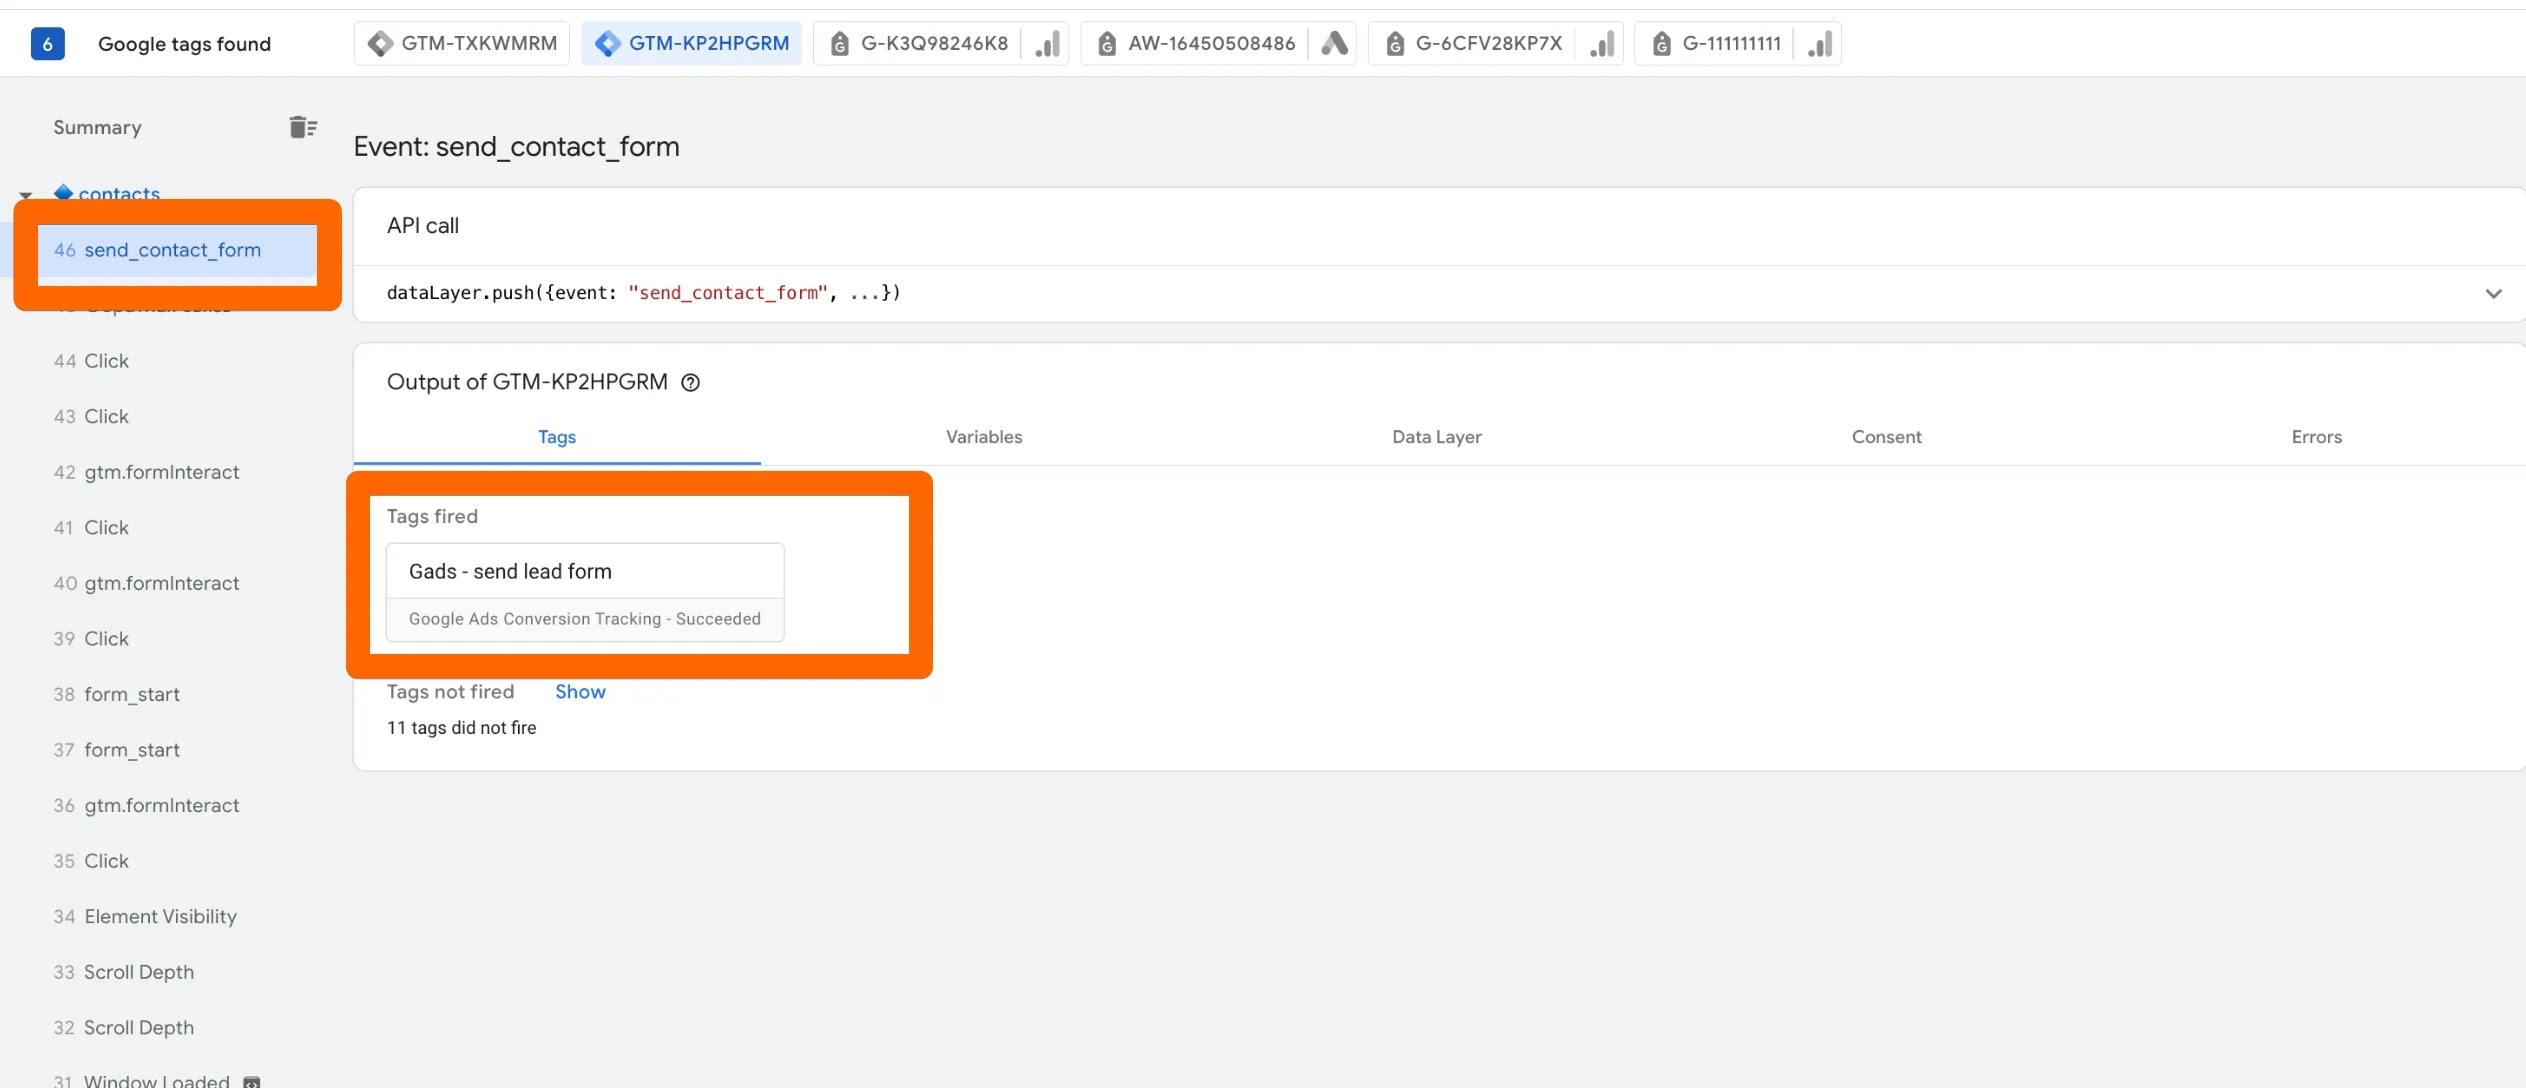
- Checking if the data transfer to Google Ads has occurred
This can be done in preview mode on the tab with the account ID of the ad account:
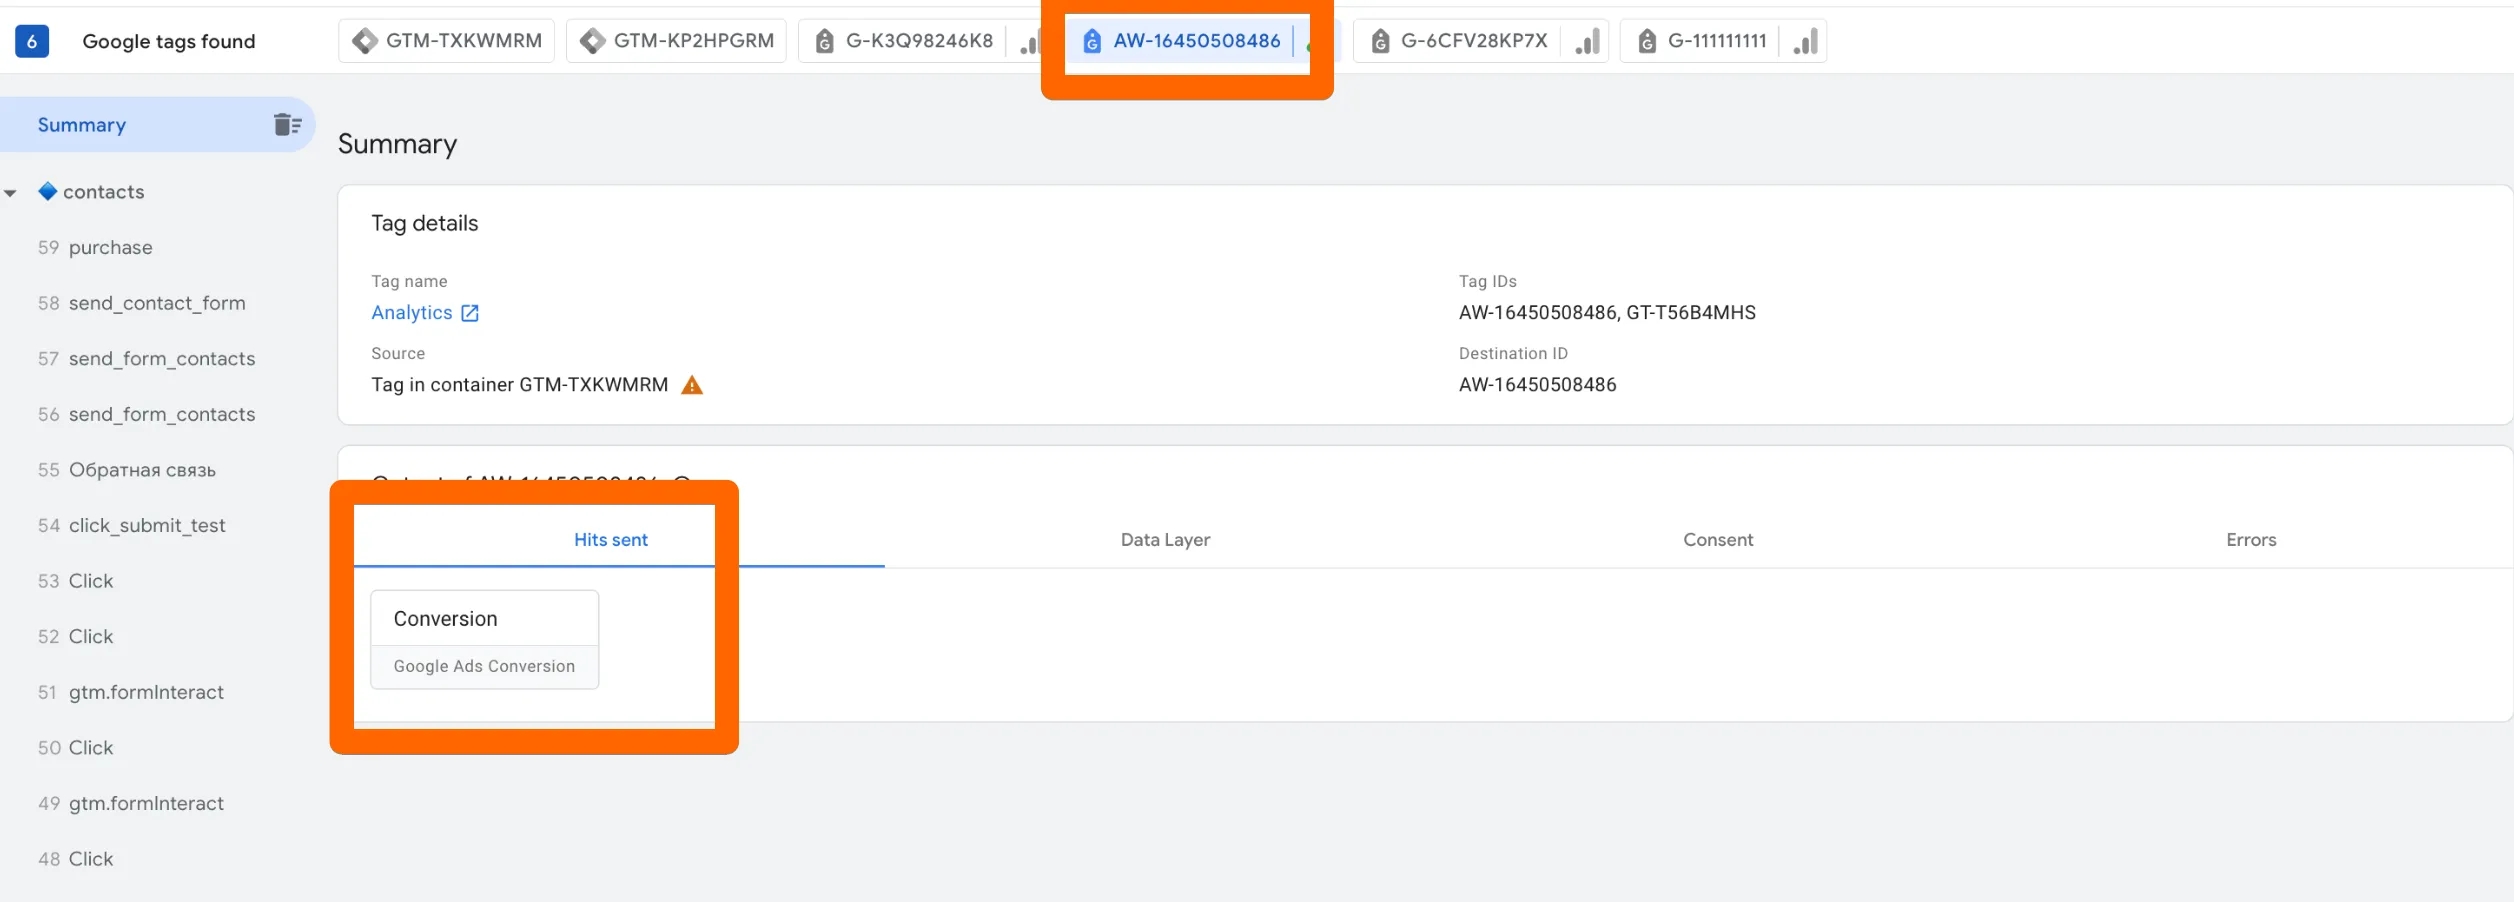
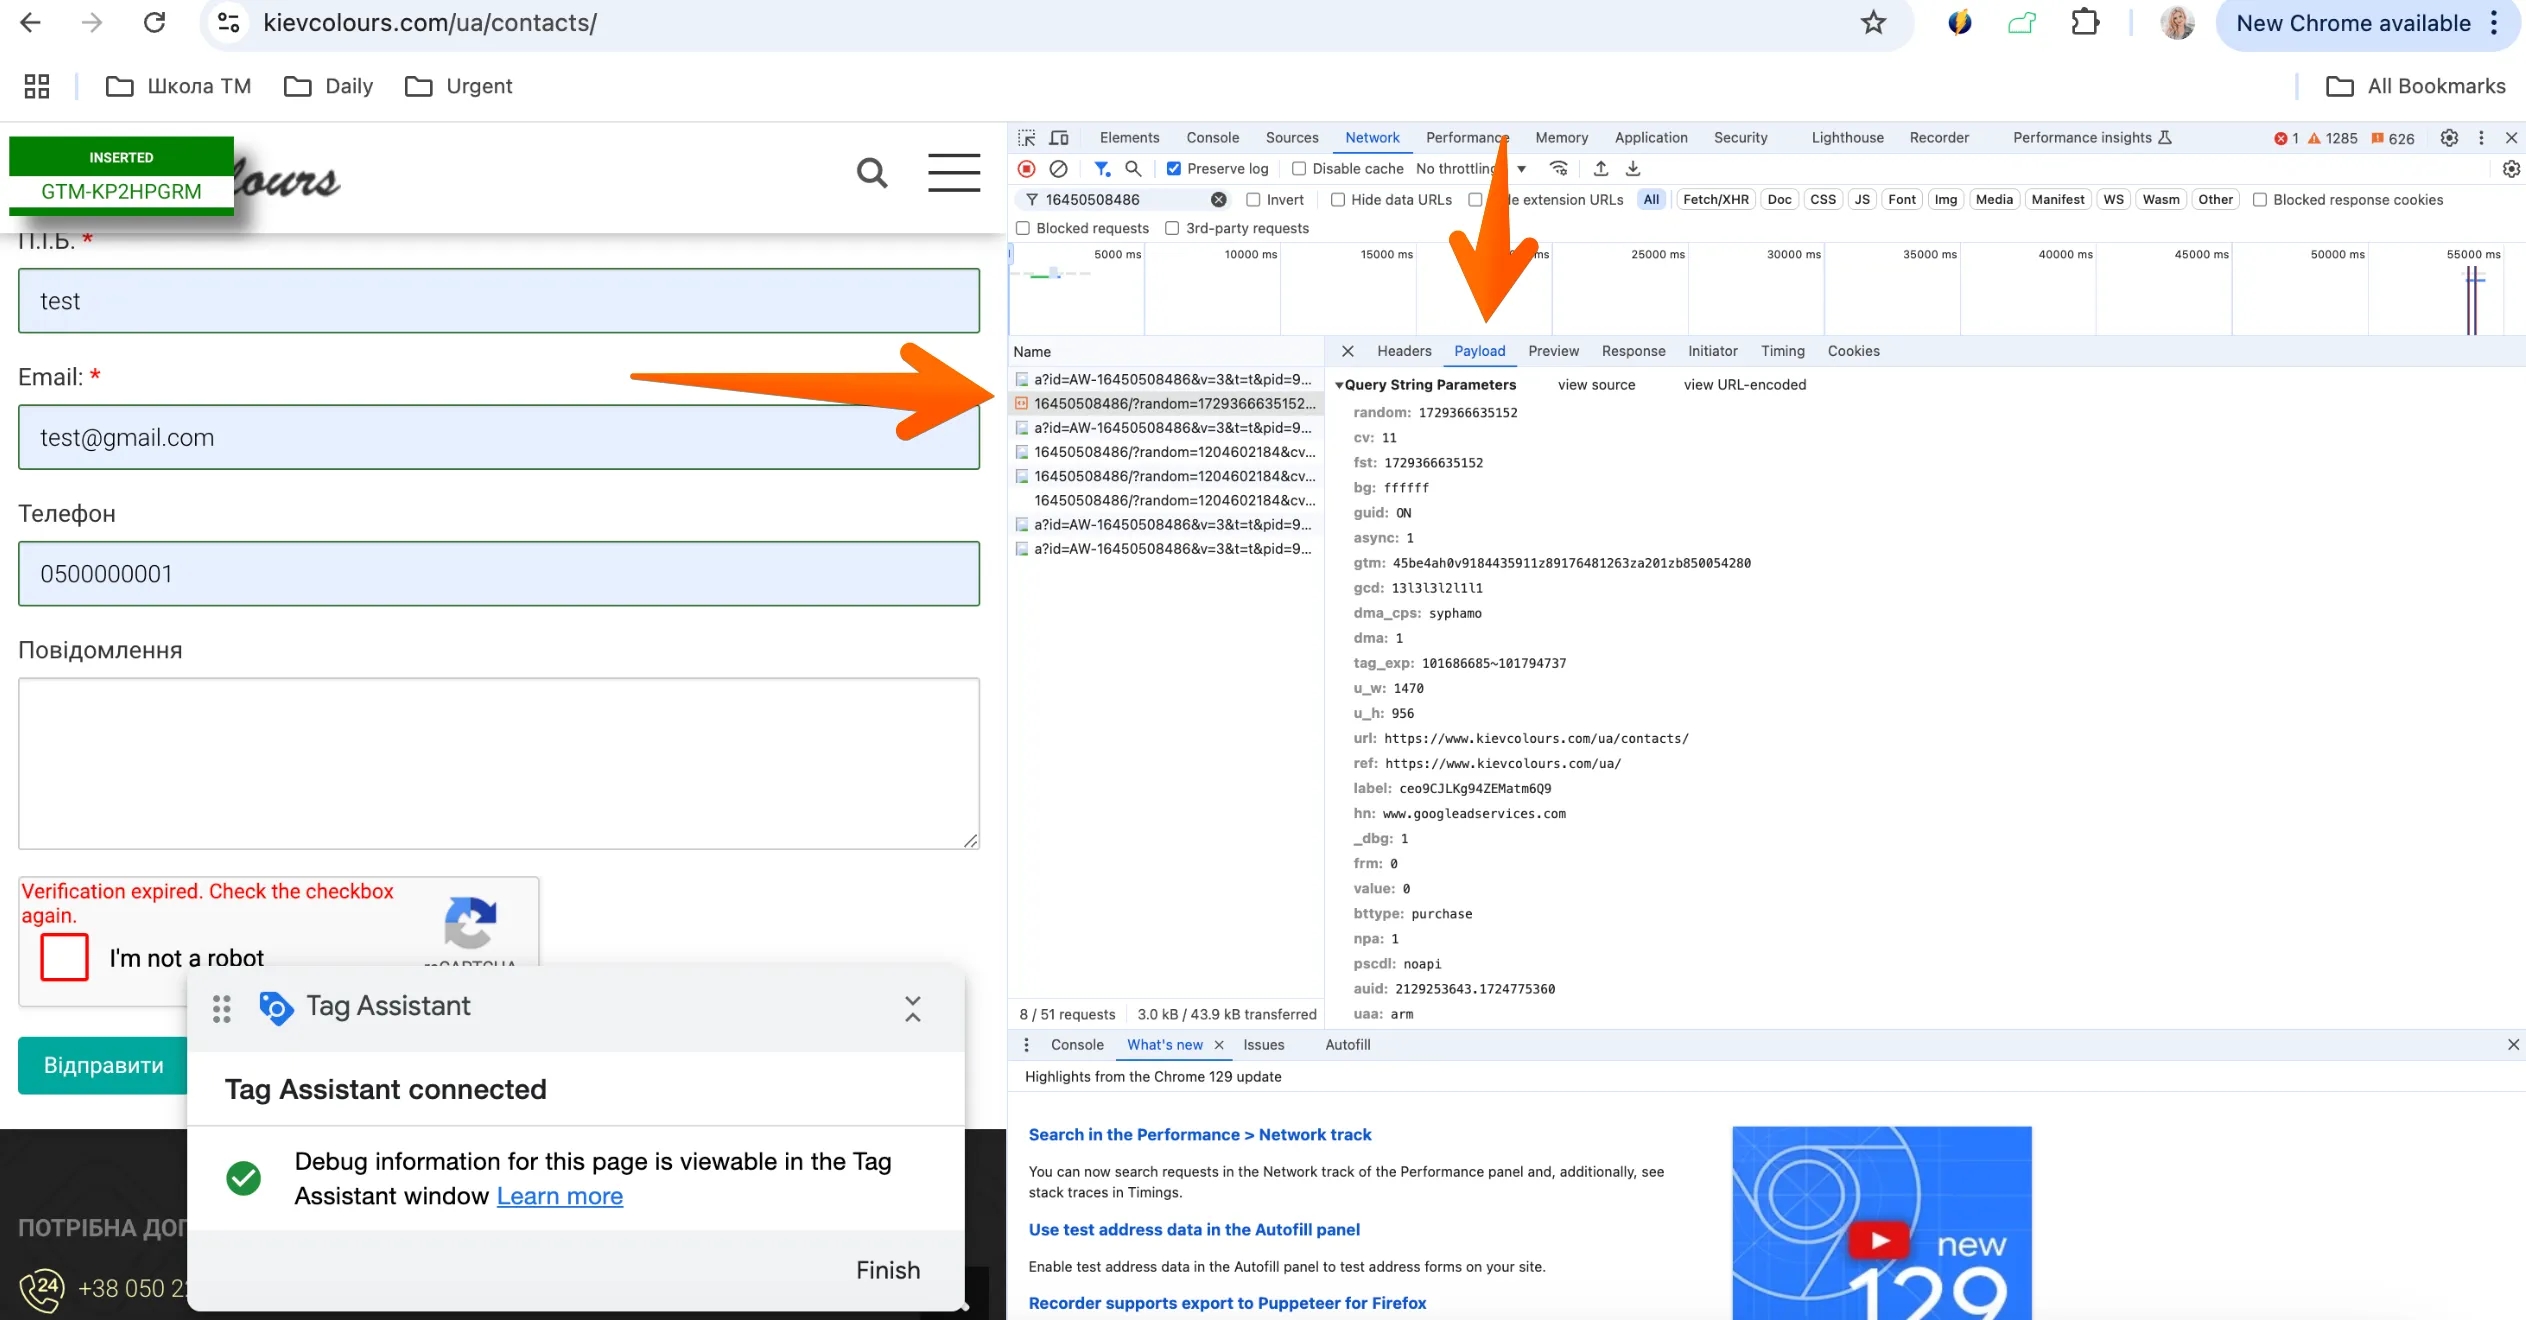
Or using Chrome Developer Tools. Right-click on the webpage, select Inspect, and go to the Network tab. To simplify the search, enter the account ID of the ad account. Then find the request in the network using the path googleadservices.com/pagead/conversion/ (or google.com/pagead/1p-conversion/ in some browsers), and click on Payload:
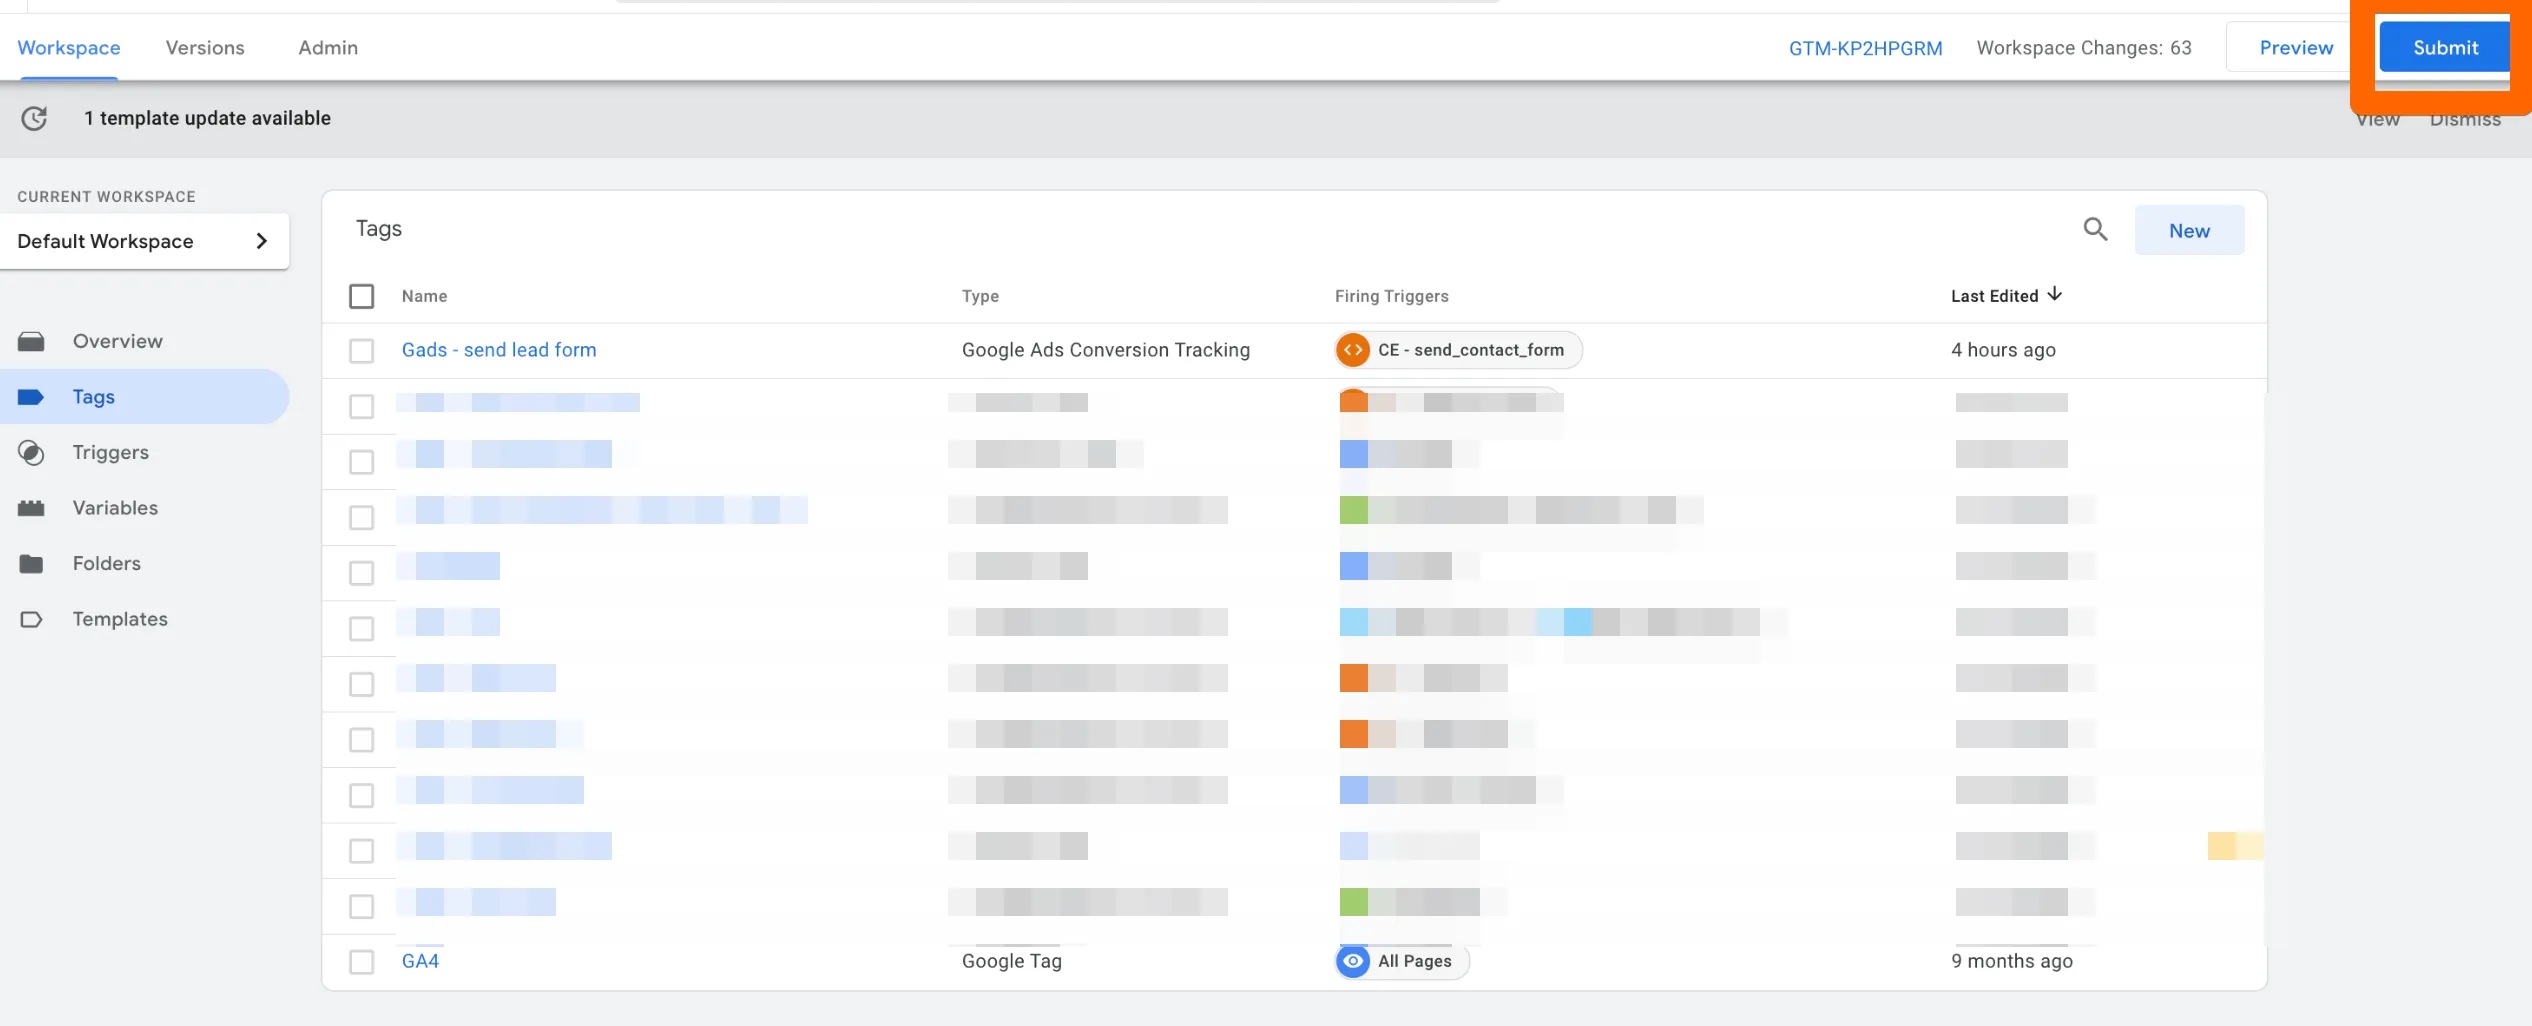
7. If the verification is successful, you only need to publish the changes in the container.
Purchases with dynamic value
Setting up Purchase Events in Google Ads
We start the setup in the Google Ads interface similarly to the process of creating a conversion for form submission, following the step-by-step instructions described in the section on Setting Up Form Submission Tracking in Google Ads. However, there are two important differences:
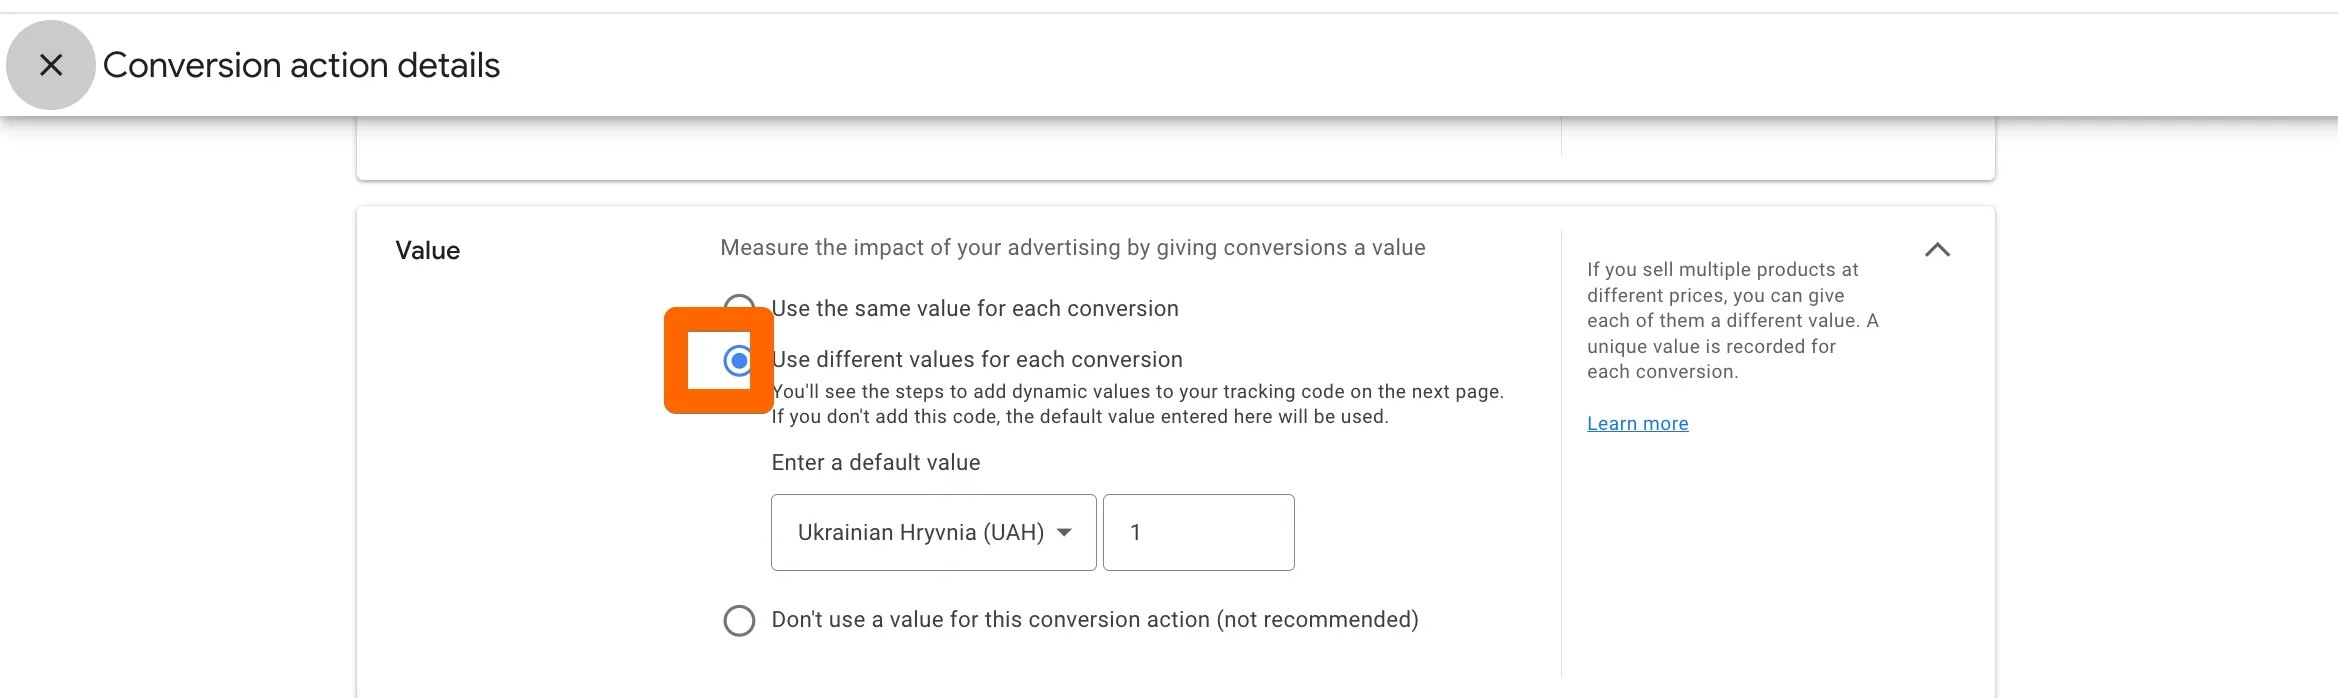
- Value: We will set up the transfer of the purchase conversion value. To do this, in the conversion settings window ( discussed in section 6 of the Setting Up Form Submission Tracking in Google Ads), select dynamic conversion value.
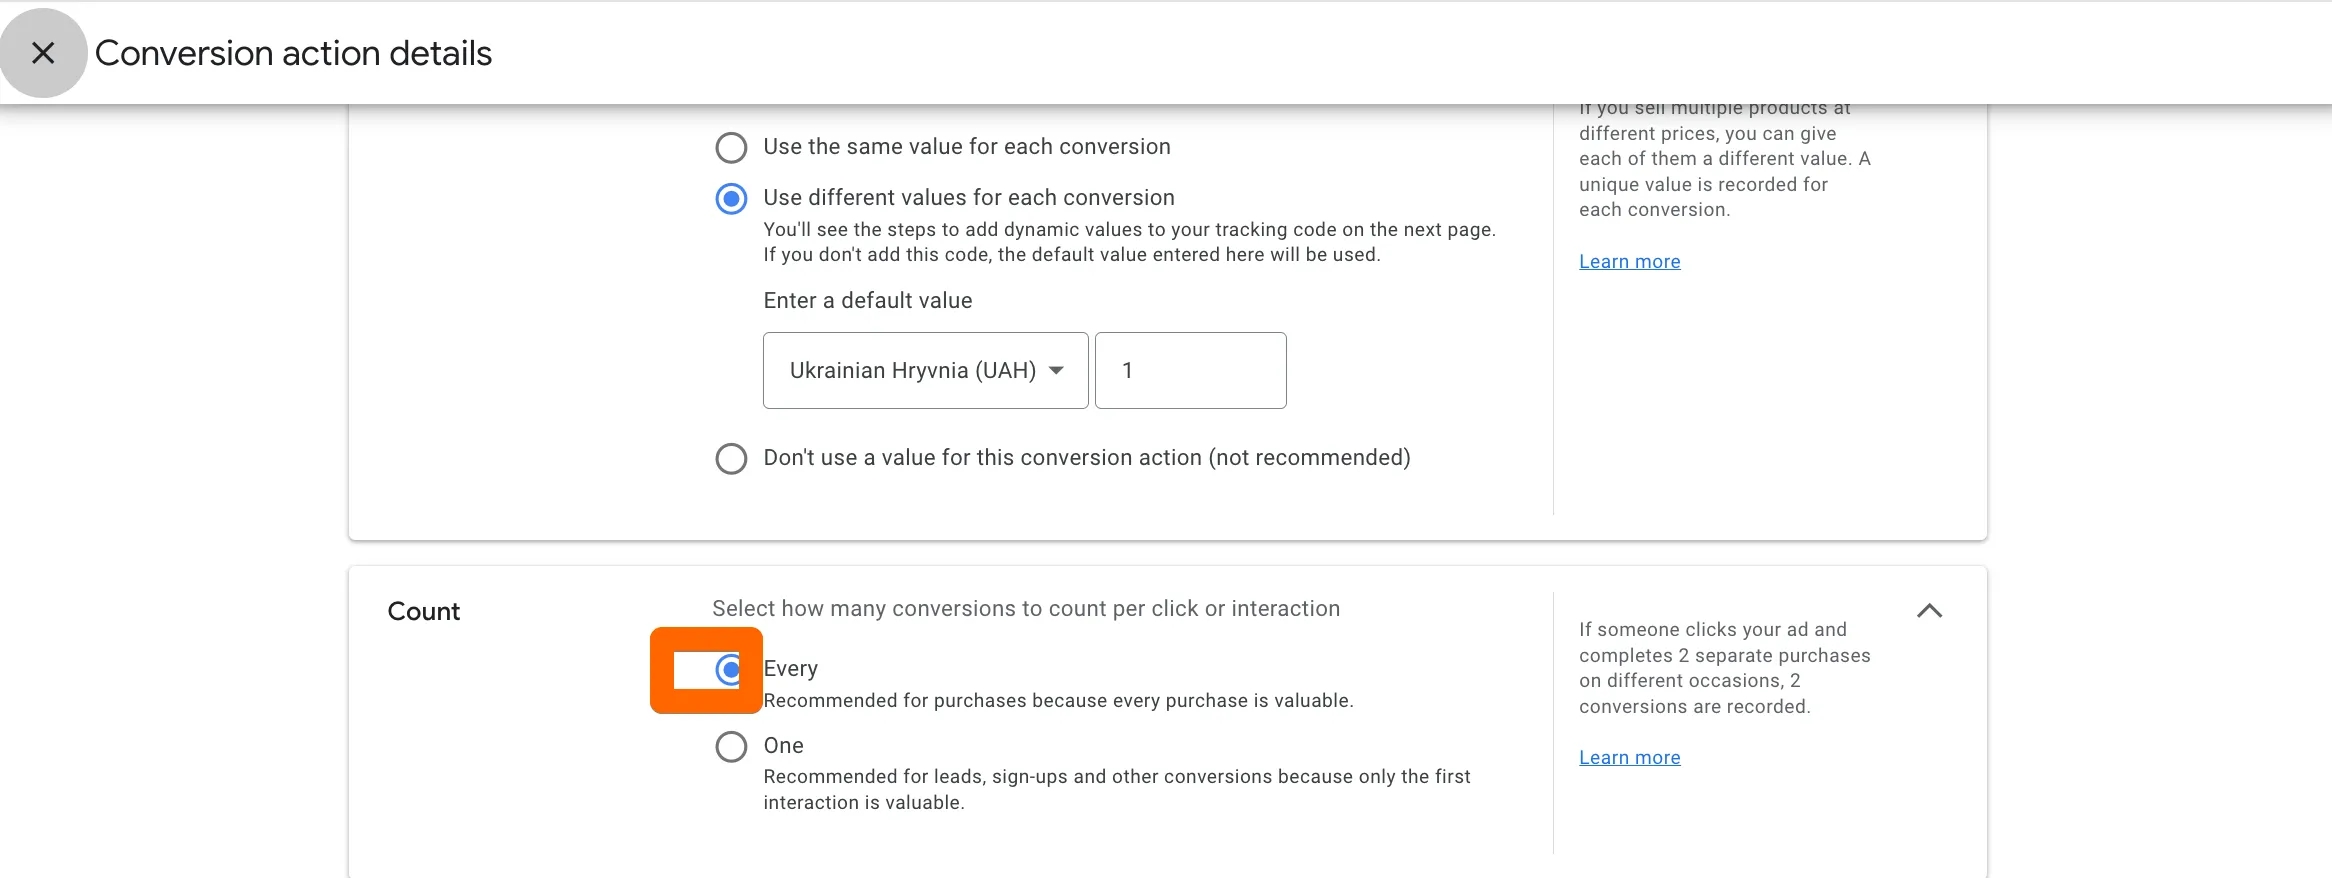
- Count: In the conversion counting field, select the option to count each conversion since each purchase has its own value.
Setting up a purchase event in Google Ads with the simplified conversion tracking setup (updated interface)
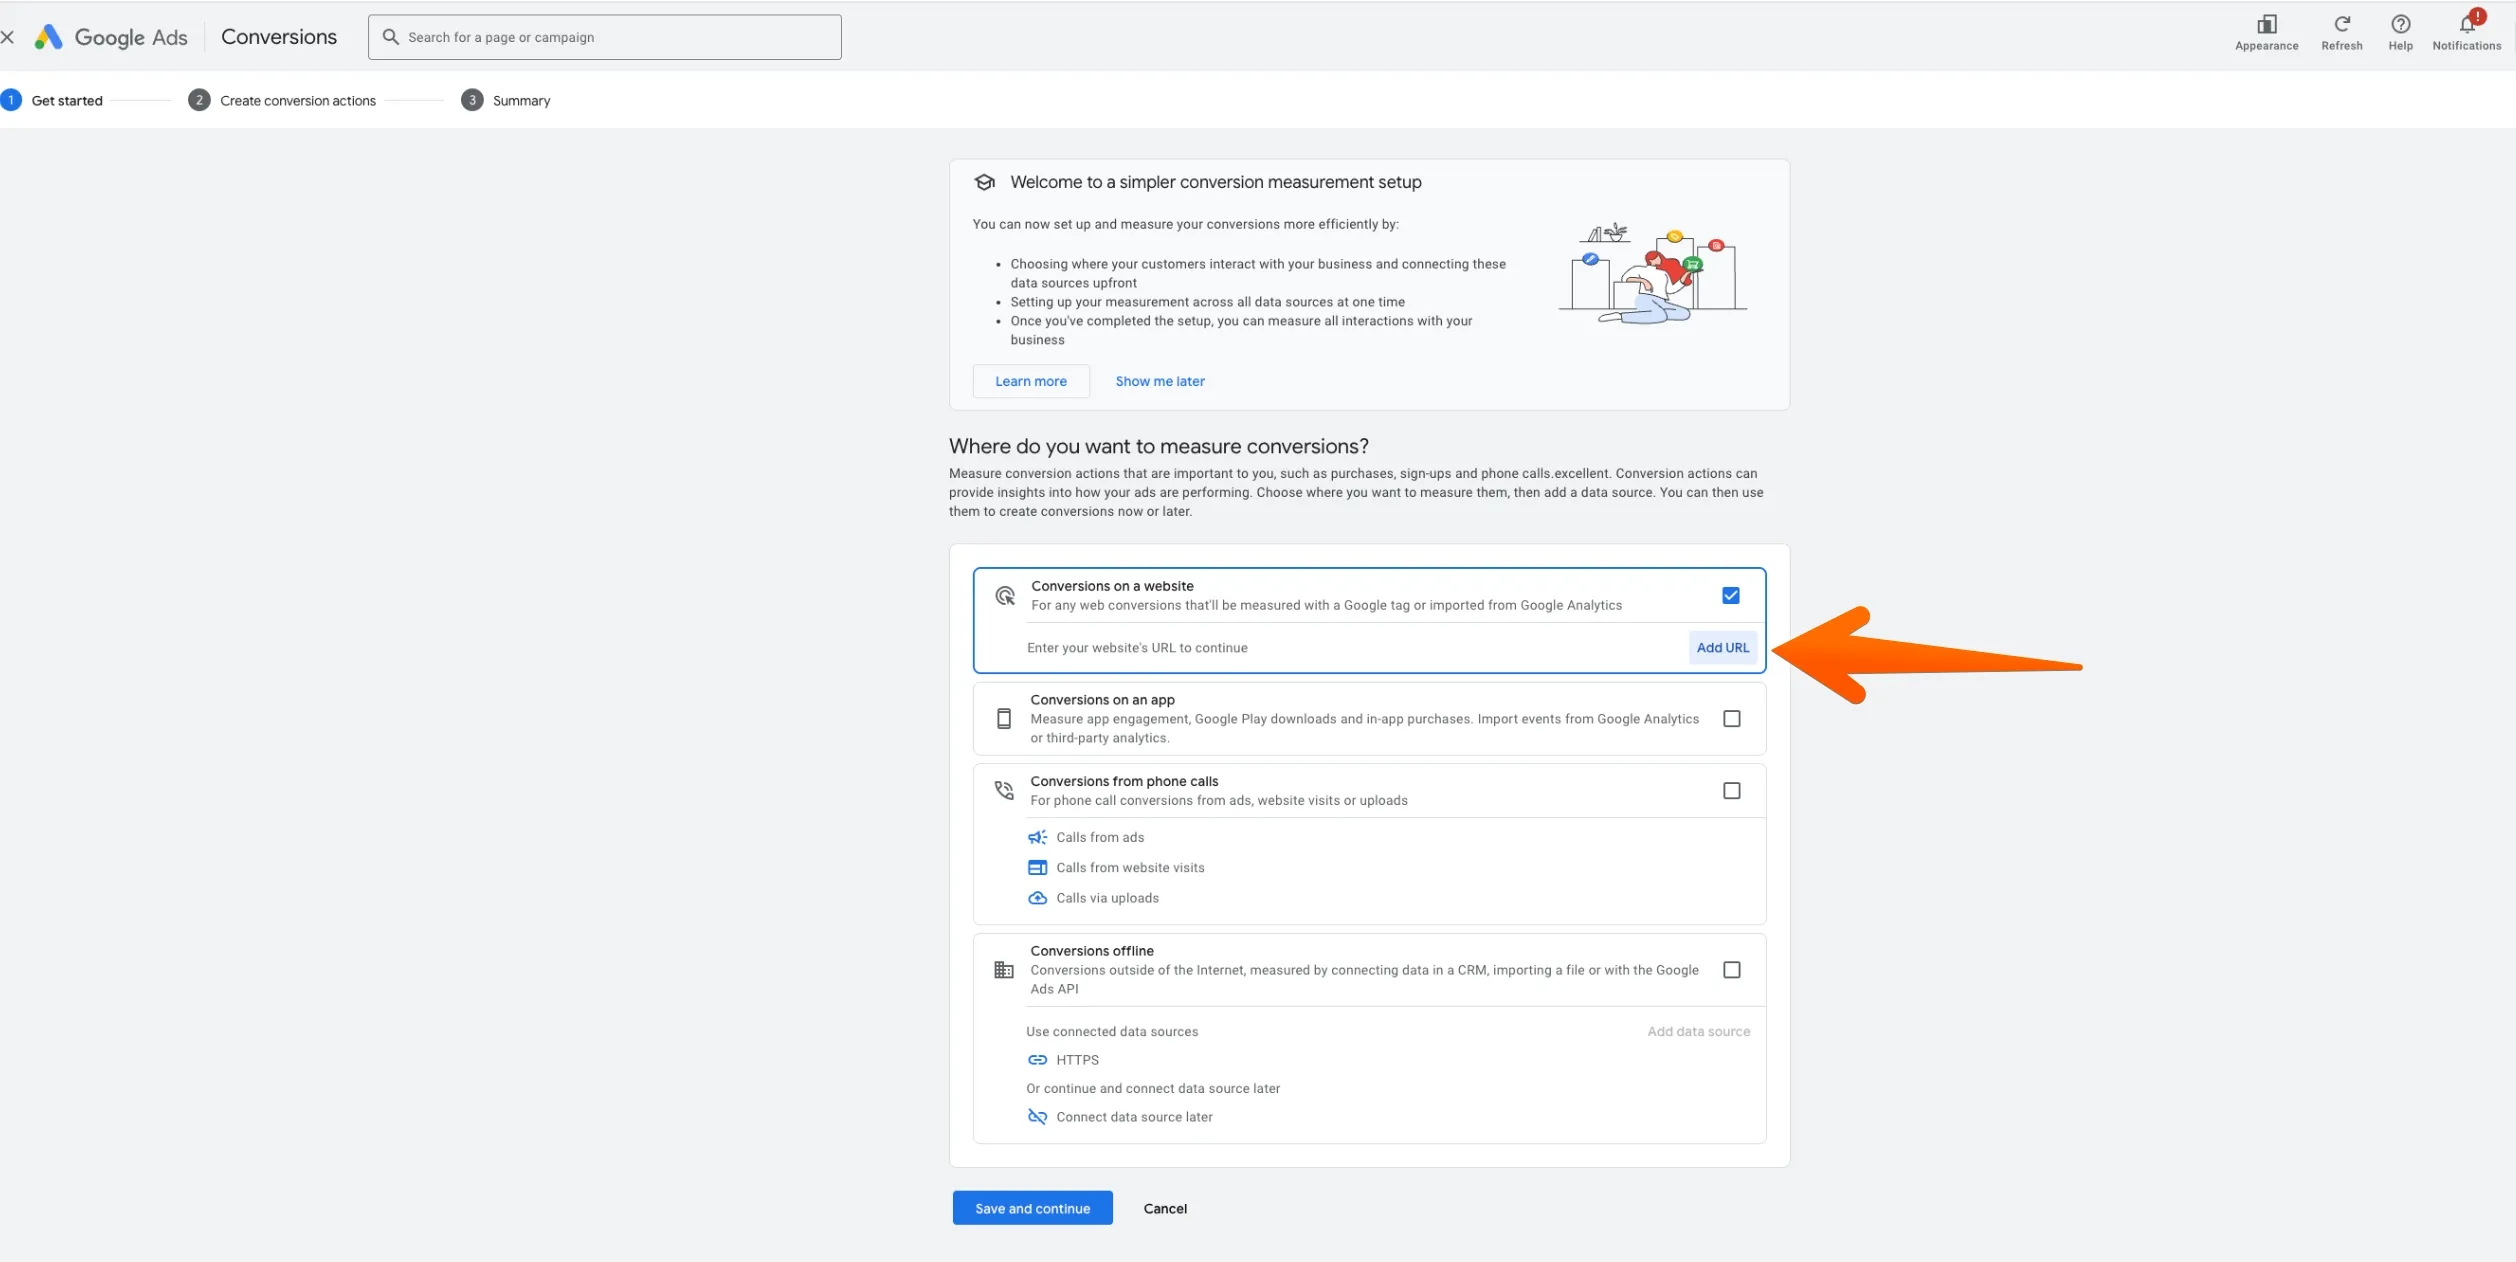
If you have the updated version of the Google Ads interface with the simplified conversion tracking setup, the process of setting up a conversion in the ad account will differ. To create a website conversion step-by-step in the updated interface, you will need to:
- Go to the “Goals” tab in your Google Ads account: Goals -> Conversions -> Summary, as we discussed earlier, and select “Conversions on a website” and click “Add URL.”
2. Enter your website domain and click “Scan.”
Next, select your Google tag → click “Done” → and then again “Save and continue,” as you will be redirected to the previous page from Step 1.
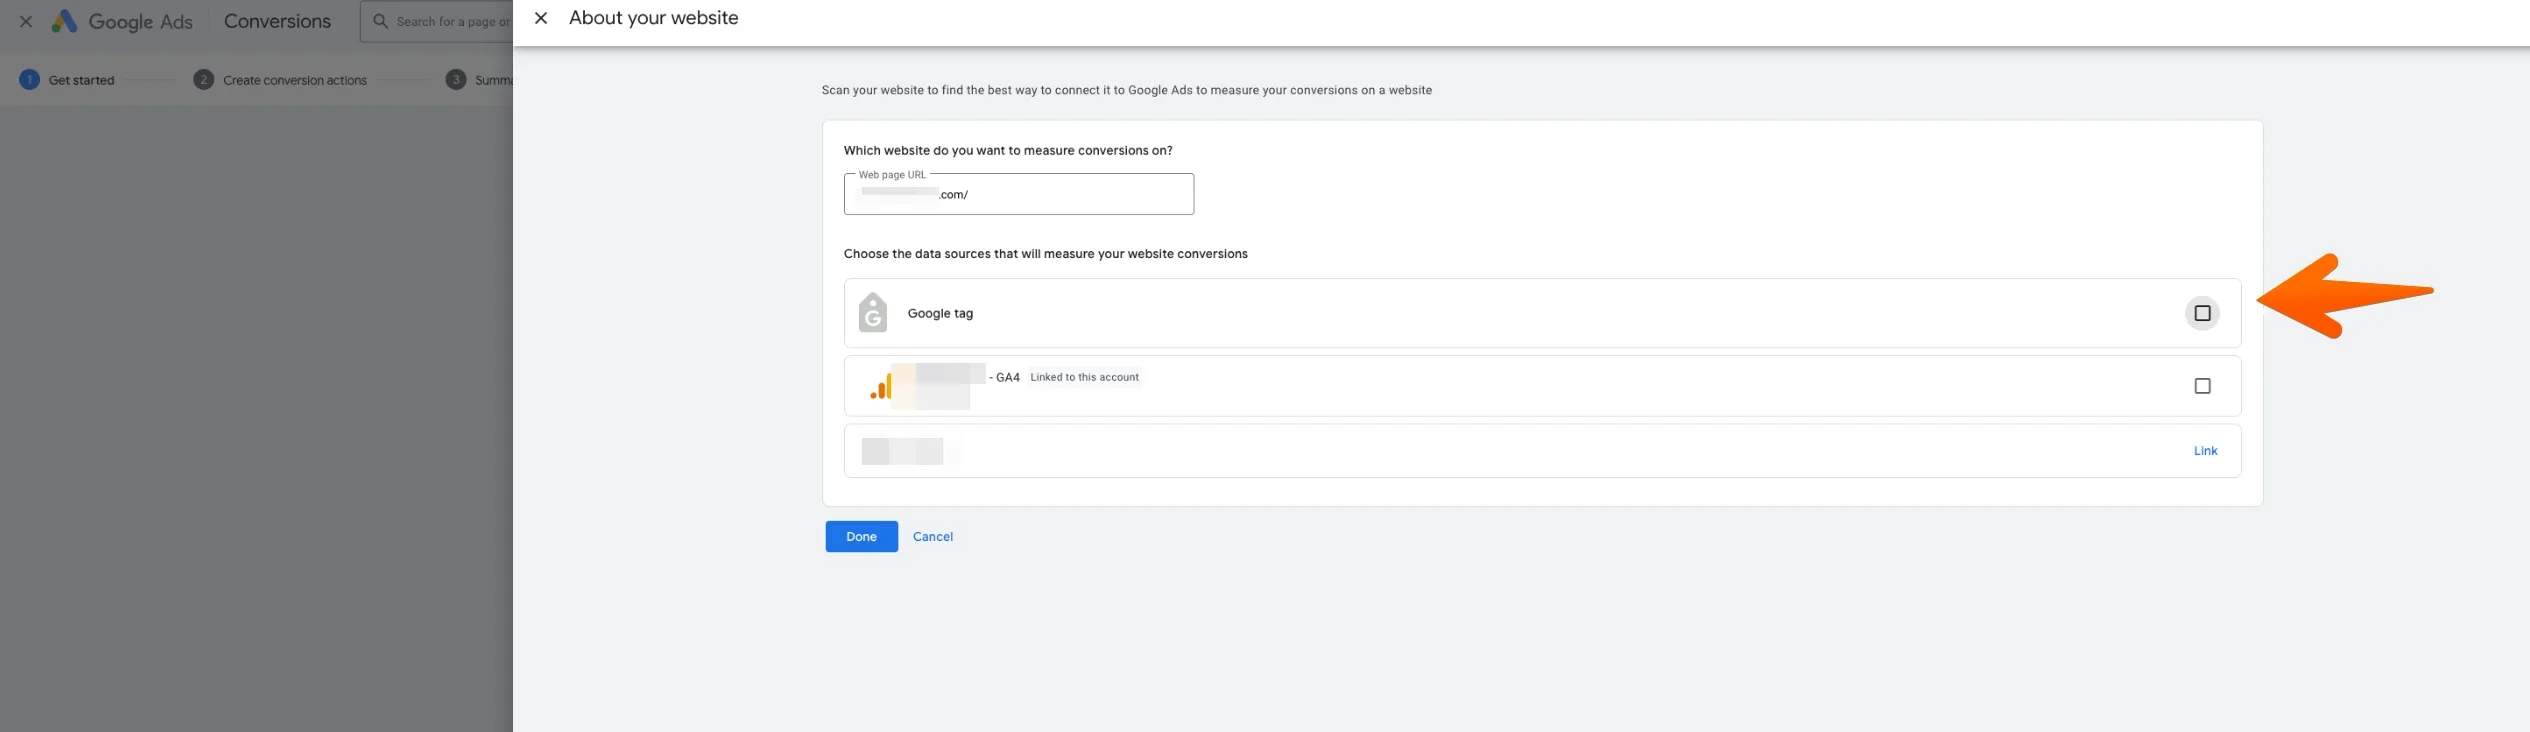
If you need to import a conversion from GA4 to your ad account, select the GA4 option that will appear in the list (on the screenshot, it is shown below the Google tag). This option will only be available if your GA4 property is already linked to your Google Ads account.
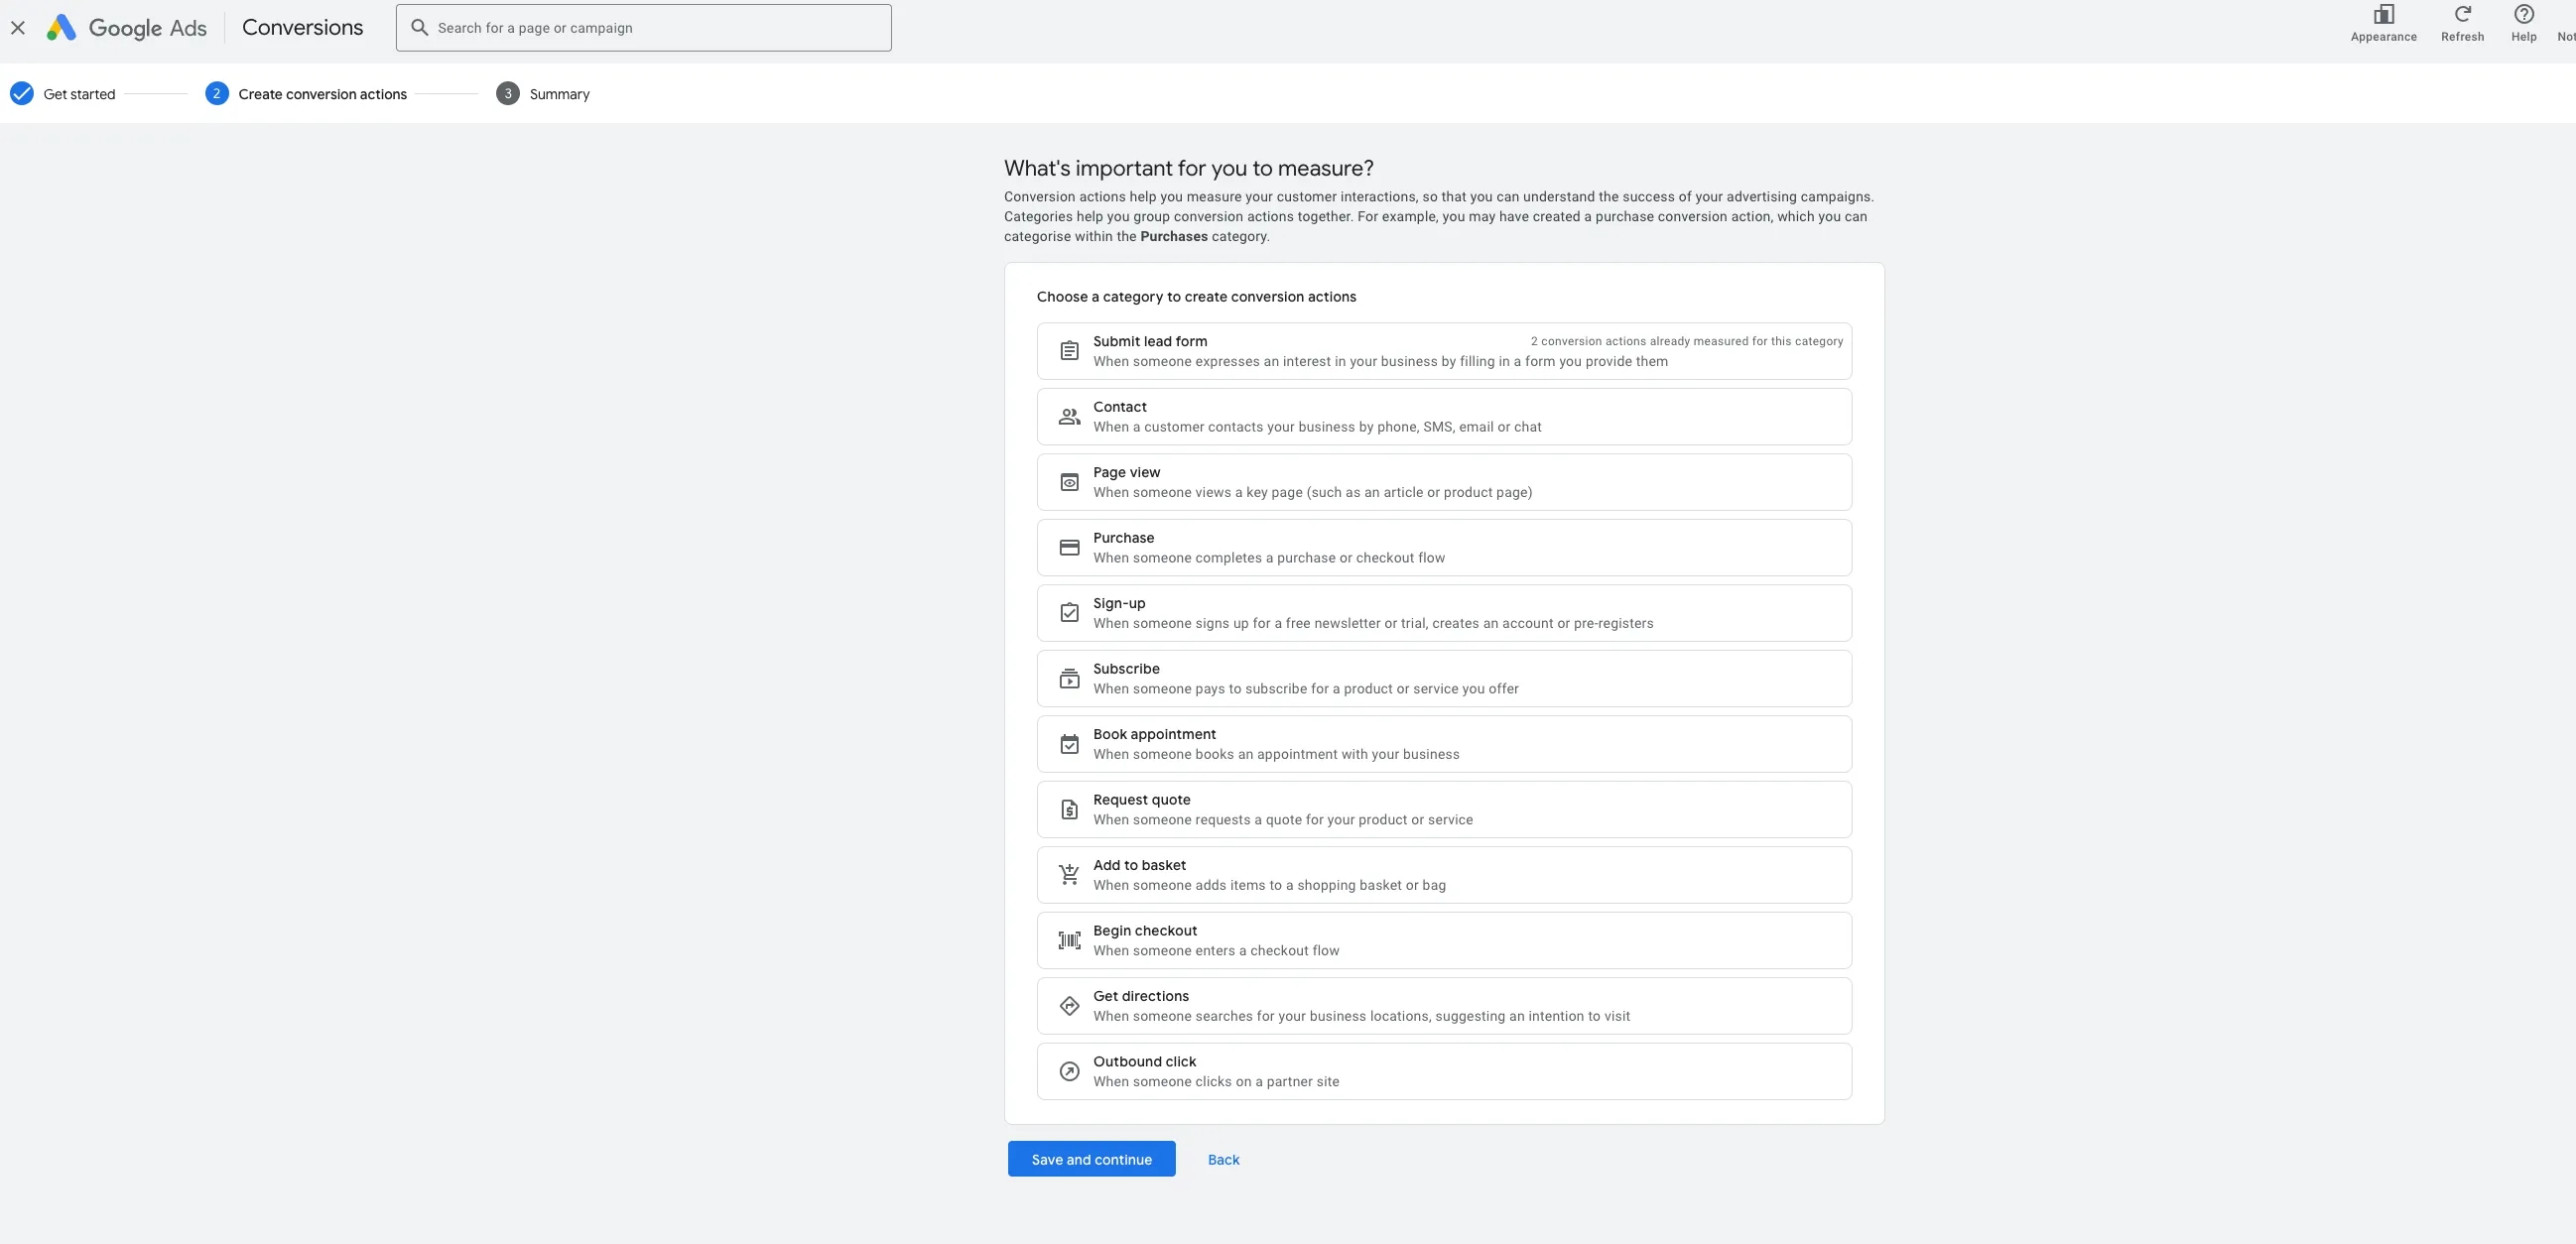
3. Select the conversion category — for example, “Purchase.” Click “Save and continue.”
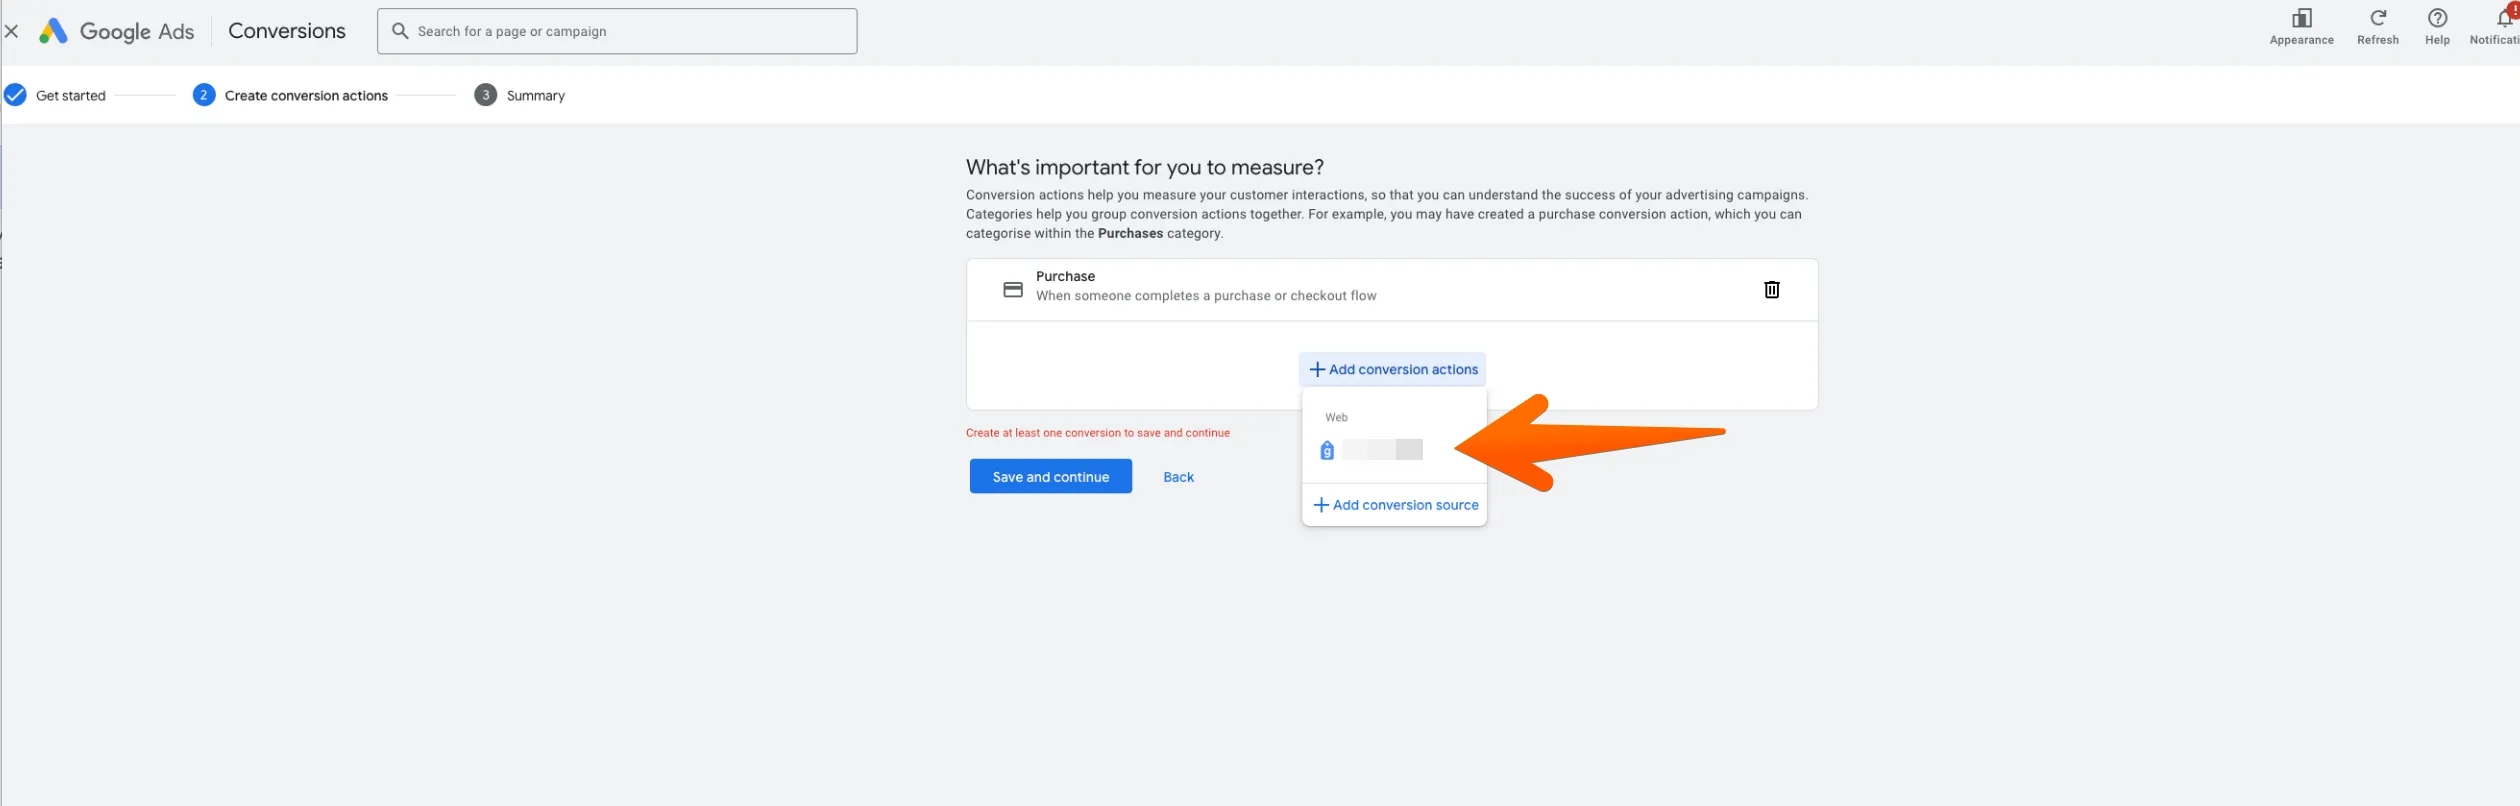
4. Click “Add conversion actions.”

5. In the dropdown list, select your Google tag installed on the site.
6. Select the “Create a manual event” option, enter the name of the conversion, and then click “Use event.”
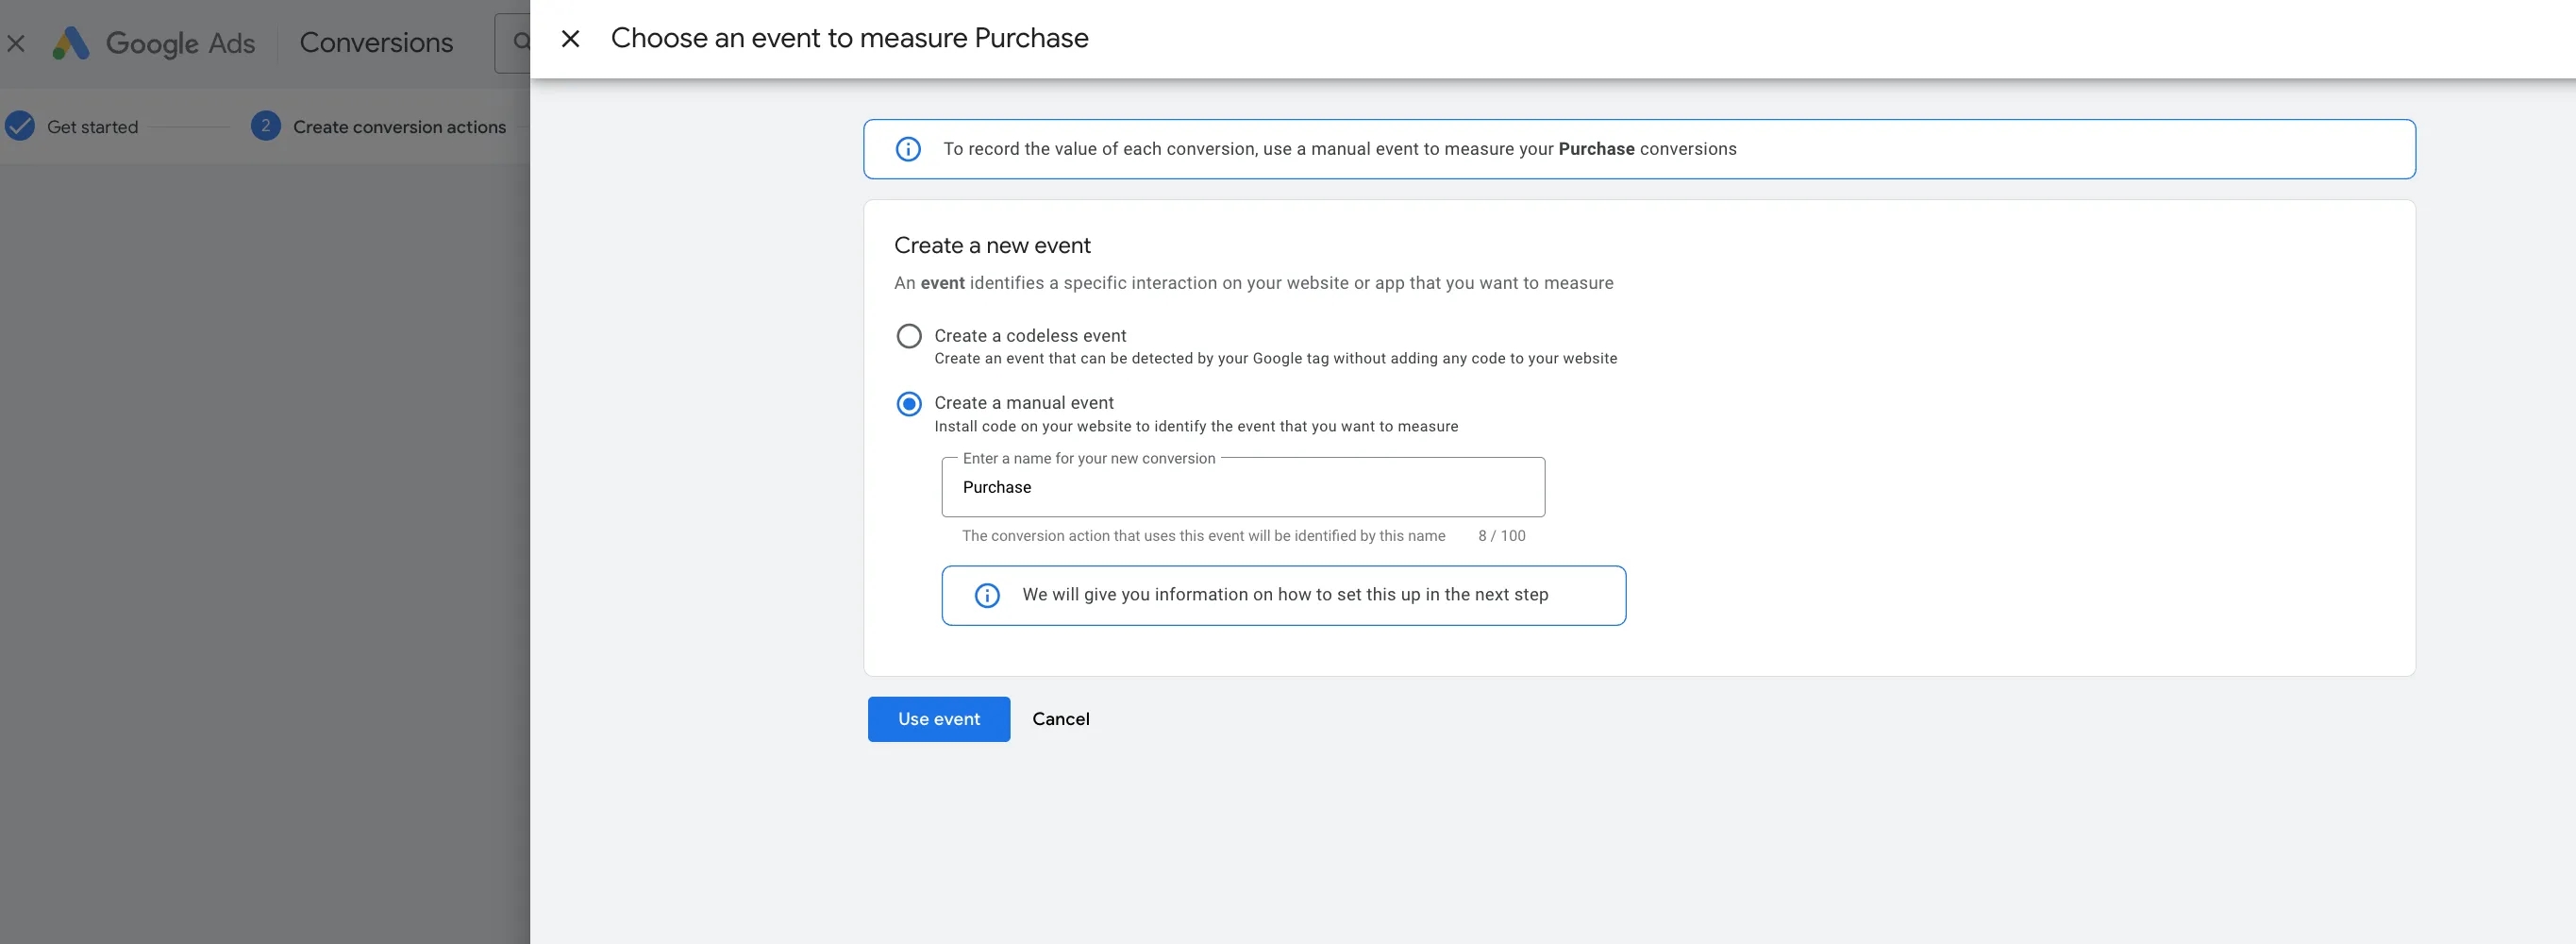
7. After creating the event, you will return to the previous screen with the parameters of the configured setup. Click “Save and continue.”
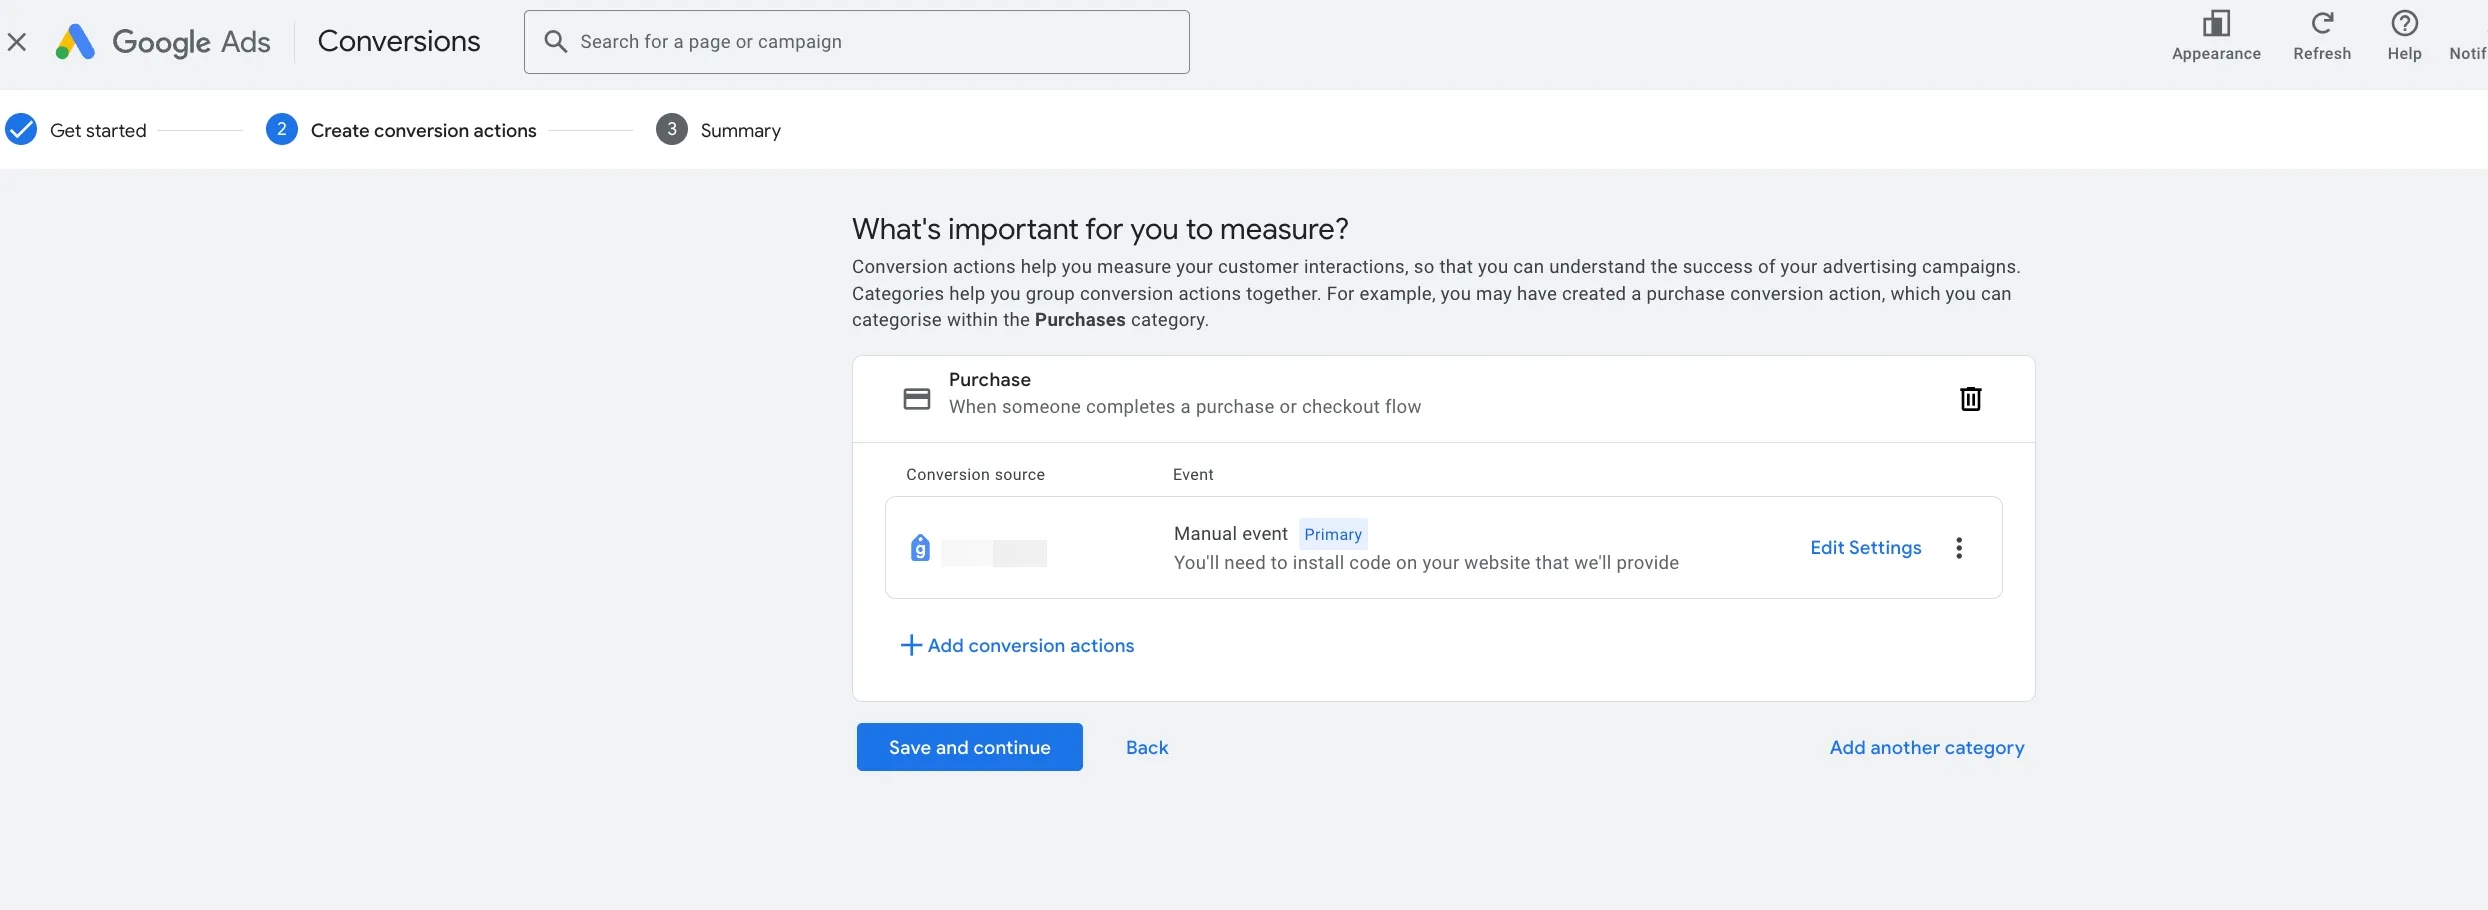
Next, you will see the final settings, which you are already familiar with from the previous version of the interface. In the Google Tag Manager tab, you can immediately copy the Conversion ID and Conversion Label. After this, click “Finish.”
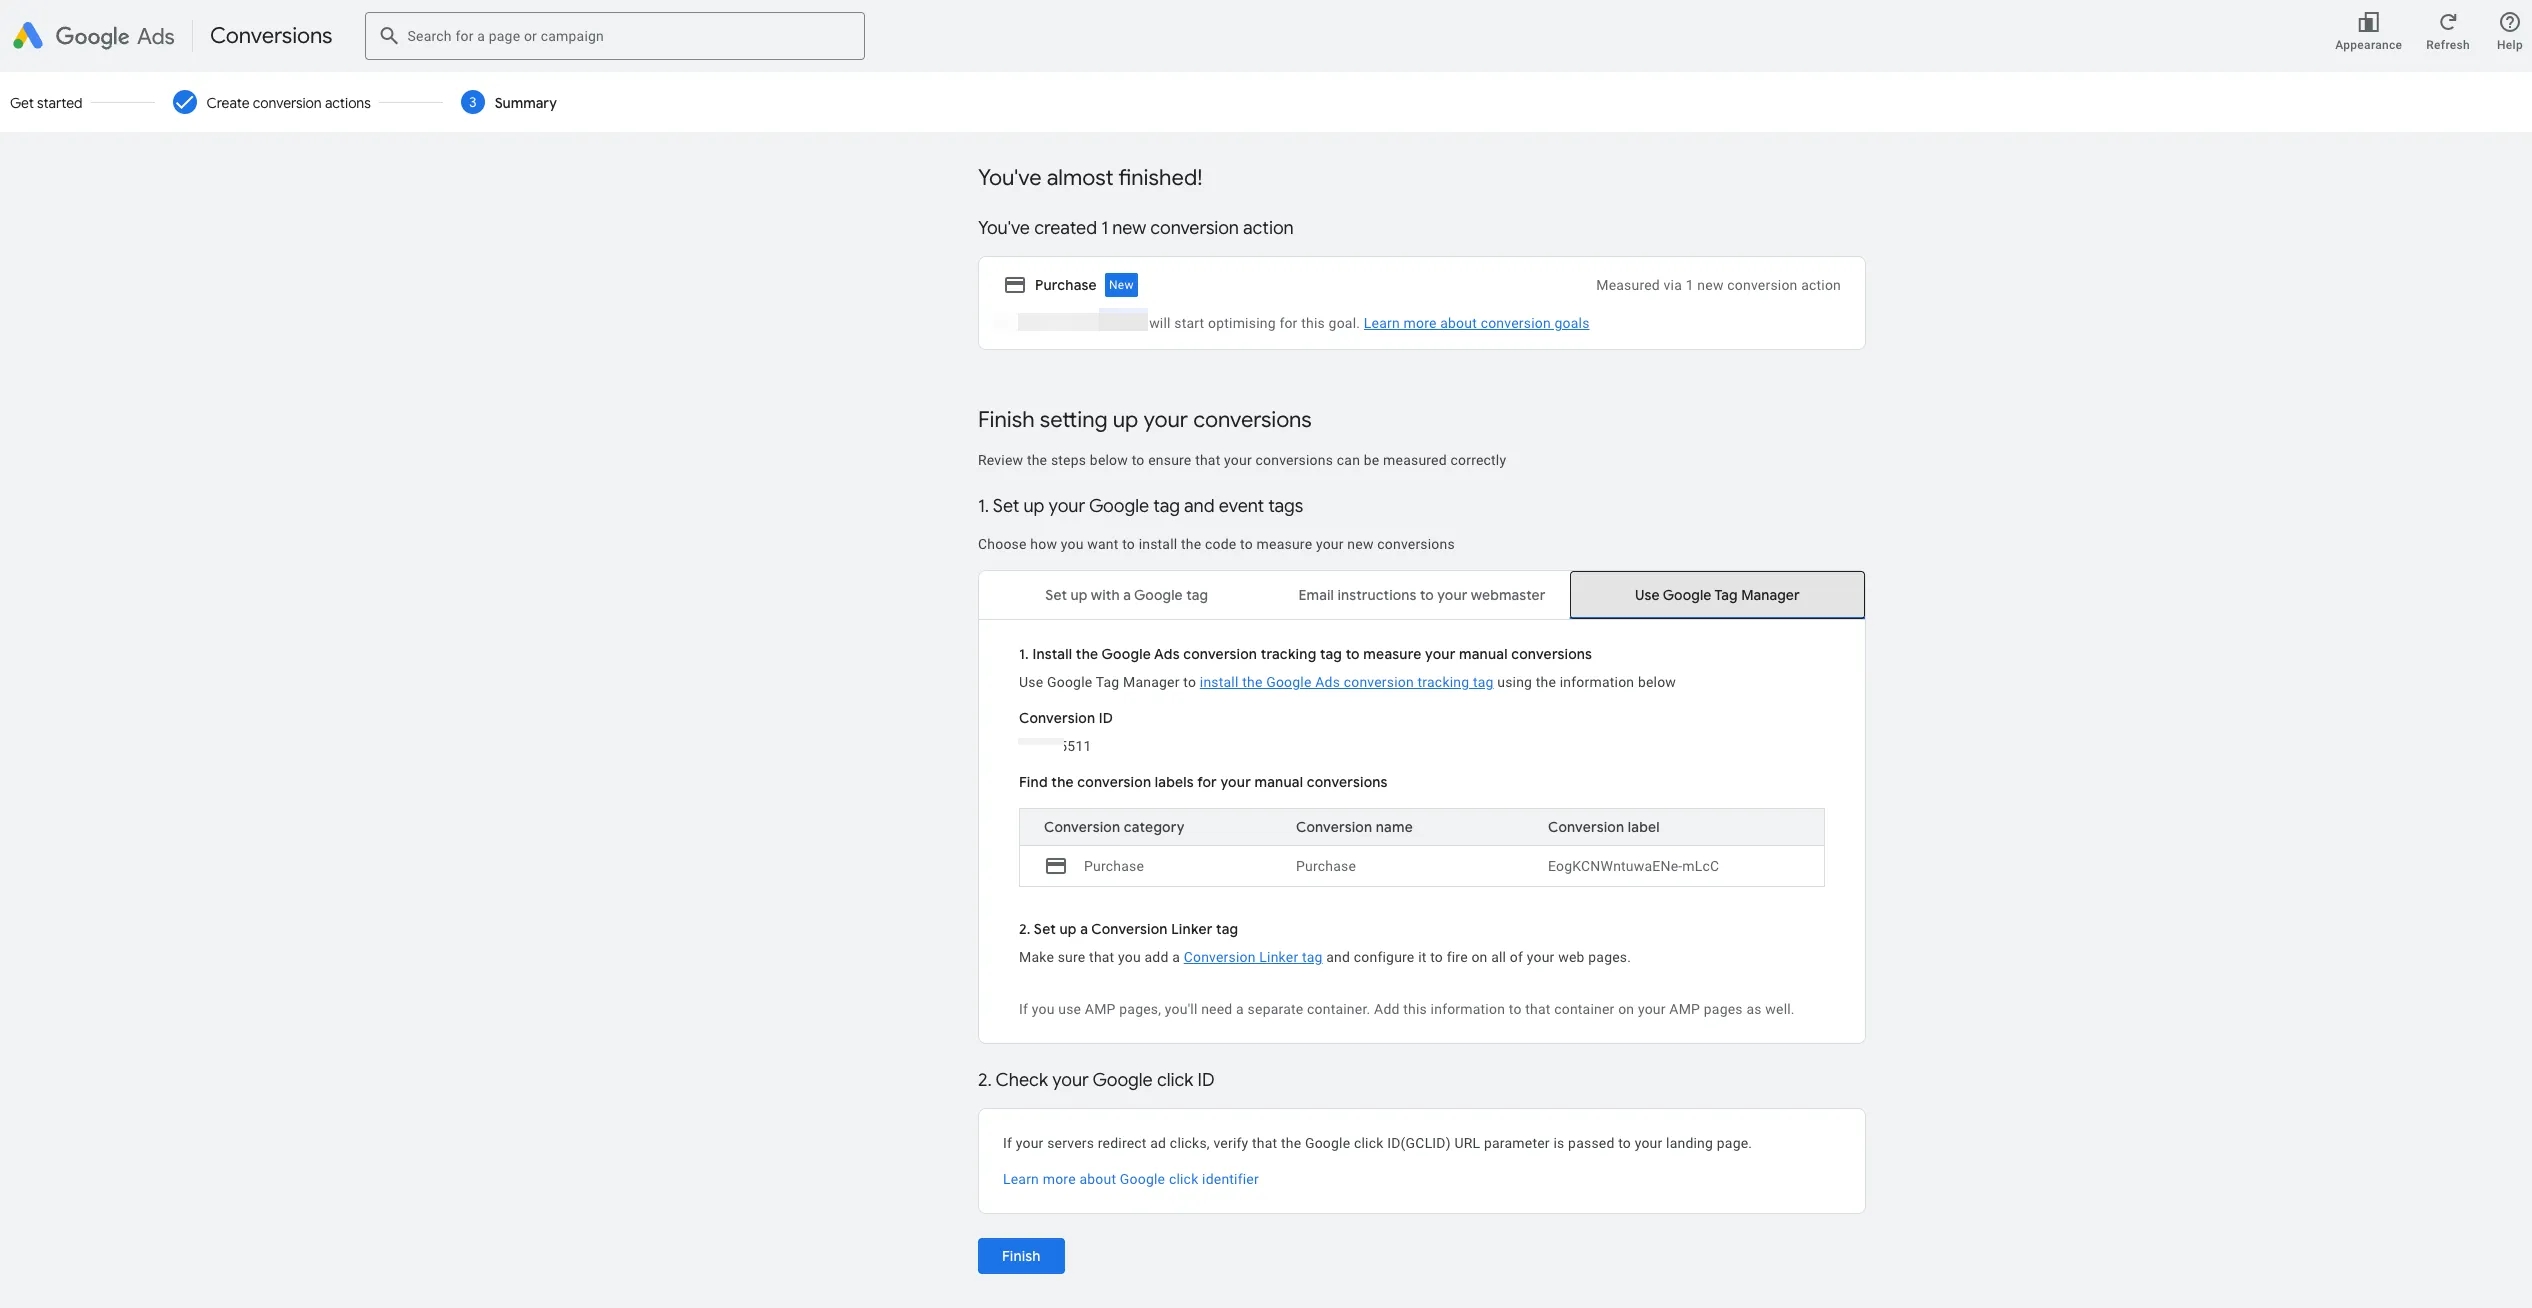
The conversion has been created. The “Conversion window,” “Value,” “Count,” and other parameters that we discussed earlier can be adjusted in the settings of the conversion itself after it is created. It will appear in the general list of conversions in your Google Ads account.
Setting up Purchase Events in Tag Manager
- We start the setup similarly to what is described in the section on Setting Up Form Submission Tracking in Tag Manager, the process for form submission: we create a tag of type Google Ads Conversion Tracking and enter the Conversion ID and Conversion Label data that you received during the creation of the conversion in the ad account.
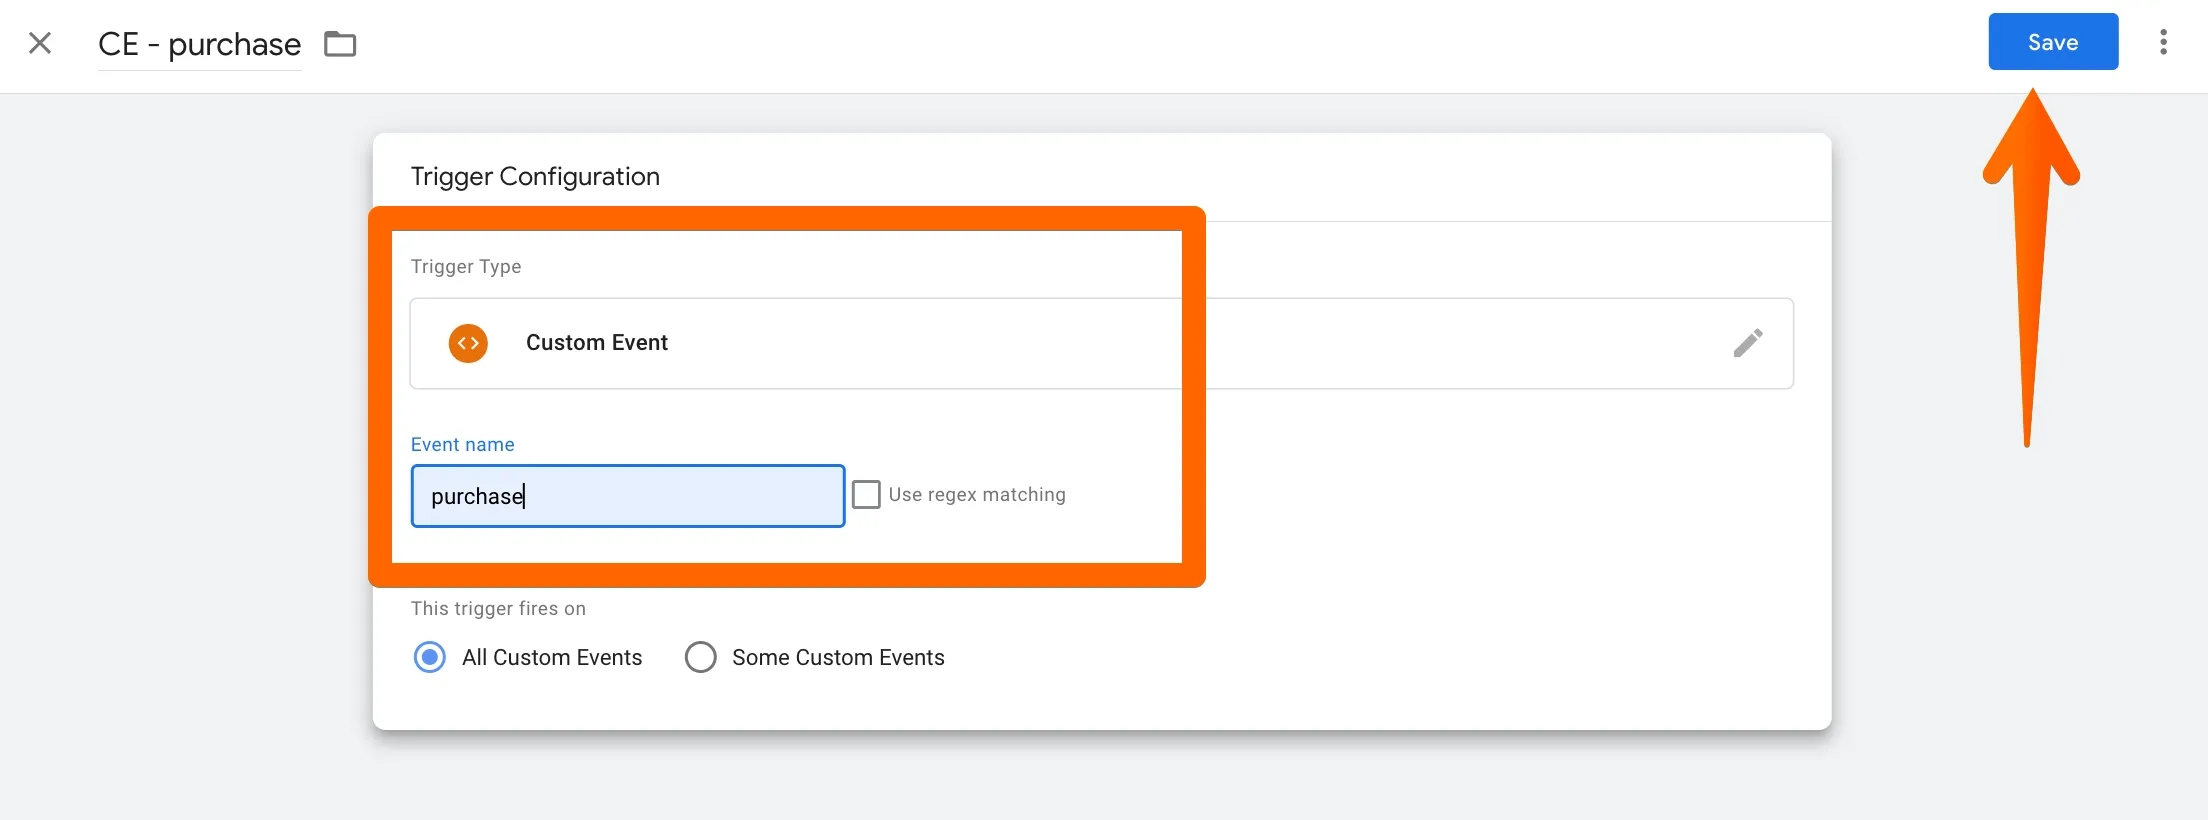
- Next, we switch to preview mode and perform a test purchase. On my site, the developer implemented the dataLayer.push purchase event according to the official Google Analytics 4 documentation on measuring e-commerce. We can see the data from the dataLayer level in the corresponding tab. This is what we will use going forward.
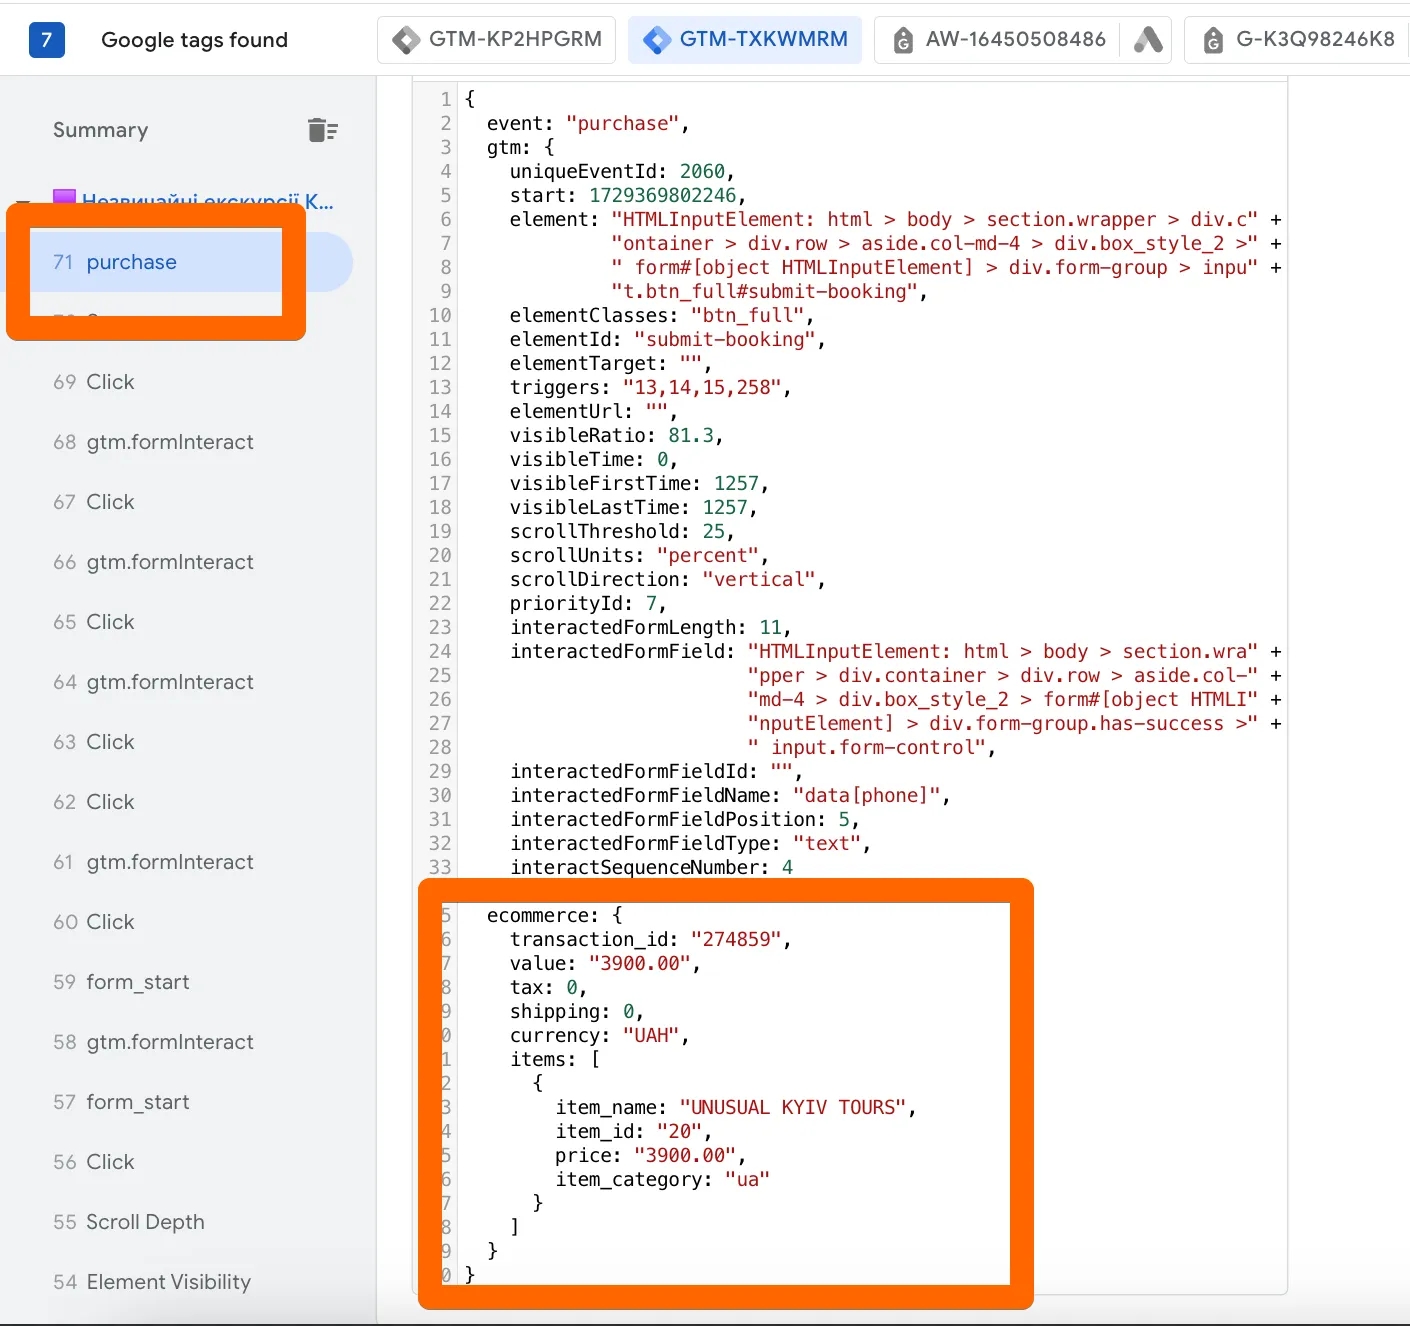
It is worth noting that setting up Ecommerce for Google Analytics is a separate large topic. If you are not familiar with this process, I recommend reading the official documentation here (Measure ecommerce | Google Analytics).
In short, to track the purchase event, you can use the following code, which correctly sends transaction data to Google Analytics, and from which data can be taken for tracking conversions in Google Ads, as in my example:
dataLayer.push({ ecommerce: null }); // Clear the previous ecommerce object.
dataLayer.push({
  event: "purchase",
  ecommerce: {
    transaction_id: "T_12345", // Unique transaction identifier
    value: 72.05, // Total purchase value
    tax: 3.60, // Taxes
    shipping: 5.99, // Shipping cost
    currency: "UAH", // Currency
    coupon: "SUMMER_SALE", // Discount code
    items: [
      {
        item_id: "SKU_12345", // Product identifier
        item_name: "Stan and Friends Tee", // Product name
        affiliation: "Google Merchandise Store", // Store
        coupon: "SUMMER_FUN", // Discount code for the product
        discount: 2.22, // Discount
        index: 0, // Product order in the list
        item_brand: "Google", // Brand
        item_category: "Apparel", // Product category
        item_category2: "Adult", // Subcategory
        item_list_name: "Related Products", // Product list
        item_variant: "green", // Product variant
        price: 10.01, // Price per unit
        quantity: 3 // Quantity
      },
      {
        item_id: "SKU_12346", // Product identifier
        item_name: "Google Grey Women's Tee", // Product name
        affiliation: "Google Merchandise Store", // Store
        coupon: "SUMMER_FUN", // Discount code for the product
        discount: 3.33, // Discount
        index: 1, // Product order in the list
        item_brand: "Google", // Brand
        item_category: "Apparel", // Product category
        item_category2: "Adult", // Subcategory
        item_list_name: "Related Products", // Product list
        item_variant: "gray", // Product variant
        price: 21.01, // Price per unit
        promotion_id: "P_12345", // Promotion identifier
        promotion_name: "Summer Sale", // Promotion name
        quantity: 2 // Quantity
      }
    ]
  }
});
Please note, this solution will work only if the purchase event is configured to be sent to GA4 on the site.
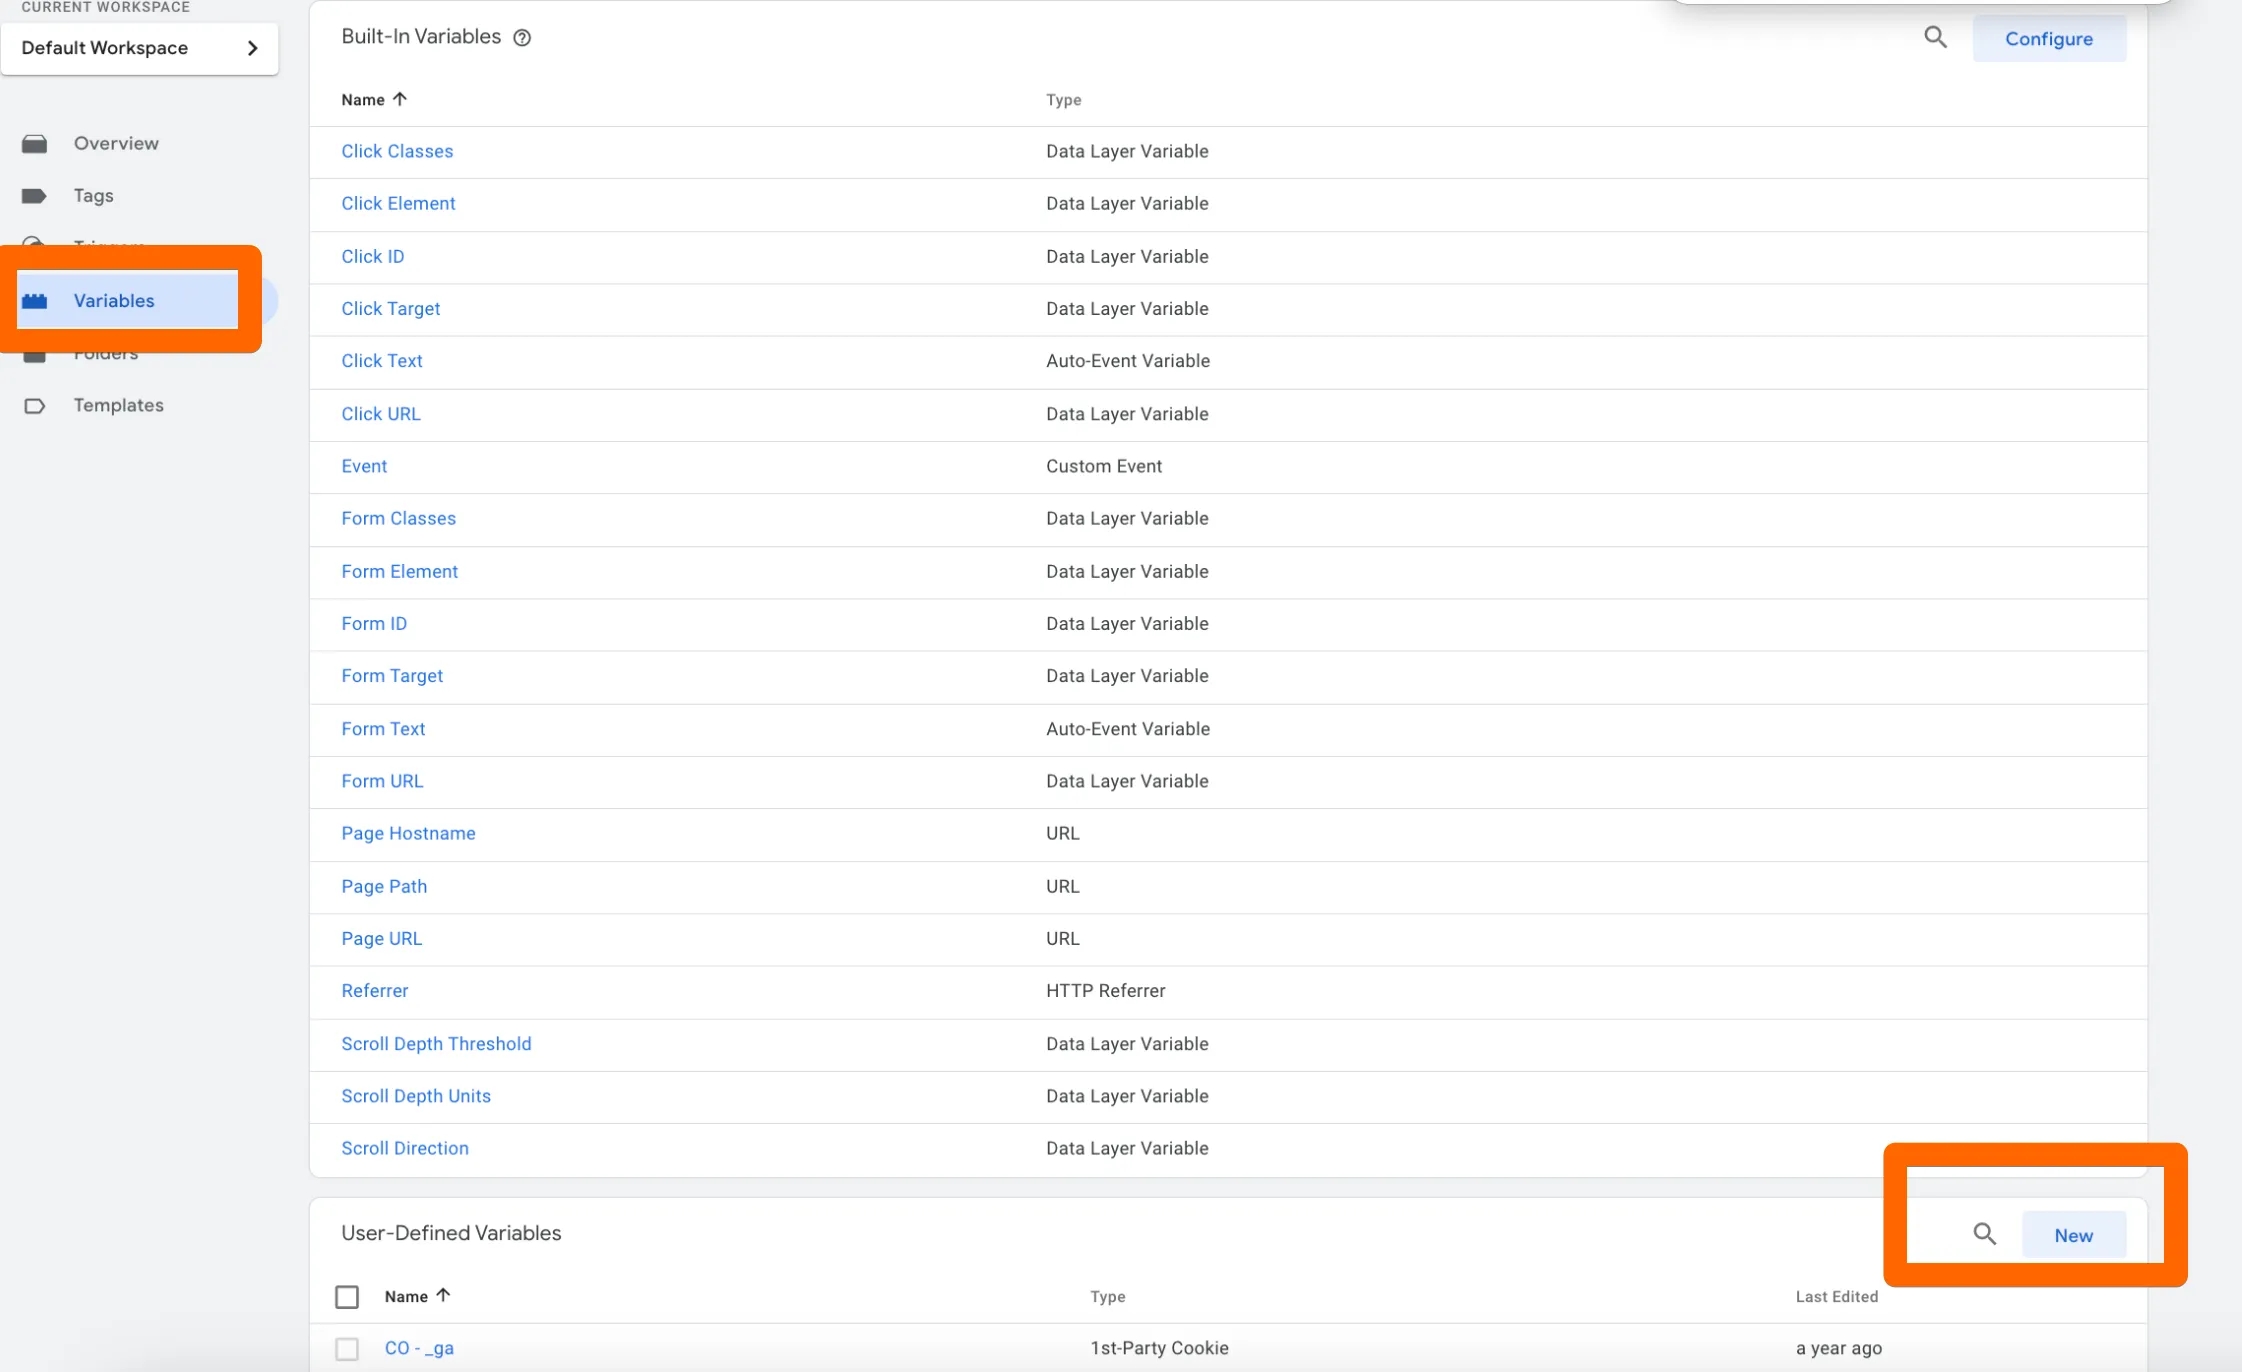
3. Next, go to the Variables menu and click New to create a new variable.
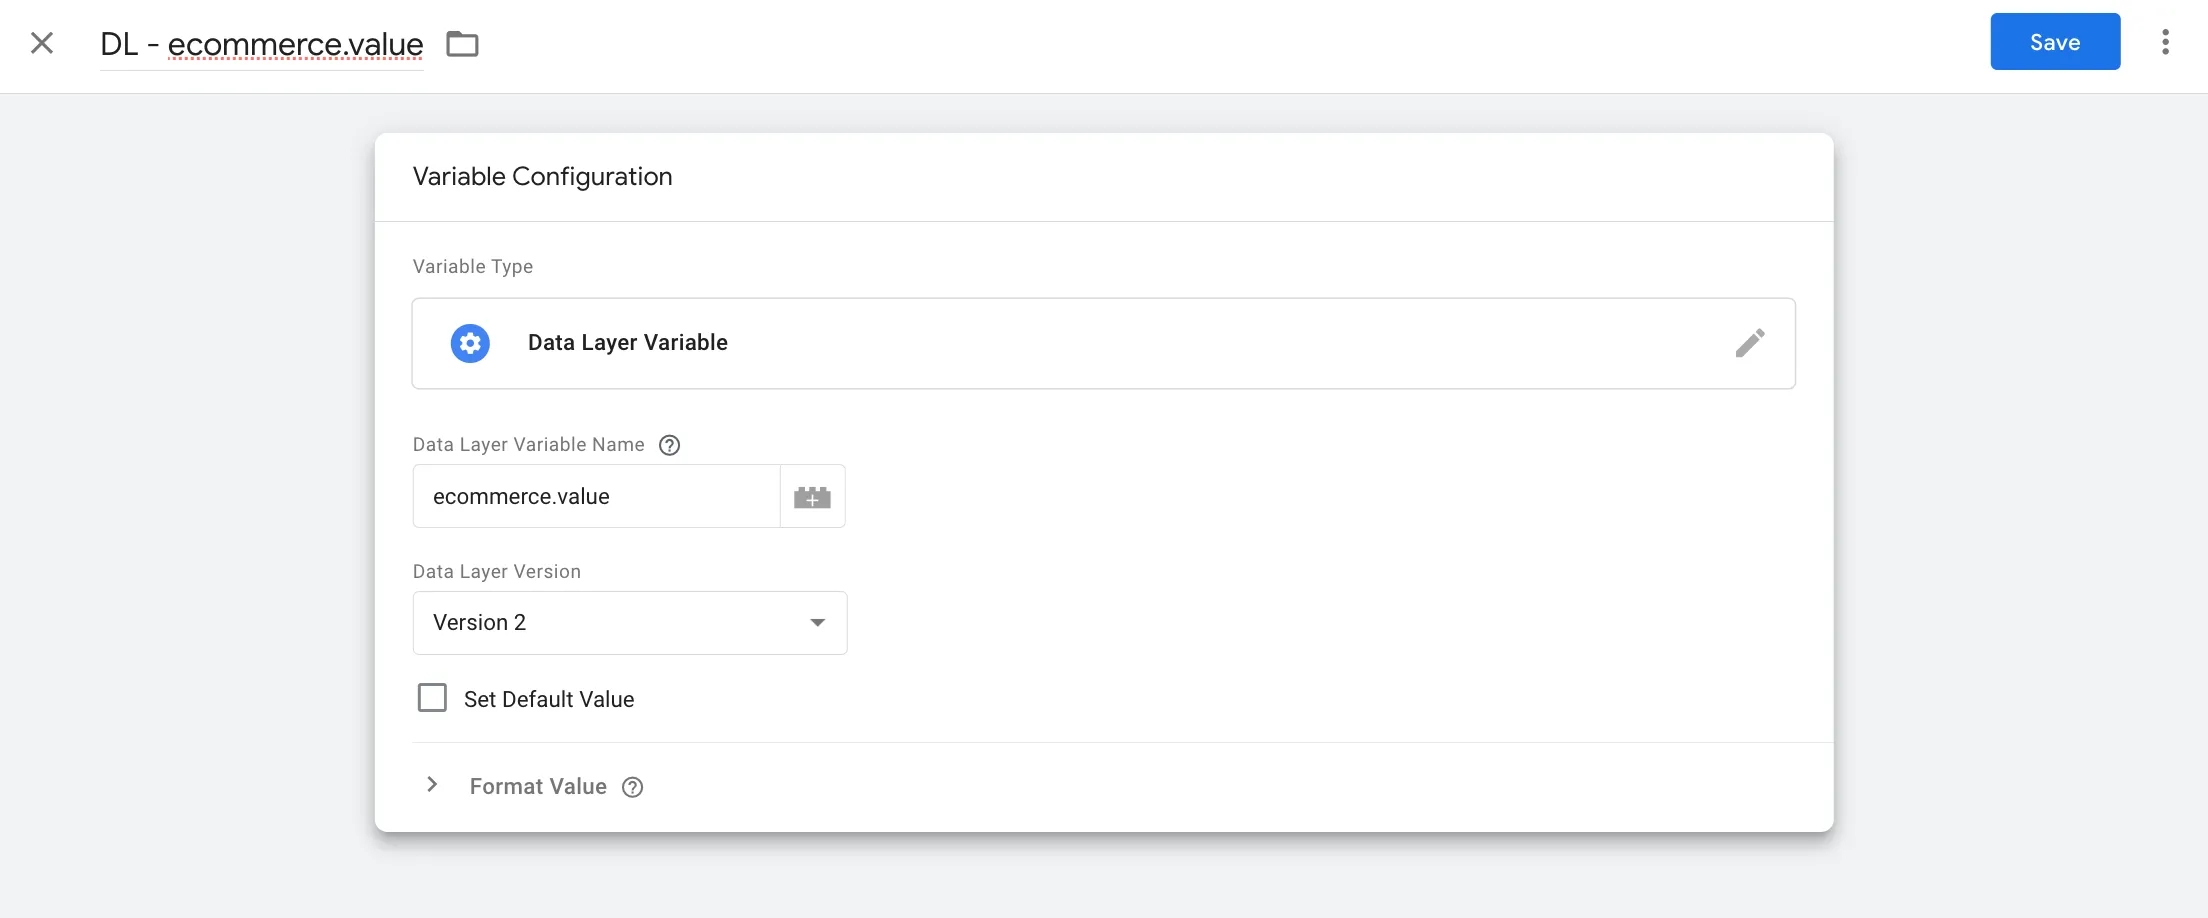
- Create a new Data Layer variable and enter the key name stored in the data layer:
ecommerce.value. This way, we will obtain the value of the purchase.
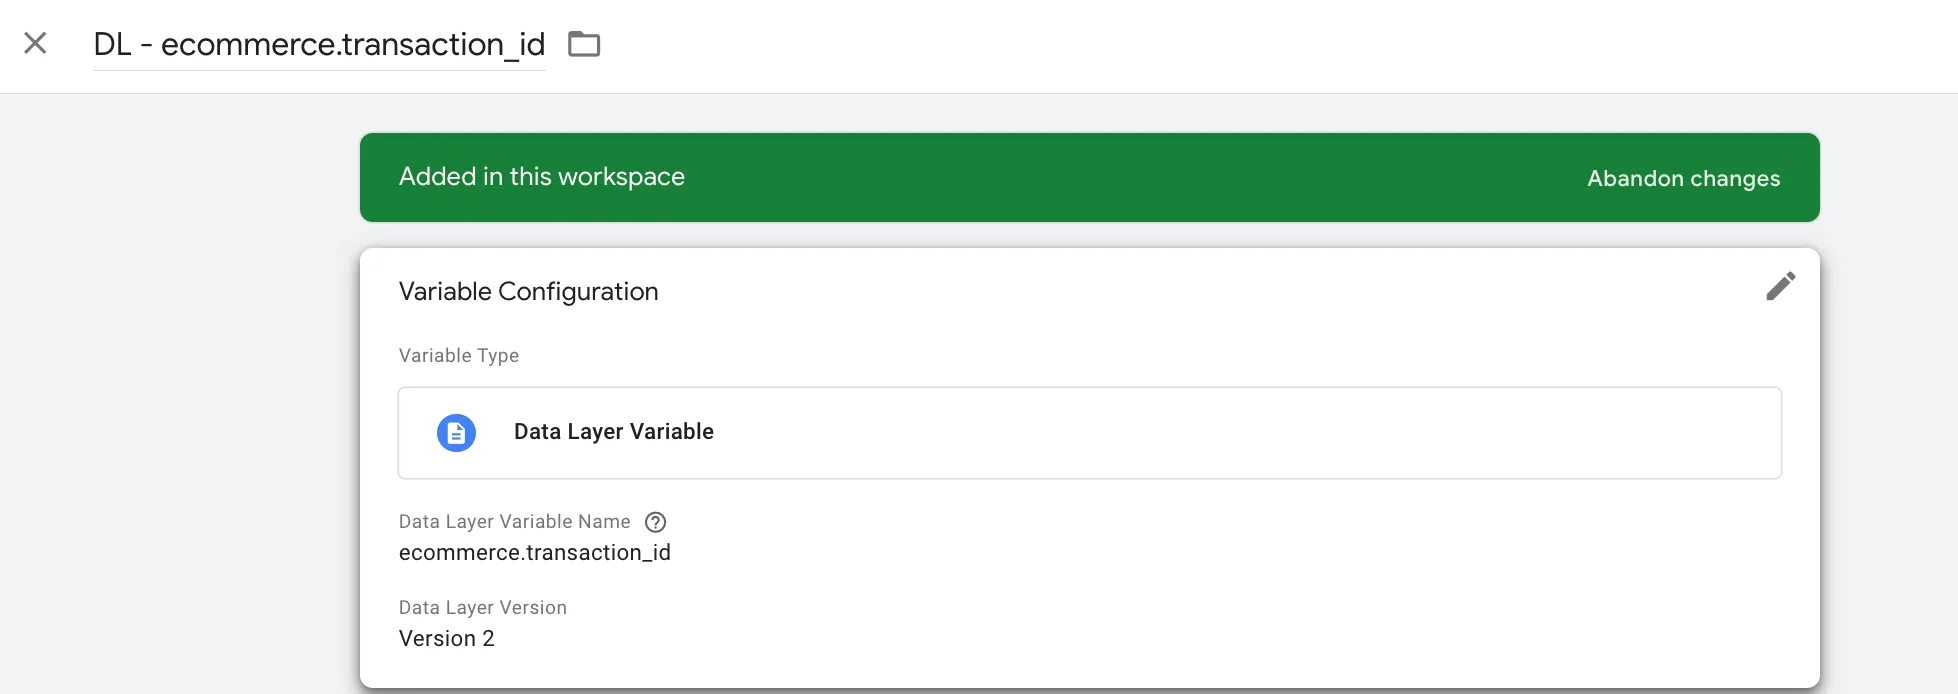
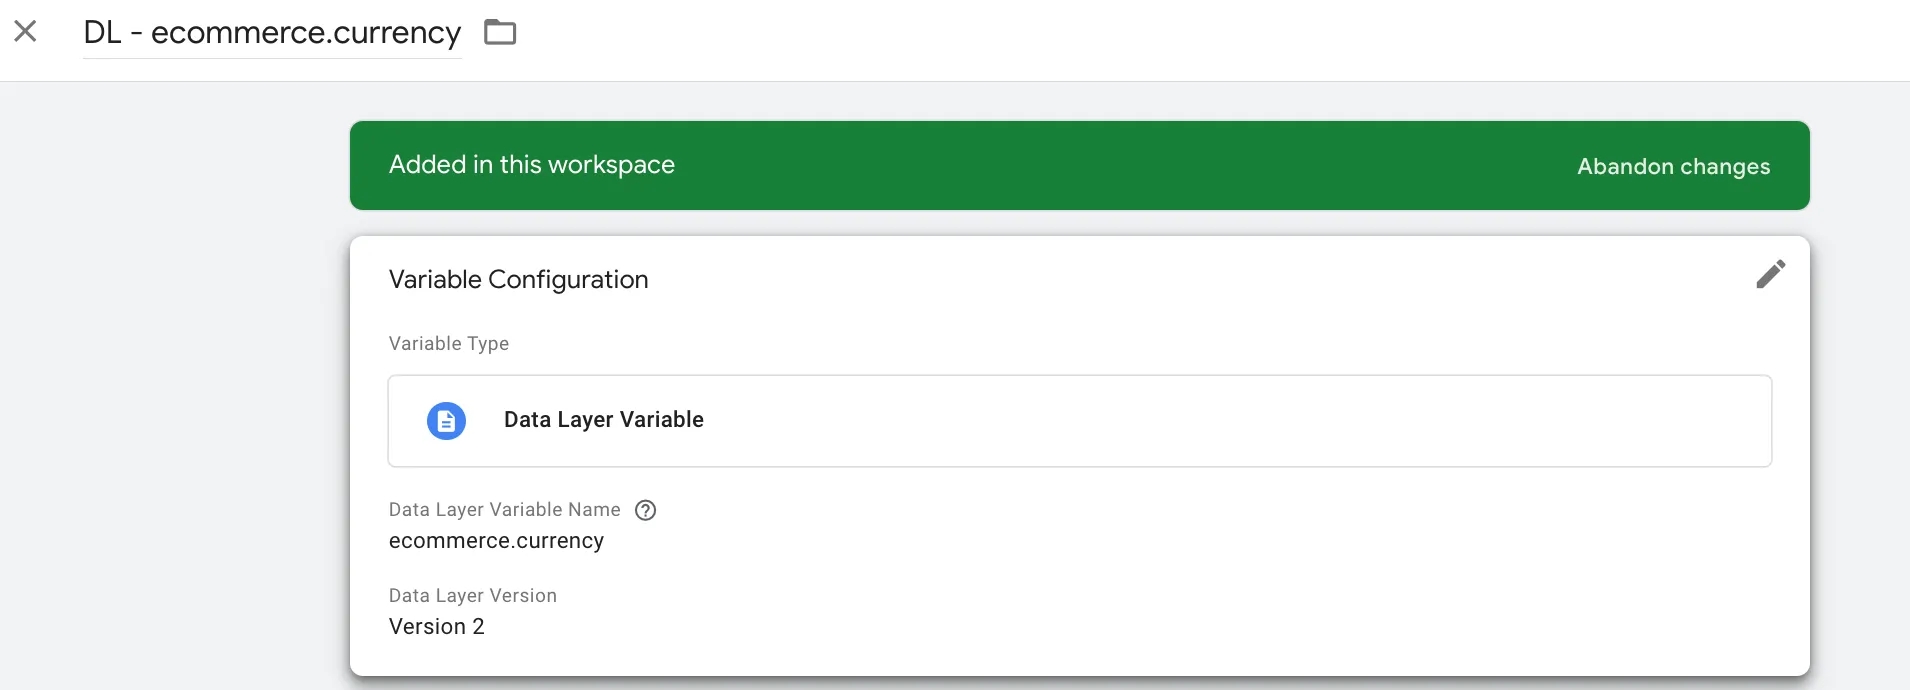
- In a similar manner, create two more variables: one for the transaction ID (to prevent transaction duplication) and another for the currency. The key names will be:
ecommerce.transaction_idandecommerce.currency.
4. Return to the Google Ads Conversion Tracking tag and add the newly created variables in the corresponding fields.
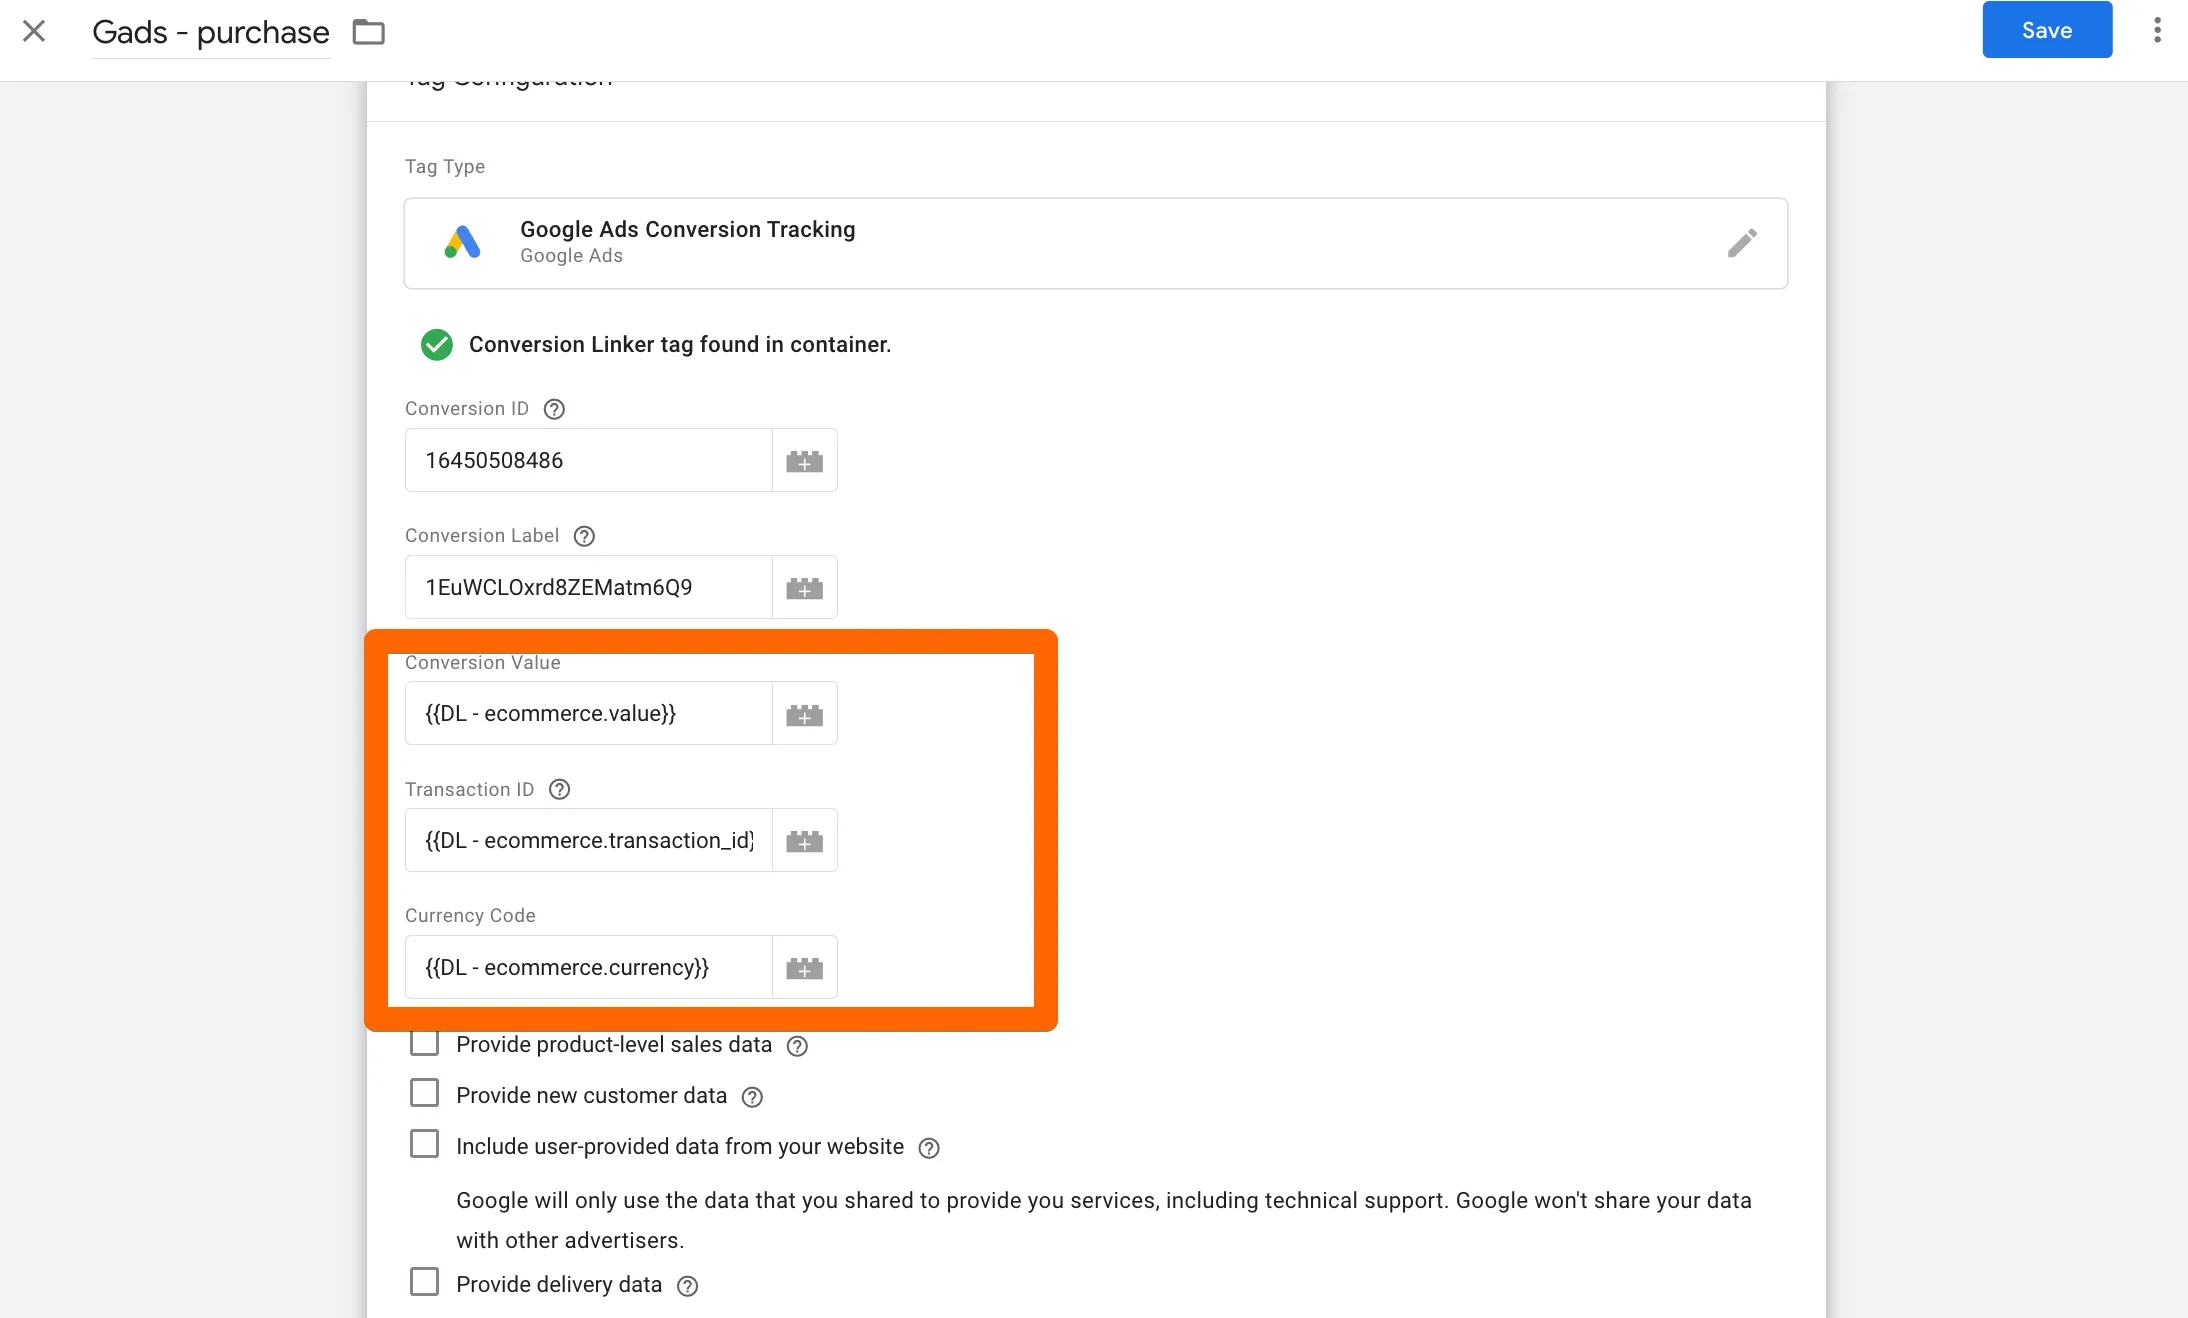
5. Lastly, you need to add the purchase trigger.
- To do this, you can go to the Triggers menu, as we did during the form setup, or directly within the tag setup, click on Choose a trigger and add a new trigger by clicking the “+” sign.
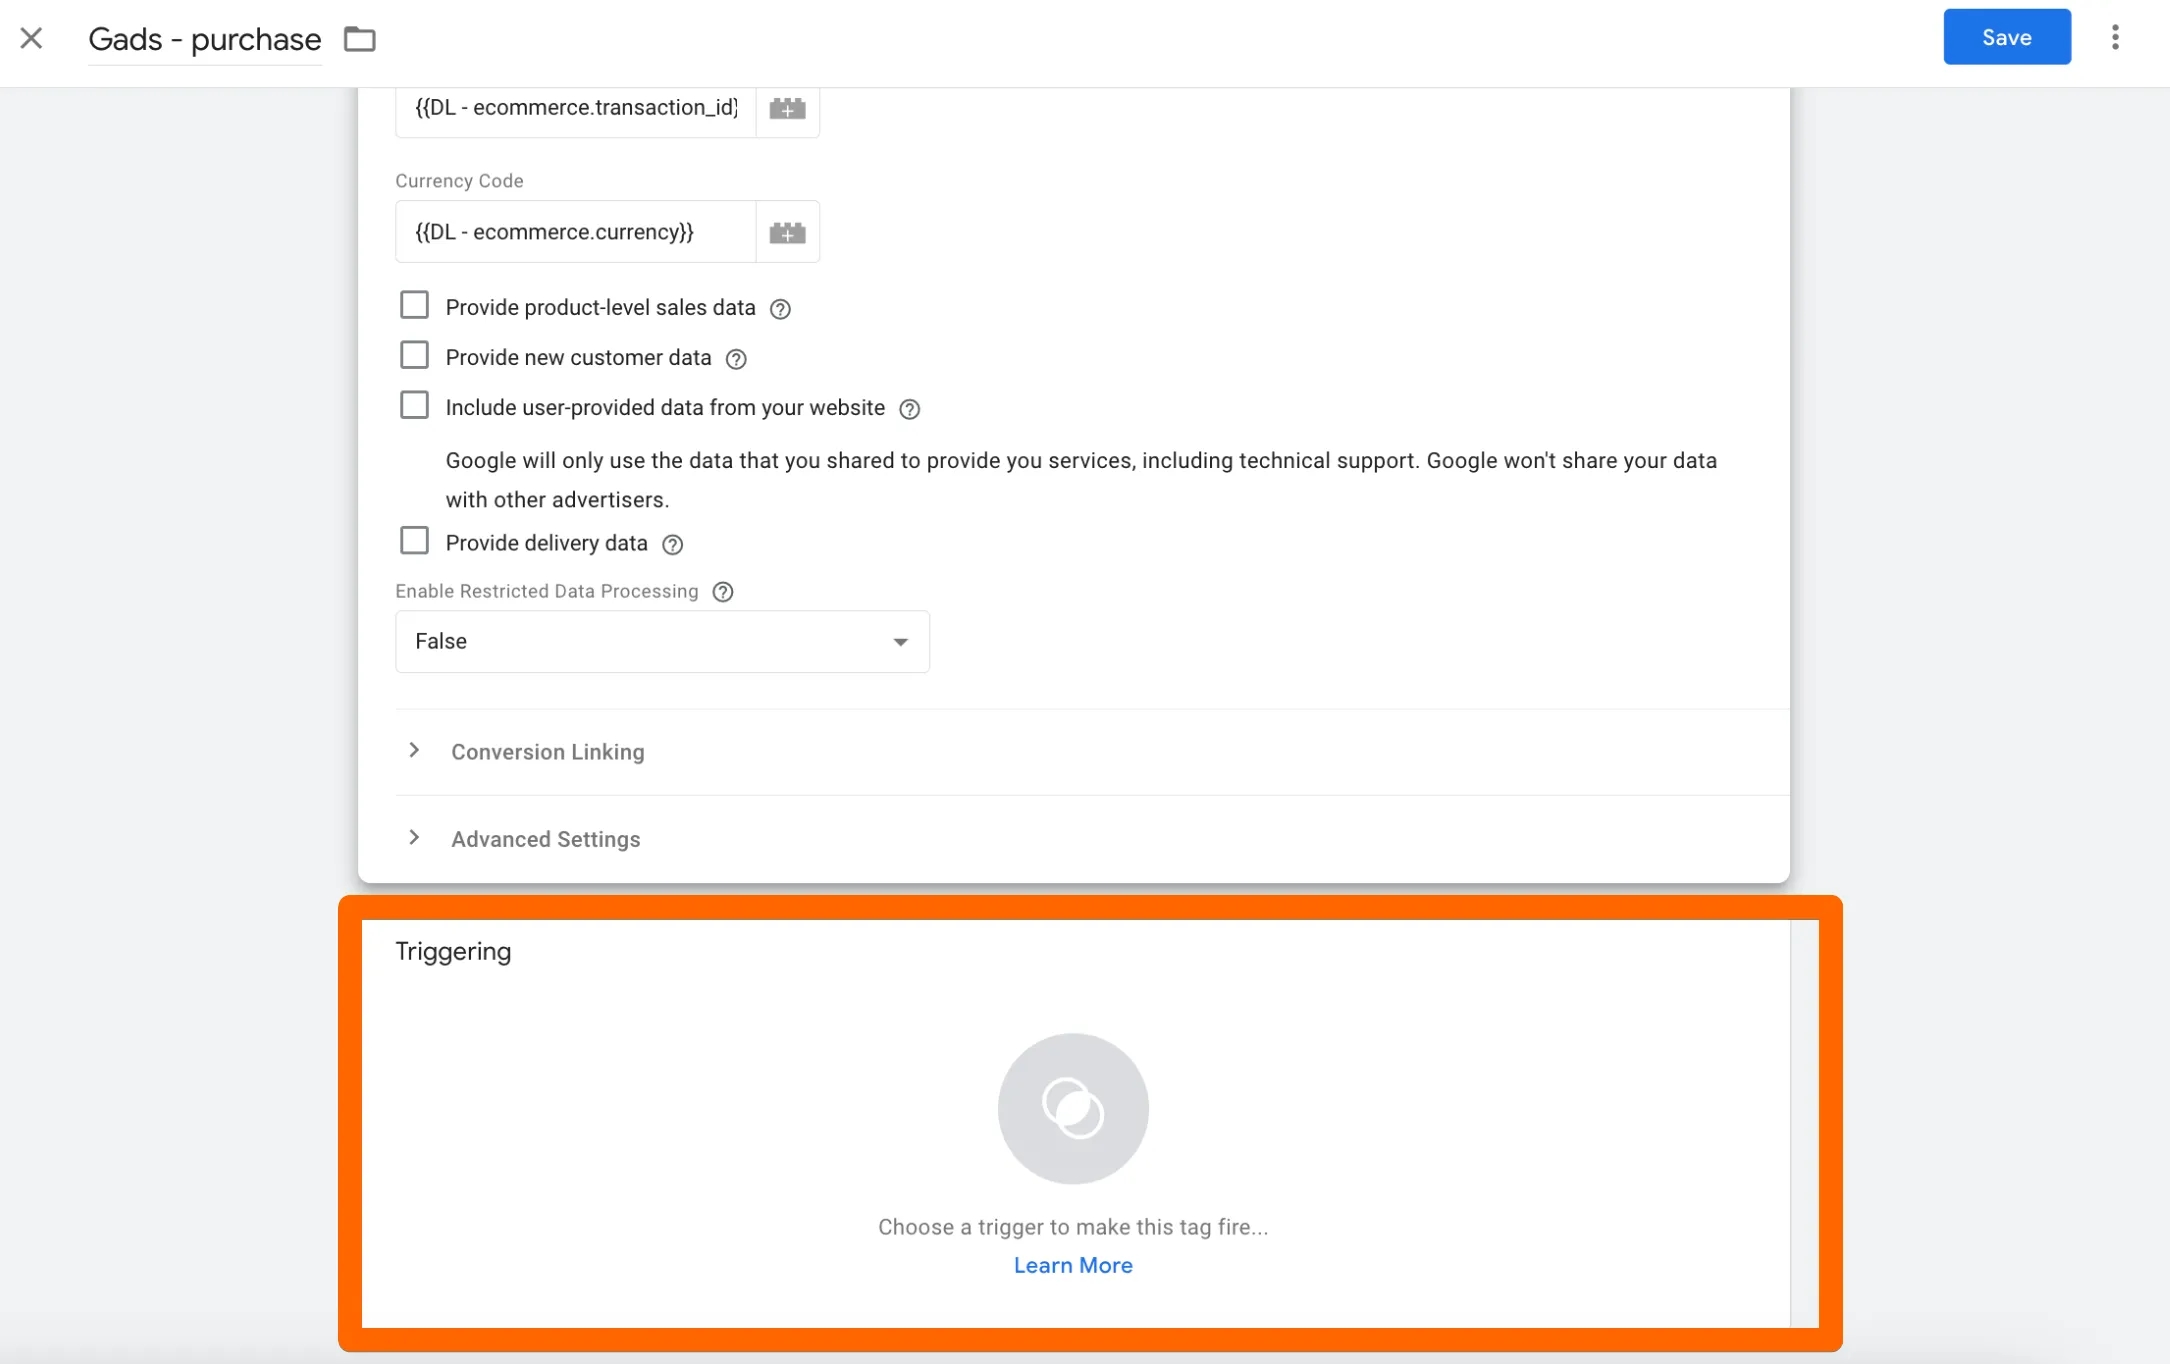
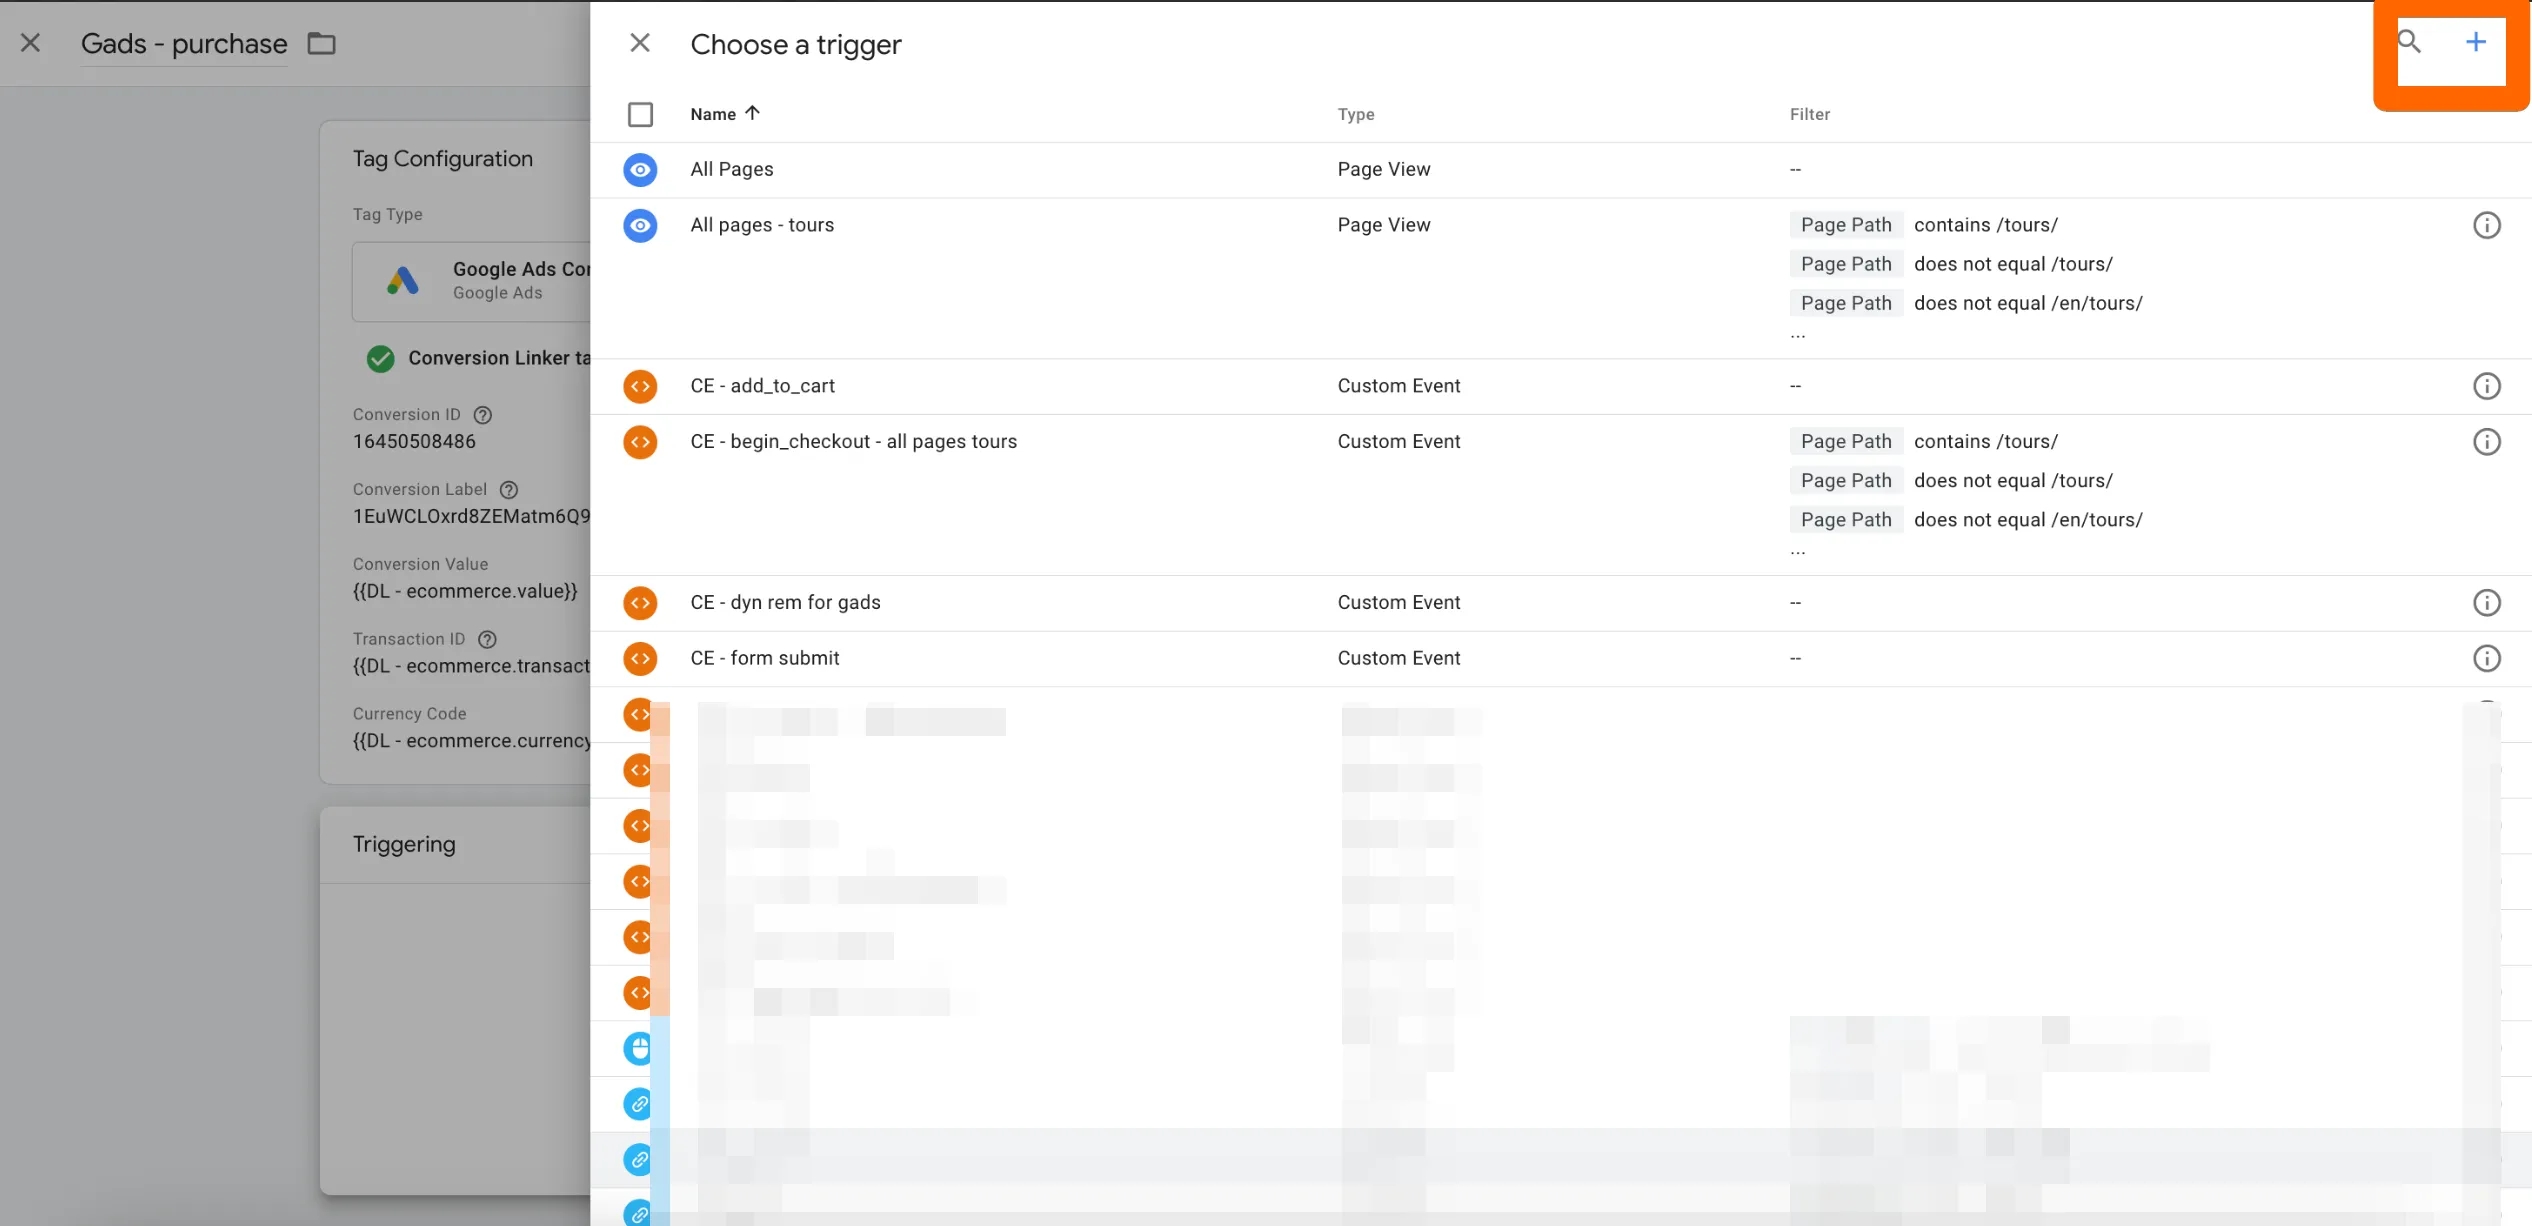
- Create a Custom Event trigger according to the data stored in the Data Layer, as we saw in step 2. Don’t forget to save the trigger.
6. Check if the tag works in preview mode, similar to how it was described for form submission. Additionally, click on the tag and check if it contains the data that should be transferred with our variables: value, currency, and transaction ID.
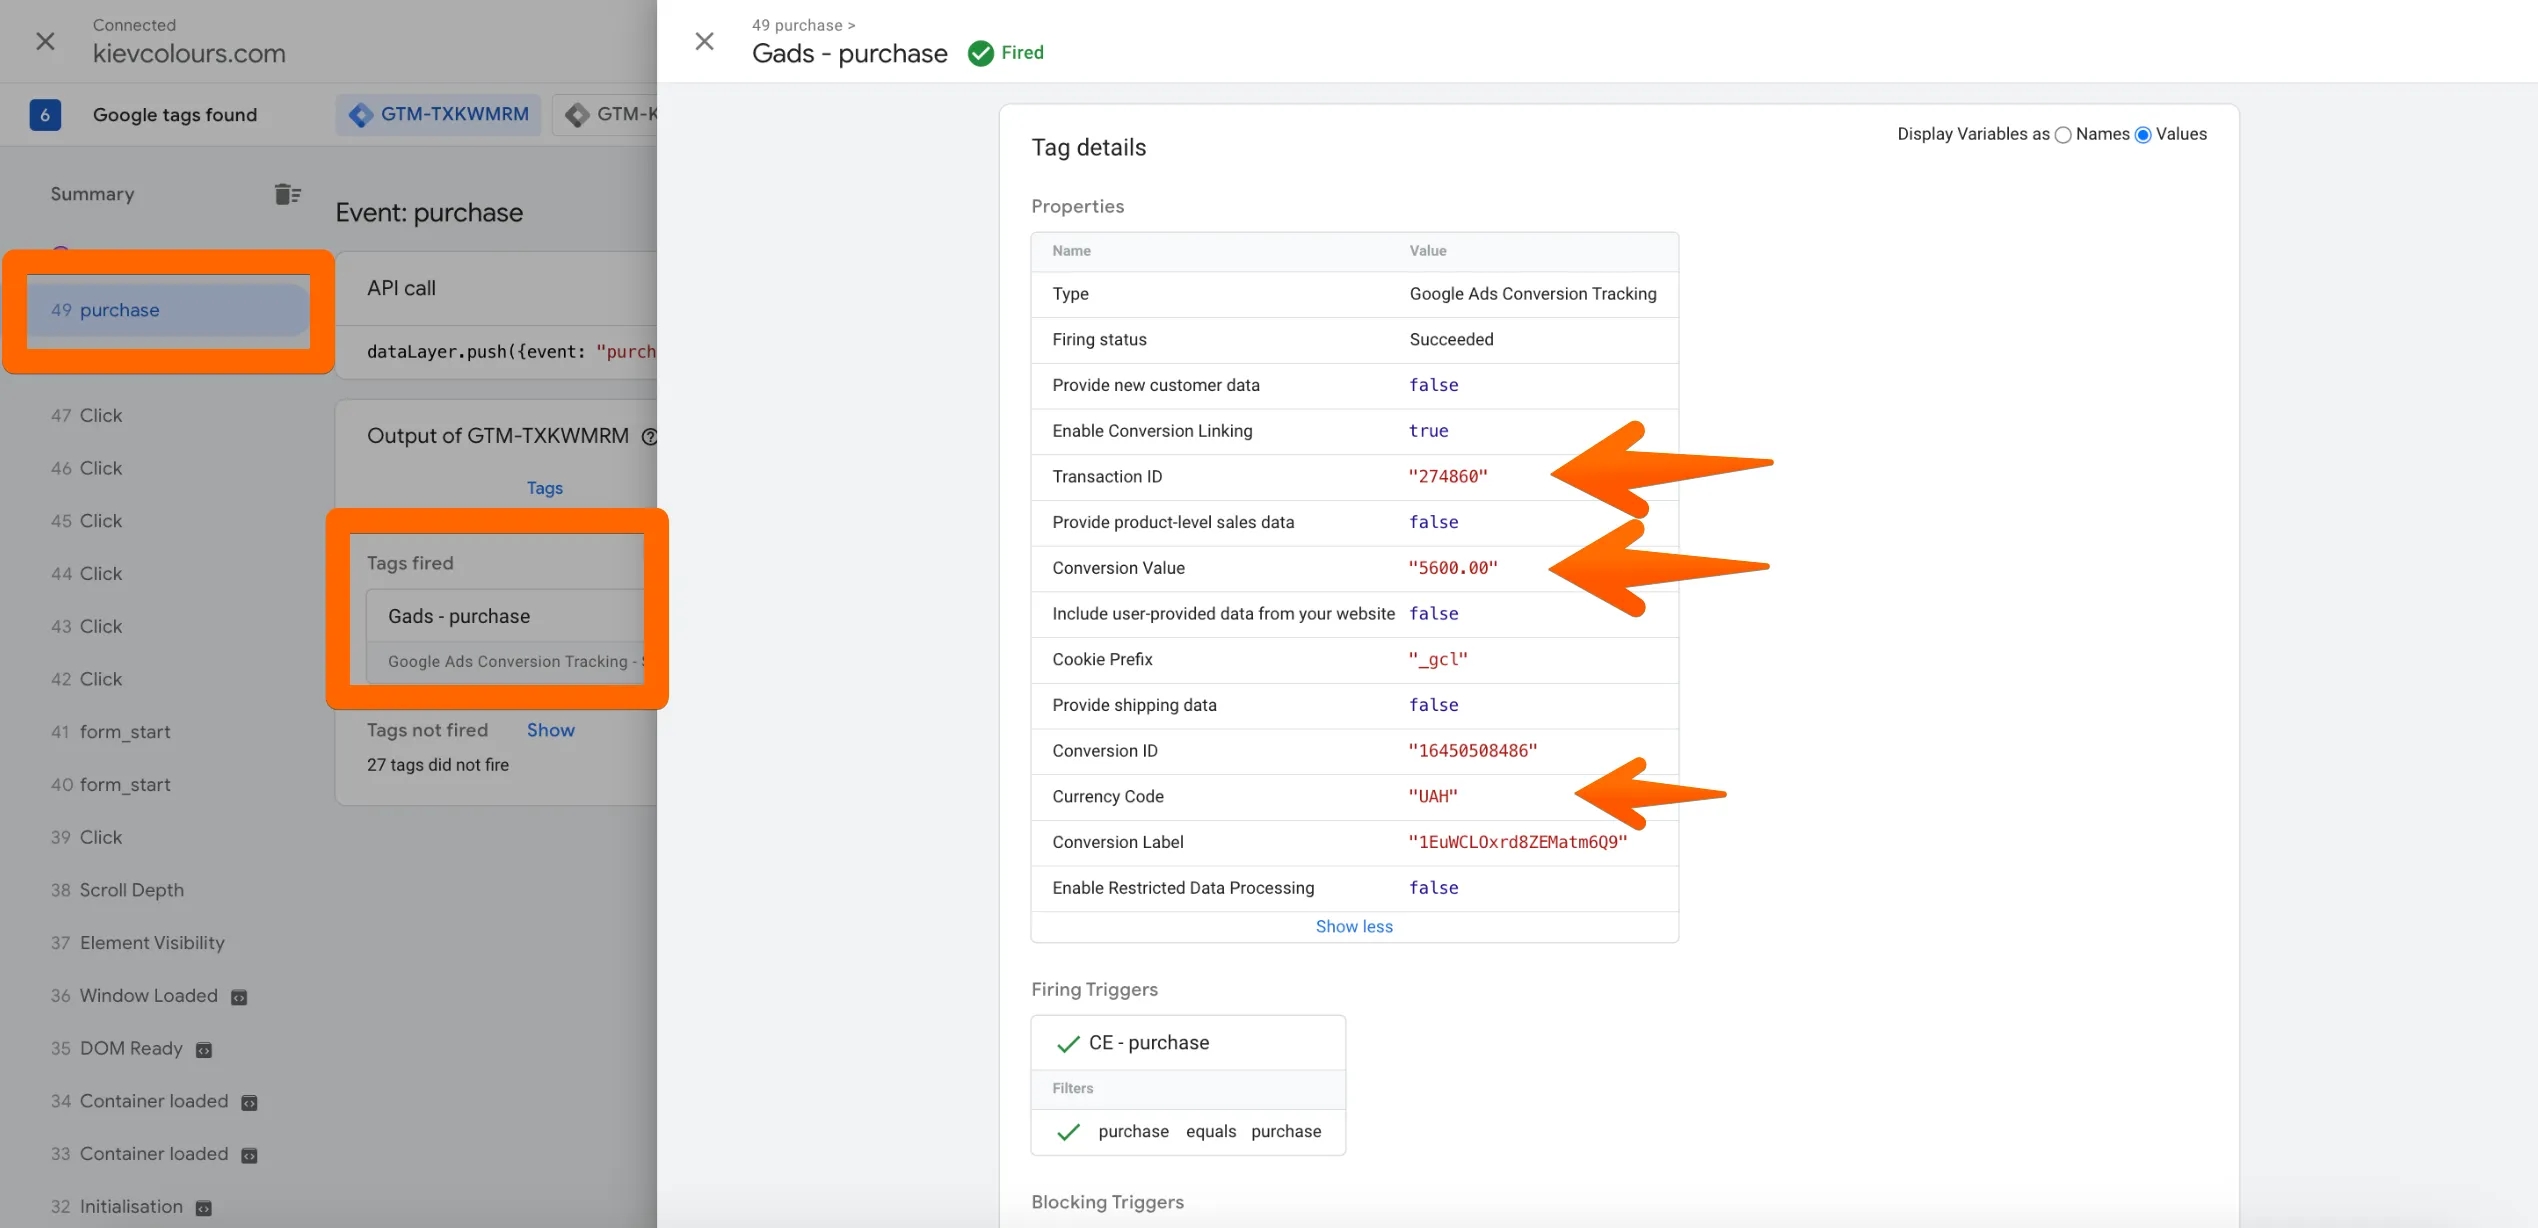
If you don’t see the data that should be collected by the variables created in the previous steps, check the spelling of their names. If everything is correct, then perform another check to confirm that the data has been sent to Google Ads (see section 6 in the Setting Up Form Submission in Tag Manager). Once you’ve ensured that the setup is correct, don’t forget to publish the container.
In conclusion
As you can see, using Tag Manager (GTM) makes it easy to integrate events, such as form submissions or purchases, without the need for complex programming and to send the corresponding conversions to Google Ads for further optimization of advertising campaigns and improving their effectiveness.
In this article, I have tried to thoroughly cover the setup process in both the ad account and Tag Manager. It is also important to check that the tags are working properly and analyze the collected data for further refinement of the advertising strategy. I hope these step-by-step instructions will be useful for you in setting up effective campaigns in Google Ads. I wish you success!
Loading comments…