
The article`s concept is simple and elegant: we send an engagement event (the name can be arbitrary) to GA4 when a user spends X amount of time on an active tab and scrolls the page down to Y%. In Universal Analytics, this method helped accurately measure the bounce rate, especially for single-page websites.
GA4, in turn, has improved the engagement metric and does not consider visiting a single page as a bounce if the person spends more than 10 seconds on it. Technically, in standard reports, the engagement metric takes priority over the bounce rate, though these are simply mirror-opposite metrics. GA4 also "cares" that if 10 seconds is too short a time for you to consider that a user meaningfully interacted with the content (which is too short for anyone, really), you can change this duration in the settings. However, this setting still applies at the session level and does not indicate with which specific page the user had "quality" interaction.
Thus, the method described below will help understand the number of "quality" interactions for each page separately. You determine the quality criteria by specifying the percentage of vertical scrolling and the minimum time the user must spend on the page.
SPA (single-page application) is essentially a browser-based application. Unlike "traditional" websites, it loads content in the background. When navigating to other "pages," standard page loading does not occur. Therefore, for GTM, it's as if you stay on the same page. Page transitions can be "seen" by a history change trigger, but this does not help properly process a scroll trigger. I will explain why later in the article.
This article also aims to demonstrate how you can adapt an online solution to your specific task if, for some reason, the solution doesn't suit you. Moreover, such an adaptation doesn't require you to be a developer. Basic knowledge and the ability to explain to GPT what you need is enough. This solution involves writing some JavaScript functions, but don't worry. I'll show you that it's not complicated, and after completing the PRO GTM course, it's actually quite simple. We'll delegate the most complex part to GPT itself.
Today's article plan:
Details about the purpose of the configuration
At the beginning of this article, I briefly touched upon what this configuration allows you to track. The original idea was about the proper bounce rate metric in Universal Analytics. However, in GA4, the definition of a bounce or an engaged session is slightly different. Specifically, an engaged session is defined as a session where a person viewed two or more pages, performed a key event, or the session duration exceeded the time set in the Adjust timer for engaged sessions.
Our configuration, in turn, does not aim to impact the bounce rate metric. Its goal is different: to understand whether users are interacting with our content and, if so, with which specific content.
In fact, GA4 has made a significant step forward in tracking interactions with a website. Such events as user_engagement and scroll are automatically tracked. Let’s take a closer look at these events:
user_engagementis an automatic event sent when the page unloads. There are other moments when it can be sent, but they are not relevant here. Unloading happens when you either close the tab/browser or when you navigate to another page on a "traditional" website. [Help]scrollis another automatic event sent when the user scrolls down to 90% of the page. [Help]
In my opinion, neither of these events indicates actual interaction with the content. For instance, the user_engagement event can be sent even if the person didn’t look beyond the initial screen of the page. The scroll event at 90% can trigger simply if the user quickly scrolled all the way to the bottom of the page without paying much attention.
In this configuration, we can set a criterion for triggering based on two simultaneous conditions. In my case, I consider interaction as spending 40 seconds on the active tab and scrolling halfway down the page.
Scrolling to 50%
If you have a "traditional" website, you only need to set up a trigger identical to the one in the original article.
For SPA, the built-in trigger won’t work, as it only starts listening for scroll events in three cases:
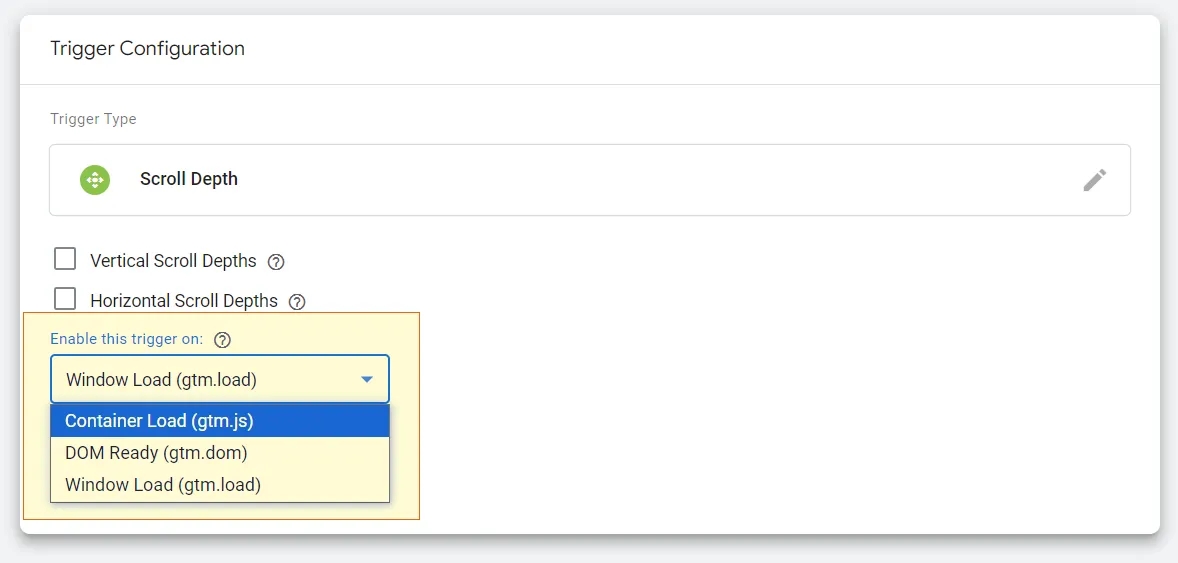
All three occur at the time of page load. For SPA, this happens once—when the user visits the site—but not when navigating between pages. History change triggers can "see" page transitions and restart scroll listening, but as you can see, they are not included in the list. Restarting scroll listening is necessary because such triggers activate only once after the page load. Let’s analyze some cases:
- You configure a 50% scroll trigger.
- The user lands on the homepage and scrolls halfway down—trigger fires, and the event is sent to analytics.
- The user navigates to a second page. Since the scroll listener is not refreshed, the user scrolling halfway down this page will not trigger the event.
One more case:
- You configure a 50% scroll trigger.
- The user lands on the homepage but does not scroll. They navigate to the second page and scroll halfway—trigger fires, and the event is sent to analytics.
- The user navigates to a third page and scrolls halfway down—but the trigger doesn’t fire because it has already activated on the previous page.
What to do? Write a custom scroll listener using JavaScript. This is exactly the moment where GPT can lend a hand.
I lack deep knowledge of JavaScript, but for such tasks, understanding its syntax is sufficient. You need this understanding because no one is perfect, not even GPT—it can make mistakes. However, in my experience, the quality of GPT’s output is directly proportional to the quality of your input. So, the better you describe your task, the higher the chance GPT will provide the solution you need.
After reading the paragraph above, you might think I’m an expert prompt engineer. And that’s true! My prompt, despite including a typo like lavascripot (because it was written on a Sunday evening), was understood by GPT exactly as I intended—albeit not exactly how I imagined.
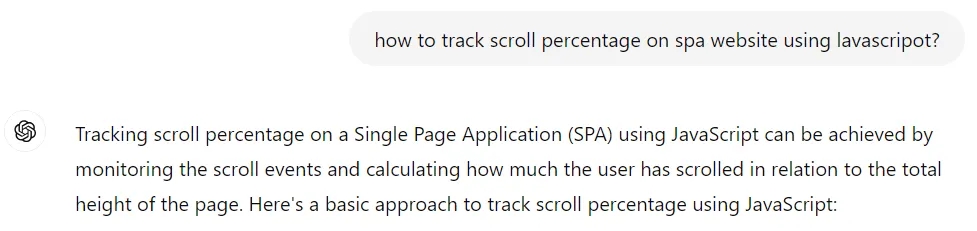
GPT cannot yet read minds, so clarifying that I only needed scrolling to 50% was enough for it to offer a working solution:
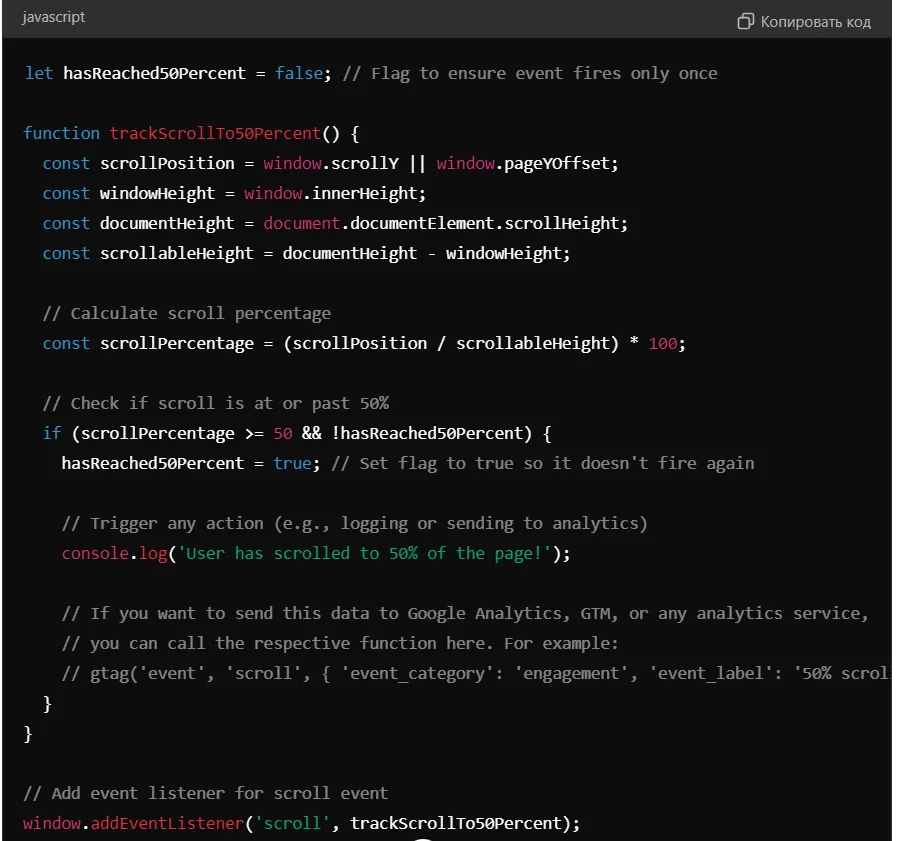
Of course, the code won’t work out of the box, and GTM will show you this:
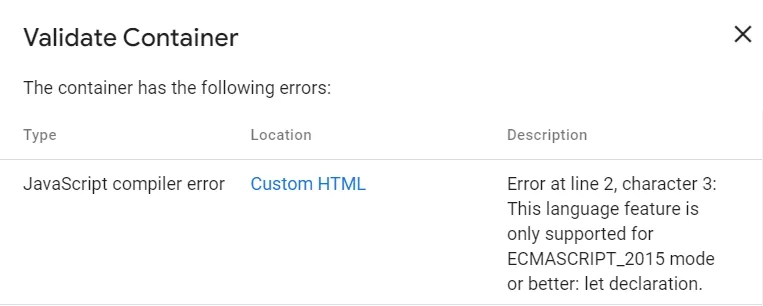
But this is not because the code is faulty. The issue lies in GTM not supporting let and const keywords for declaring variables. Therefore, they need to be replaced with var in the code. That’s not all:
- GPT kindly provides a code snippet in the comments, which sends an event to GA4 using the
gtagfunction and writes to the console that the user has scrolled 50%. Obviously, this is unnecessary because we configure the data to be sent to thedataLayer. However, understanding where in the code to place the command for reaching a goal is essential. In the “Trigger any action” section, instead ofconsole.logand comments aboutgtag, I add the usualdataLayer.pushwith the name of the event I need—scroll_to_50_pct. - Another modification involves writing to
localStorage. Since I need both goals—scrolling and time—to be achieved, I need a way to mark the completion of 50% scrolling if it happens before the user spends 40 seconds on the page. Therefore, I add anotherlocalStorage.setItemcommand to record0inlocalStoragewhen navigating to the page and1when scrolling reaches 50% on the page. If this explanation isn’t entirely clear yet, keep reading—the details follow.
The final code, which sends the scroll_to_50_pct event to dataLayer and records the necessary values in localStorage:
<script>

  Storage ? localStorage.setItem('gtm_scroll_to_50_pct', '0') : undefined;

  var hasReached50Percent = false; // Flag to ensure event fires only once

function trackScrollTo50Percent() {
  var scrollPosition = window.scrollY || window.pageYOffset;
  var windowHeight = window.innerHeight;
  var documentHeight = document.documentElement.scrollHeight;
  var scrollableHeight = documentHeight - windowHeight;

  // Calculate scroll percentage
  var scrollPercentage = (scrollPosition / scrollableHeight) * 100;

  // Check if scroll is at or past 50%
  if (scrollPercentage >= 50 && !hasReached50Percent) {
    hasReached50Percent = true; // Set flag to true so it doesn't fire again

    dataLayer.push({
      'event': 'scroll_to_50_pct'
    });

    Storage ? localStorage.setItem('gtm_scroll_to_50_pct', '1') : undefined;

  }
}

// Add event listener for scroll event
window.addEventListener('scroll', trackScrollTo50Percent);

</script>
This article aims to demonstrate that with the right prompt, GPT can provide you with the solution tailored to your specific task. Moreover, this solution will require minimal adjustments. That’s precisely what happened in my case—I needed a scroll listener for 50%, and I got it. A skilled developer would have created a variable at the beginning to allow setting a scroll threshold other than 50%, but here I can manage without a developer. Basic knowledge of JavaScript is enough to understand that changing 50 to 60 where it appears in the code will suffice for a 60% scroll. And, of course, you can continue consulting GPT if you need the code written differently.
Add this code to a Custom HTML tag. In the triggers, ad
- I need to track events on blog pages, so I choose a page view trigger where the path starts with
/blog/. If you need all pages, choose All Pages. This trigger fires when the page loads.
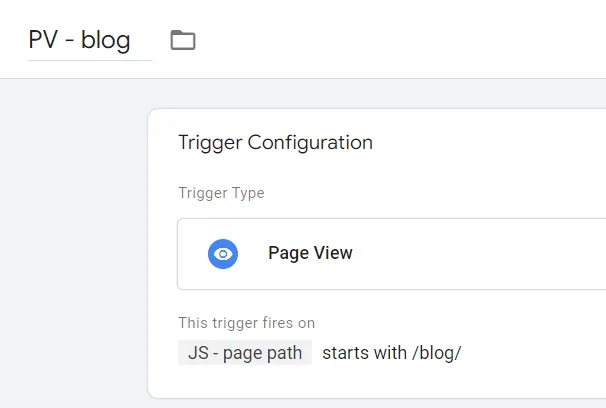
2. Custom event trigger for page_view: this trigger is also limited to blog pages for me, but you can omit conditions.
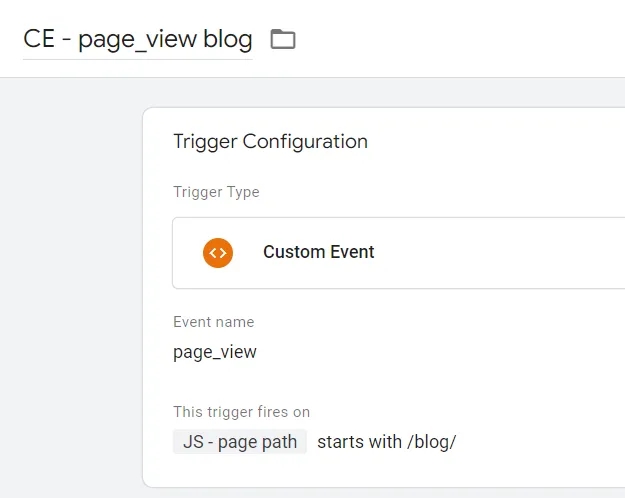
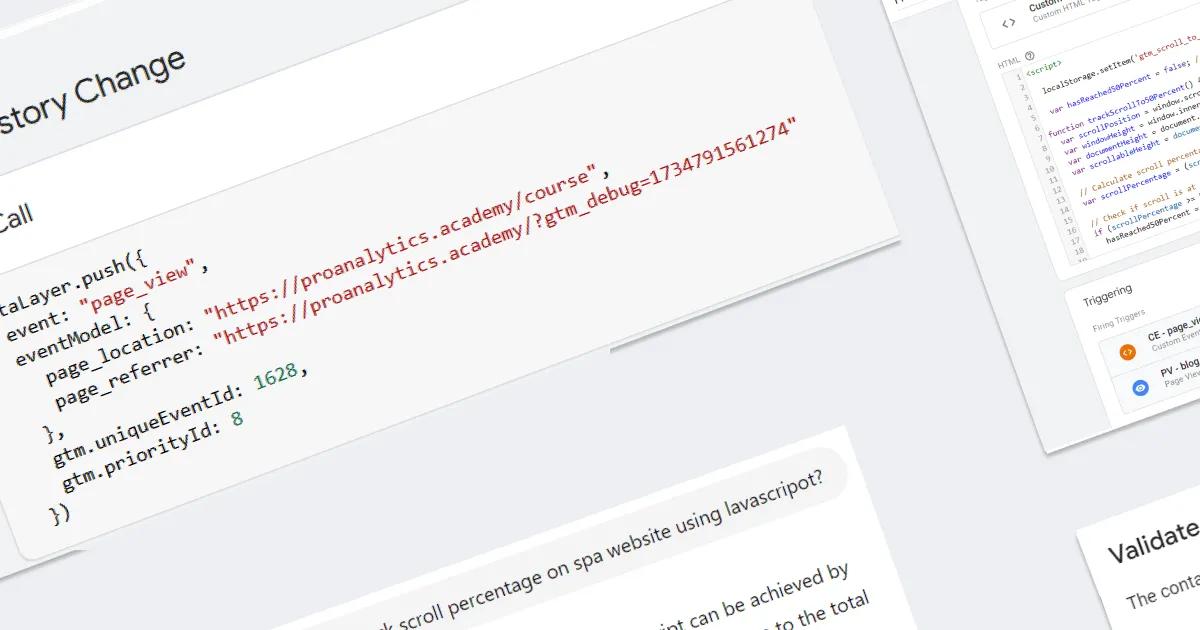
This event is generated by the GA4 library during virtual transitions between pages. In GTM and dataLayer, it looks like this:
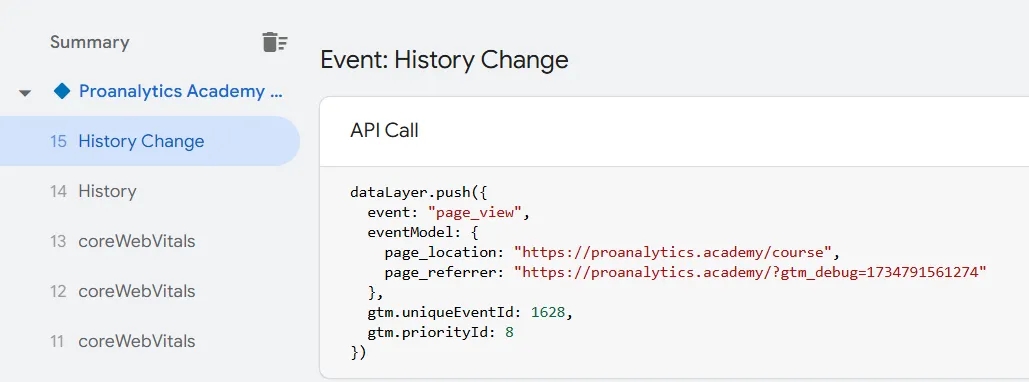
And we have received this set up:
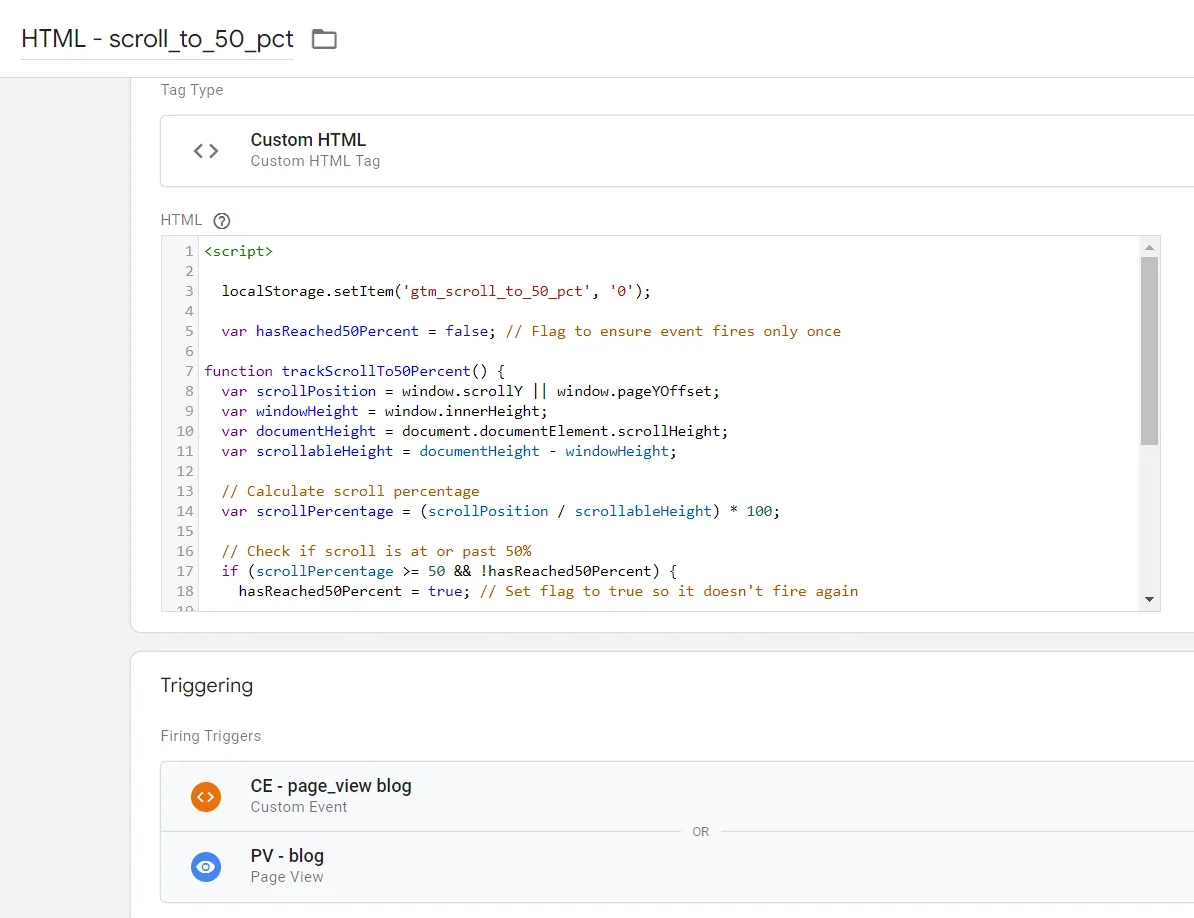
Timer for time on active tab
To make the timer code work, your site must have the jQuery library. If your site doesn’t use it, you can manually add it via GTM, but this isn’t an optimal solution as it unnecessarily loads the site with additional libraries.
Thus, this code needs to be rewritten in plain JavaScript. I also delegated this task to GPT.
Actually, I rewrote it during a course earlier, though I don’t remember exactly why. At that time, there was no blog to share it with.
Here’s the code:
<script>
var TIME_WHEN_SEND_DATA = 40; // змініть на потрібну кількість секунд

var invisibility_time = 0;
var window_invisibility_time = 0;

function fixTime() {
  var dateObj = new Date();
  return Math.floor(dateObj.getTime() / 1000);
}

Storage ? localStorage.setItem('gtm_active_time', '0') : undefined;

function onVisibilityChange() {
  var current_timestamp;
  if (document.visibilityState === "hidden") {
    invisibility_time = fixTime();
  } else {
    current_timestamp = fixTime();
    window_invisibility_time += (current_timestamp - invisibility_time);
  }
}

document.addEventListener('visibilitychange', onVisibilityChange, false);

if (document.visibilityState === "visible") {
  if (typeof dataLayer === 'undefined') {
    console.log('dataLayer is not defined!!!');
  } else {
    var startLiveDoc = fixTime();

    var check_time = function() {
      if (document.visibilityState === "visible" && fixTime() - startLiveDoc - window_invisibility_time === TIME_WHEN_SEND_DATA) {

        dataLayer.push({
          'event': 'active_time_' + TIME_WHEN_SEND_DATA
        });

        Storage ? localStorage.setItem('gtm_active_time', '1') : undefined;

      } else {
        setTimeout(check_time, 1000);
      }
    };

    check_time();
  }
}

</script>
By default, this code counts 40 seconds. If you need a different duration, change the value in the first line: var TIME_WHEN_SEND_DATA = 40;. The event name will also reflect this value, following the format active_time_{{number_of_seconds}}.
Additionally, I added a command to record another entry in localStorage: the value 0 when the page loads and 1 when 40 seconds are reached on that page. Add the same two triggers as for scrolling, and we get the following setup:
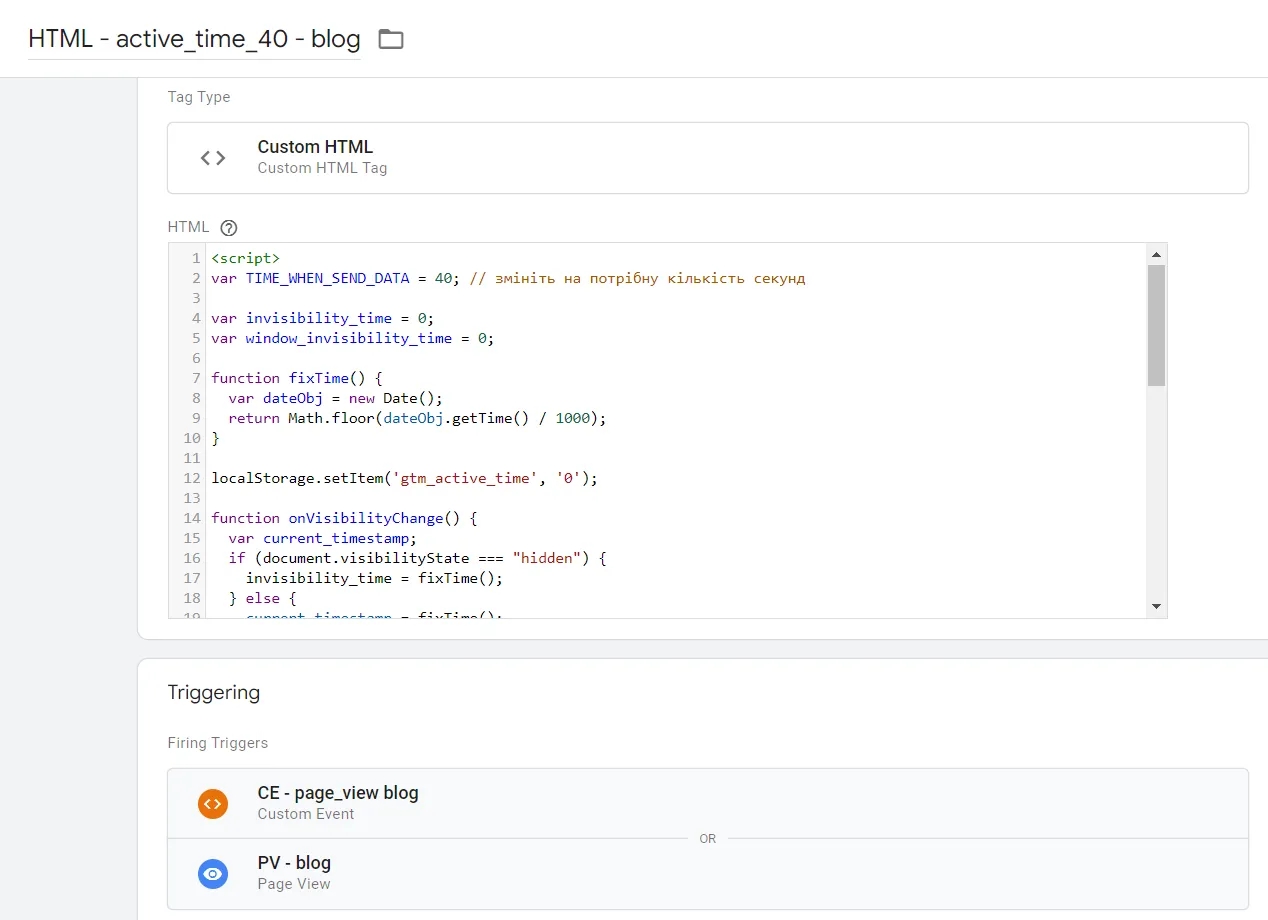
If you have a “traditional” website, you only need to use the Page View (All Pages) trigger.
Adding variables with localStorage
Soon, you’ll understand why we stored data in localStorage. But for now, we need to create two variables in GTM to retrieve the values our tags recorded there.
Go to GTM’s Variables section and create two variables of type Custom JavaScript:
- First variable retrieves the value from the key
gtm_scroll_to_50_pct:
function() {
    return Storage ? localStorage.getItem('gtm_scroll_to_50_pct')  : undefined;
  }
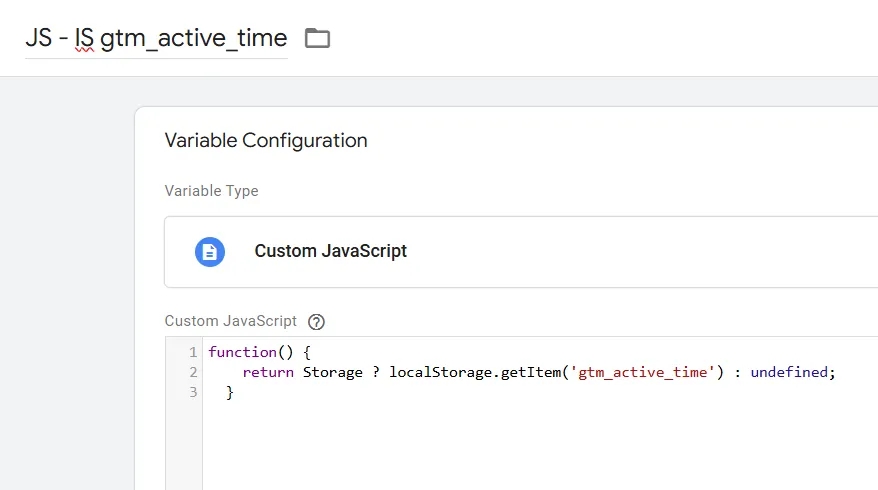
2. The second one is from gtm_active_time key:
function() {
    return Storage ? localStorage.getItem('gtm_active_time') : undefined;
  }
Simply copy the code for each variable, paste it into the appropriate field, name the variable, and save it. An example of one of them:
Configuring the engagement event
After all the preparations, it’s time to combine everything into an engagement event.
If you have a "traditional" website, follow the original article's instructions to create a Trigger Group. Its principle works as follows:
- A user visits the site.
- They scroll to 50%—the scroll event fires.
- They spend 40 seconds on the same page—the time event fires.
- The Trigger Group activates because both triggers fired on the same page.
- The engagement event is sent to GA4.
- The user navigates to another page > 40 seconds + 50% scroll > Trigger Group > engagement.
If neither the 40-second time condition nor the 50% scroll is met on this page, the Trigger Group does not activate, and the engagement event is not sent.
For SPA, the story is different. The same limitation applies to Trigger Groups as it does to the scroll trigger—it fires only once after the page loads. Thus, the event will only be sent once, and if the user navigates to other SPA pages, the Trigger Group will no longer activate.
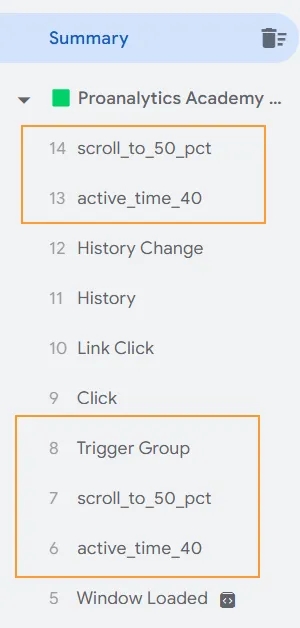
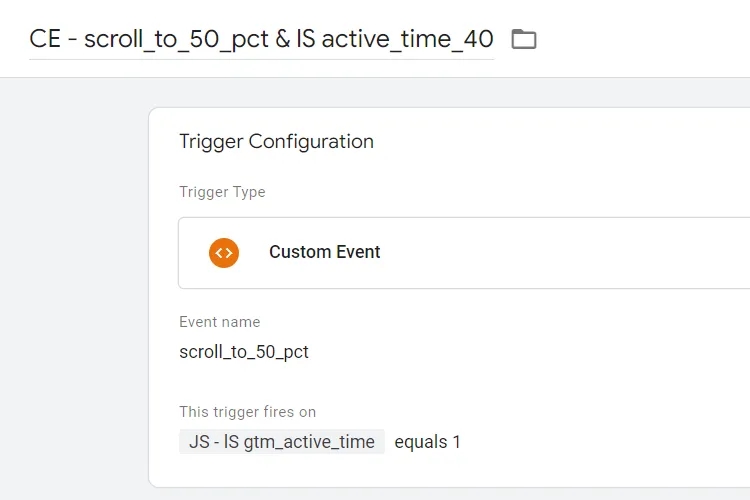
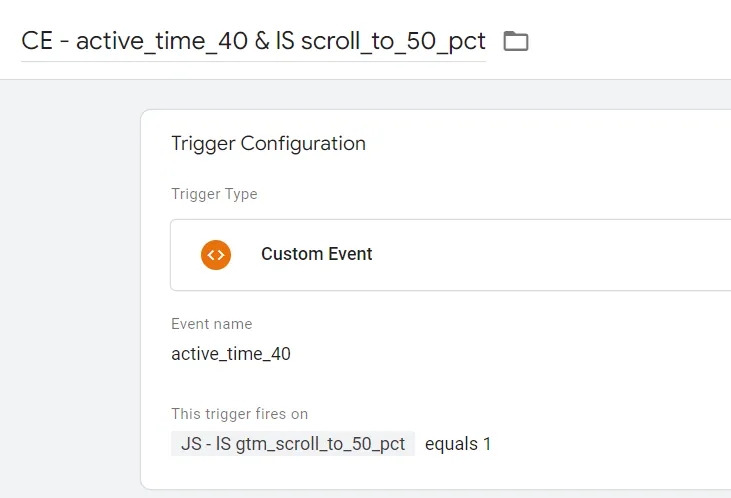
Instead of using a Trigger Group, we need to manually track when both conditions are met. To do this, create two triggers:
- The first trigger fires on the
scroll_to_50_pctevent (when 50% is reached), but only if thegtm_active_timevalue inlocalStorageequals 1. This means that by the time the scroll reaches 50%, the user has already spent 40 seconds on the page.
- The second trigger is mirrored—it fires on the
active_time_40event, but only if thegtm_scroll_to_50_pctvalue inlocalStorageequals 1. This ensures that by the time the 40 seconds are recorded, the user has already scrolled 50% of the page.
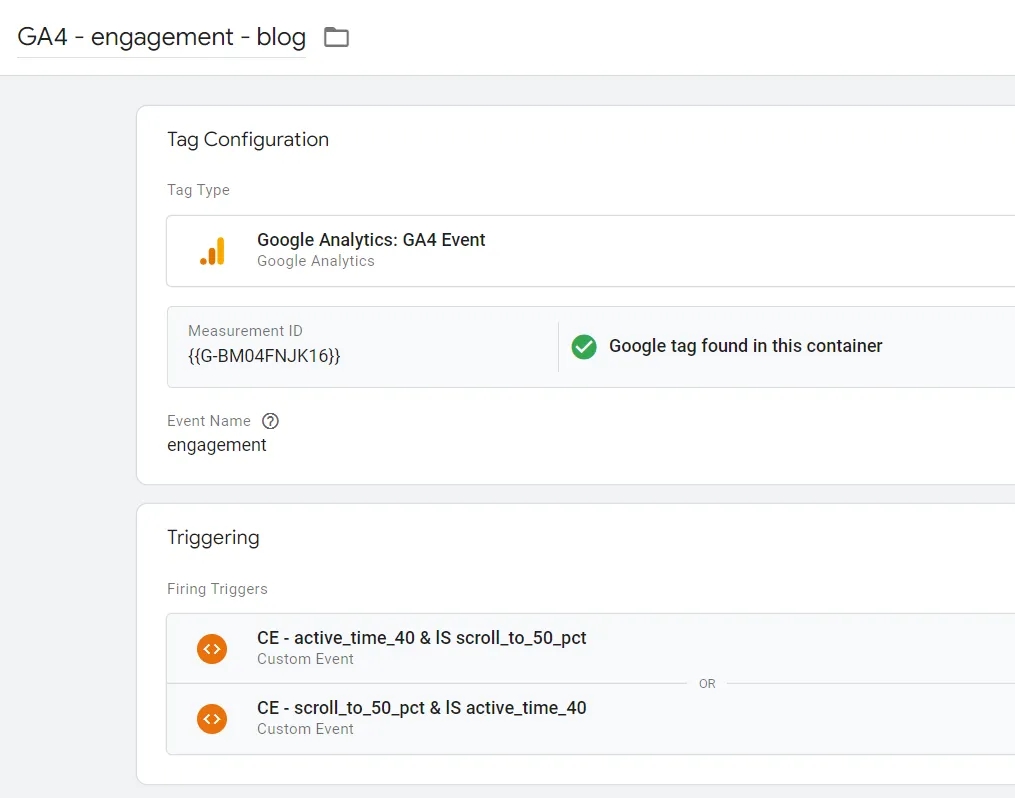
Finally, configure the engagement tag:
- Choose the tag type GA4 Event.
- Add the Measurement ID.
- Write the event name as
engagement. - Add the two triggers you just created.
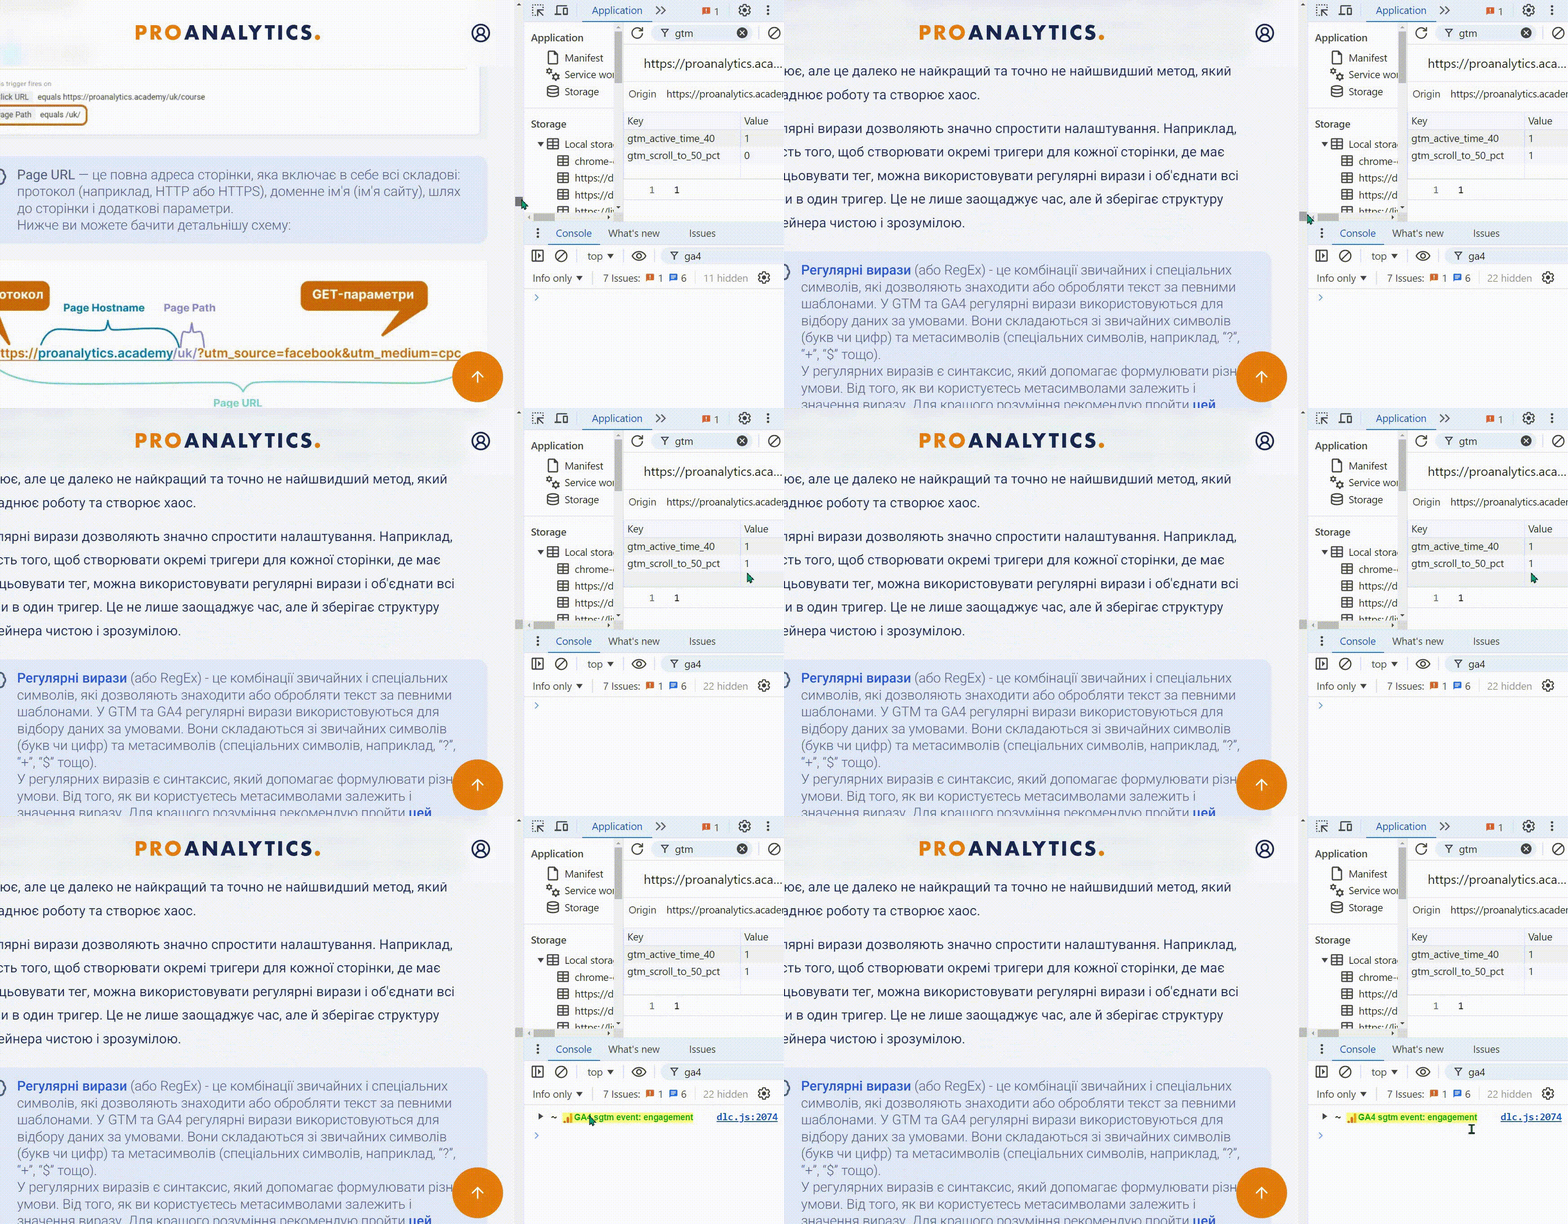
Save, test, and publish.
In Conclusion
This article turned out quite detailed, but only because I wanted to explain why all these steps are necessary.
I also wanted to share the workflow of someone who is not a JavaScript developer, showing that you don’t have to be a developer to implement interesting and useful configurations. GPT can be your assistant—but just an assistant, nothing more. You don’t need to know JavaScript at a level where you can write code from scratch, but you must understand it enough to evaluate what your "assistant" provides.
I hope you’ve successfully completed this setup, and now you’ll know whether users interacted with your content and with which specific pages.
Loading comments…