
Every business owner and marketing specialist faces a challenge: how to get accurate data about user behaviour on a website or in a mobile app? It's important for making the right decisions, but setting up analytics can be a challenge. Incorrect settings lead to distorted data and incorrect conclusions, so it's worth paying special attention to the setup and getting it right from the start.
GA4 allows you to track user interactions, analyse data, and optimise marketing activities. In this article, we'll take a closer look at how to install and configure GA4 correctly to avoid potential problems and get the most out of this tool.
The guide described in this article is quite detailed and comprehensive, and tries to cover all aspects of GA4 configuration. If you notice that something is missing, please write about it in the comments and I will try to add it to the article.
The article contains more than 50,000 characters without spaces, and I think that a large number of those who read it will be looking for an answer to a specific question. Feel free to use the outline below to get to the point you need to get to immediately.
If you’re working with or just starting to explore GA4 or other analytics tools like BigQuery, Power BI, Google Tag Manager, and more, I invite you to join my Telegram channel. There, I share announcements about my articles, videos, news, and other useful materials related to web analytics. It could be valuable for you.
What we'll talk about:
- Create Google Analytics 4 account and property
- Create Data Stream in GA4
- How to place a Google Analytics 4 code on your website
- How to connect Google Analytics 4 (Google Tag) to your website with Google Tag Manager
- Set up Google Analytics 4 after installation
- Instead of conclusion
- Google Analytics 4 set up: FAQ
- How to install GA4 on a Wordpress website
- How to install GA4 on a Shopify website
- How to install GA4 on the website builder
- Why do my conversion data in GA4 differ from the CRM data?
- I have a website and a subdomain. Do I need cross-domain tracking?
- I have several payment systems on my website and some conversions are credited to them, what should I do?
- There is no demographic data in the reports. Age, gender, and interests of website visitors are not available in the reports
- I do not see data for more than two months in GA4 custom reports
- I have several websites - do I need to create a Data Stream for each one?
- How to exclude internal traffic in GA4
- How to view internal search data
- I see the Unassigned channel in the traffic report. What does it mean and how can I fix it so that this traffic is distributed to the channels I understand?
- I set up GA4 an hour/day ago, but there is no data in the reports?
- Where can I see Google Ads data in GA4?
- How do I view SEO data? Where can I find Search Console data?
- Why is revenue data in Google Analytics 4 different from CRM?
- Where can I find utm_term and utm_content data?
- How do I exclude dynamic IPs?
- There is an internal search on the site, the Enhanced Masurements are turned on, but I don't see search data in the reports
- I have a mobile app. How do I connect Firebase with GA4??
- My GA4 is broken and doesn't show data for today/yesterday. Where should I look for the problem?
- It seems that every time I look at the data in GA4, it is different. Even though I'm looking at the same reports
Create Google Analytics 4 account and property
Register in Google Analytics 4
To create an account with Google Analytics 4, you can use your regular Google account. If you don't have one, follow this link to create one.
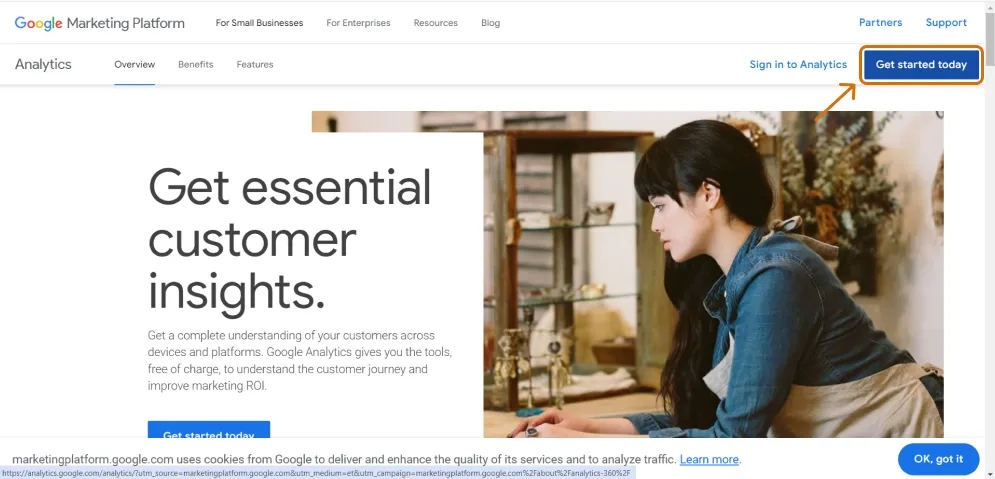
- Now go to the Google Marketing Platform website and click Get started today.
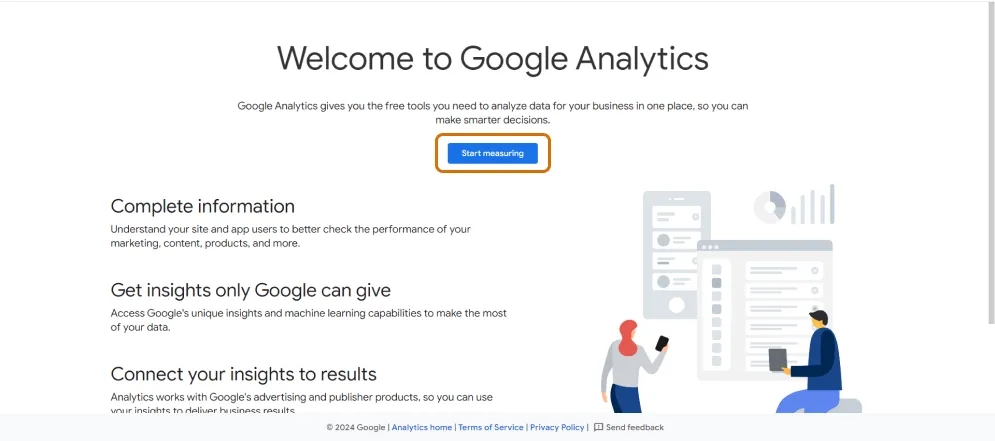
2. Click Start measuring.
Next, you will need to go through the process of creating an account, property, and data flows, which consists of the following steps:
- Account creation
- Property Creation
- Business Details
- Business Objectives
- Data Collection
I'll show you each of them.
Create account in Google Analytics 4
At the Account creation stage, as the name implies, we will create a GA4 account. The settings are simple and there are only two of them:
- Account name - we give our account a name, for example, it can be the name of your business or project.
To make it easier to understand what an account is, imagine that an account is a company, and the Property that we configure in the Property details section is the company's website. A property is hosted in an account and includes data for one user base. If you need to analyse data about a product line, brand, or app together, they should be in one property. So, in most cases, you will have one GA4 account and one GA4 property (since most companies have only one website). However, if the company has more than one website, then there will be several properties in such an account.
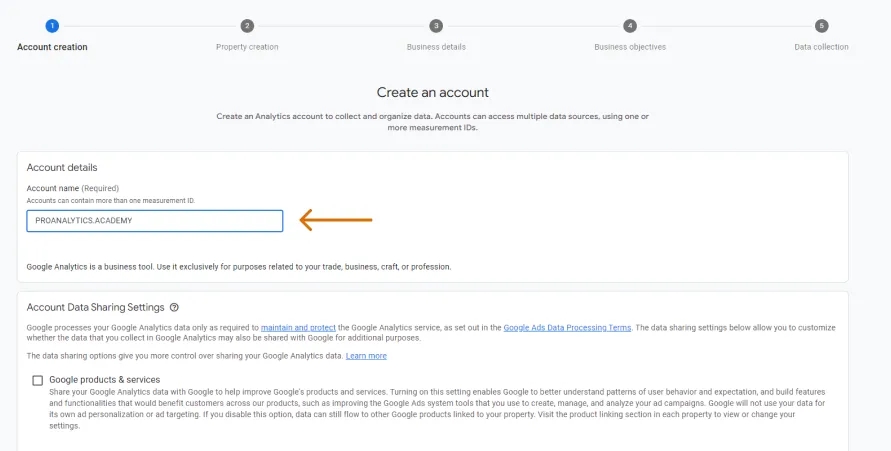
2. Account Data Sharing Settings - as the name says, this is where you decide what data you want to share with the Google team and how you want to share it. If you're in a hurry, you can leave the set that Google Analytics 4 offers by default, but since I want to review all the steps and explain them in this article, let's go through each item.
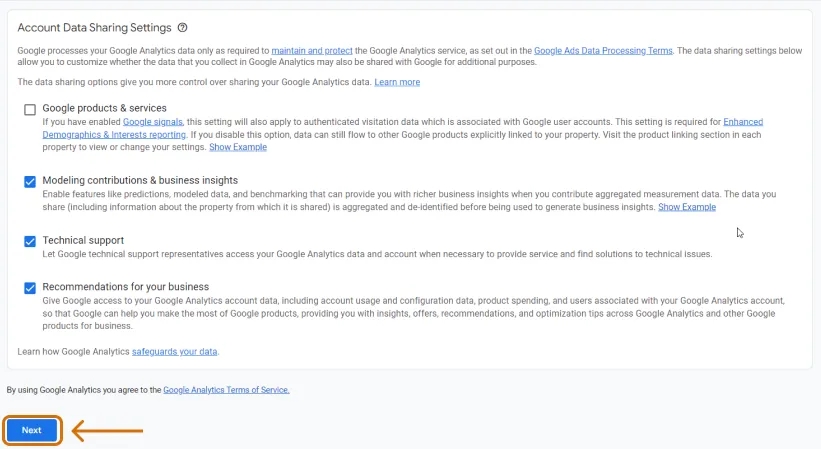
- Google products & services - checking this box will allow the Google team to use your data to improve the performance of their services. Please note that this setting does not affect data sharing with other Google services configured through Product links at the property level.
- Modeling contributions & business insights - check this box if you want to use data forecasting and modelling, as well as industry benchmarking in Google Analytics 4, which Google promises in the future, similar to the one in GA Universal. This item is also responsible for calculating predictive metrics, such as: Probability of purchase, Probability of user churn, Projected income. The choice is yours, but my recommendation is to activate it.
- Technical support - not that GA4 support is in a hurry to run into your account and figure out what's wrong. But if you're lucky and they are willing to take a look, this is the item that is responsible for ensuring that they have the necessary access. The choice is also yours, and my recommendation is to activate it again.
- Recommendations for your business - we all know that Google's recommendations are mostly aimed at making Google more money, but sometimes they can actually be useful. You can activate them at will.
Once you have checked all the boxes, don't forget to click Next.
Create property in Google Analytics 4
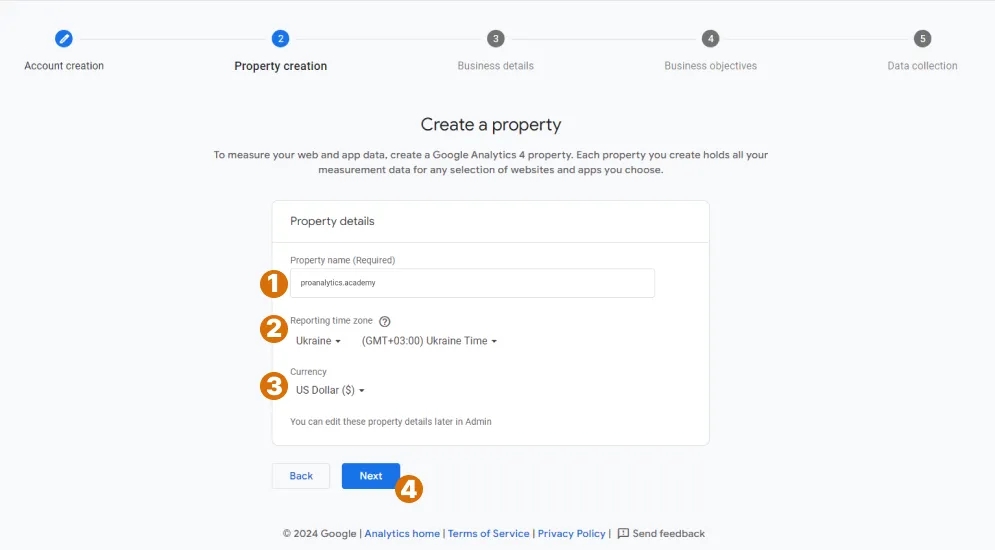
Now let's move on to the Property Creation block. Before we move on to the actual creation, let's take a closer look at what a property is: the GA4 team gives the following explanation in the help - “ A property represents a grouping of data from a website and/or app in Google Analytics” - which is not very clear, so let's try to understand it first with examples.
As mentioned above:
- If you have one website, the property will be equal to the website.
- If you have one website and two mobile applications (Android and iOS) related to the same business, you will also have one property, since you actually have the same user base who simply use the functionality that is more convenient for them at a certain point in time: a website or mobile applications.
In general, if you look at the best practices for account structure and properties in the official GA4 white paper, you will notice that in most cases they recommend having one property per account. And although this may seem a bit strange to some, the reason is quite obvious if you remember the rule “one property for each logical user base”. If we have one company, then we most likely have one user base, and therefore one common property.
I hope this information is enough for you to understand how many properties you need to have (most likely one), so let's move on to the settings.
- Property name - enter the name of your property here. In most cases, you can just enter the name of the site.
- Reporting time zone - choose the time zone carefully, as this is the time zone that will be used to display data in your GA4 reports.
Pay attention to the following points:
- If a user visits your website on Monday in their time zone, but it is Sunday in your time zone, the visit will be registered for Sunday.
- Changing the time zone only affects future data. If you change the time zone for an existing property, it may result in a flat area or a spike in the graph due to the time shifting forward or backward, respectively.
- Although you can change this setting later in the property settings, it's always best to decide which time zone you want to see the data in and not change it.
3. Currency - select the currency in which you sell goods or services - this is the currency in which the data will be displayed in the reports. Keep in mind that Google does not support multiple currencies, so if you have a multicurrency website, you will still have to choose one main currency. Below I will tell you in more detail - What are the options for data transfer for multicurrency sites.
To move to the next step, click Next.
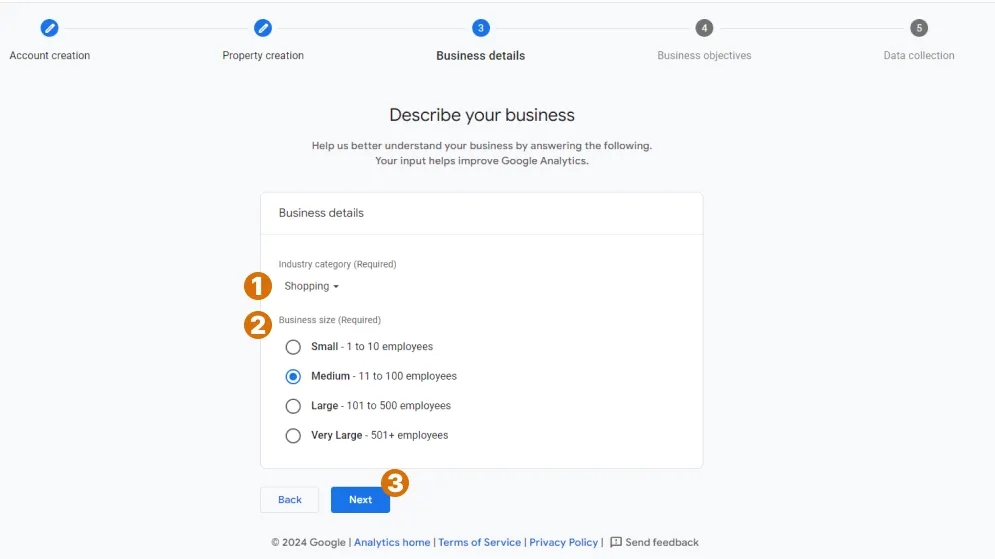
Business details when creating GA4 account
In the next section, Business Details, you will describe your business. Currently, this setting only affects certain further recommendations in the GA4 interface, such as recommended audiences. In the future, they also plan to add industry benchmarking reports to Google Analytics 4. Therefore, if you like to compare yourself with something average in the industry, I recommend that you select the correct answers in the Industry category and Business size items. And don't forget that other users may not fill out these items so carefully, and therefore the industry average may be like in that joke.
How to choose the right business objectives when register in GA4
First of all, you need to know that your choice of Business objectives will determine the appearance of the interface in Google Analytics 4. The GA4 team has even created a separate page in the official help, which shows the components of the GA4 interface in the form of a table depending on the selected business goals.
Nevertheless, regardless of your business goals, I recommend that you choose the lower Other option.
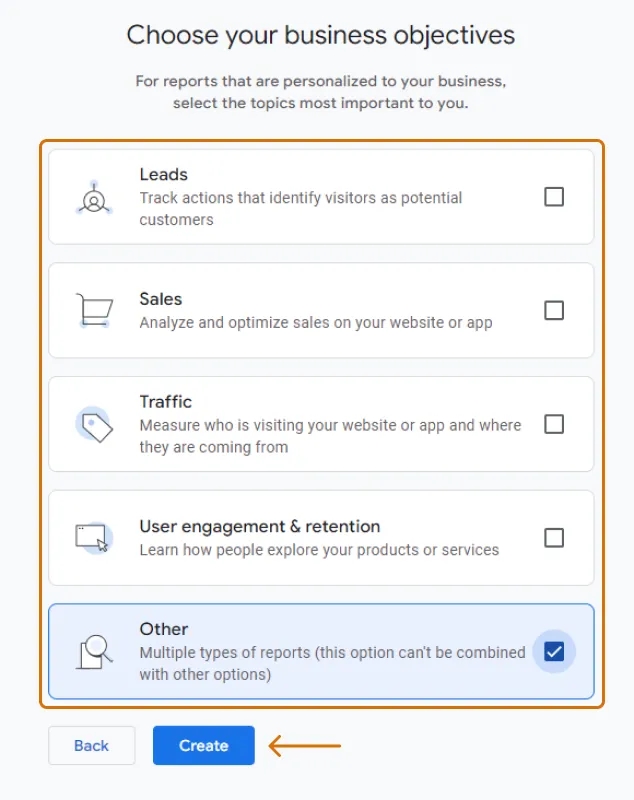
Why is this so? Because GA4 is not as personalized to your specific objectives. If you look closely at the help table, you'll notice that GA4 has a certain number of reports that it mixes and matches depending on the goals you choose, sometimes even changing their names to match your business type. So again: “No one is going to create individual personalized reports for you that will perfectly match your goals.” You'll have to customize them yourself.
Most authors on the Internet, including me, focus on the Other option in their articles. This means that if you choose this option, it will be easier for you to find tips and use other guides. Here is what your GA4 report block will look like if you choose this option:
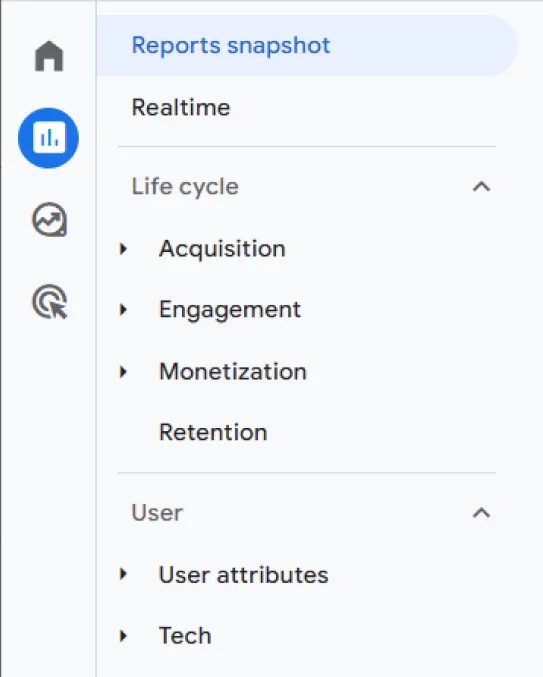
In fact, regardless of what you choose at the Business objectives stage, all standard reports that are not displayed in your Reports block are always available in the library.
After selecting the standard reports you want, click Create and agree to all the terms and conditions in the next step (there is no other choice anyway).
Congratulations! We have successfully created a Google Analytics 4 account and property.
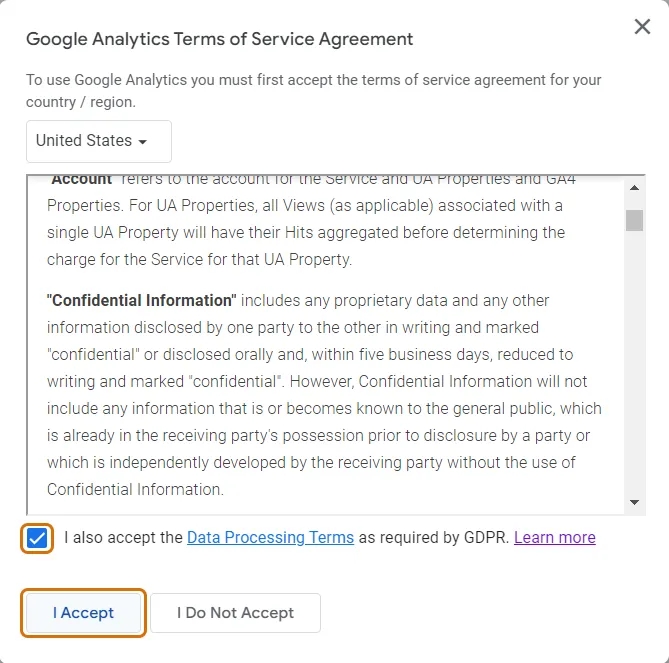
Now you need to create a data stream. And set up the Google Analytics 4 property. There is a lot of work to be done, so let's continue.
Create Data Stream in GA4
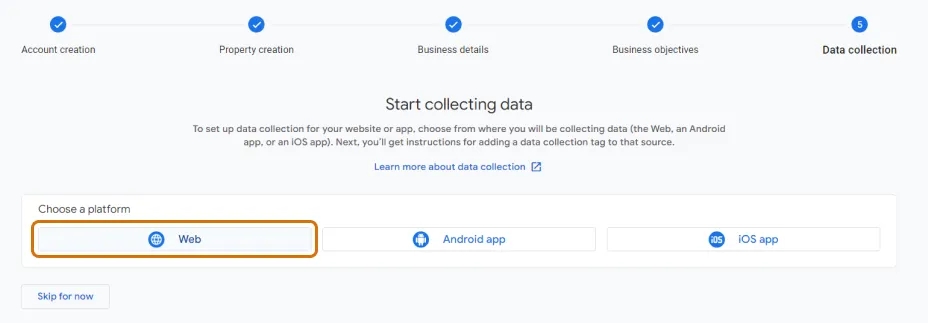
Now that we have a GA4 account and property, we move on to the Data Collection block. To start collecting data about the interaction of visitors with your website or mobile application, you need to select the platform from which you want to collect it. There are 3 options:
- Web
- Android app (Android mobile application)
- iOS app (iOS mobile application)
The whole process of creating a data stream can be divided into two parts:
- Placing the code on the website/mobile application;
- Setting up the data flow;
The next paragraph is for those who want to use GA4 for mobile app analytics. If you are interested in website analytics, you can skip it.
The configuration for a website is the most common, so the article focuses on it. In addition, most of the data flow settings for mobile apps are done on the Firebase side, which is beyond the scope of this article. And, unlike website analytics, you definitely cannot do without a developer with mobile apps. With this in mind, further in this paragraph, as well as in the Data Stream Settings paragraph in GA4, we will only talk about websites. But this does not mean that if you have a mobile application, you need to close this article. Since property-level settings are common to both websites and mobile apps, you will find a lot of useful information in the sections on Property Settings in Google Analytics 4 та GA4 Integrations with Other Platforms. I especially recommend that you pay attention to the section on Setting up Google Analytics 4 integration with Firebase.
If you have a mobile application, I also recommend that you read the detailed instructions for installing the analytics code for mobile applications in the official help (iOS and Android).
Since we're going to talk about analytics for websites, in the Choose a platform section, select Web.
As you probably already understood, a Data Stream is actually a data source: a mobile application or a website. So, I hope you won't have any problems filling in the fields with the site name and the stream name. If not, you can take a look at the screenshot below ;)
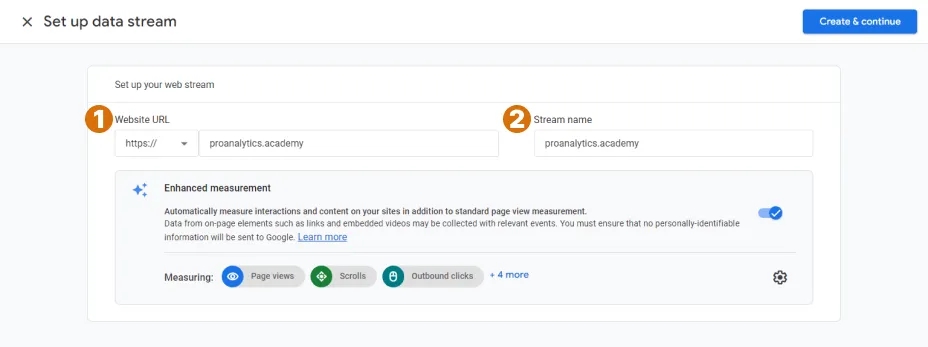
At this point, you may also notice the Enhanced Measurement block. It is automatically activated, but you can change the settings if you wish.
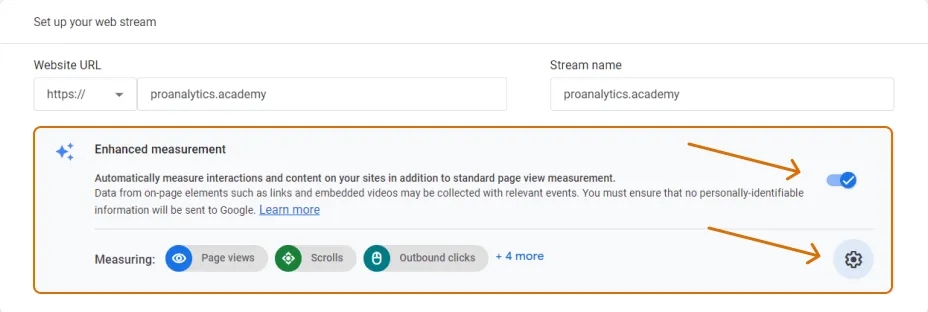
We will analyze it in more detail in the section Set up Data Stream in Google Analytics 4. For now, you can safely click Create & Continue.
If at this point you think you're done, look at the page scrolling block on the right.
The next step is to install the GA4 code on your website. This is necessary in order to transfer data about user interaction with the site to GA4.
How to place a Google Analytics 4 code on your website
From the experience of communicating with my students as part of my courses, I know what surprises many people: “Why did we make the flow for GA4, but install the Google Tag code on the site?”
The Google Tag (gtag.js) is a universal tag that you can add to your website to integrate with various Google products and services. Instead of managing multiple tags for different Google products, you can use a single Google Tag throughout your website and connect it to different services. One such service is Google Analytics 4.
By default, GA4 immediately recommends you a way to manually install the Google Tag on your site, and I recommend this option as well. However, be careful: at first glance, it may seem that Install manually is an option where you need to copy the code and give it to the developer to install it on the site. Not everyone has a developer, and even if they do, it can be downloaded.
Therefore, I think Google recommends this option for other reasons - it also applies to the use of Google Tag Manager. Of course, I definitely recommend that you do your customization with GTM.
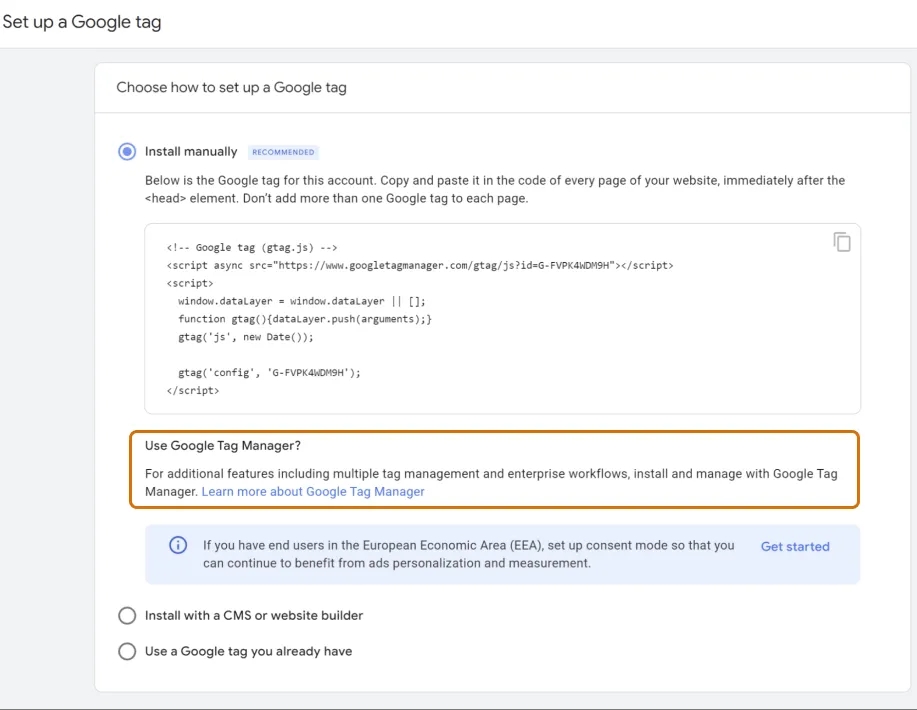
If for some reason you still don't use this great free tool for managing website tags from Google, it's time to read my article What is Google Tag Manager, why you need it, and how to use it in your business.
Google Tag Manager is one of the basic analytics tools used to install marketing and analytics codes on a website, including Google Tag. It allows you to easily manage and deploy analytical and marketing codes on your website without having to interfere with the website code itself. With it, you can transfer data about users' actions on the site to GA4 and advertising offices without additional involvement of specialists.
Only if you are not using GTM yet and, for some reason unknown to me, cannot install it on your site and start using it right now, you can click Show more options to see other options for installing Google Tag on your site. But, remember, it is much more convenient to use Google Tag Manager.
If we click Show more options, we will see 2 more ways to install:
- Install with a CMS or website builder
- Use a Google tag you already have.
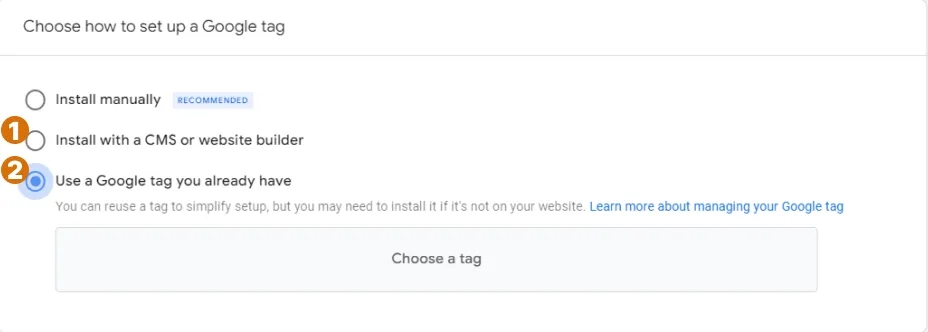
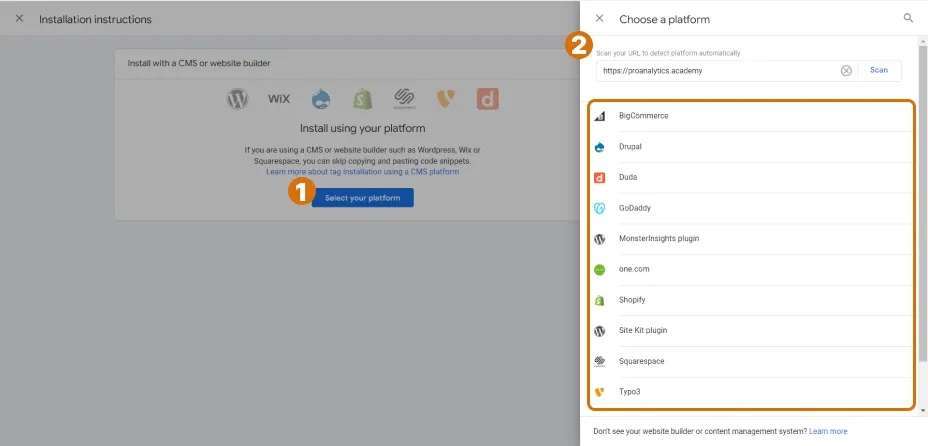
- If you choose the Install with a CMS or website builder option, you will be prompted to select the platform you are using and then Google will provide detailed instructions. Use this method only if your CMS or website builder does not support GTM installation. Otherwise, it is better to install GTM on your website and connect Google Tag through it. I will tell you more about how to connect Google Tag through Google Tag Manager below.
2. Use a Google tag you already have - I wrote above that the Google tag is a universal tag that supports all major Google marketing and analytics products. If you already have a Google Tag installed on your site for other tasks, for example, for Google Ads conversion tracking, you can use it to connect GA4. But I still keep reminding you that the best option is to work through the Google Tag Manager.
How to connect Google Analytics 4 (Google Tag) to your website with Google Tag Manager
- If you don't have a Google Tag Manager account yet, you can create one here and then install the GTM code on your website. Below, I will describe in detail how to create a Google Tag Manager account and container and how to connect Google Analytics 4 to your website using GTM.
- If you already have a GTM account, I recommend that you skip right to the section on how to connect Google Analytics 4 to your website using GTM.
Create an account and a container Google Tag Manager
If you have not yet worked with GTM, you need to register an account.
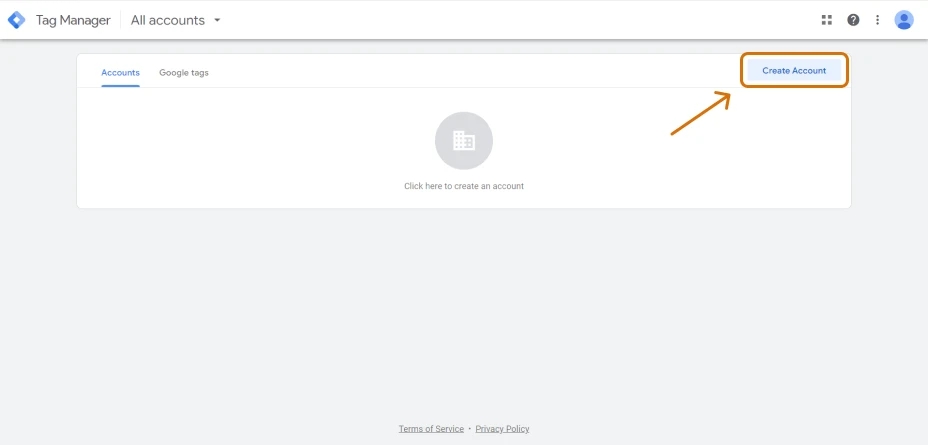
Follow this link and click Create account.
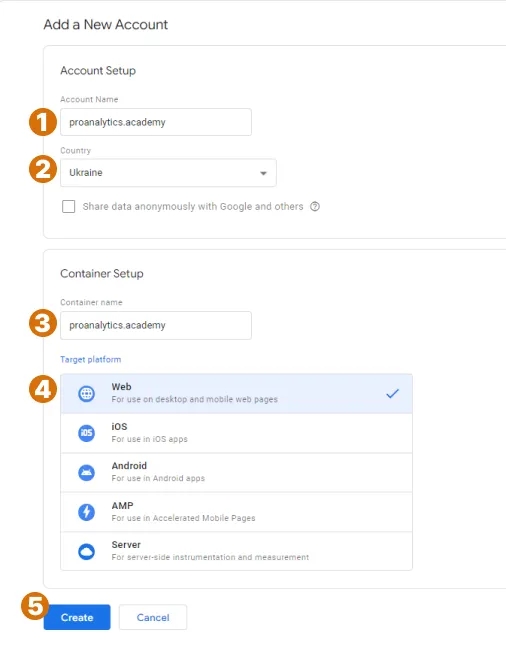
- Fill in the basic information (you can specify the name of the site in the account and container name), select Target Platform - WEB and click Create.
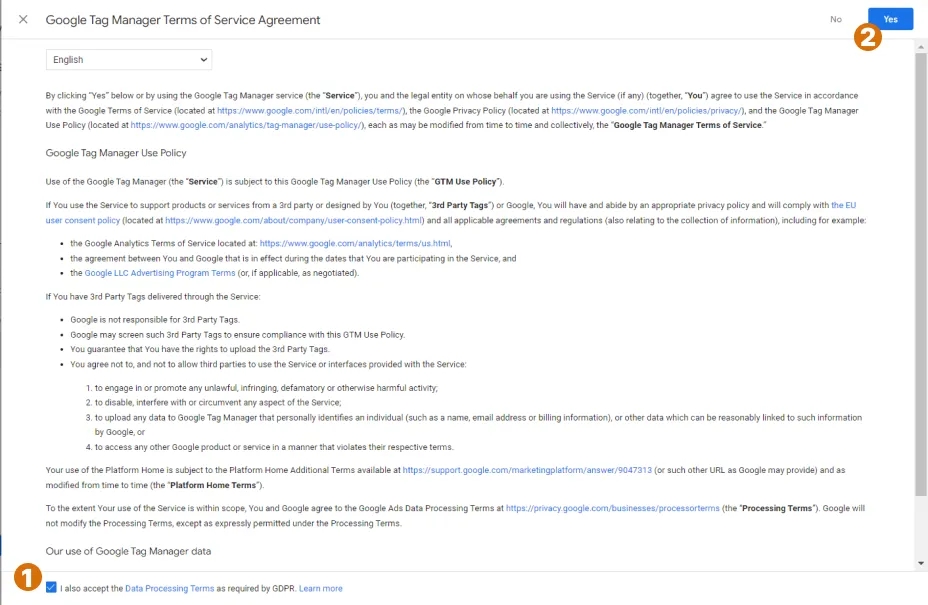
2. We agree with all the information offered and proceed.
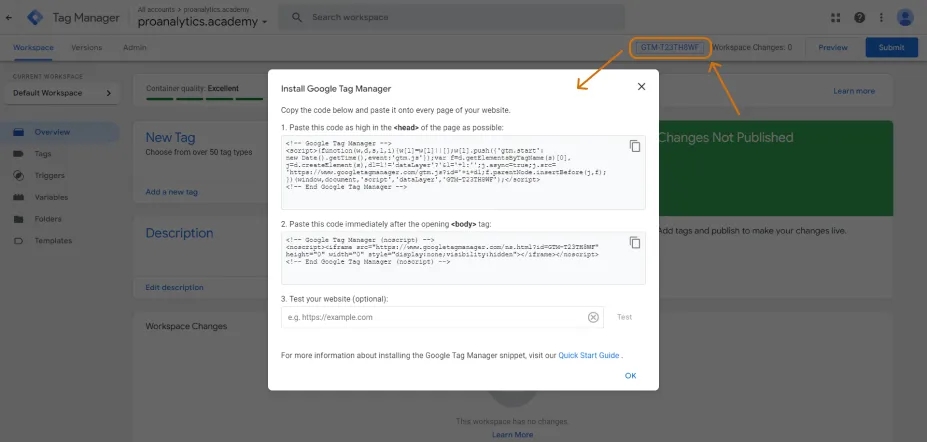
3. Now you need to install the code on your website according to the instructions. You can pass it to the developer. If this window disappears, you can click on your container code (shown in the picture), then the instructions will appear again.
If at this point you have questions like the following in your head: “What do I need GTM for? Do I have to put its code on the website where my winnings are? It's just extra work, I could ask the developer to install the GA4 code on the site, and here I still need to install the GTM code" - these are very correct questions and now you will find out what the advantage is.
Indeed, when you first install GTM on your site, you need to involve a developer, but then you can solve many tasks without them - just with GTM.
- Need to install GA4 code - you can do it with GTM
- What about the Facebook Pixel code - you can do it with GTM
- And what about TikTok, Linkedin, Pinterest pixels? - you can do it with GTM too
- Ok, and what about not basic pixels, but conversion codes, for example? - you can do it through GTM too.
That is, once you invest in installing the GTM code on your website, you can use it to install codes for marketing and analytical systems many times.
Install GA4 code on your website usong GTM
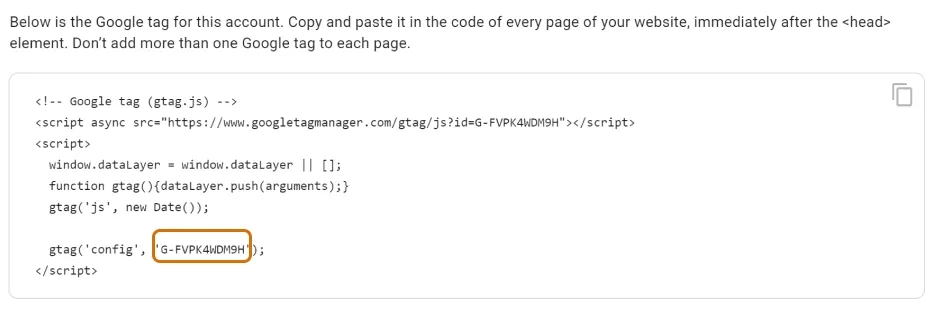
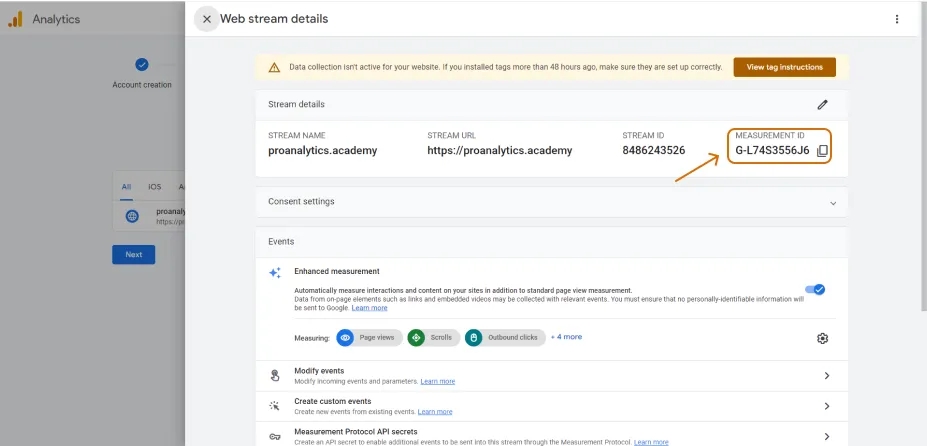
In order to connect GA4 to GTM, you will need a Measurement ID. You can find it in the code that opens after creating the flow, as shown in the screenshot below:
This article is not an exhaustive guide to Google Tag Manager, but for better understanding, I think it's worth explaining the two main entities we'll use in the setup process:
- Tags are pieces of code that are added to a website to collect analytical data or to pass data to marketing or analytical systems. Tags can be of different types and can be configured for specific events or pages, allowing you to control exactly when tags are activated.
- Triggers define the conditions under which tags should be activated on a website. Triggers are based on various events or website states, such as page load, click on a certain element, or form submission. Triggers allow you to set up the exact conditions under which tags are activated.
As you can imagine, we'll need to create a tag and add a trigger for it.
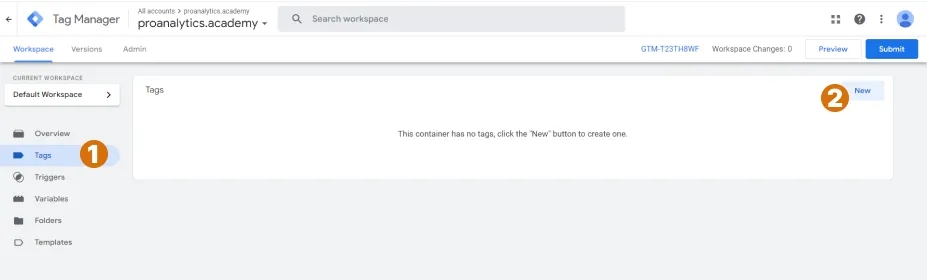
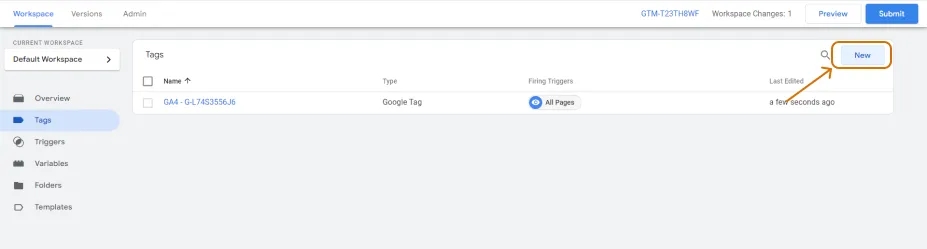
- Go to the Tags section and select New.
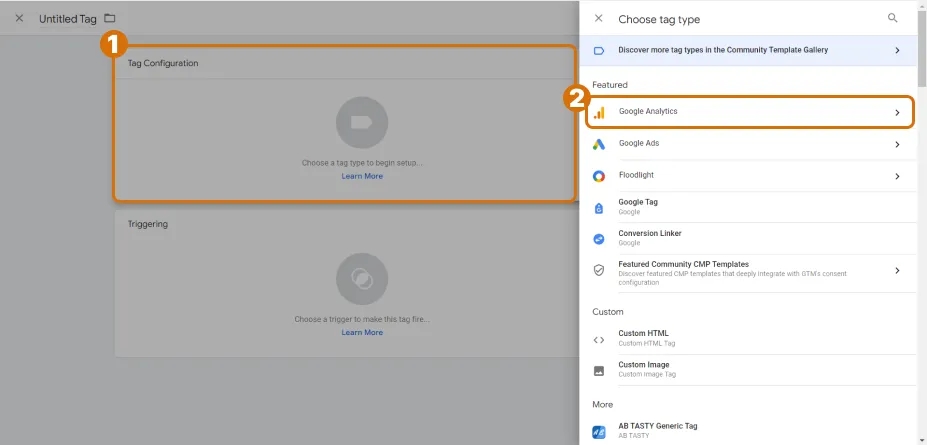
2. Now click on the Tag Configuration field and select Google Analytics.
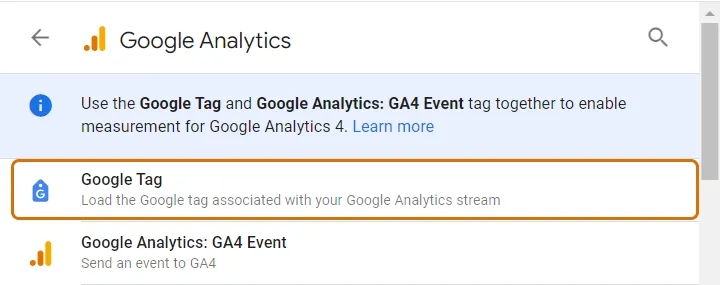
3. We need a Google Tag.
4. You will need to fill in 3 fields to configure:
- Tag ID
- Triggering
- Tag name
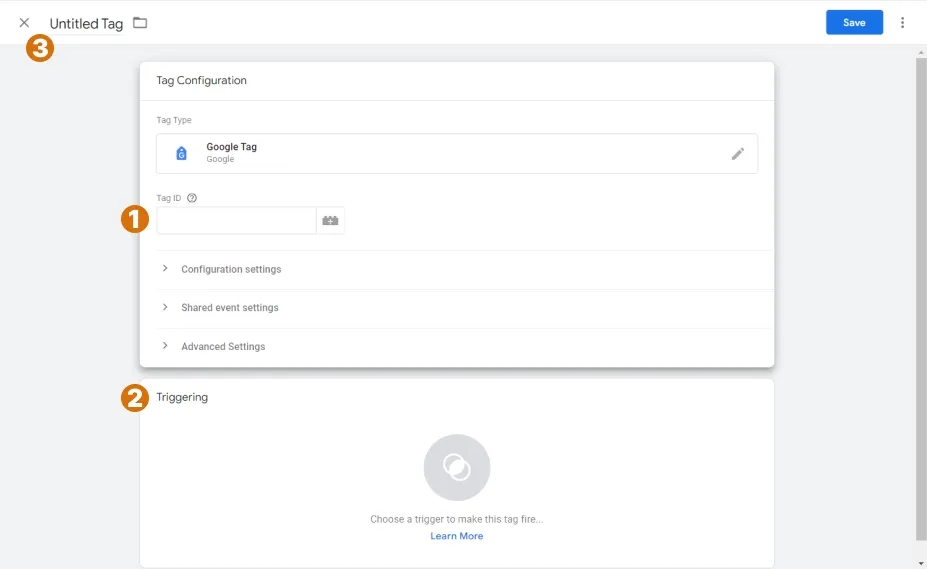
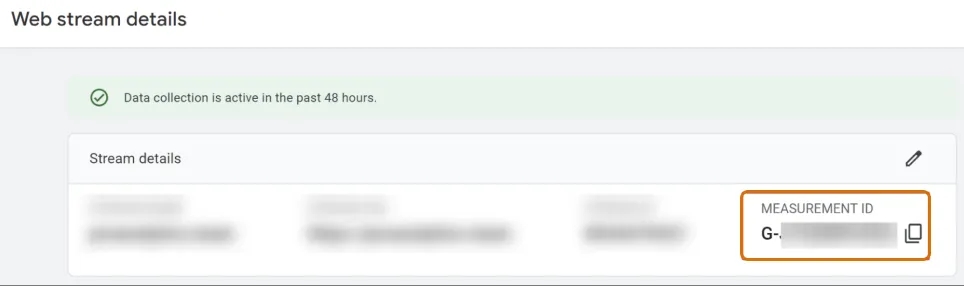
Tag ID is the identifier of the Data Stream that we created earlier in GA4, called Measurement ID. I described one way to find it above. Next, I will describe an alternative way - Admin -> Data Streams -> Select the desired data stream. We will need the Measurement ID, so copy it and return to Google Tag Manager.
5. Insert our ID and now click on the Triggering field.
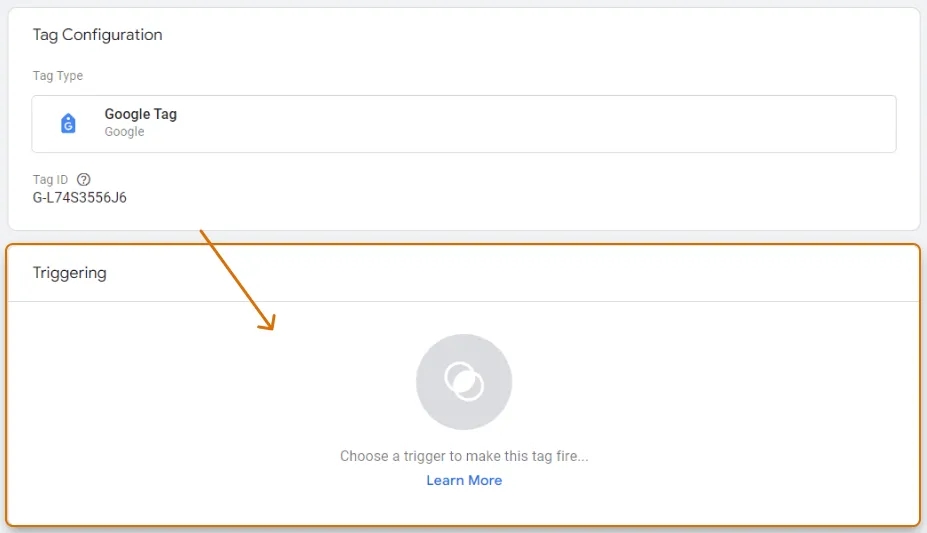
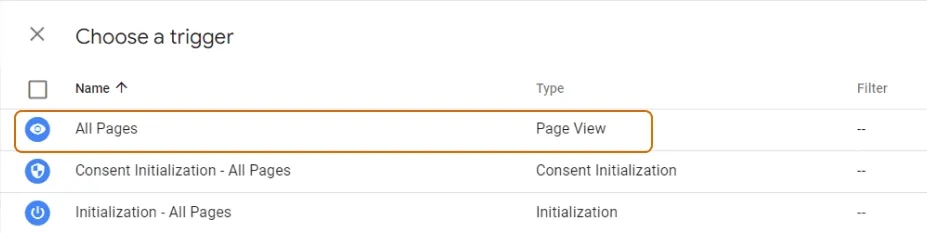
6. By default, three triggers are already available to you. In most cases, any of them may suit you. Select the All pages trigger.
7. It remains to give a name to our tag, usually I add it in the format "GA4 - G-XXXXXXXX". Save our tag.
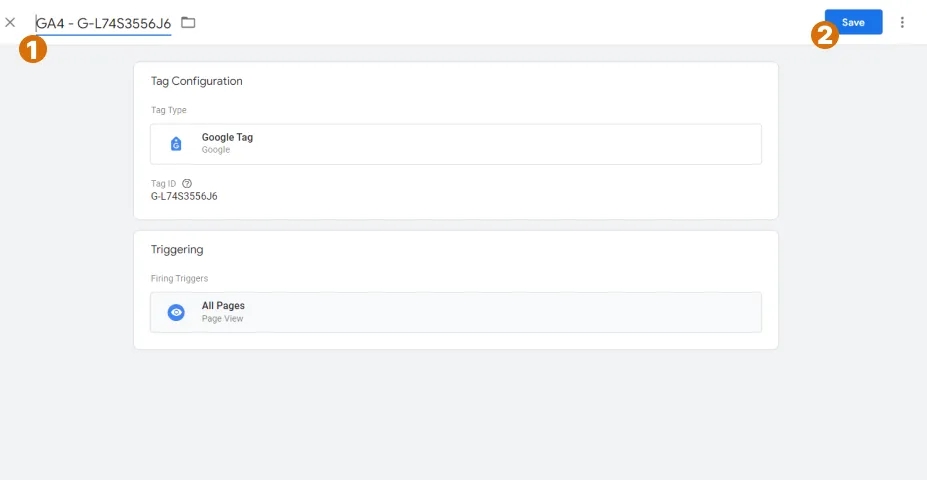
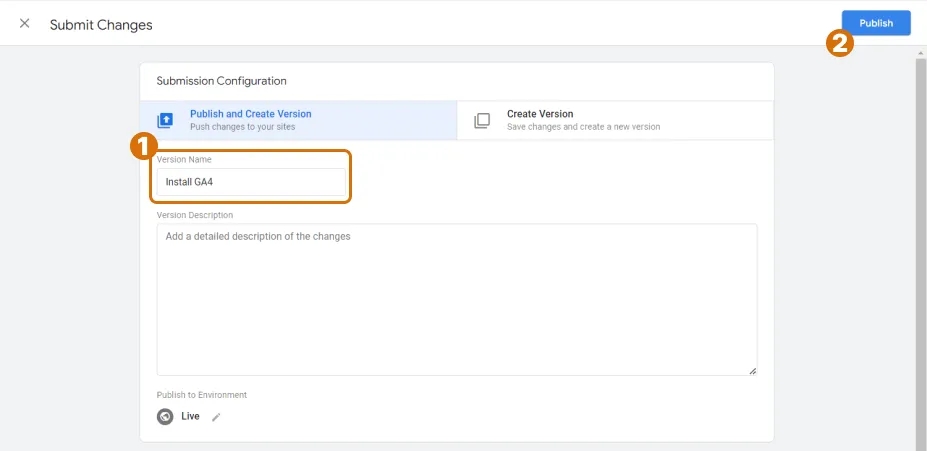
8. Don't forget to post your changes to activate them. To do this, click Submit.
9. Now specify the version name, for example, we can write it as "Install GA4".
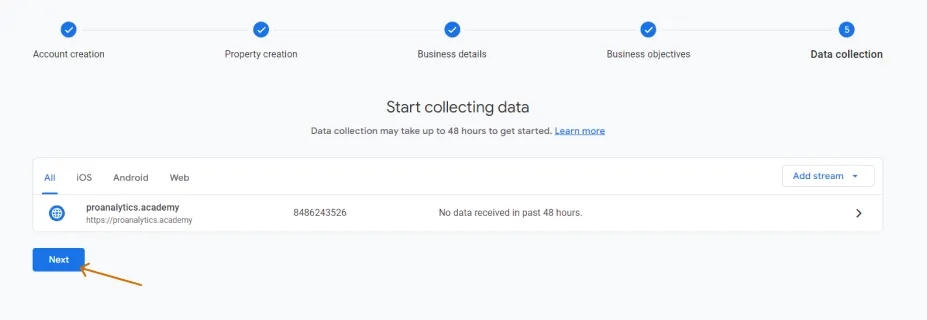
10. Now we've created a Data Stream, installed the code on the site, and all that's left is to click Next.
11. Click Continue to Home to exit setup mode.
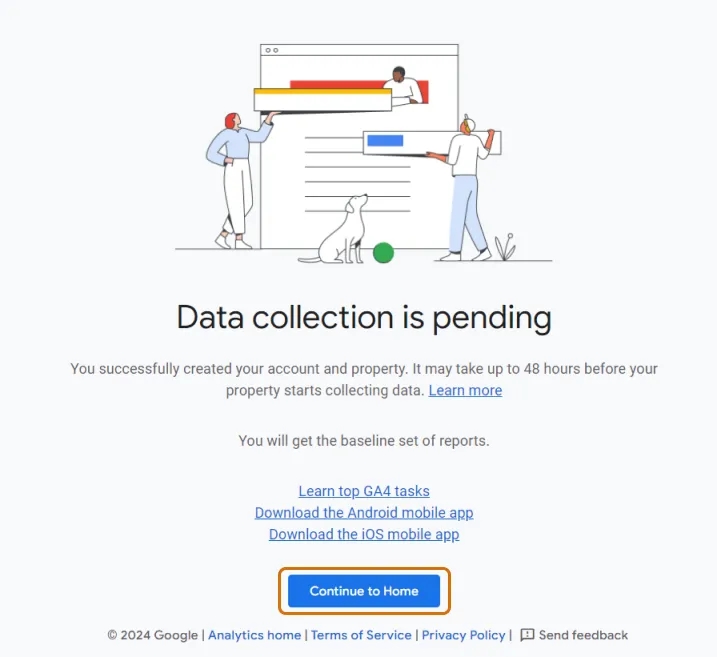
Congratulations on setting up Google Analytics 4!

Set up Google Analytics 4 after installation
Now we've got to the main page, but before you start working with data, it's worth making some settings that will help you avoid unpleasant surprises and make a high-quality analysis of site data to improve your business.
While this article is a fairly extensive and detailed guide, it doesn't actually cover all the settings, as some of them are only needed in specific cases. Below I will focus only on those settings that are required or will be useful for most sites. We will go sequentially through each block of basic settings:
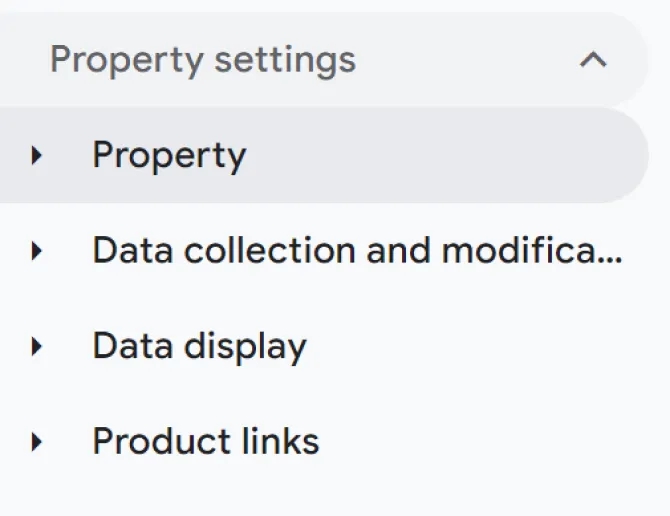
Set up Google Analytics 4 property
Let's start with the settings at the Property level.
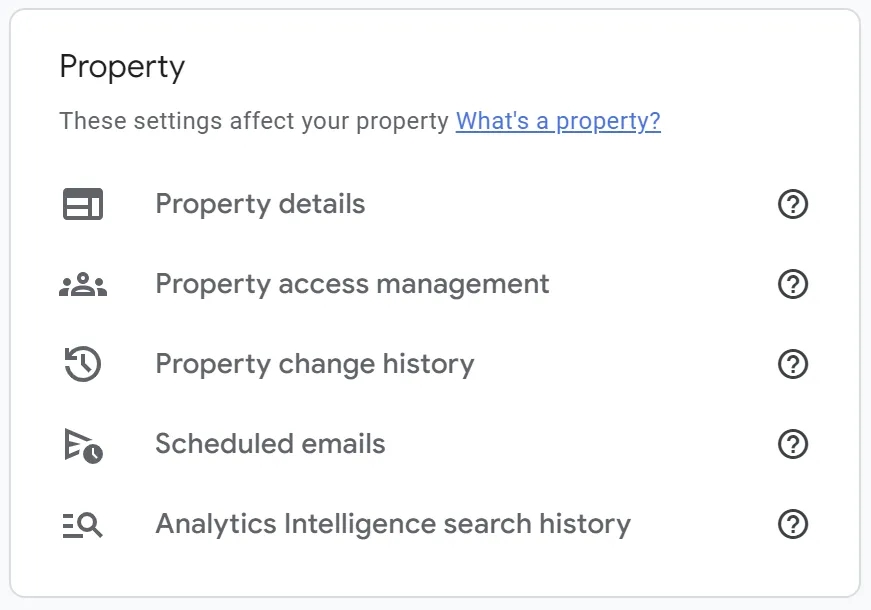
Although you can see 5 items there, in fact, the settings are only in the first one, Property details. This is where you can change the time zone and currency if you wish. But, as I wrote above, it is better to think at the stage of creation and immediately choose the right one.
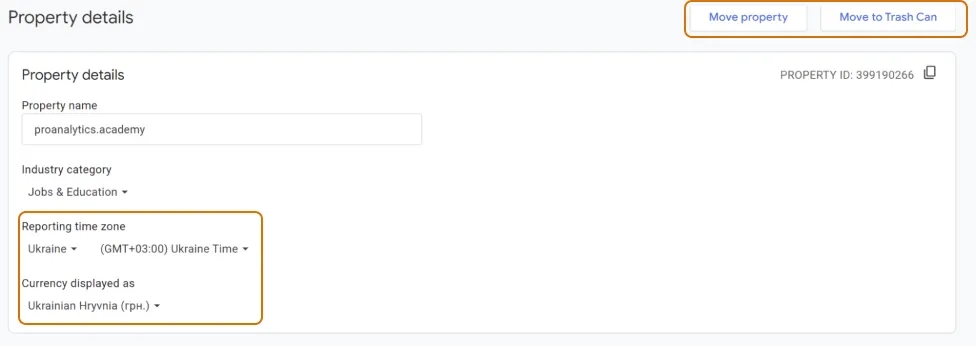
If you ever need to delete your resource, or move it to another account, then this is also done on the same screen. Pay attention to the buttons on the top right.
As for the other items, none of them are actual settings that impact data collection or processing:
- Property access management - here you can grant access to your colleagues or contractors.
- Property change history - stores the entire history of key settings at the property level. If something goes wrong - you can always find out whose actions led to it.
- Scheduled emails - allows you to schedule the delivery of specific reports via email. This definitely isn’t a fundamental setting, but if you're interested, you can read more about it in the help.
- Analytics Intelligence search history - stores your search history in GA4, as well as the search history of your colleagues. You can always see what others have been interested in. But this also isn’t a setting, so let's confidently move on to the next section.
Data collection and modification
This section contains the key settings for data collection. To save you time, I’ll briefly describe each item in this section below so you can decide whether it’s relevant to you or not. You’ll also find more detailed information about each item below or by clicking on the item’s name in the list (note that only the items related to basic settings are clickable).
- Data streams - one of the most crucial elements of the basic settings. We’ll go into detail below. Definitely something everyone should pay attention to.
- Data collection - this item is important only if you want to see data in GA4 reports related to users’ age, gender, and interests. It’s also necessary for remarketing.
- Data import - allows you to import data from other systems into GA4. For example, information about ad spend from the Facebook ad account or purchase data from a CRM system. These settings are definitely not basic, so in this article, I’ll limit myself to just providing a link to help. If you're interested in this section in more detail, feel free to mention it in the comments, and I might cover these settings in a separate article.
- Data retention - a very important item for anyone who doesn’t want to lose their data after 2 months. We’ll discuss it in more detail below.
- Data filters - Important only if you want to exclude traffic from your colleagues. This setting is closely related to Define internal traffic, so we’ll discuss it further when we cover that item.
- Data deletion requests - If for some reason you need to delete data from GA4 servers, you can do it here. It’s definitely not part of the basic settings, but it’s good to know this option exists. More details here.
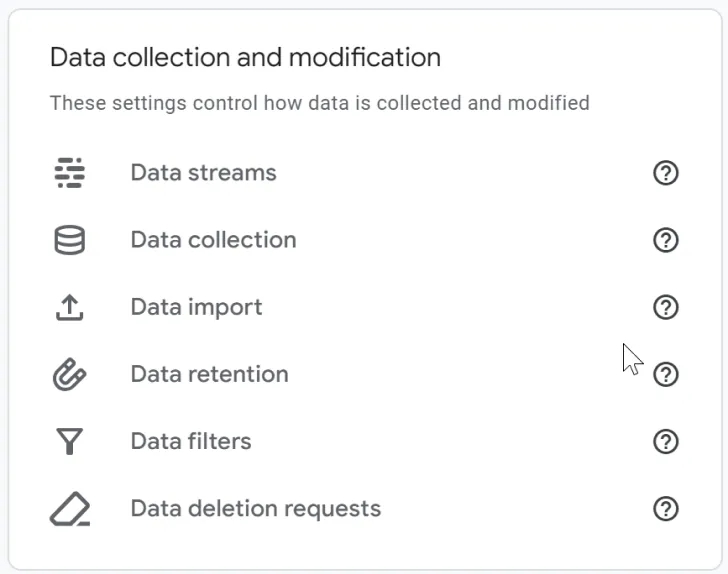
Now that you have an overview of each item, let’s dive into them in more detail.
Settings at the Data Stream level in GA4
All settings are specific to a single stream, so you'll need to select a specific stream to continue.

Please note, as I wrote earlier in this article, the settings described below apply to websites. The data flow setup for mobile apps will be different and is not covered in this article.
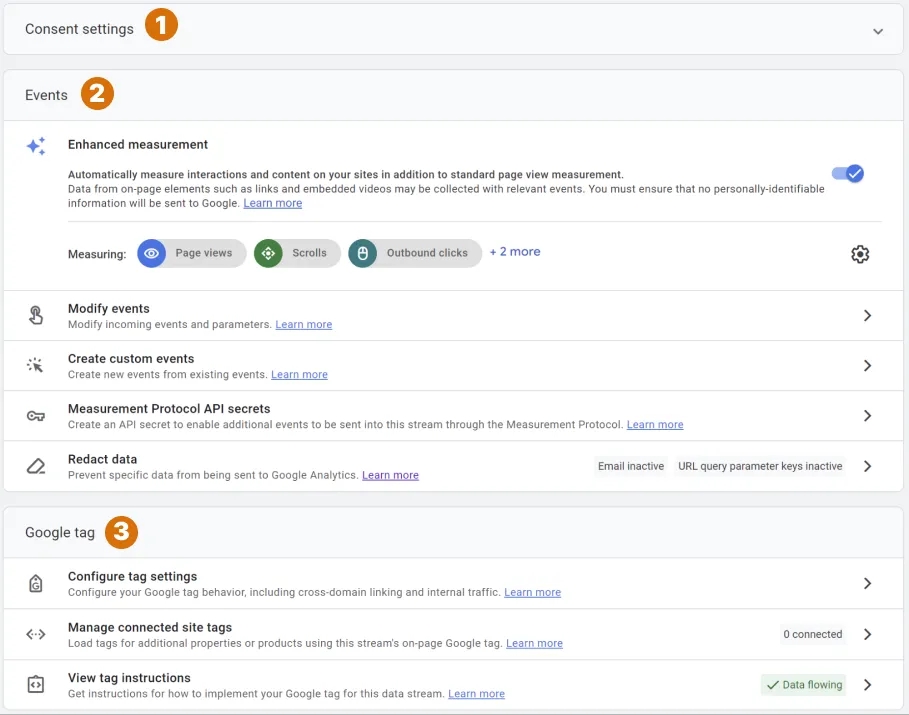
Settings for streams can generally be divided into three parts. Here is a brief overview of each, followed by a detailed explanation of the items that are important in the context of basic GA4 setup.
- Consent settings - Consent settings are definitely an important stage of data collection setup, especially if you are engaging with audiences from the EU where GDPR applies, or from California with its CCPA. This topic is so extensive that Simo Ahava's blog features a 3,000-word article on it by Markus Baersch. It also contains 222 comments at the time of writing this article. So if you’re interested in consent issues, read more here.
- Events - in this article, I’m trying to cover the settings that everyone needs to configure at the start of working with GA4. Modifying existing events, setting up custom events through GA4, and passing events via Measurement Protocol are definitely not included. However, Enhanced measurement and Redact data will be covered in detail below.
- Google tag - as previously mentioned in this article, the Google tag is a universal tag that can be added to your website for integration with various Google products and services. Google itself notes that "not all Google Tag settings are directly related to Google Analytics 4."

Therefore, below I will analyze only a certain part of the Google Tag settings.
Configure Enhanced Measurements in GA4
We saw this settings block during the creation of a Data Stream in GA4
and could have configured it then, but I mentioned it would be better to address it later. So now it's time to dive into it.
Typically, the default analytics code tracks only a single user action on a website, such as page views. To track other events, such as video views, sign-ups, form submissions, or purchases, additional code usually needs to be added to the site to trigger at the appropriate moments. Enhanced measurement allows you to expand (sorry for the tautology) the list of user actions that can be tracked on your site without adding extra code.
To see which specific events (as user actions on the site are called in analytics) you can track, click on the settings icon in the upper right corner.
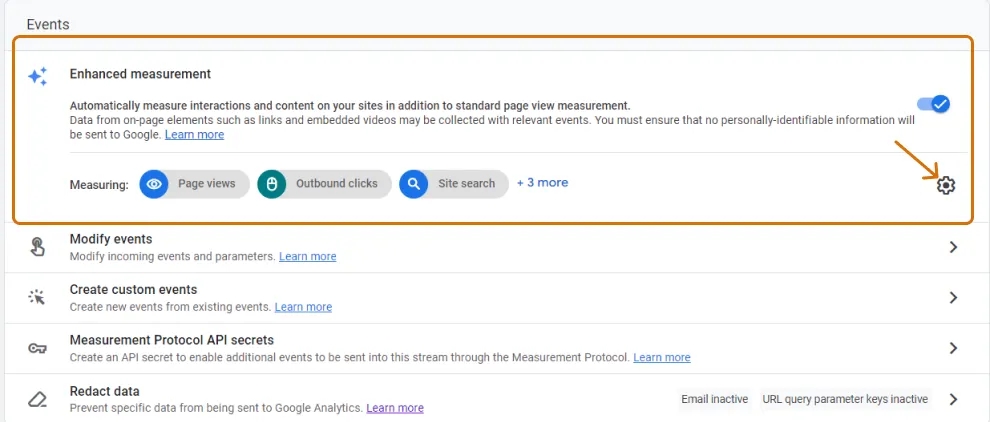
In the pop-up that opens, you'll see a complete list of events being tracked. At first glance, everything seems fine, and you can see a multitude of additional events. However, as is often the case, some of them have their own nuances. So, let’s take a closer look at them.
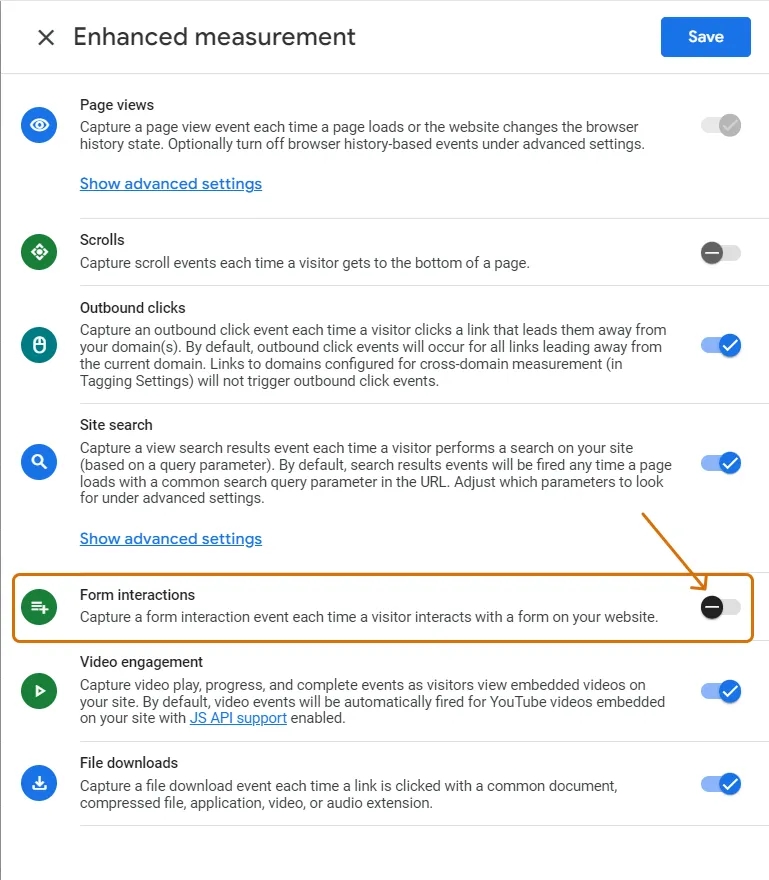
Some events in Enhanced Measurement also include parameters that allow us to not only know that a visitor performed a certain action but also to gather more details. For example, for the internal site search event, the parameter includes information about the search query text that the user entered into the search box.
Although the Enhanced Measurement settings show clear event names, such as Outbound clicks, in reports they might be represented by different, not always obvious names, such as click in this case. Therefore, below, for each event, I will provide both the name used in the settings and the event names that correspond to it in the reports.
- Page views - The event is called
page_view. This event is triggered every time a page loads or when a Single Page Application (SPA) changes its browser history state. It’s the classic event found in almost all analytics systems, but unlike many others, GA4 works seamlessly "out of the box" not only with traditional websites but also with SPAs. Note that the switch for tracking history changes is hidden under Show advanced settings.
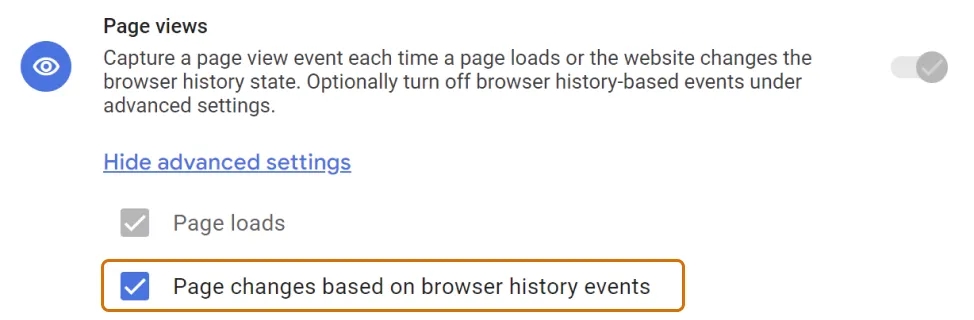
The documentation states that the page_view event transmits the parameters page_location (the URL of the page) and page_referrer (the URL of the previous page). In reality, these parameters are sent not only with this event but also with all other events sent to GA4, including not just extended statistics events but also custom ones (except for those created with an ausience trigger). Additionally, the documentation forgot to mention the page_title parameter – it is also transmitted with both the page_view event and other events.
- Scrolls is tracked by the
scrollevent, which is triggered when a user first reaches the bottom of each page (i.e., when 90% of the page is visible vertically). Why Google chose exactly 90% instead of 100% or 80% remains a mystery. The key point is to keep this in mind during your analysis. There are no additional settings for this event. Your task is to analyze the collected data to understand how users interact with the content on your pages.
According to the documentation, no parameters are transmitted with this event. However, in practice, the percent_scrolled parameter is always sent with a value of 90.
- Outbound clicks (Clicks on External Links) are tracked by the
clickevent, which is triggered every time a user clicks on a link to navigate away from the current domain. Note that this applies specifically to navigating outside of domains, while subdomains are not counted. For example, if your domain isproanalytics.academyand a user clicks through toanalytics-tips.com, this click will be tracked. However, if a user moves fromproanalytics.academytolms.proanalytics.academy, the event will not be recorded, as the latter is a subdomain of the main domain.
Along with the event, the parameterslink_classes,link_domain,link_id,link_URL, andoutbound(a boolean value) are transmitted. For more details on how to analyze clicks on external links, refer to the related blog article.
Links to domains configured for cross-domain tracking will not trigger external link clicks. What cross-domain tracking is and how it works will be explained further.
- Site search is tracked by the
view_search_resultsevent, which is triggered whenever a user views a search results page. This setting should be explicitly enabled. This is how you can find out what users are searching for on your site. Note the additional event settings parameters:Search Term Query ParameterandAdditional Query Parameters.
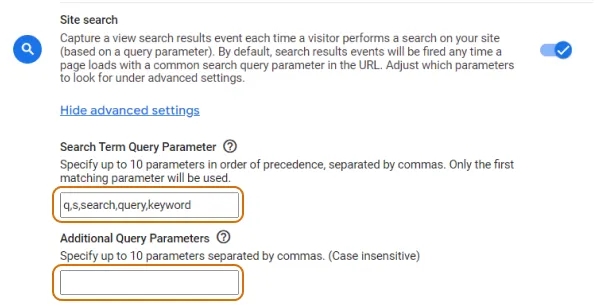
Why are these settings important? As mentioned earlier, this configuration triggers not when a user clicks the search button, but when they land on the search results page. So, how does GA4 distinguish that this is not just any page on the site, but specifically a search results page? This is where the additional settings come into play.
By default, the Search Term Query Parameter setting uses one of five query parameters in the URL to identify search results pages: q, s, search, query, or keyword. However, you can also add additional parameters in the Additional Query Parameters setting.
To determine which parameter is used on your site and whether you need to make additional settings, follow these steps:
- Go to your website and perform a search. For example, on my blog, analytics-tips.com, if you search for “Google Tag Manager”, you will be directed to a search results page.
- Look at the URL. After the question mark, you will see a section like
s=Google+Tag+Manager. This is the search term parameter, wheresis the parameter name (the part before the equals sign) andGoogle+Tag+Manageris the search term value (the part after the equals sign).

Along with this event, the search_term parameter is transmitted, which will display the search query of your visitor. Additionally, there may be a parameter in the format q_<additional key=""> (where <additional key=""> corresponds to any additional query parameters you specify in the Additional Query Parameters settings).
I also recommend checking out the additional blog article to learn how to properly analyze site search data.
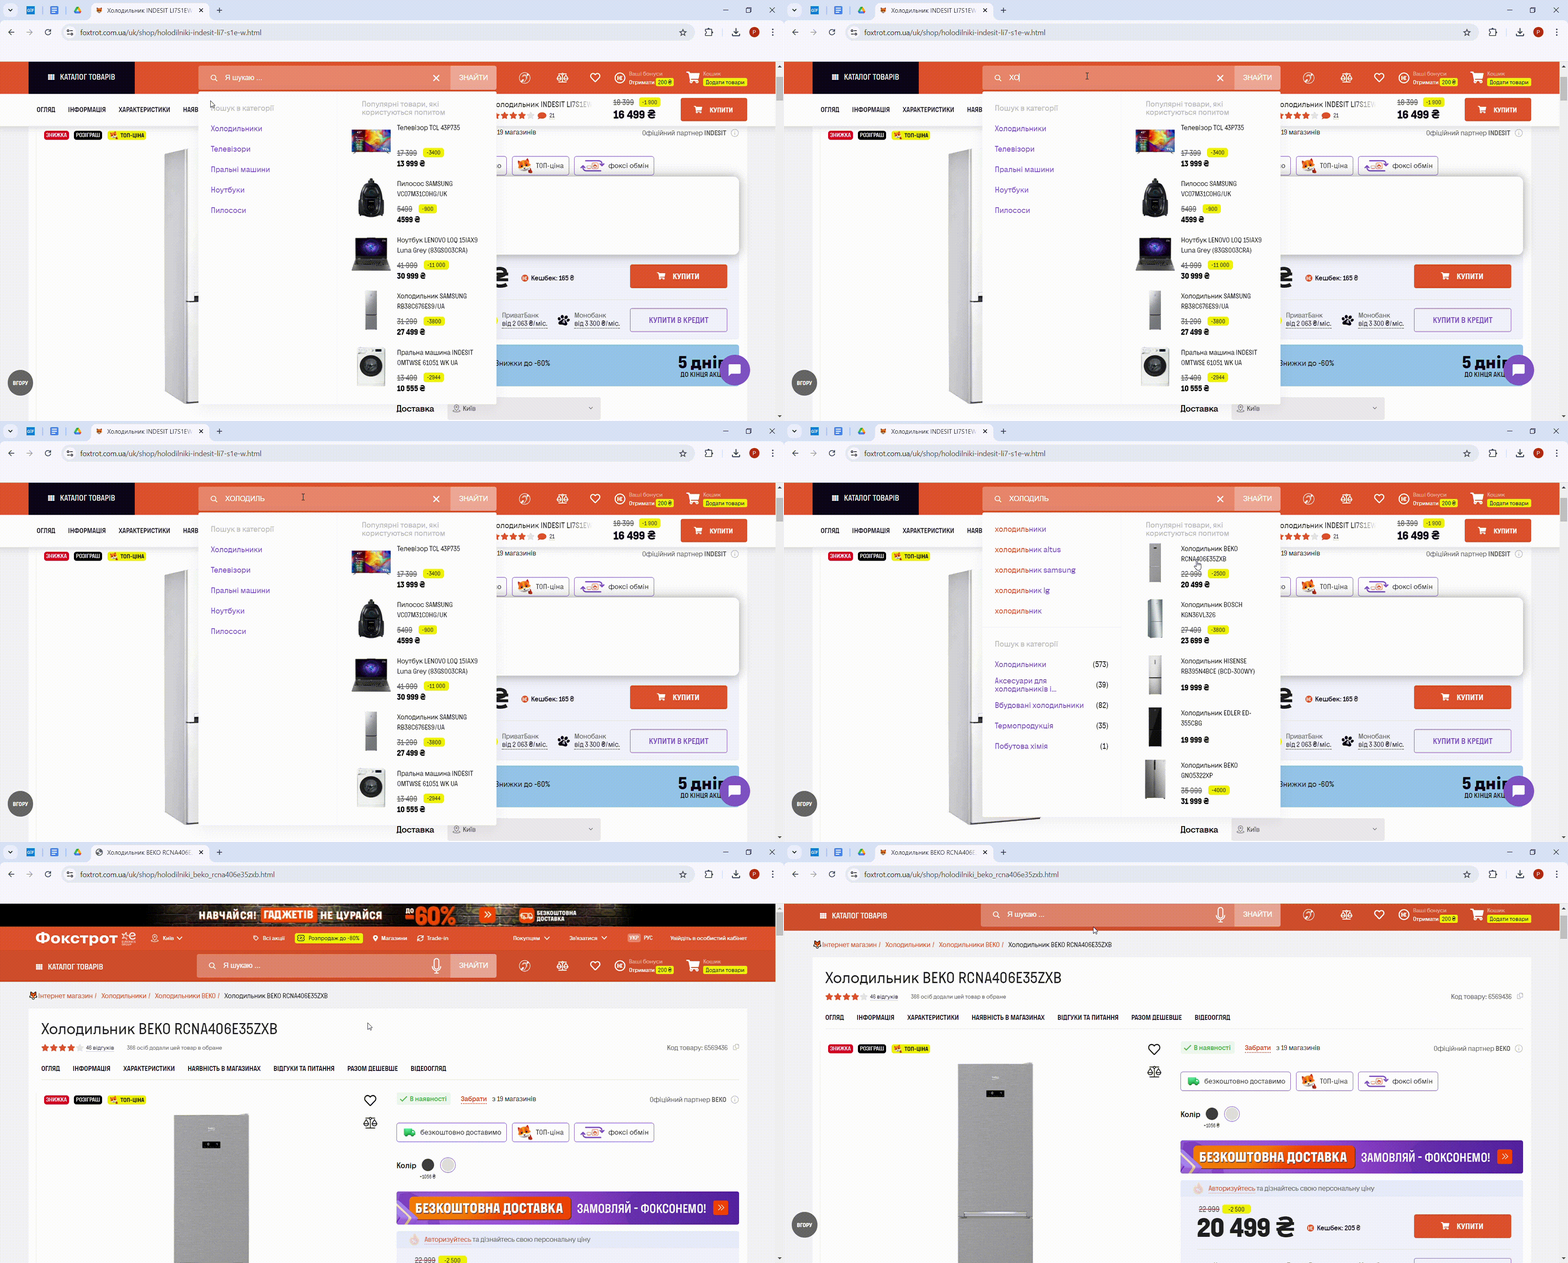
Note that if a user does not land on a search results page but instead receives search results in a pop-up, as shown in the screenshot below, this search will not be tracked by this setting. To track such interactions, you will need to use GTM (Google Tag Manager).
- Form interactions are tracked by the
form_startandform_submitevents. Theform_startevent captures the user's first interaction with a form during a session, while theform_submitevent is triggered when the user submits the form.
These two events allow you to determine how many users started filling out a form and compare this data with the number of users who actually submitted the form. This can be a marketer's and business owner’s dream for understanding form engagement and conversion rates. However, be cautious: this setup can often lead to event duplication or incorrect triggers.
If you are new to GA4 and are unsure how to verify whether this configuration will work correctly for your form, it’s better to disable it initially.
Additional parameters are also sent with these events:
form_id(the HTML identifier attribute of the <form> DOM element),form_name(the HTML name attribute of the <form> DOM element),form_destination(the URL to which the form is sent) are automatically collected forform_start- For
form_submit, parametersform_id,form_name,form_destinationand one moreform_submit_text(the text of the "Submit" button, if any) are similarly registered.
- Video engagement (YouTube Video Interaction) – if you have YouTube videos on your site, be sure to enable this setting. It allows you to register the following user interactions with the video:
video_start– the start of video playback;video_progress– moments when the user watches 10%, 25%, 50%, and 75% of the video;video_complete– the completion of video playback.
Along with these events, additional parameters are collected, which allow you to analyze user actions in more detail:video_current_time– the specific second of the video that the user was watching at the time of the event;video_duration– the total duration of the video;video_percent– the percentage of the video that the user had watched at the time of the event;video_provider– currently, this will only be `youtube`, but hopefully, the GA4 team will enable tracking interactions with videos from other platforms in the future;video_title– the title of the video being watched by the user;video_URL– the link to the video being watched by the user;visible– a boolean value indicating whether the video was in the visible area of the screen at the time the event occurred.
If this setting is not working for you, ask your developer to check if JS API Support is enabled for the videos on your website.
- File downloads – the event is called
file_downloadand is recorded when a user clicks a link to a file with one of the following common types:- Text
- Executable
- Presentation
- Compressed
- Video
- Audio
Along with the event, the following parameters are collected:
file_extension– the extension of the file that was interacted with;file_name– the name of the file that was interacted with;link_domain– the domain from which the user downloaded the file;link_id– the value of the class attribute for the link element;link_text– the text of the link that was clicked to initiate the download;link_URL– the full link to the file that was downloaded.
Note that the event is recorded specifically when a click occurs on a link with the appropriate file extension. Any file downloads initiated via JavaScript code will not be captured.
In a previous blog article, I also covered how to find out which files users download most frequently from your website.
The file_download event triggers only when a click occurs on a link with an extension that matches the following regular expression:
pdf|xlsx?|docx?|txt|rtf|csv|exe|key|pp(s|t|tx)|
7z|pkg|rar|gz|zip|avi|mov|mp4|mpe?g|wmv|midi?|mp3|wav|wma
Redact data
Цей пункт налаштувань дозволяє вам видалити персональні дані користувачів з URL параметрів. Тобто якщо, наприклад, у вас на сайті після відправки форми чи оформлення замовлення, відвідувача перекидає на сторінку типу example.com/success?name=Maks&[email protected] - зверніть особливу увагу на цей пункт налаштувань.
If you are unsure whether personal user data is being transmitted in URL parameters on your site, use the guide from Julius Fedorovicius's article to check this.
Why is this important? According to the official Google Analytics 4 policies, you are not allowed to send personal user data to this system. Therefore, Google provides a simple way to clean this data.
In the GA4 interface, you are provided with two ways to handle this task:
- Email – automatically searches for email addresses in the URL and removes them. This means you don’t have to specify the
emailparameter from the example above; the system will remove it on its own. - URL query parameters – allows for more precise settings by removing values from the parameters you specify. In the case described above, you would need to specify the
nameparameter.
Additionally, you can specify a URL and see how the settings will apply in real-time.
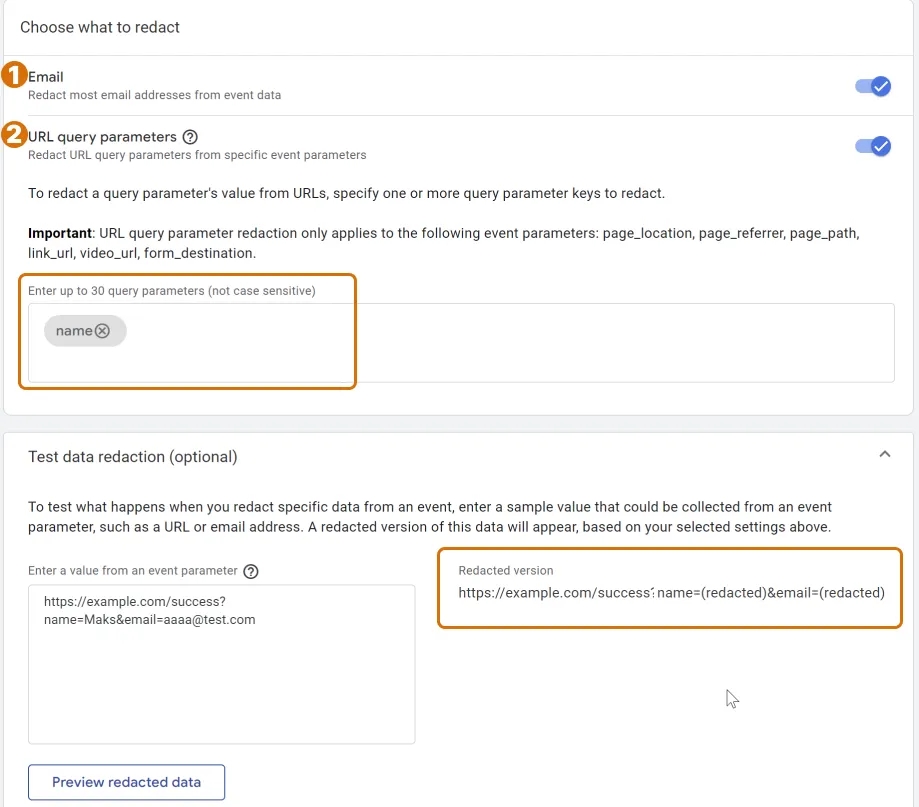
Note that GA4 does not remove parameters from the URL entirely. The parameters remain, but instead of the original data, the value will be displayed as (redacted).
This setting applies to data in the following parameters: page_location, page_referrer, page_path,link_url, video_url, and form_destination.
Configure Tag Settings
At this stage, the settings pertain to Google Tag, and as mentioned earlier, not all of these are fundamental to GA4, so I will focus only on the following. Below is a brief description of each item and a quick link. Feel free to jump straight to the relevant section.
- Configure your domains – This handles cross-domain tracking setup. It is relevant only if you have multiple sites on different domains.
- Define internal traffic – Allows you to set up filtering for employee and contractor data to prevent them from affecting your analysis. It filters only static IPs.
- List unwanted referrals – Enables you to exclude domains of payment systems and other services that are not actual traffic sources but often appear in traffic reports as primary sources of incoming customers. The explanation is brief, but if your site has online payments, you should read this section in more detail.
- Adjust session timeout – Allows you to increase session duration and more accurately calculate Engagement Rate. I recommend paying attention to this setting.
Configure your domains - Cross-domain tracking configuration
If you have multiple sites on different domains and you collect user data from each of them, it's important to set up cross-domain tracking in GA4. This will allow you to accurately merge data about visits from users who navigate between these sites during a single session.
For example, if a user visits proanalytics.academy, and then moves to the blog analytics-tips.com, cross-domain tracking will ensure that they have a consistent identifier in your analytics. This helps you see the complete user journey and avoid counting duplicates when aggregating data from multiple domains.
Pay special attention – this setting specifically pertains to separate DOMAINS. There is no need to include your subdomains in the configuration (domains that contain the main domain). For example, sites like myshop.com and blog.myshop.com are on the same domain, and GA4 will automatically combine user interactions across these sites into a single session.
The setup is quite straightforward: in the Cross-domain Linking Configuration field, enter the domains of all the sites where you are tracking user interactions and then click Save.
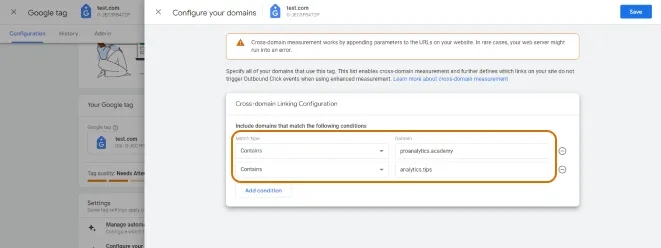
Note that although the setting we've discussed seems very straightforward, cross-domain tracking has many nuances. To better understand how it works, I recommend reading the excellent article on this topic by Simo Ahava.
Define internal traffic
Internal traffic refers to the traffic generated by you or your colleagues. There's no need to track these interactions as they can skew your GA4 data. Moreover, if not excluded, internal traffic can distort your analytics, as people working on the project often behave differently from regular site visitors.
You can filter out this traffic in your reports by excluding IP addresses. Remember to activate the filter after setting it up. To exclude IP addresses, go to Define internal traffic and set up rules to filter out these IPs.
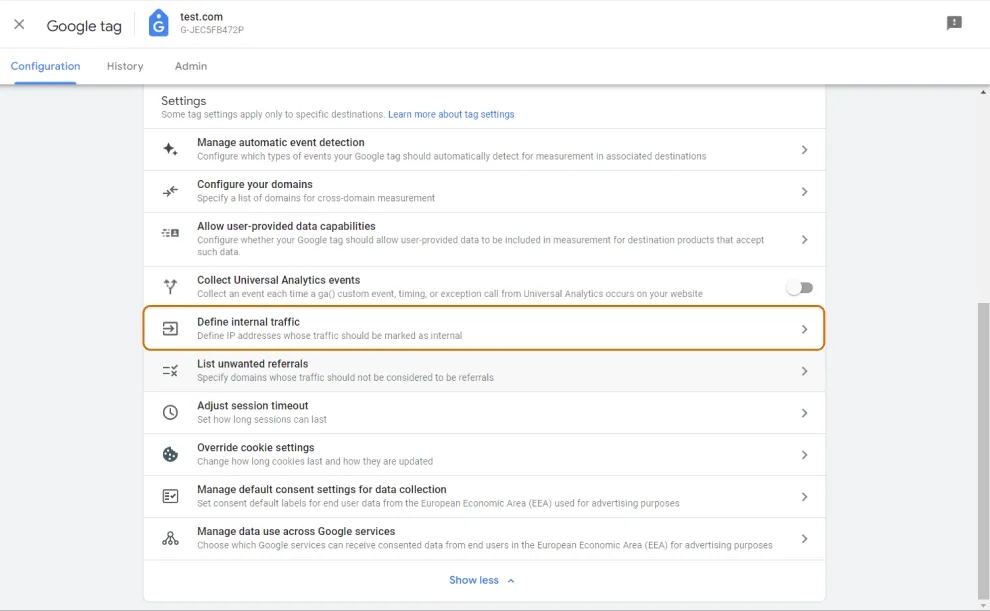
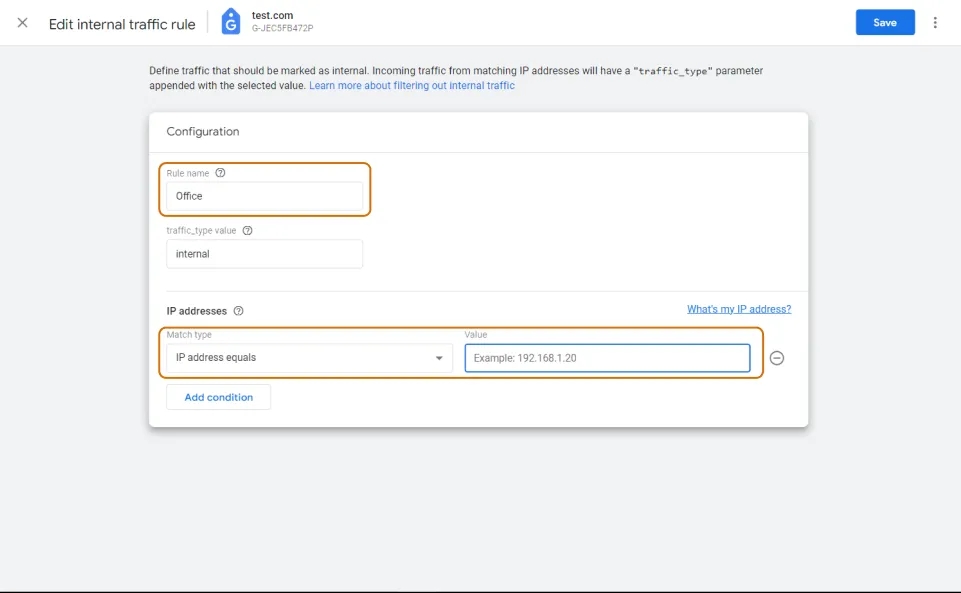
Now, we need to create a new rule and fill in the required fields:
- Name the Rule – For example, use "Office" if it’s the IP address of your office, or "Home" if it’s from a home address.
- Enter the IP Address – Input the IP address you want to exclude.
This will allow you to filter out traffic from specific IP addresses, ensuring that internal traffic does not affect your analytics data.
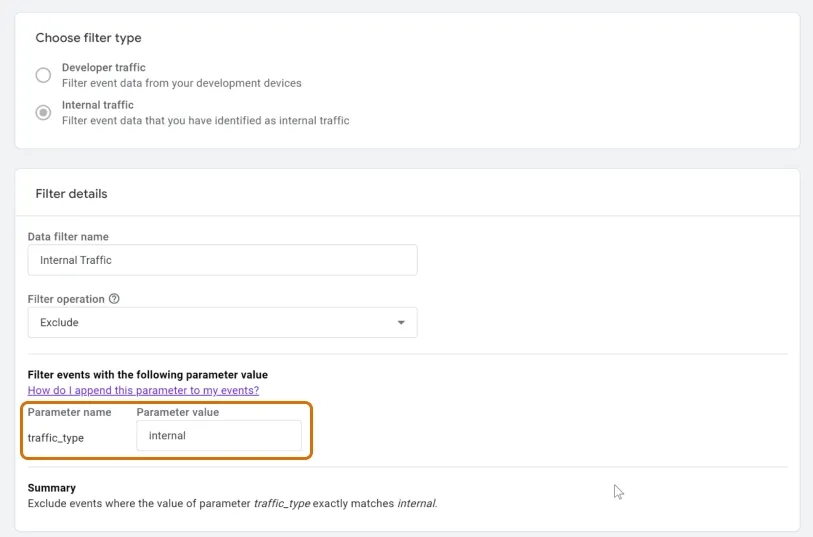
Pay attention to the value in the traffic_type field, as it will be important for later steps.
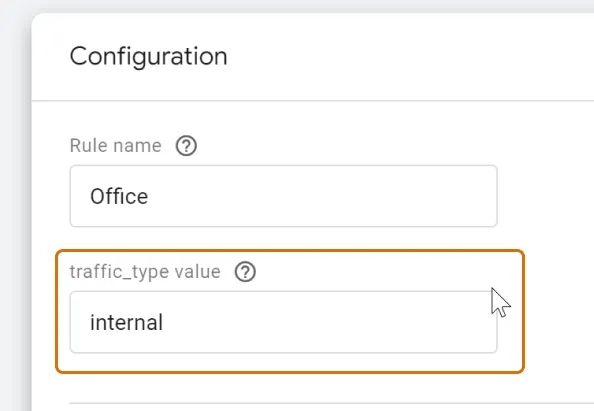
After setting up these configurations, GA4 will start tagging this type of traffic, and you will be able to filter it in reports. However, this will need to be done manually each time. To ensure that this traffic is filtered at the data collection stage, you must activate the filter.
To do this, assuming you haven’t changed the value in traffic_type, follow these steps: Admin -> Data Collection and Modification -> Data Filters -> Click on the three dots -> Activate filter
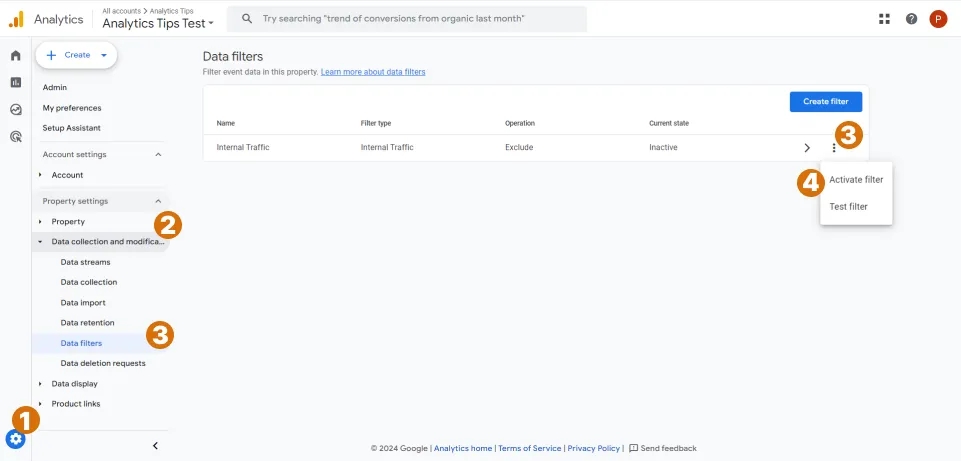
If you have changed the traffic_type value, you will need to specify it in the filter settings.
Note that this setting is suitable only if you have static IPs.
List unwanted referrals
If your site uses payment systems or logins through popular services like Google, make sure to add these domains to the list of unwanted referrals. This will help ignore technical traffic sources such as portmone.com, liqpay.ua, stripe.com, accounts.google.com, etc.
The setup is very simple — just enter the domains you want to exclude. This way, traffic from these sources will be counted as direct traffic, and due to GA4’s last-click attribution, it will not be considered in your reports.
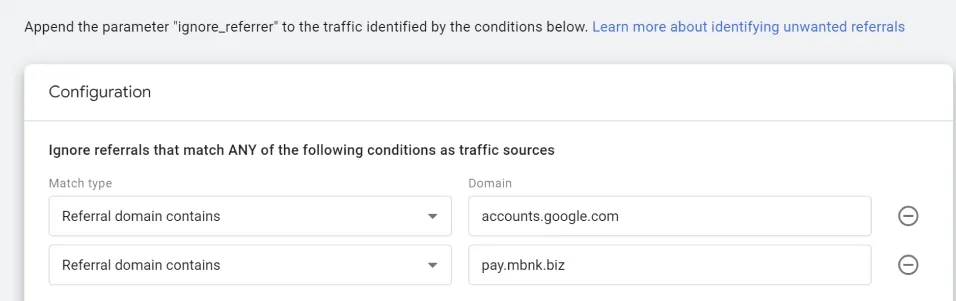
Note that sometimes a technical domain from which the transition occurs, such as during login, might overlap with a domain generating marketing traffic. For example, this situation occurs with Facebook. When a user logs into your site through Facebook, they will necessarily pass through the domain facebook.com. Consequently, if this domain is not excluded from referrals, the performance of such traffic is likely to be overstated. If you add facebook.com to the list of unwanted referrals, you will stop seeing any traffic from this domain altogether. Naturally, neither option is ideal.
In such cases, you should consult a developer. When a user logs into your site through Facebook, the developer should add the parameter ignore_referrer=true to the redirect URL. For more details, refer to the documentation.
This setting does not take effect immediately. For a few days, you may still see traffic from the excluded domains. However, this applies only to users who have previously visited your website.
Adjust session timeout
This section covers two important settings:
- Increasing session length
- Configuring the engaged session timer
Let's start with the latter, as it is crucial for any website. Why is this important? An engaged session is an indicator of user interest, but can 10 (default) seconds, half of which are often spent loading the site, truly reflect user interest? Likely not. Therefore, a more meaningful duration would be at least 30-40 seconds spent on a page.
To adjust this setting, go to Adjust timer for engaged sessions and specify the appropriate time, for example, 40 seconds.
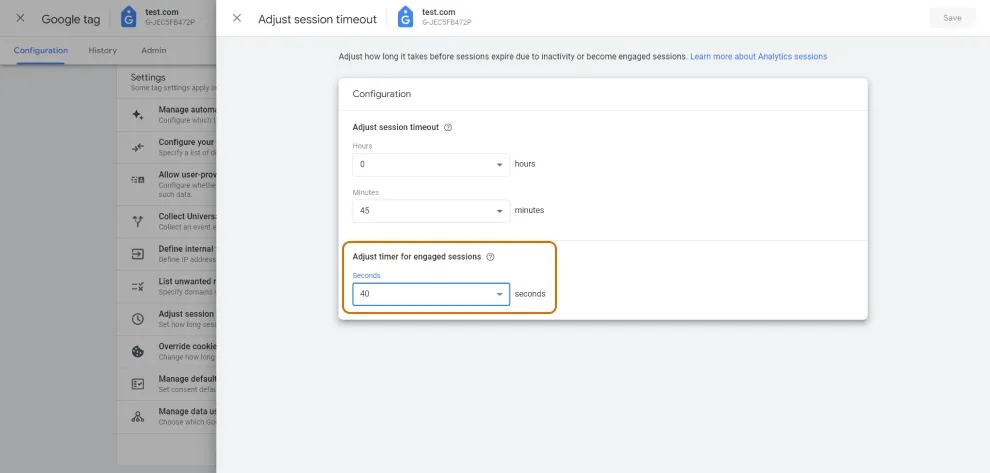
Regarding increasing the session length, this setting is necessary only in two cases:
- If your website allows users to view certain content for an extended period without interacting with the site, such as watching videos, listening to music, or radio.
- If users often leave a tab open and return to it over time. This is relevant for SaaS services or sites where users spend a long time contemplating a purchase.
Why is this setting important?
By default, GA4 starts a new session after 30 minutes of user inactivity. For example, if a user spends 5 minutes selecting a movie and then watches it for 50 minutes (without any further interactions), their next activity on the site after 50 minutes will be counted as a new session. As a result, you will see two sessions and metrics that are far from reflecting the actual user engagement during a session. A similar situation occurs if a user leaves a tab open, such as in an online store. For instance, if they view a product page and then decide to have a coffee, returning after 35 minutes to make a purchase, this purchase will be counted in a SECOND session.
To have GA4 count these intermittent activities as one session, you can increase the session duration to 7 hours and 55 minutes.
Note that after implementing this setting, for example, the sessions per user metric will significantly drop. Therefore, everyone working with GA4 in the company should be informed about these changes.
Changes will also affect other metrics, such as average session duration. Therefore, make adjustments cautiously.
The configuration process is straightforward: simply enter the desired time in the fields under Adjust session timeout.
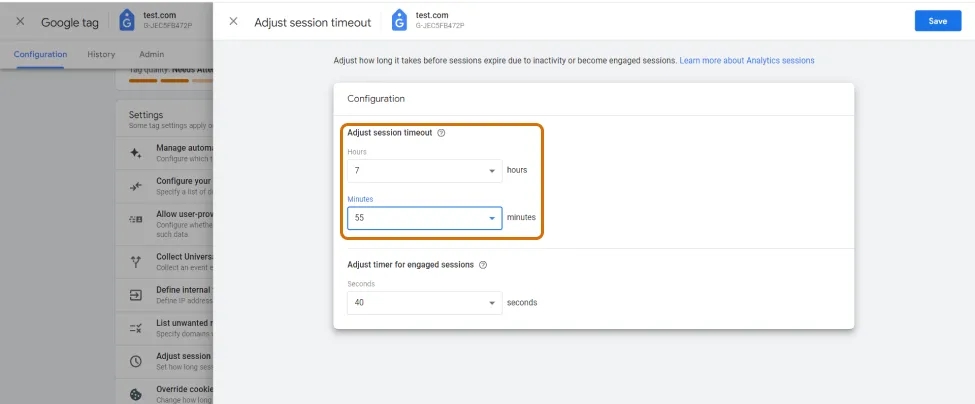
Congratulations! With the data stream settings now complete, let’s move back to the higher level.
Data collection
Google signals data collection
Google Signals is responsible for collecting aggregated data from users who have signed into one of their Google accounts (Gmail, YouTube, etc.) and have enabled ad personalization.
This functionality provides you with the following capabilities:
- Run remarketing campaigns to website users across different devices.
- Analyze user data by age, gender, and interests in the corresponding reports.
To enable this data collection, simply switch on the toggle next to Google signals data collection.
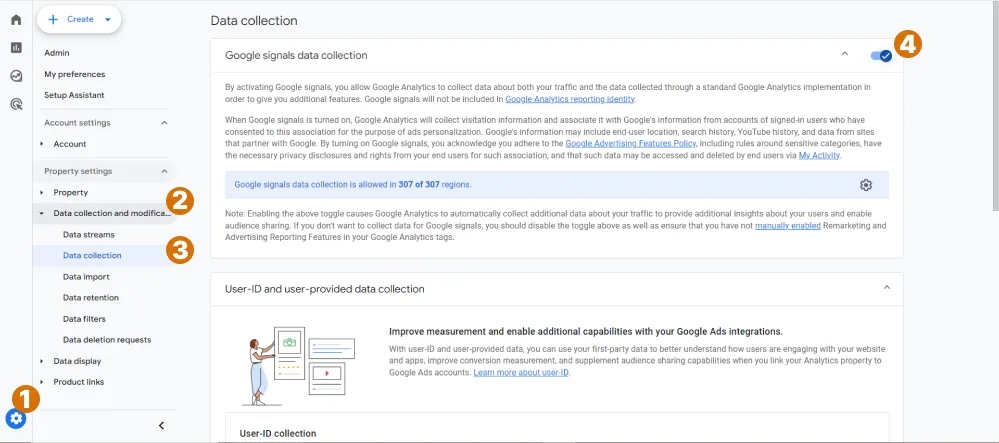
But be cautious: although this setting seems like a must-have, Google does not enable it by default for a reason. Make sure you are not violating user rights, especially in regions where GDPR and other similar regulations apply.
User-ID and user-provided data collection — Why it is better NOT to enable this setting
In this article, I focused only on the points that should be addressed during the basic setup. This point is an exception.
DO NOT DO WHAT IS DESCRIBED BELOW UNLESS YOU FULLY UNDERSTAND WHY YOU NEED IT. I mention it here only because I often see people enabling this setting without understanding its implications. And it leads to problems. So please, DO NOT toggle the switch below during basic setup.
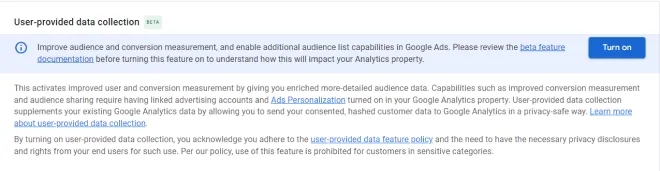
For those who are still curious about why:
- Firstly, enabling this setting will result in the User-ID not being transferred to Google BigQuery, requiring additional custom configurations.
- Secondly, if you transfer User-ID and collect user-provided data, there may be duplicates due to different hashing and data tagging in these settings.
Read more about how this setting can disrupt your analytics here.
And once again, unlike most settings, there is no way to revert this. So, please be cautious. I repeat, this feature SHOULD NOT be enabled.
Data retention
User and event data retention or how to store data about user actions on the website for longer
This is one of those Google Analytics 4 settings that you absolutely must not overlook. Here’s why.
By default, GA4 sets the data retention period to 2 months. This means that user data and their actions beyond the 2-month period will be unavailable for analysis. Need to compare current period data with similar data from last year? — Sorry, that’s not possible. Want to prepare for this year’s Christmas season by analyzing last year’s trends? — It’s unlikely you’ll be able to do so with the default settings.
So, before you continue, I recommend stopping right here and checking your settings.
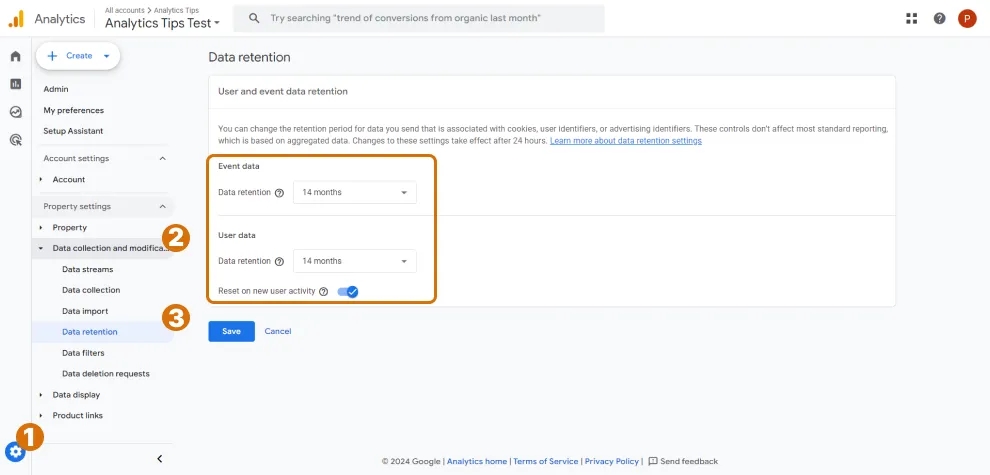
Attentive readers may have noticed a logical error in the previous paragraph: in fact, even with the default settings, data in standard reports will be available. But let's be realistic—what kind of meaningful analysis can you do with only the standard reports? So, while Google aims to save storage by retaining less data, make sure to set the maximum retention period in your settings.
Data filters
At the time of writing this article, GA4 allows you to filter only two types of traffic:
- Internal Traffic, i.e., traffic from colleagues, which I discussed earlier.
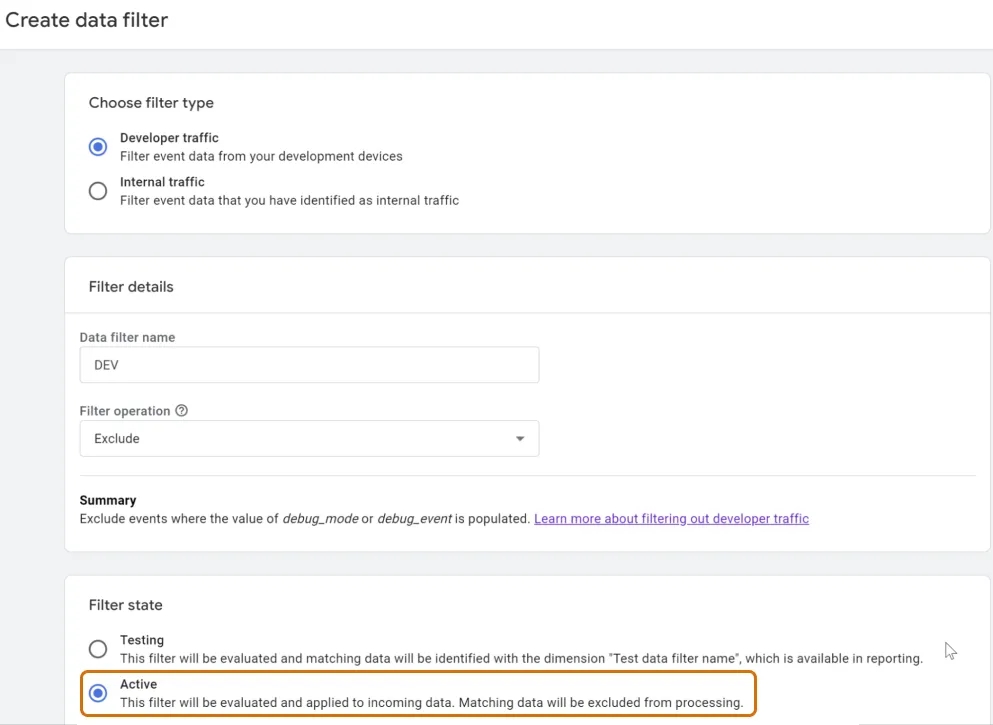
- Developer Traffic. Note that this setting will only help if the developer is using debug mode during their work.
To exclude developer traffic, add a separate filter with the settings shown in the screenshot below.
Great, we have completed another stage of the setup. Only the Data Display and Product Links blocks remain. The good news is that most of these settings are not essential, so you are almost at the finish line. The downside is that you will need to configure a significant portion of them over time. Below, I will briefly outline some important points.
Data Display
The main feature of most settings in this block is that they affect the data that has already been collected. That means you select certain settings, the system recalculates your metrics, you change the settings to others, and the system recalculates and provides you with new data. This applies to items such as Comparisons, Channel Groups, Attribution Settings, and Reporting Identity. Let’s take a closer look at each of these:
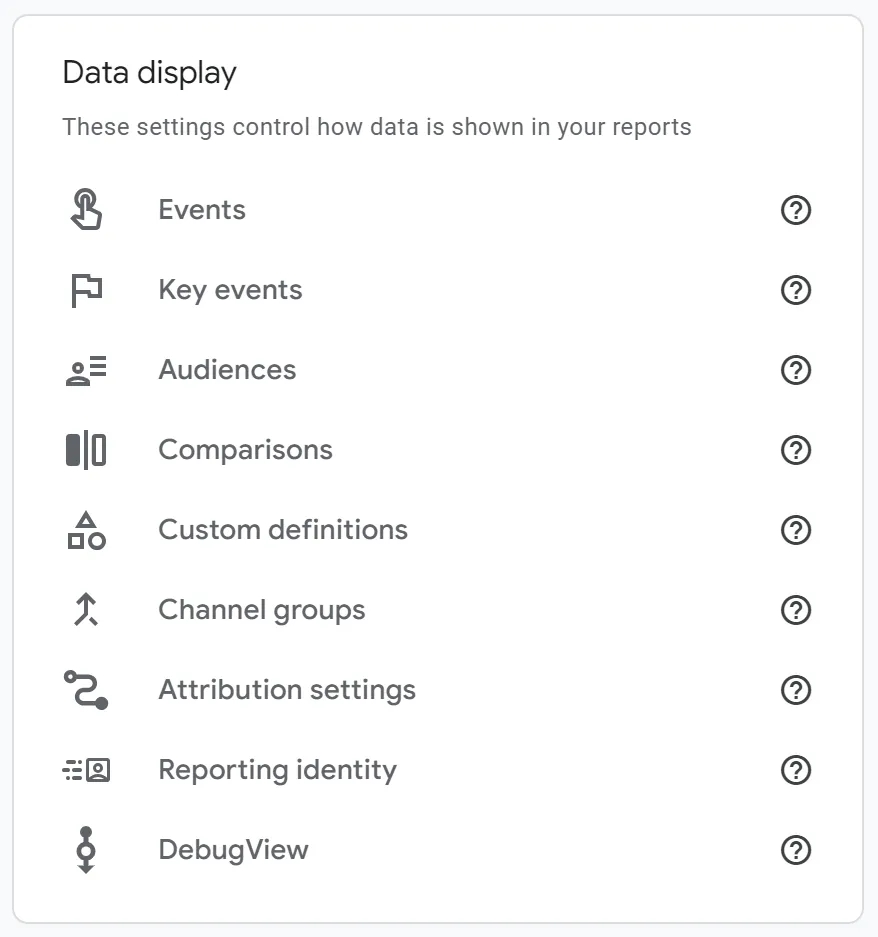
- Events - any actions users take on the website (such as adding items to the cart, submitting forms, scrolling the page, watching videos, etc.) are referred to as events in Google Analytics 4 terminology. Therefore, if you want to know what users are doing on your website, I recommend not limiting yourself to only the Enhanced Measurement events discussed earlier but also configuring the collection of information on other relevant user actions for your site.
- Key events - while events encompass any user actions on the site, key events, as the name suggests, are the most important events. Typically, these include actions after which the company receives contact information from visitors, such as form submissions, calls, purchases, registrations, newsletter sign-ups, etc. This should be one of the first things you set up when configuring GA4. I covered this in detail in the article - How to Set Up Key Events (Former Conversions) in Google Analytics 4: A Step-by-Step Guide.
- Audiences - you understand that you need to target specific audiences for your advertising campaigns, ideally those interested in your product or service. One of the advertising strategies is remarketing, where you try to engage users who have previously interacted with you, such as visiting your site, adding products to the cart, or watching videos on the site. Many of these users need some time to make a decision, so remarketing often yields good results. You can create remarketing audiences in this settings block. Of course, remarketing is just one reason to use the audience creation functionality.
- Comparisons - when analyzing data in GA4 reports, you often need to segment a specific group of people to analyze their actions on the site or compare the performance of one group of users against another. In the Comparisons block, you can prepare such groups so that you don’t have to create them manually each time. This functionality may seem similar to audiences, and it is, but audiences are more geared towards advertising activities, while Comparisons are designed for data analysis.
- Custom definitions - we previously discussed that user actions on the site in GA4 are called events. However, sometimes just events are not enough. For example, if a user submits a form, we send an event called
form_submit, but it's hard to understand which specific form the user submitted. This is where event parameters come into play, allowing us to pass the form's name. Another example is if you want to analyze how users interact with the site based on a specific plan, but GA4 does not have a standard parameter like "User Plan." This is where custom user-level parameters come in handy. This block of settings is where you configure such custom additional parameters.
- Channel groups - many marketers are used to analyzing traffic based on
source/mediumparameters. However, for large businesses, analyzing traffic across hundreds of differentsource/mediumcombinations can be quite complex. In such cases, you can use the Default channel group in GA4, but this grouping is template-based and may not always meet the business's actual needs. You can create custom channel groups in this block.
- Attribution settings
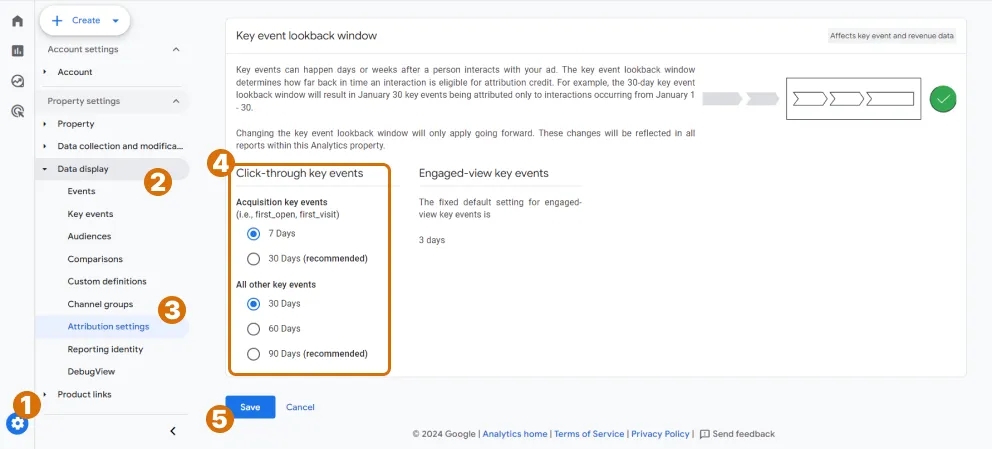
I think you understand that visitors to your website often don't make a purchase immediately and may visit the site multiple times before buying. This complex path to conversion in web analytics is called a multi-channel funnel. Now imagine: a user visits your site 5 times before making a $100 purchase. Which of these sessions should get the $100? The attribution model rules determine how the value of a purchase is distributed across sessions in a multi-channel funnel, and you will find these settings in this block.
For most businesses, I recommend setting the key event windows to the shortest periods, as shown in the screenshot. However, of course, this setting highly depends on your business type. For example, for businesses like pizza delivery or lock repair, where orders are placed quickly, shorter periods are suitable. On the other hand, for a car dealership, it’s better to choose longer windows.
- Reporting identity
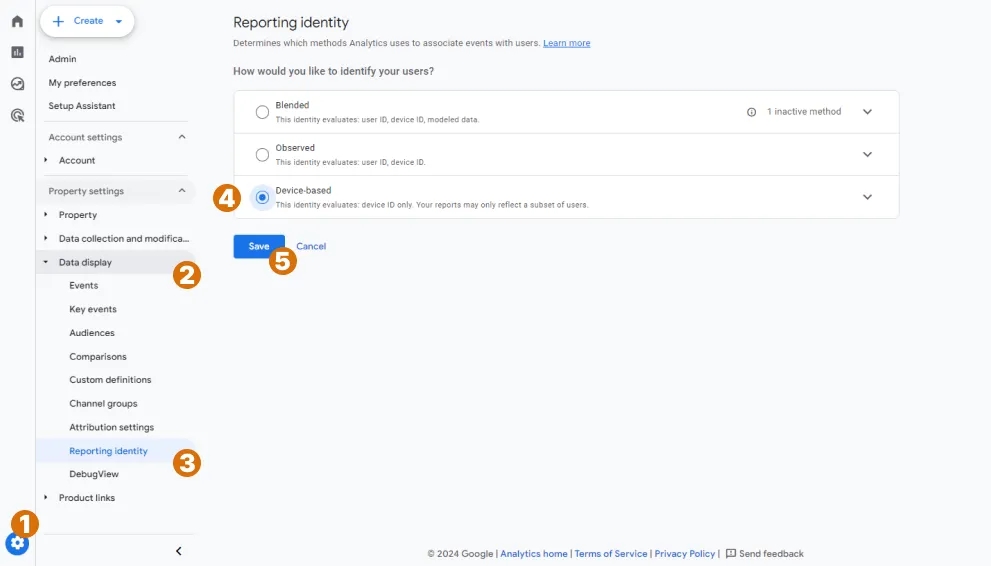
This setting determines how users are counted in your GA4 property. By default, the option is set to Blended. You can generally keep this setting, especially if your site has advanced Consent Mode configured. However, in practice, you might encounter issues in GA4 where the data in reports appears at least strange. For instance, key events from Google Ads traffic may not be displayed, even though they are present in the ad dashboard. This is not the only reason, but in such cases, I recommend trying to switch to the device-based mode and check the data again. Since data collection is not dependent on identification settings, you can quickly test this hypothesis and switch back. In other words, you can select device-based — and the report will be recalculated, then switch back to Blended — and the report will be recalculated as it was before.
Note that User-ID will not work in device-based mode. Additionally, if you are using advanced Consent Mode, switching to device-based mode will result in less data being visible, as it will only include users who have allowed data collection without modeled data.
- DebugView
This settings block is designed for verifying the accuracy of event data transmission. For more detailed information, I recommend checking out the following material.
Product Links - Set up GA4 integrations with other platforms
Google Analytics 4 offers integration with many platforms, and I definitely recommend connecting your GA4 property to each of the platforms shown in the screenshot below if you are using them.
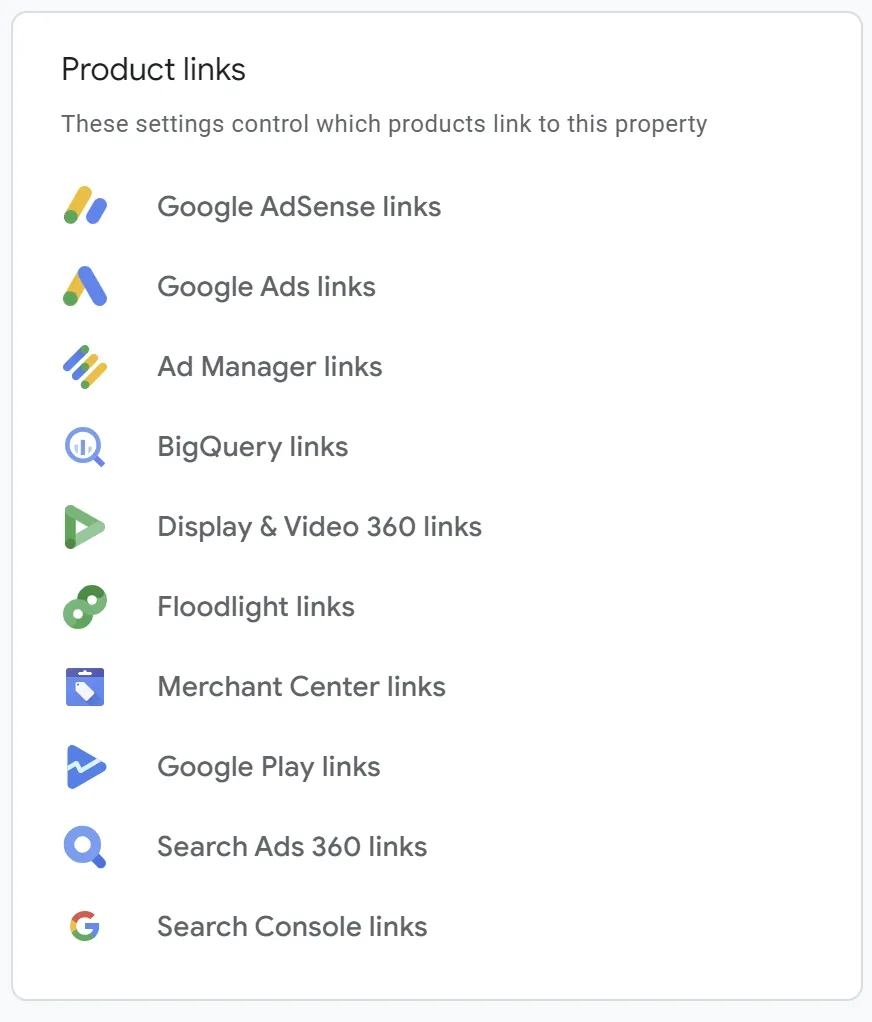
In this article, I will cover the integration with only the 3 most popular services:
Google Ads Links - Connect your GA4 property to Google Ads
As mentioned above, if you are running or planning to run ads in Google Ads, make sure to link these two systems. The integration works in both directions:
- It allows you to import key events and audiences from GA4 to Google Ads.
- It allows you to view more detailed information about the performance of your ad campaigns in GA4 reports.
To set up the integration:
- Select the appropriate settings option:
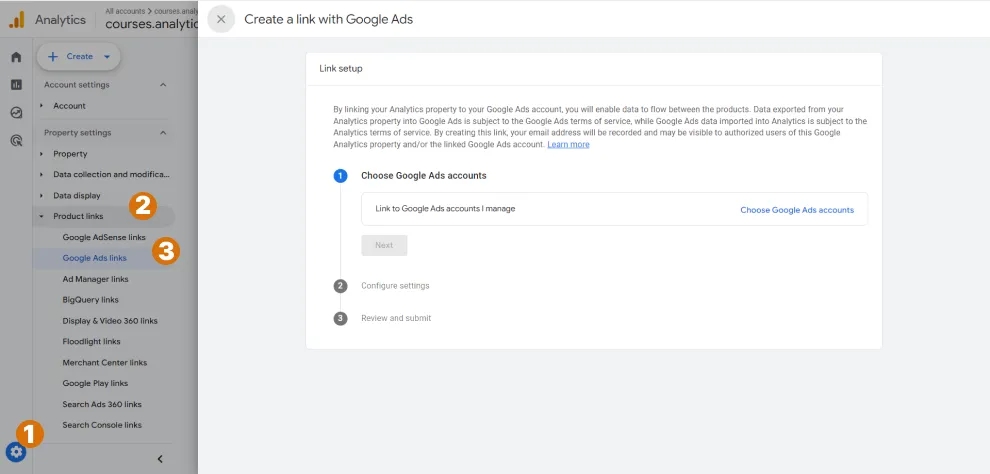
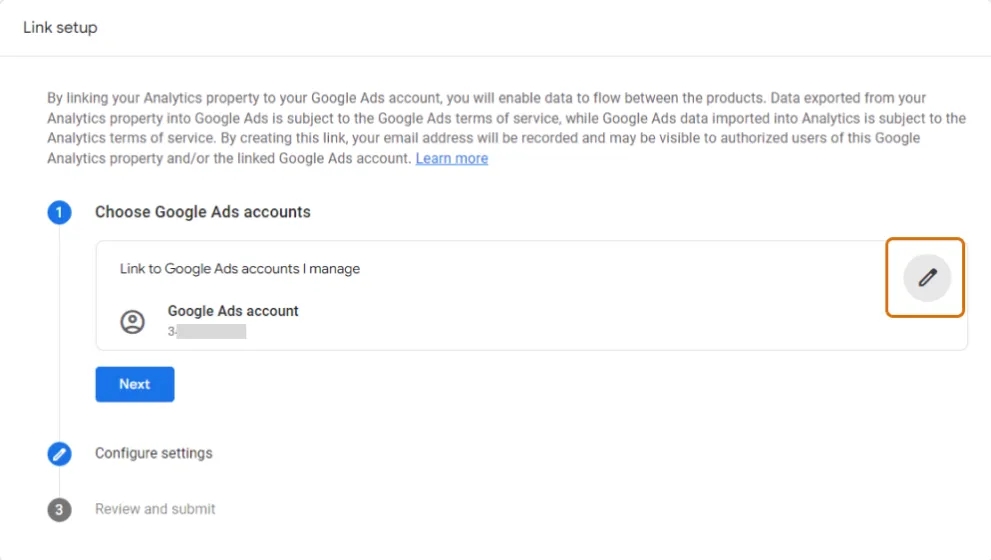
2. Select the Google Ads account(s) you want to link for importing. Click on Next.
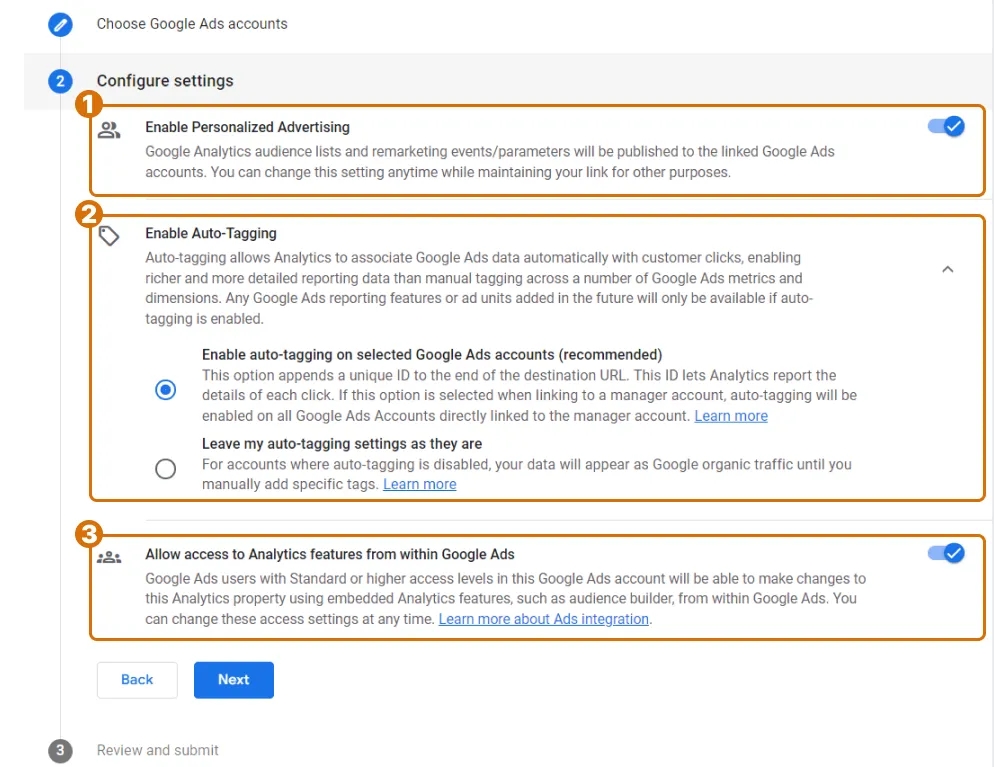
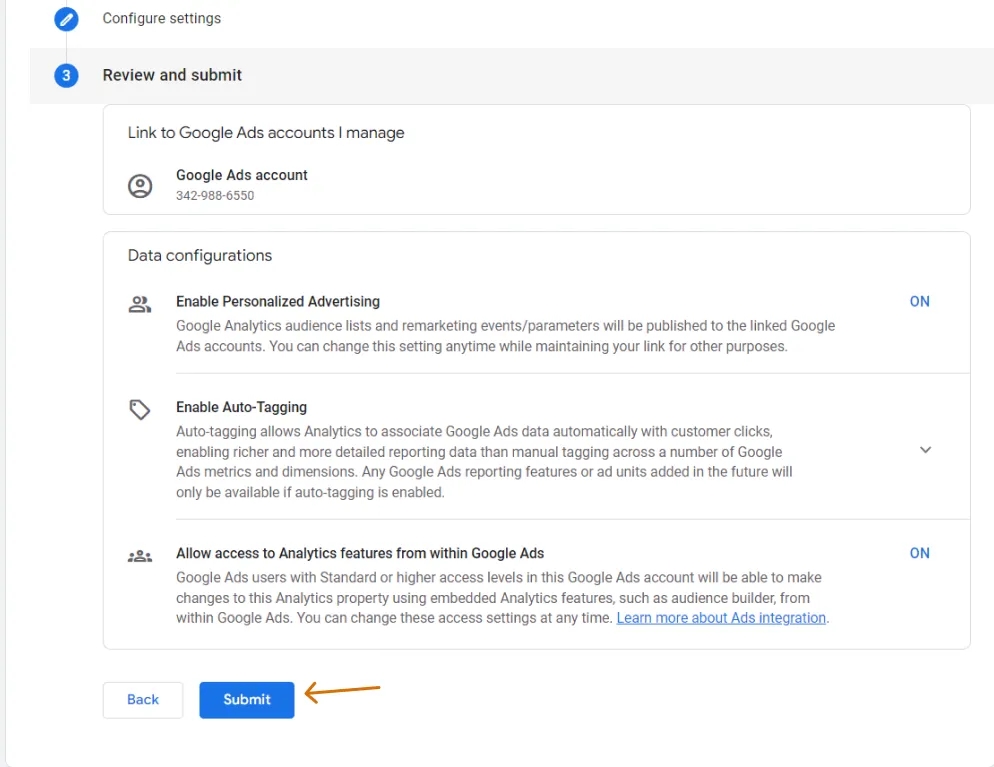
3. Тепер нам надається можливість змінити налаштування:
- Enable Personalized Advertising - the name of this setting speaks for itself; if you want personalized advertising, it’s best to leave this enabled.
- Enable Auto-Tagging - this feature allows Google to add certain parameters, such as
gclid, to the URLs of your website pages when a user clicks on your ad, helping to track ad effectiveness. I definitely recommend leaving this enabled. - Allow access to Analytics features from within Google Ads - this feature allows users with access to the ad account to access certain Google Analytics features. It's hard to imagine managing ads effectively without access to analytics, so definitely keep this enabled.
After making your choices, or actually just agreeing, click Next.
4. On the final step, review all the settings once again and click Submit.
Search Console Links - Connect your GA4 property to Google Search Console
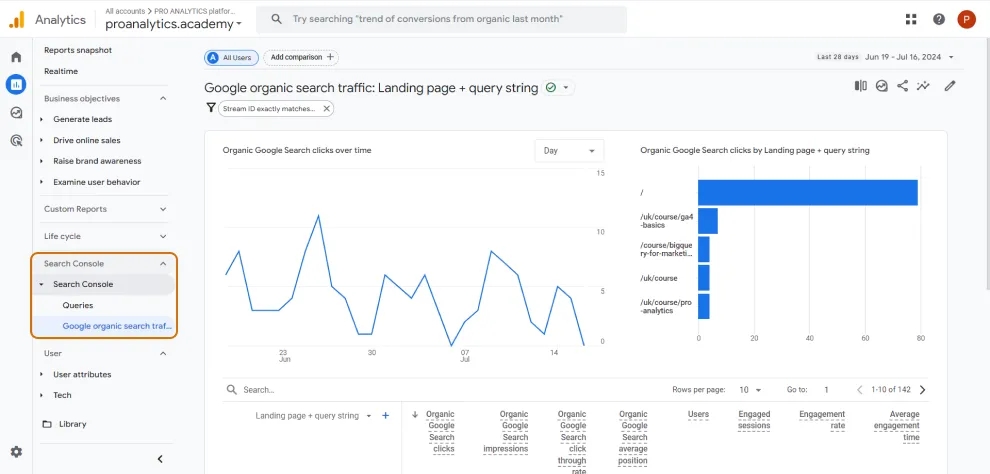
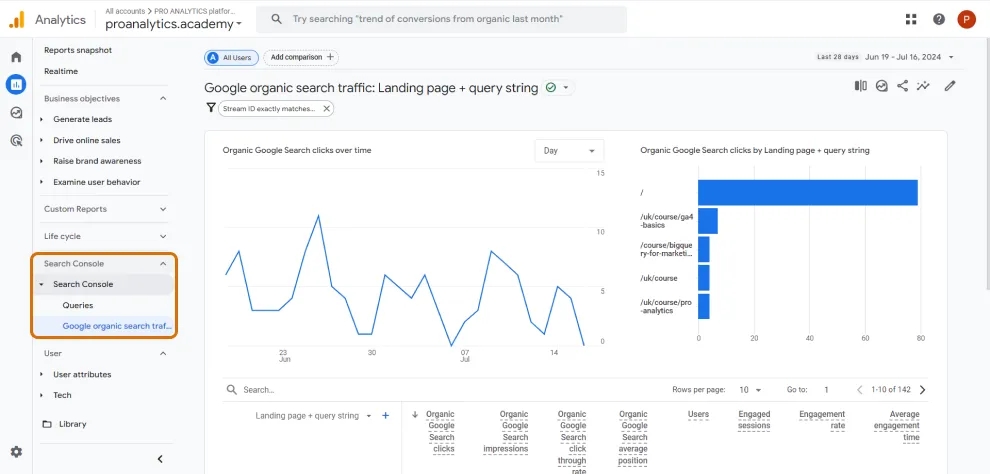
If the previous integration was only necessary for those running paid ads on Google Ads, then this integration, in my opinion, is essential for everyone. It's hard to imagine rejecting free, relevant traffic from Google Search. By linking your GA4 property with Google Search Console, you will get two new reports in the GA4 interface under the Search Console collection:
- Queries
- Google organic search traffic: Landing page + query string
Here's how it will look in GA4:
To set up the connection:
- Open the relevant settings section.
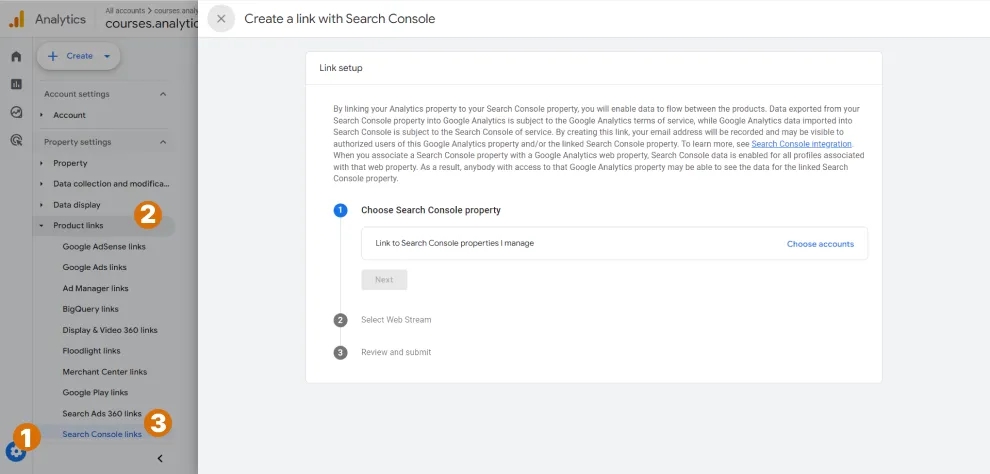
2. Select the desired property in Search Console and click Next.
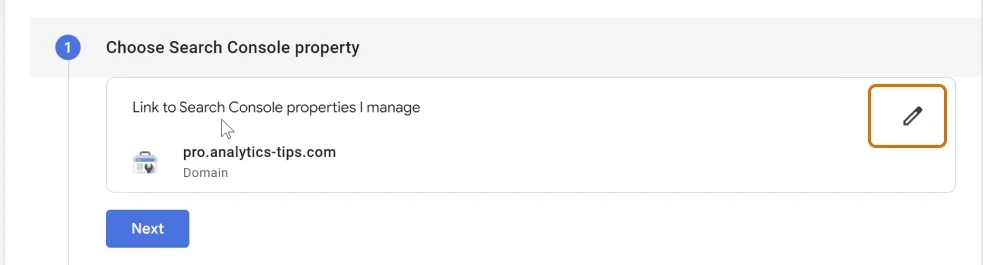
3. Select the desired web stream and click Next.
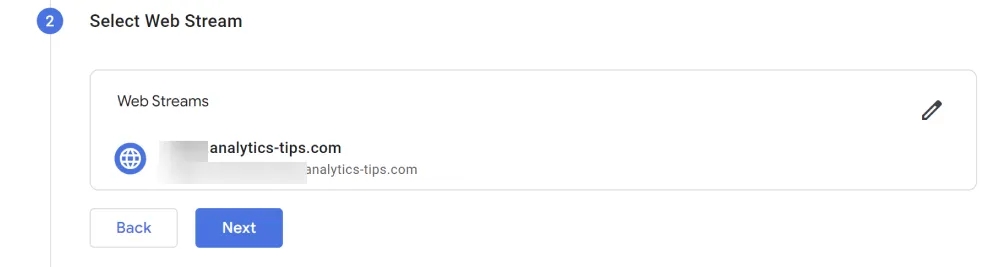
4. Review the settings and don’t forget to click Submit.
BigQuery Links - Connect your GA4 property to BigQuery
If you want to analyze data in custom reports for a period longer than 14 months, exporting data to BigQuery will help. In fact, the ability to view data over an extended period is one of the many advantages and opportunities that BigQuery offers. If you're not familiar with it yet, I recommend reading the comprehensive guide I published earlier on this blog — Everything You Need to Know About BigQuery: What It Is, Why It Matters, and Its Marketing Benefits.
Data will start being collected in BigQuery only after you set up the export, so the sooner you do this, the better.
To connect BigQuery, go to the relevant section and click Link. Similar to previous steps, you will need to select a project for the link and specify how the connection will operate. Since there are many settings involved, and a detailed guide is already available on the blog, I recommend checking it out - Integration of Google BigQuery with Google Analytics 4.
Instead of conclusion
Congratulations! Now you not only know how to correctly set up Google Analytics 4 but also have a much better understanding of what each setting controls. You should also have a general idea of the various advanced features available. The next step is to figure out what to do with all the collected data, but that’s a topic for another time. For now, it’s time to take a break ;)
By the way, I’ve compiled the most popular questions from my clients and students, as well as common mistakes and solutions. You might find answers to your issues among these questions. So be sure to bookmark the article and share it with your friends.
Want to learn more about working with GA4? Sign up for the PRO ANALYTICS course group or take the GA4 Basics course in a self-study format. .
Google Analytics 4 set up: FAQ
How to install GA4 on a Wordpress website
Of course, the best way to set up GA4 on any site is through Google Tag Manager (so if you have GTM, click here). However, if for some reason you don’t have GTM and can’t connect it to your site, use the following instructions:
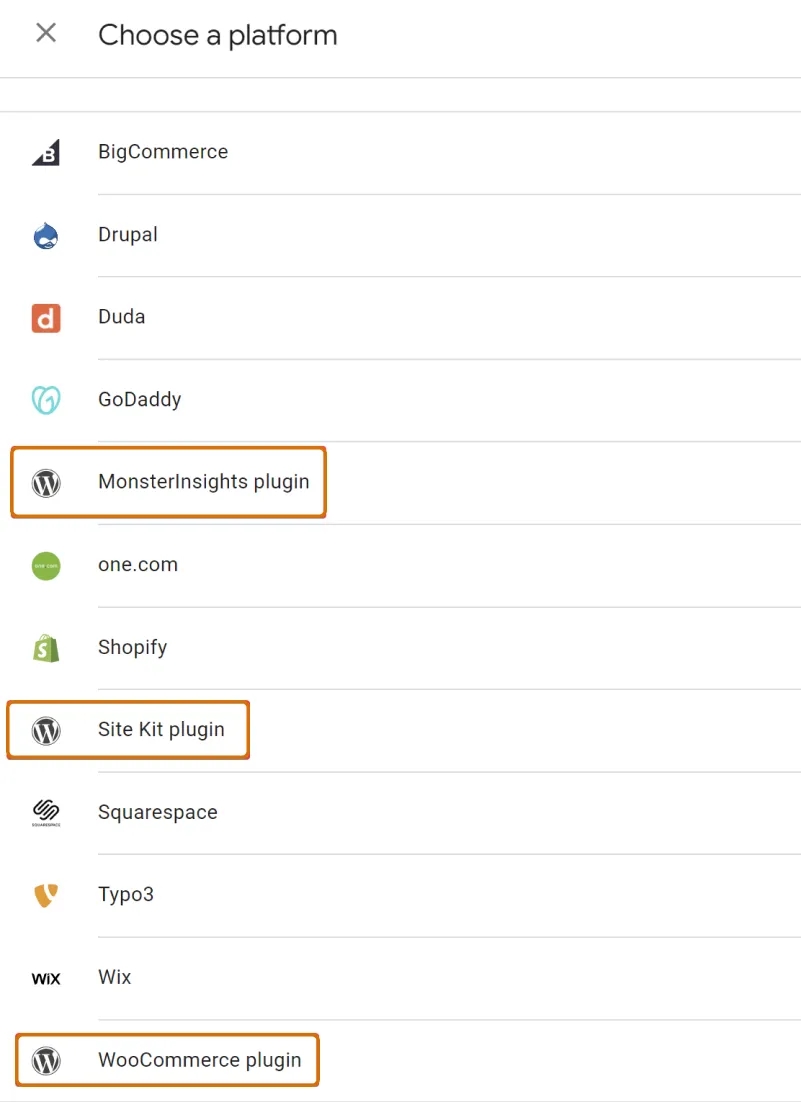
- At the code installation stage, select the option Install with a website builder or CMS. Next, choose one of the plugins that is already installed on your site, or install one of the suggested ones.
2. After selecting the plugin in GA4, a detailed setup guide will open.
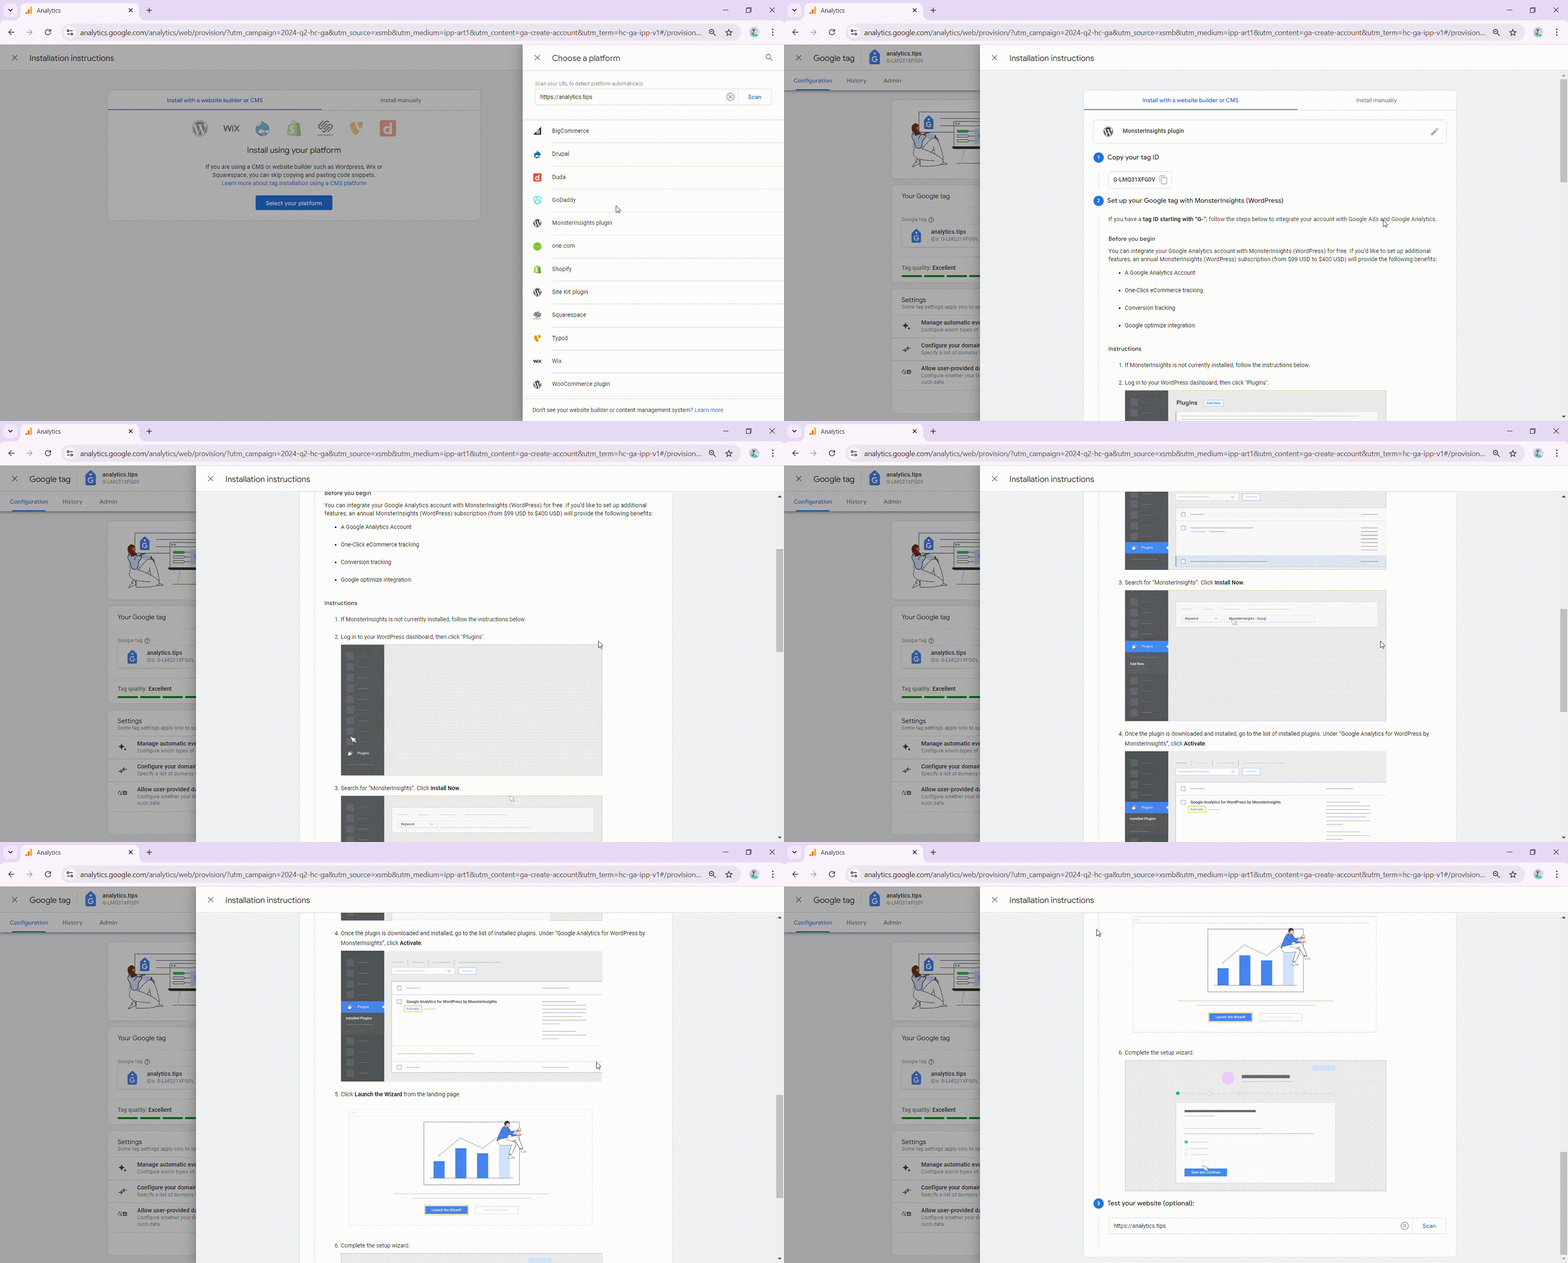
To access the Install with a website builder or CMS option, follow these steps: Admin -> Data Collection and Modification -> Data streams -> View tag instructions.
How to install GA4 on a Shopify website
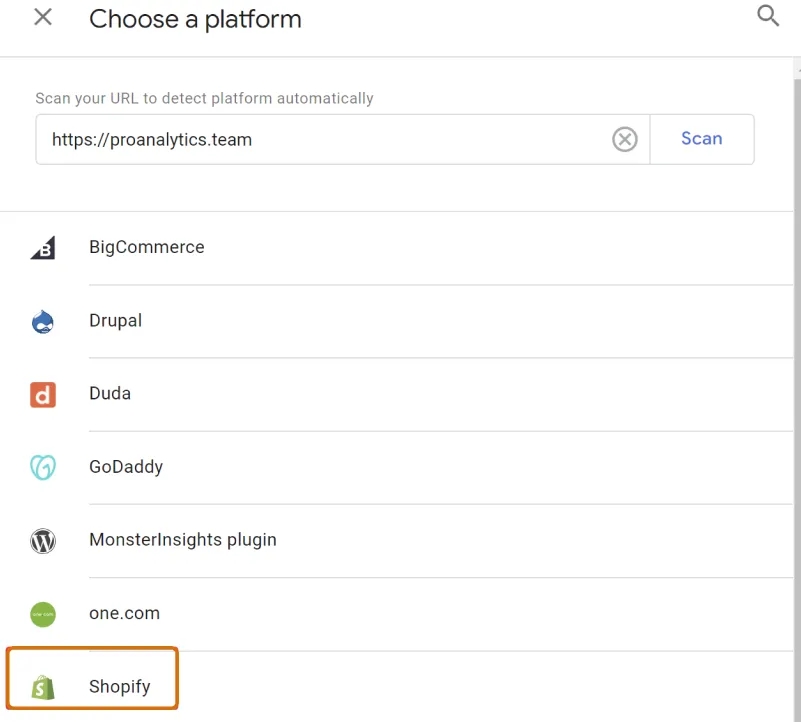
At the code installation stage, select Install with a website builder or CMS. Then, from the list of platforms, choose Shopify and follow the steps outlined in the official instructions.
How to install GA4 on the website builder
The best way to install GA4 code on any website is to do it through GTM. The screenshot below shows the settings you need to configure.
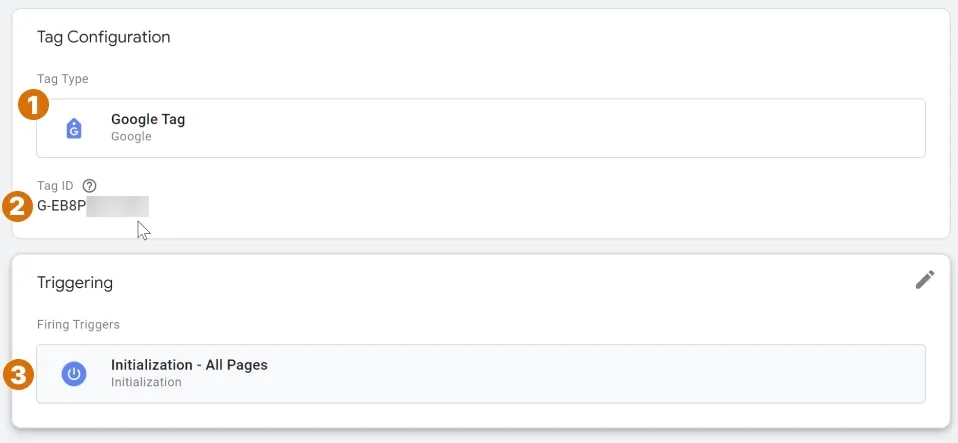
В поле Tag ID вкажіть значення Measurement ID, яке можна знайти в GA4 за шляхом: Admin -> Data Collection and Modification -> Data streams
For a more detailed setup process, refer to the section How to Place the Google Analytics 4 Code on Your Website earlier in this article.
If, for some reason, GTM is not yet implemented on your site, I strongly recommend installing it first and completing the setup as described above.
In some cases, your website builder may not support GTM. In such a scenario, consider using the ready-made solutions provided by Google under the section Install with a website builder or CMS (Admin -> Data Collection and Modification -> Data streams -> View tag instructions).
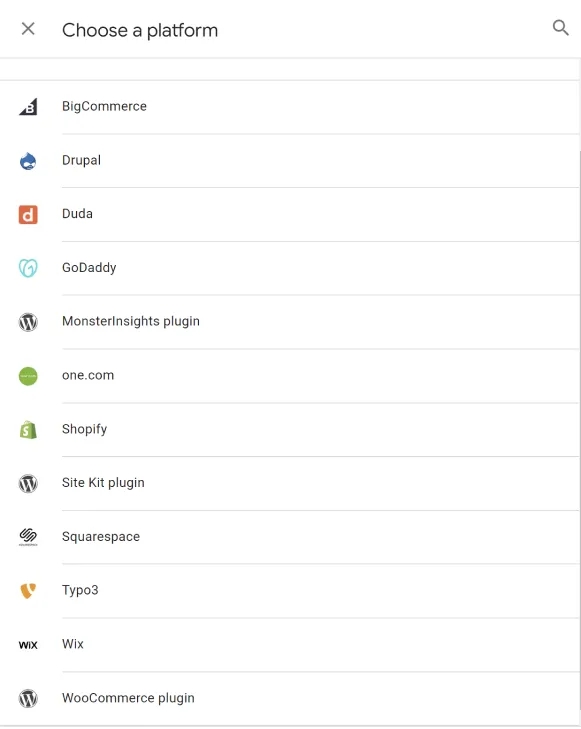
If you couldn't find your website builder in this list, I recommend reaching out to its support team to inquire about the best solution for integration.
Why do my conversion data in GA4 differ from the CRM data?
If the discrepancy is within 15-20%, it's normal. Data in Google Analytics is transmitted from the front end, which means such transmission can be limited by browsers (especially in incognito mode) and browser extensions (e.g., ad blockers). Therefore, it is normal to lose some data in this case. With sufficient traffic, even considering the losses, the collected data will be enough to form and test hypotheses. If you want to capture 100% of the data in GA4, you need to use server-side tracking with GTM Server-Side or the Measurement Protocol. However, even then, you may not always get 100% of the data, as regulations such as GDPR mean that some users will opt out of sharing their data with analytics platforms.
I have a website and a subdomain. Do I need cross-domain tracking?
No, it’s not needed. This setting is only used if you have two DIFFERENT domains.
I have several payment systems on my website and some conversions are credited to them, what should I do?
Use the List unwanted referrals functionality to add payment system domains to the exclusion list. More details in the section - List unwanted referrals
There is no demographic data in the reports. Age, gender, and interests of website visitors are not available in the reports
Check if you have enabled data collection for Google Signals.
I do not see data for more than two months in GA4 custom reports
Check your Data Retention settings.
I have several websites - do I need to create a Data Stream for each one?
It all depends on your structure. If these are sites between which users can freely navigate (for example, site A has links to site B and vice versa), it is better to create a single shared stream. This will allow you to track interactions between sites as part of a single user journey.
On the other hand, if these are separate sites with no cross-navigation and are completely independent businesses, even if they are owned by the same person, it is better to create two separate properties. This will allow for more precise analysis of each site's data separately without mixing information.
How to exclude internal traffic in GA4
Use the Define internal traffic setting.
How to view internal search data
First and foremost, make sure that the necessary data is being collected — I discussed this in detail here. If the data is being collected, read here to understand how to work with it properly.
I see the Unassigned channel in the traffic report. What does it mean and how can I fix it so that this traffic is distributed to the channels I understand?
Unassigned traffic can appear for various reasons, and to better understand what falls into this type of traffic, it's important to know the main causes of its occurrence.
The first and most common reason is the use of custom UTM parameters. How does this work? When analyzing traffic in terms of Default channel groups, GA4 uses certain categories to classify traffic. However, these categories may not always match your specific needs, especially if you use custom parameters that do not adhere to GA4 standards.
Specifically, this can lead to some of your traffic falling into the Unassigned category because the system cannot assign it to any of the predefined groups. To reduce the amount of Unassigned traffic, you should review your UTM parameters and ensure they conform to GA4 standards or set up custom channel groups according to your needs.
Below is a full list and here’s a link to the documentation.
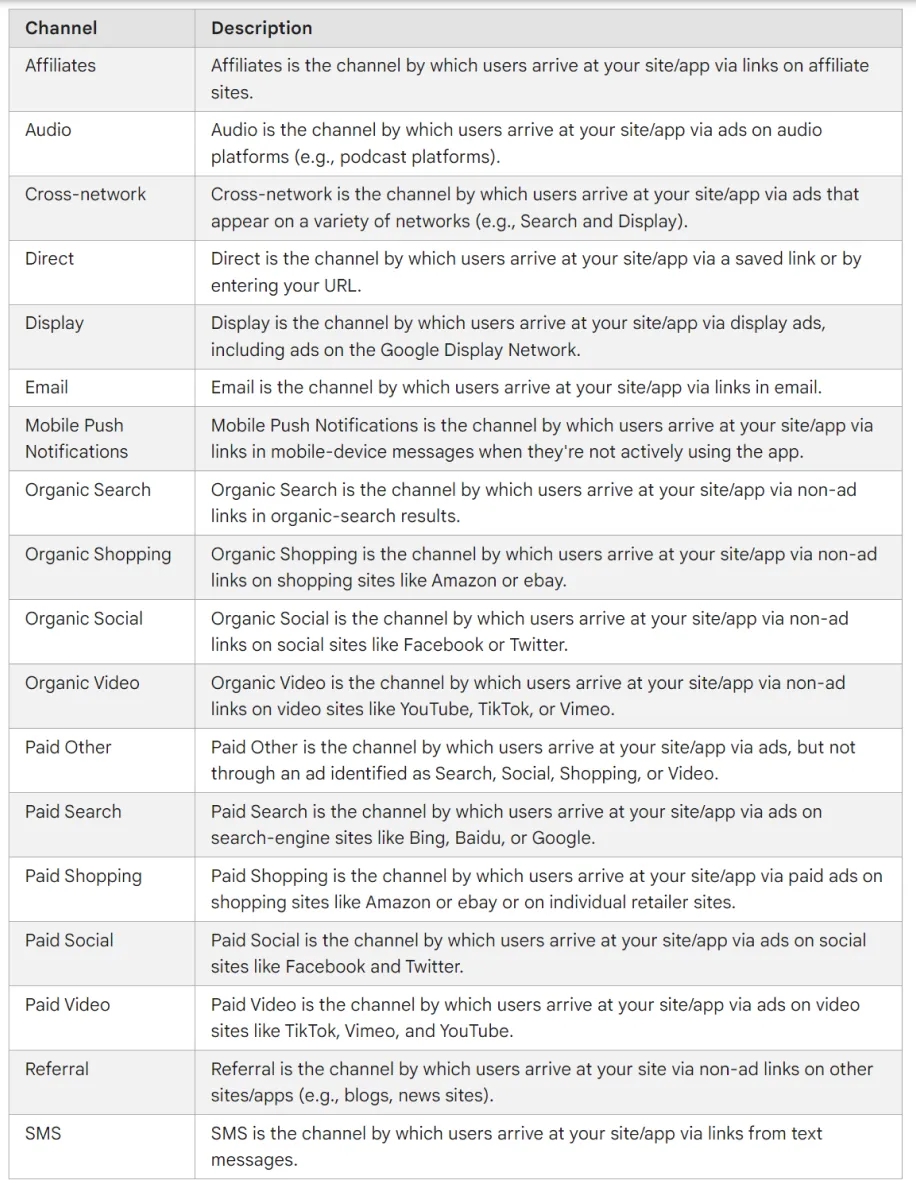
Unassigned traffic can appear for various reasons, and to better understand it, it's important to know what falls into this category. The first and most common reason is the use of custom UTM parameters.
Why is this the case? Note that the Unassigned value appears when you analyze traffic in terms of Default channel group. These are certain traffic groups that GA4 has predefined for you by default, and they may not fit everyone's needs. This "something" ends up in Unassigned. To see more details about what’s included, try adding the Session source / medium parameter to the report, and you will likely uncover the breakdown.
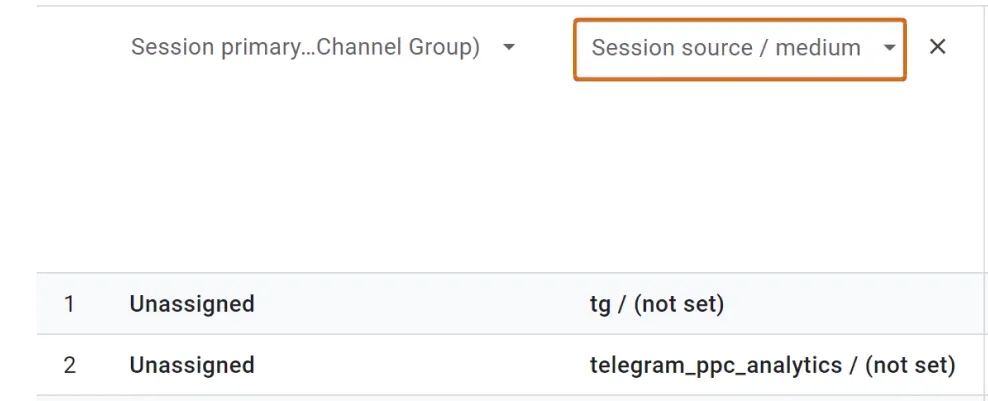
Custom UTM parameters are not always a negative factor. Further actions depend more on whether this UTM markup works for you or if it might be worth discussing a certain structure of UTM usage rules with colleagues.
If, after adding the source / medium parameter, you see values like not set in the column, as shown in the screenshot below, keep reading.
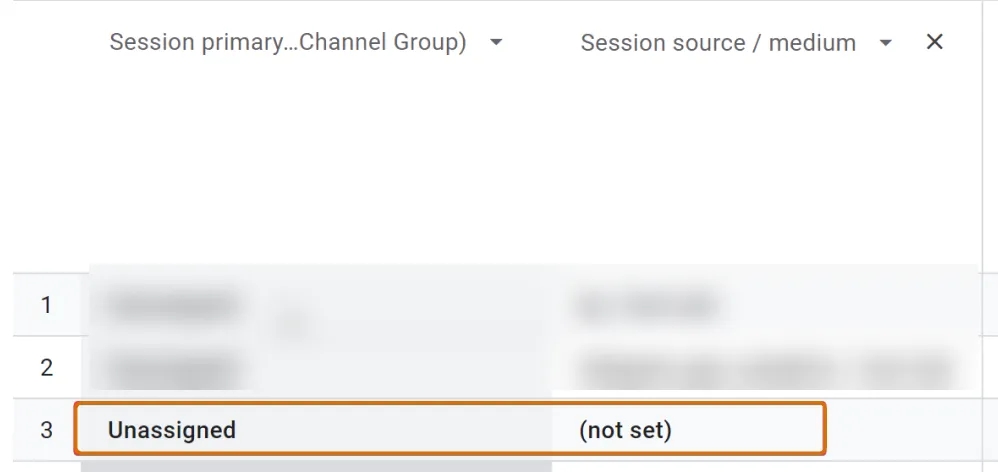
Another common reason for traffic appearing in the Unassigned category is that GA4 has not yet processed your data. Often, people try to view GA4 reports for today and do not see traffic breakdowns by source, only Unassigned values. This is completely normal. According to the documentation, GA4 may take up to 48 hours to process data. If you want to work with data more quickly, set up export to BigQuery. To confirm if this is the reason, try looking at data from 3-4 days ago. If sources are correct there, there’s no need to worry. Just wait.
And the last reason for Unassigned traffic — incorrect GA4 settings. If the first two points don't help, it's time to audit your GA4 settings.
Firstly, I would recommend paying attention to Measurement Protocol settings—this is often a major cause of Unassigned traffic.
Another common issue: users not closing tabs, leading to session expiration after 30 minutes of inactivity. Returning to the tab after, say, 40 minutes, starts a new session with some custom event, creating a problem in GA4 with identifying the traffic source. To fix this, use the setting that extends session duration.
But in reality, there can be many reasons, so good luck with your troubleshooting.
I set up GA4 an hour/day ago, but there is no data in the reports?
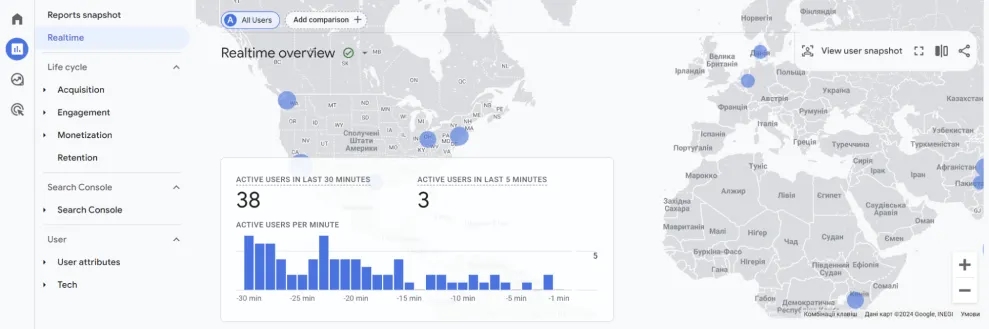
It's normal, don't panic. According to the documentation, data in GA4's general reports should appear within 48 hours. If you're very concerned, open the Real Time report and visit your site yourself. If the GA4 code is correctly added to the site, you should see yourself and other visitors in this report.
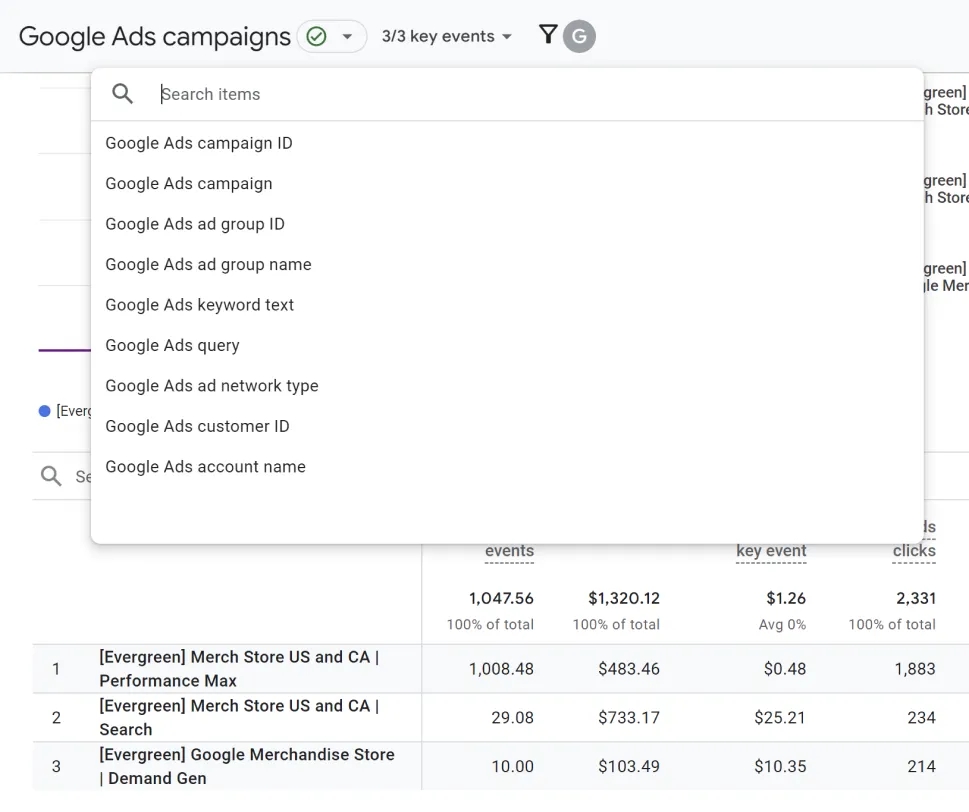
Where can I see Google Ads data in GA4?
First, make sure you have set up the connection between GA4 and Google Ads as described above. Once the connection is set up, you can view the data through the following path: Advertising -> Planning -> Google Ads
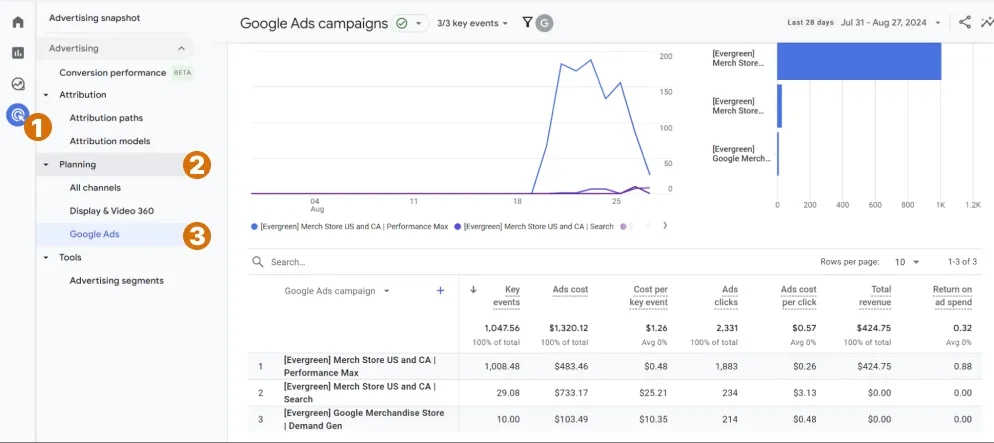
More parameters for analysis can be found in the dropdown list in the first column:
How do I view SEO data? Where can I find Search Console data?
First, make sure that you have set up the integration between the systems as I described above. If the integration is configured correctly, you can find the necessary reports in the section Reports -> Search Console
Why is revenue data in Google Analytics 4 different from CRM?
First, it's important to consider that often a user might place an order for certain products, but after interacting with a sales manager, they might add new items (based on the manager's recommendation), cancel the order (due to long delivery times), or make other changes to their order. Typically, data is sent to GA4 at the moment the order is placed, not at the time of the final sale. Additionally, all the reasons described in the section Why do my conversion data in GA4 differ from CRM data? are also relevant.
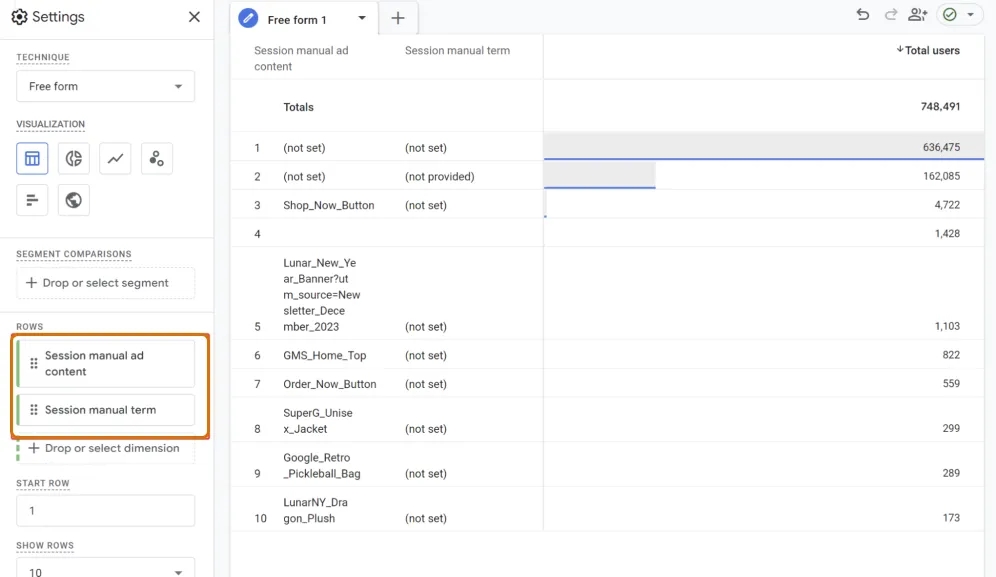
Where can I find utm_term and utm_content data?
In the standard GA4 reports, unfortunately, you won’t be able to find the data you need. To analyze this information, you’ll need to build a custom report or exploration. Below is an example of how to set up one such configuration.
How do I exclude dynamic IPs?
Unfortunately, GA4 does not have the capability to filter traffic from dynamic IPs, so there is no quick solution for this issue. However, you can use one of the custom solutions described in the following article.
There is an internal search on the site, the Enhanced Masurements are turned on, but I don't see search data in the reports
Check if, after interacting with the internal search, the user is redirected to a search results page and if your GET parameter is specified in the settings. I wrote more about this here.
I have a mobile app. How do I connect Firebase with GA4?
Note that such integration can only be set up on the Firebase side. You must have one of the following roles in Firebase: Owner, Editor, or Firebase Admin, and at least Editor rights in Google Analytics 4. To set it up, follow these steps:
- Open your Firebase project and go to its settings.
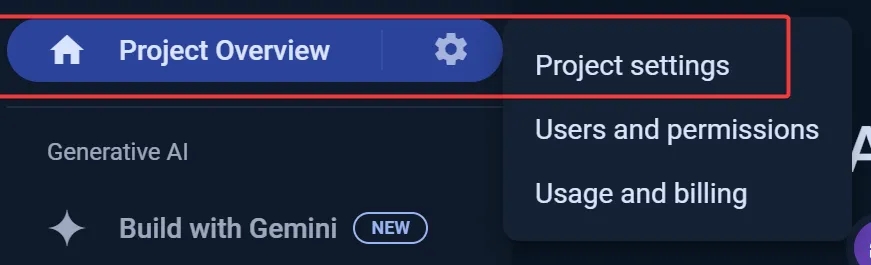
2. Select the Integrations tab and click on Link on the Google Analytics 4 card. Then choose an existing GA4 account or create a new one.
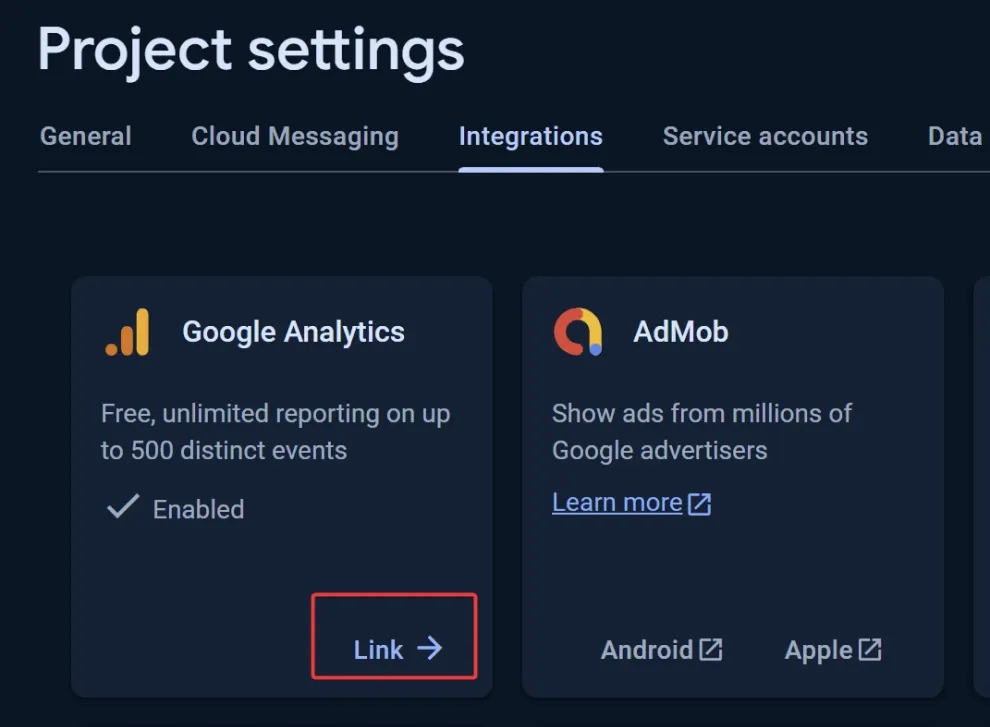
- If you choose an existing account, you will be able to select an already existing Google Analytics 4 property within that account or create a new property.
- If you decide to create a new account, a new Google Analytics 4 property will be created for you, and your project will be linked to this new property.
After linking Firebase and Google Analytics 4, it may take up to 24 hours for your data to appear. Of course, GA4 will only display Firebase data once you have linked your Google Analytics 4 property with Firebase.
My GA4 is broken and doesn't show data for today/yesterday. Where should I look for the problem?
Don’t worry, there’s no problem. According to the documentation, GA4 needs up to 48 hours to process your data. To check if tracking is working correctly, go to the Real-Time report. If you see site visitors there, everything is fine. Just wait, and the data will appear in other reports soon.
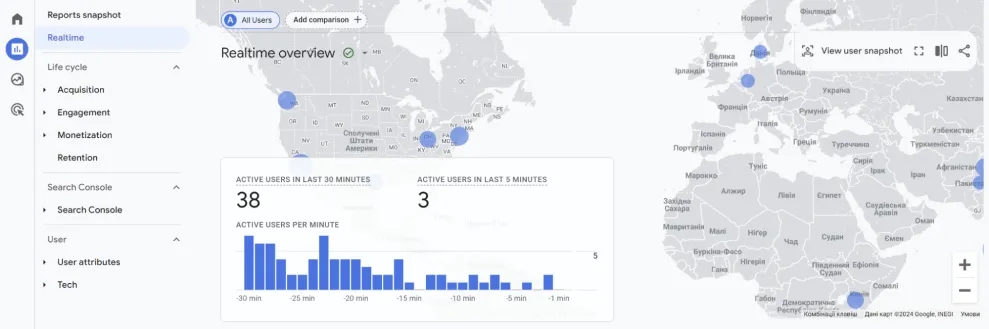
It seems that every time I look at the data in GA4, it is different. Even though I'm looking at the same reports
It’s likely you’re not mistaken. GA4 can indeed show different data in the same reports. There are two main reasons for this:
- Data Processing Time: remember that GA4 can take up to 48 hours to process data. Therefore, data you see at 00:01 for yesterday may differ from the data you see at 14:20 on the same day.
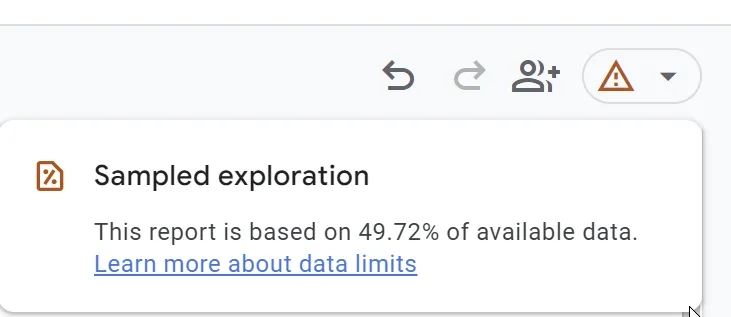
- Sampling: Google doesn’t want to analyze large volumes of your data for free, so it applies sampling. This can lead to discrepancies in results. If you see different data in reports, check for an orange triangle above the report, as shown in the screenshot below.
If you’re facing issues with data discrepancies in GA4, you have three main options:
- Continue dealing with questionable data
- Start paying for Google Analytics 360
- Start using GA4 data export to BigQuery. For detailed instructions on how to set it up, refer to the article - Everything You Need to Know About BigQuery: What It Is, Why It Matters, and Its Benefits for Marketing.
Tired of the quirks of the GA4 interface? Join the BigQuery for Marketing course, and I’ll teach you how to work with raw data effectively.
If you want to learn more about working with various analytics tools and platforms, such as BigQuery, Power BI, GA4, Google Tag Manager, and others, you can find many useful materials in my Telegram channel.
I also invite you to subscribe to my newsletter to stay updated with the latest and most useful content in web analytics. Every two weeks, I send out a roundup of updates, insights, new features, and recommendations to help you stay informed. To join the newsletter, simply scroll down the page below the comments — there you’ll find the subscription form.
Loading comments…