

In web analytics, we typically track dozens of different events: clicks, page views, interactions with elements, scrolling, form submissions — all of this helps us understand how users behave on a website.
But there are always actions that carry significantly more weight for a business. For example, a completed order, a successfully submitted contact form, booking a consultation, or paying for a service. These actions show whether the website is achieving its goals and whether the user is moving along a path that matters to the company. In Google Analytics 4, such actions are called Key events.
If you’ve been working with Google Analytics for a long time, you might know them by another name — “conversions.” In the new terminology, they have been replaced with Key events, but the logic remains similar: they represent actions that are valuable to the business.
In this article, we’ll look at how to work with key events in GA4 today: how to create them, what options are available, and how these methods differ.
Today’s plan includes:
- What key events are and what makes them special
- Default key events: which events Google Analytics creates automatically
- Method 1: Mark an event as key in “Recent events”
- Method 2: Create a key event manually in the GA4 interface
- Method 3: Create a key event based on an audience (Audience Trigger)
- Summary
What key events are and what makes them special
Every user interaction with a website — such as clicking a button, viewing a page, scrolling, interacting with a form or a video — is tracked as an Event in Google Analytics 4. These events help you understand overall user behavior and evaluate how they interact with various elements of your site.
However, not all events are equally important for a business. Some of them play a supporting role — they indicate user activity and interest but don’t give a direct understanding of whether the site is actually fulfilling its objectives. Instead, there are actions that have a completely different level of importance: completing a purchase, submitting a request, registering, confirming an email, and so on. These are the actions that impact revenue and product success.
In GA4, such actions receive a dedicated status — Key events. Essentially, they are regular events to which you assign elevated importance so you can analyze them separately, optimize advertising toward achieving them, and make more accurate decisions.
A key event means that the event:
- can be sent to Google Ads,
- participates in the calculation of specific traffic-quality metrics:
- Session key event rate,
- User key event rate,
- appears in specialized reports under the Advertising section.
To sum up: an event is any recorded user interaction with the website; a key event is an event to which you assign business value.
Usually, a key event is either when a user submits their contact information or when a user completes a payment.
First, GA4 must receive the event in any way (via GTM, code, or the interface), and only after that can you assign it the status of a Key Event.
A key event always starts as a regular event.
Default key events: which events Google Analytics creates automatically
In Google Analytics 4, some events are marked as key events automatically. In other words, GA4 already “knows” that certain actions are critically important for the business and highlights them even before you configure anything.
This is especially noticeable in mobile apps, where key actions like the first app open or an in-app purchase are essential parts of the user journey. GA4 immediately includes them in the list of key events so that you receive accurate data from day one. But this is also relevant for websites, since an event like a purchase is always considered key as well. The list of default key events includes:
purchase— for both web and mobile apps; this is the main “commercial” event, which is why it automatically receives key event status;first_open— for mobile apps only; records the first time the app is opened and shows how many new users installed it;in_app_purchase— for mobile apps only; important for monetization;app_store_subscription_convert— for mobile apps only; indicates when a user switches to a paid subscription;app_store_subscription_renew— for mobile apps only; tracks subscription renewals.
All of these events have key event status immediately, even if you have not configured anything manually.
An important clarification: the fact that these events are always key does not mean they do not require configuration. For example, to track the purchase event, you still need to implement Ecommerce settings.
Another case where GA4 automatically “upgrades” events to key status is when Ads Personalization is enabled through a linked Google Ads account. In that scenario, the system adds key events that are important for advertising analytics and Smart Bidding in Google Ads. These include:
add_to_cartadd_to_wishlistbegin_checkoutsession_startview_itemview_item_listview_search_results
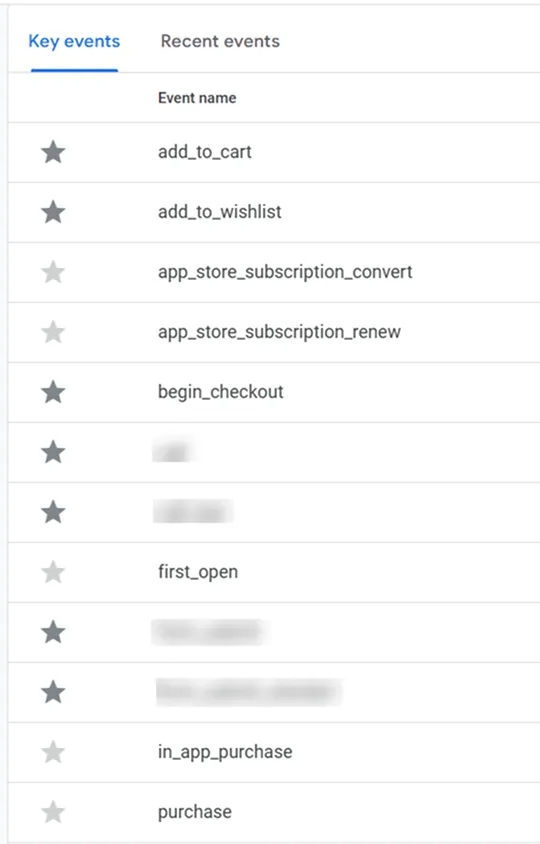
Default key events are helpful, but every business is unique, so let’s look at the available ways to mark any event as a key event. There are two such methods:
- Mark an event as key in “Recent events”
- Create a key event manually via the GA4 interface
Method 1: Mark an event as key in “Recent events”
The fastest way to make an event a key event in GA4 is to mark it with a star directly in the Recent events list. This method is convenient because it takes only a few seconds:
- Go to Admin.
- Then open the Events section.
- Open the Recent events tab.
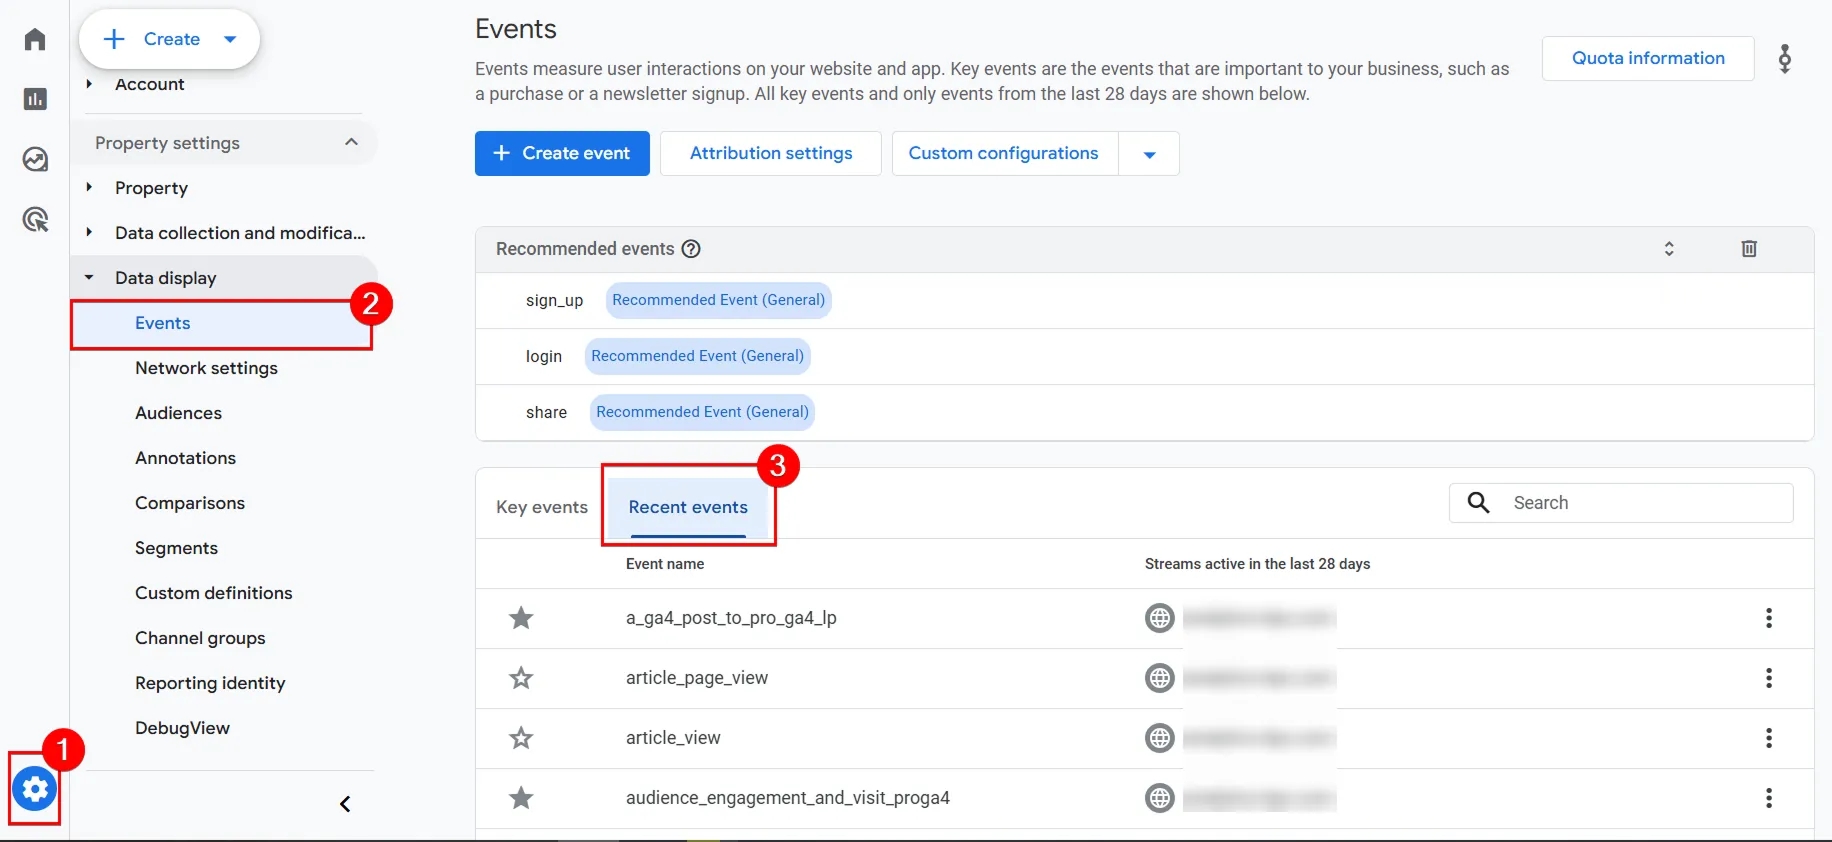
- Find the needed event in the list.
- Enable the switch in the Mark as key event column.
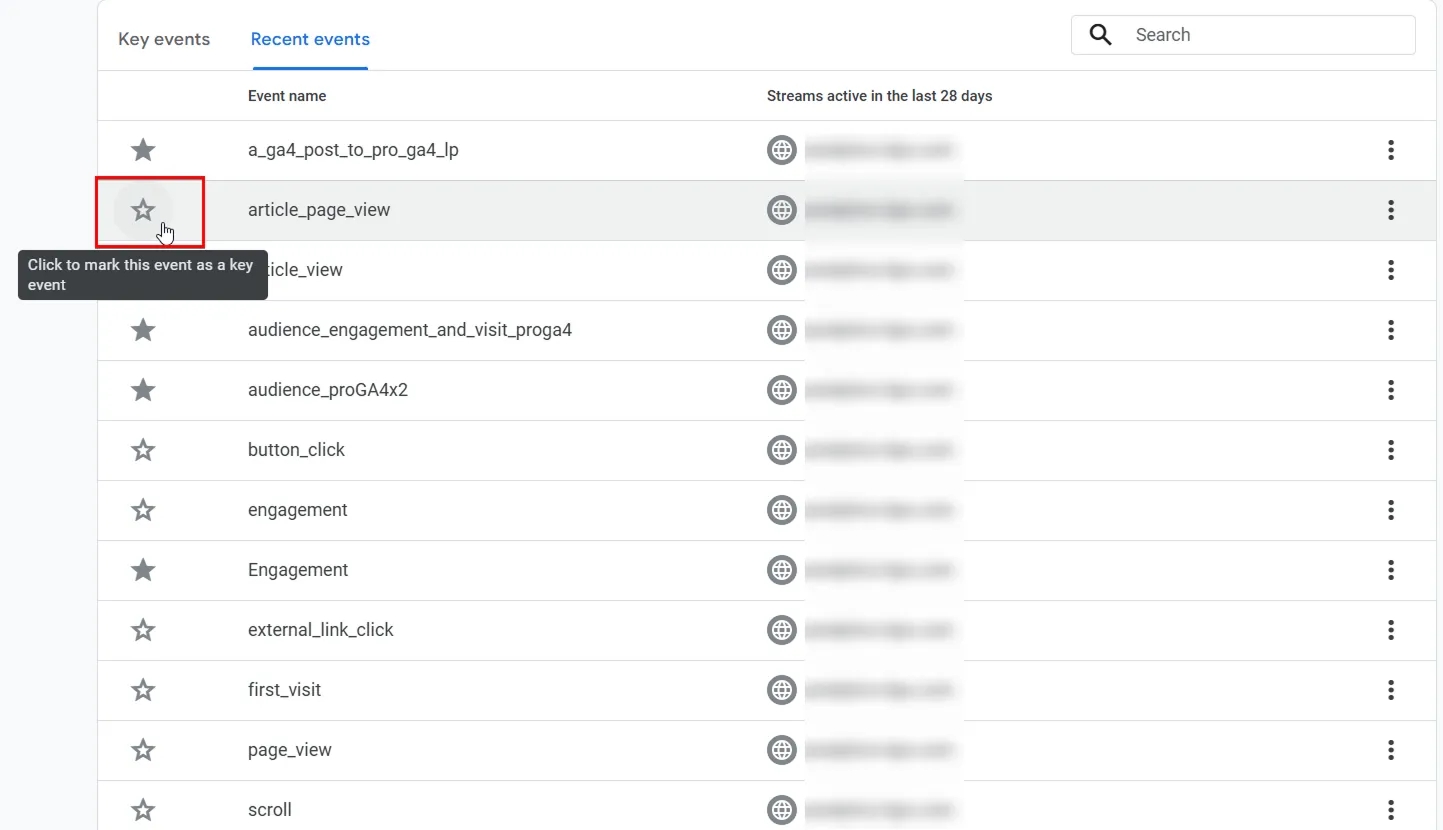
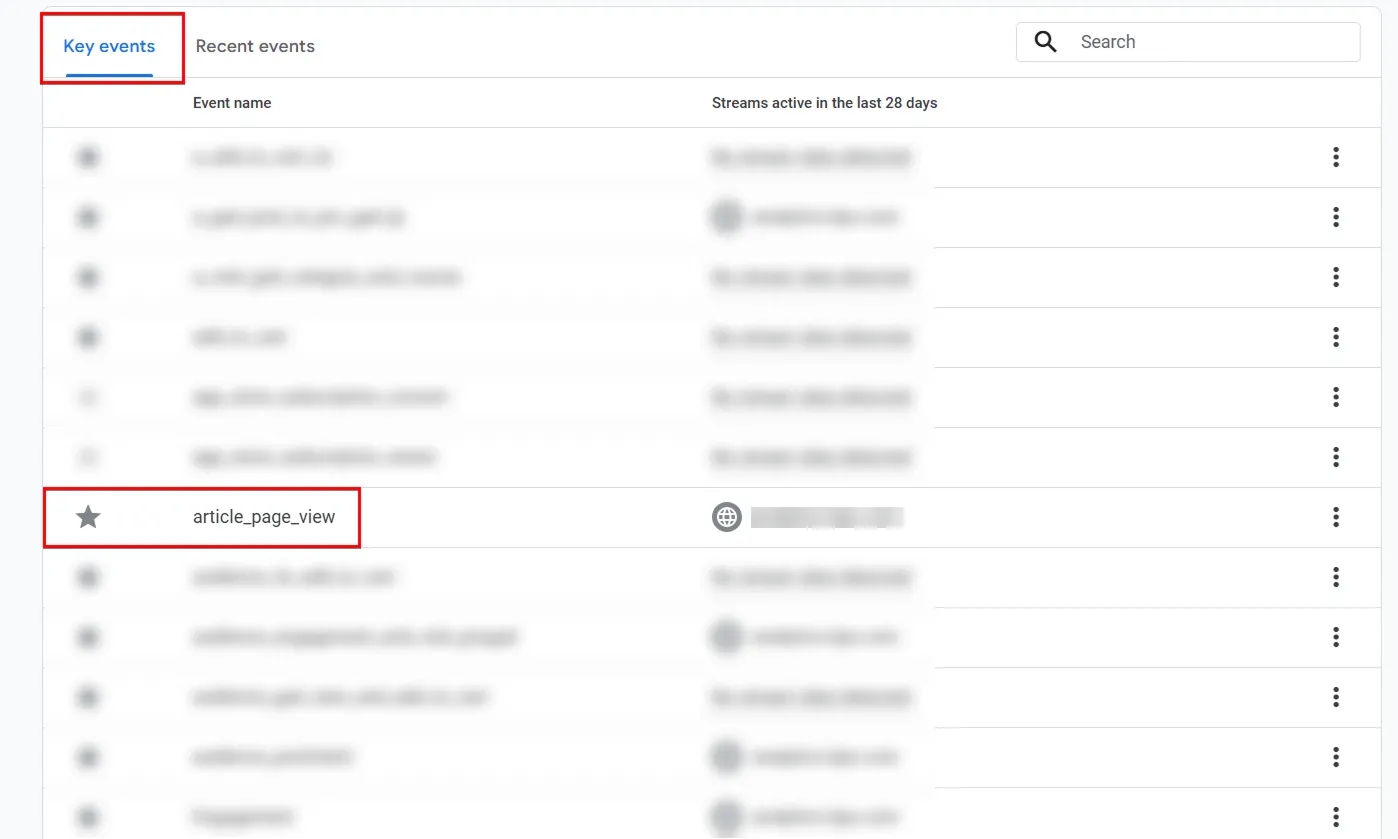
After that, the event will immediately appear in the Key events list, and GA4 will start processing it as an important (key) event: calculating separate metrics, displaying it in advertising reports, and making it available for import into Google Ads.
The only downside of this method is that you can use it only after GA4 has already processed data for this event. In other words, you cannot configure an event in GTM and immediately mark it as a key event this way. You’ll need to wait (up to 72 hours according to the documentation, and usually about 24 hours in practice), and only then you’ll be able to mark it as key. If you don’t have time to wait — there is another method.
Method 2: Create a key event manually through the GA4 interface
If you need to mark an event as key before it appears in the Recent events tab, you can manually create a key event. To do this, follow these steps:
- Go to Admin.
- Then open the Events section.
- Click Create event.
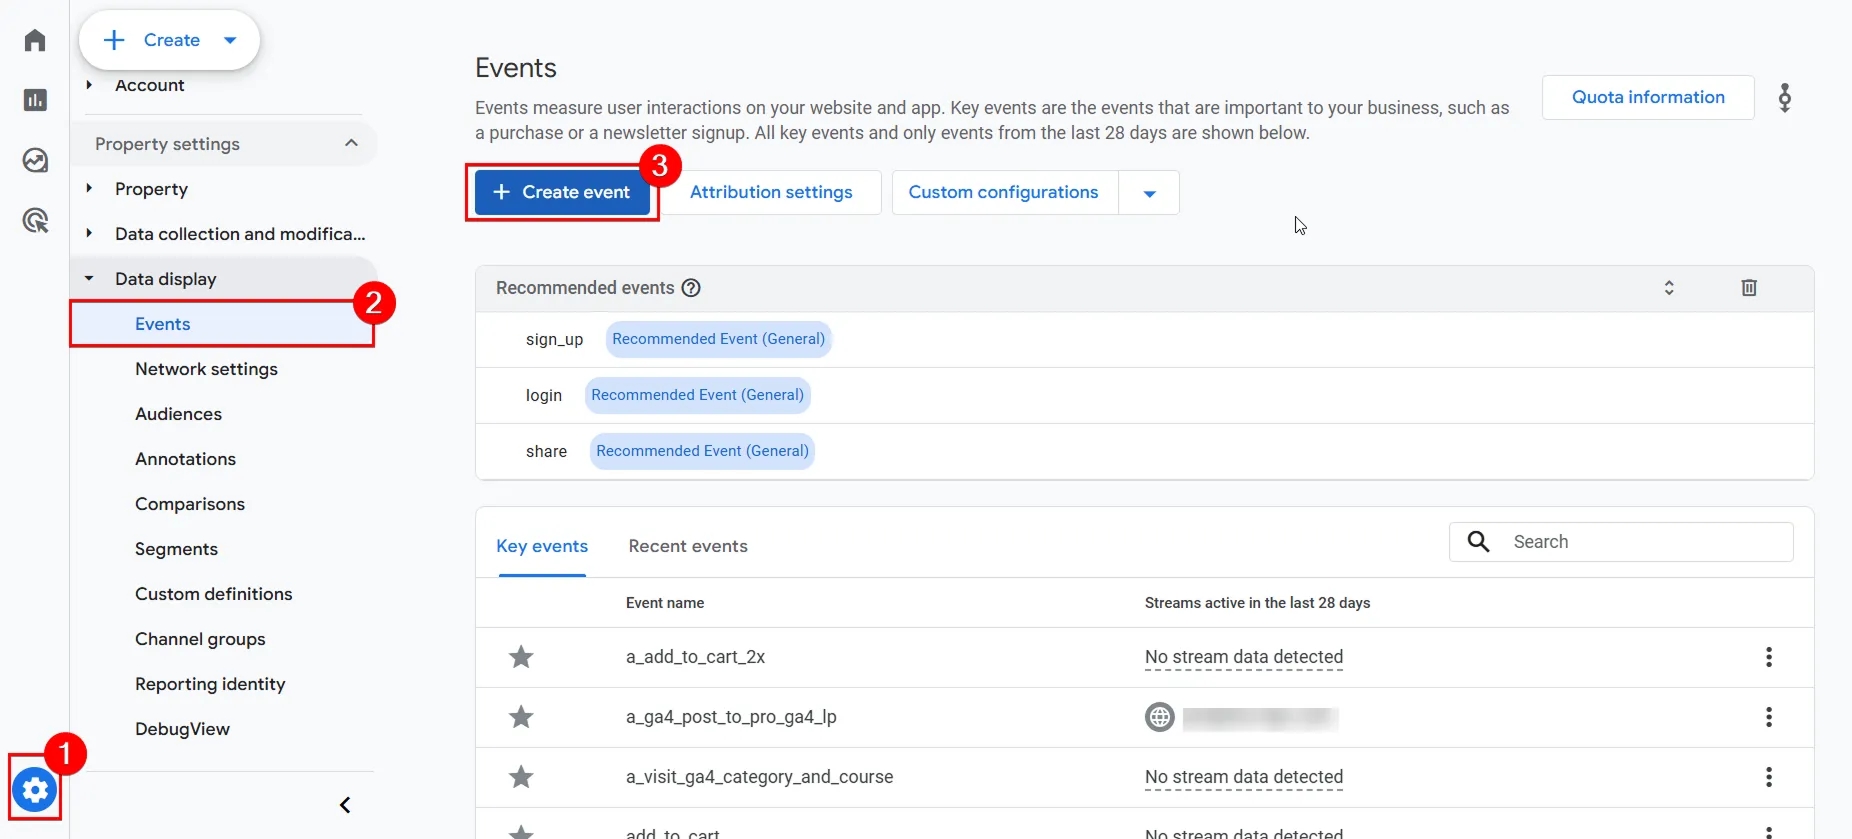
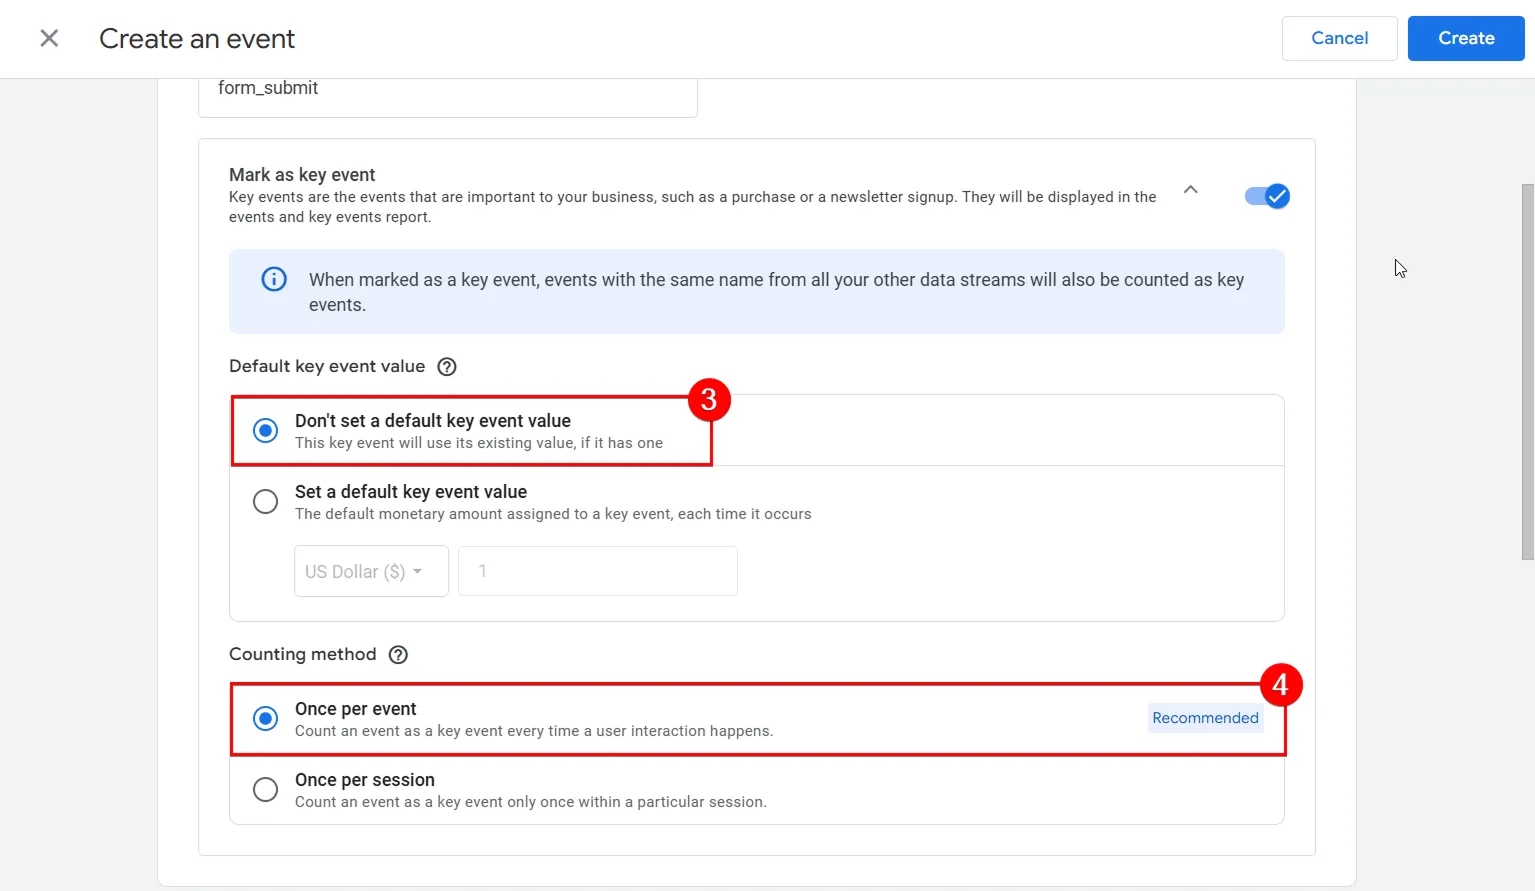
- In the Custom event name field, enter the name of the event you need, for example:
form_submit. - Enable the option Make this a key event.

- Optionally, you can set a value. However, it’s better to send the value dynamically with the event rather than specifying a static number, so I recommend choosing Don’t set a default key event value.
- Select the trigger frequency Once per event, which Google recommends.
- In the Choose how to create this event section, you have two options. For now, select Create with code. This option is needed for events coming through Google Tag Manager. We will examine both options in detail further on.
- Click Create.
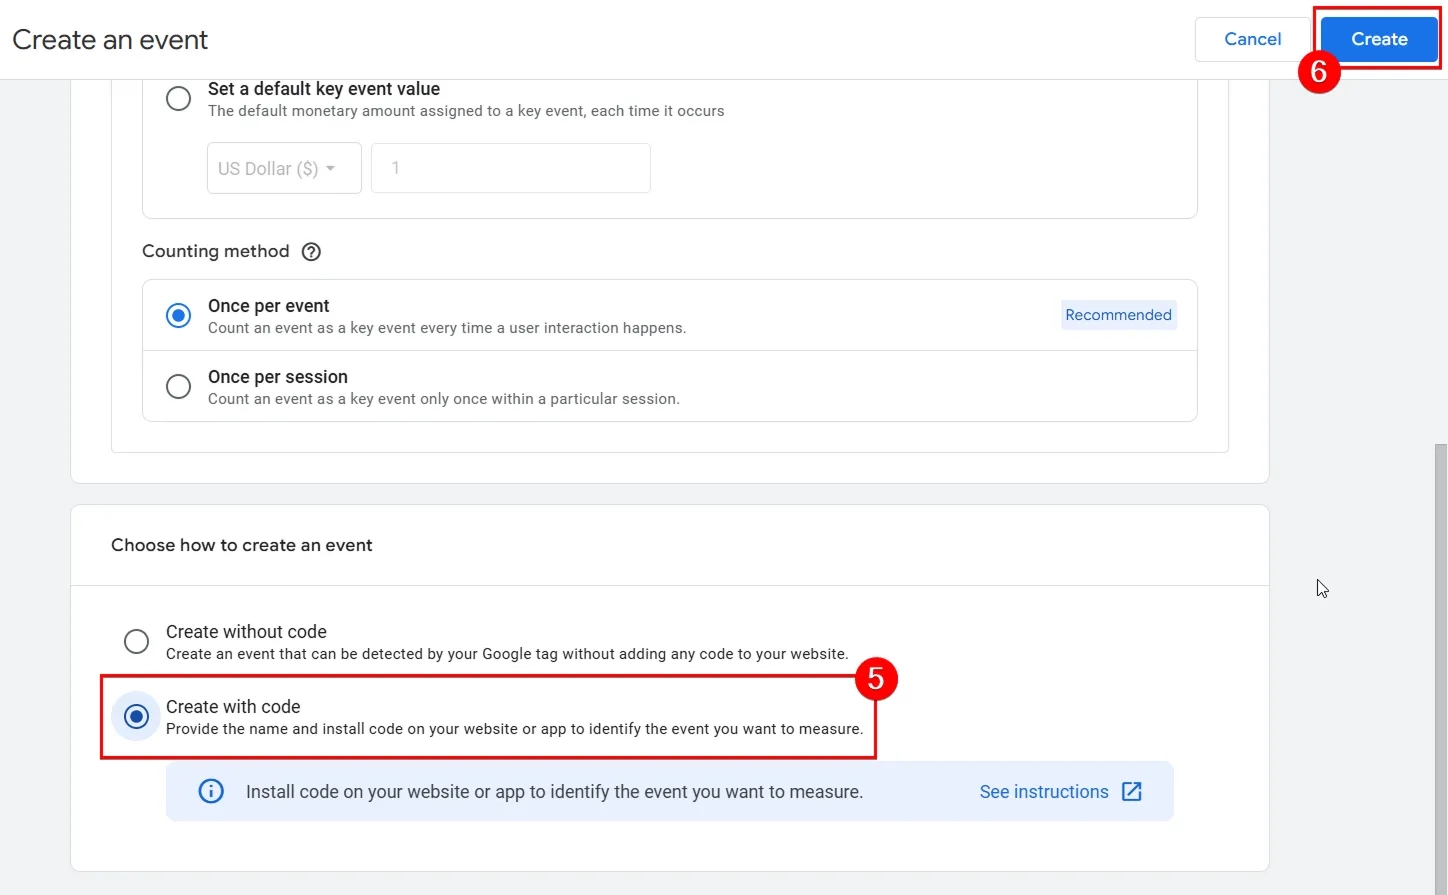
The result of these steps is identical to the first method. We have marked the event as a key event. Yes, this method is longer than the previous one, but it works immediately, without waiting for GA4 to process the first incoming data for the event.
Creating a key event “with code” and “without code” (Create with code / Create without code)
When creating a key event manually in GA4, you saw two options for this configuration:
- Create with code
- Create without code
They work differently, and it’s important to understand when to use each one.
Create with code is the option you should choose in most real working scenarios — especially when the event comes:
- through Google Tag Manager (yes, keep in mind that a GTM tag is essentially code, even if presented as a convenient template),
- through code implemented on the website by a developer,
- through a third-party script or plugin that sends events directly to GA4.
In reality, Create with code does not create a new event — it simply assigns key event status to an existing event that is already being sent from the website. This is the correct and recommended option for all “real” events that physically arrive in GA4 from your site.
Create without code allows you to create new events inside GA4 based on other events.
I want to emphasize again: you cannot create an event from scratch using this method. This approach only allows you to create an event based on an existing one.
For example:
- creating an event based on a parameter of another event,
- separating a specific form from a shared event,
- splitting several events within the same event type.
This is useful in cases where the site sends one “general” event, but you need to extract separate, more specific scenarios from it. Or when a plugin or service sends event names or event types that do not match your taxonomy or needs.
Let’s look at an example using a familiar event — form_submit. Imagine your site has two forms — a contact form and a newsletter signup form.
Both of them send the same event, form_submit, to GA4. Along with the event, a parameter is sent that helps determine from which form the action originated:
- form_name = contacts
- form_name = newsletters_subscribers
But the problem is that from a business perspective these are two completely different interactions:
- the contact form can generate leads and potential revenue,
- the newsletter signup form expands your email audience — a different type of interaction and a different type of value.
Yes, over time someone from the subscriber list may also become a lead and bring revenue, but I think you’ll agree that at the moment of form submission, the quality of these contacts is very different. Therefore, tracking them as a single event is incorrect. A good solution is to separate the “Contact” form into its own event. Let’s walk through how to do this.
Please note: whenever possible, I recommend configuring this in Google Tag Manager. However, many builders and plugins do not always allow working with GTM. Only in such cases do I recommend creating events directly in the GA4 interface, as shown here.
- First, select the event on which the new event will be based — choose
form_submit. - Next, we can define additional conditions, which is the most important part. You can ignore the URL field because the main focus here is on the event conditions.
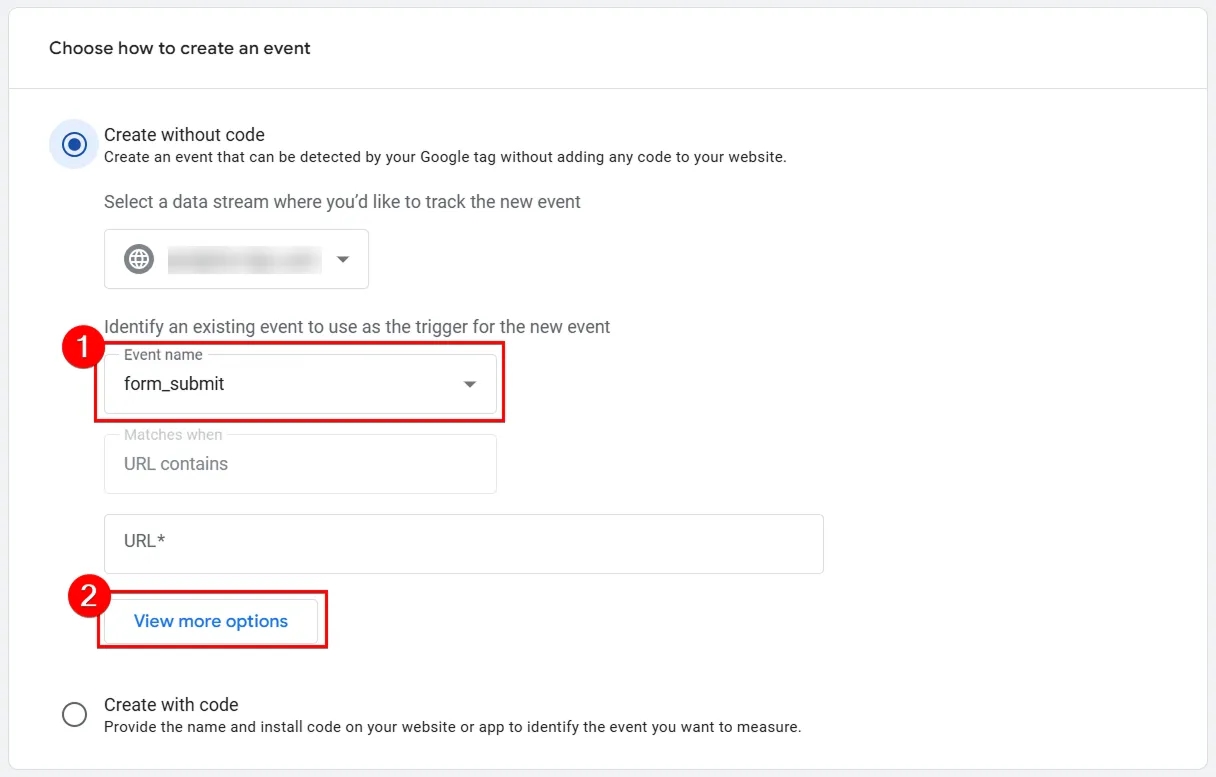
- Leave the first condition as is. It means: “If the event
form_submitoccurs.” - Then click Add condition.
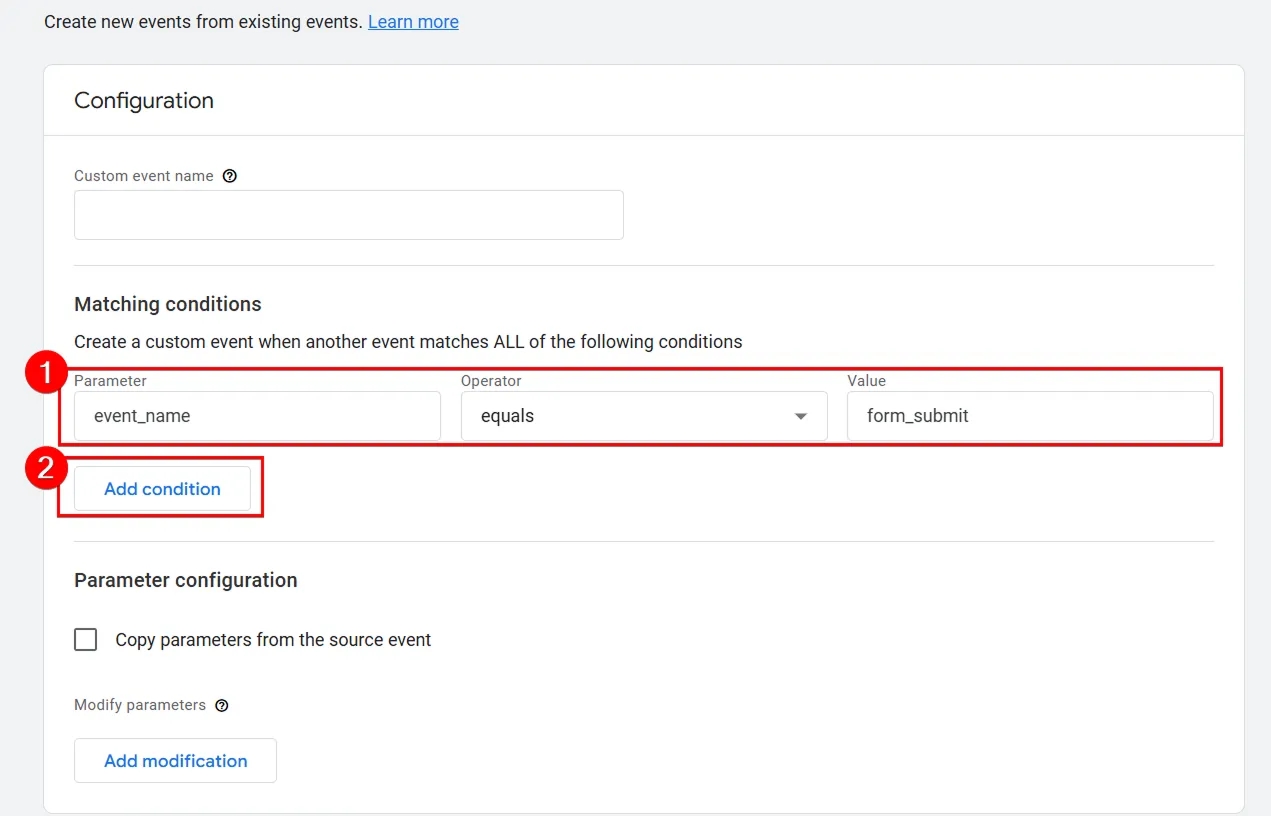
- Next, add a condition with the parameter for the contact form that you send together with the event: “Parameter name” equals “Parameter value,” which reads as: “The parameter form_name equals contacts.”
- Then specify the resulting event — the one that should be triggered. When the event
form_submitoccurs AND the parameter form_name equals contacts, a new eventform_submit_contactswill be sent. - Save the event.
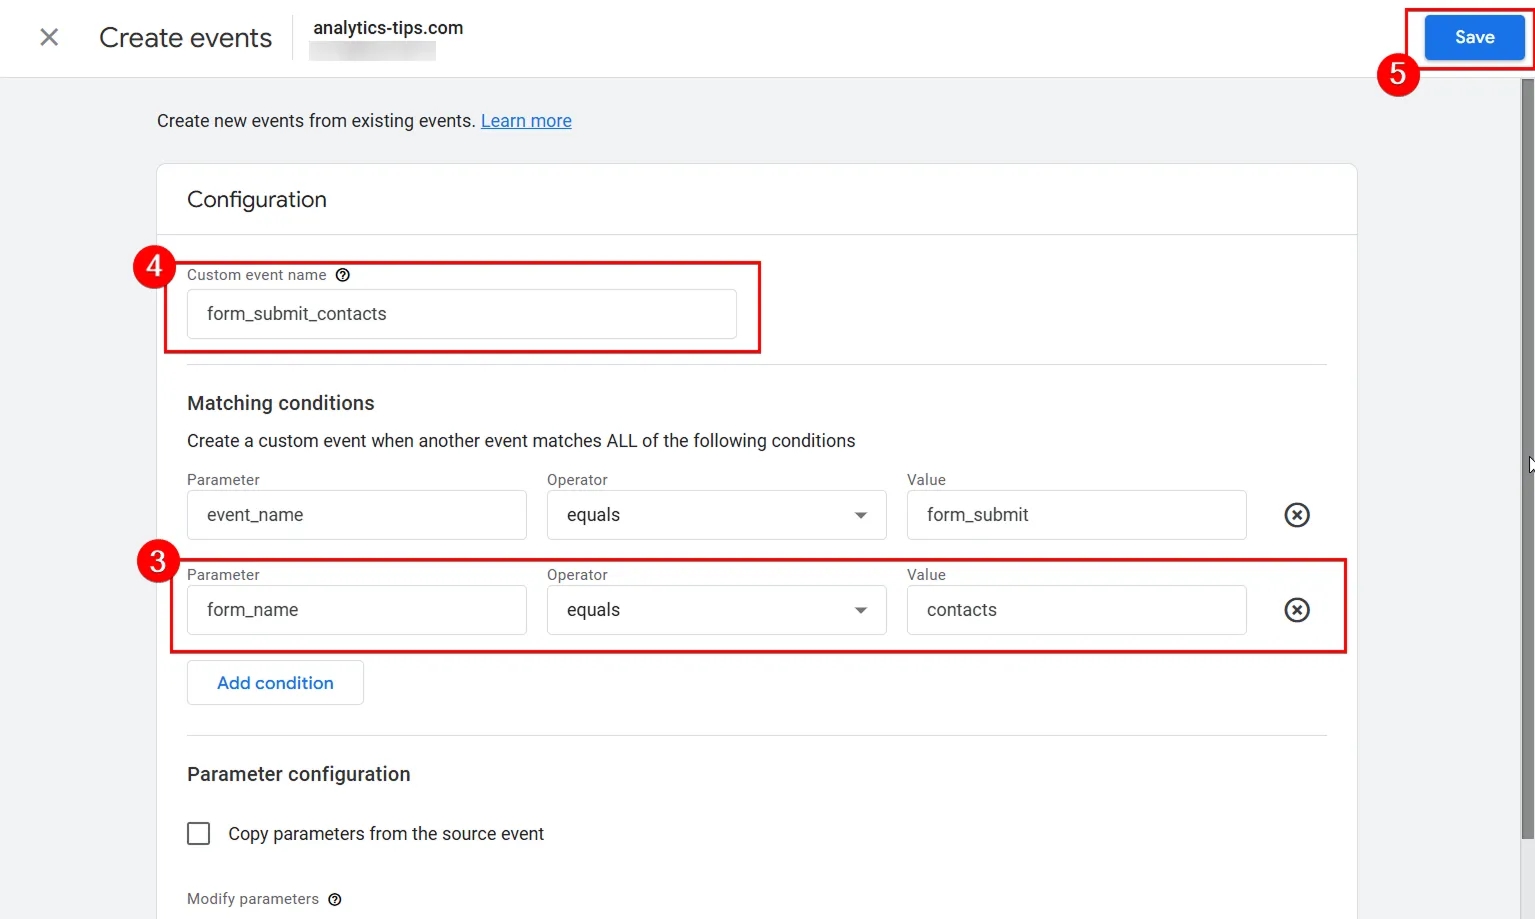
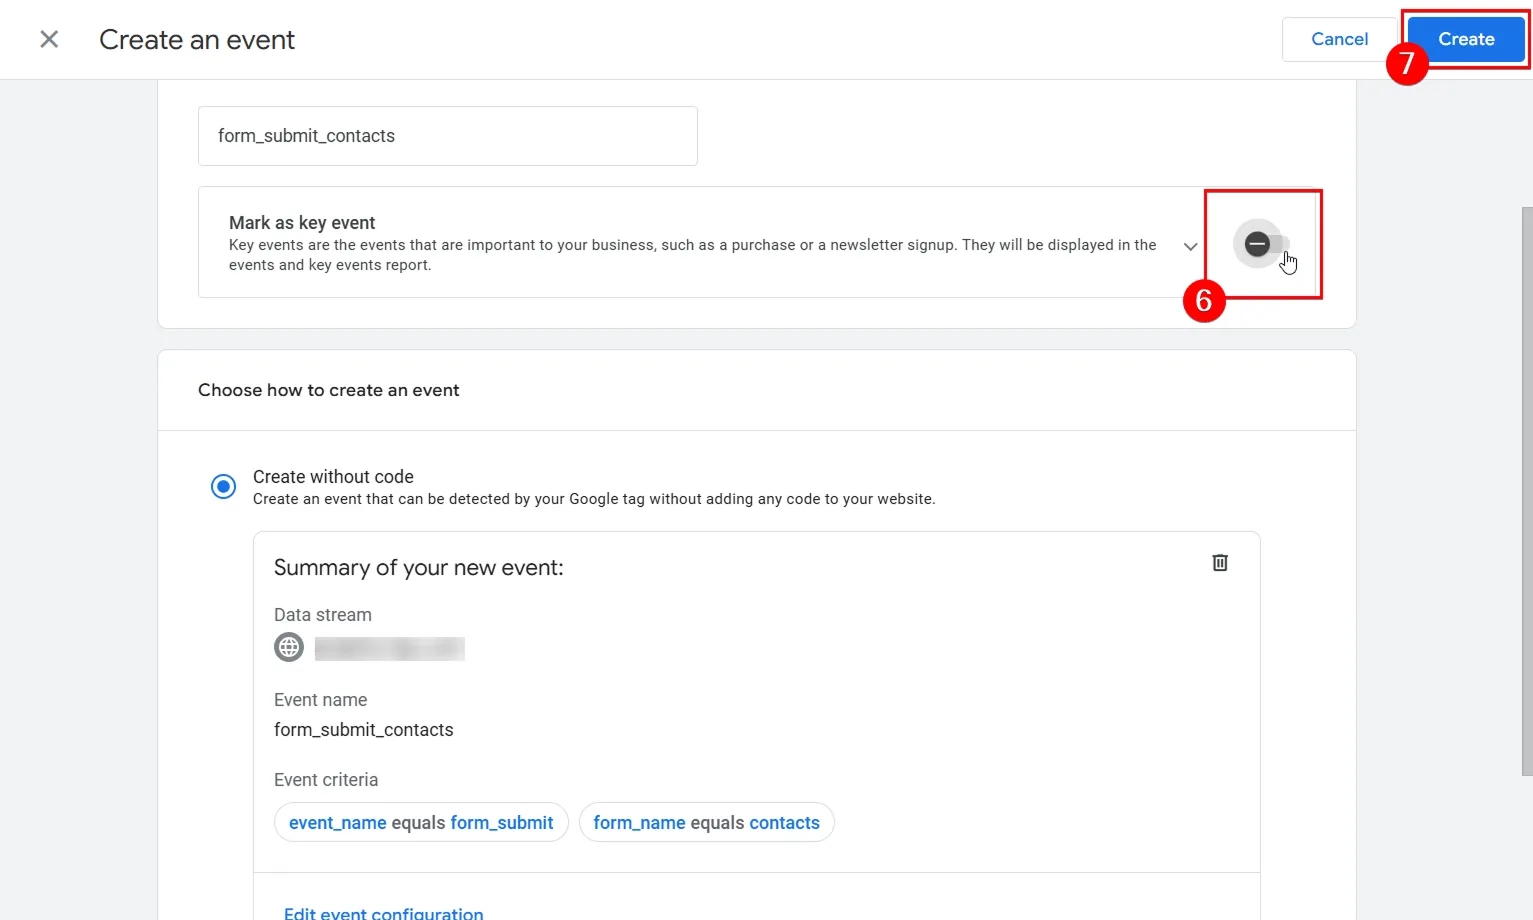
- If needed, you can immediately mark the event as key.
- Then click Create.
An important nuance of creating events without code
Although the Create without code method allows you to separate a specific form into an independent event, it has one important nuance: if you check which events are being sent from the website to GA4 — for example, in Preview mode in GTM or through my favorite extension, Adswerve — dataLayer Inspector+, you will see two events: form_submit and the newly created event, which in our case is named form_submit_contact.
Our configuration is correct, and this is standard behavior for this functionality, but it leads to one issue: in Preview mode it becomes difficult to understand whether the event is coming from a site plugin, developer code, or a GA4 interface configuration. As a result, this creates unnecessary confusion during work, especially with new projects, because you must manually check several possible sources at once: GTM, developer tags, plugins, and GA4 itself — which increases both time and risk of mistakes.
Therefore, if you have access to Google Tag Manager, it is better to create events there. If you still decide to configure them through the GA4 interface, I recommend adding the prefix v_ (virtual) to event names so it is immediately clear that the event is “virtual” and created inside GA4.
Method 3: Create a key event based on audiences (Audience Trigger)
Google Analytics 4 offers a unique way to create key events — not based on a specific user action (such as a button click, form submission, or page view), but based on a user entering an audience.
This approach lets you register as a key event not only a single interaction but even a sequence of conditions that the user completes during one session — or across multiple sessions. This opens possibilities that can be difficult to implement in any other way.
This method is useful when the focus is not on one particular action but on a pattern of behavior. For example:
- a user scrolls an article to 50%,
- and then completes a registration form,
or performs a sequence of other important interactions.
Such scenarios are perfectly described using audiences. So, let’s look at how to create such an event:
- Go to Admin.
- Open the Audiences tab.
- Click New audience.
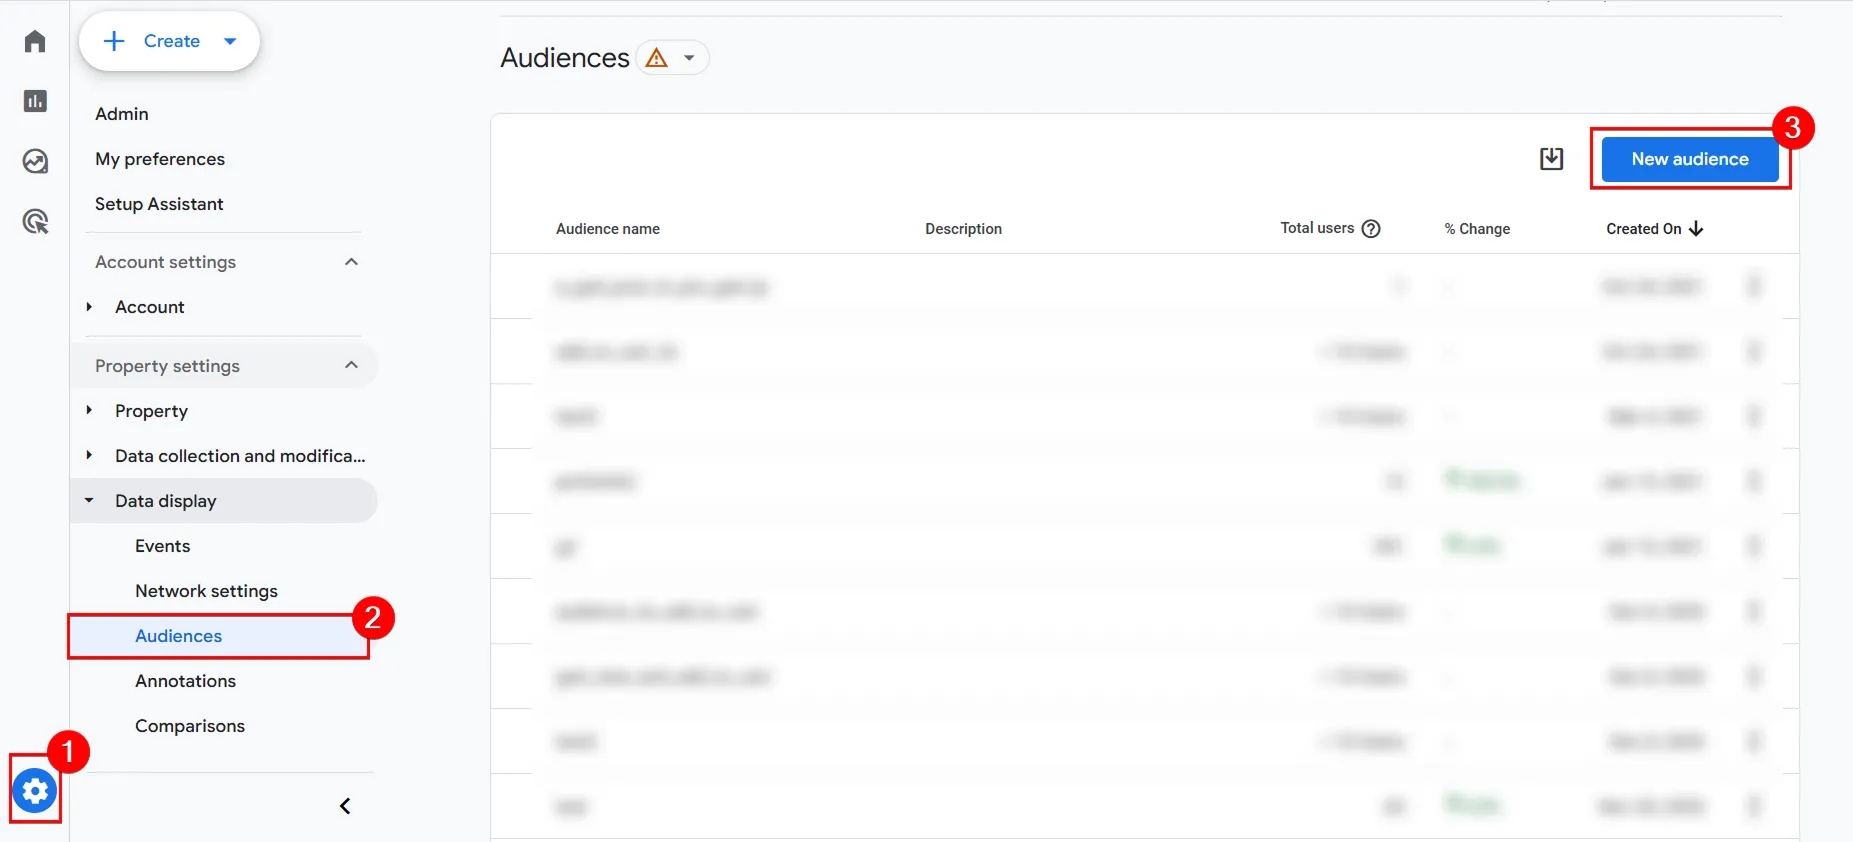
- Click Create a custom audience.
By the way, I’ve previously published a full guide on audiences in GA4. If you’re interested in the topic or want to explore it in more detail, check out the article “How to set up audiences in Google Analytics 4: from simple solutions to complex scenarios.”
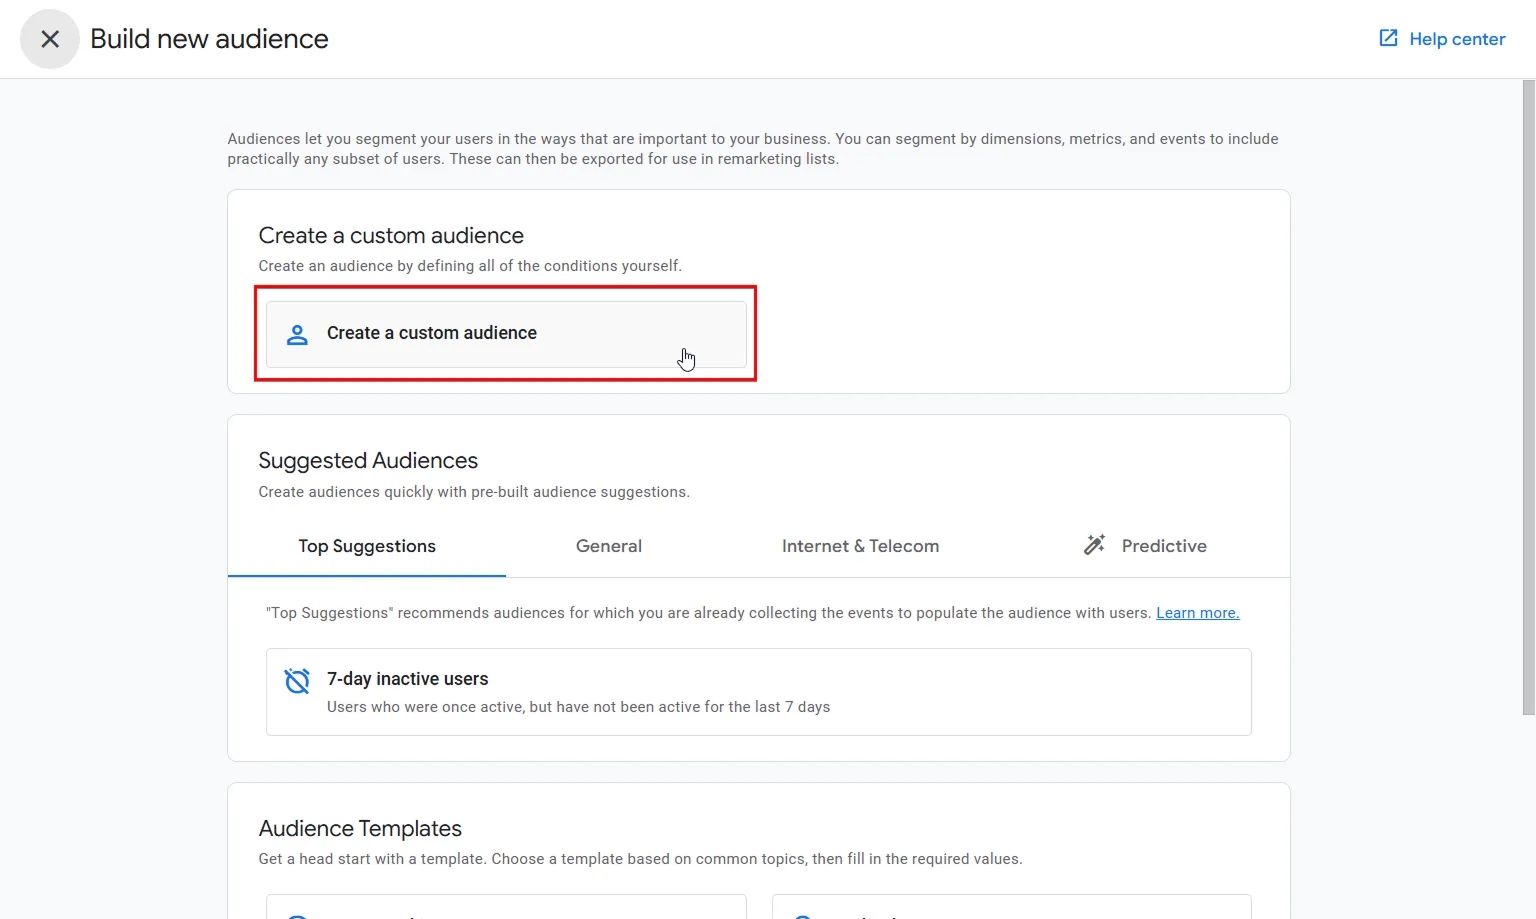
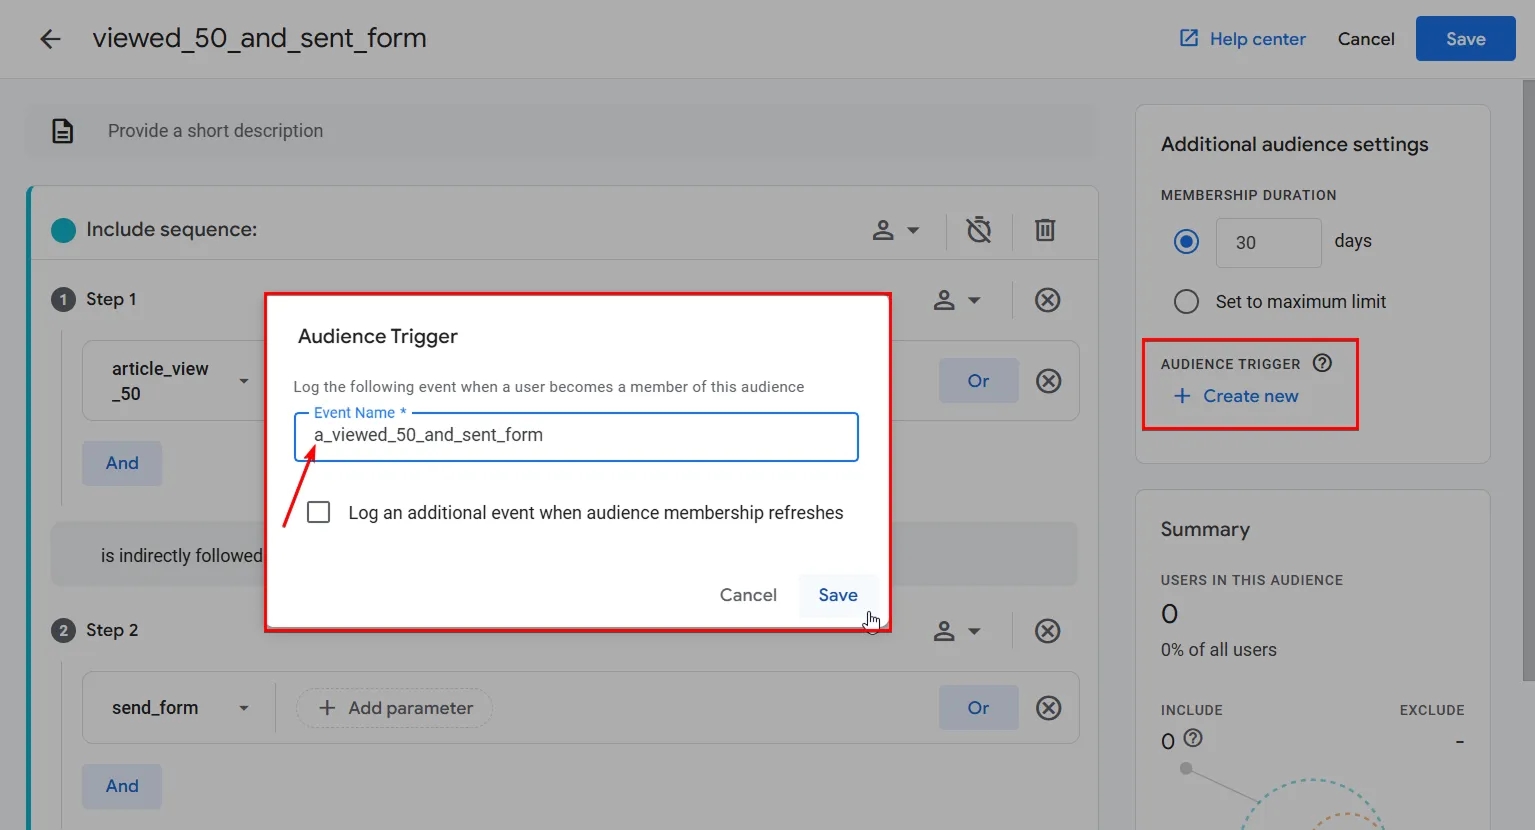
- Specify all the conditions for including users in the audience (we won’t focus on that here) and click Create New under Audience trigger.
- Give the event a name and save it.
- Don’t forget to mark it as a key event using one of the previous methods — 1 or 2.
A personal tip: add the letter “a” at the beginning of the event name as a reminder that it was created based on an audience.
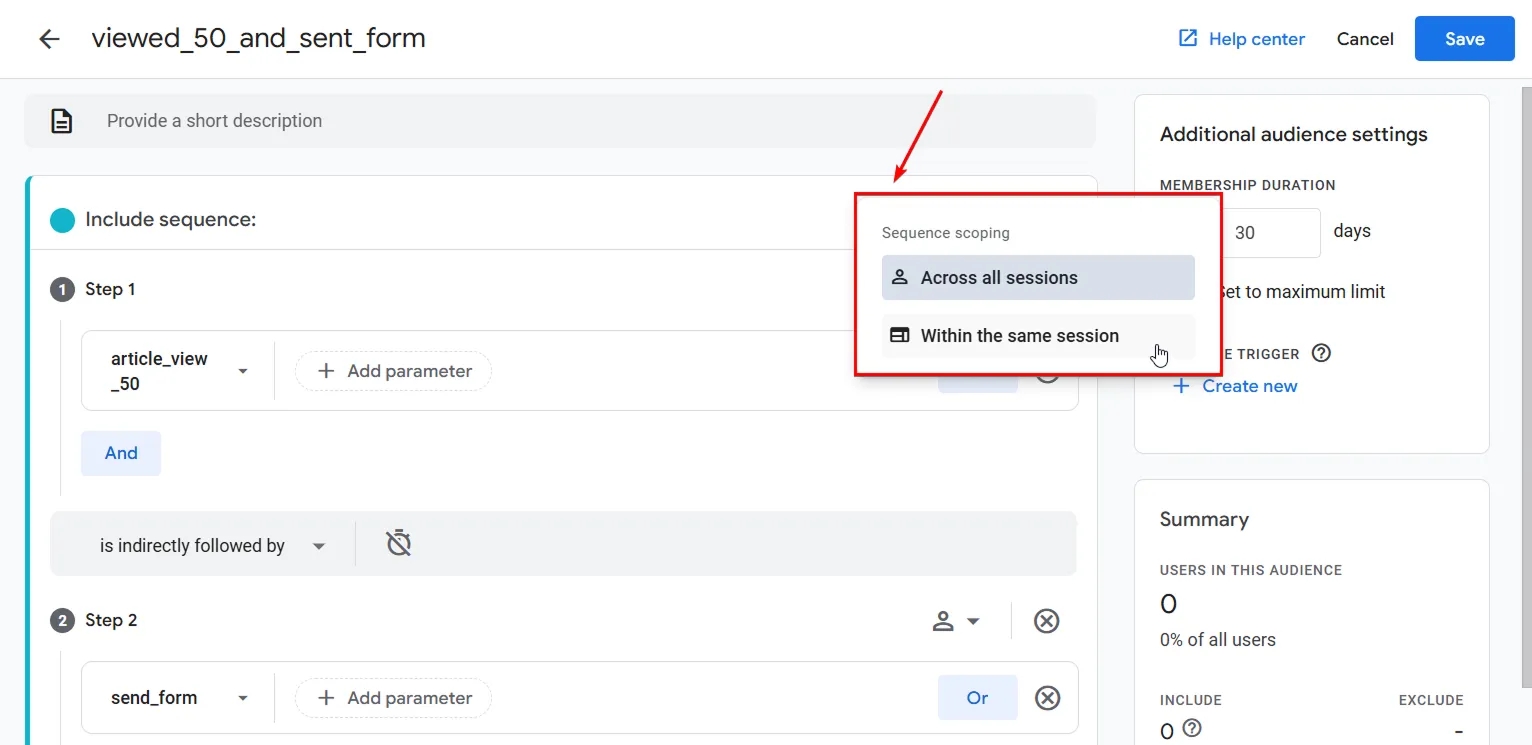
Pay attention to one more detail — the Sequence scoping setting defines the time frame within which the user must meet the specified conditions:
- Within the same session — if it’s important that all events occur within one session.
- Across all sessions — if your scenario allows user actions to occur gradually: one today, another tomorrow.
Summary
I hope this article helped you better understand how you can create and configure Key Events in Google Analytics 4.
If you’re interested in the audience-based method of creating events, I recommend checking out the detailed guide: “How to set up audiences in Google Analytics 4: from simple solutions to complex scenarios.”
And if you want to deepen your knowledge of sending events through Google Tag Manager, here is a collection of materials where I walk through different types of website interactions and how to send them to Google Analytics 4 step by step:
- Tracking Form Submissions Using the Element Visibility Trigger
- Tracking Form Submissions with a Basic GTM Trigger
- Tracking Link Clicks with Google Tag Manager: A Practical Guide with Examples
- Tracking Clicks on Website Elements Using Google Tag Manager: Advanced Guide
- Improved timer trigger in Google Tag Manager: launching the timer based on tab activity time
- Tracking User Interactions with Forms Using Google Tag Manager
Wishing you success in event configuration and always-accurate analytics!
Loading comments…