
A few years ago, I hosted an open webinar on the most common mistakes in Google Tag Manager. Since then, I have encountered an increasing number of mistakes, and not everyone had the opportunity to attend the webinar. Therefore, I decided to compile an updated version of the most frequent mistakes in text format.
This article is not overly complicated, but it is still intended for those who already have experience with GTM.
Below is the full list of mistakes I want to talk about today:
- Mistake 1. Sending events when the button is clicked, and not when the form is actually sent
- Mistake 2: Setting up triggers using the Click Text variable
- Mistake 3: Publish versions instead of using preview mode
- Mistake 4. Not specifying the name of the version when creating it
- Mistake 5: Assuming that if a tag is fired, the data is 100% successfully sent to the correct system
- Mistake 6. Confuse Page URL and Page Path variables
- Mistake 7: Not using regular expressions and thinking that the more triggers and tags, the better
- Mistake 8: Not using CSS selectors and instead running to developers to add IDs to elements
- Mistake 9. Thinking that a button always consists of one element
- Mistake 10. Forgetting that CSS selectors tend to change over time
- Mistake 11. Incorrect or partial use of dataLayer
- Mistake 12. Ignore Consent Mode settings that change the rules of the game
- Mistake 13: Give access at the GTM account level, not at the container level
- Mistake 14. Do not use GTM, because it has a bad effect on the speed of the site
- Instead of a conclusion
Let's start. We will consider all mistakes according to the following plan:
- What is the problem?
- Possible solutions
Mistake 1. Sending events when the button is clicked, not when the form is actually sent
Yes, yes, you are not mistaken. This is one of the most common mistakes.
What is the problem?
Let's look at an example of a real form on the proanalytics.academy website identify the issue.

If a person fills in two fields: name and contacts and clicks the "Send" button, the form is sent. Therefore, at first glance, it may seem that tracking a click on such a button is enough for conversion tracking. But in reality it is not so.
Imagine the following situation: a person fills in their name but forgets to enter their email. After clicking the "Send" button, an error occurs, preventing the form from being submitted.

If the trigger for the tag in GTM is set to a button click, then this "empty" click will be recorded in GA4 as a form submission. That is why such a setting is incorrect.
The most common reasons for this error are:
- People just don't know how to configure otherwise, so they just track the click on the submit button. As we have already understood, this is wrong, because a click does not always equal a form submission.
- People know how to track a form, but they still set it up incorrectly. They think they've set up form submission tracking, but they've actually set up a button click. Why does this happen? Not all forms are made correctly, namely, they transmit the browser's
Submitevent at the time of successful submission of the form.
What solutions?
Regardless of which category you fall into, in order to avoid such a mistake, the solution is one: you should always check the settings on the empty and semi-empty form. That is, first you try to send a form in which the fields are not filled and check whether the event is transmitted to analytics. Then you fill in the part and check again. These are very important steps that many people forget. But you need to train yourself to check all options: filled form, half filled and empty.
Here are some helpful links to help you improve your form tracking
Mistake 2: Setting up triggers using the Click Text variable
What is the problem?
If you need to track a button click or a form submission ( as we previously discussed, the latter can be problematic; however, many people make both mistakes simultaneously), many people choose the Click Text variable and set up a trigger based on the button text. In other words, the button's text is specified in the condition, for example, "Send":
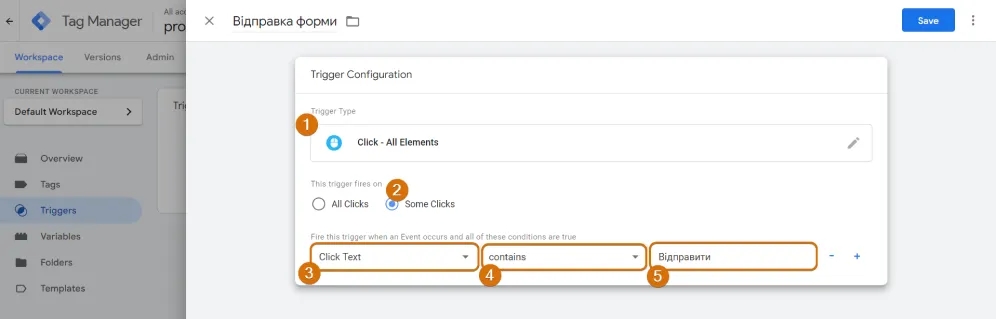
This is a bad option because it is very difficult not to miss any possible scenarios. Let me explain: the site may have multiple language versions, and the button text will change accordingly. Do not forget to list all possible options. Naturally, a skilled professional should not overlook such scenarios. But there is another situation that many forget about - Google Translate and its analogues. Users can log in from other countries and use translators. Because of this, the text of the button may change, leading a particular user to a completely unexpected option. For example, from "Submit" to "申し出る". This will cause the event to fail.
What is the solution?
Do not use Click Text to set up triggers.
You should not completely abandon this variable. In no case. It can be used to pass event parameters, but NEVER use the Click Text variable to set up triggers. Better learn how to work with CSS selectors.
Mistake 3: Publishing versions instead of using preview mode
What is the problem?
After making certain configurations in Google Tag Manager, it's crucial to test them before publishing a version. However, many users skip this step for various reasons: they might be in a hurry, overly confident in their correctness, or simply unaware of how to use preview mode. Either way it leads to chaos in GTM.
When you publish a version, a new version of GTM is created. So why is it problematic to create a separate version for each change? Each published version appears on the version tab, and when you need to determine when specific errors began to occur - you have to go through all these versions, making it more challenging to pinpoint the source of the problem. For example, I had six versions on one account in half an hour, and each one was published, even though you could have just used the preview mode. It looked something like this:
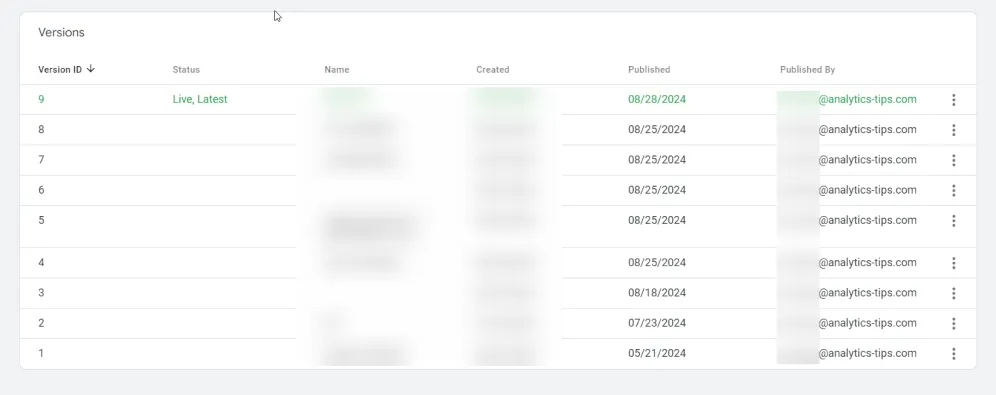
And even better, when people give normal names to the versions, then you can immediately understand that the specialist does not know how to work with the preview mode, but usually no one writes something like this:
- Version 10 - Adjusted the transmission of the successful form submission event for GA4
- Version 11 - Tried to set up form submission success event handling for GA4, posted the previous version but made a mistake in the trigger, so posting another one with edits
- Version 12 - Adjusted the transmission of the successful form submission event for GA4, now it's definitely final
- Version 13 - Adjusted the transmission of the successful form submission event for GA4 final final
Therefore, you and I approach the next mistake. Oh, sure, I almost forgot about the solution.
What is the solution?
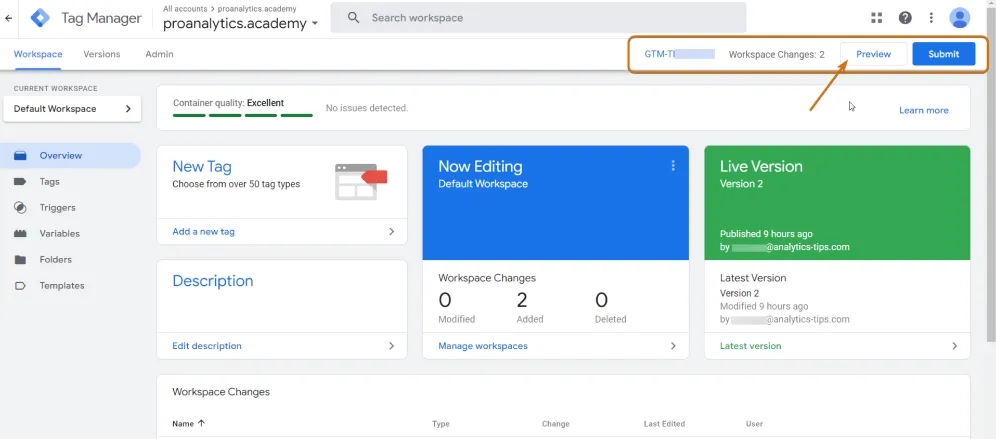
Learn how to work with preview mode.
Use the Preview button to check your settings. It allows you to see changes on the site without publishing a new version. After clicking the Preview button, you can see the events on the site and can check that everything is working correctly without publishing a version.
Mistake 4. Not specifying the name of the version when creating it
What is the problem?
As mentioned earlier, version history provides a convenient way to track what changes were made, when, and by whom in GTM. Since a tag manager typically involves multiple specialists within a company, it is good practice to maintain proper documentation. The tag manager actually does most of this work for you. All you have left is:
- specify clear names for tags, triggers and variables;
- maintain an Event Map (Map of events);
- and specify the name of the version at the time of publication;
And if I don't consider the lack of an Event Map a bug when working with Google Tag Manager (read below in the note why), then the lack of a version name is a definite bug. Just take a look at the screenshot below - how clear are you about the tweaks that have been made to this tag manager over the last year?
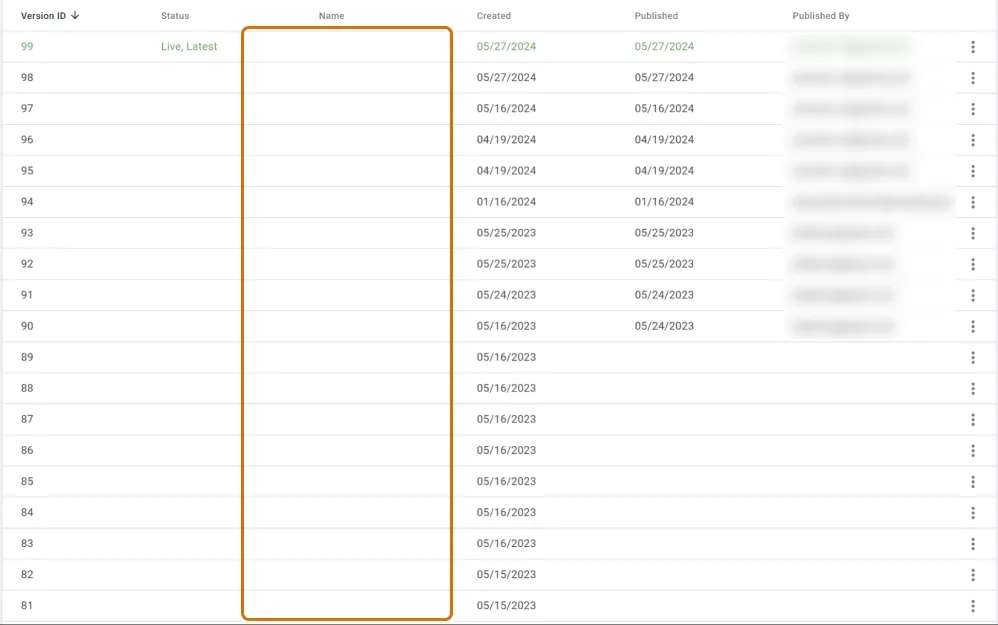
What is the solution?
Always specify a version name when creating a version. Of course, it is good to also specify the description, but let's start at least with the name))
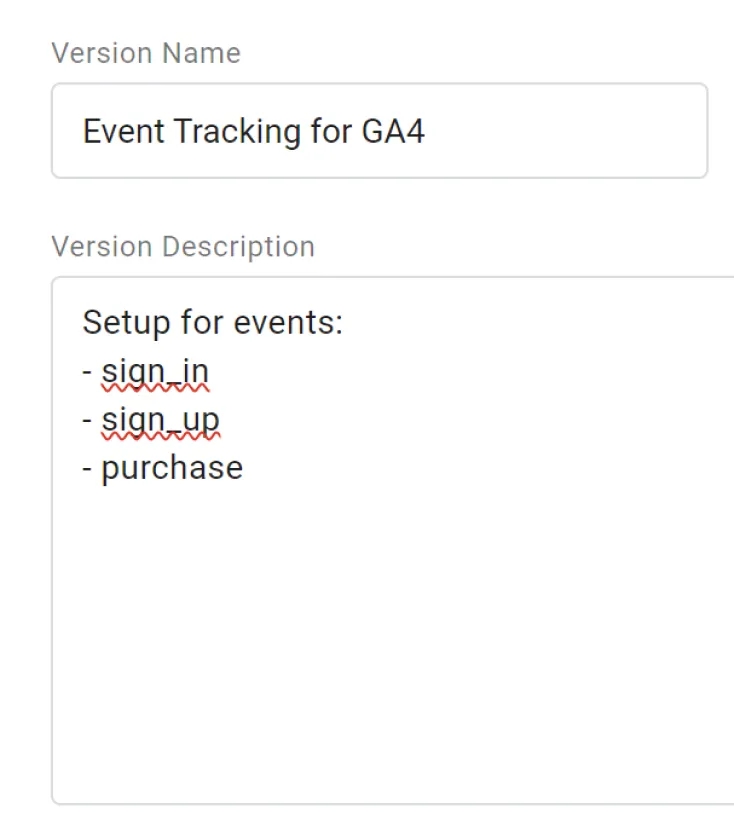
Why I don't think the lack of Event Map is a bug when working with Google Tag Manager. Everything is actually very simple: I believe that the lack of Event Map is an error of an even more global level - it is an error in web analytics settings in general. How can we properly analyze the collected data if we do not know what exactly is behind it? Every time looking in the technical documentation written to the developer or digging into the GTM settings to understand what exactly is behind this or that event is the most inefficient waste of time. And Event Map will save you from it.
Since this is an article about working with GTM, I will not describe in detail the rules for creating an Event Map here, but in short, it is usually a certain file that describes at least:
- at what exact moment or moments the event is sent;
- screenshots of site elements, interaction with which leads to sending an event;
- what parameters the event can have and their possible values;
- which tag/s or code on the site is responsible for transmitting it.
Mistake 5: Thinking that if a tag is fired, the data is 100% successfully sent to the correct system
What is the problem?
Many people mistakenly believe that if your tag appears in the Tags Fired block during preview, the code has executed successfully and the data has been sent to the correct system. I’m not sure where this myth originated, but it is inaccurate.
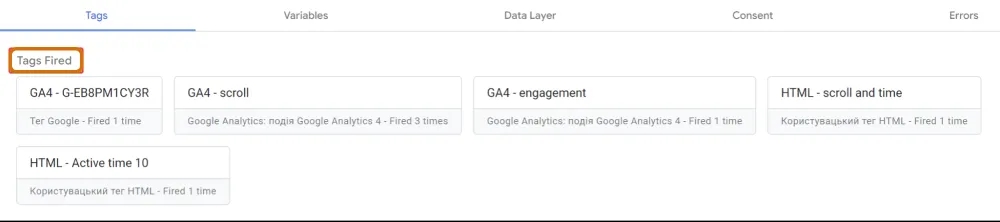
If we literally translate Tags Fired, we get Tags are launched. That is, notice, no one tells us: The tags are successfully executed or the Data is sent to GA4. All it tells us is that the tag was fired. But we remember that although in most cases in GTM we use tag templates, actually code is hidden under each of the templates. Given this, it becomes clear that the code may for some reason not perform the action you need (for example, you entered incorrect data in the appropriate fields) or your custom code returned an error.
Here is one such example: A tag was run but executed with an error. And this is still a fairly "light" case. In the sense that GTM helps us and shows the Failed status.
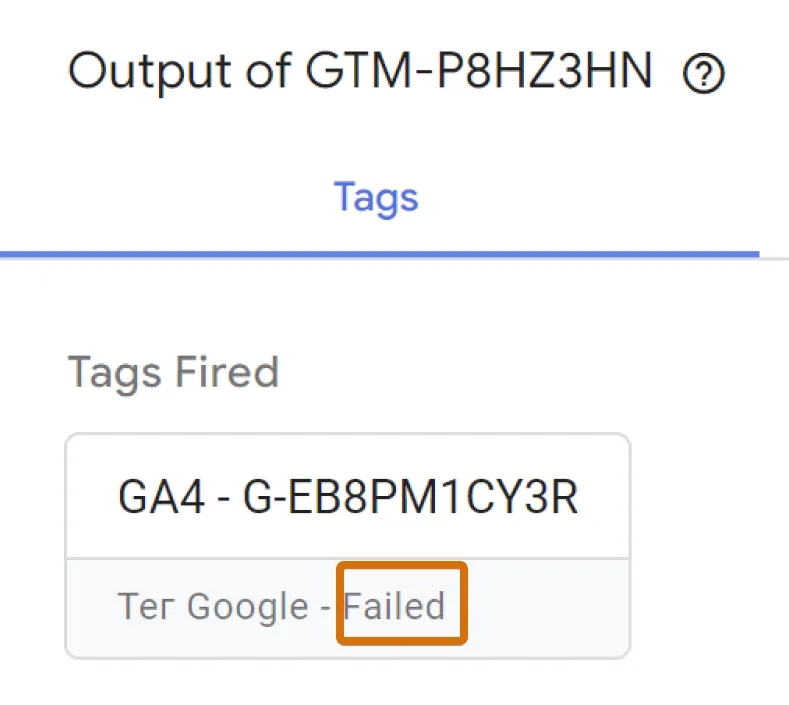
In fact, there may be more complicated situations when, for example, the code in the thesis was executed successfully, the status Succeeded, but the error was in the code itself - it did not do what the author intended. Or when the tag executed successfully, everything was as intended, but the server you were sending the data to didn't accept the request. You will not find out about all such situations from the presence of your tag in the Tags Fired block.
What is the solution?
- The solution is simple: in addition to the preview mode in GTM, use additional tools, for example:
- functionality in the interface of the system to which you send data to check the correctness of sending events, for example, DebugView in the GA4 interface;
- developer tools in the browser (talking about the Network tab);
- special browser extensions (Meta Pixel Helper, Adswerve)
What does the presence of a tag in the Tags Fired block actually tell us.
It only says that the condition for the trigger you set up to fire the tag has been met, and so the code in the thesis has started executing.
Given this information, you can now quickly understand where the problem is in your settings:
- If you performed the required action on the site to send the event, and the tag entered the Tags Fired block, but the data did not arrive in the required system, for example, in GA4, the problem is precisely in the tag settings.
- If after the desired action on the site the tag remained in the Tags Not Fired block, you definitely have a problem with the trigger.
Mistake 6. Confusing Page URL and Page Path variables
What is the problem?
I often see people not understanding the difference between these variables and this leads to incorrect settings. Let's analyze an example: you want to track an event only on the main page of the site, for example, a click on the "Start learning" button.
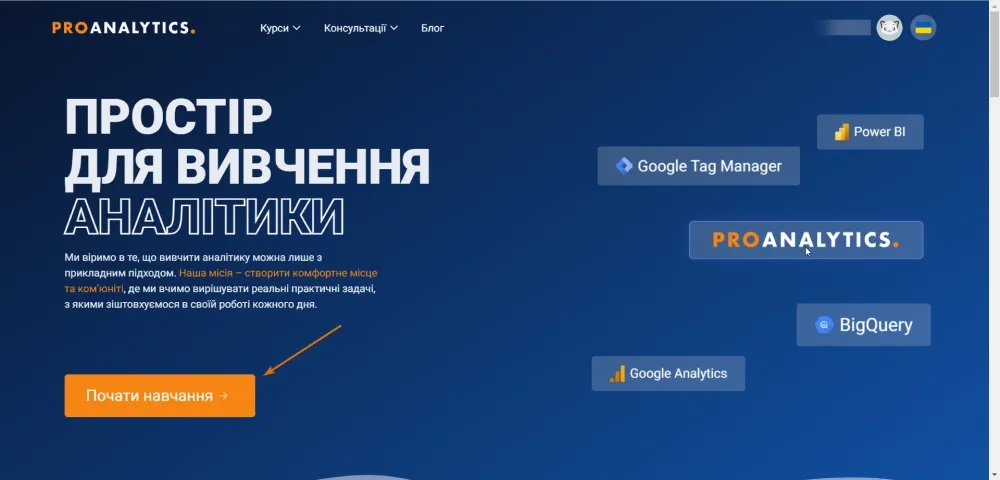
I won't complicate the setup with CSS selectors now, so let's pretend that the trigger you see in the screenshot below is enough for us:
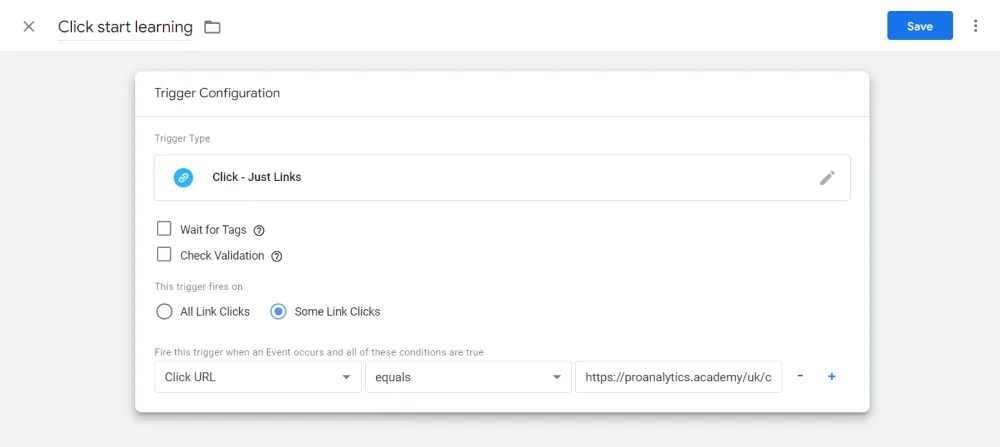
But it will be just a click, without a filter on the page. And as you remember, we are only interested in the main one. Often I come across settings where they take the URL from the main page and use it in the trigger settings. It looks like this:
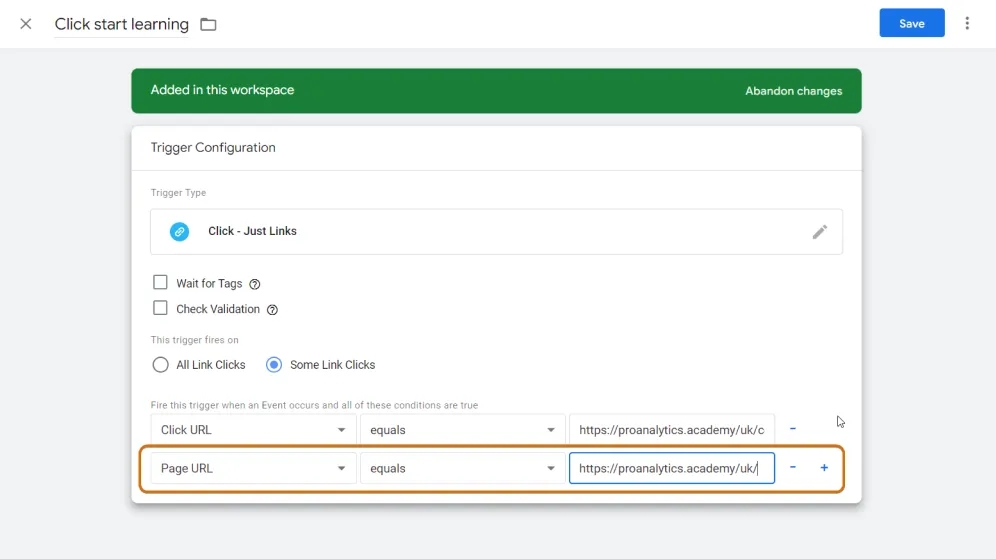
But this is wrong. Most likely, such an event will work only in some cases. The reason is that, in addition to the protocol, domain, and page path, the Page URL also contains GET parameters. Nothing is mentioned about them in the condition. I understand that it can be difficult. Let's take an example: if the user clicks on a link with a UTM tag, for example. as follows: https://proanalytics.academy/uk/?utm_source=facebook&utm_medium=cpc
it will still see the main page, but the trigger will no longer fire. Because https://proanalytics.academy/uk/ is NOT equal to https://proanalytics.academy/uk/?utm_source=facebook&utm_medium=cpc
What is the solution?
Use the Page Path variable as it contains only the path to the page, no GET parameters or other parts of the URL. That is, our setting should look like this:
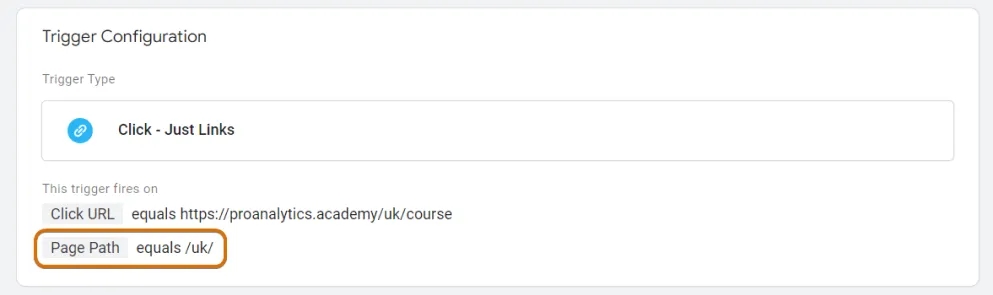
Page URL is the full address of the page, which includes all components: protocol (for example, HTTP or HTTPS), domain name (site name), path to the page and additional parameters.
Below you can see a more detailed diagram:
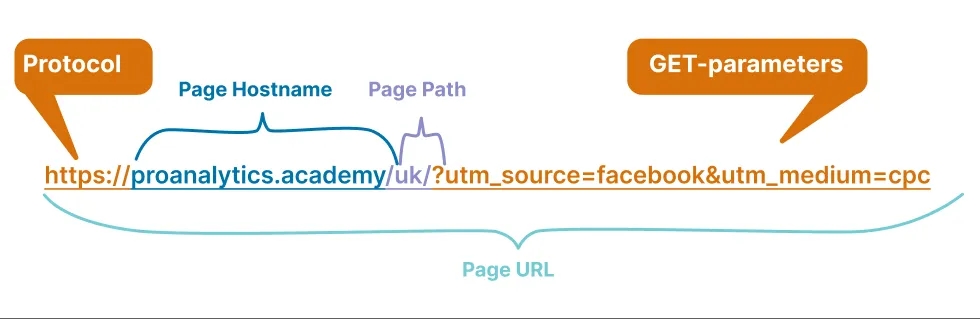
- Protocol: https
- Domain: proanalytics.academy
- Path (Page Path): /uk/
- GET parameters: ?utm_source=facebook&utm_medium=cpc
The Page URL includes all of these elements, including the Page Path, so it is the full path to the resource.
Page Path is always a specific part of the URL that is responsible for the path to the page.So, configure your triggers to use Page Path instead of Page URL when you need to track specific pages.
Mistake 7: Not using regular expressions and thinking that the more triggers and tags, the better
What is the problem?
I have seen projects where a separate trigger and tag was created for each button or event. And I'm not even talking about separate buttons, but about the same one, which is placed on different pages. That is, if the button was on several pages, then new tags and triggers were created for each of them. Sure, it works, but it's far from the best and certainly not the fastest method, which complicates work and creates chaos.
Regular expressions allow you to significantly simplify the configuration. For example, instead of creating separate triggers for each page where the tag should fire, you can use regular expressions and combine all conditions into one trigger. This not only saves time, but also keeps the container structure clean and clear.
Regular expressions (or RegEx) are combinations of regular and special characters that allow you to find or process text according to certain patterns. In GTM and GA4, regular expressions are used to select data according to conditions. They consist of regular characters (letters or numbers) and metacharacters (special characters such as “?”, “+”, “$”, etc.).
Regular expressions have a syntax that helps you formulate various conditions. The meaning of the expression depends on how you use metacharacters. For a better understanding, I recommend going through this small interactive tutorial, and you can test your expressions using the tool at this link. ChatGPT also works well with regular expressions.
Let's analyze the following situation: imagine that you need to configure a click on the "Enroll" button on the PRO GTM course page.

But you have two language versions of the site: Ukrainian and English. Of course, you can create two separate triggers, but this option is not very good. It's only two pages in our case, but what if we need to include 4, 5 or 10 pages?
What is the solution?
Learn how to use regular expressions. The final trigger setup will look like this:
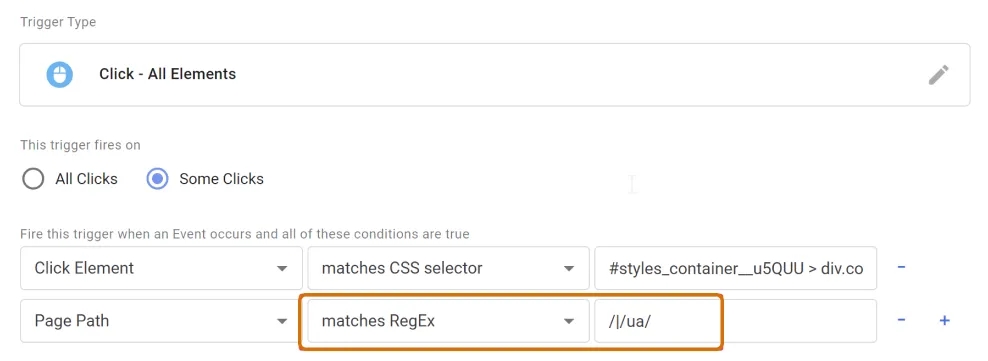
The example uses the special metacharacter “|” (vertical line) which means "OR". That is, after enumerating the path to the pages through this metacharacter, you will get a condition: either the click was on page 1 or on page 2. According to this scheme, you can add as many pages as you need.
Mistake 8: Not using CSS selectors and instead running to developers to add IDs to elements
What is the problem?
Many configure tracking based on classes or element IDs found in the code. And, in general, I have nothing against such a practice. However, it happens that there is no ID, and the classes are repeated for several elements, some of which are not needed for tracking. In such cases, customizing via element ID or class can cause problems. And usually in such cases they go to the developers and ask them to add certain IDs to certain elements. But this requires time and the presence of a developer who may be busy or even absent from the project.
What is the solution?
Use CSS selectors to track any element, regardless of site layout.
Simply put, a CSS selector is a way to select elements on a page based on their position in the structure of the HTML code. These can be precise selectors that apply to a specific element. If we draw a parallel with geographical ones, then something like:
- Latitude: 50.4501° N
- Longitude: 30.5234° E
Selectors can also be generic and match many elements on the page. Again, if we draw a parallel with geographical coordinates, something like:
All cities at latitude: 35.6762° N
CSS selectors give you more flexibility and allow you to track clicks on different elements, even if they don't have unique IDs. Very convenient, you say?
You can find and copy the CSS selector in the site code by right-clicking on the desired element, and then selecting Inspect -> Right-click on the element code -> Click Copy -> Copy selector. And then you configure the trigger with the condition Click Element matches CSS selector [and your selector itself]. More details on the screen:
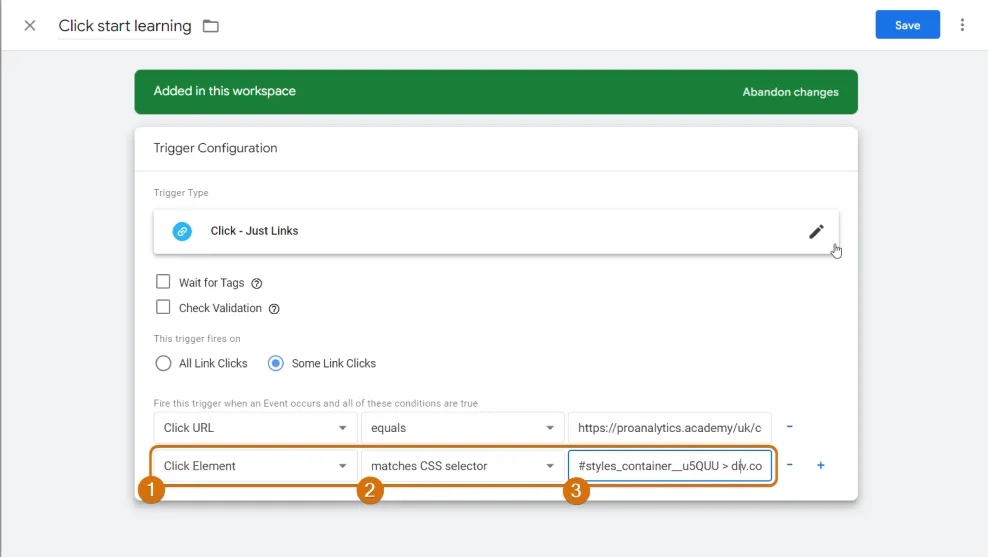
But what if you need to track clicks on several similar items? Then creating 20 triggers is not a very rational use of time. The answer lies again in regular expressions, because they can be used in conjunction with CSS selectors.
Mistake 9. Thinking that a button always consists of one element
I often see people setting up button click tracking and thinking that a button is always a single element. But this is not always the case (I hope you haven't gotten tired of this phrase yet, because it's only the middle of the article))). Let's take a look at the following button example.
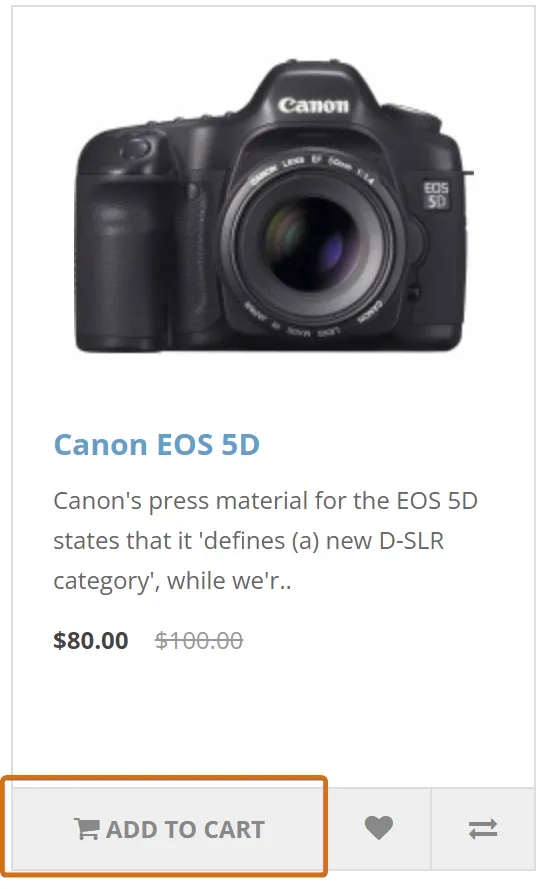
It looks like a normal Add to Cart button, but let's take a look at the code:
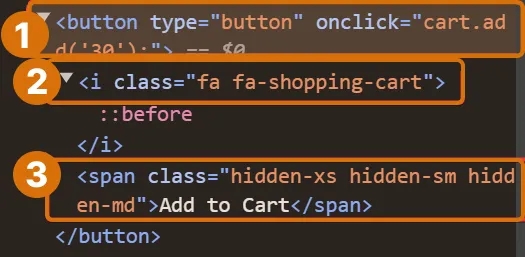
Here you can see that the button consists of 3 elements: the button itself (the <button> tag), the icon (the <i> tag) and the text “Add to Cart” (the <span> tag). Sometimes there may be even more components.
Why is it important to pay attention to this? If you specify only one of the elements in the trigger settings, for example, the central text, then the text in this place will be tracked, and the edges of the button will NOT be tracked. Please refer to the screenshot below for a better understanding: clicks in the area that is not highlighted will not be tracked.
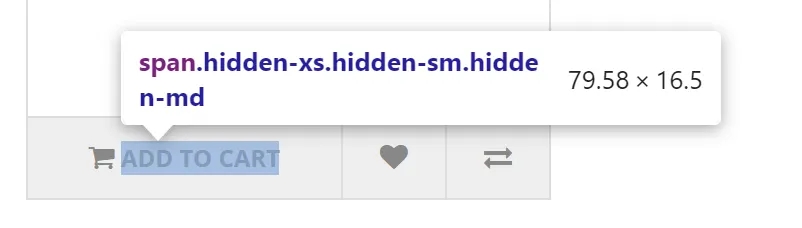
What is the solution?
First of all, make it a rule to carefully examine how many elements a button consists of. And, of course, do not forget to specify all possible elements in the trigger settings. If you configure click tracking using CSS selectors, you can use the following solutions:
List all possible selectors separated by commas. In my case it would look like this:
#content > div.row > div > div > div.button-group > button:nth-child(1),#content > div.row > div > div > div.button-group > button:nth-child(1 ) > i,#content > div.row > div > div > div.button-group > button:nth-child(1) > span
Use the CSSX, CSSX * combination to shorten the record. Where CSSX is the selector of the topmost (parent) element. In my case, the <button> tag. The final result will look like this:
#content > div.row > div > div > div.button-group > button:nth-child(1),#content > div.row > div > div > div.button-group > button:nth-child(1 ) *
The last option is especially relevant when the button consists of a large number of elements.
Mistake 10. Forgetting that CSS selectors tend to change over time
What is the problem?
As much as I love CSS selectors, there is one downside to them that can sometimes lead to significant analytics issues: CSS selectors can change over time. Of course, this does not happen by itself. Earlier I drew a parallel between selectors and geographical coordinates, but there is one difference: a city located at specific coordinates is usually not moved by anyone to other coordinates. But with elements on the site, everything is more complicated: at a certain moment, we can decide to change the placement of the element on the site, and, of course, its coordinates will most likely also change.
Why is this bad? Changing the selectors will lead to tracking problems and, accordingly, to incorrect or missing data.
What is the solution?
The best solution in this case is cooperation between team members: usually, before making any changes to the site, you need to formulate a hypothesis, and the designer prepares a new version of the page. Then this design goes to the developer and after a certain time appears on the test version of the site. Already at this stage, it is desirable to connect analytics and assess whether changes in the design will affect existing selectors. If this is the case, then you need to make the appropriate changes in your GTM. Then, when a new version of the page is released, the analyst will continue to work correctly.
Mistake 11. Incorrect or partial use of dataLayer
What is the problem?
Very often, I see a situation on projects when the developer is first asked to transfer the data needed to configure Ecommerce in GA4 to the Data Layer, and then they are asked to configure separate codes for the work of dynamic remarketing in Google Ads, Meta Ads or other systems. This extra developer work makes no sense. All the necessary data in this case is already in the Data Layer: the data required for Ecommerce in GA4 and dynamic remarketing settings in any advertising system are the same. The structure is slightly different, but the data itself is the same.
What is the solution?
Transform existing Ecommerce data in the Data Layer using a Custom HTML tag, a Custom JavaScript variable, or ready-made solutions from the template gallery into the format you need for advertising cabinets and save your time and nerves.
Learn more about how the Data Layer works in Google Tag Manager.
Mistake 12. Ignoring Consent Mode settings that change the rules of the game
What is the problem?
Probably, everyone has already heard and knows what the Consent Mode setting is, but I notice that everyone has figured out how it affects our GTM settings. Here is one example: in the tag settings, the trigger condition is specified "1 time per page" and two triggers are added: when the page is loaded - Initialization (in case the user has already given consent on previous pages) and a custom event (must fire if when the user accepts consent on the current page).
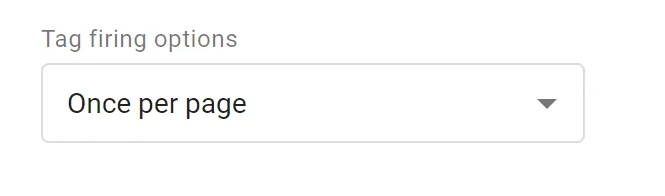
The idea is great, the logic seems to be correct, but the consensus changes the rules, and this setting will not work as intended. What will actually happen:
- The user enters the site for the first time and sees the banner. At this moment, our Initialization trigger will fire, but the tag will not run because the user has not yet given consent. Our tag will be in the new block Tags Blocked by Consent Settings.
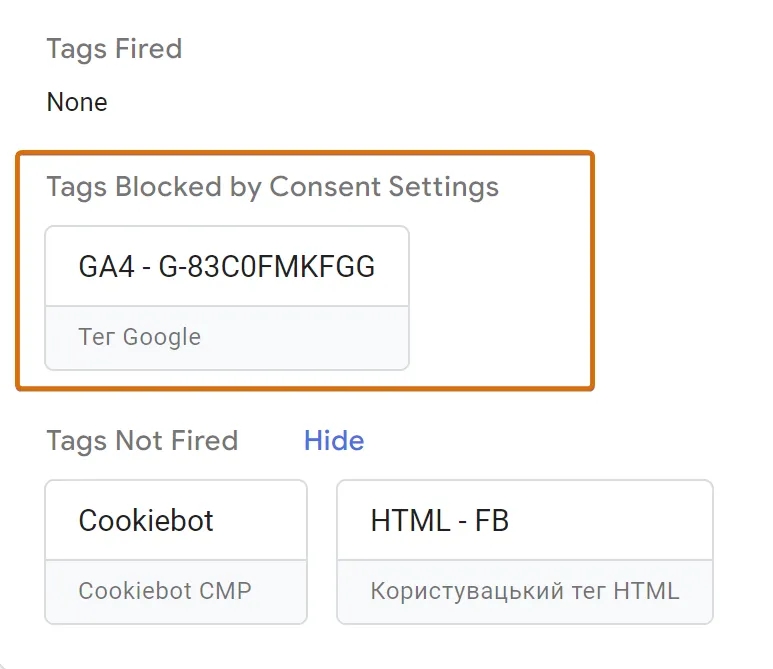
2. The user gives consent, and our custom event is executed. The consent is there, the conditions for the trigger are correct... but the tag won't fire again because it was already fired before (yes, it was blocked by the consent then, but it still "fired" and we have a trigger condition of "Once per page")
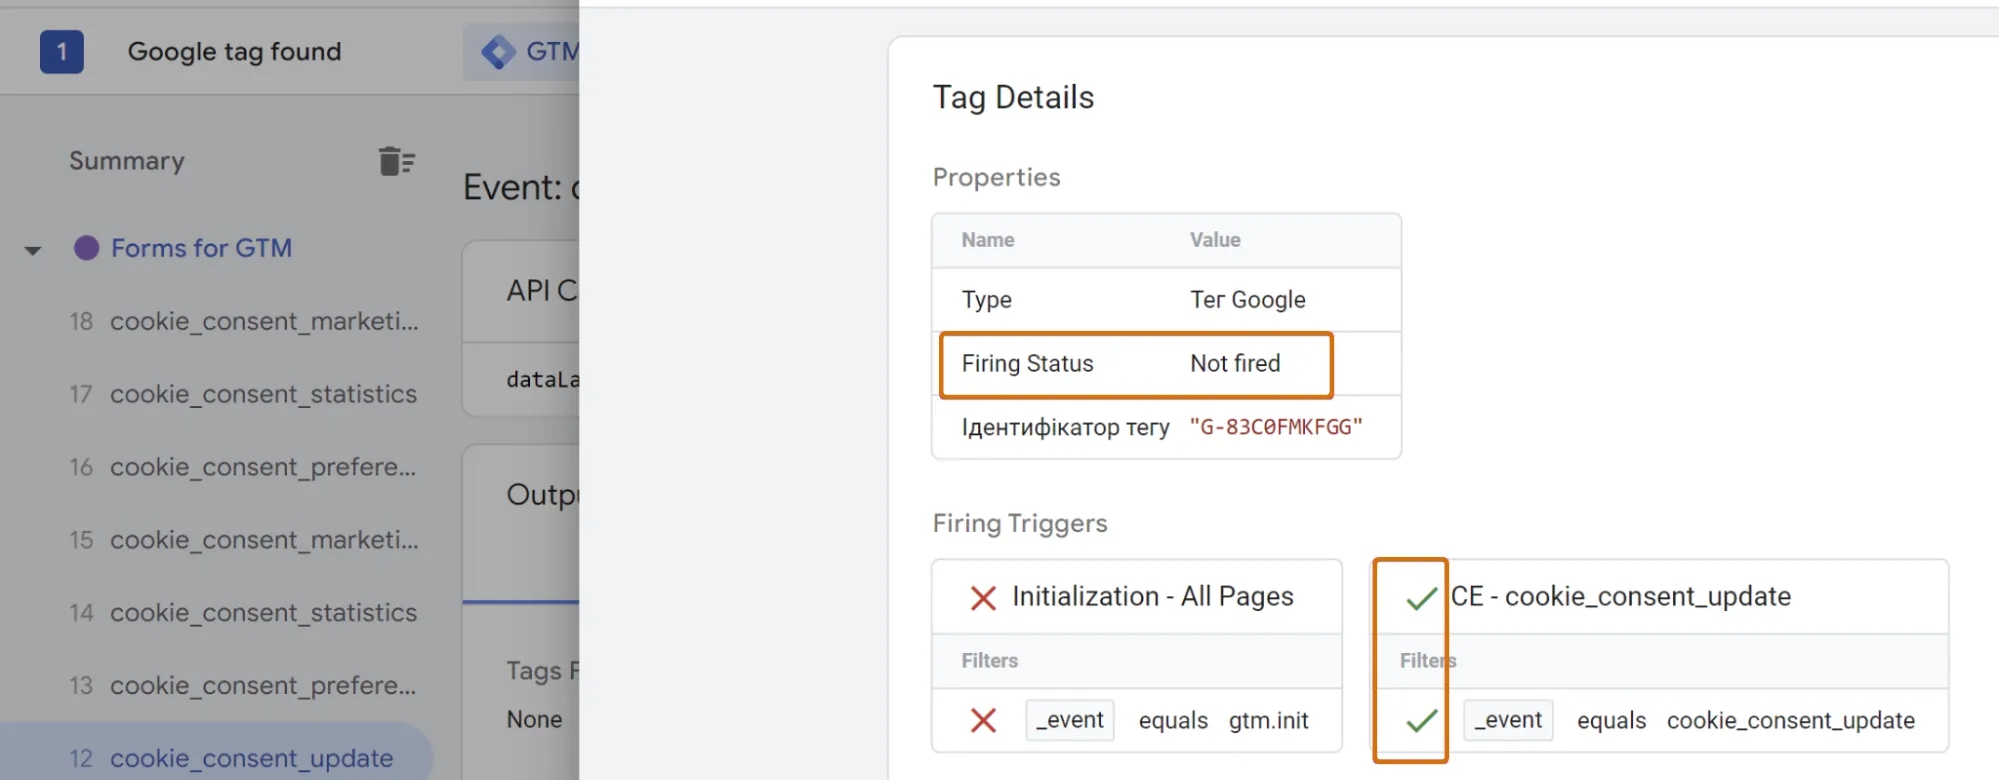
As you understood, with this setting, events from this page will not be included in the analytics.
What solutions?
Keep your finger on the pulse and do not forget to update your knowledge in time, because new changes in the interface often lead to changes in the rules of the tool in general. Well, you need to figure out the setting of the socket.
Mistake 13: Giving access at the GTM account level, not at the container level
What is the problem?
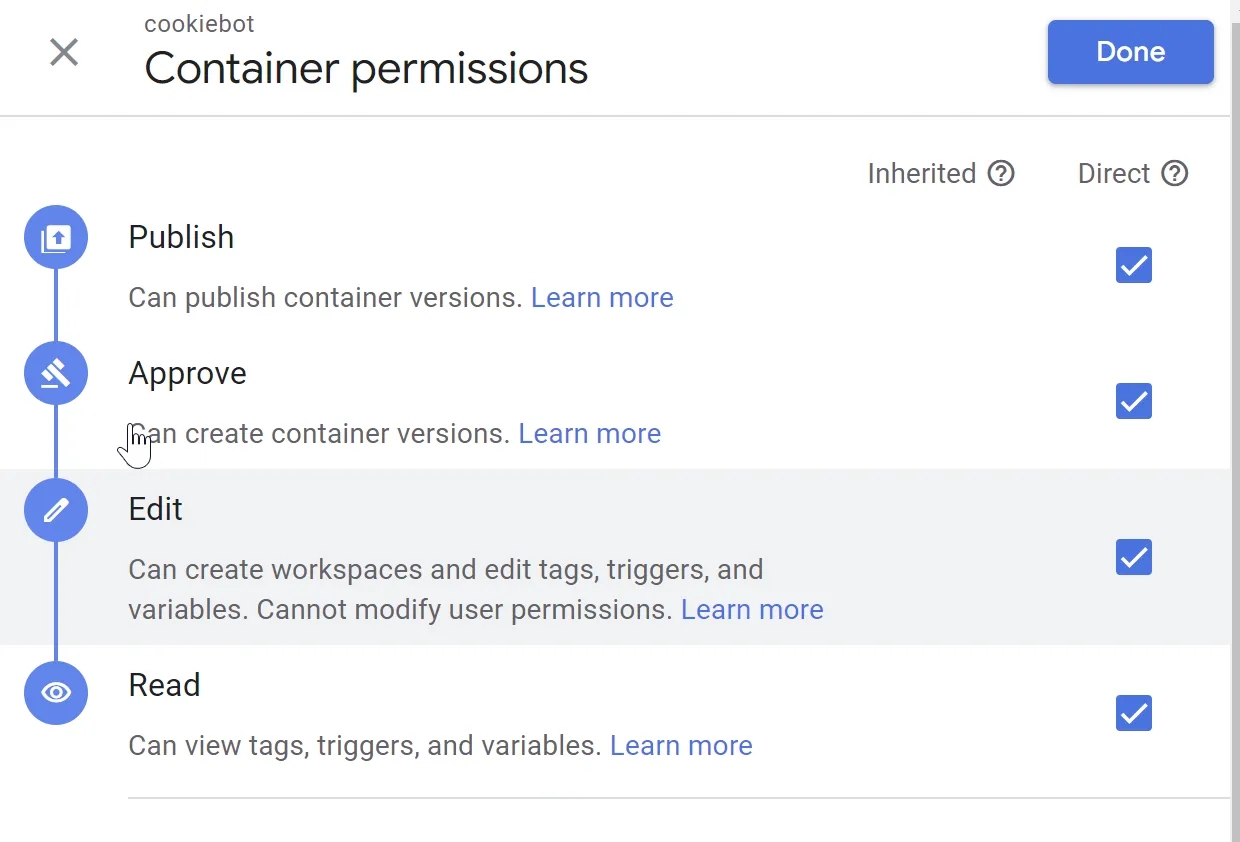
Although this error is not related to settings, it is so common that I cannot help but mention it. When you request or grant access to Google Tag Manager, remember that in GTM, higher-level access does not extend to lower-level access. That is, if you give User level access at the account level, the user will not get access to any of the containers.
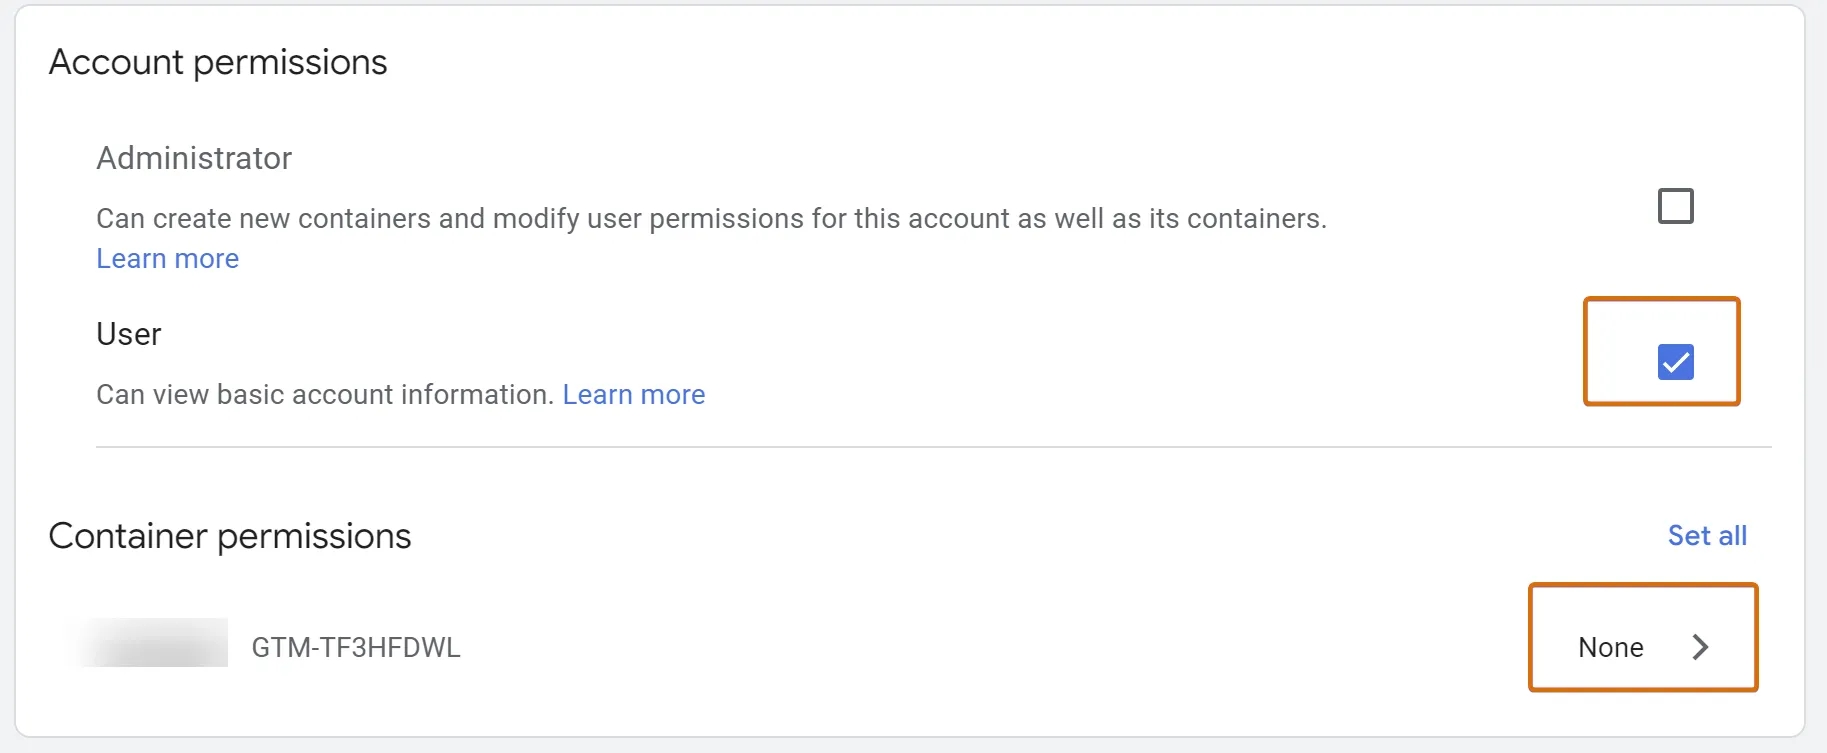
Although his account will start to appear in the interface, it will be empty:

What is the solution?
Don't forget to provide access at the container level as well and check for access no later than the night before the deadline)
Mistake 14. Not using GTM, because it has a bad effect on the speed of the site
What is the problem?
And the last, but definitely not the least important. I often see a situation where a developer or SEO specialist refuses to use GTM on a project. They argue that it significantly reduces the speed of the site. Sometimes they can even conduct a test and show that if you demolish GTM, the speed of the site increases. But as always, there is a nuance: when conducting such a test, one small but important nuance is often forgotten. A lot of other code is loaded through the tag manager, so simply demolishing GTM and showing that your site's speed has increased won't be enough. For a proper test, you need to tear down GTM and all the codes that were in GTM, put it directly on the site and then measure it. Usually, in such cases, you will not see a statistically significant difference in the loading speed of the site with and without GTM.
What solutions?
Check the information, don't just go along with what you're told. Here is a good article with studies on how GTM affects site loading speed.
Well, if you really want to increase the speed of your site, then it is better to consider the option of using GTM Server-Side. I've already talked about the benefits of using and the setup process in more detail before.
Instead of a conclusion
I hope the article was useful for you and most of these mistakes were not about you)
If you are interested in this topic and want to learn how to make more useful settings in GTM, such as setting up ecommerce tracking, conducting end-to-end analytics or setting up remarketing audiences, then you will definitely be interested in the PRO GTM course. You can view the program and sign up at this link.
Loading comments…