
How it all started?
I first heard about the MCP Server from Maks in the July 17 newsletter (I hope you’re subscribed to it as well, and if not, you can subscribe at the bottom of the page). Then Max published the article “Model Context Protocol: what it is and why it’s the future of analytics.” And that’s when it really caught my attention. I went into the comments on Telegram and started asking Max how to set up this “wonder.”
After mulling over it for a while and realizing that Max wasn’t in a hurry to write a setup guide, I went back to the July 17 newsletter and found a video guide on setting up the MCP Server in VS Code on YouTube. I watched it a bit, googled around, talked to ChatGPT, and found out that there are three main popular services for setting up MCP:
- Claude Desktop
- VS Code
- Cursor
Each service has its pros and cons. In this article, I won’t do a detailed analysis and comparison of the available services. The goal of the article is to show the setup algorithm of the MCP Server using MCP Server GA4 as an example. But you can easily set up the required MCP Server in any other program using a similar algorithm.
At first, I set up MCP servers in Cursor, but the program wasn’t very stable for me and often produced errors.
So I decided to switch to VS Code. In VS Code, everything worked out for me — MCP runs stably and without issues. Meanwhile, I discussed this with Maks and got a proposal to write an article for the blog. And here it is.
Article plan
First, I’ll talk a bit about the idea of this article and why you’ll be able to easily set up your MCP Server. At the end, I’ll provide instructions for setting up the MCP Server GA4 in VS Code. If you already have VS Code, Python, and the APIs configured, you can go straight to setting up the MCP Server.
Then I’ll talk about the services you’ll need:
- What I wanted to say with this article
- How the Google Analytics 4 MCP Server works
- Preparatory settings and work
- Setting up the Google Analytics MCP Server
- Conclusion
As the Germans say, los und gehen — or simply, let’s get started.
What I wanted to say with this article
I have been working in SEO, contextual advertising, and analytics for over 10 years. Yes, I have some technical knowledge, which, for example, is necessary for technical SEO, but I don’t know how to program, set up servers, or create websites. But thanks to artificial intelligence, I can now do much more than, say, 5 years ago.
In this article, I want to convey a simple truth — you can achieve much more if you believe in yourself and find enough time and motivation to figure things out. Yes, for this, you might have to do a lot of Googling, bother ChatGPT even more, and even, as in my case, watch videos with subtitles because you don’t know English well enough. But the result is often worth more than the time spent, especially since this knowledge stays with you forever.
Don’t worry — in this case, I’ve already gone through the whole process from scratch to result, cleaned it from unnecessary things, and packed it into this article so you can calmly repeat everything and enjoy the result.
Despite the fact that this article uses many developer tools, and considering the length of the article and the number of screenshots, it will only take you 15 to 30 minutes to set up your first MCP Server. You set up the server once, and then you just use it.
How the Google Analytics 4 MCP Server works
Before we move on to the main part, I’ll very briefly describe the overall process of what the system we’re about to set up will do:
- The AI agent (naturally, using an LLM, for example, Claude or ChatGPT) forms a request — for example: “Show the number of visits over the past week in GA4.”
- This request is sent via the MCP protocol to your MCP server.
- The MCP server, which is written in Python, receives this request.
- The Python code on the server calls the necessary API (in this example — the Google Analytics 4 API).
- The API returns the required data (for example, the number of visits, traffic sources, etc.).
- Python processes this data into a convenient format and returns it back via MCP to the AI agent.
- The AI agent displays the result as a response, chart, or table.
Preparatory settings and work
In this section, I’ll outline what you need to do beforehand, before starting the MCP server setup.
- A service that has an AI agent and allows you to configure the MCP server. This could be VS Code, Claude Desktop, Cursor, etc. In this article, I’m demonstrating using VS Code, but you can use other programs. Without it, unfortunately, nothing will work.
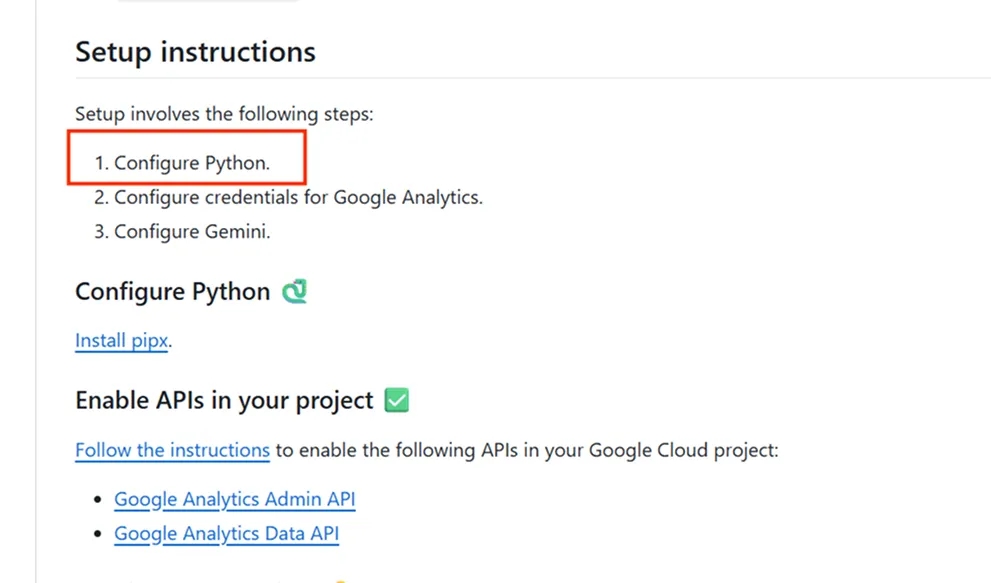
- Depending on the MCP server, you’ll need to install Python or Node.js. This information is always available in the MCP server’s description on GitHub. This way, you’ll know right from the start what else you need to install.
3. An account on Google Cloud Console, where you can enable the necessary APIs for each project and create an API key.
4. ChatGPT or similar tools may be needed as an assistant if any unforeseen issues arise.
Installing Visual Studio Code
To begin, go to https://code.visualstudio.com/ and download the version of Visual Studio Code (hereafter VS Code) for your PC.
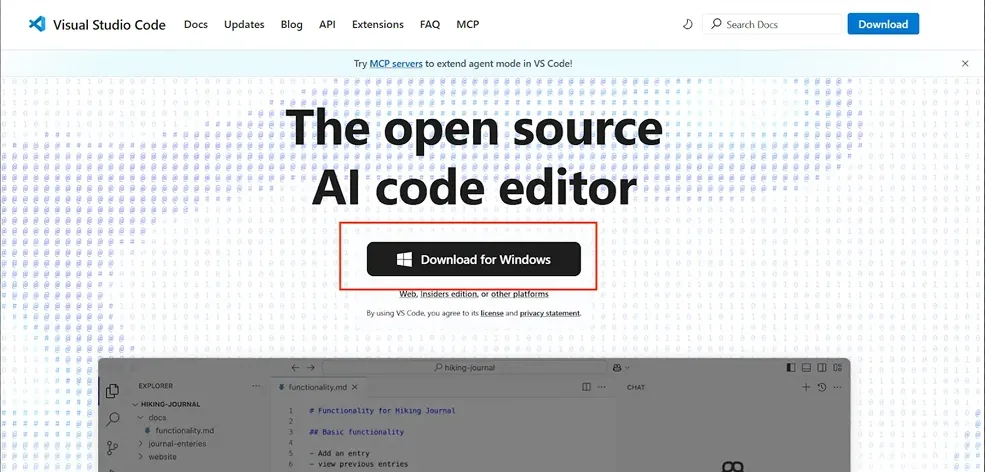
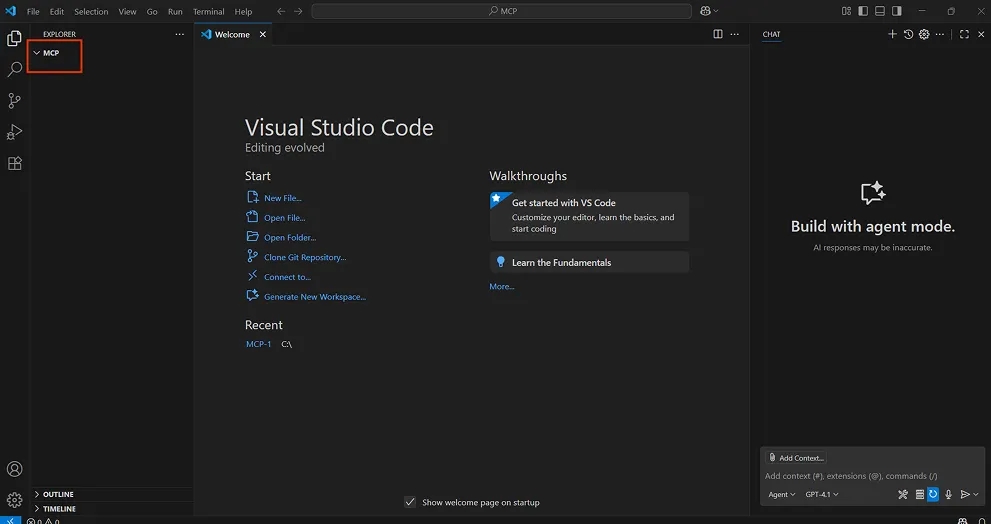
After installation, launch the program and create a folder named MCP (or any other name that is convenient for you) on your PC, then open it in VS Code.
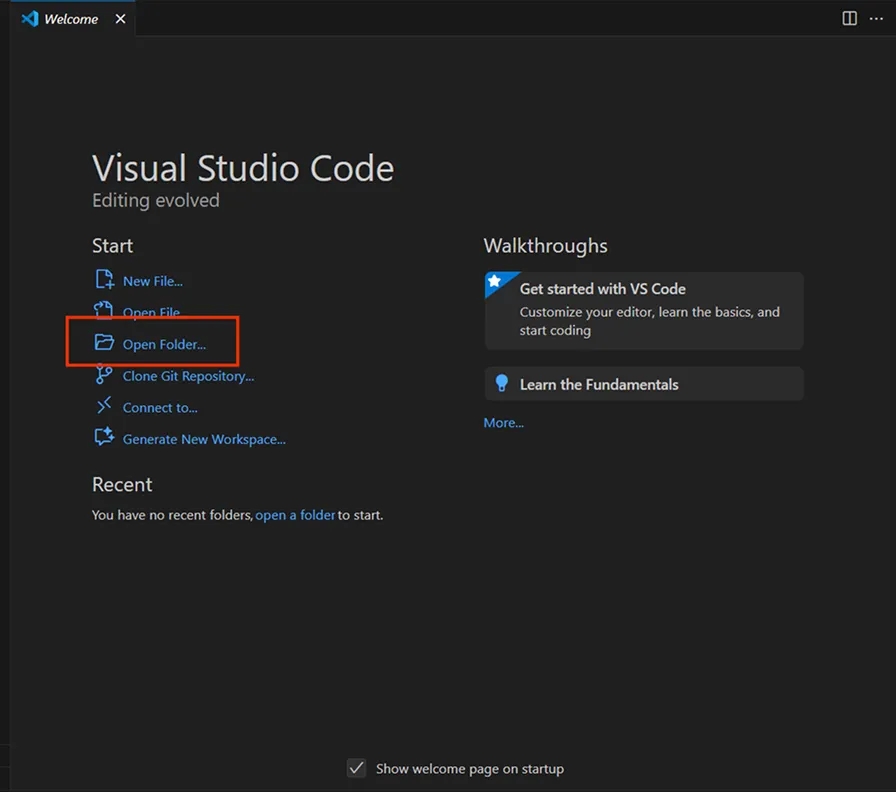
Your program will look like this. Stop here — we’ll continue with this later.
Installing Python/Node.js
In this article, I’m showing the process of installing Python specifically, because the official MCP server from Google is written in Python. However, in the future you may need other programming languages.
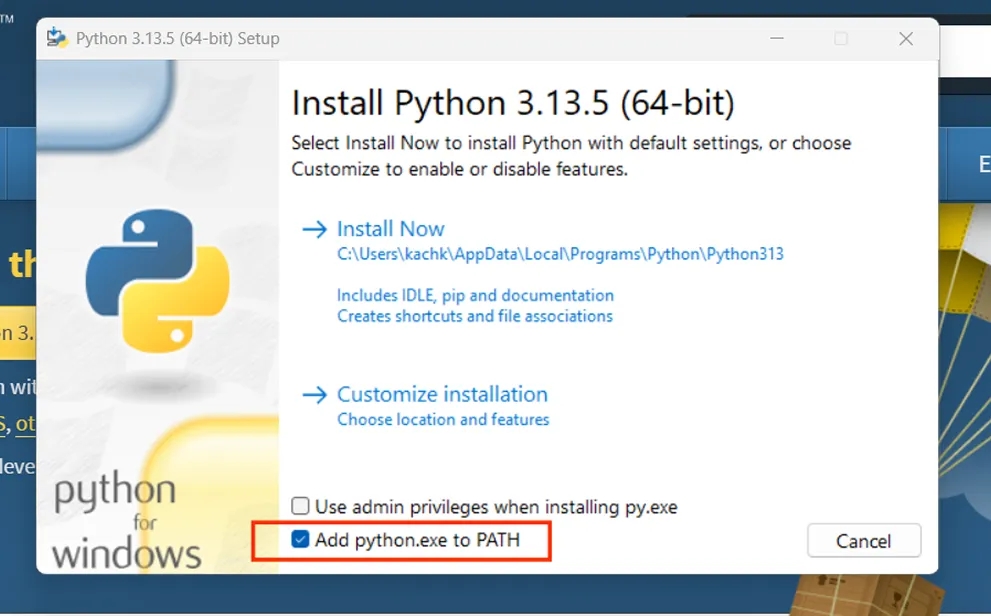
You can download the program from the official website. The main thing — during installation, be sure to check the box Add Python to PATH, otherwise it won’t work, just like it didn’t for me the first time :)
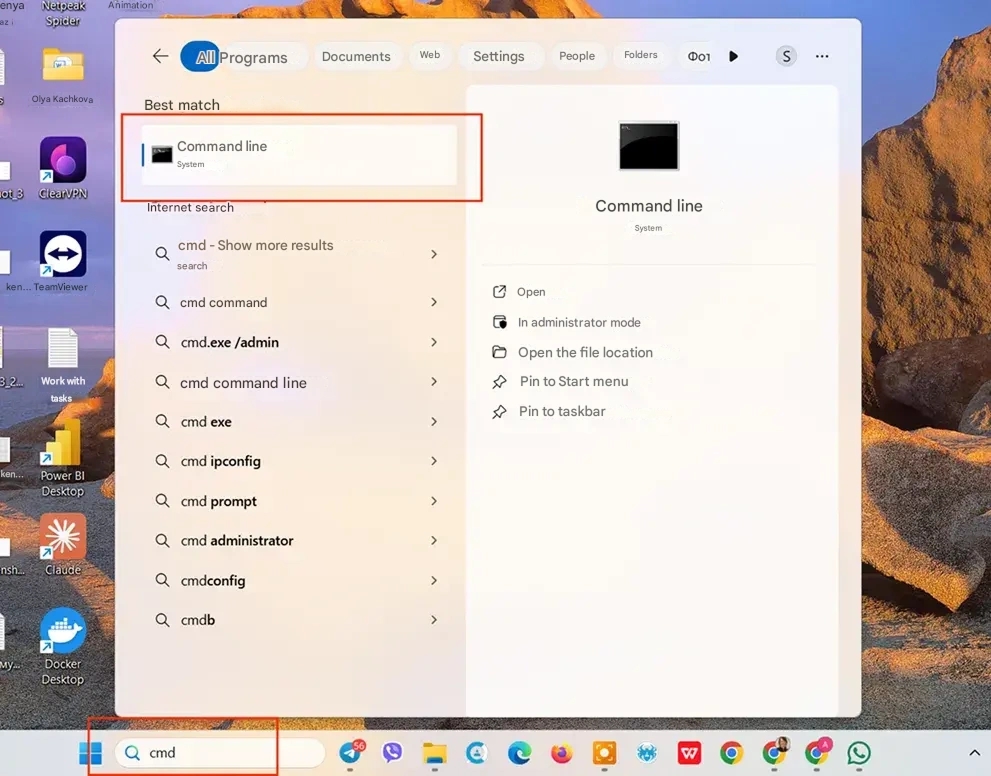
After installation, open the command prompt. To do this, type cmd in the search bar.
Now you can check if everything is okay — to do this, paste this code into the command prompt:
python --version
pip --version
You should see a message similar to the one in the screenshot:

If something goes wrong or you see an error, my advice is this: take a screenshot and ask ChatGPT. I’ve never had a case where we couldn’t find a solution together. And believe me, we’ve solved much more complex problems.
Registering and creating Google Cloud Console
Now you need to create an account in Google Cloud Platform if you don’t already have one. Cloud Platform is a kind of rabbit hole into Google’s underground world. It’s very mysterious and intimidating, but once you fall into it, you find many treasures, such as BigQuery or APIs for various Google services. Honestly, I use only a small part of its functionality myself, but marketers don’t need to know everything anyway.
By the way, Maks has already talked in detail about the benefits of BigQuery for marketing in his article.
To use the MCP Server GA4, we will need to do the following:
- enable the required APIs;
- create a service account and an API key.
I will describe the process itself below in the setup section. If you already have a project in Cloud Platform, you can go straight to that section.
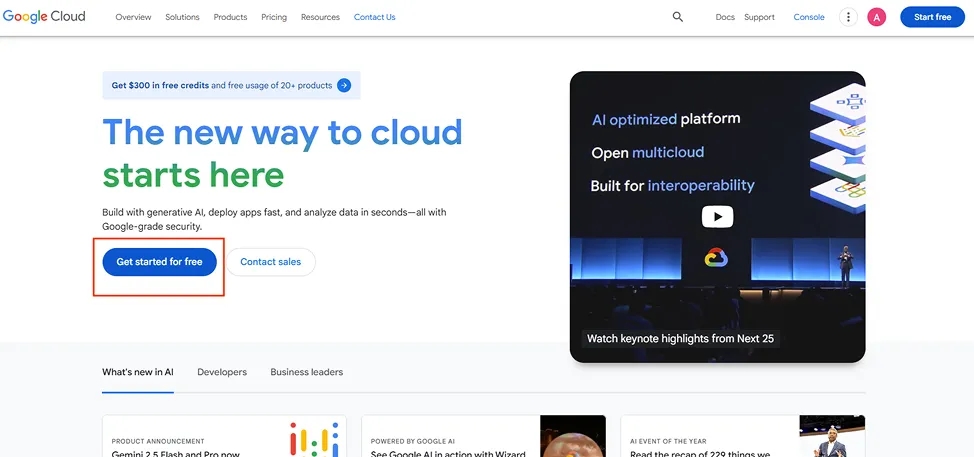
Next, go to the website and click the Get started for free button.
Select your country and continue.
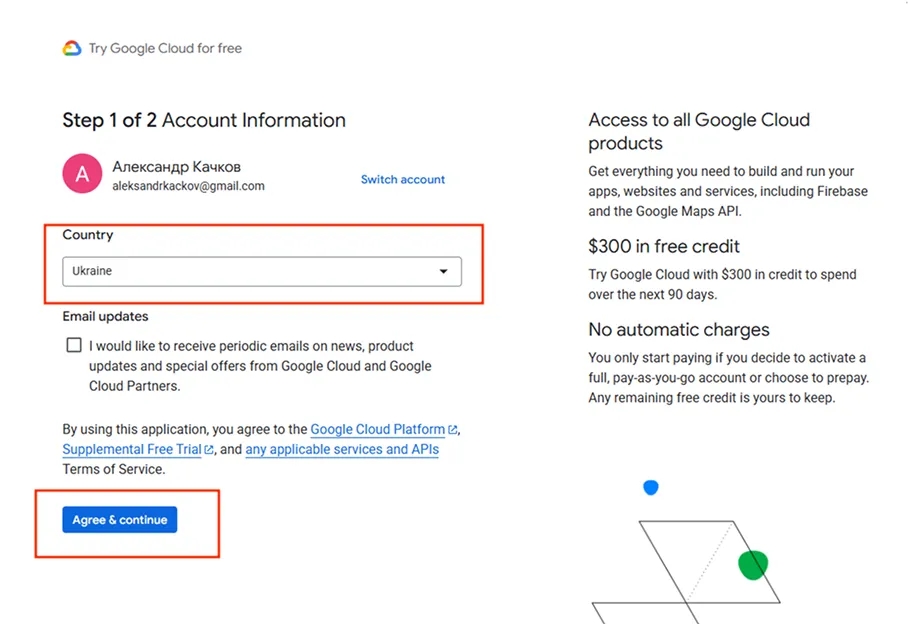
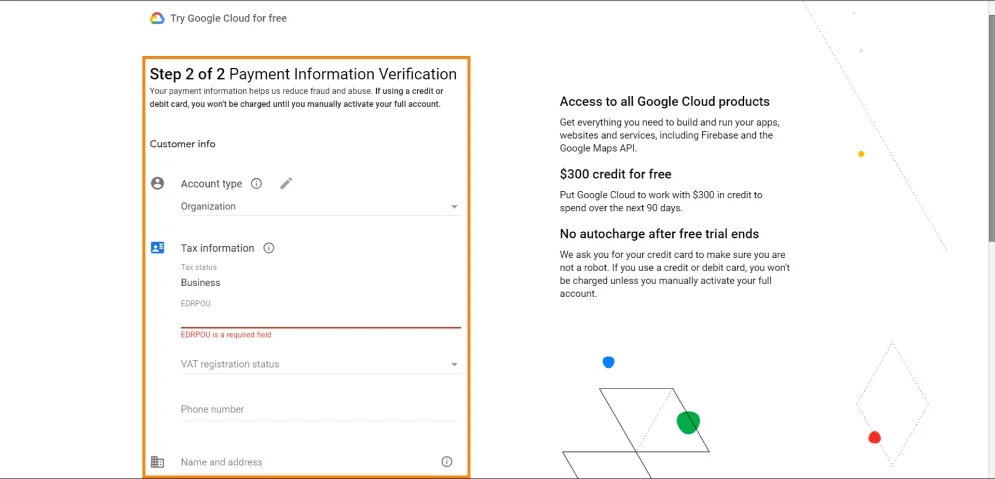
Fill in information about yourself or your organization, add payment details, and then click Start free.
A new project named "My first project" will be created.
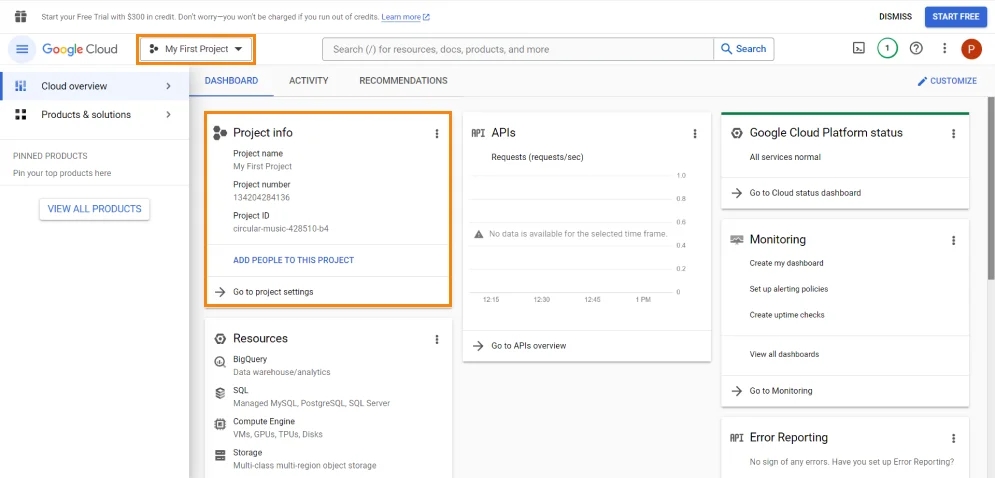
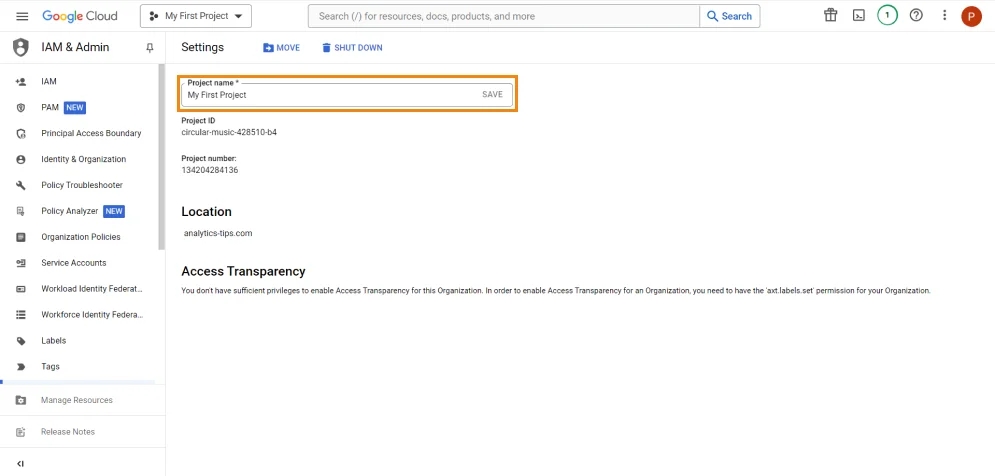
After creating the project, go to its settings.
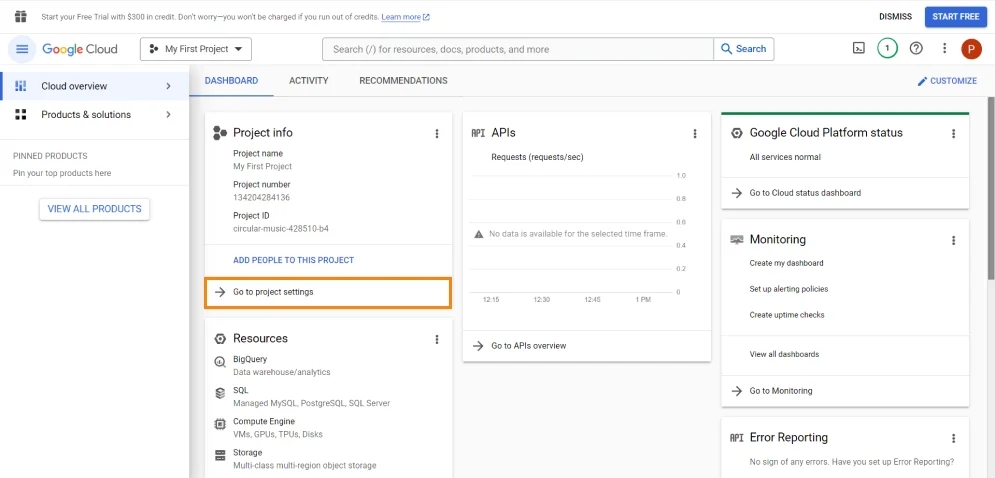
Give it a name that makes sense to you so that in the future it will be convenient to work with and find the required project.
ChatGPT or analog
This point is just in case something goes wrong.
I hope you have ChatGPT, Gemini, Claude, or any other AI you work with and are familiar with.
I will show you step-by-step how to configure and run the MCP Server, but something might still go off-plan. In that case, AI will come in handy. Just send it the error code, a screenshot, or ask your question, and in most cases, you’ll get the correct answer.
Setting up the Google Analytics MCP Server
I configured the MCP server according to the instructions in the official Google repository at this link.
Now I will show you step-by-step what needs to be done.
Setting up in Google Cloud Console
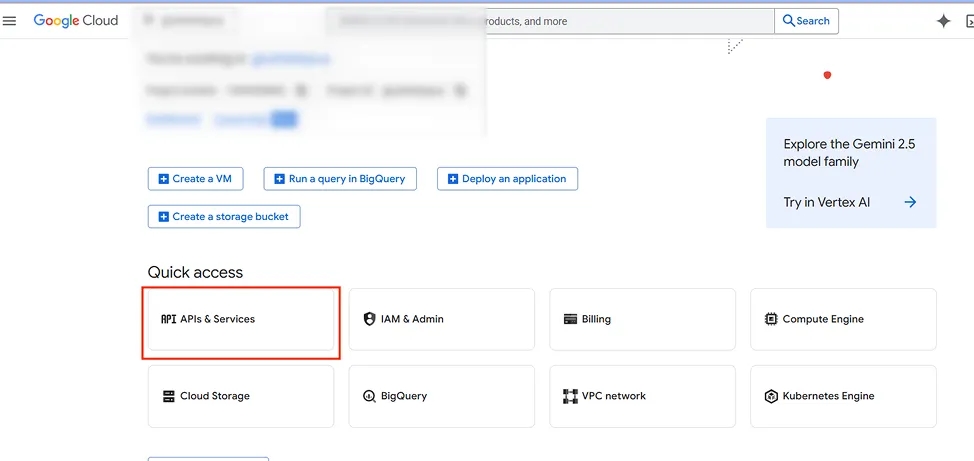
First, open your Google Cloud Console and select the project for which you want to connect MCP. Then choose API & Services.
We need to enable the following two APIs:
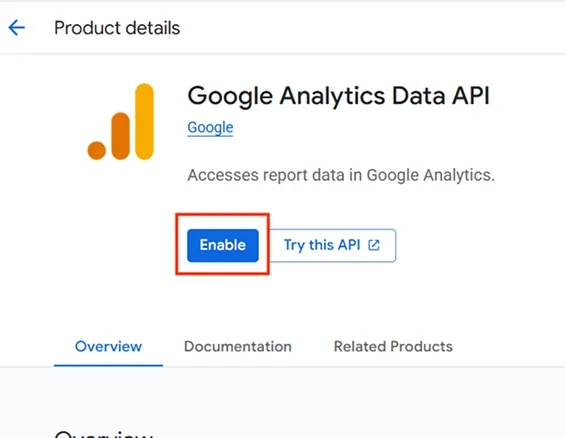
- Google Analytics Data API
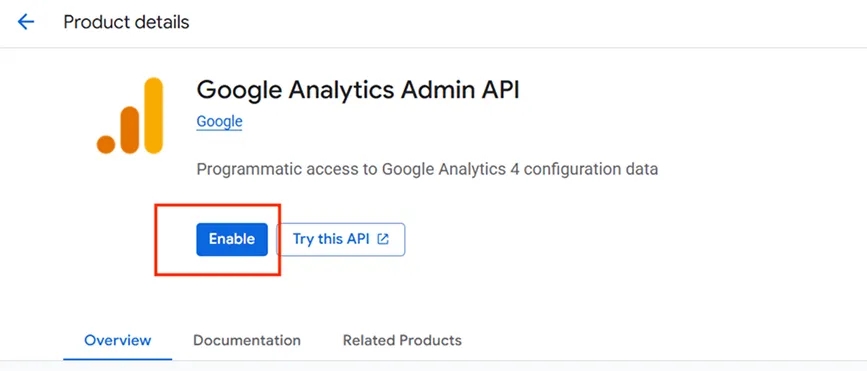
- Google Analytics Admin API
Follow this link and enable the API — to do this, click the Enable button.
Follow this link and enable the Google Analytics Admin API.
Now you need to create Credentials, for which you will then generate an API Key required to connect the MCP server to Google Analytics.
Important note: you can use this API Key not only for GA4 but also for other Google services. Therefore, you can either create one universal key or several — one for each service.
It’s also important to decide whether you need just one key for all projects (which you can create, for example, in an agency account) or to create a separate key for each project. It’s best to discuss this with the client or your team before starting the MCP server setup.
In the next step, open Credentials, click Create credentials, and select Service account.
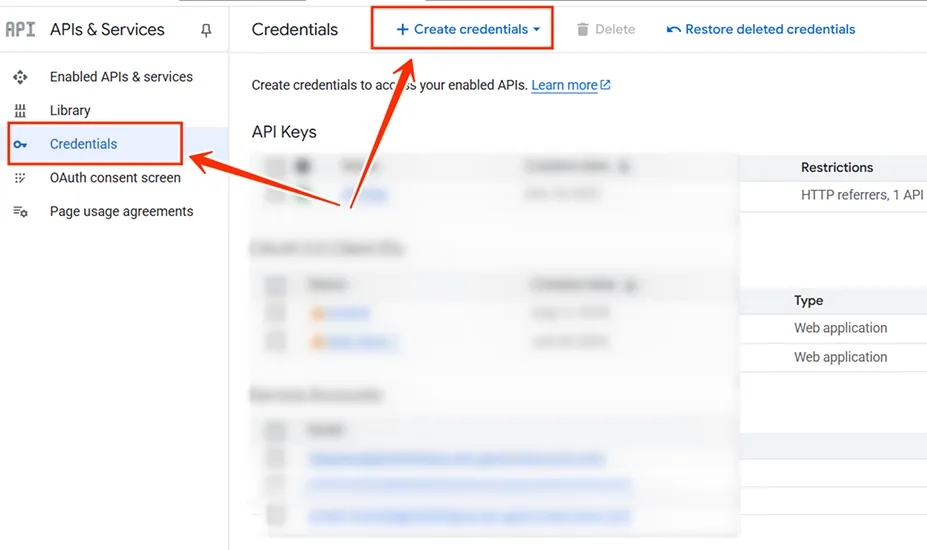
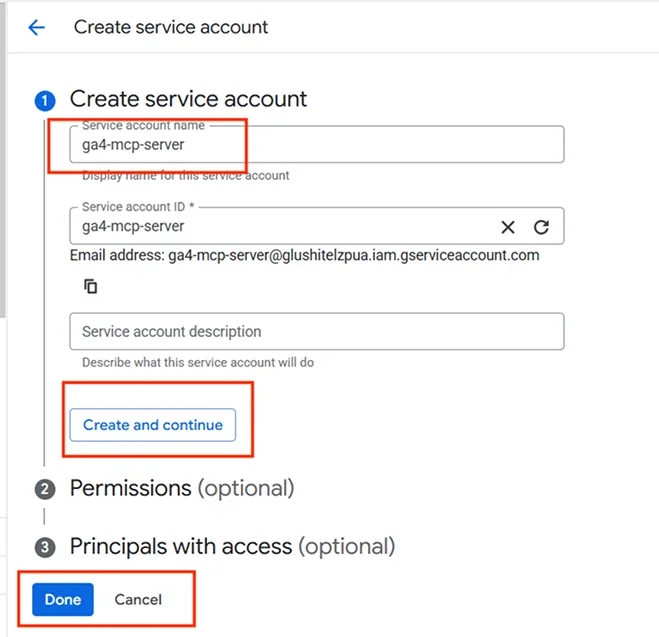
Give it a name, for example, ga4-mcp-server, and click Create and continue.
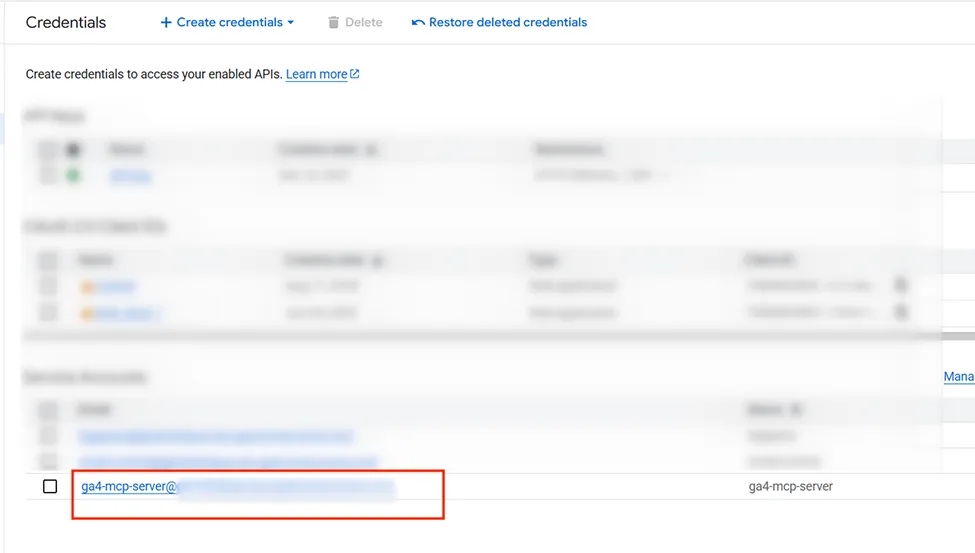
Click on the created Service Account.
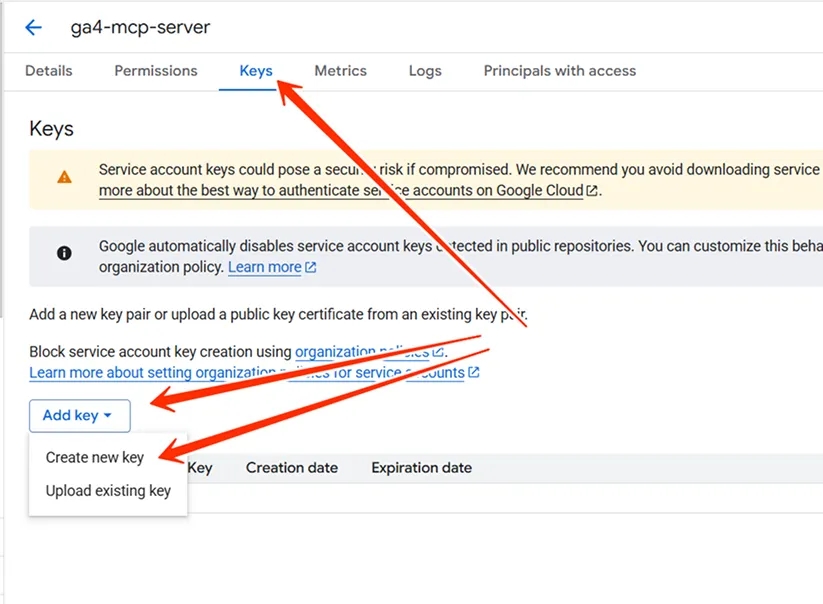
Go to Keys and click Add Key, then choose Create new key.
Select JSON and click Create.
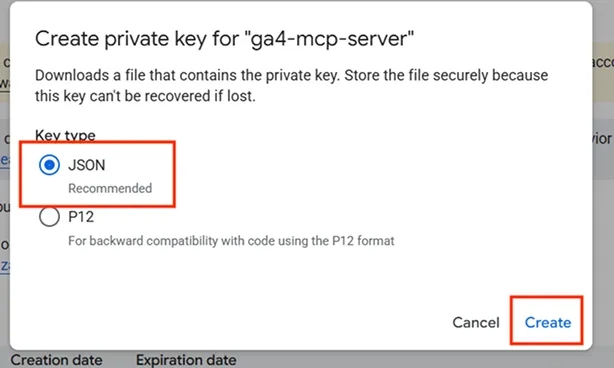
Save it to your folder on the PC that we created earlier.
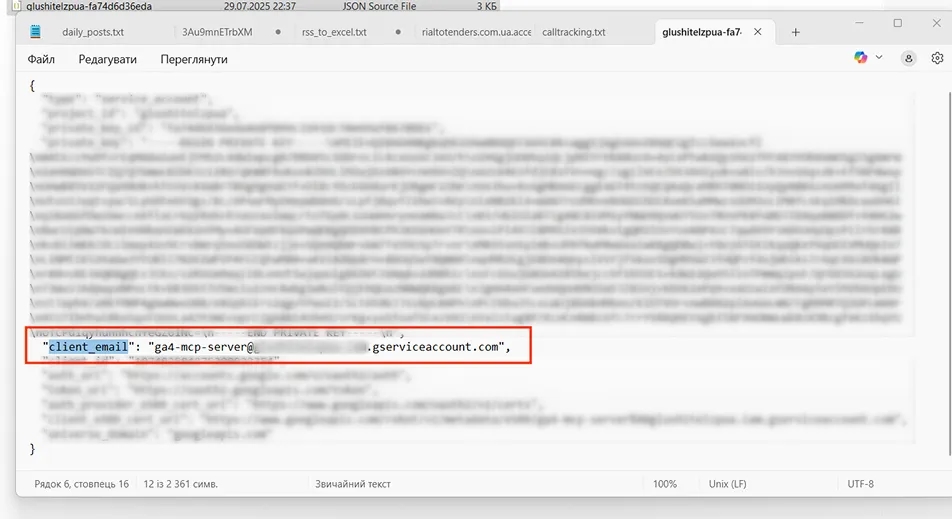
Open your file with a text editor and find the client_email, which you will need later.
Setting up Google Analytics 4
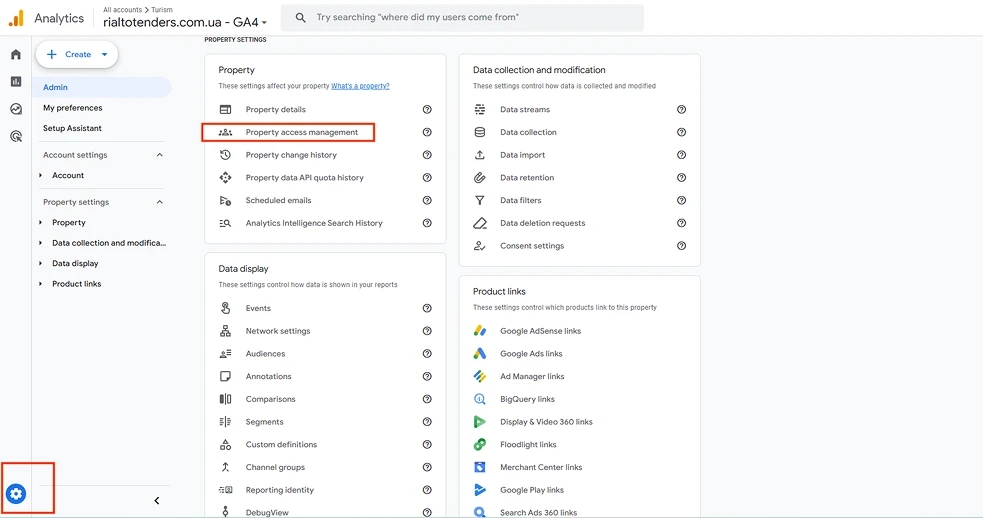
Open Google Analytics, select your project, open Admin, and go to Property access management.
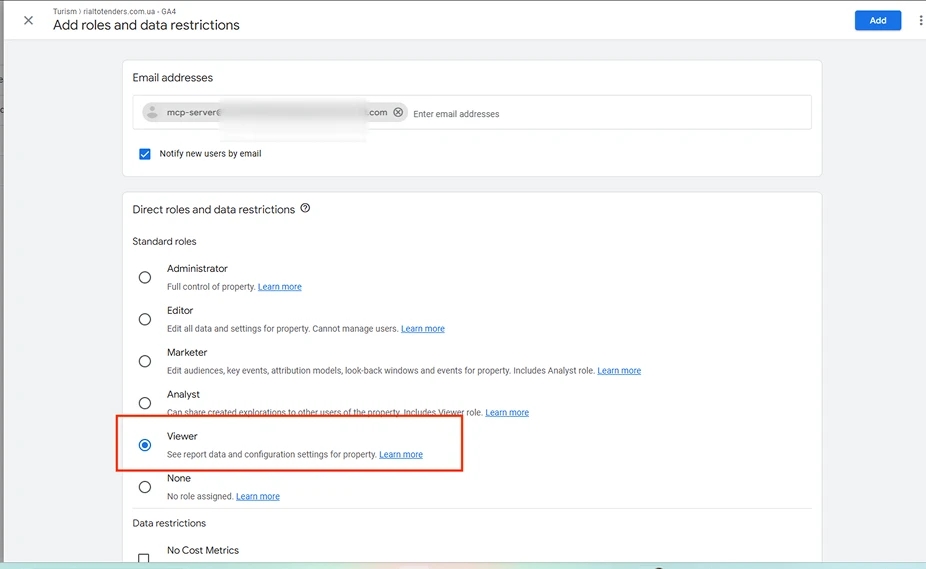
Add a user with the Viewer role.
Now the preparatory work is done, and all that’s left is to set up the server.
Setting up the MCP Server in VS Code
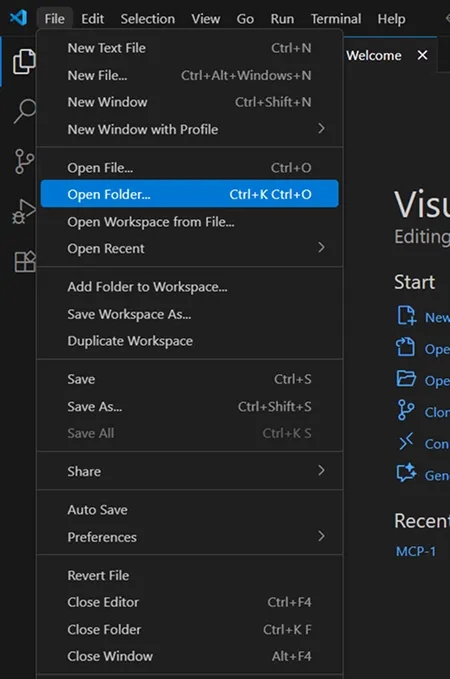
Open VS Code → File → Open Folder (or Ctrl+O) and open the folder where your JSON file is stored.
Now you need to launch the terminal. You can do this with the keyboard shortcut Ctrl+` or via View → Terminal, or Terminal → New Terminal. After that, the program will look like this:
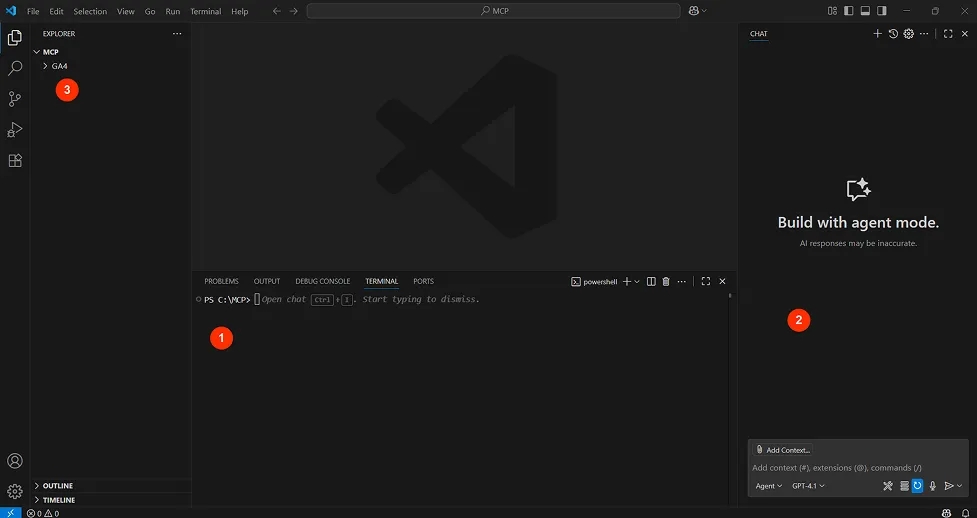
Where:
- Terminal — the place where Python code will run.
- Chat window — here you will communicate with the AI.
- File explorer — here your folder with all files will be displayed.
We need to install pipx for our MCP server to work. To do this, paste this code into the terminal (to paste, right-click in the terminal, since standard Ctrl/Cmd+V won’t work) and press Enter:
py -m pip install --user pipxThe libraries should be installed, and you will see the following in the terminal:
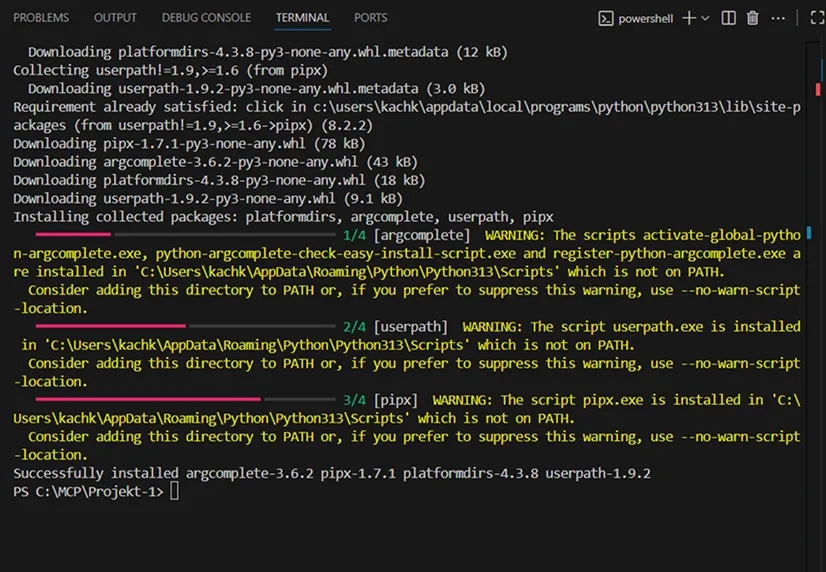
Now copy the following code, paste it into the terminal, and press Enter.
py -m pipx ensurepathAfter that, you will see the following in the terminal:
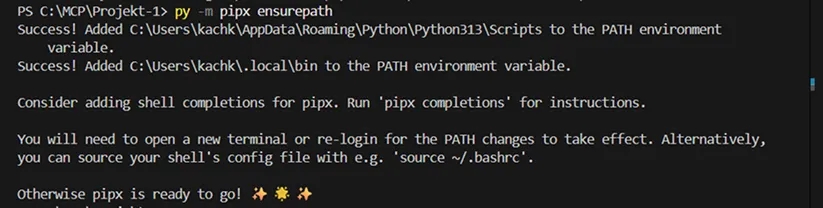
Close VS Code and open it again (one way to quickly restart it). Then copy and paste this command into the terminal:
pipx --versionYou should see your pipx version.

Now we will install the libraries of the official GA4 MCP server from Google. To do this, copy and paste the code below into the terminal and press Enter:
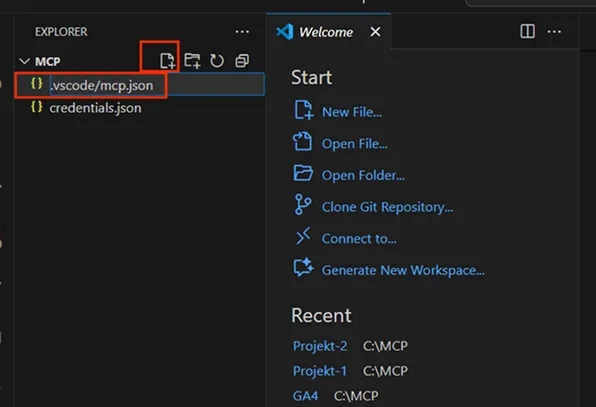
pipx install git+https://github.com/googleanalytics/google-analytics-mcp.gitNow let’s configure the MCP server configuration file. To do this, create a new file in the MCP folder, copy and paste this name: .vscode/mcp.json.
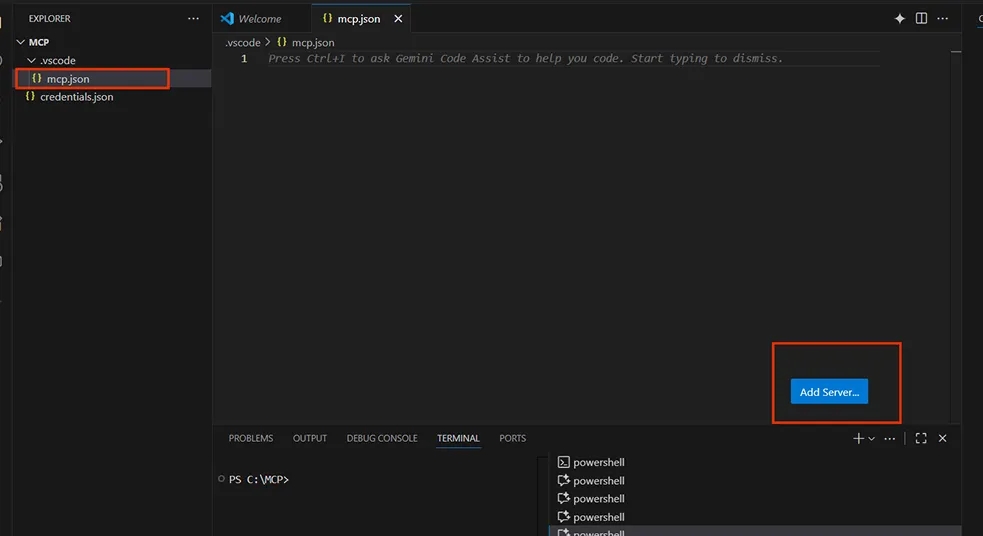
After you create the file, you will see an empty JSON file. Now click the Add Server... button.
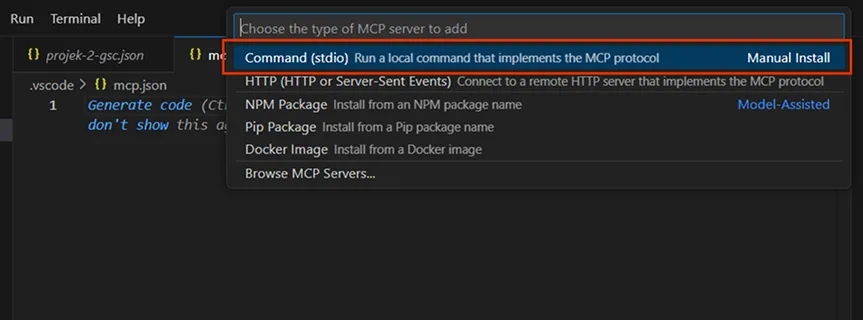
Select Command (stdio)
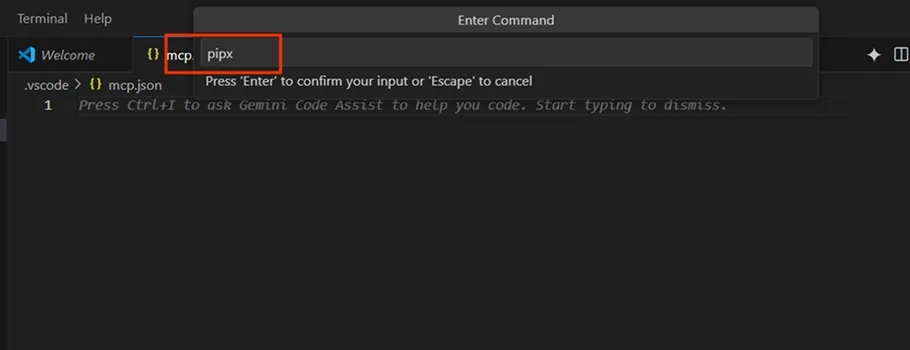
Now type pipx and press Enter — this is how we specify the command to run the server’s executable file.
Besides Python, you can also use npx, node, docker for other MCPs.
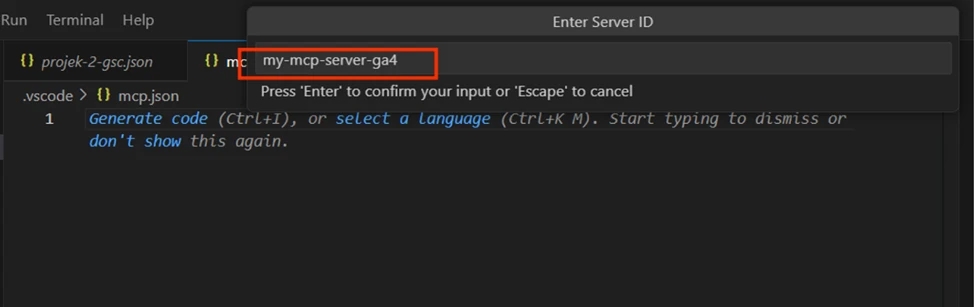
Set a name for your server so that it’s clear what it will run, for example, my-mcp-server-ga4, and press Enter.
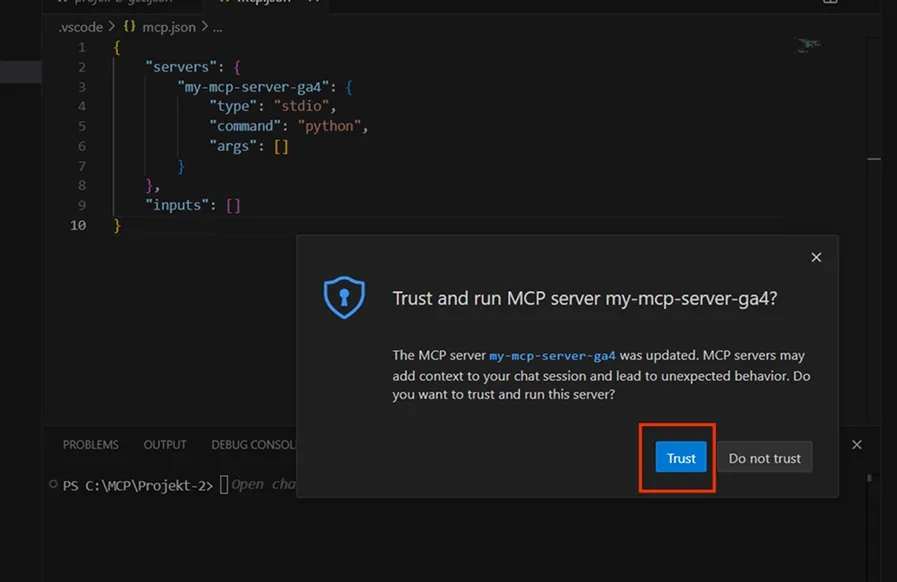
Click the Trust button.
Now your file looks like this. We just need to add a few more details, and your MCP Server will be ready.
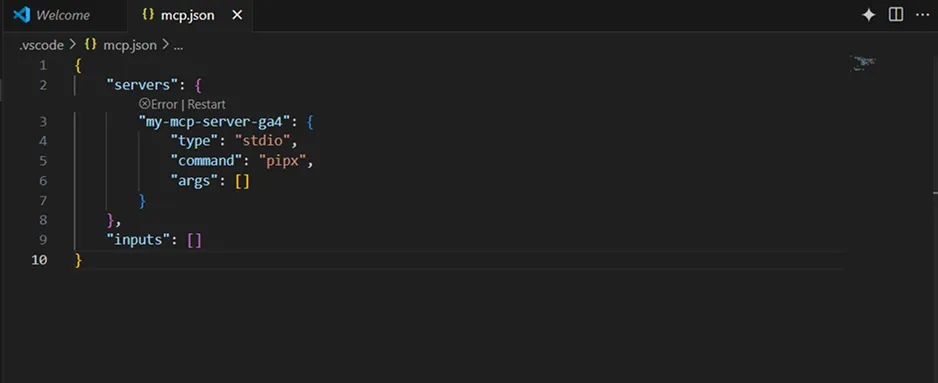
You need to add data in "args": [] and below insert the code for env, where we will pass environment variables for the server.
To make it easier, replace this code:
"args": []With the following:
"args": ["run",
             "--spec",       "git+https://github.com/googleanalytics/google-analytics-mcp.git",
            "google-analytics-mcp"],
			"env": {
			"GOOGLE_APPLICATION_CREDENTIALS": "C:\\MCP\\credentials.json"
			}
Where:
C:\\MCP\\credentials.json— the path to your API key.
To get the path to your credentials.json file, right-click the file, select Copy Path, and paste it into the code above. Then add extra \\ so that the path looks like this: C:\\MCP\\credentials.json.
Once again, note the double \\.
The final MCP server configuration should look like this:
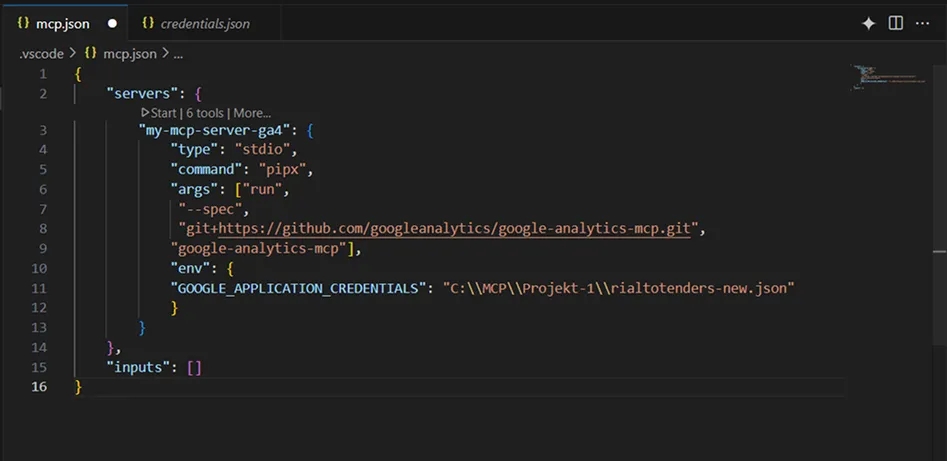
I sincerely congratulate you — you’ve set up your MCP Server for Google Analytics 4. Now let’s run it. To do this, first close and save the file, restart VS Code, and click the Start button.

You will also see the following server control buttons: Stop, Restart, the number of available Tools (6 for ours), and the More… button.
If you click the Tools button in the chat window, you will see all running servers and the available tools for each of them:
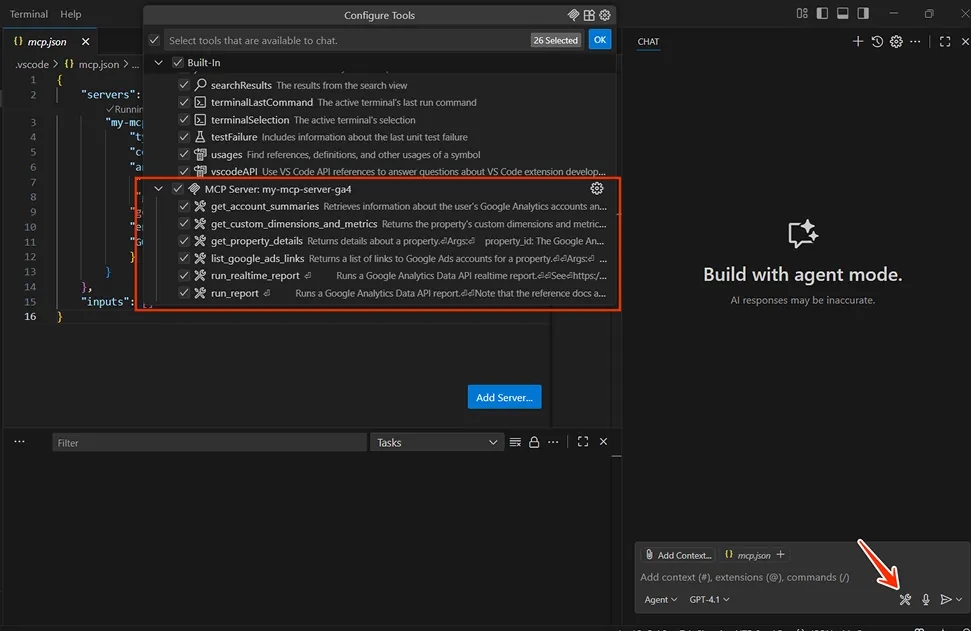
This MCP Server for GA4 in VS Code has 6 main tools (methods) that can be called directly from the chat:
- get_account_summaries
Retrieves information about the user’s Google Analytics accounts and their properties. This is useful for quickly getting a list of all available resources. - get_custom_dimensions_and_metrics
Returns custom dimensions and metrics for a specific GA4 property. This helps you understand what additional parameters are being collected besides the standard ones. - get_property_details
Provides detailed information about a specific GA4 property, including its settings, time zone, currency, etc. - list_google_ads_links
Returns a list of links between the selected GA4 property and Google Ads accounts. Useful for checking analytics integration with ad campaigns. - run_realtime_report
Uses the Realtime report in the GA4 API — shows what’s happening on the site or app right now (number of users online, pages, events, etc.). - run_report
This is the main tool we set all this up for: using the Google Analytics Data API, it returns a report for the selected dimensions, metrics, filters, and date range. This is the main way to get historical and aggregated data.
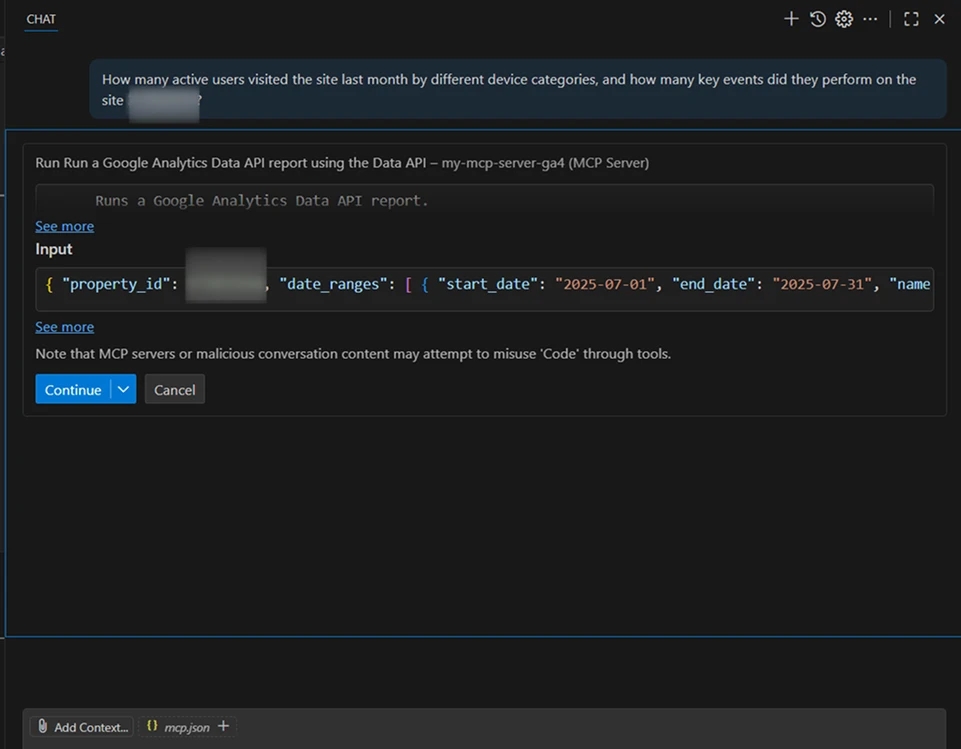
Now let’s check together that everything works. To do this, ask how many active users visited the site last month by different device categories and how many key events they performed on the site. Be sure to click the Continue button so the agent can proceed.
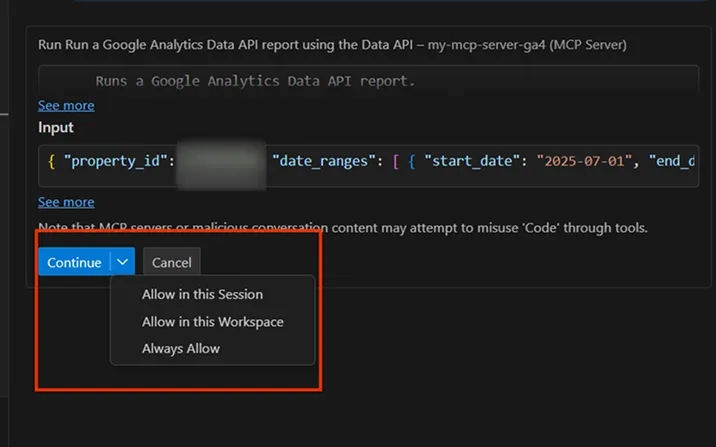
You can also grant this server permission to execute operations always, in this session, or in the workspace, so you don’t have to click Continue every time you ask a question.
The chat gave me the following answer:
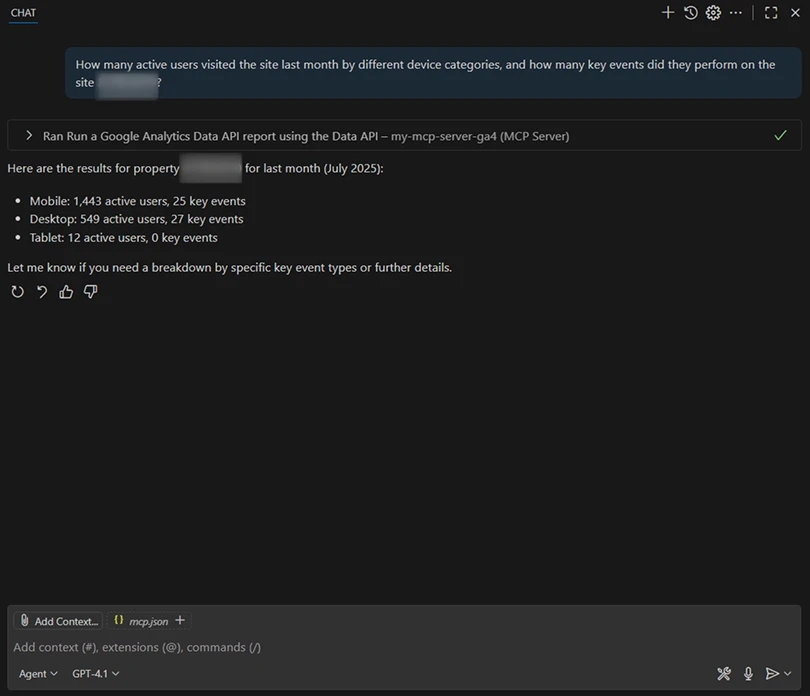
Let’s compare it with the analytics:
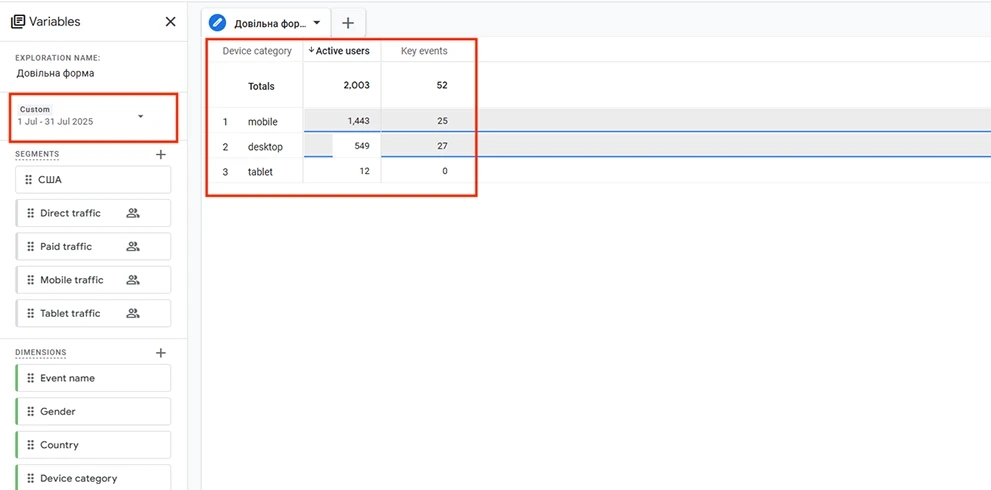
The data matches, which means our server is working correctly. Maks has shown more ideas for analytics-specific queries in "GPT-5 + Google Analytics 4 MCP: A Small Revolution in Marketing Analytics" .
Discover how GPT-5 with MCP for Google Analytics 4 answers 10 real marketing questions ⚡️ Examples, comparisons with GA4 data, and key takeaways for marketers ⚡️ Pro Analytics Blog.
Conclusion
I hope this article helps you set up the Google Analytics MCP Server without issues or at least with fewer of them than I had. If you have any questions, write in the comments or send me a direct message — I’ll be happy to try to help you.
You can find other MCP servers on GitHub or on the official pages of the services. The setup process for most servers is the same and should not cause you significant difficulties.
In the next article, I will show you how to set up the Google Search Console MCP Server and will definitely share practical examples of using it.
I also want to touch on the topic of VS Code and its competitors. In addition to VS Code, there is the Cursor I mentioned earlier and a solution from Anthropic based on Claude Desktop, which introduced MCP to the world.
In terms of cost, the cheapest option is VS Code — only $10 per month for Copilot Pro (this is the Chat in VS Code through which you ask questions). This package includes unlimited messages for GPT-4.1 and GPT-4o models from OpenAI. Other models are also available, but all of them have monthly limits depending on the plan.
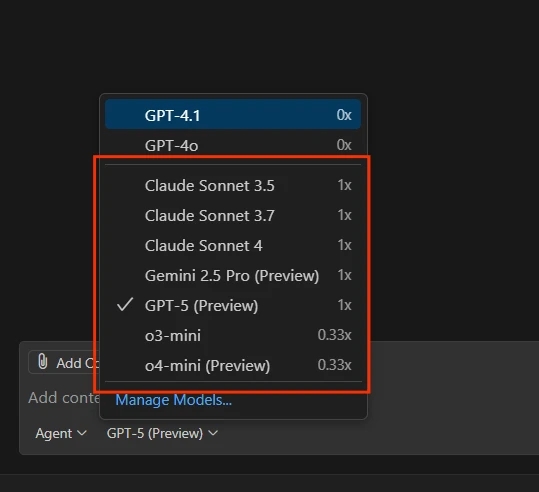
Claude Desktop — costs $20 and already has many ready-made modules for MCP, and you can easily add a new MCP using Zapier. However, unfortunately, it has a daily request limit, even in the paid version. If you already have it, then it probably doesn’t make sense to consider VS Code.
Cursor — costs $20 per month, has a request limit, and in my case, unfortunately, stopped working with MCP servers. Even support couldn’t help.
There are also other services that allow you to use MCP. Above, I described the most popular ones. But the principle of operation is always the same, so choose the one you prefer. The main thing to remember is this: no matter how good the data from AI looks, no matter how simple and revolutionary it may seem, always verify the data that the artificial intelligence kindly provides you.
Loading comments…