
This article is the second in a series. The first article is available here.
A form is one of the most important conversion points on a website — and one of the most fragile. If a user enters what they believe to be correct data and gets an error, most will simply close the page.
Until you track it, you have no idea how many people tried to submit a form and failed because they:
- couldn't enter a phone number in the required format,
- missed a required field you forgot to mark with an asterisk "*",
- filled out part of the form, saw ten more fields ahead, and left the site.
Form interaction tracking helps you understand this better. It can be broken down into two parts:
- Understanding the form interaction funnel:
- Tracking form validation errors to understand exactly where the form is "breaking" users.
In this article, we'll cover both.
How to Set Up Form Interaction Funnel Tracking in GTM
The classic form interaction funnel consists of 4 stages. Each requires its own configuration, which I'll walk through in detail below. But before we begin, one important note: for all the configurations that follow, I'll be using CSS selectors for the form and its elements. If you already know what those are, feel free to skip the note below. If this is new to you, make sure to read it first.
What Are CSS Selectors and How to Copy Them
To quickly understand what a CSS selector is, think of it as the coordinates of an element on a page. Just as every point on Earth has its own coordinates, every element on your website has its own CSS selector — and no other element on the page will share the same selector value. This is the principle that GTM tracking is built on: you can specify a form's selector in a condition and be confident that the event will only fire when that exact form appears in the user's viewport.
To copy an element's selector:
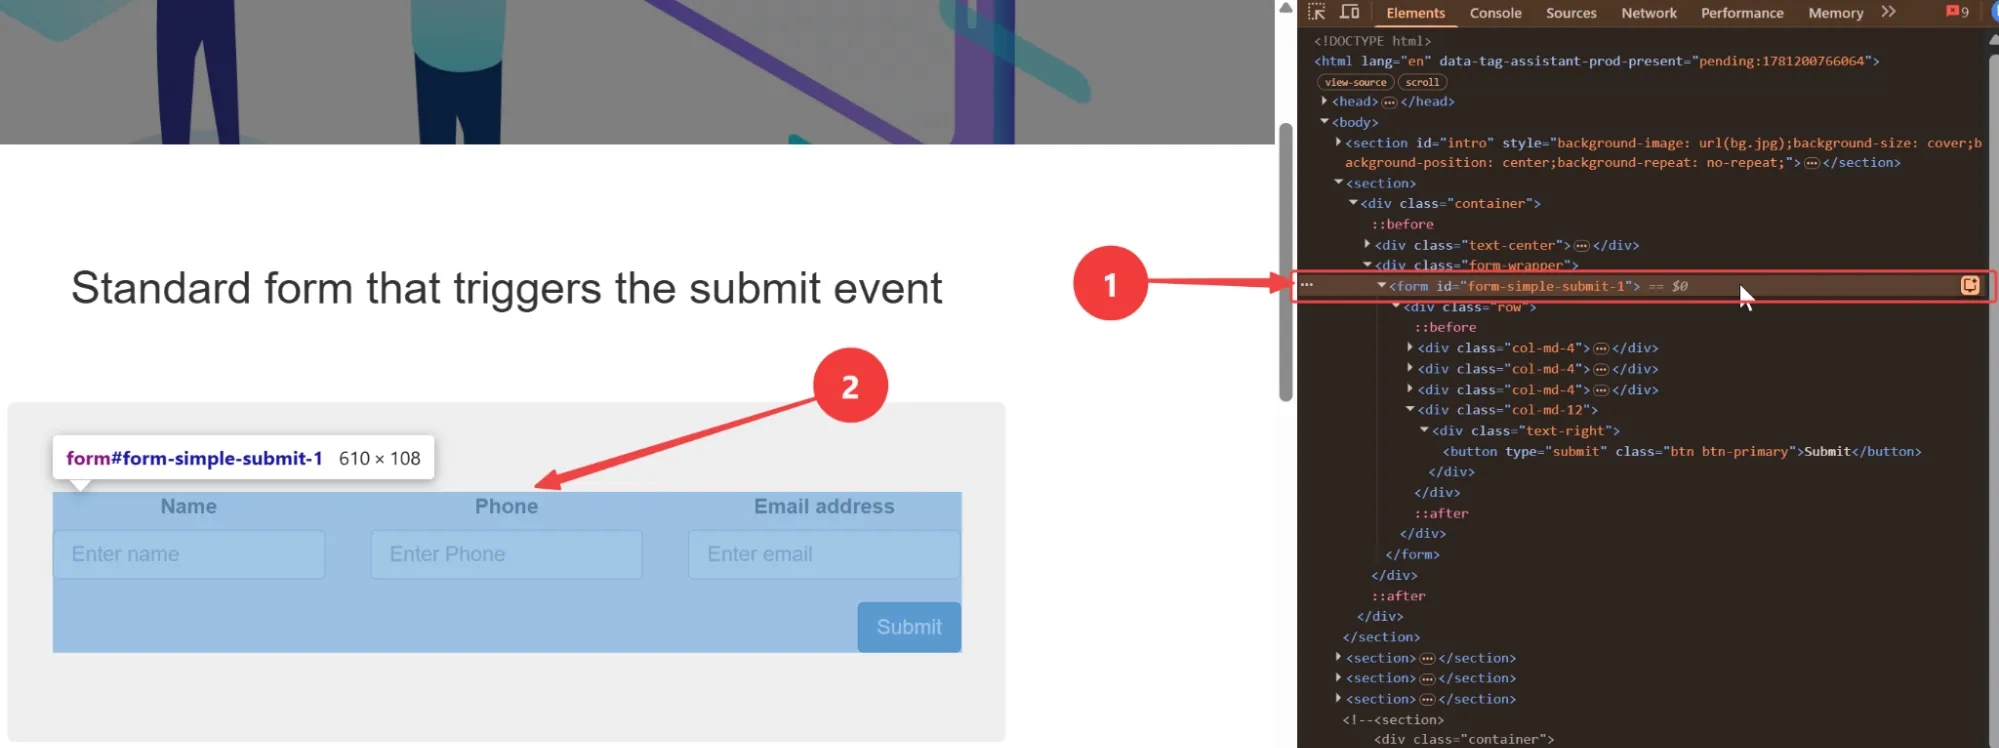
- Right-click on the element you need and select Inspect.
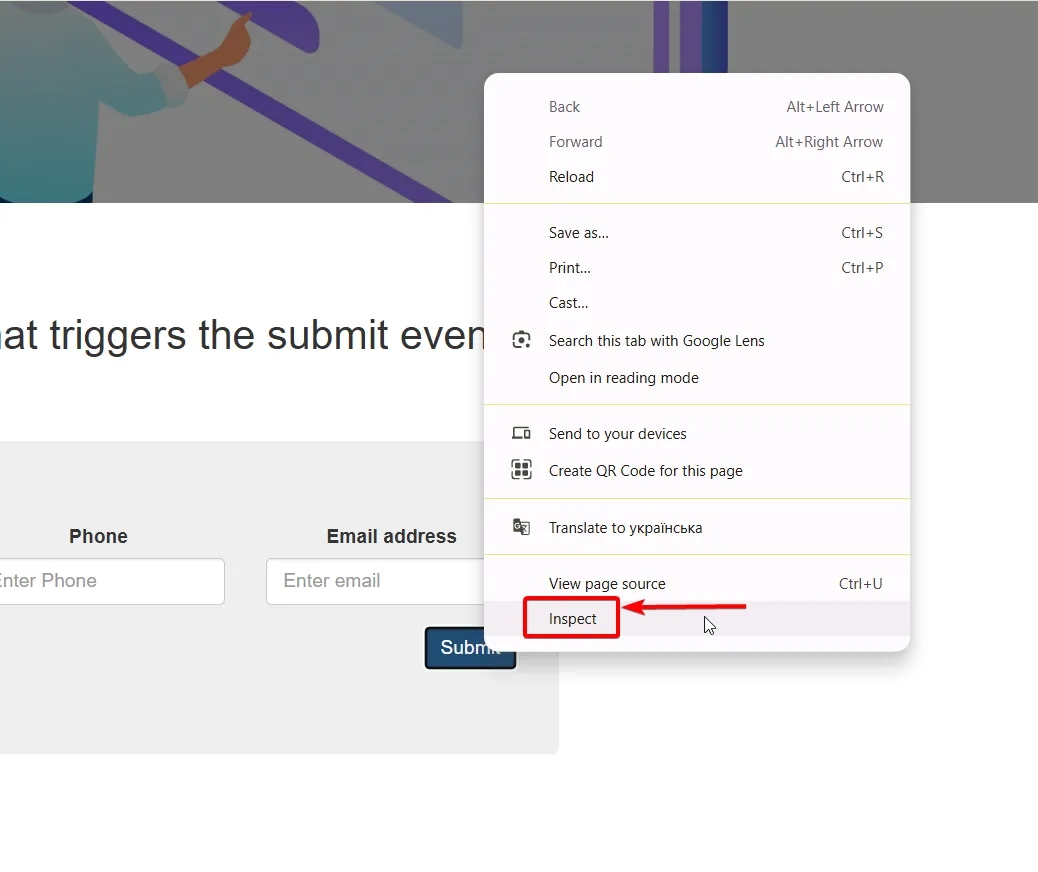
This will open DevTools in your browser, with a portion of the code highlighted — the part that corresponds to the element you right-clicked. Note that hovering over that highlighted code should also highlight the element on the page — this is a quick way to confirm you've done it correctly.
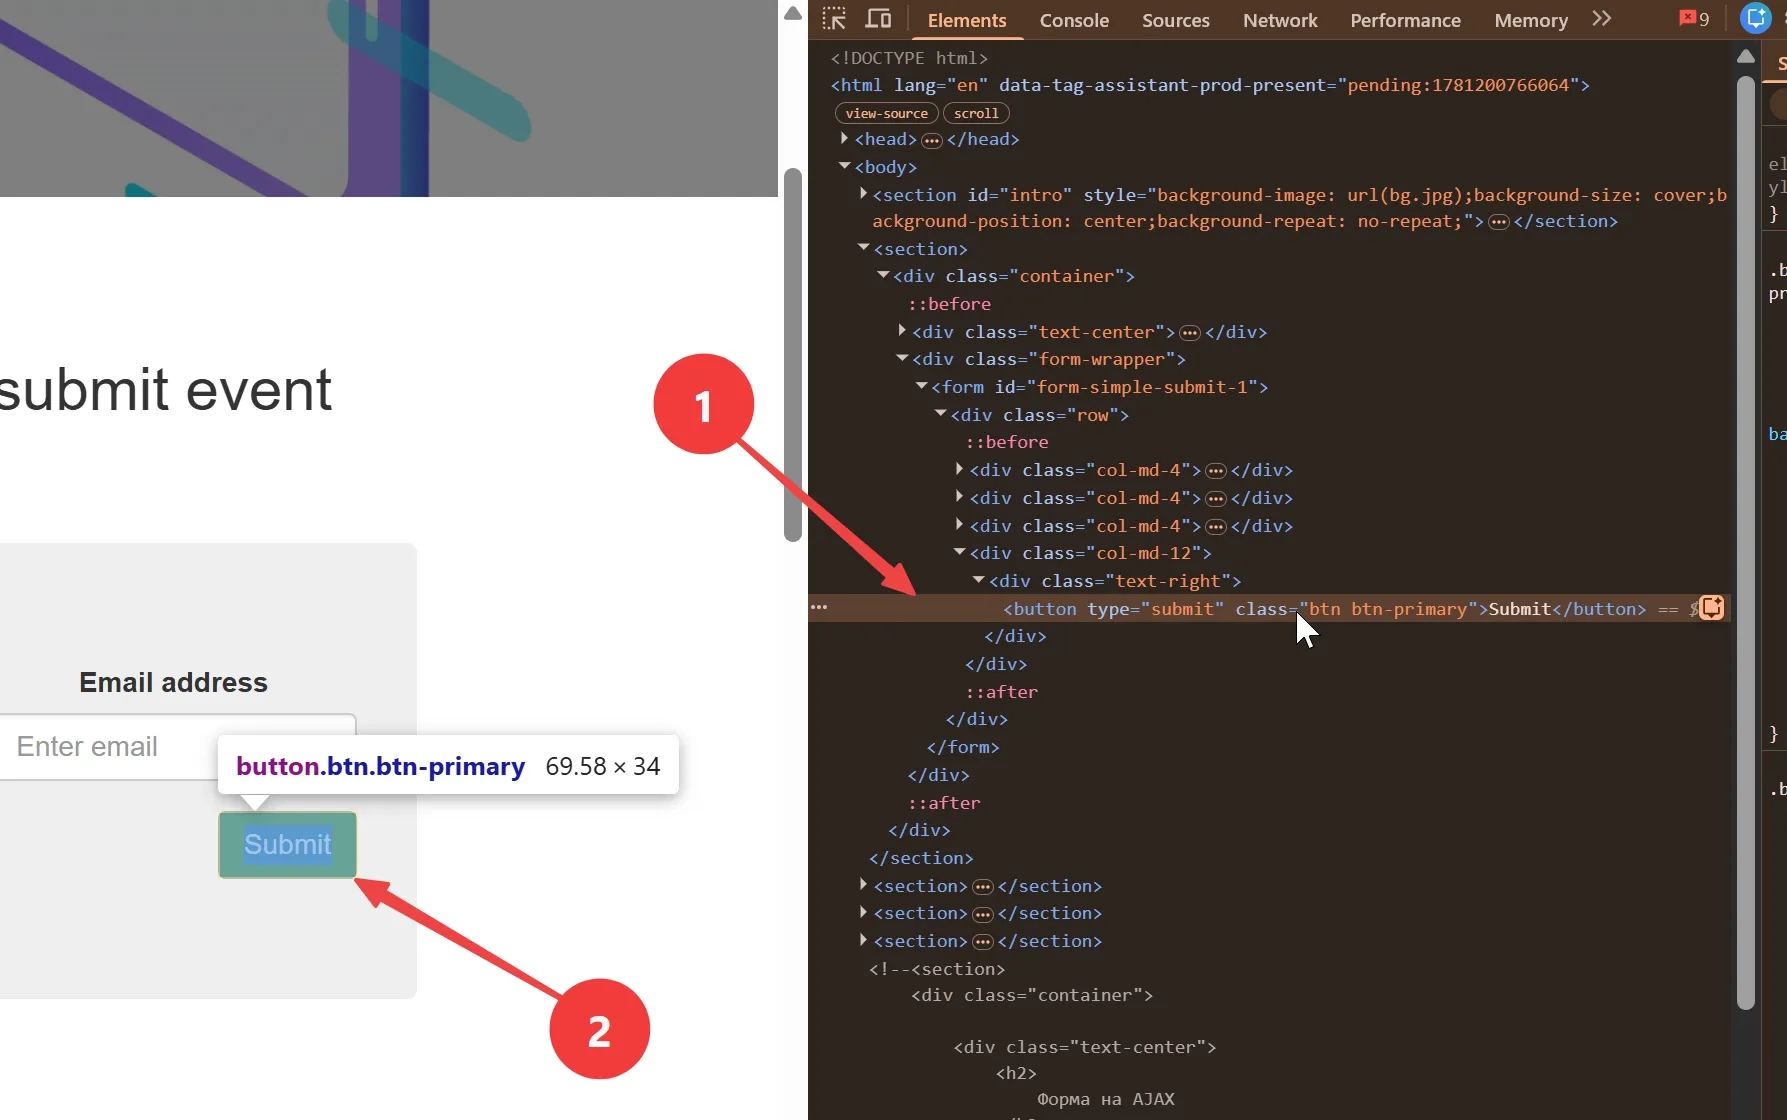
2. Now right-click on the relevant line of code and select Copy > Copy selector.
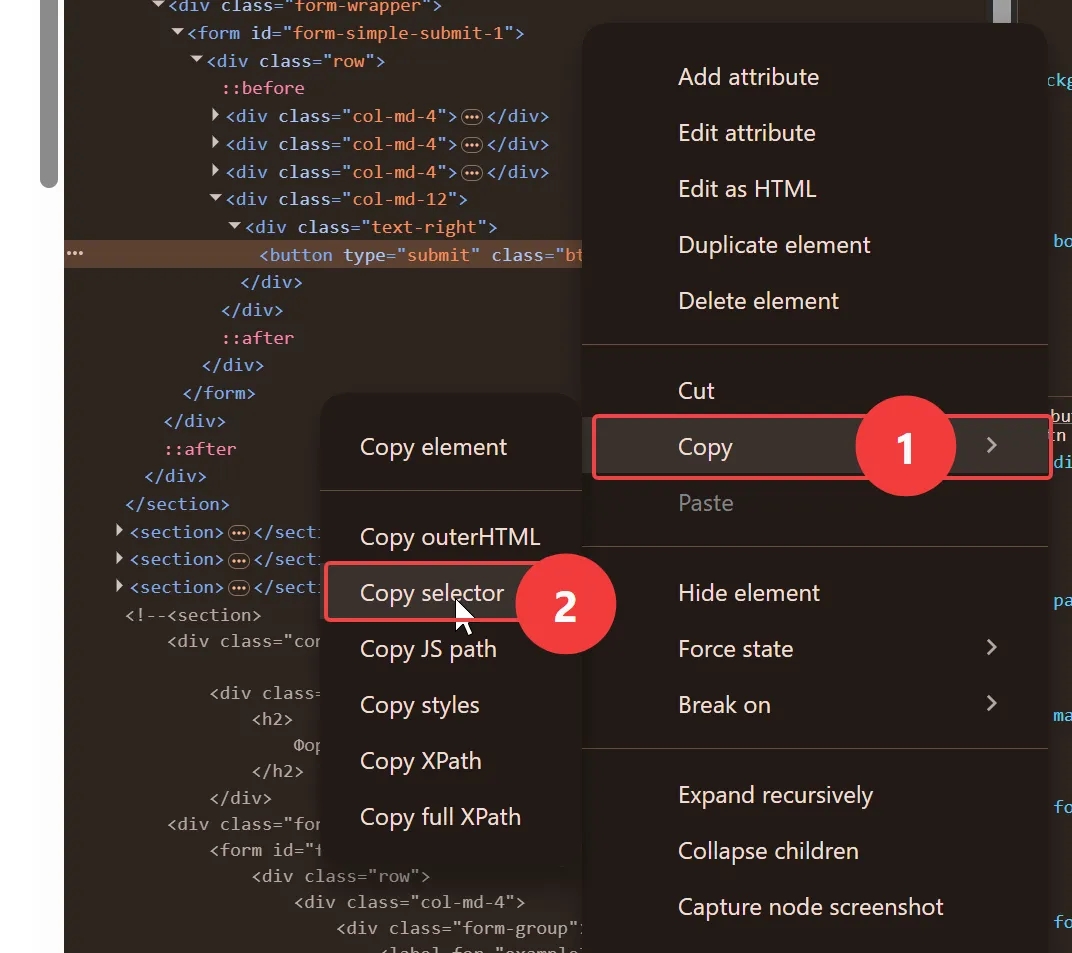
One important note. Some elements on a page are fairly large and made up of several nested elements — forms are a good example, as they contain input fields, buttons, and so on. To find the code that corresponds to the form itself, you'll need to look through the code for a tag that starts with <form. You can verify it the same way as with simpler elements: hover over the code and see which element gets highlighted on the page. Everything else about copying selectors for these elements works the same as for simpler cases.
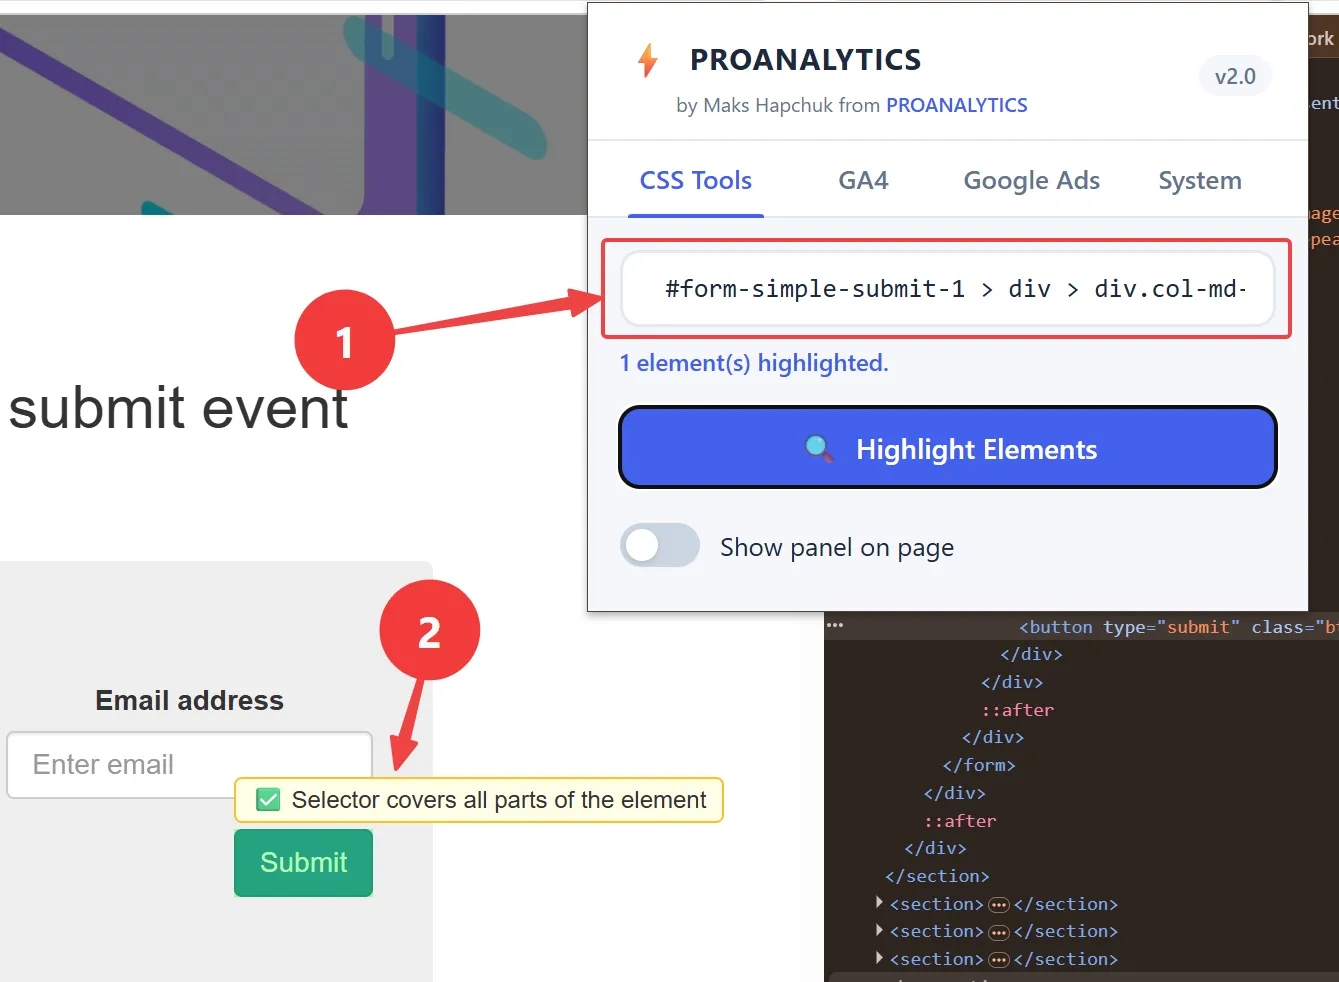
You can also verify that you've copied the correct selector using the PROANALYTICS extension — just paste the copied selector into the relevant field and see which element gets highlighted on the page. Read more about the extension's other useful features for working with GA4 data here.
With that covered, let's move on to the main configuration.
Step 1. How to understand how many users saw the form on your site
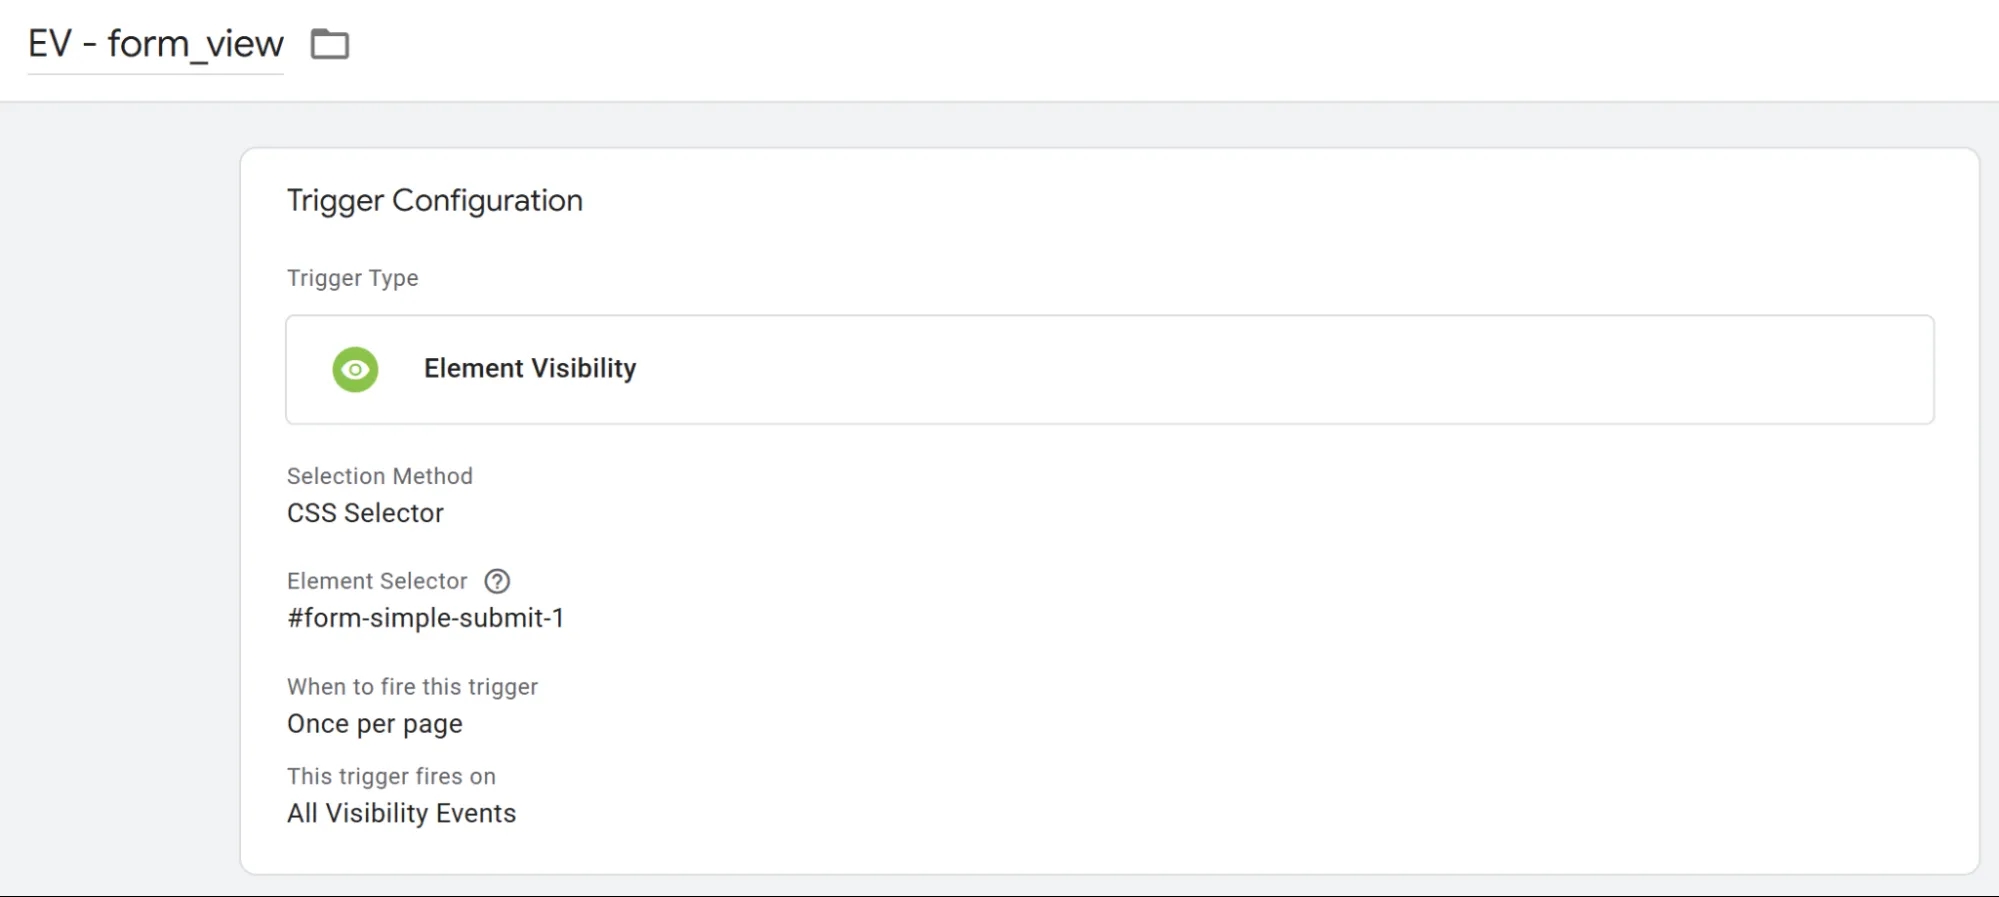
For this, we need an Element Visibility trigger to detect when the form enters the user's visible viewport, and a tag to send this event to GA4.
Trigger configuration:
- In Selection Method, choose CSS Selector
- In the Element Selector field, enter your form's selector
- (Optional) Add a filter under This trigger fires on to limit the trigger to pages where the form exists
- Don't forget to name and save the trigger
Tag configuration:
- In the Measurement ID field, enter your GA4 Measurement ID
- Set the event name to
form_view - Add the trigger we just created
- (Optional) If your site has multiple forms, you can pass the form name as a
form_nameparameter
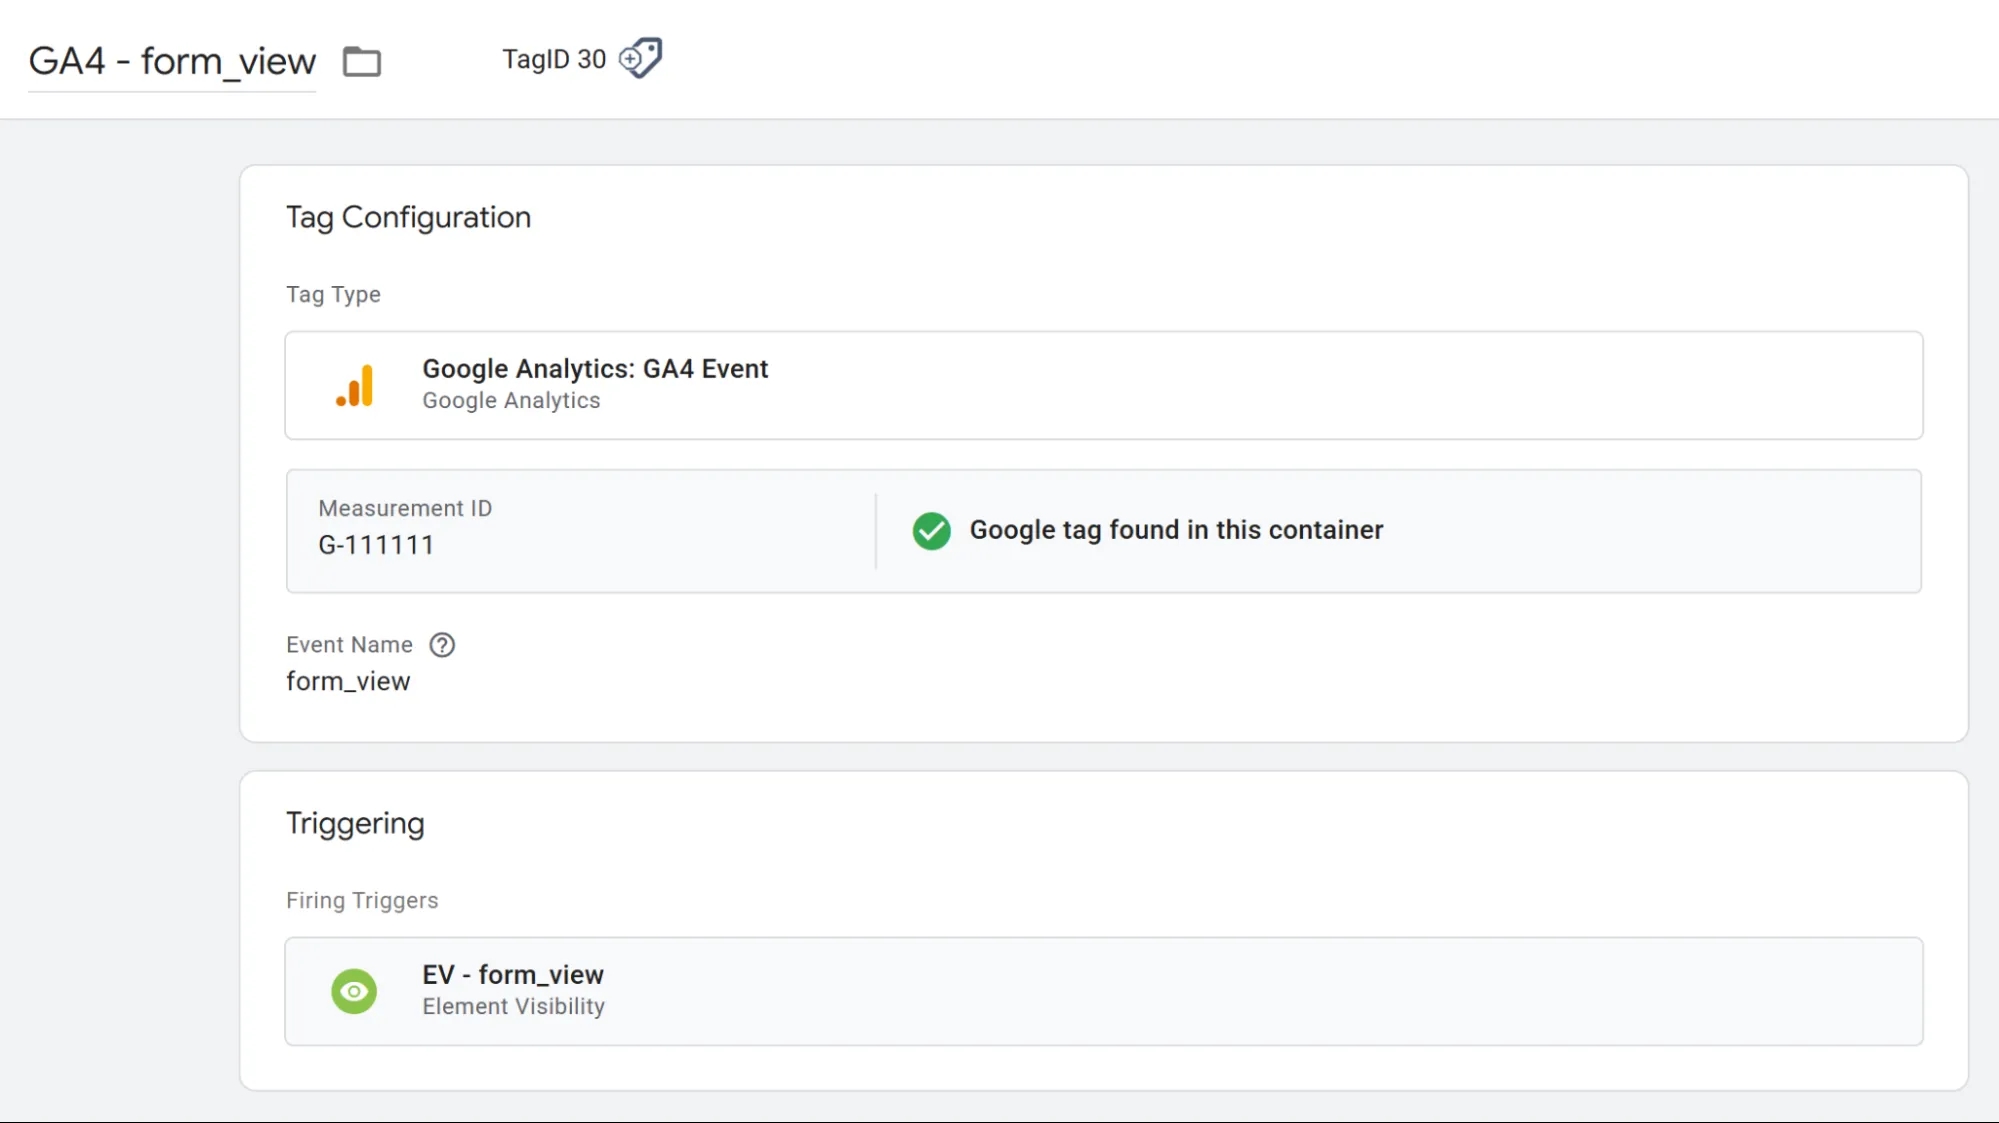
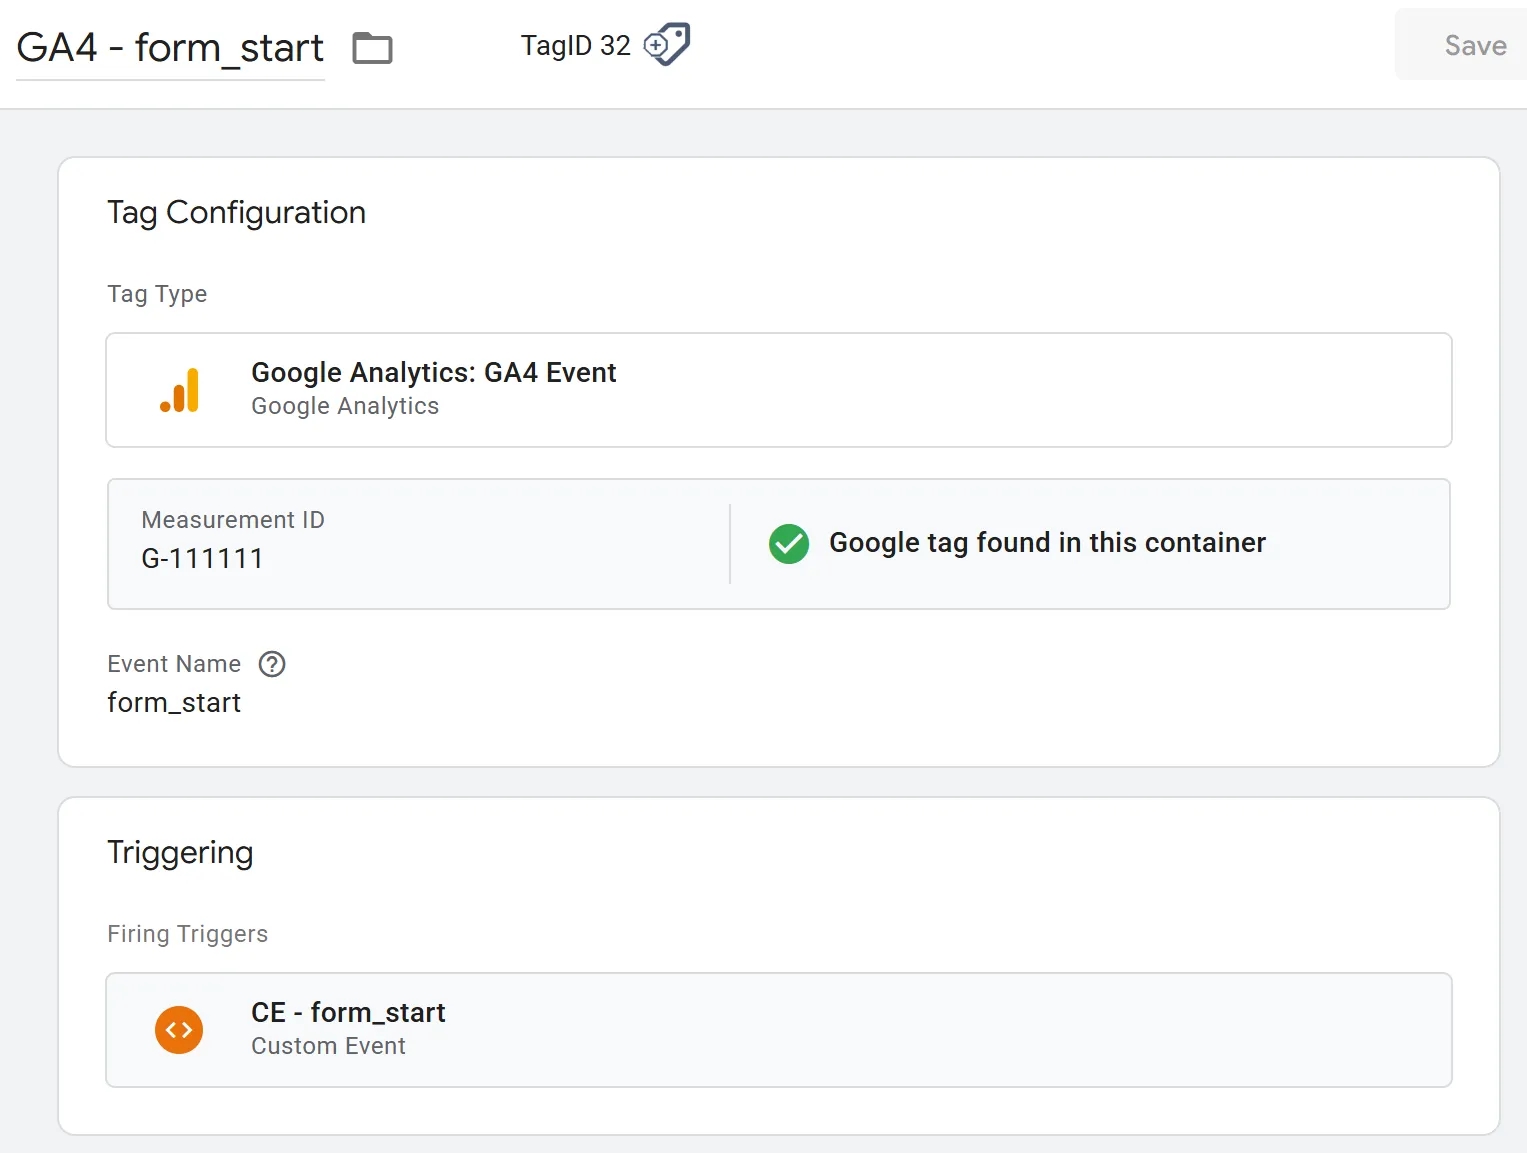
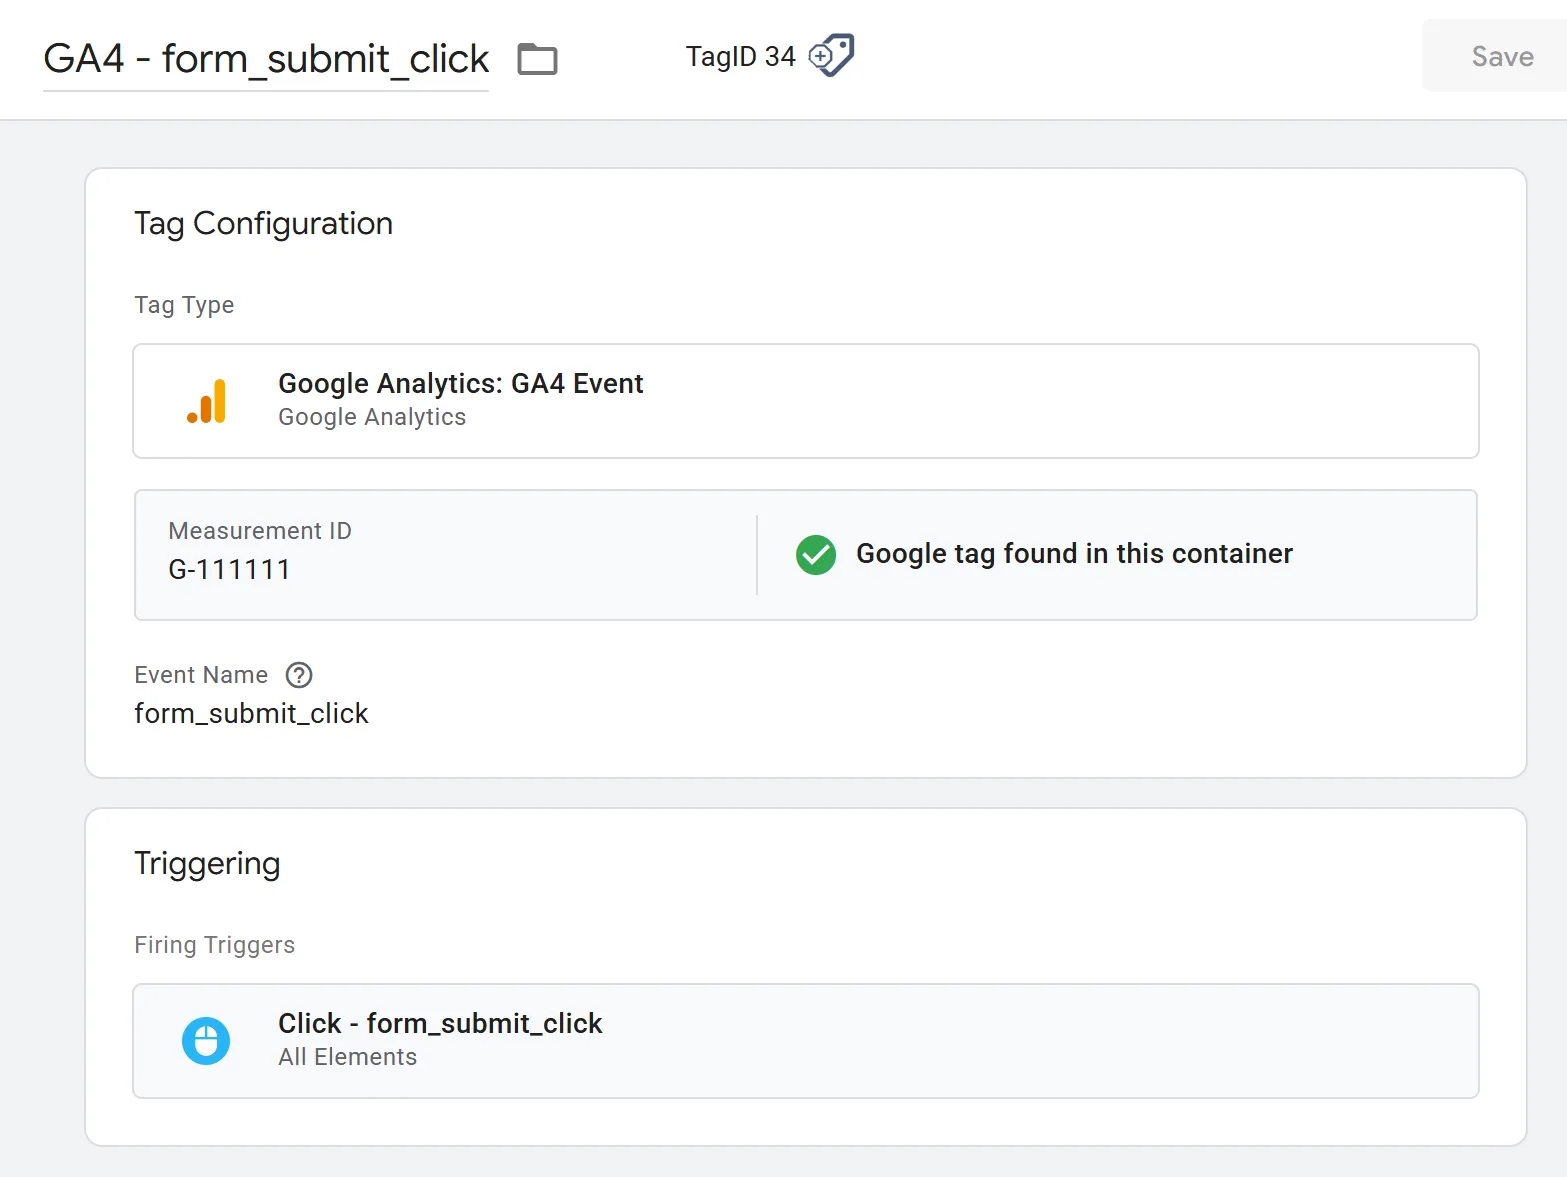
All four GA4 tags for our form interaction stages share the same configuration — only the event name changes. From here on, I'll just include a screenshot of the settings. Pay attention to the event name.
Step one is done. Let's move on.
Step 2. How to Track How Many Users Started Filling Out the Form
This will be one of the more complex steps, but I'll explain what we're using and why.
Since GTM has no built-in trigger that fires at the moment a user begins filling out a form, we'll need a Custom HTML tag with the following JavaScript code:
<script>
  (function() {
    var formSelector = 'YOUR_SELECTOR';
    var form = document.querySelector(formSelector);
    if (form) {
      form.addEventListener('change', function() {
        window.dataLayer = window.dataLayer || [];
        dataLayer.push({
          event: 'form_start'
        });
      });
    }
  })();
</script>
This code pushes data into the dataLayer at the right moment. The only thing you need to change is replacing YOUR_SELECTOR with your form's CSS selector. The final tag configuration will look like this:
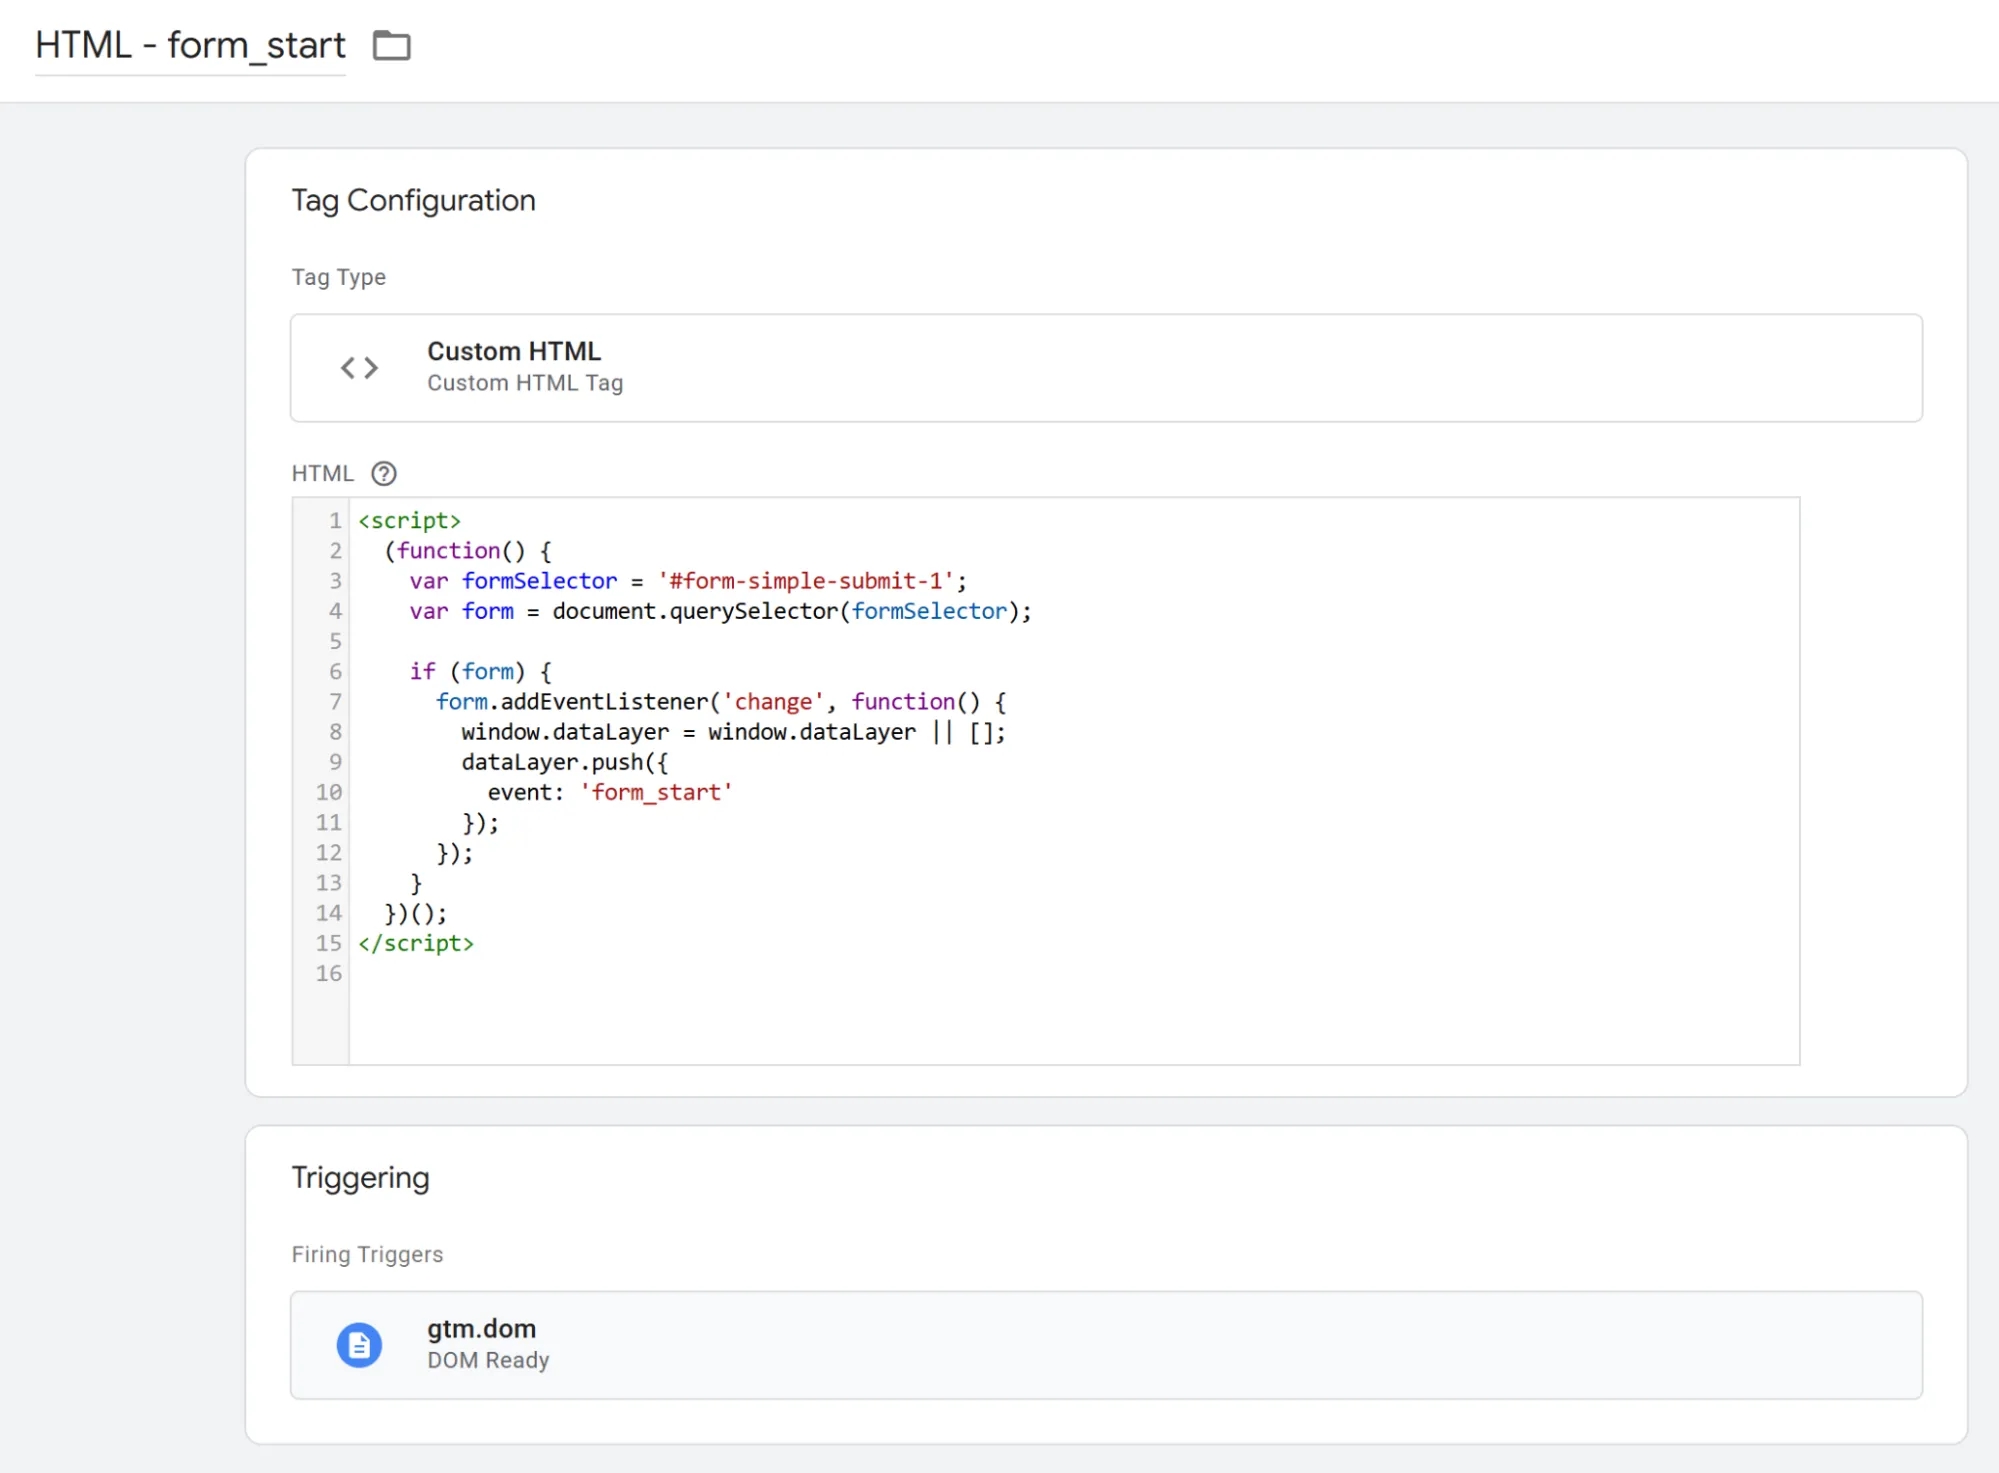
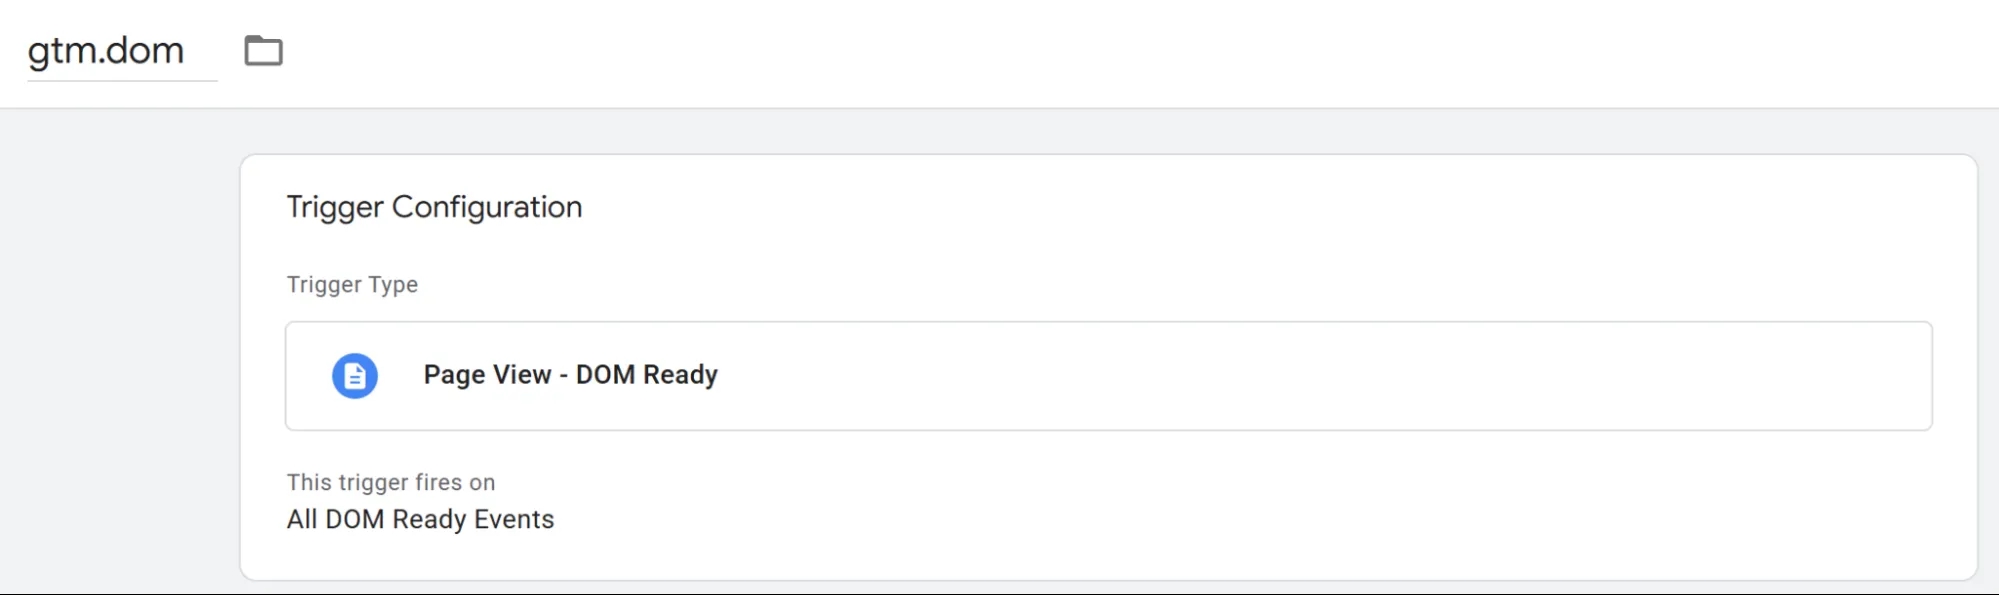
The trigger is DOM Ready with no additional conditions.
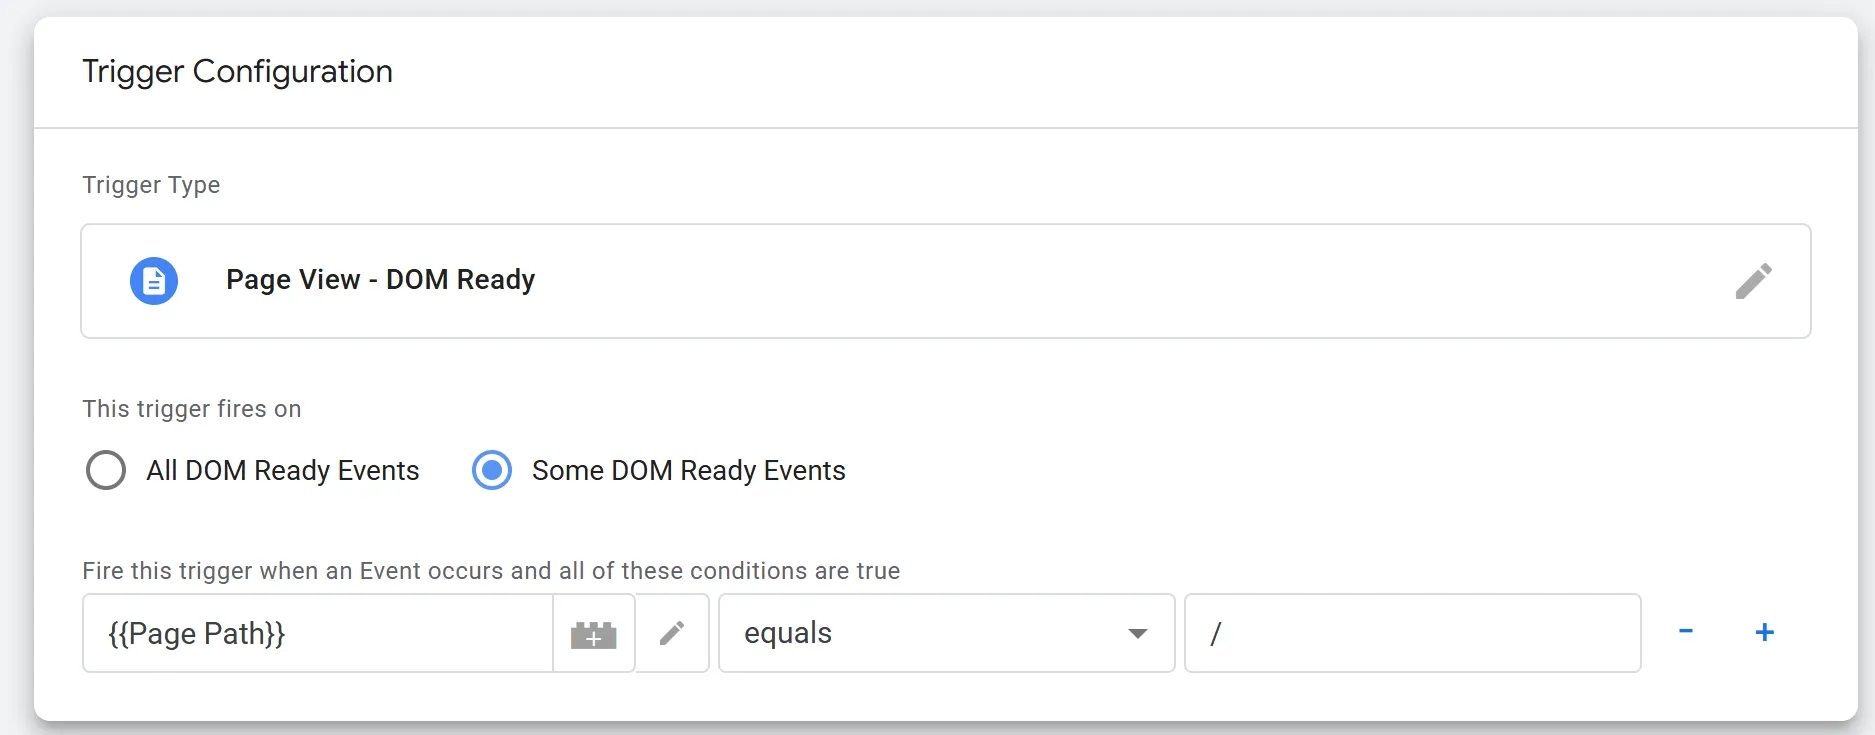
If needed, you can also add a page filter so the code only fires on pages where the form exists. In that case, the trigger configuration would look like this (shown here with a condition for the homepage only):
When the user starts filling out the form, our code pushes a form_start event to the dataLayer. That's exactly what we'll configure the trigger to listen for when sending data to GA4.
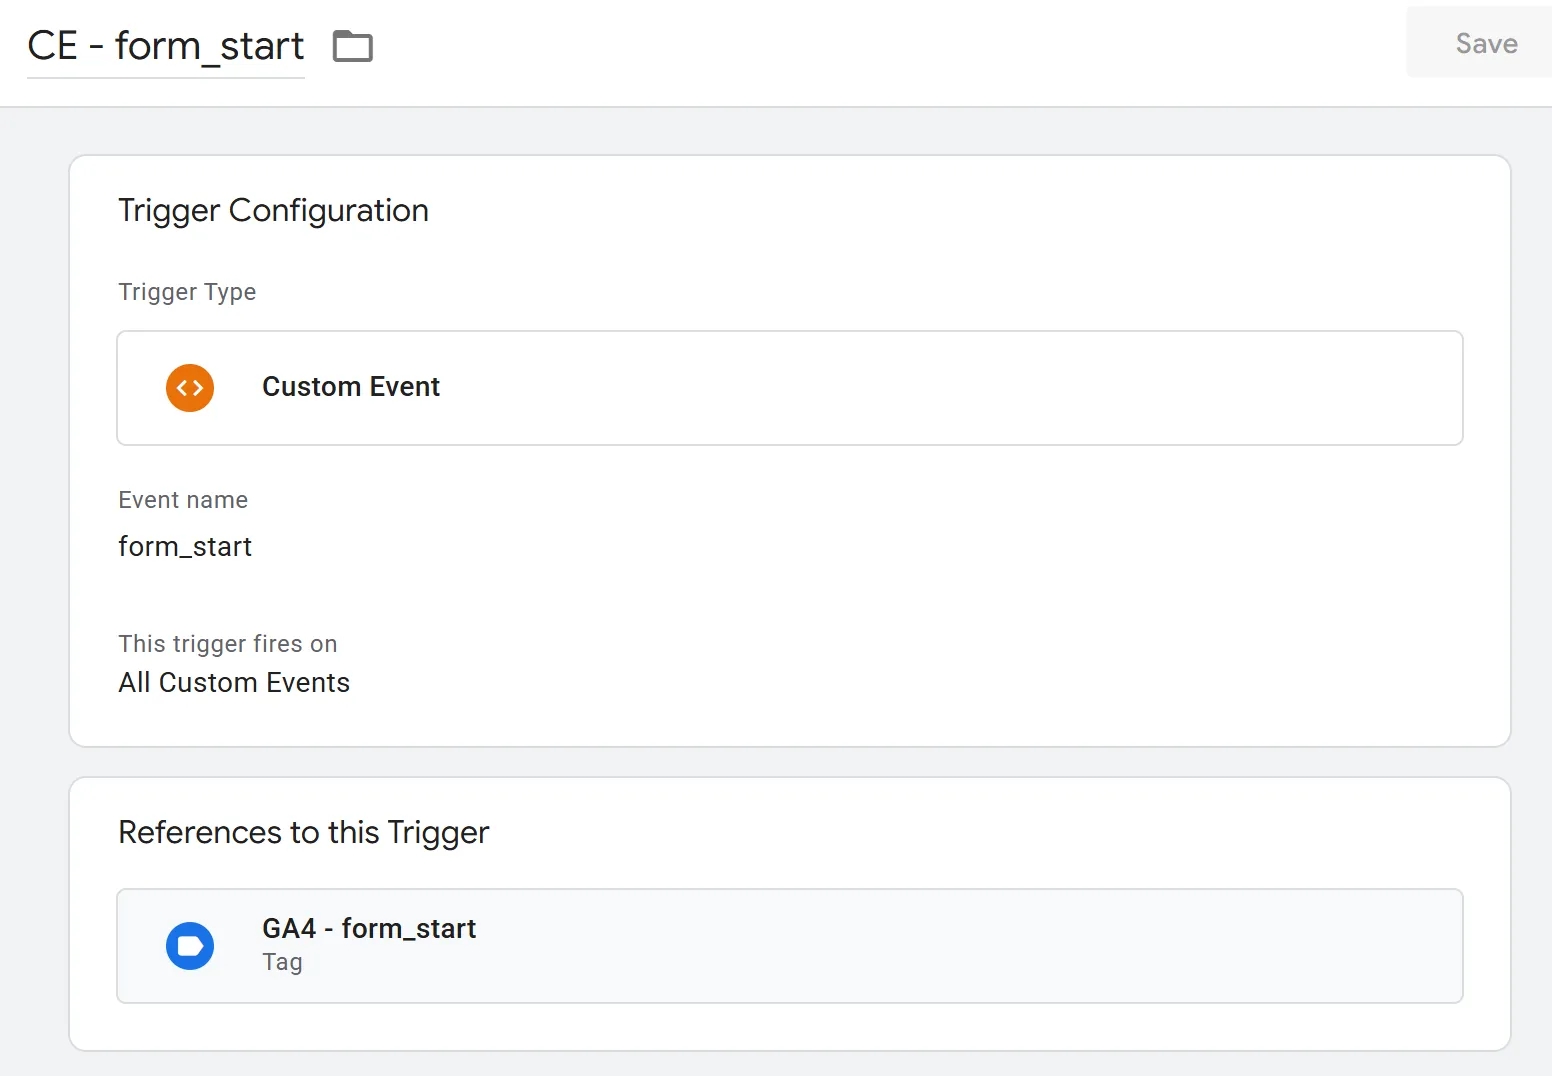
And finally, the tag to send data to GA4. Event name: form_start.
Halfway there — let's keep going.
Step 3. How Many Visitors Clicked the Submit Button
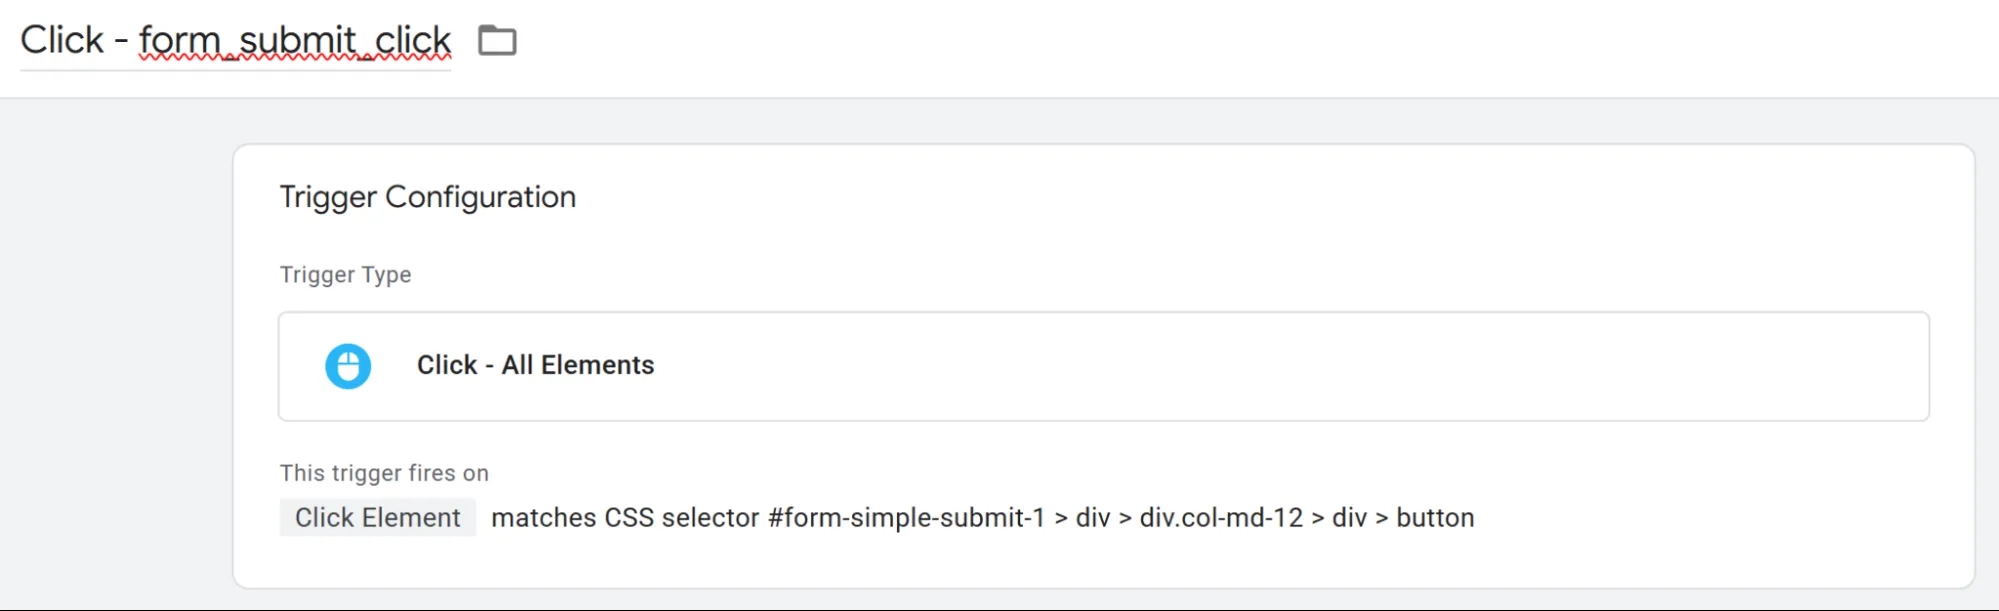
This is the simplest step. We need a Click - All Elements trigger and a tag to send the event to GA4.
In the trigger settings, add a condition: variable {{Click Element}} matches CSS selector [enter your form's button selector here].
Same as before — event name: form_submit_click.
Step 4. How many successful formsubmissions were recorded
This step has an important distinction: regardless of the technologies used to build your form, the first three steps are always the same — you just need to insert the right selectors. But at this stage, it's crucial to understand how your form is built.
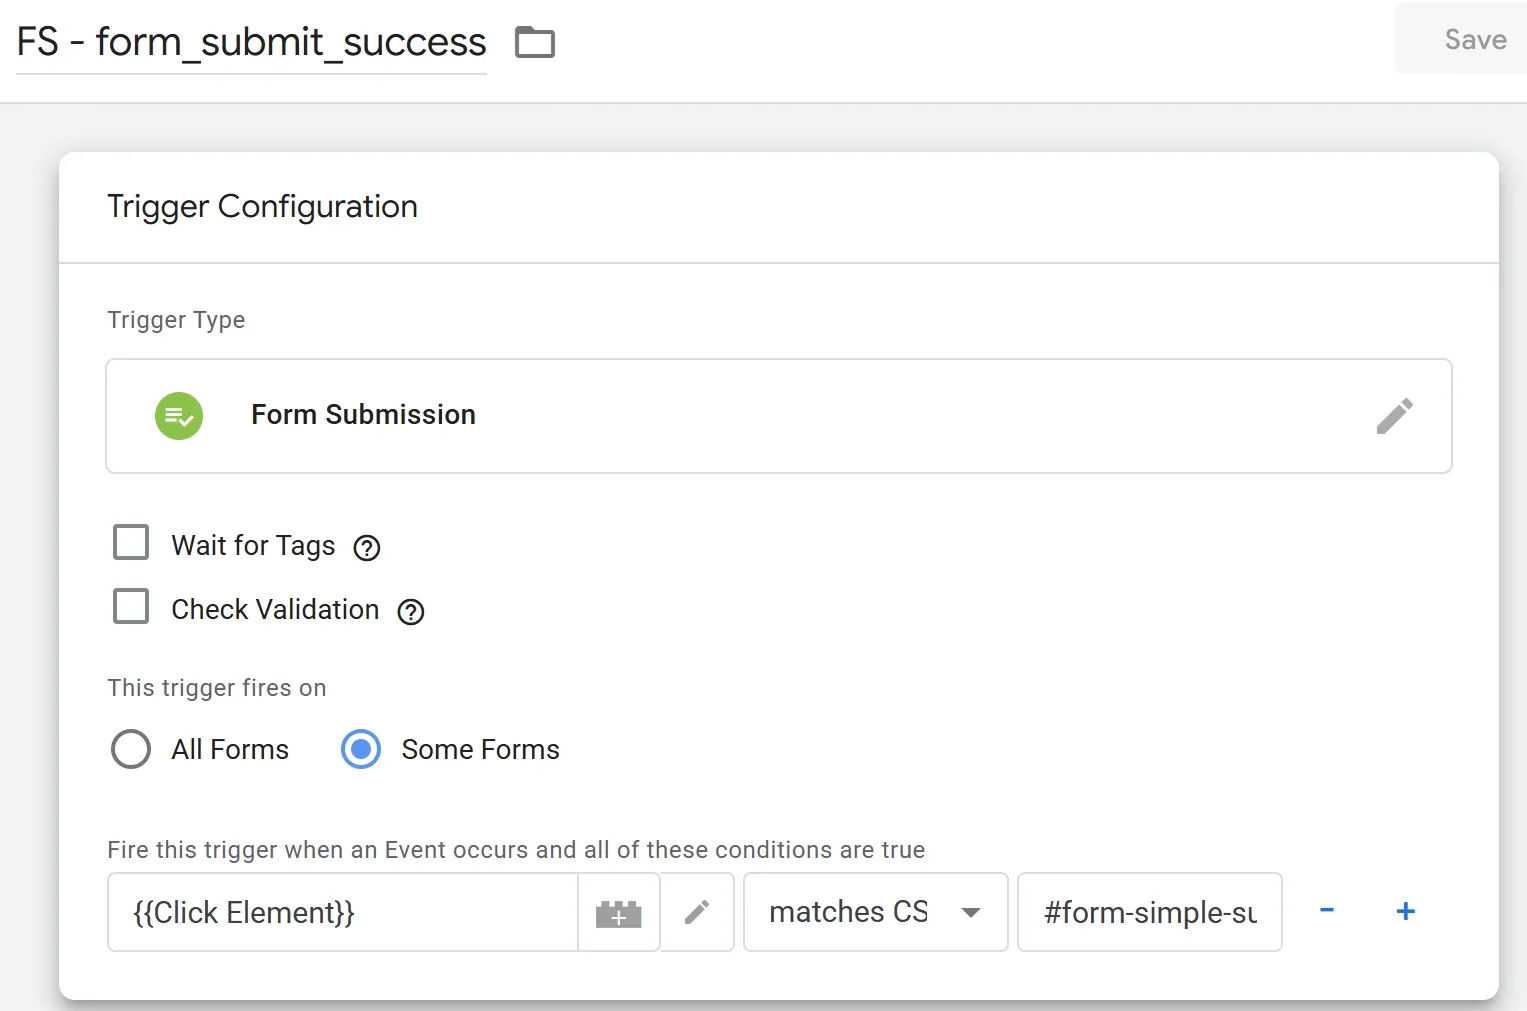
For demonstration purposes, I'm using a simple form tracked via the Form Submission trigger, but you may encounter more complex cases. I've linked to my other articles on tracking successful form submissions below:
- Tracking form submission using the basic GTM trigger
- Tracking form submission using the Element Visibility trigger
- Working with custom events in Google Tag Manager. The auto-event tag
- Tracking user interactions with forms using Google Tag Manager
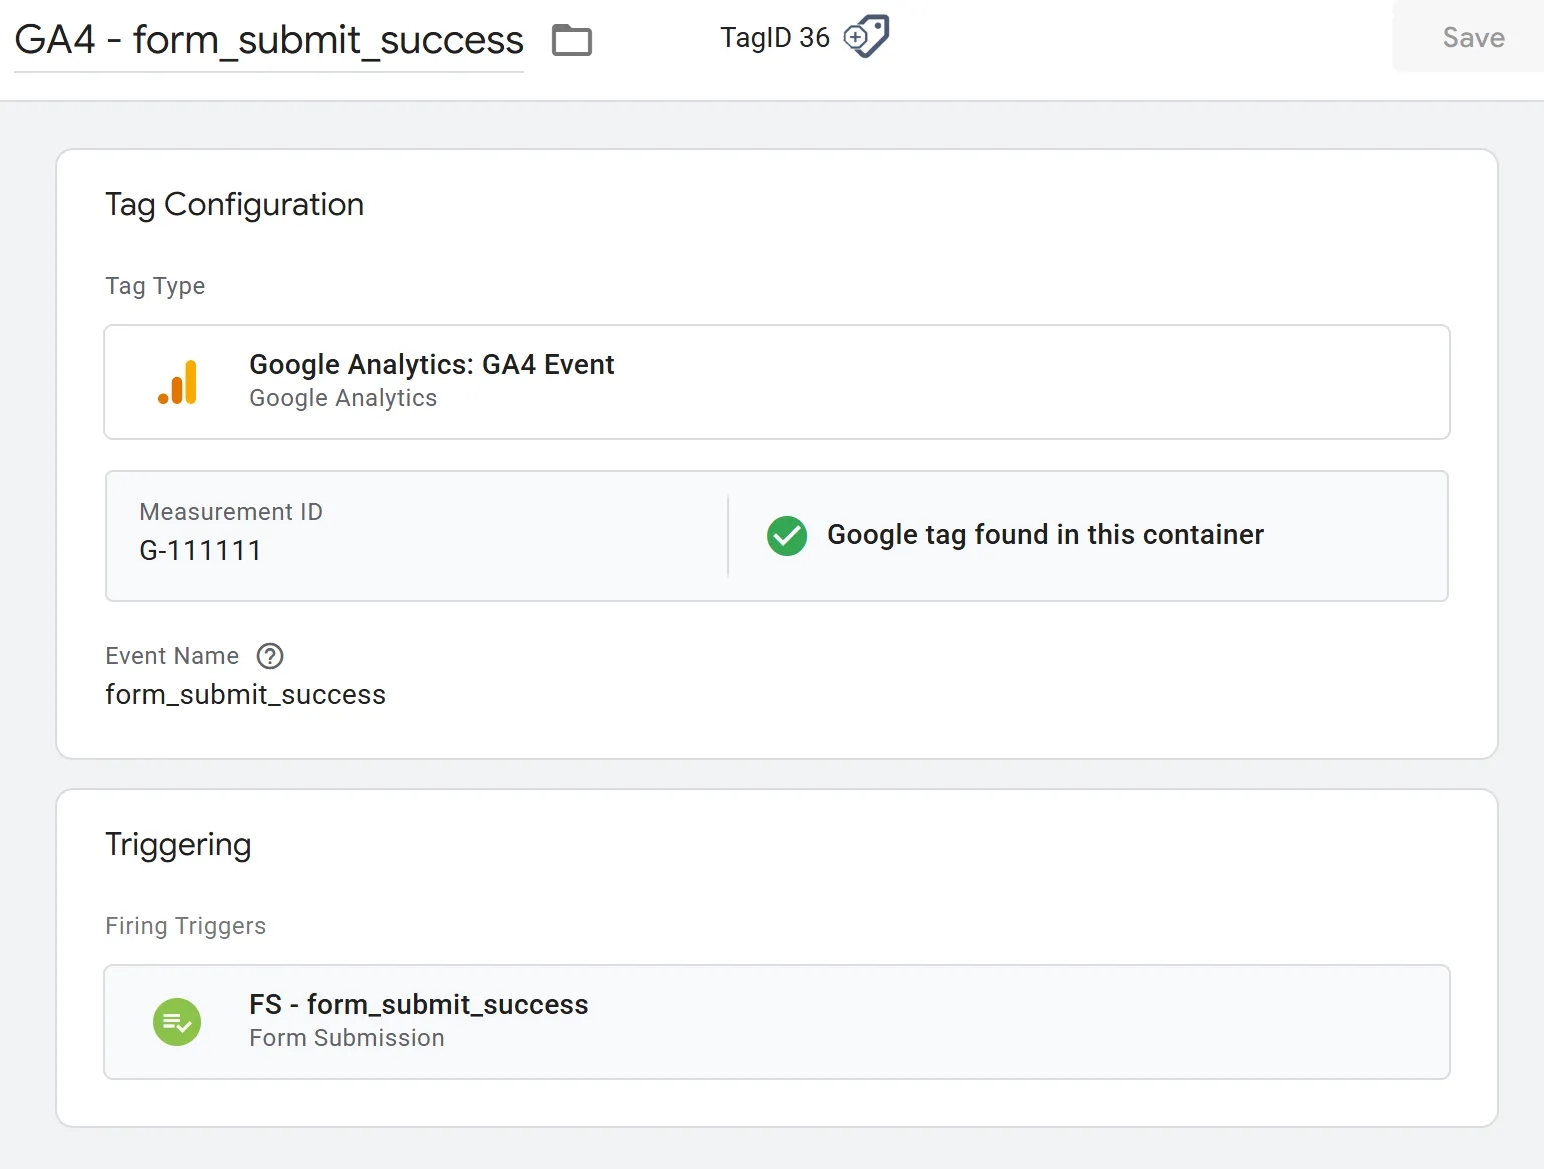
Whichever method works for your form, you'll always end up with a trigger and a tag. In my case, they look like this.
Trigger configuration:
Tag configuration:
Setting Up the Form Interaction Funnel in GA4
Now for the most interesting part — visualizing the data. To do this:
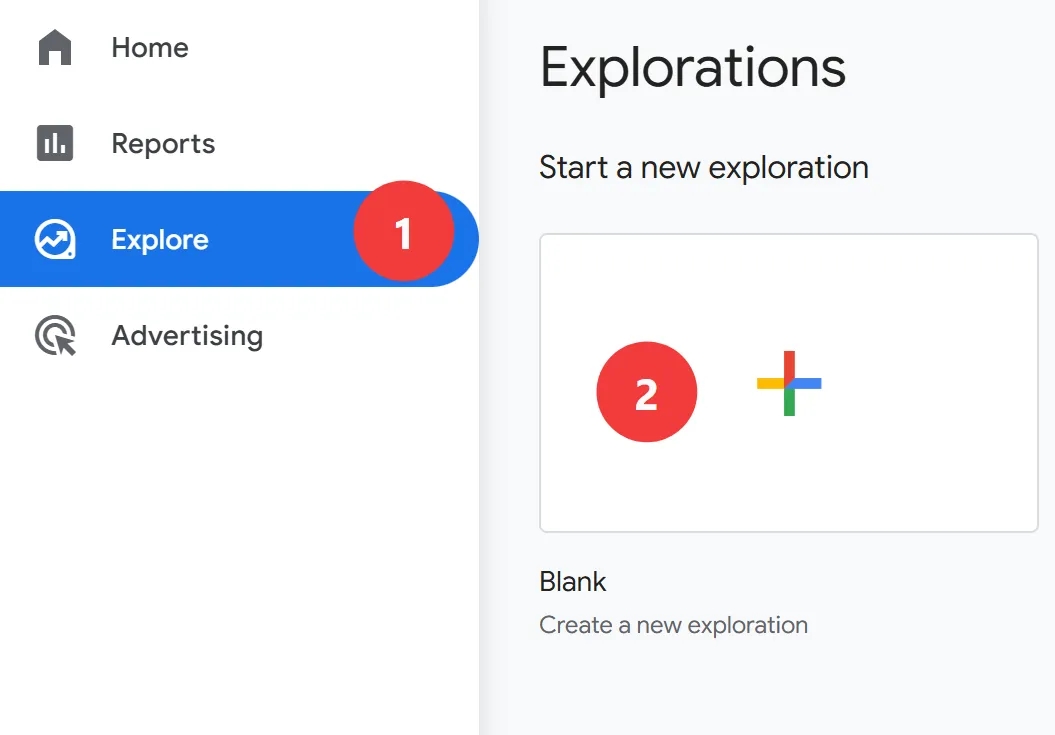
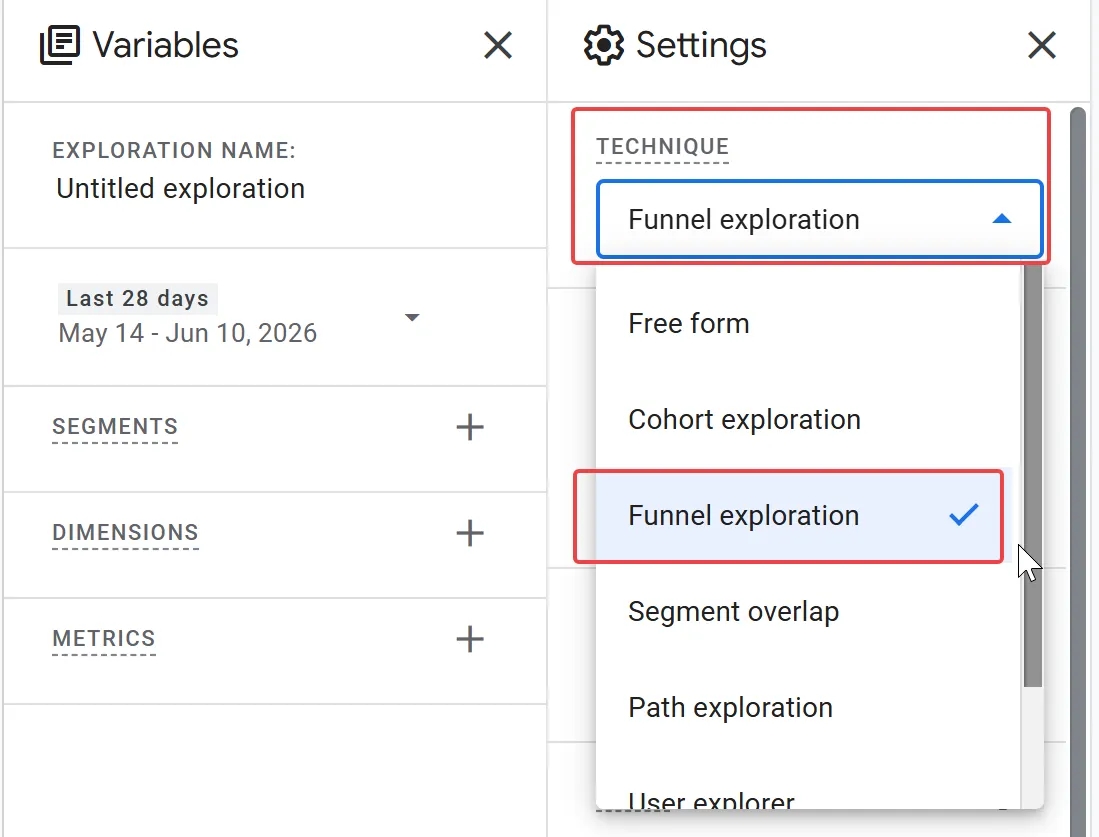
2. Choose the Funnel exploration technique.
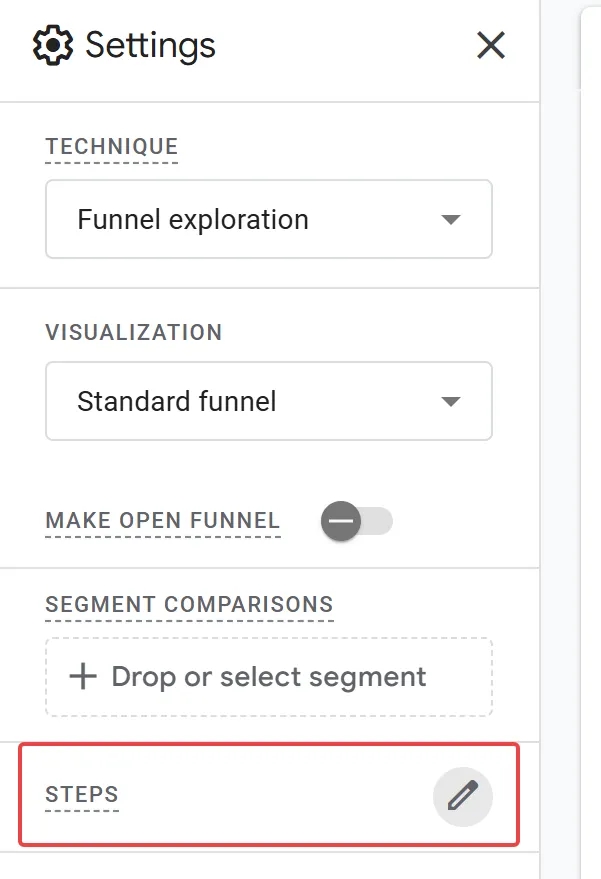
3. Select Steps.
4. Enter the event names we configured earlier as funnel steps. If you followed the naming I used, it will look like this:
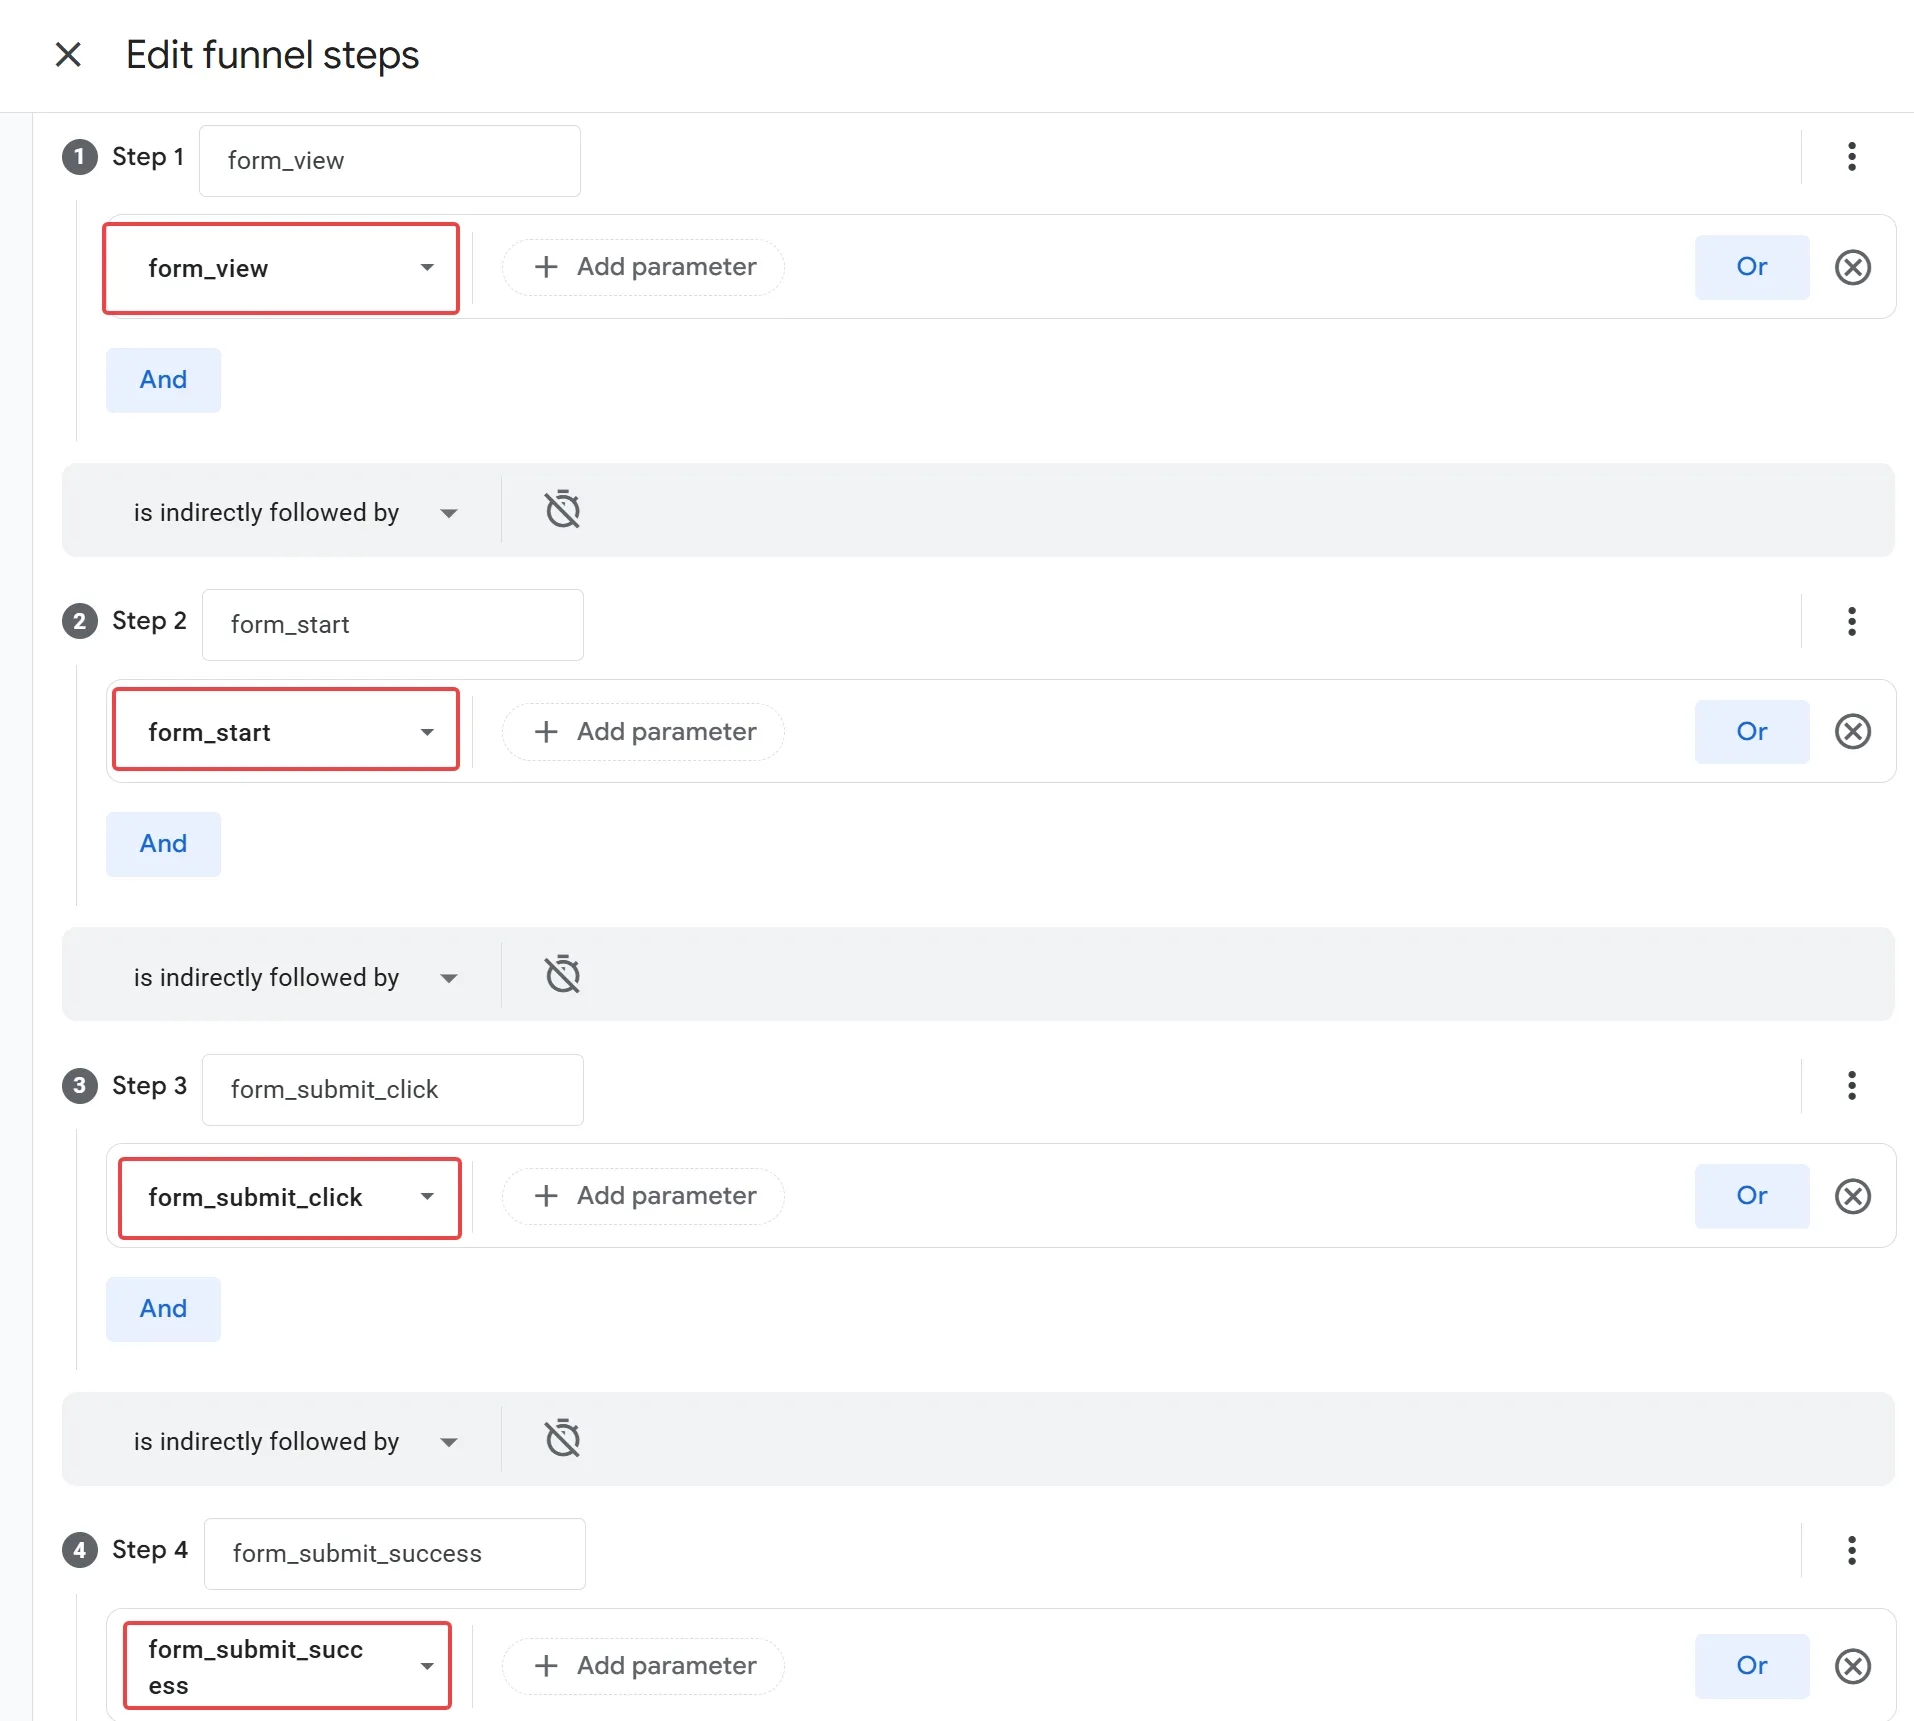
Click Apply in the top right corner. Now just wait for the first data to come in, and you'll see something like this:
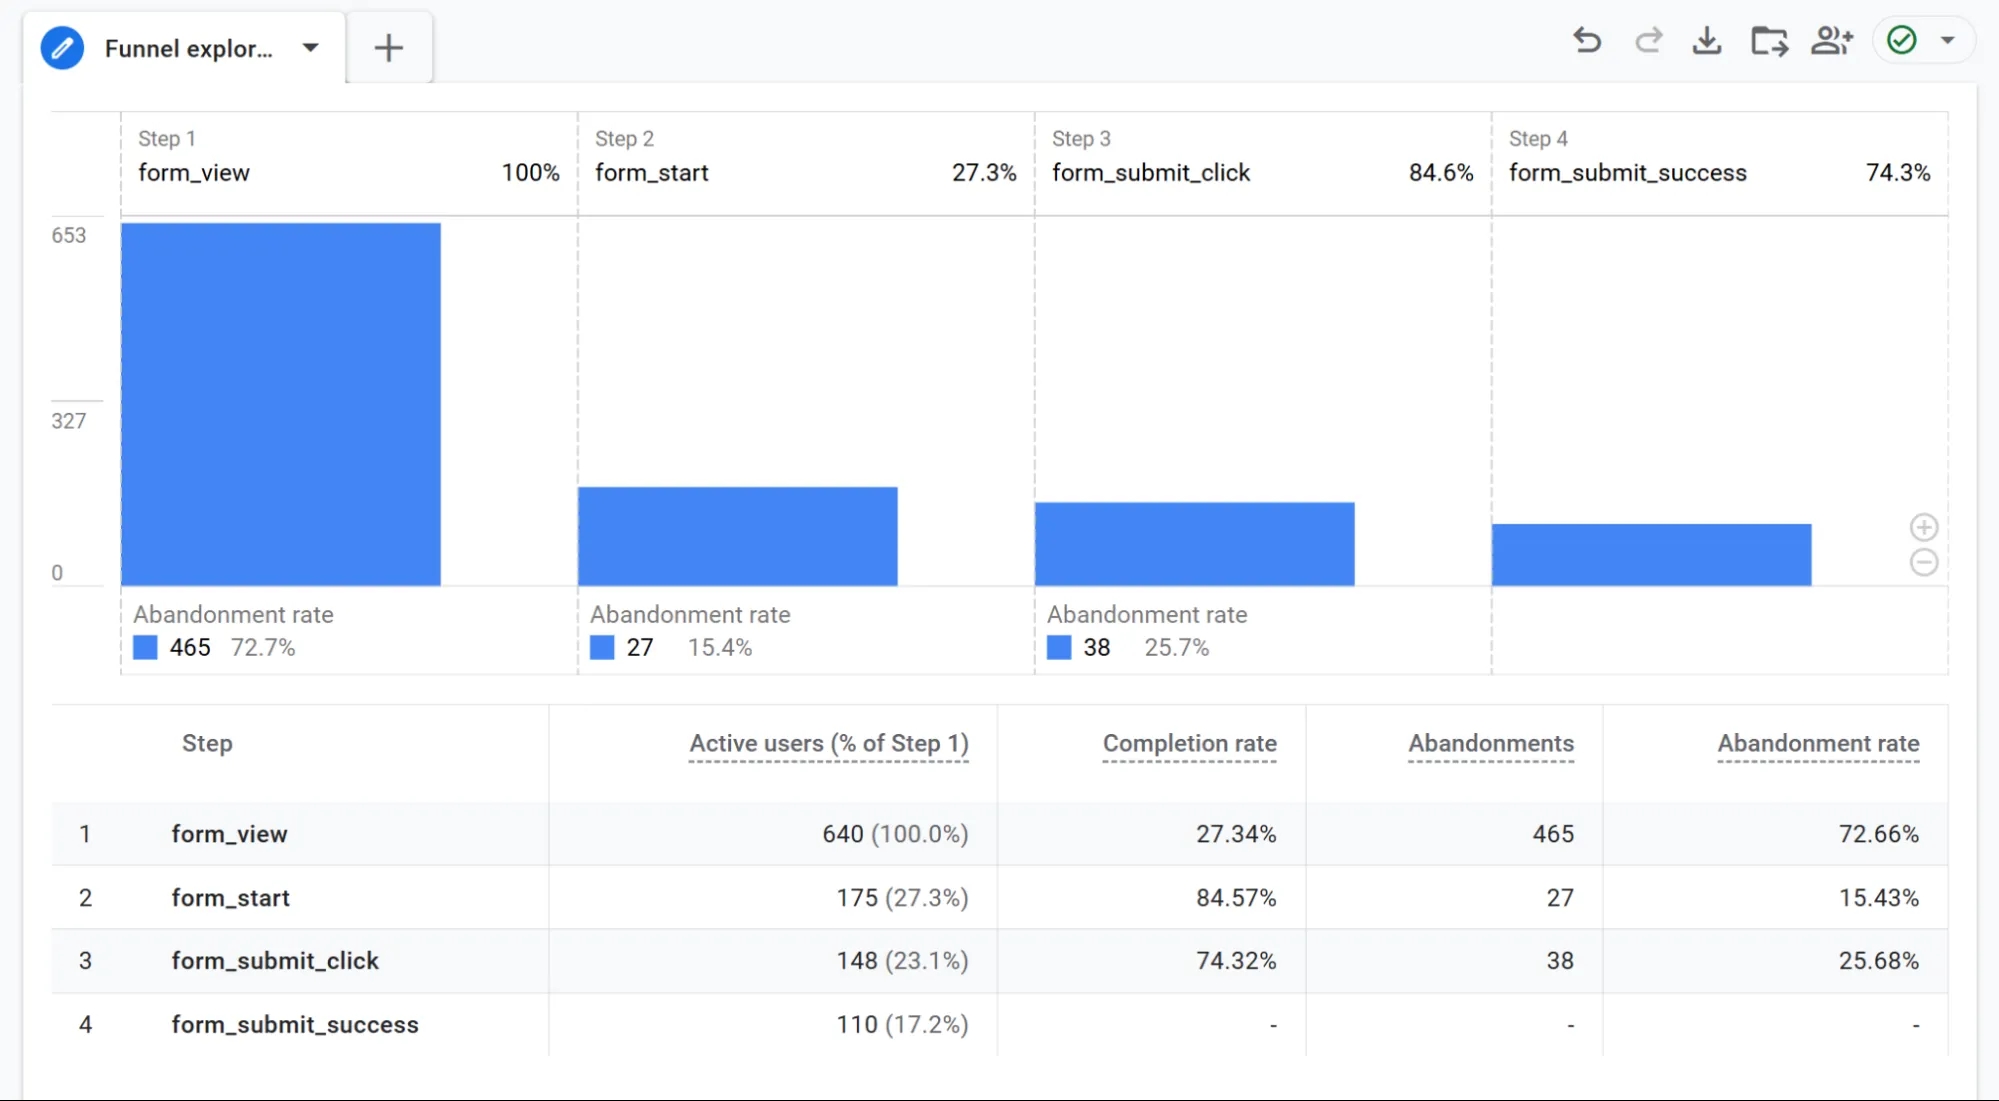
I've already written about working with funnels in GA4 in more depth in the article: Funnel Analysis in Google Analytics 4: An Advanced Guide to Funnels.
Congratulations! You now know at which stage of the form interaction your users are dropping off. This funnel could actually be taken further — tracking the completion of each individual form field. But that's a topic for another time. For now, let's look at another important area.
How to Set Up Form Validation Error Tracking with GTM
You've probably noticed those messages — usually in red — that appear when filling out a form to tell you what you missed or got wrong. Something like this:
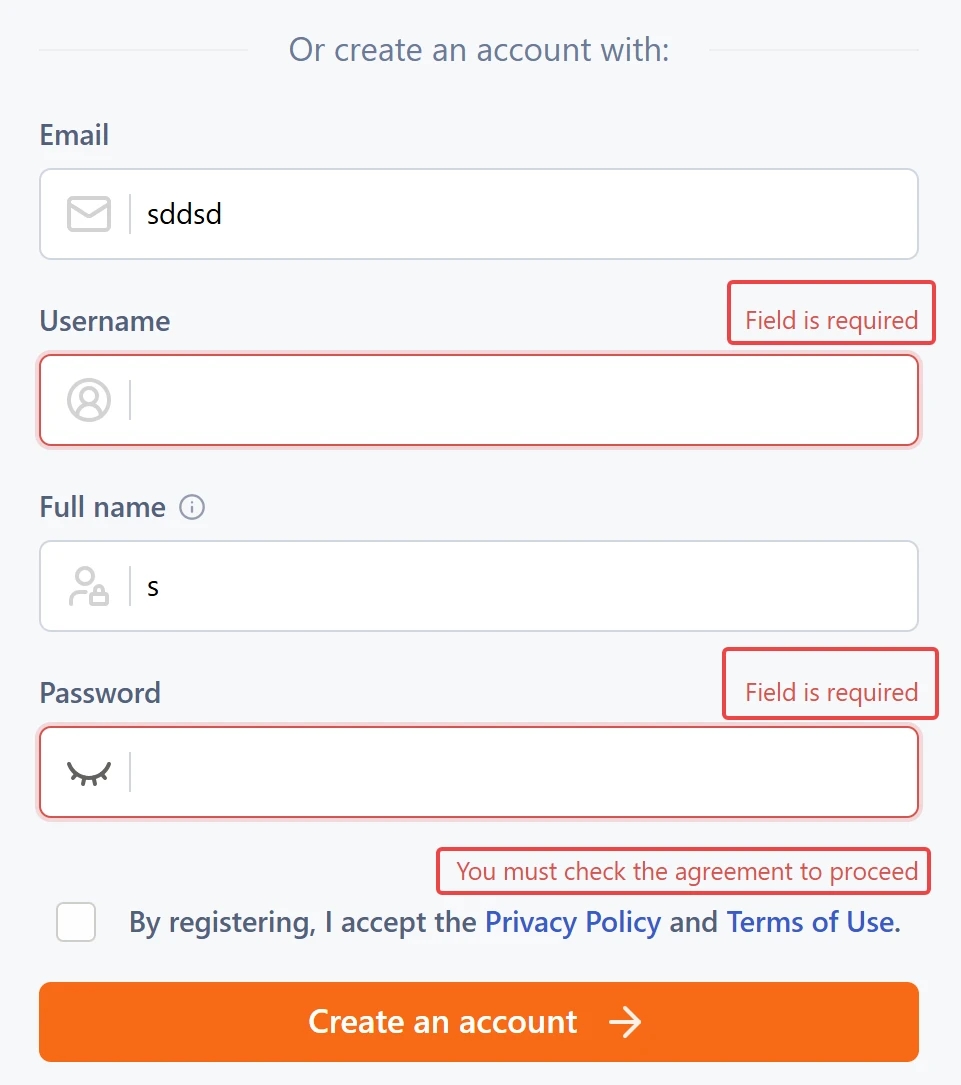
These messages aren't only useful to the person filling out the form. They can also surface valuable insights if you collect and analyze the data. For example, you can see which errors users encounter most frequently and try to redesign the form to reduce them.
First, find the CSS class of the error message element. I covered how to find selectors above. One thing to add: if there are multiple selectors — one per form field — you can list them all in the trigger, separated by commas.
Now we'll configure GTM to react the moment this error message appears on the user's screen. For this, we need an Element Visibility trigger:
- Change Selection Method to CSS Selector.
- In the Element Selector field, paste the error element selector(s)
- Under When to fire this trigger, select Every time an element appears on screen — this is important in case the user makes multiple errors in a row.
- Check Observe DOM changes — this is critical, since the error appears dynamically without a page reload, and GTM will miss it without this option enabled.
- Name the trigger and save.
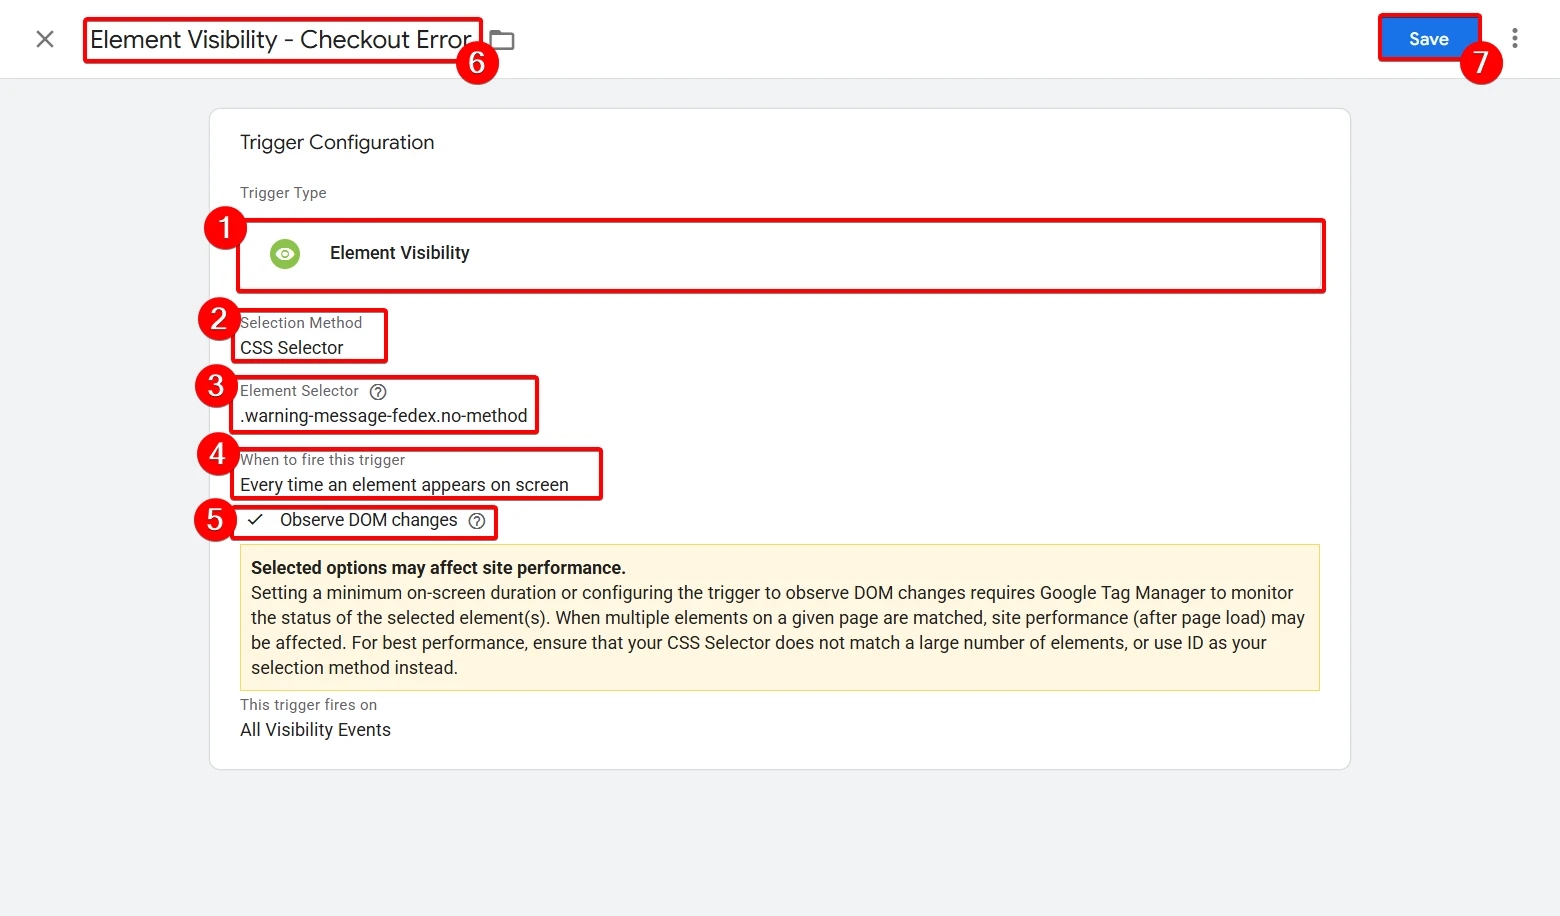
The final step is packaging the data and sending it to analytics.
Go to Tags and create a new tag of type Google Analytics: GA4 Event.
- In the Event Name field, enter:
form_validation_error - In Event Parameters, set the parameter name to
error_textand the value to the variable{{Click Text}} - Under Triggering, select the trigger we just created
- Name the tag GA4 - Event - Form Validation Error and save
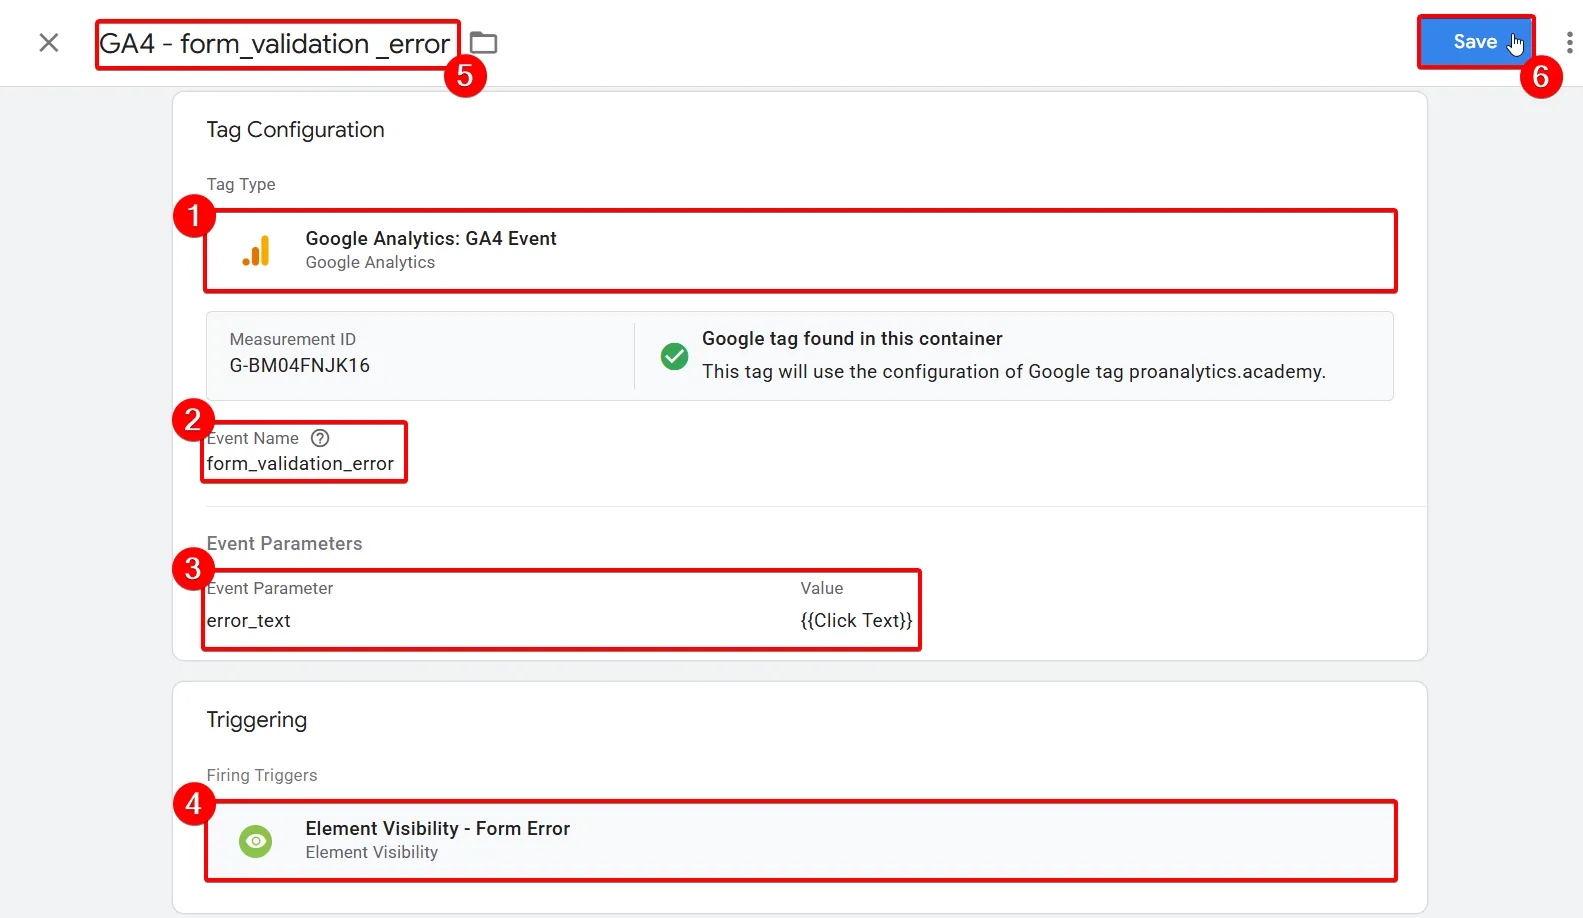
There's no need to pass the page URL as an event parameter — GA4 tracks that automatically with every event. However, it does make sense to pass the form name in a form_name parameter if your site has multiple forms.
Checkout Errors
The payment page is the most critical conversion point. The user has already decided to buy, entered their card details, clicked "Pay" — and received an error. This is the most painful scenario for a business: a loss here isn't just a missed page view, it's direct revenue lost.
Checkout errors can occur for various reasons — incorrect card details, payment gateway issues, technical failures. GTM lets you capture these events and understand the scope of the problem.
Steps for setting up checkout error tracking in GTM
The configuration is identical to the previous step. I've included this section in the article to illustrate that the approaches described here aren't limited to registration forms — there are many other situations where they apply.
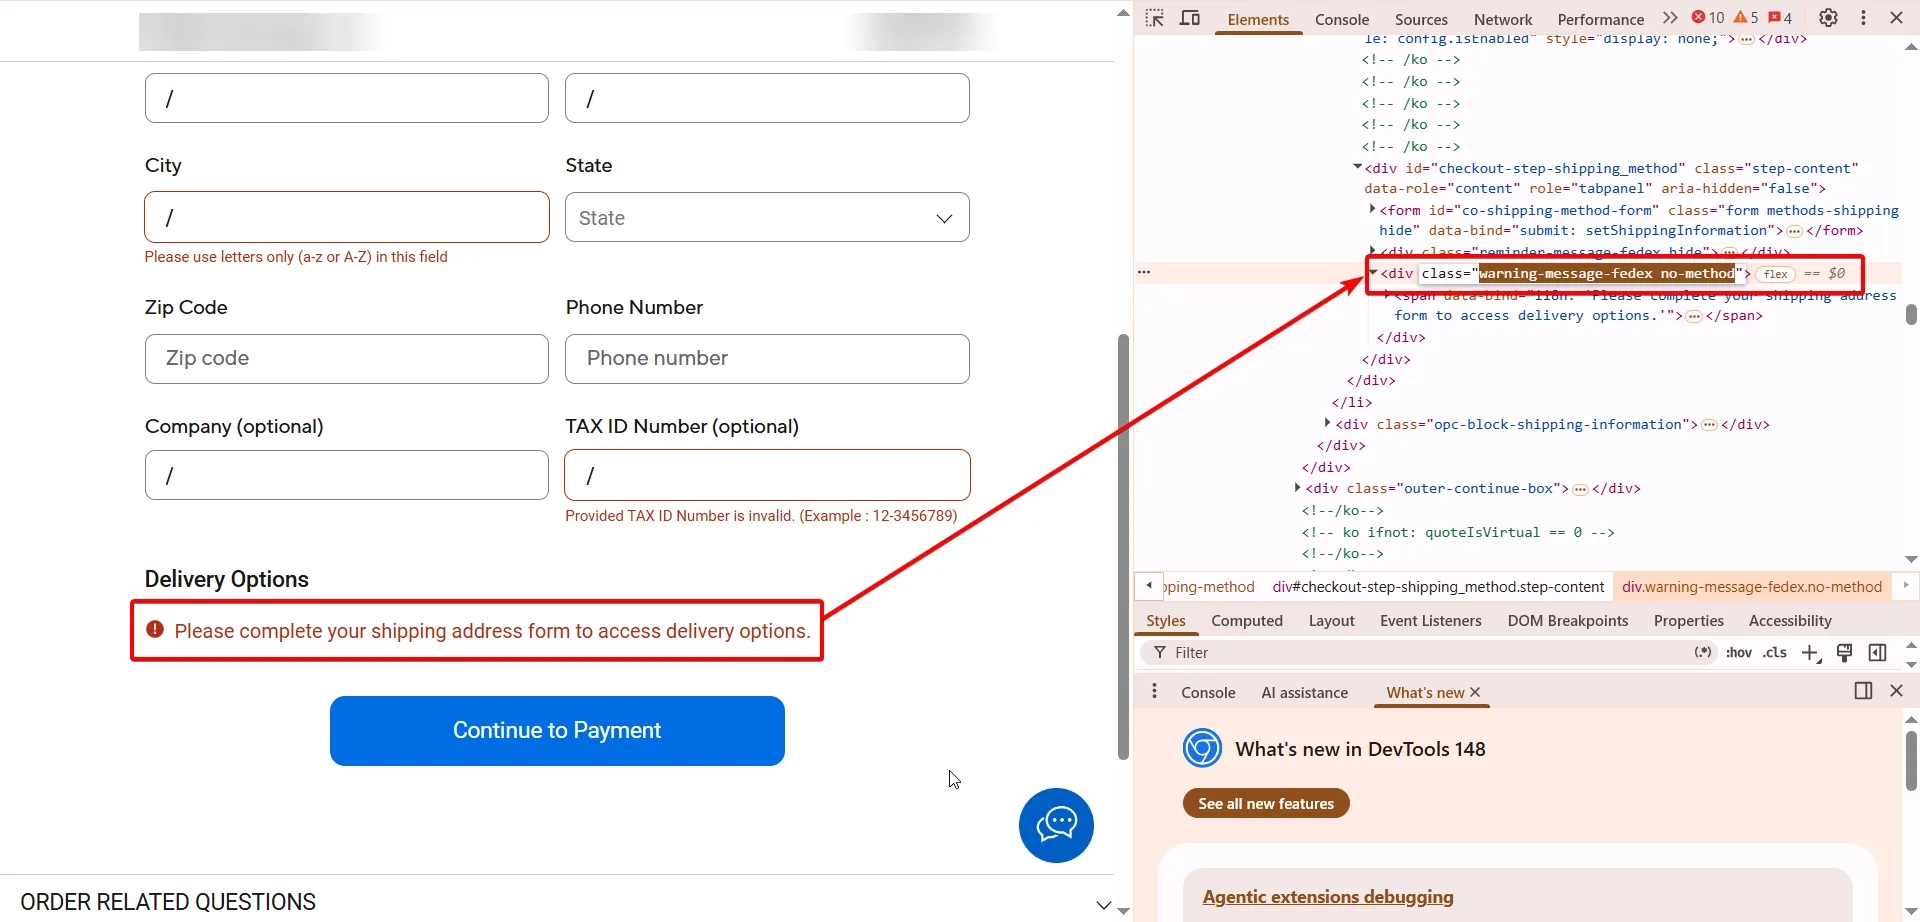
To get started, find the error message element. Open the checkout page, intentionally enter incorrect data (for example, an invalid card number). When the error message appears, right-click it → Inspect and find the CSS selector of the element.
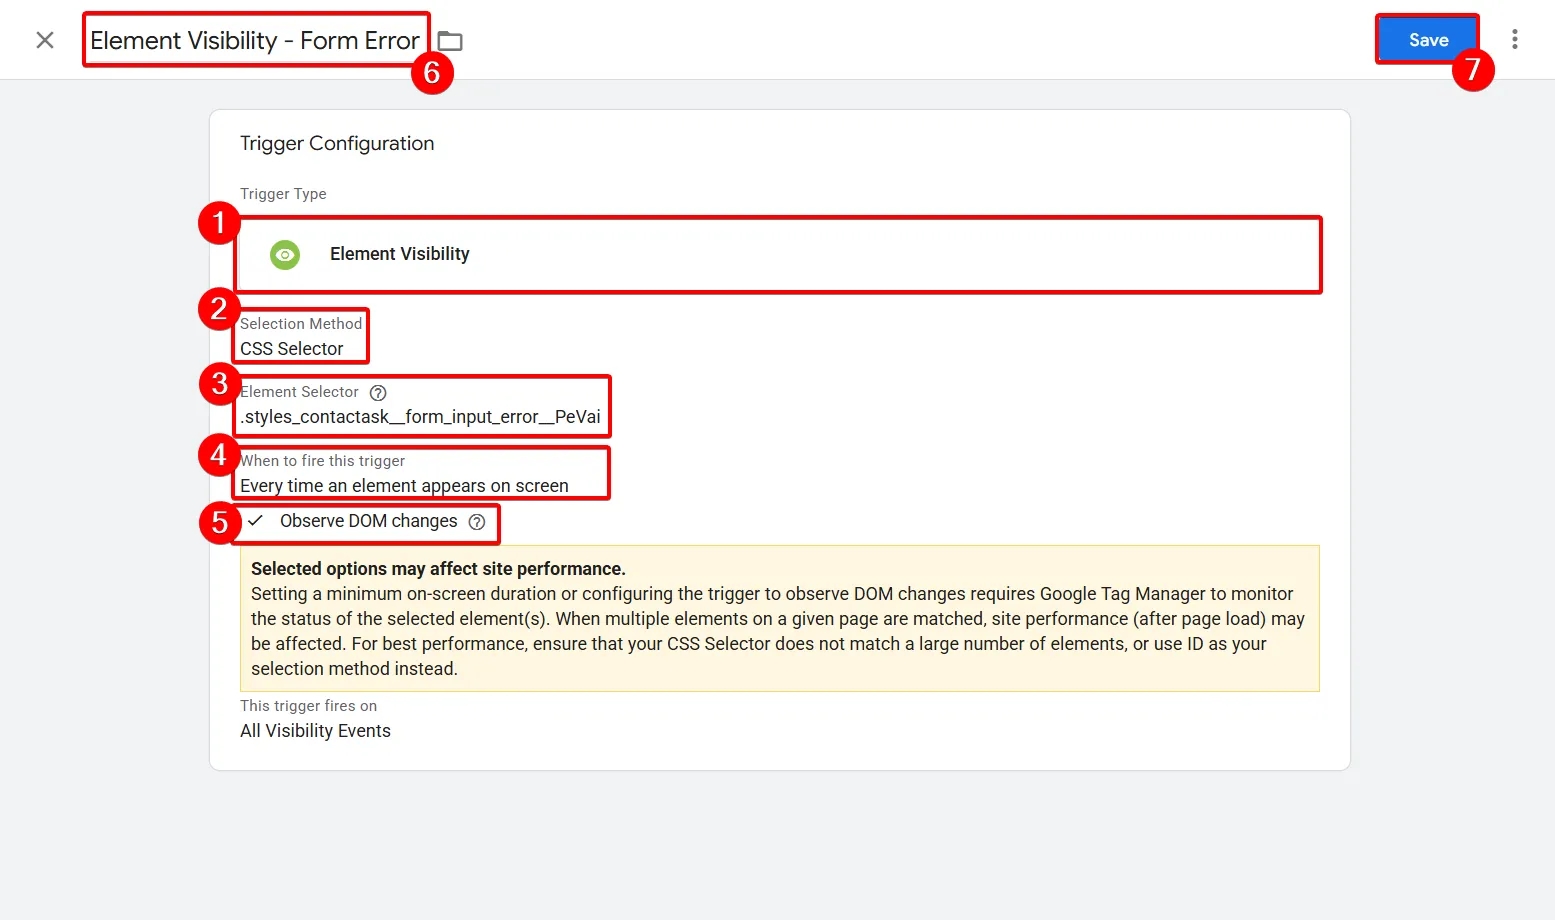
- Go to Triggers and select the Element Visibility type
- Change Selection Method to CSS Selector
- In the Element Selector field, paste your selector
- Under When to fire this trigger, select Every time an element appears on screen
- Check Observe DOM changes
- Name the trigger and save
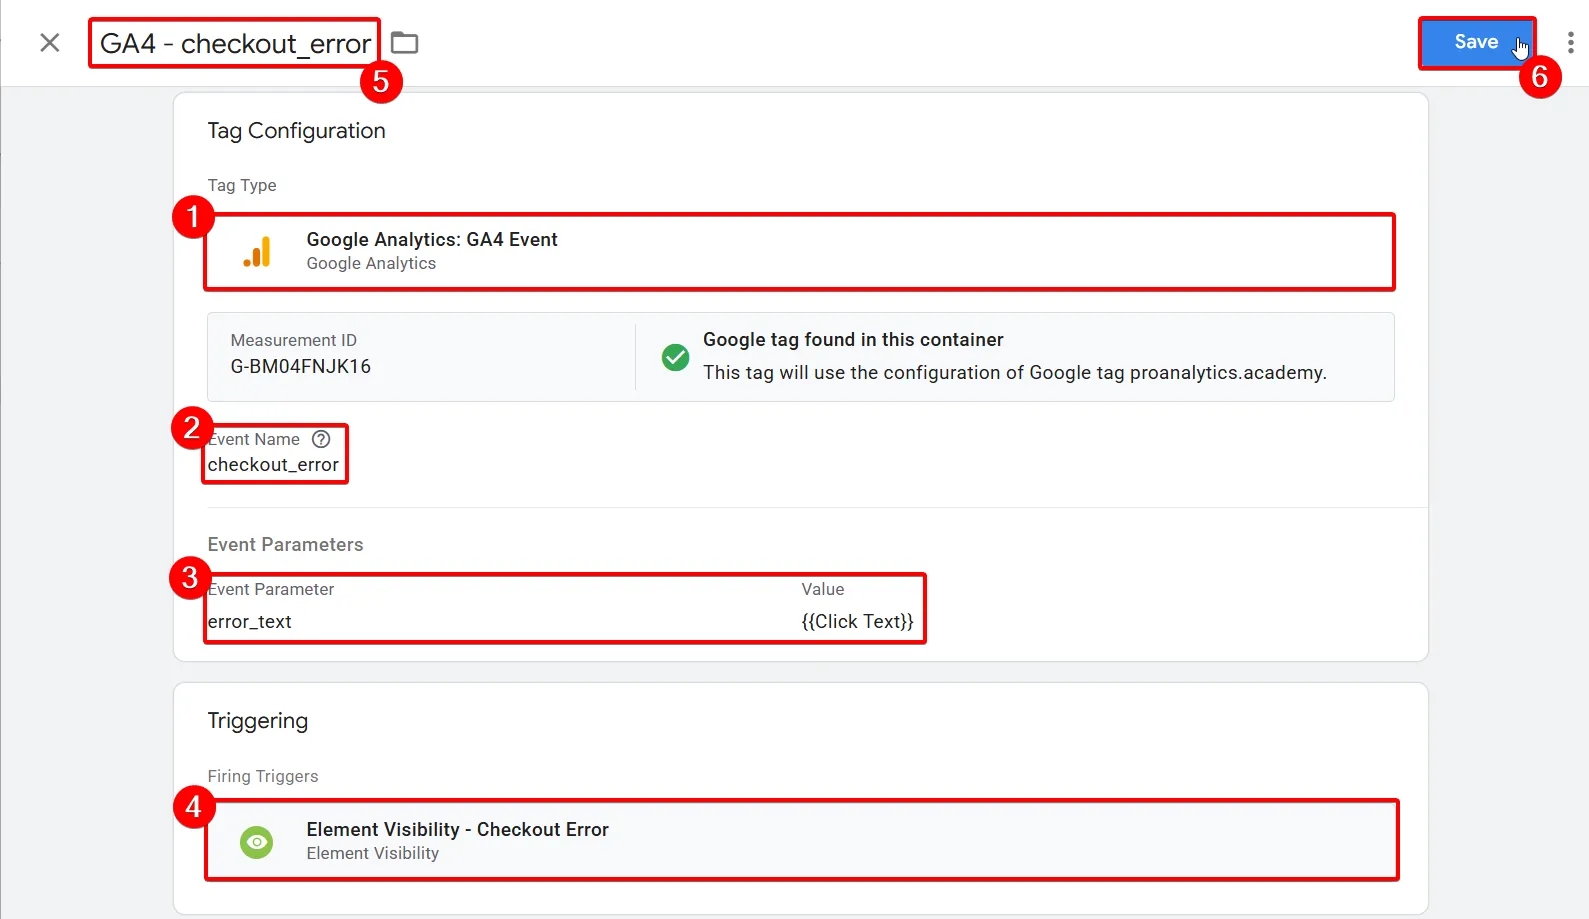
For sending data to GA4, use a standard Google Analytics: GA4 Event tag. In the Event Name field, enter: checkout_error. As with the previous example, add an error_text event parameter with the value {{Click Text}}.
Don't forget to publish your changes.
Instead of a Conclusion
The approaches described in this and the previous article in the series apply far beyond large e-commerce projects or complex products. They matter for any website that has user interaction points: forms, buttons, lead submissions, registrations, checkout flows, or any similar scenario.
This is especially relevant now, in the age of vibe coding. Today, users without deep technical experience can quickly build landing pages, websites, and even fully functional products. This opens up many opportunities for businesses — but also introduces new risks: some functionality may be undertested, certain scenarios may behave inconsistently, and bugs may go unnoticed until they're already affecting leads, sales, and user trust.
And that's exactly why solutions like the ones described here keep Google Tag Manager relevant. If anything, GTM's role is becoming more important. It lets you quickly and flexibly configure tracking without constantly involving developers, validate critical interaction points on your site, capture technical issues, and send that data to GA4 for further analysis.
Tracking form interactions isn't just another set of events in your analytics. It's a way to see exactly where users are stopping, what's preventing them from submitting a request, and which errors may be costing the business real money. When you can see not just the successful form submission, but the entire funnel leading up to it, you have far more opportunities to optimize.
Loading comments…